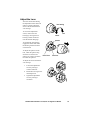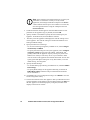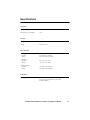
1
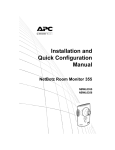
Installation and Quick Configuration Manual NetBotz® Room Monitor 455 NBWL0455 NBWL0456 This manual is available in English on the enclosed CD. Dieses Handbuch ist in Deutsch auf der beiliegenden CD-ROM verfügbar. Este manual está disponible en español en el CD-ROM adjunto. Ce manuel est disponible en français sur le CD-ROM ci-inclus. Questo manuale è disponibile in italiano nel CD-ROM allegato. 本マニュアルの日本語版は同梱の CD-ROM からご覧になれます。 Instrukcja obsługi w języku polskim jest dostępna na CD. O manual em Português está disponível no CD-ROM em anexo. Данное руководство на русском языке имеется на прилагаемом компакт-диске. an ual finns tillgänglig på svensk a på med fö ljande CD. 您可以从包含的 CD 上获得本手册的中文版本。 동봉된 CD 안에 한국어 매뉴얼이 있습니다 . Contents Introduction 1 Product Description . . . . . . . . . . . . . . . . . . . . . . . . . . . . . . . . . . . . 1 Document Overview . . . . . . . . . . . . . . . . . . . . . . . . . . . . . . . . . . . . 2 Related Documents . . . . . . . . . . . . . . . . . . . . . . . . . . . . . . . . . . . . 2 Additional Options . . . . . . . . . . . . . . . . . . . . . . . . . . . . . . . . . . . . . 3 InfraStruXure-certified . . . . . . . . . . . . . . . . . . . . . . . . . . . . . . . . . . 3 Physical Description 4 Front . . . . . . . . . . . . . . . . . . . . . . . . . . . . . . . . . . . . . . . . . . . . . . . . 4 Rear . . . . . . . . . . . . . . . . . . . . . . . . . . . . . . . . . . . . . . . . . . . . . . . . . 5 Inventory 6 Installation 8 Install the NetBotz 455 . . . . . . . . . . . . . . . . . . . . . . . . . . . . . . . . . . 8 Electrical box . . . . . . . . . . . . . . . . . . . . . . . . . . . . . . . . . . 8 Wall . . . . . . . . . . . . . . . . . . . . . . . . . . . . . . . . . . . . . . . . . 9 Ceiling . . . . . . . . . . . . . . . . . . . . . . . . . . . . . . . . . . . . . . 10 Enclosure . . . . . . . . . . . . . . . . . . . . . . . . . . . . . . . . . . . . 11 Connect the NetBotz 455 to Your Network . . . . . . . . . . . . . . . . 12 Power-over-Ethernet (PoE) injector . . . . . . . . . . . . . . . . 12 PoE-capable hub or switch . . . . . . . . . . . . . . . . . . . . . . 12 Connect Sensors to Sensor Ports . . . . . . . . . . . . . . . . . . . . . . . 13 Connect Sensors and Sensor Pods to A-Link Ports. . . . . . . . . 14 Adjust the Lens. . . . . . . . . . . . . . . . . . . . . . . . . . . . . . . . . . . . . . . 15 Initial Configuration 16 Overview . . . . . . . . . . . . . . . . . . . . . . . . . . . . . . . . . . . . . . . . . . . . 16 Obtain network settings using DHCP . . . . . . . . . . . . . . . 16 Configure network settings using the Serial Configuration Utility . . . . . . . . . . . . . . . . . . 17 Install a wireless network device . . . . . . . . . . . . . . . . . . 19 NetBotz 455 Installation and Quick Configuration Manual i The APC Configuration Wizard . . . . . . . . . . . . . . . . . . . . . . . . . . 19 Access an Appliance . . . . . . . . . . . . . . . . . . . . . . . . . . . . . . . . . . 20 Overview . . . . . . . . . . . . . . . . . . . . . . . . . . . . . . . . . . . . 20 Administrator account user ID and password . . . . . . . . . 20 Root account user ID and password . . . . . . . . . . . . . . . 20 Lost password recovery . . . . . . . . . . . . . . . . . . . . . . . . . 21 Basic View . . . . . . . . . . . . . . . . . . . . . . . . . . . . . . . . . . . 21 Advanced View . . . . . . . . . . . . . . . . . . . . . . . . . . . . . . . 22 APC Quick Configuration . . . . . . . . . . . . . . . . . . . . . . . . . . . . . . 22 Configure appliance settings . . . . . . . . . . . . . . . . . . . . . 23 Configure alert actions . . . . . . . . . . . . . . . . . . . . . . . . . . 24 Upgrade Options 25 Software Feature Upgrades. . . . . . . . . . . . . . . . . . . . . . . . . . . . . 25 Hardware Upgrades . . . . . . . . . . . . . . . . . . . . . . . . . . . . . . . . . . . 25 Add pods to your appliance . . . . . . . . . . . . . . . . . . . . . . 26 Connect a USB modem . . . . . . . . . . . . . . . . . . . . . . . . . 28 Connect a USB digital I/O device . . . . . . . . . . . . . . . . . . 28 Connect an APC Switched Rack PDU . . . . . . . . . . . . . . 29 Connect external sensors . . . . . . . . . . . . . . . . . . . . . . . 30 Clean the NetBotz 455 30 Specifications 31 Warranty 32 Two-Year Factory Warranty. . . . . . . . . . . . . . . . . . . . . . . . . . . . . 32 Terms of warranty . . . . . . . . . . . . . . . . . . . . . . . . . . . . . 32 Non-transferable warranty . . . . . . . . . . . . . . . . . . . . . . . 32 Exclusions . . . . . . . . . . . . . . . . . . . . . . . . . . . . . . . . . . . 32 Warranty claims . . . . . . . . . . . . . . . . . . . . . . . . . . . . . . . 33 ii NetBotz 455 Installation and Quick Configuration Manual Introduction Product Description The American Power Conversion (APC®) NetBotz® Room Monitor 455 functions as the central hardware appliance for a NetBotz security and environmental monitoring system. The NetBotz 455 can be installed anywhere in a room and includes an integrated camera and internal sensors that monitor temperature, humidity, air flow, and motion. It also includes four sensor ports for connecting temperature, humidity, smoke, door, vibration, spot fluid, and third-party dry contact and 0–5 V sensors. Plus, it supports two-way audio, audio sensing, and audio recording. You can increase the space monitored by adding up to two NetBotz sensor pods. The integrated camera includes the following features: • Image processor that generates images up to 1280 x 1024 resolution, 24-bit color, and up to 30 frames per second. Note: The maximum frame rate describes the maximum number of images that the camera imager is capable of producing each second. The actual frame rate is dependent on the amount of available bandwidth and current resolution. • Image Size: 7.7 mm x 6.1 mm (9.82 mm diagonal = 0.387 in). • Field of View: 64º (H) x 53º (V) for all resolutions. • User adjustable and switchable industry-standard CS-mount lens. CS-mount permits access to hundreds of different general purpose and special purpose lenses. NetBotz 455 Installation and Quick Configuration Manual 1 Attention: THE EQUIPMENT CONTAINS, AND THE SOFTWARE ENABLES, VISUAL RECORDING CAPABILITIES, THE IMPROPER USE OF WHICH MAY SUBJECT YOU TO CIVIL AND CRIMINAL PENALTIES. APPLICABLE LAWS REGARDING THE USE OF SUCH CAPABILITIES VARY BETWEEN JURISDICTIONS AND MAY REQUIRE AMONG OTHER THINGS EXPRESS WRITTEN CONSENT FROM RECORDED SUBJECTS. YOU ARE SOLELY RESPONSIBLE FOR INSURING STRICT COMPLIANCE WITH SUCH LAWS AND FOR STRICT ADHERENCE TO ANY/ALL RIGHTS OF PRIVACY AND PERSONALTY. USE OF THIS SOFTWARE FOR ILLEGAL SURVEILLANCE OR MONITORING SHALL BE DEEMED UNAUTHORIZED USE IN VIOLATION OF THE END USER SOFTWARE AGREEMENT AND RESULT IN THE IMMEDIATE TERMINATION OF YOUR LICENSE RIGHTS THEREUNDER. Document Overview The NetBotz Room Monitor 455 Installation and Quick Configuration Manual describes how to install a NetBotz Room Monitor 455, how to connect devices to the appliance, and how to configure network settings. After performing the configuration procedures in this manual, you can access your system through its software interface, perform additional configuration tasks, and begin monitoring the environment. Related Documents Unless otherwise noted, the following documentation is available on the CD provided with the appliance or on the applicable product page on the APC Web site, www.apc.com. To quickly find a product page, enter the product name or part number in the Search field. NetBotz Appliance User’s Guide – Includes all details for using, managing, and configuring a NetBotz system with one of the following appliances: NetBotz Room Monitor 355 (NBWL0355, NBWL0356), NetBotz Rack Monitor 450 (NBRK0450), NetBotz Room Monitor 455 (NBWL0455, NBWL0456), or NetBotz Rack Monitor 550 (NBRK0550). 2 NetBotz 455 Installation and Quick Configuration Manual Additional Options The following options are available for the NetBotz 455. For more information about any of the options, contact your APC representative or the distributor from whom you purchased your APC product. • NetBotz Camera Pod 160 (NBPD0160) • NetBotz Rack Sensor Pod 150 (NBPD0150) • NetBotz Room Sensor Pod 155 (NBPD0155) • Temperature Sensor (AP9335T) • Temperature/Humidity Sensor (AP9335TH) • Temperature Sensor with Digital Display (AP9520T) • Temperature/Humidity Sensor with Digital Display (AP9520TH) • NetBotz Spot Fluid Sensor (NBES0301) • NetBotz Door Switch Sensor for Rooms or Third Party Racks (NBES0302) • NetBotz Door Switch Sensor for APC Racks (NBES0303) • NetBotz Dry Contact Cable (NBES0304) • NetBotz 0-5 V Sensor Cable (NBES0305) • NetBotz Vibration Sensor (NBES0306) • NetBotz Smoke Sensor (NBES0307) • NetBotz USB-to-Serial Cable (NBAC0226) • NetBotz Sensor Pod 120 (NBPD0122) • NetBotz Camera Pod 120 (NBPD0121) InfraStruXure-certified This product is certified for use in APC InfraStruXure® systems. NetBotz 455 Installation and Quick Configuration Manual 3 Physical Description Front Item 4 Description Vented internal sensors Network link LED Shows the status of the network connection. Blinks to indicate network traffic (green—connected at 10 Mbps; yellow—connected at 100 Mbps). Power LED Indicates whether the unit is receiving power (green—receiving power; dark—not receiving power). Camera LED Blinks steadily when the integrated camera is active. Alert LED Indicates the alert status of the system. When more than one alert exists, the most severe will be indicated. • Flashing once every eight seconds—Informational • Flashing once every four seconds—Warning • Flashing once every two seconds—Error • Flashing once every second—Critical • Flashing twice per second—Failure Temperature display • Displays the current temperature from 0 to 99 in Centigrade or Fahrenheit. Temperature reading from internal temperature sensor. If the temperature exceeds 99, the display will flash 99. • When the unit first receives power, displays the unique identifier number for one minute. • If an alert exists, flashes at the same rate as the Alert LED. • During a firmware upgrade, displays 88. Lens housing Must be removed to change the focus of the integrated camera. Vented opening for airflow, temperature, and humidity sensors. NetBotz 455 Installation and Quick Configuration Manual Rear Item Description Microphone jack Supports audio sensing, audio recording, and two-way audio. Maximum length of microphone cable: 3 m (9.8 ft). Speaker jack Supports two-way audio. Maximum length of speaker cable: 3 m (9.8 ft). A-Link port Used for cascading NetBotz sensor pods and temperature and humidity sensors with digital displays. Provides communications and power to the connected devices over standard CAT-5 cabling with straight-through wiring. For details, see “Connect Sensors and Sensor Pods to A-Link Ports” on page 14. 10/100 Base-T network port Provides for a 10/100 Base-T network connection and power through Power-over-Ethernet (PoE). Status and link LEDs indicate network traffic: • Status LED—blinks orange and green at start-up; indicates the status of the network connection (solid green—IP address established; blinking green—attempting to obtain an IP address). • Link LED—blinks to indicate network traffic (green—connected at 10 Mbps; orange—connected at 100 Mbps). Sensor ports (4) Used for connecting APC sensors, third-party dry-contact sensors, and standard third-party 0-5 V sensors. Third-party dry-contact state sensors require the NetBotz Dry Contact Cable (NBES0304). Standard third-party 0-5 V sensors require the NetBotz 0-5 V Sensor Cable (NBES0305). NetBotz 455 Installation and Quick Configuration Manual 5 Inventory Inspect the contents of the package to ensure that the parts included match those shown below. Report missing or damaged contents to APC or your APC reseller. However, if damage was due to shipping, immediately report the damage to the shipping agent. The shipping and packaging materials are recyclable. Please save them for later use or dispose of them appropriately. 6 NetBotz 455 Installation and Quick Configuration Manual Item Description NetBotz Room Monitor 455 Bracket mounting plate for electrical boxes Extender arms Ball-joint adjuster arms T-bar mounting plate Rubber bracket cover Mounting plate Cable retainer Mounting screw wall anchors Extender arm set screw 203-mm (8-in) tie wraps Adhesive cable tie holders 13-mm (0.5-in) machine screws (for electrical box) 19-mm (0.75-in) sheet metal screws (for wall or enclosure) 1.8 m (6-ft) NEMA 5-15P to IEC-320-C13 power cord (only included with NBWL0456) 1.8 m (6-ft) IEC-320-C13 to IEC-320-C14 power cord (only included with NBWL0456) Allen wrench Netbotz Appliance Utility CD Power-over-Ethernet injector power supply (100–250 VAC in, 48 VDC out) (only included with NBWL0456) NetBotz 455 Installation and Quick Configuration Manual 7 Installation Install the NetBotz 455 Choose an installation option that meets your needs. Take the following into consideration: Caution: Only connect approved devices to ports on the NetBotz 455 as directed in this manual. Plugging in other devices may result in equipment damage. Note: Consider the location of the nearest network port. Note: Make sure the camera will not be obstructed. Note: Consider cable routing for all sensors that you plan to connect to the appliance. Note: If the direction of airflow is known, the ideal position of the NetBotz 455 for measuring the airflow is directly facing the oncoming air. Electrical box 8 NetBotz 455 Installation and Quick Configuration Manual Wall Note: Drill 4.76-mm (3/16-in) pilot holes for wall anchors. Caution: Do not overtighten the screws. NetBotz 455 Installation and Quick Configuration Manual 9 Ceiling 10 NetBotz 455 Installation and Quick Configuration Manual Enclosure Note: Use a #32 drill to make four 2.94-mm (0.116-in) pilot holes. NetBotz 455 Installation and Quick Configuration Manual 11 Connect the NetBotz 455 to Your Network Power-over-Ethernet (PoE) injector Caution: Before you energize the NetBotz 455, review the electrical specifications on page 31 to avoid overloading the circuit. Caution: Be sure the appliance is properly grounded by plugging the power cord directly into a wall outlet or by verifying the ground path if you are using a power strip. Non-PoE-capable hub or switch PoE-capable hub or switch To appliance 10/100 Base-T network port 12 NetBotz 455 Installation and Quick Configuration Manual Connect Sensors to Sensor Ports This procedure applies to the following sensors, which are supported by the NetBotz 455 and connect to the sensor ports: • Temperature Sensor (AP9335T) • Temperature/Humidity Sensor (AP9335TH) • NetBotz Vibration Sensor (NBES0306) • NetBotz Smoke Sensor (NBES0307) • NetBotz Spot Fluid Sensor (NBES0301) • NetBotz 0-5 V Sensor Cable (NBES0305) • NetBotz Door Switch Sensor for APC Racks (NBES0303) • NetBotz Door Switch Sensor for Rooms or Third Party Racks (NBES0302) • NetBotz Dry Contact Cable (NBES0304) For sensors that connect to A-Link ports (Temperature Sensors with Digital Display [AP9520T] and Temperature/ Humidity Sensors with Digital Display [AP9520TH]), see “Connect Sensors and Sensor Pods to A-Link Ports” on page 14. Connect APC and third-party sensors to the four sensor ports labeled Sensors on the NetBotz 455. • Third-party dry contact sensors require the NetBotz Dry Contact Cable (NBES0304). To connect a sensor to the cable, follow the instructions provided with the sensor and the instructions provided with the cable. • Standard third-party 0-5 V sensors require the NetBotz 0-5 V Sensor Cable (NBES0305). To connect a sensor to the cable, follow the instructions provided with the sensor and the instructions provided with the cable. • If a sensor cable is not long enough, use an RJ-45 coupling (provided with some sensors) and standard CAT-5 cabling to extend the cable up to 15 m (50 ft) for a Temperature/Humidity Sensor (AP9335TH) or a Temperature Sensor (AP9335T) and up to 30.5 m (100 ft) for all other supported sensors. NetBotz 455 Installation and Quick Configuration Manual 13 Connect Sensors and Sensor Pods to A-Link Ports You can cascade up to a combined total of two NetBotz Rack Sensor Pod 150s (NBPD0150) and NetBotz Room Sensor Pod 155s (NBPD0155) and up to a combined total of eight Temperature Sensors with Digital Display (AP9520T) and Temperature/Humidity Sensors with Digital Display (AP9520TH). You cannot cascade appliances. Use one appliance per system. A-Link is an APC proprietary CAN (Controller Area Network) bus. Devices compatible with A-Link are not Ethernet devices and cannot coexist on an Ethernet bus with other networking devices, such as hubs and switches. Before performing this procedure, follow the installation instructions provided with the devices you are cascading. 1. Connect sensors and sensor pods to the appliance as shown. – Use CAT-5 (or equivalent) Ethernet patch cables (. Caution: Do not use crossover cables. – Connect to in and out ports as shown. – The maximum combined length of all A-Link cables must not exceed 1000 m (3,280 ft). 2. Plug an A-Link terminator into the unused A-Link port (). 14 NetBotz Room Monitor 455 (NBWL0455) NetBotz Rack Sensor Pod 150 (NBPD0150) NetBotz Rack Sensor Pod 150 (NBPD0150) Temperature/ Humidity Sensor (AP9520TH) NetBotz 455 Installation and Quick Configuration Manual Adjust the Lens View the camera feed during the adjustment of the camera in order to correctly adjust the focus of the feed and field of view settings. lens housing To access the adjustment screws, remove the lens housing by turning the lens housing counter-clockwise until the latches disengage. unlock lock aperture To reattach the lens housing, engage the latches and rotate the housing clockwise until a click is heard. To adjust the aperture of the lens, rotate the aperture ring clockwise to increase the aperture or counter-clockwise to reduce the aperture. field of view fine-focus To adjust the focus and field of view settings: 1. Loosen the adjustment screw by turning it counter-clockwise. 2. Rotate the lens rings to the desired position. 3. Tighten the adjustment screw by turning it clockwise. NetBotz 455 Installation and Quick Configuration Manual 15 Initial Configuration Note: Disregard the procedures in this section if you have APC InfraStruXure Central as part of your system. See the documentation for your InfraStruXure device for more information. Overview You must configure the following TCP/IP settings before the appliance can operate on a network: • IP address of the appliance • Subnet mask • Default gateway Note: If a default gateway is unavailable, use the IP address of a computer that is located on the same subnet as the appliance and that is usually running. The appliance uses the default gateway to test the network when traffic is very light. Obtain network settings using DHCP By default, your appliance obtains its network settings using DHCP. When you connect the appliance to your network and apply power to the unit, it automatically attempts to contact a DHCP server. The appliance waits 30 seconds for a response. If the DHCP server is configured to provide a hostname, the appliance requests either its configured hostname or netbotzxxxxxx (where xxxxxx is the last 6 digits of the MAC address of the appliance) as a hostname associated with the IP address granted by the DHCP server. This enables you to use a Web browser to connect to the appliance using the address http://netbotzxxxxxx without any additional configuration. The appliance also requests DNS server addresses, a DNS domain, SMTP server addresses, and NTP server addresses from the DHCP server. Install the serial configuration utility and other programs. The APC Serial Configuration Utility is a Java®-based application that configures the network settings on your APC appliance. Use the NetBotz Appliance Utility CD to install the Serial Configuration Utility, as well as the Advanced View (the monitoring and management console for your NetBotz appliance) and the Java Runtime Environment (JRE) on your system. Note: The Java Runtime Environment used by the Advanced View application is always installed, regardless of whether the installation target already has a suitable JRE installed. 16 NetBotz 455 Installation and Quick Configuration Manual • Microsoft® Windows® Systems: To install the applications and the JRE on a computer running Windows XP SP1 or SP2, or Windows 2000, place the NetBotz Appliance Utility CD in the CD drive of the computer that you will use to configure and manage your appliance. The NetBotz Installer starts automatically. If you have disabled Autorun on your computer, click Start > Run, type x:\av\windows\install.exe in the Open field (where x is the drive letter assigned to your CD drive) and click OK. Follow the prompts to complete the installation of your software. • Linux Systems: To install the applications and the JRE on a computer running Red Hat® Enterprise Linux® 4 or Fedora™ Core 4 or later, place the NetBotz Appliance Utility CD in the CD drive of the computer that you will use to configure and manage your NetBotz appliance. Mount the drive if necessary. Run install.bin from the Linux subdirectory on the CD. For example, if you are using Linux and you mounted the CD drive as /mnt/cdrom, execute the following command: sh /mnt/cdrom/linux/install.bin Follow the prompts to complete the installation of your software. Configure network settings using the Serial Configuration Utility To configure your appliance using the Serial Configuration Utility: 1. Click Start > Programs > APC > Serial Configuration > Serial Configuration Utility to start the Serial Configuration Utility. 2. Connect one end of a USB cable to your computer and the other end of the cable to the Console port on the NetBotz appliance. 3. Plug the power cord provided with your NetBotz appliance into a wall outlet, and then connect it to the AC line inlet. Note: This power cord is to be used only with APC NetBotz products. The green Power LED illuminates immediately after you apply power to the appliance. The unit can take up to two minutes to initialize, depending on appliance configuration. The red Alert LED illuminates when the appliance detects an alert condition. Click Next to continue. 4. The Serial Configuration Utility automatically scans your system COM ports to determine if an APC appliance is connected to the network. If an APC appliance is discovered, the appliance is listed in the Device column of the window. Select the radio button for the appliance to configure and click Next to continue. NetBotz 455 Installation and Quick Configuration Manual 17 Note: If the COM port associated with the port to which your USB cable is connected is currently in use by another application, the message beside the COM port in the Owner column indicates that the port is not available. To correct this, close the application that is using the COM port and click Scan Serial Ports. 5. The Root Password window appears. Enter the administrator account password for this appliance (apc, by default) and click OK. 6. Specify whether to use DHCP to specify the network settings of your appliance. Click Yes or No, and click Next to continue. 7. The utility scans the appliance and displays the network settings stored on the appliance. The network settings are divided into Ethernet Card Settings and DNS Settings. 8. Specify the Ethernet Card settings. – To use network settings assigned by a DHCP server, select Configure automatically via DHCP. – To specify network settings for use by this appliance, select Configure using these settings and provide an IP address, subnet mask, and gateway address for the appliance. Specify a NAT proxy name or IP address to be used by a NAT Proxy server in your network to allow users to connect to the appliance from outside the firewall. You can also specify speed and duplex settings for use by this interface, or use the default setting, Auto Negotiate. 9. Specify the DNS Settings. – To use DNS Settings provided by your DHCP server, check Use DHCP DNS Settings. – To specify DNS Settings for this appliance manually, clear the Use DHCP DNS Settings checkbox and provide the domain and DNS server information. 10. Click Next to save your configuration settings. Click Finish to close the Serial Configuration Utility. 11. Test the IP connection of the APC appliance. Start your Web browser and type the IP address of the appliance into the address field. Press Enter. If the APC appliance is online and properly configured, the Basic View displays in the browser window. 18 NetBotz 455 Installation and Quick Configuration Manual Install a wireless network device You can install a third-party wireless network device by connecting it to the Ethernet port on the appliance using an Ethernet cable. APC currently supports the D-Link DWL-G820, a wireless Ethernet bridge. To install and configure a third-party wireless network device, see the instructions provided with that device. The APC Configuration Wizard Use the Configuration Wizard to configure the following settings on your appliance: • Domain Name Server Settings • Clock and Calendar Settings • Region Settings • Administrator User ID and Password • E-Mail Settings • E-Mail Alert Notification Recipients The Configuration Wizard downloads the latest available version of BotzWare to your appliance. When you finish configuring your appliance with the Wizard, your appliance monitors your environment for lack of adequate air flow and for changes in temperature and humidity and detects motion in the area in which the camera is located. Alert conditions detected by any of these sensors generate an e-mail to send to a specified e-mail address. The Configuration Wizard runs each time you use the Advanced View with your APC appliance until you complete all of the steps in the Wizard or check Don’t Show Configuration Wizard Next Time. You can run the Wizard again by selecting Configuration Wizard from the Advanced View Tools pull-down menu. NetBotz 455 Installation and Quick Configuration Manual 19 Access an Appliance Overview After the appliance is running on your network, you can access the configured appliance through the Basic View or the Advanced View. Administrator account user ID and password Your NetBotz appliance has a pre-configured Administrator account. The User ID and Password for this account are: • User ID: apc • Password: apc Note: To increase security, be sure to use the Advanced View Users task to change the default User ID and Password for the Administrator account. Root account user ID and password Your NetBotz appliance has a pre-configured root account. The root account is used only for appliance communications that are performed using the USB Console Port, e.g., when you use the Serial Configuration Utility to specify network settings. The default User ID and Password for this account are: • User ID: root • Password: apc Note: You cannot change the root account User ID. To increase security, use the Advanced View Change Root Password Tool to change the default root account password. 20 NetBotz 455 Installation and Quick Configuration Manual Lost password recovery To recover from a lost password: 1. Locate the reset switch on the bottom of the appliance. 2. Use a thin wire such as a paper clip to press the reset switch for 10 seconds. This causes the system to restart. 3. Once the system restarts, login within two minutes using the default login values: – For Advanced View: • User ID: apc • Password: apc – For the console: • User ID: root • Password: apc Note: If you do not log in within two minutes after holding down the reset switch, you must repeat the procedure. 4. After you log in, change the password to increase security. Basic View Use the Basic View to view the current sensor data, image capture, and other appliance data in a HTML-based interface. Use the Basic View to perform basic appliance configuration. The configuration tasks available from the Basic View are limited and are included for initial appliance installation and setup. This view is provided to allow you to use a Web browser to view appliance status. APC supports the following Web browsers: • Microsoft Internet Explorer® 5.5 and higher (on Windows operating systems only) • Mozilla®-based browsers that support Firefox® 1.x (on all operating systems) • Netscape® 7.x and higher (on all operating systems) Note: Other commonly available browsers also may work but have not been fully tested by APC. NetBotz 455 Installation and Quick Configuration Manual 21 Advanced View Use the Advanced View to view sensor data, camera images, and other appliance data in a custom Java application. You can also use the Advanced View to generate relay output actions and configure all appliance features. The Advanced View is a stand-alone application that must be installed on a supported network-attached computer. For more information on the Basic View or the Advanced View, see the NetBotz Appliance User’s Guide. APC Quick Configuration Once you configure, install, and apply power to your appliance, use the Advanced View to perform the following procedures. • Configure Appliance Settings: Configure the appliance Clock, DNS, Region, Network Interface (hostname, NAT proxy, and speed and duplex settings), E-mail Servers, and Proxy settings. • Configure Alert Actions: Configure the Play Audio Alert and Primary E-mail Notification alert actions. 22 NetBotz 455 Installation and Quick Configuration Manual Configure appliance settings Open the Advanced View and perform the following Appliance Settings tasks. The icons associated with each task are located in the Configuration pane, in the Appliance Settings region. 1. Set the Clock settings. By default, your appliance synchronizes the system clock with the default NTP servers. If network access to these servers is not permitted, double-click on the Clock icon and specify your NTP server address or manually specify clock settings. 2. Set DNS settings. Double-click the DNS icon and specify the DNS Domain and at least one DNS Server address. 3. Set the Region settings. Double-click the Region icon and set Locale and Time Zone. The default settings are US and Central Standard Time. 4. Specify a hostname for your appliance. Double-click on Network Interfaces and specify a hostname for your appliance. Optionally, specify a NAT proxy name or IP address to be used by a NAT Proxy server in your network to allow users to connect to the appliance from outside the firewall. You can also specify speed and duplex settings for use by this interface, or use the default setting, Auto Negotiate. 5. Assign a unique User ID and Password to the Administrator account. By default, User ID and Password for the Administrator account are both apc. To increase security, double-click the Users icon, double-click APC Admin Account, and specify a unique User ID and password for the administrator account. 6. Set your E-mail Server settings. This is the e-mail server that your appliance uses to deliver e-mail alert notifications. Double-click the E-mail Servers icon, and configure the following settings: – (Optional) Provide a From address. – In the SMTP server field, type the hostname or IP address of your SMTP server (for example, mail.yourcompany.com). – If necessary, specify a Port value. (25, by default). – Select an SSL option for authentication and certificate verification. Check with your network administrator for further assistance. – Click Test E-mail Server, type in your e-mail address, and click OK. An e-mail is sent to your address when an alert is detected. Confirm that you received the test e-mail and continue. 7. If your network uses an HTTP or Socks proxy server, double-click the Proxy icon and specify your Proxy settings. If you are unsure whether you use an HTTP or Socks proxy, check with your network administrator. NetBotz 455 Installation and Quick Configuration Manual 23 Configure alert actions You can configure your appliance to play audio alert notifications through the headphone/speaker jack on your Camera Pod 160 or Camera Pod 120 or to send an e-mail alert notification to your e-mail address when sensor thresholds are violated. Open the Advanced View and perform the following Pod/Alerts Settings tasks. The icons associated with each task are located in the Configuration pane, in the Pod/Alerts Settings region. 1. Open the Alert Actions task. Double-click the Alert Actions icon to open the Alert Action Configuration window. 2. Click Add... to open the Select Alert Action window, select Play Audio Alert and click OK to open the Add Alert Action window. 3. In the Alert Action Name field, type a name for this alert action (for example, Play Audio Alert). 4. Select your Camera Pod from the Output Device drop box. Optionally, adjust the Volume% setting. 5. Click OK to close the Add Alert Action window and continue. Your newly created alert action is included in the list of Alert Actions. 6. Select Primary E-mail Notification from the list of defined alert actions and click Edit. 7. Check Include a sound clip with the alert. This ensures that any alert e-mailed to you includes a sound clip with any camera images that are delivered. You can disable this option later, if the file size of alert notifications is too large. 8. Click Add..., type your e-mail address in the Add E-mail Address window, and click OK. 9. Click OK to close the Edit Alert Action window and continue. 10. Click OK to close the Alert Action Configuration window. 24 NetBotz 455 Installation and Quick Configuration Manual Upgrade Options Software Feature Upgrades The BotzWare on your appliance can be upgraded using the Upgrade task in the Advanced View. The following software packs can be added to your appliance. • Advanced Software Pack, which includes the following features: – Block out masking for camera images – Digitally signed clips – Enhanced audio features – Detailed appliance location information – Increased number of definable users and user capabilities Note: The features of this pack are standard on the NetBotz 550. • 5 Node Scanner/IPMI Pack, which provide IPMI and SNMP scanner integration Note: When you upgrade your appliance, the connected pods are automatically updated. If your network includes more than one appliance, you must perform the upgrade on all appliances. Valid data is not available during the upgrade. Hardware Upgrades You can upgrade your NetBotz appliance hardware in the following ways: • Add Camera Pod 160s, Sensor Pod 150s, Sensor Pod 155s, and CCTV Adapter Pod 120s to your NetBotz appliance • Add a supported USB modem to a USB port on your appliance • Add a supported USB digital I/O device to a USB port on your appliance • Add supported USB-to-serial port device on your appliance Note: The NetBotz Room Monitor 455 supports the NetBotz Sensor Pod 120 and the NetBotz Camera Pod 120. NetBotz 455 Installation and Quick Configuration Manual 25 Add pods to your appliance The NetBotz Room Monitor 455 supports the following pods: • A combined total of two Camera Pod 160s, Camera Pod 160s, and CCTV Adapter Pod 120s. • A combined total of two Sensor Pod 150s, Sensor Pod 155s, Sensor Pod 120s, and 4-20mA Input Pod 120s. Camera Pods, Sensor Pod 120s, and 4-20mA Input Pod 120s can be connected directly to the appliance USB port, or you can connect a USB hub to your appliance and then connect pods to the hub. Hubs can also be daisy chained, and pods can be connected to the daisy-chained hubs as long as the pod is no more than the fifth device in the chain. Note: Due to power requirements, Camera Pod 160s, Sensor Pod 120s, CCTV Adapter Pod 120s, and 4-20mA Input Pod 120s must be connected either directly to the USB port at the appliance or to a USB hub receiving power from an external source. RS232-based sensors or devices can be connected to unpowered USB hubs. As pods are connected to your appliance, they automatically appear in the Navigation pane in both the Basic and Advanced View interfaces. Newly added pods are labeled by their pod type and their serial number. Once a pod is added, you can change its label using either the Basic View or the Advanced View. • Once connected, CCTV Adapter Pod 120s require additional configuration before they can be used. For more information, see “Install and configure a CCTV adapter pod 120” on page 27. • If you connect a pod and then disconnect it, its entry in the Navigation pane in the Advanced View is grayed out. If you reconnect a disconnected pod, its Navigation pane entry becomes active again. 26 NetBotz 455 Installation and Quick Configuration Manual Install and configure a CCTV adapter pod 120. To install a CCTV Adapter Pod 120, connect your video source to the appropriate DIN, BNC, or RCA video input jack on the pod. Use the USB cable to connect your pod to your NetBotz appliance, or to a USB hub connected to the appliance. To reduce radio frequency noise and emissions from the USB cable, clamp one clamp-on ferrite onto the USB cable within 51-76 mm (2-3 in) of the end that connects to the pod, and the second clamp-on ferrite onto the USB cable within 51-76 mm (2-3 in) of the end that connects to your appliance or to the USB hub. After you connect your CCTV Adapter Pod 120 and video source to your appliance, use the Advanced View to configure the pod. To configure your pod: 1. Start the Advanced View. From the Appliance drop-down list, select the IP address of the appliance to which you have connected the CCTV Adapter Pod 120. Log in to the appliance using a user account that has administrator privileges. After you log in, confirm that the newly connected CCTV Adapter Pod 120 appears in the Navigation Pane. The default label for CCTV Adapter Pod 120s is CCTV Video Pod serial, where serial is the serial number of the pod. 2. Select the Configuration button and double-click the Camera Pods icon (located in the Pod/Sensor Settings portion of the Configuration pane). 3. In the Camera Pod Configuration pane, select the entry that corresponds to the CCTV Adapter Pod 120 and then click Capture. 4. The Camera Capture Settings window opens. In addition to the fields that are available when you use this window to configure Camera Pod 160s, one additional control is available when you configure a CCTV Adapter Pod 120: – Video Format: Used to specify the format in which video is transmitted by the video source. Available selections include: NTSC-M, NTSC-Japan, PAL-B, PAL-D, PAL-G, PAL-H, PAL-I, PAL-M, PAL-N Combination, and SECAM. 5. Use the controls in the Camera Capture Settings window to configure the camera and image capture settings for use with the pod. To see an example of an image capture using the currently selected Video Format, Brightness, Contrast, and Image Quality settings, click Apply. The sample image in the Capture window will be updated using the new values. When you are finished, click OK to save your changes to the appliance. Your video source should now appear in the Advanced View Cameras pane. Once configured, you can use the video source in the same ways you use Camera Pod 160s. NetBotz 455 Installation and Quick Configuration Manual 27 Connect a USB modem You can enhance the network communication capabilities of your appliance by connecting a supported USB modem to your appliance. The following USB modems are supported for use with the appliance: • MultiTech® MultiModem® GPRS • MultiTech MultiMobile™ USB • Option GlobeSurfer® iCon Connect the USB modem to your appliance, or to a USB hub that is connected to the appliance. Once the modem is recognized as a serial port by the appliance, use the Basic View Setup view or the Advanced View Serial Devices task to specify the modem that is associated with the serial port. Once you specify the modem model, use the Advanced View PPP/Modem task to configure your appliance for PPP communications. To uninstall your USB modem, use the Serial Devices task in the Advanced View to remove the device. Connect a USB digital I/O device You can increase the number of dry contact sensors that can be connected to your appliance by connecting a supported USB digital I/O device to your appliance. The following USB digital I/O devices are supported for use with the appliance: • Sealevel® SeaLINK PIO-48 (adds 48 digital I/O connections) • Sealevel SeaI/O 462U (adds 96 digital I/O connections) • Sealevel SeaI/O 463U (adds 96 digital I/O connections) • Sealevel SeaI/O 450U (adds 96 digital I/O connections) To connect a USB digital I/O device to your appliance: 1. Remove power from the appliance. 2. Connect the USB digital I/O device to your appliance, or to a USB hub that is connected to the appliance. 3. Apply power to the appliance. 4. Once the appliance has finished booting up, power for the digital I/O device will be recognized at a serial port by the appliance. Use the Basic View Setup view or the Advanced View Serial Devices task to specify the digital I/O device that is associated with the serial port. 5. Use the Advanced View Dry Contacts task to configure any dry contact sensors you have connected to your digital I/O device. To uninstall your USB digital I/O device, use the Serial Devices task in the Advanced View to remove the device. 28 NetBotz 455 Installation and Quick Configuration Manual Connect an APC Switched Rack PDU To connect an APC Switched Rack PDU 79xx to your appliance, connect a USB-to-serial cable (NBAC0226, available from APC and APC resellers) to the RJ-12-to-DB9 serial cable (940-0144A) included with the Rack PDU. Connect your USB-to-serial cable to your appliance, or to a USB hub that is connected to the appliance. Once you connect the USB-to-serial cable to your appliance, you can connect the Rack PDU to the RJ-12-to-DB9 serial cable for use with your appliance. Supported APC Switched Rack PDUs. APC Switched Rack PDUs with firmware version 2.74 and lower are supported at this time. Install intelligent power strips. Connect the intelligent power strip to a serial port on your USB-to-serial cable. Use the Basic View Setup view or the Advanced View Serial Devices task to specify which serial port-based sensor you have connected to the appliance. The sensor readings associated with the device will appear in the Basic and Advanced Views once you complete installation. To uninstall your intelligent power strip, use the Serial Devices task in the Advanced View to remove the device. NetBotz 455 Installation and Quick Configuration Manual 29 Connect external sensors To install an external sensor, plug the sensor into an available External Port on any Sensor Pod 150, Sensor Pod 155, or Sensor Pod 120. Note: When connecting a sensor to a Sensor Pod 120, be sure to note both the sensor pod serial number, located on the back of the pod, and the number of the External Port on the pod when you connect the cable. You will need this information when you use the sensor pod task to configure your appliance. The External Port number is printed above the port on the pod. The female connectors on the NetBotz 120 Sensor Pod units are Version 2, NetBotz DIN standard connectors and can only accept male, Version 2, NetBotz DIN Sensor Cables. The new Version 3 products use standard RJ-45 connectors. If the external sensor cable is not long enough, use an Extension Cable for External Sensors, available in 15 m (50 ft) and 30 m (100 ft) lengths from your APC reseller, to lengthen the cable. When you have finished installing external sensors, use the Sensor Pods task to configure the appliance to use the external sensor. Once you configure your appliance, an additional temperature sensor appears in the Sensor Data pane when the pod to which the temperature sensor is connected is selected from the Navigation pane. Use the Advanced View Sensor Pods task to specify thresholds for this external sensor. Clean the NetBotz 455 To clean the device, gently wipe surfaces with a clean, dry cloth. 30 NetBotz 455 Installation and Quick Configuration Manual Specifications Electrical Input voltage, nominal 48 VDC (Power-over-Ethernet) Maximum power consumption 15 W Physical Dimensions (H x W x D) 210 x 170 x 94 mm (8.3 x 6.7 x 3.7 in) Weight 0.64 kg (1.40 lb) Environmental Elevation (above MSL) Operating Storage 0 to 3000 m (0 to 10,000 ft) 0 to 15 000 m (0 to 50,000 ft) Temperature Operating Storage 0 to 45ºC (32 to 113°F) -15 to 65°C (5 to 149°F) Relative Humidity Operating Storage 10 to 90%, non-condensing 10 to 90%, non-condensing Compliance Immunity/Emissions CE, FCC Part 15 Class A, ICES-003 Class A, VCCI Class A, EN 55022 Class A, EN 55024, AS/NZS CISPR 22 NetBotz 455 Installation and Quick Configuration Manual 31 Warranty Two-Year Factory Warranty This warranty applies only to the products you purchase for your use in accordance with this manual. Terms of warranty APC warrants its products to be free from defects in materials and workmanship for a period of two years from the date of purchase. APC will repair or replace defective products covered by this warranty. This warranty does not apply to equipment that has been damaged by accident, negligence or misapplication or has been altered or modified in any way. Repair or replacement of a defective product or part thereof does not extend the original warranty period. Any parts furnished under this warranty may be new or factory-remanufactured. Non-transferable warranty This warranty extends only to the original purchaser who must have properly registered the product. The product may be registered at the APC Web site, www.apc.com. Exclusions APC shall not be liable under the warranty if its testing and examination disclose that the alleged defect in the product does not exist or was caused by end user’s or any third person’s misuse, negligence, improper installation or testing. Further, APC shall not be liable under the warranty for unauthorized attempts to repair or modify wrong or inadequate electrical voltage or connection, inappropriate on-site operation conditions, corrosive atmosphere, repair, installation, exposure to the elements, Acts of God, fire, theft, or installation contrary to APC recommendations or specifications or in any event if the APC serial number has been altered, defaced, or removed, or any other cause beyond the range of the intended use. THERE ARE NO WARRANTIES, EXPRESS OR IMPLIED, BY OPERATION OF LAW OR OTHERWISE, OF PRODUCTS SOLD, SERVICED OR FURNISHED UNDER THIS AGREEMENT OR IN CONNECTION HEREWITH. APC DISCLAIMS ALL IMPLIED WARRANTIES OF MERCHANTABILITY, SATISFACTION AND FITNESS FOR A PARTICULAR PURPOSE. APC EXPRESS WARRANTIES WILL NOT BE ENLARGED, DIMINISHED, OR AFFECTED BY AND NO OBLIGATION OR LIABILITY WILL ARISE OUT OF, APC RENDERING OF TECHNICAL OR OTHER ADVICE 32 NetBotz 455 Installation and Quick Configuration Manual OR SERVICE IN CONNECTION WITH THE PRODUCTS. THE FOREGOING WARRANTIES AND REMEDIES ARE EXCLUSIVE AND IN LIEU OF ALL OTHER WARRANTIES AND REMEDIES. THE WARRANTIES SET FORTH ABOVE CONSTITUTE APC’S SOLE LIABILITY AND PURCHASER’S EXCLUSIVE REMEDY FOR ANY BREACH OF SUCH WARRANTIES. APC WARRANTIES EXTEND ONLY TO PURCHASER AND ARE NOT EXTENDED TO ANY THIRD PARTIES. IN NO EVENT SHALL APC, ITS OFFICERS, DIRECTORS, AFFILIATES OR EMPLOYEES BE LIABLE FOR ANY FORM OF INDIRECT, SPECIAL, CONSEQUENTIAL OR PUNITIVE DAMAGES, ARISING OUT OF THE USE, SERVICE OR INSTALLATION, OF THE PRODUCTS, WHETHER SUCH DAMAGES ARISE IN CONTRACT OR TORT, IRRESPECTIVE OF FAULT, NEGLIGENCE OR STRICT LIABILITY OR WHETHER APC HAS BEEN ADVISED IN ADVANCE OF THE POSSIBILITY OF SUCH DAMAGES. SPECIFICALLY, APC IS NOT LIABLE FOR ANY COSTS, SUCH AS LOST PROFITS OR REVENUE, LOSS OF EQUIPMENT, LOSS OF USE OF EQUIPMENT, LOSS OF SOFTWARE, LOSS OF DATA, COSTS OF SUBSTITUENTS, CLAIMS BY THIRD PARTIES, OR OTHERWISE. NO SALESMAN, EMPLOYEE OR AGENT OF APC IS AUTHORIZED TO ADD TO OR VARY THE TERMS OF THIS WARRANTY. WARRANTY TERMS MAY BE MODIFIED, IF AT ALL, ONLY IN WRITING SIGNED BY AN APC OFFICER AND LEGAL DEPARTMENT. Warranty claims Customers with warranty claims issues may access the APC customer support network through the Support page of the APC Web site, www.apc.com/ support. Select your country from the country selection pull-down menu at the top of the Web page. Select the Support tab to obtain contact information for customer support in your region. NetBotz 455 Installation and Quick Configuration Manual 33 Radio Frequency Interference Changes or modifications to this unit not expressly approved by the party responsible for compliance could void the user’s authority to operate this equipment. USA —FCC This equipment has been tested and found to comply with the limits for a Class A digital device, pursuant to part 15 of the FCC Rules. These limits are designed to provide reasonable protection against harmful interference when the equipment is operated in a commercial environment. This equipment generates, uses, and can radiate radio frequency energy and, if not installed and used in accordance with this user manual, may cause harmful interference to radio communications. Operation of this equipment in a residential area is likely to cause harmful interference. The user will bear sole responsibility for correcting such interference. After an electrostatic discharge (ESD) event, the appliance may require up to 2 minutes to restart services that are necessary for normal operation. During this time, the Web interface of the appliance will be unavailable. If any necessary services or devices external to the appliance, such as a DHCP server, were affected by the ESD event, these devices also need to restart properly. Canada— ICES This Class A digital apparatus complies with Canadian ICES-003. Cet appareil numérique de la classe A est conforme à la norme NMB-003 du Canada. Japan—VCCI This is a Class A product based on the standard of the Voluntary Control Council for Interference by Information Technology Equipment (VCCI). If this equipment is used in a domestic environment, radio disturbance may occur, in which case, the user may be required to take corrective actions. この装置は、情報処理装置等電波障害自主規制協議会(VCCI)の基準 に基づくクラス A 情報技術装置です。この装置を家庭環境で使用すると、電波 妨害を引き起こすことがあります。この場合には、使用者が適切な対策を講ず るように要求されることがあります。 Taiwan—BSMI 警告使用者 : 這是甲類的資訊產品 , 在居住的 環境中使用時 , 可能會造成射頻 干擾 , 在這種情況下 , 使用者會 被要求採取某些適當的對策。 Australia and New Zealand Attention: This is a Class A product. In a domestic environment this product may cause radio interference in which case the user may be required to take adequate measures. European Union This product is in conformity with the protection requirements of EU Council Directive 2004/108/EC on the approximation of the laws of the Member States relating to electromagnetic compatibility. APC cannot accept responsibility for any failure to satisfy the protection requirements resulting from an unapproved modification of the product. This product has been tested and found to comply with the limits for Class A Information Technology Equipment according to CISPR 22/European Standard EN 55022. The limits for Class A equipment were derived for commercial and industrial environments to provide a reasonable protection against interference with licensed communication equipment. Attention: This is a Class A product. In a domestic environment this product may cause radio interference in which case the user may be required to take adequate measures. APC Worldwide Customer Support Customer support for this or any other APC product is available at no charge in any of the following ways: • Visit the APC Web site to access documents in the APC Knowledge Base and to submit customer support requests. – www.apc.com (Corporate Headquarters) Connect to localized APC Web sites for specific countries, each of which provides customer support information. – www.apc.com/support/ Global support searching APC Knowledge Base and using e-support. • Contact the APC Customer Support Center by telephone or e-mail. – Local, country-specific centers: go to www.apc.com/support/contact for contact information. For information on how to obtain local customer support, contact the APC representative or other distributors from whom you purchased your APC product. Entire contents copyright 2008 American Power Conversion Corporation. All rights reserved. Reproduction in whole or in part without permission is prohibited. APC, the APC logo, NetBotz, and InfraStruXure are trademarks of American Power Conversion Corporation. All other trademarks, product names, and corporate names are the property of their respective owners and are used for informational purposes only. 990-3295C-001 *990-3295C-001* 12/2008