1
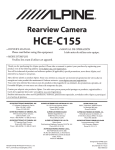
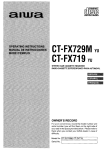
CT-X417 w
STEREO CAR CASSEITE RECEIVER
RADIO-CASSETTE ESTEREOFONICO PARA AUTOMOVIL
OWNER’S RECORD
For your convenience, record the model number and
serial number (you will find them on the bottom of your
set)inthespace
provided below. Please refertothem
when you contact your Al WA dealer in case of difficulty.
Model No. CT-X41 7
Serial No. ~
●TABLE OF CONTENTS
PRECAUTIONS .................................................................................................................................. 3
DETACHING THE CONTROL PANEL ............................................................................................... 4
CONTROL PANEL .............................................................................................................................. 6
SOUND ADJUSTMENTS
............................................................................................................. 7
RADIO OPERATION .......................................................................................................................... 8
PRESETTING STATIONS ................................................................................................................ 10
TAPE PLAYBACK ............................................................................................................................. 13
CONNECTING A PORTABLE CD PLAYER OR OTHER EQUIPMENT .......................................... 15
SPECIFICATIONS ............................................................................................................................ 16
NOTE
FOR USE IN THE U.S.A.
This equipment has been tested and found to comply with the limits for a Class B digital device, pursuant
to Part 15 of the FCC Rules. These Iimlts are designed to provide reasonable protection against harmful
interference in a residential installation.
This equipment generates, uses, and can radiate radio frequency energy and, if not installed and used
in accordance with the instructions, may cause harmful Interference to radio communications. However,
there is no guarantee that interference will not occur m a particular installation. If this equipment does
cause harmful interference to radio or television reception, which can be determined by turning the
equipment off and on, the user is encouraged to try to correct the interference by one or more of the
following measures:
— Reorient or relocate the receiving antenna.
— Increase the separation between the equipment and receiver.
— Connect the equipment into an outlet on circuit different from that to which the receiver is connected.
— Consult the dealer or an experienced radioflV technician for help.
CAUTION
Modifications or adjustments to this product, which are not expressly approved by the manufacturer, may
void the user’s right or authority to operate this product.
EN
2
❑ PRECAUTIONS
Ensure to remove the cassette tape from the
cassette compartment of the unit when you are
not using the unit.
● Do not let cassette
tapes come m contact with
●
direct sunlight, diri or dust. Do not touch the
tape inside a cassette as doing so may
contaminate the tape surface.
Do not leave cassette tapes near electrlc motors
or magnets. Store them separately to avoid
unwanted noise or loss of tone quality,
●Use acleamng cassette to clean the playback
head and capstans approximately once a month.
If the playback head is dirty, the high tone sound
may not be reproduced properly.
●Keep screwdrivers etc. or other metallic or
magnetic objects away from the playback head.
● When your car is parked under dtrect sunlight m
summer, there may be a considerable nse m
temperature inside the car. Ensure to let the
ambient temperature cool down before playing
a cassette tape.
● This unit is designed
to be operated on a 12 volt
DC negative ground electrical system only.
*When replacing the fuse, be sure to use the fuse
whose amperage rating is identical. Use of a
fuse with higher amperage may cause serious
damage to the unit.
CAUTION
●
There is a transit protection pad in the cassette
compartment,
Be sure to remove the pad and push the eject
button before operating the umt.
●
Transit protection pad
SECURITY LAMP
The LED lamp on the front side of umt is vmble
when the control panel E detached. This lamp
continues to flash to deter theft while the car’s
Ignition key IS turned off with the control panel
detached. However, this unit is not equipped with
the security alarm system that sounds an audible
alarm, therefore there are limitations to this antltheft dewce.
EN
3
~ DETACHING THE CONTROL PANEL
You can detach the control panel from the unit and carry it with you when you leave your car unattended.
1 if a cassette is inserted, remove
possible damage to the unit.
it to prevent
2 Press PW to turn the unit off.
EN
4
3
While supporting the control panel with one hand,
press Q to release one side of the panel. Care
must be taken not to drop the panel as it may
suddenly eject at this point.
4
When the control panel is lifted from the unit,
remove it by pulling away from the unit.
Do not touch the connector on the reverse side of the control
panel as doing so may contaminate the connector and cause
a poor connection resulting in a malfunction of the unit.
● Put the control
panel inside the supplied carrying case to
protect it from being damaged when you carry it with you.
?
Attaching the control panel
Cleaning the connector
The connector on the reverse side of the control panel needs to be cleaned every so often. Wipe the
surface of the connector with a cotton swab slightly moistened with alcohol.
The AUX jack can be covered by the supphed AUX jack cover If the jack ISnot used to connect a portable
CD player or other equipment (p.1 5).
To remove the AUX Jack cover, disengage the claws that hold it m place on the rear of the control panel
using a pointed tool.
\ EN
15
❑ CONTROL
PANEL
II
Display window
@ +/–
(audio control) buttons
@ PS/A. ME (preset scan/auto memory)
button
@ TUNE A/V
buttons
@ AUX (auxiliary) jack (3.50)
@EJECT = button
@Cassette compartment
@ REW/FF DIRECTION (rewind/fast
forward) buttons
@ PW (power onloff) button
@) ~ (release) button
@ preset station buttons 1-6
@LO (local/DX) button
@SELECT button
EN
6
@ AUX (auxiliary) button
@ LOUD (loudness) button
@ MUTE button
@BAND button
@ST (stereo/monaural) button
@ Band indicators
@ST (stereo) indicator
@ MONO (monaural) indicator
@ LOC (local) indicator
@
@
@
@
@
LOUD (loudness) indicator
4(tape direction) indicators
Audio control indicators
Main display section
Subdisplay section
~SOuNDADJUsTMENTs
I
Press SELECT to select the mode that you went to
adjust from: VOL (volume), BASS (bass), TRE
(treble), BAL (balance) and FAD (fader).
The following indications are displayed in cyclic order.
The selected mode changes to that of the volume mode when
SELECT is pressed for more than 5 seconds.
I
z Press i-l–
to adjust the sound quality.
Quickly press (less than 0.5 second) either side of the button
to change the level in small steps. Press and hold either side
of the button to change the level rapidly.
Adjust each mode referring to the audio control indicators in
the display window (see page 6).
Decreases the bass
level
Increases the bass
level
Decreases the level
Decreases the level
=
speaker~s)
speaker(s)
Decreases the level
of the rear speakers
Decreases the level
of the front
soeakers
Without selecting any mode with SELECT, only the volume
level can be adjusted by pressing +/-.
MUTE button
Press this button to temporarily
level.
lower the volume level. Press it again to restore the previous volume
LOUD (loudness) button
Press this button to boost both bass and treble while listening with low volume level.
EN
7
● RADIO
OPERATION
1 Press PW to turn the radio cm.
The radio frequency is displayed.
f
)
z Press BAND to sefect the band from FM1, FM2, FM3
and AM.
The band indicators light up cyclically in order.
(The FM1, FM2 and FM3 share the same frequency range.)
s Press (less than 0.5 second at a time) either
TUNEA
or TI.INEV
repeatedly
to tune in the
desired station.
Press A to increase and V to decrease the frequency
4 Adjust the volume
EN I
81
with +/-.
Seek tuning
Press and hold either TUNEA
(up) or TUNE V (down) for more than 0.5 second to activate the seek
function. The unit automatically tunes in the next station with good reception. Press the button again to
cancel the function. Repeat the procedure until the desired station is tuned in.
To turn the radio off
Press PW. The frequency indication goes off at the same time. If you Insert a cassette, the radio mode
will automatically be canceled as well.
The LO (local/DX) trtrtton
You can use the local mode when you want to tune m only the strong signal stations during seek tuning.
lntheradio
mode, press LOtoselect the local mode. The’’LOC indicator llghts up.
●When you are not seek tumng, leave the unit in the DX (distance) mode.
To cancel the local mode and enter the DX mode, press LO again.
● The “ST” (stereo) indicator hghts up when the tuned station ISbroadcasting
m stereo and the reception
condlt!on is good.
The ST (stereo/monaural) button
You can switch between the stereo and monaural modes by using this button. When the radio reception
ISnot good, that maybe improved by switching to the monaural mode. The mode ISalternately changed
each time you pressthls button. When in the monaural mode, the “MONO (monaural) indlcatorappears.
EN
9
I
~ PRESETTING STATIONS
To preset stations automatically (auto memory)
1 Press BAND to select the band from FMI,
and AM.
FM2, FM3
z Press and hold PSIA.ME for more than 1.5 seconds
to activate the automatic preset function.
The six strongest available stations will be stored in memory
on the preset station buttons 1 to 6 in order of their signal
strength.
Use this function to automatically preset up to 6 stations each for FM1, FM2, FM3 and AM (Up to a total
of 24 stations.)
● To stop automatic
presetting, press PS/A. ME again or press any of the preset station buttons 1 to 6.
To check the preset stations (Preset Scan)
● If you want to check the preset stations,
press PSi’A. ME for less than 1.5 seconds. The preset stations
stored in memory will be tuned in for 5 seconds each in order.
● To stop this function,
press PS/A. ME again or press any of the preset station buttons 1 to 6.
To preset stations manually
1 Press BAND to select the band from FM1, FM2, FM3
and AM.
‘~
z Tune in the station you want to preset.
s Press one of the preset station buttons 1 to 6 for
approximately
1.5 seconds.
The number of the pressed preset stafion button is displayed
next to the frequency indication.
Repeat this process to preset up to 6 stations each for FM1, FM2, FM3 and AM.
stations.) Small beeping sounds are made to acknowledge your input as you perform
● You can manually
preset the stations which have not been selected by automatic
=If you try to preset a station on a preset station button on which another station of
already been preset, the previously preset station will be erased.
(Up to a total of 24
manual presetting.
presetting.
the same band has
EN
11
PRESETTING STATIONS
To tune in the preset stations
Press BAND to select the band from FM1, FM2, FM3
and AM.
Press the desired preset station button.
The number of the pressed preset station button is displayed
next to the frequency indication, and the preset station will be
received.
--lliiiive’hming
reception control
(ATRC)
‘“fis
unit au~omatically suppresses FM noise caused by varying signal strength resulting from the
movement of a car.
●The built-in automatic blending circuit mixes the right and left channel signals according to the strength
of the reception. At the same time the high-cut circuit activates to maintain the sound quality.
● If the reception becomes even weaker, the tuner automatically
switches to the monaural mode to reduce
the noise.
mTApEpLAyBACK
1 Press PWtoturn
theunitorr.
z Insert a cassette
to start playback.
a Adjust the volume
with +/-.
Press these buttons to operate tape playback
Press this button
To do tflk
Stop the playback and eject the tape
@l
~
Change the playback side
Fast-forward the tape
and
❑ simultaneously
E
Rewind the tape
I
Stop fast winding and resume playback
❑
‘Do not depress ~ or
hard. Doing so may
change the direction of tape transport.
H
I ~
or
❑ lightly’
Auto reverse function
When the end of the tape is reached during
playback or fast tape transport, the direction of
tape transport is automatically reversed, and
playback starts again.
/EN
13
TAPEPLAYBACK
Tape direction indicators
Switching the modes
If the unit is in the radio when you insert a
cassette, the unit will enter the tape mode
automat ically.
To prevent tape problems
B
Before turning the ignition switch off
Ensure to eject a cassette from the unit before
turning the ignition switch off. Otherwise, the unit
may be damaged when you detach the control panel.
Before inserting acassette into the unit, make
sure that there is no slack in the tape. If necessaty,
take uptheslack
byinserting a pencil into the
spindle hole and wind the slack up.
m CONNECTING A PORTABLE CD PLAYER OR OTHER
EQUIPMENT
●
1
Connect a portable CD player, etc. via the AUX jack
(3.5 mm dia.) on the unit.
2
Press PW to turn the unit on.
3
Press AUX.
The “CV indication will be displayed.
Fo( furlher inforr’nation on the porlable CD player, etc., refer to the operating instructions for the player.
Note
While the unit is in the AUX mode with “CD displayed in the display window, you cannot hsten to the
radio or tape playback. Provided that a portable CD player etc. is connected to the AUX jack, when you
press AUX, the unit will enter AUX mode with “CD” display in the display window.
Be sure to press AUX after you connect a portable CD player, etc. to the AUX jack.
●
EN
15
❑ SPECIFICATIONS
RADIO SECTION
AUDIO SECTION
Max. Power Output:
(FM)
Frequency Range:
87.5 MHz – 108 MHz
~fl;[z
step)
Usable Sensitivity:
50 dB Quieting Sensitivity
17.2 dBf
IF Rejection:
80 dB
Frequency Response 30 Hz -15,000 Hz
S/N Ratio:
63 dB
Stereo Separation:
35 dB at 1 kHz
Alternate Channel Selectivity
70 dB
Capture Ratio:
3 dB
(AM)
Frequency Range:
Usable Sensitivity
520 kHz – 1,720 kHz
(10 kHz step)
30 IN (30 dB)
TAPE SECTION
Wow/Fluttec
0.1% (WRMS)
Tape Speed:
4.8 cm/sac. (1 7/sips)
S/N Ratio (normal): 50 dB
Frequency Response: 40 Hz – 14,000 Hz
Stereo Separation:
40 dB
FFIREW Time:
180 sac. (C-60)
AUX
40 W x 4 ch,
input
Input sensitivity (load impedance)
500 mV (10 I@)
AUX
GENERAL
Power Supply Voltage:
14.4 V(11 to 16 V allowable),
DC, negative ground
Load Impedance:
4Q
Tone Control:
Bass *l OdBat 100Hz
Treble * 5 dB at 10 kHz
Pre-amp Output Voltage
500 mV (min.)
Installation size:
Accessory supplied:
●
182 (W) x 53 (H) x 155 (D) mm
(7 ‘/~ (W)X2‘/8(H)X61/,
(D)
inches)
Carrying case (1)
Specifications and external appearance are
subject to change without notice due to product
improvement.
EN
17
● INDICE
PRECAUCIONES
.. ........... ...... .........
..... ...................
................ ......... 3
DESMONTAJE DEL PANEL DE CONTROL ....... . ... ......... ..... .. ...... .. ..... ..... ............. ...... ......... 4
PANEL DE CONTROL..
. .. .... .. . ..... .. .. ..... .. ... ... .... ... ...........6
AJUSTES DEL SONIDO.
.. .. ...... ..... ....
7
FUNCIONAMIENTO
DE LA RADIO
. ... . .. ... .
8
PROGRAMACION DE LAS ESTACIONES
.... .. .. ... .. ...... .. ... .. ... ... 10
REPRODUCTION DE LA CINTA . .. . ... . .. ..
.. . . .. ..... ... . ..
.
.....13
CONEXION DE UN TOCADISCOS DE DISCOS COMPACTOS PORTATIL U OTRO EQUIPO ....15
ESPECIFICACIONES
.. . ... ... ........ .. .. .... .. 16
;
PRECAUCIONES
No se olvide de sacar la cassette del aparato si
no piensa seguir escuchando.
*No exponga Ias cassettes a Ios rayos del sol,
sucledad o polvo. Notoque la cinta de la cassette
ya que esto puede hater que se ensucie la
superhcie de la ctnta.
● No deje Ias cassettes cerca de un motor electrico
o de un iman. Guardelas en sus cajas para
ewtar que aparezcan ruidos y para evltar que
dlsmmuya la cahdad del tono.
● Utilice una cassette
de Iimpieza para Iimplar la
cabeza de reproducc}on y Ios cabrestantes mas
o menos una vez al roes. Una cabeza de
reproduction sucla harA que Ios sonidos de
tono agudos no se reproduzcan blen.
● No acerque destornilladores,
etc u otros ob)etos
metalicos
o magneticos
a la cabeza de
reproduction,
..Si deja estaclonado el coche en Un Iugar
●
expuesto a Ios rayos del sol, en verano, el
interior
del veh(culo
puede calentarse
excesivamente.
Espere hasta que baje la
temperature 10 suficiente antes de empezar a
reproducer una cinta en el aparato.
● Este aparato fue disefiado
para funclonar con
un sistema electrico de CC de 12 voltios con
conexion a tierra negativa.
● Cuando
tenga que camblar un fusible, uthce
otro que tenga Ias mismas especificaciones. El
uso de un fusible con un amperaje mayor puede
provocar dahos graves en el aparato.
PRECAUCIONES
●
Se ha colocado un forro de protection para el
transport
dentro del compartimiento
de
cassettes.
Saque sin falta el forro y presione el boton de
expulsion antes de utilizar et aparato.
Forro de p;oteccion para el transport
LUZ DE SEGURIDAD
Se puede ver una Iuz LED en el Iado delantero
del aparato cuando se desmonta el panel de
control. Esta Iuz permanece destellando para
evitar su robo, al girar la Ilave de encendido a la
posiclon OFF con el panel decontrol desmontado.
Sm embargo, este aparato no posee un sistema
de alarma de seguridad sonoro por 10 que et
disposlbvo
antirrobo no es compietamente
m
~
PRECAUTION
No realice modificaciones o ajustes en este producto que no hayan sido aprobados explicitamente por
el fabricate
porque estos pueden cancelar el derecho o autorizacion del usuario para ei uso de este
producto.
E
3
m DESMONTAJE DEL PANEL DE CONTROL
Se puede desmontar et panel de control del aparato y Ilevarlo consigo cuando se deja el coche
estacionado sin vigilancia.
1 Si hay una cassette en el aparato, saquela
evitar que pueda daiiarse el aparato.
z Presione
PW para desconectar
para
el aparato.
s Mientras se sujeta el panel de control con una
mane, presione Q para soltar un Iado del panel.
Haga este procedimiento
con cuidado para que no
se caiga el panel porque puede saltar en este
memento.
4 Para Ievantar ei panel de control del aparato,
desmontelo sacandolo del aparato.
No toque el conector en el Iado de atras del panel de control
porque esto puede hater que se ensucie el conector y
provocar una mala conexion, con 10 que se producira un
malfuncionamiento del aparato.
● Guarde el panel de control en la caja de transport
que viene
con el aparato para protegerlo contra golpes y daiios en
general durante su transport.
lrrstalaciondel panel de control
Limpieza del conector
Es necesario Iimpiar el conector en el Iado de atras del panel de control con cierta frecuencia. Frote la
superficie del conector con un algodon Iigeramente empapado en alcohol.
Latoma AUX puede cubrirse con Iatapa de toma AUX suministrada si no se utiliza la toma para conectar
un tocadiscos de discos compactos portatil u otro equipo (pag. 15).
Para sacar la tapa de la toma AUX, suelte Ias garras que 10fijan a la parte trasera del panel de control
utilizando una herramienta puntiaguda.
IE
5
● PANEL
DE CONTROL
Visualizador
@ Boton +/–
(control de audio)
@ Boton PS/A. ME (exploration
programads/memoria
automatic)
@ Botones TUNE/VV
@ Toma AUX (auxiliar) (diam. 3,5)
@) Boton EJECT =
@ Compartimiento de cassettes
@ Botones REW/FF DIRECTION
(rebobinado/avance
rapido)
@ Boton PW (conexionldesconexion)
@ Boton ~ (desmontaje)
@ Botones de estaciones programadas
@ Boton LO (local/DX)
(@ Boton SELECT
1-6
@
@
@
@
@
Boton
Boton
Boton
Boton
Boton
AUX (auxiliar)
LOUD (sonoridad)
MUTE
BAND
ST (estereo/monoaural)
@
@
@
@
@
@
@
@
@
Indicadores de banda
Indicador ST (estereo)
Indicador MONO (monoaural)
Indicador LOC (local)
Indicador LOUD (sonoridad)
Indicadores de aentido de la cinta ( 4>
Indicadores de control de audio
Seccion del visualizador principal
Seccion del visualizador secundario
)
~
AJUSTES DEL SONIDO
f
Presione SELECT para seleccionar el modo que
desea ajustar de entre: VOL (volumen), BASS
(graves), TRE (agudos), BAL (balance), FAD
(equilibria).
Las siguientes indicaciones aparecen una tras otra.
El modo seleccionado vuelve al modo de volumen cuando se
presiona SELECT durante mas de 5 segundos.
Presione +/para ajustar la calidad del sonido.
Presione rapidamente (menos de 0,5 de segundo) uno de [OS
Iados del boton paracambiarde nivel en intervals pequehos.
Mantenga presionado uno de Ios Iadosdel boton para cambiar
rapidamente et nivel.
Ajuste cada modo de acuerdo a Ios indicadores de control de
audio que aparecen en el visuaiizador (vea la pagina 6).
Iado )t
)-i)
xl
L()(
)=$
] Disminuye el
Iado iI Aumenta el
-f
Disminuye el nivel
de Ios graves
Aumenta el nivel de
Ios graves
T
1
)=( 1=
II
#_
Disminuye el nivel
de Ios agudos
Aumenta et nivel de
Ios agudos
=
~~
de Ios altavoces
)=
~
=
no se ha seleccionado ningun modo con el SELECT solo
podra ajustarse el volumen presionando el +/-.
Si
Both MUTE
Presione este boton para bajartemporalmente
original.
el volumen. Presione nuevamente paravolveral
volumen
Both LOUD(sonoridad)
Prwione este boton para reforzar tanto Ios graves como Ios agudos cuando se escucha a un nivel de ~
volumen bajo.
7
I
~
FUNCIONAMIENTO
DE LA RADIO
1 Presione PW psrs conectar la radio.
Aparece la frecuencia de sintonizacion
de la radio.
z Presione BAND para seleccionar de Ias bandas
FM1 , FM2, FM3 y AM.
Se iran encendiendo Ios indicadores de banda en orden.
(FM1, FM2 y FM3 comparten la misma gama de frecuencias.)
3 Presione (durante menos de 0,5 de segundo)
TUNE A o TUNE V varias veces hasta sintonizar
la estacion deseada.
Presione A
para subir y V
4 Auste el volumen con
● 1-.
para bajar la frecuencia.
Sintonizacioncon bksqueda
Mantenga presionado TUNE A
(arriba) o TUNE V
(abajo) durante mas de 0,5 de segundo para
activar la funcion de busqueda. El aparato sintonizara automaticamente la siguiente emisora con buena
recepcion, Presione nuevamente el boton para cancelar la funcion. Repita el procedimiento hasta
sintonizar la estacion deseada.
Para desconectarla radio
Presione PW. La indication de frecuencia se apaga en ese memento. Si se coioca una cassette, se
cancelara tambien automaticamente el modo de la radio.
BotonLO (local/DX)
Se puede utilizar el modo local para sintonizar solo Ias estaciones de serial fuertes durante la
sintonizacion con busqueda. En el modo de la radio, presione LO para seleccionar el modo local. Se
enciende el indicador “LOC,
●Cuando no se esta haciendo una sintonizanion con bkiqueda, deje el aparato en el modo DX (distancia).
Para cancelar el modo local y para volver al modo DX, presione nuevamente LO.
● Se enciende
el indicador “ST (estereo) cuando la estacion sintonizada esta transmitiendo en estereo
y la recepcion de Ias seriales es buena.
Bot6rrST (estereo/monoaural)
Este boton permite conmutarentre Ios modos estereo y monoaural. Cuando la radio no se escucha bien,
podra mejorar la recepcion conmutando al modo monoaural. El modo cambiara alternadamente cada
vez que presione este boton. En el modo monoaural, aparece el indicador “MONO (monaural).
E
9
~
PROGRAMACION
Programacion automatic
DE LAS ESTACIONES
de Ias estaciones (memoria automatic)
1 Presione BAND para seleccionar la banda entre
FM1, FM2, FM3 y AM.
2 Mantenga presionado P!YA.ME durante mas de 1,5
segundcs tiara activar la funcion de programaci6n
automatic.
Las seis estaciones con recepcion mas fuerte se memorizaran
en Ios botones de estaciones programadas 1 a 6 en et orden
de la fuerza de Ias setiales.
Utilice esta funcion para programarautomaticamente
hasta 6 estaciones cada una para FM1, FM2, FM3
y AM. (Hasta un total de 24 estaciones.)
● Para parar la programacion
automatic,
presione nuevamente PS/A. ME o presione cualquiera de Ios
botones de estaciones programadas 1 a 6.
Verification de estacionesprogramadas(Exploration programada)
● Si se desean
verificar Ias estaciones programadas, presione PS/A. ME durante menos de 1,5
segundos. Las estaciones programadas memorizadas se iran sintonizando cada ma durante 5
segundos.
* Para parar esta funcion, presione nuevamente PS/A. ME o presione cualquiera de Ios botones de
estaciones programadas 1 a 6.
Programacion
manual de Ias estaciones
1 Presione BAND para seleccionar la banda entre
FM1 , FM2, FM3 y AM.
z Sintonice la estacion que desea programar.
I
a Presione uno de Ios botones de estacion
programada 1 a 6 durante aproximadamente 1,5
segwtdos.
El numero del boton de estacion programada aparece al Iado
de la indication de frecuencia.
Repita este procedimiento para programar
un maximo de 24 estaciones.) Se escucha
hate la programacion manual.
● Se
pueden programar manual mente
automaticamente.
● Si se trata
de programar una estacion
estacion en la misma banda, se borrara
hasta 6 estaciones cada una en FM1, FM2, FM3 y AM. (Hasta
un sonido de aviso bajo para confirmar la entrada cuando se
Ias estaciones
que no han podido
en un boton de estacion programada
la estacion programada previamente.
ser programadas
donde ya existe otra
E
11
PROGRAMACION DE LAS ESTACIONES
Sintonizacion de estaciones programadas
(
“
1 Presione
BAND para seleccionar
la banda entre
FM1 , FM2, FM3 y AM.
z Presione el boton de la estacion programada donde
desea programar.
El numero del boton de la estacion programada presionado
aparece al Iado de la indlcaci6n de frecuencia y se escuchara
la estacion programada.
Controlde recepciofrcon sintonizacionactiva (ATRC)
El aparato eliminara automaticamente el ruido de FM provocado por Ias variaciones en la fuerza de la
sefial a consecuencia del movimiento de un coche.
● El circuito de mezcla automatic
incorporado mezcla Ias sehales de Ios canales de la derecha y de la
izquierda de acuerdo a la fuerza de la recepcion. Al mismo tiempo, sc activa el circuito de torte de altos
para mantener la calidad del sonido.
* Si la recepcion se vuelve debil, el sintonizador conmutara automaticamente al modo monoaural para
reducir et ruido.
1;
~LECTUREDECASSETTE
1 Appuyer sur PWpourmettre
tension.
l’appareii sous
2 Inserer une cassette pour commencer la lecture.
s Ajuster Ie volume ala touche +/-.
Appuyezsur Ies touchessuivantes pour enclencher la lecture
Pour
Appuyez sur la touche
Arreter la lecture et ejecter la cassette
B
Changer la face de lecture
H
Avancer rapidement la bande
D
Rebobiner la bande
a
Arr&er Ie rebobinage rapide et continuer la lecture
~
‘Ne pas appuyerforlsur
~
ou ~.
Cela
pourrait faire changer Ie sens de defilement de
la bande.
et ~
ou
en rnerne Wnps
❑ Iegerement’
Fonctiond’auto-inversion
En arrivant a la fin de la bande pendant la lecture
ou Ie transport rapide, Ie sens de defilement de la
bande est automatiquement inverse, et la lecture
rep rend.
F
13
REPRODUCTION DE LA CINTA
Indicadoresde sentido de la cinta
Reproduction
Avarice
rapido
Rebobhado
Conmutacionde modos
Si el aparato esta en ei modo de la radio cuando
se coloca una cassette, el aparato
automaticamente en el modo de cinta.
entrara
Para evitar problemas con la cinta
Antes de colocar una cassette en el aparato,
veriflque que no haya flojedad en la cmta. En
caso de que fuera necesario, tense la cinta
mtroduc!endo un Iapiz en el orlficio de bobinado
y elimine la flojedad.
Antes de girar la Ilave de encendidoa la
position OFF
No se olwde de sacar la cassette del aparato
antes de girar la Ilave de encendido a la posiclon
OFF De 10contrario el aparato puede dafiarse al
desmontar el panel de control.
~
CONEXION DE UN TOCADISCOS DE DISCOS
COMPACTOS PORTATIL U OTRO EQUIPO
Conecte un tocadiscos de discos com~actos
portatii, etc. utilizando la toma AUX (diam. de
3,5 mm) de este aparato.
2
Presione
PW para conectar
el aparato.
s Presione AUX.
Aparecera la indication
●
“CD.
Para mas detalles sobre el tocadiscos de discos compactos portatil, etc. lea el manual de instrucciones
del tocadiscos.
Nota
●
Cuando el aparato esta en el modo AUX y aparece la indication “CD en el visualizador, no podra
escuchar la radio o reproduction de la cinta. Si hay un tocadiscos de discos compactos portatil
conectado en la toma AUX, al presionar AUX el aparato entra en el modo AUX y aparece la indication
“CD” en el visualizador. presione AUX SOIO
despues
de
haber conectado un tocadiscos de discos
compactos portatii en la toma AUX.
E
15
,
ESPECIFICACJONES
SECCIONOE LA RAOIO
SECCIONDE AUOIO
(FM)
Maxima potencia de salida,
40 W x 4 canales
Gama de frecuencias 87,5 MHz -108 MHz
(intervalo de 100 kHz)
Errtradade AUX
Sensibllidad aceptable:
12.7 dBf
Senslbilidad de silenciamiento en 50 dB:
17,2 dBf
Rechazo IF:
80 dB
Respuesta de frecuencla:
30-15.000
Hz
Relation de sefial/ruldo:
63 dB
Separation estereo
35 dB at 1 kHz
Seleccion de canal alternabvo
70 dB
Relation de captura:
3 dB
(AM)
Gama de frecuencias.
520 kHz – 1.720 kHz
(mtervalo de 10 kHz)
Sensibdldad aceptable:30@J (30 dB)
SECCIONOECINTA
0,1 % (WRMS)
Ululacion/tr6molo:
Velocidad de la cinta 4,8 cm/seg.
Relation de sefial/ruido (normal)
50 dB
Respuesta de frecuencla:
40-14000Hz
Separaclon estereo:
40 dB
Tiempo de FF/REW:
180 seg (C-60)
Sensibilidad de entrada (impadancla de carga)
AUX:
500 mV (10 kf2)
GENERALIDAOES
Tension de summistro de cornente:
14,4 V (11 a 16 V admissible),
DC, tierra negativa
Impedancia de carga: 442
Graves +10 dB a 100 Hz
Control de tono.
Agudos *5 dB a 10 kHz
Tension de sahda pre-amplificaclon:
500 mV (min.)
Tamafio de mstalacion:
182 (An.) x 53 (Al.) x
155 (Prof.) mm
Accesono eummlstrado
Bolsa de transport (1)
. Las especificaciones y aspecto exterior estan
sujetos a cambios sin previo aviso.
E
17
~
TABLE DES MATIERES
PRECAUTIONS ............. ....................................................................... ................... ........................ 3
DETACHMENT
DU PANNEAU DE COMMANDE ............................................................................ 4
PANNEAU DE COMMANDE .............................................................................................................. 6
AJUSTEMENT DU SON ......................................................... ........................................................... 7
FONCTIONNEMENT DE LA RADIO .................................................................................................. 8
PREREGLAGE DES STATIONS ..................... ............. ... ....... .... ...... ......... .... ... ..................... 10
LECTURE DE CASSETTE ....................................................................... ....................................... 13
RACCORDEMENT DUN LECTEUR CD PORTABLE O!J D’UN AUTRE APPAREIL ...................... 15
SPECIFICATIONS
................................................................................................... Couveriure dos
;
❑ PRECAUTIONS
Ne pas oublier de retirer la cassette du Iogement
cassette quand I’appareil n’est pas utilise.
● Ne pas soumettre
Ies cassettes aux rayons
directsdu soleil, ala salete ou a la poussiere. Ne
pas toucher la surface de la bande clans la
cassette parce qu’elle pourrait &re salie.
● Ne pas Iaisser Ies cassettes
pres de moteurs
@lectriques ou d’aimants. Les ranger separement
pour eviter Ie bruit non souhaite ou une perte de
qualite de la tonalite.
● Utiliser une cassette de nettoyage pour nettoyer
la t~te de lecture et Ies cabestans environ tous
Ies mois. Si la tt+te de lecture est sale, Ies
tonalites elevees peuvent ne pas 6tre reproduites
correctement.
● Maintenir
Ies townevis, etc. ou autres objets
metaliiques ou magnetiques eloignes de la t&e
de lecture.
* Quand Iavoiture est garee en plein soleil en ete,
la
temperature
peut
augmenter
consid&ablement
a I’interieur.
Laisser la
temperature ambiante baisser avant de jouer la
cassette.
●Cet appareil est conpu pour fonctionner
uniquement clans un systeme electrique a masse
negative CC de 12 volts.
● Au replacement
du fusible, bien utiliser un
fusible de m~me amperage. L’emploi d’unfusible
a amperage superieur peut serieusement
endommager I’appareil.
●
PRECAUTION
●
Un bourrelet de protection de transport est
installe clans Ie Iogement cassette. Ne pas
oublier de Ie retirer et de presser Ie bouton
dejection avant la mise en fonctionnement de
I’appareil.
Bourrelet de protection de transport
TEMOIN DE SECURITE
La LED-temoin surl’avant de I’appareil est visible
quand Ie panneau de commande est retire. Elle
continue a clignoterpourdecourager
des voleurs
quand I’interrupteur dallumage de la voiture est
coupe avec Ie panneau de commande detache.
Mais cet appareil n’etant pas dote d’un systeme
dalarme de secours emettant unealarme audible,
ce dispositif antivol a des Iimites.
ATTENTION
Les modifications ou ajustements de ce produit, non expressement approuvees par Ie fabricant, peuvent
annuler Ie droit ou I’autorite de I’utilisateur a faire fonctionner ce produ’it.
F
3
Le panneau de commande peut r%re detache de I’appareil et emport~ Iorsqu’on Iaisse sa voiture saris
surveillance.
1
Si une cassette est inser6e, la retirer pour eviter
tout dommage possible de I’appareil.
Presser
PW pour mettre I’appareil
hors tension.
En soutenant Ie r)anneau de commande d’une main,
presser ~ pour” Iiberer un c6te du panneau.
Prendre garde de ne pas Iaisser tomber Ie panneau,
car il pourrait brusquement
s’6jecter a ce momentla.
Une fois Ie panneau de commande soulev6 par
rapport a I’appareil, Ie retirer en tirant dessus.
Ne pas toucher
Ie connecter
a I’arriere du panneau
de
commander
parce qu’il pourrait
&re sali et assurer une
u
mauvaise connexion
qui se traduira par un mauvais
fonctionnement de I’appareil.
● Placer Ie panneau
de commande clans Ie sac de transport
fourni pour Ie proteger pendant Ie transport.
.
Fixation du panm?aude commande
Nettoyagedu connecter
Le connecter
a I’arriere du panneau de commande doit &re nettoye de temps a autre. Essuyer sa
surface avec une ouate de coton Iegerement humidified d’alcool.
La prise AUX peut 6tre recouverte avec Ie capuchon pour prise AUX fourni, si elle n’est pas utilisee pour
raccorder un Iecteur CD portable ou un autre appareil (p.1 5).
Pour retirer Ie capuchon de la prise AUX, desengager Ies ergots qui Ie maintiennent en place a I’arriere
du panneau de commande avec un outil pointu.
F
5
~
PANNEAU DE COMMANDE
@)Touches +/(commande audio)
@ Touche PSIA. ME (balayage prereglel
memorisation automatique)
@)Touches TUNEAIV
@ prise AUX (auxiliaire) (3,50)
@ Touche EJECT =
@ Logement a cassette
@)Touches REW/FF DIRECTION
(rebobinage/avance rapide)
@ Touche PW (mise hors tension)
@ Touche ~ (liberation)
@Touches de prereglage des stations 1-6
@ Touche LO (local/DX)
@ Touche SELECT (selection)
@Touche
AUX (auxiiiaire)
@ Touche LOUD (intensi~esonore)
@ Touche MUTE (assourdissement)
@ Touche BAND (bande radio)
@ Touche ST (stereoimonaural)
@ Indicateurs de bande
@ indicateur ST (stSreo)
@ Indicateur MONO (monaural)
@ Indicateur LOC (local)
@ Indicateur LOUD (intensite sonore)
@
Indi.ateurs
@
indicateurs de con?r61e audio
4
k
(sens
de la bande)
@Section d’affichage principaie
@ Affichage aecondaire
~AJUSTEMENTSDU
soN
1 Appuyer sur SELECT pourselectionner lemodea
ajuster parmi: VOL (volume), BASS (basses), TRE
(aigues), BAL (balance) et FAD (fader).
Les indications suivantes s’afficheront
@i
g
L-+3
J’35+’7
cycliquement.
;? E-+3
;T l.+’
;3
xl
Le mode selectionne passe au mode volume si la touche
SELECT est pressee plus de 5 secondes.
2 Presser +/-
pour ajuster la qualite sonore.
Appuyer brieverrwnt (moins de 0,5 seconde) sur un c~te de la
touche pour modifier Ie niveau par petites etapes. Appuyer et
maintenirenfonce un c6te pour modifier rapidement Ie volume.
Ajusterchaque mode en consultant Ies indicateursdecontr61e
audio clans la fen~tre d’affichage (voir page 6).
I
c6te -
I
Cate +
Reduit Ie volume.
Augmente Ie
volume.
Reduit Ie niveau des
basses.
Augmente Ie niveau
des basses
Reduit Ie niveau des
aigues.
Augmente Ie niveau
des aigues.
~t #=( I
Allfl_
R6duit Ie niveau des
haut-parleurs
droit(s).
Reduit Ie niveau du
(ales) haut-parleurs
crauche(s).
=;q;
/_
Reduit k niveau des
haut-parleurs
arriere.
Reduit Ie niveau des
haut-parleurs avant.
I$n)
l_f
\_i
Id
b=t
A(II
7
I
I_
b=
-t
n
/T
1=
J_
Le volume seul peut 6tre ajuste en pressant
s61ectionner de mode a la touche SELECT.
+/-
saris
Touche MlfTE
Presser pour reduire temporairement
Ie volume. Une seconde pression restaurera Ie volume precedent.
Touche LOUD(intensite sonore)
Presser pour renforcer Ies graves et Ies aigus Iors de I’ecoute a volume reduit.
FONCTIONNEMENT
DE LA RADIO
1 Presser PW pour aiiumer la radio.
La frequence radio s’affiche.
z Presser BAND pour selectionner la bande parmi
FM1, FM2, FM3 et AM.
Les indicateurs de bande s’allument cycliquement clans cet
ordre. (FM 1, FM2 et FM3 ont la meme plage de frequencies.)
a Presser (moins de 0,5 seconde) la touche TUNEA
ou TUNE Vde maniere repetee pour accorder la
station souhaitee.
Presser
reduire.
4 Ajuster
A
pour augmenter
Ie volume
avec +/-.
la frequence
et V
pour la
Syntonisation de recherche
Presser et maintenir enfonce la touche TUNE A (augmentation) ou V (reduction) pendant plus de
0,5 seconde pour activer la fonction de recherche. L’appareil accorde automatiquement
la station
suivante a bonne reception. Presser une seconde fois la touche pour annuler la fonction. Repeter la
procedure jusqu’a ce que Ie station souhaitee solt accordee.
Pour eteindre la radio
Presser PW. L’indication de frequence s’etemdra simultanement.
automatiquement annule a I’insertion d’une cassette.
Le mode radio sera egalement
Touche LO (local/OX)
Le mode local peut &re utilise quand on souhalte accorder seulement Ies stations a signal puissant
pendant la syntonisation de recherche. En mode radio, presser LO pour selectlonner Ie mode local.
L’indicateur “LOC s’allumera.
OLaisser I’appareil en mode DX (dktance) quand on utilise pas la syntonisation de recherche.
Presser une seconde fois LO pour annuler Ie mode local et passer en mode DX.
d-’indicateur “ST” (st&eo) s’allume quand la station accordee dtfuse en stereo et que Ies conditions de
reception sent bonnes.
Touche ST (stereo/monaural)
Elle permet de commuter entre Ies modes stereo et monaural. Quand la reception radio n’est pas bonne,
la commutation au mode monaural peut I’amehorer. Chaque presslon fa[t alterner entre Ies modes En
mode monaural, I’indicateur “MONO (monaural) apparalt.
F
9
~ PREREGLAGE DES STATIONS
Pour preregler automatiquement des stations (m6morisation atrtomatique)
BAND pour selectionner la bancfe parmi
FM1, FM2, FM3 et AM.
1 Presser
z Presser et maintenir enfonce la touche PS/A.ME
pendant plus de 1,5 seconde pour activer la
fonction de prereglage automatique.
Les six stations a signaux Ies plus puissants
seront
sauvegardees en mernoire sur Ies touches 1 a 6 des stations
prereglees clans I’ordre de la puissance du signal.
Utiliser cette fonction pour preregler automatiquement jusqu’a 6 stations pour chacune des bandes FM1,
FM2, FM3 et AM (total de 24 stations).
● Pour arr~ter
Ie prereglage automatique, presser une seconde fois la touche PS/A. ME ou une des
touches 1 A 6 de stations prereglees.
Pour controllerIes stations prereglt!es(balayage preregle)
* Pour contrder Ies stations prereglees, presser la touche PSJA. ME au moins 1,5 seconde. Les stations
●
prereglees sauvegardees en memoire seront accordees chacune pendant 5 secondes clans I’ordre.
Presser une seconde fois la touche PS/A. ME ou une des touches 1 a 6 de stations prereglees pour
annuler cette fonction.
Prer6glage manuel ties stations
1 Presser BAND Dour selectionner la bande ~armi
FM1, FM2, FM3”et AM.
f_-)
L
z Accorder la ststion a preregler.
)
s Presser une des touches 1 a 6 de stations
prereglees pendant environ 1,5 seconde.
Le numero de la touche de stations de prereglage pressee
s’affichera a c6te de I’indication de frequence.
Repeter cette procedure pour preregler jusqu’a 6 stations pour chacune des bandes FM1, FM2, FM3 et
Afvt (jusqu?r un total de 24 stations). Des hips courts retentissent pour repondre a l’entr6e pendant Ie
prereglage manuel.
● II est possible
de preregler manuellement Ies stations qui n’ont pas 6te selectionnees au prereglage
automatique.
* Si I’on essaie de preregler une station sur une touche de stations prereglees sur Iaquelle une station
de la m6me bande est deja prereglee, la station prealablement prereglee sera effacee.
F
11
PREREGLAGE DES STATIONS
Accord des stations prereglees
Presser BAND pour selectionner la bande parmi
FMI, FM2, FM3 et AM.
r
I & Presser la touche de la station prereg16e souhaitee.
Contrtile actif de la reception d’accord (ATRC)
Cet appareil supprime automatiquement Ie bruit FM dfi a la variation de la puissance du signal resultant
du replacement de la voiture.
- Le circuit de melange automatique incorpor6 melange Ies signaux des canaux droit et gauche selon
la puissance de la reception. Simultanement, Ie circuit passe-has s’active pour maintenir la qualite
sonore.
● Si ia reception devient encore plus faible, Ie tuner commute
automatiquement au mode monaural pour
reduire Ie bruit.
121
~LEcTuREDEcAssETTE
1 Appuyer sur PWpourmettre
tension.
2
l’appareil sous
Inserer une cassette pour commencer la lecture.
s Ajuster Ie volume ala touche +/-.
Appuyszsur Ies touchessuivantes pour enclencher la lecture
Pour
Arr&er la lecture et ejecter la cassette
AD1.xIvezsur la touche
m
Changer la face de lecture
a
Avancer rapidement la bande
III
Rebobiner la bande
H
Arr6ter Ie rebobinage rapide et continuer la lecture
~
*Ne pas appuyer fort sur ~
ou ~.
Cela
pourrait faire changer Ie sens de defilement de
la bande.
et ~
o.
en rn,rne ternps
❑ legerement*
Fonctiond’auto-inversion
En arrivant a la fin de la bande pendant la lecture
ou Ie transport rapide, Ie sens de defilement de la
bande est automatiquement inverse, et la lecture
reprend.
F
13
LECTURE DE CASSETTE
Irrdicateurs de sens de defilement de la
bande
Commutation de mode
Si I’appareil est en mode radio a I’insertion d’une
cassette, il passera automatlquement en mode
bande
Pour eviter des problemes de bande
Avant I’insertion d’une cassette clans I’appareil,
v6rlfier que la bande est blen tendue
SI
n6cessaw’e, eliminer Ie mou de la bande en
mserant un crayon clans Ie trou d’axe et Ie tourner
pour eliminer Ie mou.
Avant la coupure de I’interrupteur
d’alhrmage
Verifier que la cassette a ete ejectee de I’appareil
avant de couper I’interrupteurd’allumage.
Sinon,
I’appareil pourrait ~tre endommage au retralt du
panneau de contr61e.
,
RACCORDEMENT D’UN LECTEUR CD PORTABLE OU
D’UN AUTRE APPAREIL
1
(-~
Raccorder un Iecteur CD portable, etc. via la prise
AUX (3,5 mm de dia.) de I’appareil.
z Appuyer sur PVVpour mettre I’appareil sous
tension.
a Presser AUX.
I-’indication “CD s’affichera.
(
)
o Pour de plus amples information
sur Ies Iecteurs CD portables, etc., voir Ie mode demploi du Iecteur.
Remarque
●
Quand I’appareil est en mode AUX avec “CD affiche clans la fen~tre d’affichage, I’ecoute de la radio
ou dune cassette est possible, a condition que Ie Iecteur CD portable soit raccorde a la prise AUX,
quand AUX est presse, I’appareil passe en mode AUX avec “CD affiche clans la fen&re daffichage.
Ne pas oublier dappuyer sur AUX apres la connexion d’un Iecteur CD portable, etc.
F
15
SPECIFICATIONS
SECTION RADIO
SECTION AUDIO
(FM)
Pwsance de sortie max:
40 W x 4 canaux
Plage de frequencies: 87,5a 108 MHz
(psr etapea de 100 kHz)
Sensibillte uthabie:
12,7 dBf
Seuil de sensibllite 50 dB:
17,2 dBf
Relet Fl:
80 dB
Reponse en frequence:
30a 15.000 Hz
Rapport signal/bruit: 63 dB
Separation ster60
35 dB a 1 kHz
Selecfiwte dun canal de substitution:
70 dB
Taux de capture”
3 dB
(AM)
Plage de frequencies:
Sensibhte uthsable:
Entree AUX
Sensibility dentree (impedance de charge)
AUX:
500 mV (10 IK2)
GENERALITIES
Tension dalimentation:
14,4 V(11 a 18 V dlsponibles),
CC. masse neaative
Impedance de charge 4 ~
Contr6ie de la tonahte Basses * 10 dB a 100 Hz
Aigues + 5 dB a 10 kHz
TensIon de sortie preampli:
520 a 1720 kHz (par etapes
de 10 kHz)
301JV(30 dB)
Encombrementi
Accessoires fournis:
●
SECTION CASSEllE
Pleurage/scintillement:
‘0,1% (WRMS)
vitesse de deftement de la bande
500 mV (min.)
162 x53x 155 mm (l/h/p)
Sac de transport(1)
Les specifications et I’aspect exterieur sent
sujets ~ modifications
saris preavis pour
amelioration du produit.
4,6 cmlsec.
Rapport signal/bruit (normal):”
50 dB
Reponse en frequence:
40a 14.000 Hz
Separation stereo.
40 dB
Temps FF/REW:
87-KTD-903-01
970206ATM-OX
180 sec. (C-80)
Printed in China
AIWA CO.,LTD.