1
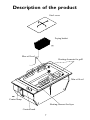
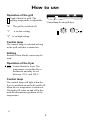
INSTRUCTION BOOK
130 FG-m
AUS/NZL
1
GB
949600686
Congratulations from AEG
Dear Customer,
Congratulations with your new Hob.
It is important that you become familiar with the functions and features of
the Hob. You should therefore read these operating instructions as they will
help you get the most out of your new Hob.
Pay extra attention to sections marked
. These are warning texts to help
you avoid accidents.
Keep the operating instructions. They will come in handy if there is
something you are not sure about, and should accompany the Hob if it is
transferred to a new owner.
The structure of the operating instructions enables you to use them as a
reference manual. The first part of the operating instructions contains a
general description of your new product. Then follows a short introduction
of the things to do before you use the Hob for the first time. The section
“How to use” describes how the Hob is used in everyday life. Use this
section until you are familiar with your new Hob. The section “Cleaning
and Maintenance” provides information on both daily and more thorough
cleaning of the individual components of the Hob. Should problems arise
when you use the Hob, you can look in the section “Before calling service”,
where there are instructions on how to remedy some practical and technical
problems yourself.
Enjoy!
Regards,
2
Table of contents
Contents
Page no
For the user
Congrafulations from AEG ......................................................................... 2
Safety information ........................................................................................ 4
Description of the product ......................................................................... 7
How to use .................................................................................................... 8
Grill .................................................................................................... 8
Fryer .................................................................................................... 8
Maintenance and cleaning ........................................................................ 11
Panel .................................................................................................. 11
Stainless steel surfaces ....................................................................... 12
Grill .................................................................................................. 12
Fryer .................................................................................................. 12
Draining of the oil ..................................................................................... 13
Service
.................................................................................................. 19
Tips on grilling ........................................................................................... 20
Tips on frying .............................................................................................. 22
For the installer
Technical specifications ............................................................................ 14
Mounting .................................................................................................. 15
Electrical installation ................................................................................. 17
How to read the operating instructions:
1... 2...Step by step
Hint and tips
Safety information
Environmental information
3
Important to know
the cleaning agents used.
The hob unit is intended for ordinary
household cooking purposes. Any
other use can result in damage to the
unit as well as personal injury.
Please read the warranty.
Service
During use
Service and repair may only be
performed by the distributor, or by a
service organization approved by the
distributor. Only repair parts delivered
by the distributor may be used.
During deep-fat frying, sauteèing,
melting of butter, etc., one must always
remain near the unit, due to the danger
of fire. In the event of fire the unit
must be shut off immediately (and the
cooker hood as well, if in use).
Disposal
Help to avoid accidents; if the hob unit
should ever be discarded, render it
useless by removing the cable, or by
cutting the cable as close to the unit as
possible.
Make sure that the unit is shut off
when not in use - the knob should rest
at “0”.
The unit becomes dangerously hot
during use, and remain so for a period
of time. They should therefore be
treated with due respect. Keep children
at a distance.
Product liability
Our liability is limited to that which is
stipulated by law, and covers only
damage to persons and property, which
results from defects in materials and
workmanship of the unit itself.
This liability extends for a period of 10
years from the date of purchase as a
factory-new unit.
Never place plastic or paper, ect., on
the unit. If the unit should be switched
on by accident, the paper could burn,
plastic melt, etc.
Reservations
For hygienic and safety reasons the
unit must be kept clean. Grease, oil
and food spills create unpleasant
odours when burnt, and can in some
cases result in open flames.
Our liability does not apply in the
event that the damage in question is
due to any of the following conditions:
The unit has not been installed in
accordance with the instructions set
forth in this pamphlet.
Read - and adhere to - the users
instructions, as well as any instructions
and warnings printed on the labels of
4
frying receptacle. The filter dome
must face upwards when in position.
That the safety rules in the instructions
have not been complied with.
That repair has been made by others
than an authorised service technician.
The unoriginal spare parts have been
used.
That the damage is caused by transport
at a later date, for instance during
removal or resale.
That the damage is caused by any form
of use contrary to common sense.
Wash the grill grid, place it on the grill
and turn on the grill (step 12). Leave it
on for 3 minutes.
Installation
The electrical installation must be
made by a certified electrician. Avoid
pinching the cable. The electric parts
of the hob must not be tampered with.
Areas of use
Safety rules
The hob is only intended for normal
household use. It is important that you
follow the advice given in these
instructions in order to avoid any risk
of damage to persons and objects.
Used for any other purpose invalidates
the guarantee as well as product
liability.
You can prevent fire and avoid serious
injuries by following the safety rules
below. Remember that the grill
becomes so hot that it can set fire to
paper, cleaning rags etc. Remember
that hot frying-oil can cause serious
burns. Never leave the appliance
unattended when in use.
Before using the unit
Some unpleasant odour and smoke
may occur the first time you use the
hob. Therefore please wash the frying
container, basket and the heating
element in hot water with washing-up
liquid. Pour 3 liters of water with some
detergent into the frying container.
Warm up the water and let it boil for
about 10 minutes. Empty the water
into a bowl through the bottom tap and
flush with hot water. Before using the
chip-fryer, fit the enclosed metal filter
over the drain hole in the base of the
5
Please keep children out of reach!!
Remember that the grid, the lava
block, the heating elements and the
frying oil remain searing hot for a long
period after you have turned off the
appliance. Never pour water into hot
frying-oil. If the frying oil catches fire,
turn off the extractor hood. Suffocate
the fire by covering it with the lid, a
pan, baking tray or similar object.
Never try to put out the fire with
water.
Steel cover
The cover supplied may only be used
on this model.
6
Description of the product
Steel cover
Frying basket
Max oil level
Heating elements for grill
MIN
Min oil level
Control lamp
Heating element for fryer
Control knob
7
How to use
Operation of the grill
Control knob for grill. The
grilling temperature is adjustable.
"0"
The grill is switched off
"1"
is on low setting
"9"
is on high setting
Controllamp
for the
Kontrolleuchte
für grill/fryer
die Kombi-Grill
190˚
170˚
Control lamp
The control lamp is activated as long
as the grill switches is turned on
Grilling
Instead of lava blocks, water may be
used.
Operation of the fryer
Control knob for fryer. The
temperature is regulated by a
thermostat and may be set
between 170˚C and 190˚C.
Control lamp
The control lamp will light when the
fryer is switched on and will switch off
when the set temperature is achieved.
The light will come on and off in line
with the thermostat regulation of the
temperature.
8
Frying
Make sure the heating element is
positioned at the bottom. Oil is poured
into the frying container. The “Min”
mark must be observed. This
corresponds to an oil content of 1,5
liters. Maximum amount of oil in the
container is 3,5 litres. The grill
elements stay turned down and the
fryer may be switched on at the
desired temperature setting. The lid
may be on the fryer to shorten the
preheatingtime.
NB!! Grill and fryer cannot be used
at the same time.
9
Overheating protection
Overheating protection during any
overheating of the oil at the fryer will
switch the inserted
overheating protection off the friteuse.
Customer service for the remedy of the
disturbance contacts.
Steel lid for the fryer
When using the combi-grill as a fryer
you can place the steel lid on top of the
frying container, it will shorten the
preheating time.
10
Maintenance and cleaning
The heating elements and the
oil will stay hot long time
after the combi-grill has been
shut off.
Do never pour water into the
hot oil as the water
explosively will start boiling
Splashquard
The splashquard can be removed to
make it easier to clean the surface.
What to do:
1. Hold the splashquard as shown
in the diagram
2. Lift the splashquard straight up
3. Clean the top surface as
described in “cleaning the steel
surface”
Be aware of the two retaining
pegs, which are sharp.
4. Replace the splashquard in
position ENSURE that it is
fitted the correct way
Never use hard or sharp
implements to lift off the
splashquard.
Do not wash the splashquard
in a dishwasher.
The hob must not be used
with the splashquard off.
11
Stainless steel surfaces
Perform daily cleaning with a slightly
damp cloth. For more severe soiling,
use a liquid scouring cream. Always
clean the steel in the direction of the
steel finish. To ensure that the steel
retains its shine, it is recommended
that you use a polishing agent for
stainless steel on a regular basis.
Always polish in the direction of the
steel finish (cross-wise).
Never use steel wool, metal sponges or
other abrasive cleaning agents.
have become very soiled. You can
clean the stones in two ways.
1. Boil the stones in water added
washings up liquid.
2. Place the stones in the frying basket
and wash it all in the dishwasher.
Replace the lava stones when they can
not be cleaned satisfactory by the
described methods.
New stones may be bought from your
white goods dealer.
The heating elements
The Grill
The grill must be cold before cleaning.
The grill grid
The grilling grid should be cleaned
after each use.
1. Remove burnt-in fat and bits of
food with a scouring pad. If the grid
is heavily soiled you can let it soak
in warm water with washing up
liquid.
2. Clean the grilling grid with washing
up liquid or in the dishwasher.
3. Apply a thin coat of cooking oil to
the grid
Normal the heating elements will burn
of fat during use but if the heating
elements get very soiled by fat or bits
of food you can clean them with a hard
brush.
The fryer
You can leave the oil in the container
from time to time. How often you need
to change the oil depends on how often
you use the fryer and for what.
You should change the oil and clean
the frying container when the oil
changes colour and/or if the oil begins
to smell.
The lava stone
It is not necessary to clean the lava
stones after each use.
The lava stones absorb and burn fat
during use. Clean the stones when they
12
Draining of the oil
1. Remove the safety shield from the
drain cock.
2. Place a bowl under the drain cock.
Make sure the bowl is large enough
to hold the oil in the container.
3. Open the drain cock and let the oil
run into the bowl.
4. Close the drain cock.
Closed
The frying container
The drain cock must closed.
1. Remove the metal filter and wash it
in warm soap water.
2. Pour warm water with washing-up
liquid in the container. You can
leave the heating element down
when cleaning the container. Clean
the container with a brush.
3. Place a bowl under the drain cock.
Make sure the bowl is large enough
to hold the water in the container.
4. Open the drain cock and let the
water run into the bowl.
5. Rinse the container in cold water.
Remember to place a bowl under
the drain cock to catch the rinsing
water.
Eventually wipe the container with
a dry clotts.
6. Close the drain cock and replace
the safety shield.
Place the metal filter with the
curved side upwards over the drain
hole in the container.
Open
13
Technical date
Element voltage
240 V
Electrical connections
240 V, 1 phase, neutral + earth
Total power consumption
2300 W
This unit is
labelled to indicate
conformity with the low voltage
directive ( 73/23/EEC ) and the EMC
directive ( 89/336/EEC ).
14
Mounting
The hob unit can be mounted in any
type of kitchen with a table surface
whose thickness is between 28 mm and
40 mm.
Minmum distance to
any shelf underneath
shall be 245 mm +
room enough for a
bowl that can take at
least 4 litres.
Fixing
Unscrew the fixing brackets just enough
so they may be turmed. Fasten the
brackets to the worktop with a screw
driver.
Cut-out measurements
One rectangular hole is sawn out for the
hob combination chosen.
The depth of the cut-out for any unit is:
490 mm
Length of hole = sum of all units`
externally measured lenght, less 20 mm.
Mounting of Reinforcement
Beams
Minimum distance
to wall:
150 mm
A reinforcement Beam, with supporting
flanges at each end, is included with
each two-burner unit. For unit
combinations, a reinforcement beam
must be used between each unit. It is not
necessary to attach the reinforcement
Reinforcement
beam to the table surface, as it is held in beams
place by a specially designed moulding,
which is incorporated in the hob unit´s
flanges.
15
Minimum distance
to wall (nonflammable material):
150 mm
Mounting of attachment fitting
on the sides of the combi-grill
If the hob is mounted in a 270 X 490
mm cutout, or if for other reasons there
is no room for the side attachments,
these should be removed before the
hob is set into the table.
Set the hob into the table and then
raise it enough to expose the screws in
the sides.
Remove the screws.
Mount the attachment fittings so that
they interlock with the frame (See
illustration).
Reinsert the screws in the sides
through the oblong hole in the fitting.
Set the hob into the table and tighten
the attachment fittings.
16
The units externally measured
length
145 mm:
Cooker hood
290 mm:
Two-burner ceramic-top electric hob
Two-burner gas hob
Grill
Fryer
Combi grill
580 mm:
Four-zone ceramic-top electric hob
Four-burner gas hob
725 mm:
Four-zone ceramic-top electric hob
17
Electrical installation
The electrical installation must only be
made by a certified electrician. The
electrical installation must be made
according to prevailing regulations for
heavy current installations and comply
with local public regulations.
No attempt must be made to tamper
with the electrical parts of the unit.
The hob is supplied with a 1,5 metre
power cable without plug and is to be
connected to an external relay with a
contact separation off at least 3mm in
each pole.
The guarantee is void in the case of
faulty installation or if the electrical
parts have been tampered with.
Connections to the unit:
1 phase - neutral - earth (max. 10A)
Type of cable, min. 1,0 mm² HO5 RNF.
18
If the combi-grill does not
function
Check to see whether a fuse has
blown.
Check to see whether the relay is
switched off.
by an alternative service organisation,
approved by the distributor. Only spare
parts delivered by the distributor may
be used. Spare parts and service are the
domain of our service network.
If the problem is not with the fuse or
relay, do not attempt to correct it
yourself.
Instead, contact our service network all repairs must be performed by our
service personnel.
Warranty
This unit is warranted against defects
in materials and workmanship, when
used as intended, for a period of one
year from the date of purchase. The
warranty covers both parts and service,
as well as necessary transportation
costs. Keep your proof of purchase.
Reservations
The warranty does not cover damages
which are not due to defects in
materials or workmanship. Repair, or
attempted repair, by any party other
than our authorized service network
will invalidate the warranty. The
warranty does not cover an unjustified
house-call by our service network.
Service and spare parts
Service and repair of this unit must be
carried out by our service personnel, or
19
Tips on grilling
Use of the grill.
The numbers 1-12 are temperature
settings. From 1-11 the heating is
increased an regulated automatically.
On 12, full power is achieved and the
heating elements are glowing. This
step is suitable for heating up the grill
quickly and for cleaning the heating
elements. The table shows the
approximate adjustment steps for
different grill dishes.
approximately 5 minutes on step 12,
the meat will get heat from the water
and become juicy. When fat drips
down into the water it will cool off so
quickly that it cannot be ignited. Keep
an eye on the water and refill as
necessary.
NB!! Oil may be applied onto the meat
before it is laid on the grill.
Warning
NB!! The grid must always be used.
Grilling over lava blocks
Before starting the grilling, the grid is
lifted off and the heating elements
turned up. The box for the lava blocks
is put into place.
The lava block box shall always be
placed in the grill and the grill grid
placed on top before the grill unit is
switched on.
NB!! Preheat the grill elements for
about 5 minutes on step 12. This will
result in the meat getting heated from
the lava blocks as well.
Spices may be sprinkled directly on
the meat, or over the lava blocs in
order to give the meat a certain aroma.
NB!! Oil may be applied onto the meat
before laying on the grill.
Grilling over water
Grilling may be done with water
instead of the lava blocs. If the grill
elements are preheated for
20
Foods
Sausages
Lamb cutlets
Hamburgers
T-bone steaks
Kebabs
Fish in oil
Hamburgers with bacon
Chicken pieces
Heat setting
6-7
7
7
7-9
7
7
7
7-9
Cooking time in minutes
10
10
16 Turn every 4 minutes
10-12
12-15
10
16 Turn every 4 minutes
40 Turn every 4 minutes
21
Tips on frying
This is how it is done. Firstly, the
desired temperature is set and after a
while the correct temperature of the oil
is reached (the lamp for the fryer is
switched off). Lower the frying basket
into the oil.
NB!! Remember that moist foodstuff
should be dried before frying (ie.
seafood, vegetables, fruit, fish). After
frying the basket is lifted out and
carefully shaken to remove excess oil
(the basket may be hung on the fixing
bracket in order to let the oil run off
further). In the table the approximate
times are given for frying, which may
serve as a guide. The times depend on
the finished appearance and personal
taste.
If you should want to fry large
amounts of food at the same time, it is
best to take up the basket after 1-2
minutes so that the oil may quickly
reach the correct temperature again.
The fried food will get more crispy
this way. If it does not get crispy
enough (even if the temperature is set
correctly), or if the oil changes colour
to light brown, the oil should be
changed.
NB!! Make sure that no naked flames
are near the fryer. The oil is hot and
ignites easily. Remember to set the
temperature dial back to 0 once the
frying is finished.
22
Foods
Amount Temperature Time min.
French fries, deep frozen
French fries, deep frozen
French fries, fresh
500 gr.
100 gr.
500 gr.
Poato chips, fresh
500 gr
Pooato croquettes, deep frozen 500 gr.
1/4 chicken
Turkey steak
Fish fingers, deep frozen
Fillet of plaice, deep frozen
Calamari rings, deep frozen
Schnitzel
Camenbert
Parsley
Dumplings
Jam doughnuts
Banana fritters
Vegetable fritters
2*250 gr.
2*250 gr.
300 gr.
300 gr.
300 gr.
200 gr.
4 x ½ pkt
4
4
2
500 gr.
23
180
180
first 170
then 180
180
first 170
then 180
8-10
4-6
4-6
2-4
3-5
1-2
3-5
180
180
180
170
170
180
180
180
170
180
180
180
8-10
3-5
4-6
3-5
3-5
5-7
2-3
2-3
6-8
6-8
3-4
8-10
Food remains left in the oil must be
removed before the fryer is used
because of fire risk!
If you should want to use both the grill
and the fryer, for instance to make a
beef steak with french fries, the
following method may be used:
side and switch on the fryer. After a
few minutes the oil is once again hot
enough and the chips may be fried
until they are crispy.
Dinner is now ready to be served.
1. Prepare the fryer to use by
removing the grill grid and box for
lava blocks, and turn the grill elements
upright. Heat the oil to 190˚C (Approx.
10 minutes). Put the chips into the
basket and lower it in the heated oil.
Boil the chips almost ready (crispy
an light brown). Hang the basket for
dripping on the bracket and place it
thereafter on kitchen paper.
Switch off the fryer.
2. The grill is used as follows:
install the lava blocks box, lower the
grill elements and lay on the grill grid.
Preheat on setting 12 for about 5-8
minutes before laying on the beef
steaks. Fry the steaks (10-15 minutes
form rare to well done).
Switch off the grill.
3. Then place the steaks on a serving
platter and keep warm. The French
fries can now be finished. Take off the
grill grid. Turn up the grill elements
and remove the lava block box. Use
kitchen gloves as the grill is hot.
Turn the grill elements down along one
24
28
325 88-4730 Rev. 1-013