1
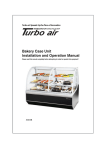
CONTENTS
INTRODUCTION
SAFETY STICKERS
INSTALLATION INSTRUCTIONS
1
2
3
Inspection for damage
Location of DELI-CASE
Leveling of DELI-CASE
PACKAGING MATERIAL
LIGHTS
SHELVES
ELECTRICAL INFORMATION
WIRING DIAGRAM
OPERATING IBSTRUCTIONS
4
4
4
5
6
7
Controls
Anti Moisture
How to place product
Shelf placement
Replacement of light
7~8
8
9
MAINTENANCE & CLEANING
Cleaning daily
Cleaning weekly
Condenser Coil
10
11
TROBLE SHOOTING
DELI-CASE not working
DELI-CASE warm
Glass sweating
Light not working
12~15
12
WARRANTY STATEMENT
Load Line
SPECIFICATIONS
DELI-CASE Unit
MODEL
COMP H.P
V/Hz
TD-4R
1/2
115V/60Hz
TD-5R
1/2
115V/60Hz
TD-4
115V/60Hz
TD-5
115V/60Hz
* TD-4, TD-5(Non Refrigerated)
REFERIGERANT
R-134a
R-134a
-
AMPS
12
12
1.1
1.1
WEIGHT
750 lbs
825 lbs
640 lbs
695 lbs
INTRODUCTION
This owner’s manual has important information. Please read the entire manual before
installing your new Turbo air refrigerated DELI-Case.
After reading manual if you have any questions, please fill free to call:
CUSTOMER SERVICE DEPARTMENT
TURBO AIR
1250 VICTORIA ST.
CARSON, CA 90746
1-800-381-7770
1-800-627-0032
Please write down model and serial number for making any reference to this unit.
CASE MODEL
SERIAL NUMBER
WARNING!
Failure to read this manual completely can result in personal injury or damage to the unit.
Keep manual in a safe place to refer to in the future.
WARNING!
Electrical must be installed by a licensed electrician.
On page 6 and 16 is information for electrician.
WARNING!
All electrical wiring must be done in accordance with all applicable standards.
Improper connections of electrical can result in death or severe injury.
Thank you for purchasing Turbo Air!
SAFETY STICKERS
The following signs are thru out Turbo Air DELI-Case. If any are missing, Pleae
call Customer Service so the sticker can be sent to you.
DANGER HIGH VOLTAGE-This sticker is on back of DELI-Case.
CAUTION-This sticker is below the DELI display pan.
! CAUTION-This sticker is on back of DELI-Case.
Please follow all safety warnings on stickers. Make sure all employees understand
warnings. Have all employees read manual for your and their safety.
Please be sure person who installs DELI-Case understands safety warnings and
has read manual.
If service technician services unit make sure they understand safety warning on
stickers. Please keep manual handy for future use for technician.
All stickers are pleaced for your protection. Please never remove stickers. If stickers
become lost or damaged call Customer Service so the stickers can be replaced.
!!! When you see this symbol, please be alerted. This will be seen thru the manual
and on stickers.
WARNING!
Please follow all instructions and all warnings for your safety.
INSTALLATION INSTRUCTIONS
INSPECTION FOR DAMAGE
Customer is responsible for checking for damage. First inspect crate as soon sa it arrives. Prior
to signing if crate is damaged make sure you note that on bill of lading.
If after uncrating there is concealed damaged and crate was in good condition you must call
Customer Service at Turbo Air. Concealed damage must be reported within 24 hours of receiving
unit. bill of lading will be requested faxed to claim department. Pictures may be requested of unit
and crating.
LOCATION OF DELI-CASE
Installation clearance:
86 inch at the top, 20 inch at the rear and 12 inch at the each side.
! CAUTION; Damage to case and glass can result if pushed on. Do not push curved
glass, end glass, doors or door frames.
Do not place DELI-Case in the following locations; near source of heat, excessive air movement,
open doors, and direct sunlight.
Move the DELI-Case to the final location before removing shipping skid.
Condenser is in back of DELI-Case. Do not block inlet.
LEVELING OF DELI-CASE
Four leveling legs are provided for leveling DELI-Case.
Use a leveler to make sure unit is leveled on all four corners.
If unit is not leveled drainage of water will not drain properly and doors will not close properly.
Leveling legs can be adjusted accordingly.
PACKAGING MATERIAL
Remove all tape that holds lift up glass and doors in place. Some residue will be left and
this can be removed with glass cleaner.
Remove all plastic ties that hold shelves and brackets for shelves.
LIGHTS
Make sure lights are in their lamp holders. Also make sure plugs for lamp holders are
completely plugged in. If they are loose it may cause lamp holder to burn.
SHELVES
To install shelves in desired position front glass must be open and rear doors removed.
Where shelf height is desired install the shelf support in shelf standard slot (see drawing)
Install shelves on rear shelf support as shown. Curved part of shelf must be toward rear
of case if not air flow will be blocked. Snap shelf into retainer clip on the shelf support,
this keeps shelf from moving (see drawing)
ELECTRICAL INFORMATION
!!! DELI-CASE MUST BE GROUNDED
Only a licensed electrician must install all electrical on DELI-Case.
All electrical must be done in accordance with applicable electrical standards.
A dedicated breaker is to be used for each DELI-Case.
Electrical must be grounded upon installation
An access hole is provided thru base of case for running electrical up through floor. Also
a hole is provided in the back of unit to run electrical. Unit is designed to be hardwired
by electrician. Electrical data is located next to electrical junction box (see drawing)
The DELI-Case comes with a power with a power cord. Cord is 9.8 feet long. the plug is a
.
!!! Improper electrical connections can result in servere injury or death.
!!! Do not operate DELI-Case with panels or grill removed.
There are two back panels.
Right side panel has light switch, power switch, thermostat, and thermometer. Also
compressor service ports, electrical condensate drain pan, fuses, and main board are
accessible.
Left side panel allows access to electrical connection box, ballast, and also allows
condenser unit to be pulled out.
Front panel is removable to have access to fans.
WIRING DIAGRAM(TD-4R, TD-5R)
WIRING DIAGRAM(TD-4, TD-5)
OPERATING INSTRUCTIONS
After installing unit and all electrical to DELI-Case, unit is ready to start up.
CONTROLS
POWER SWITCH:It is labeled with on/off position. It controls power to the entire
DELI-Case.
LIGHT SWITCH:The switch controls the power to the lighting circuit.
The switch rocker is red in the “on” position, black in the “off” position.
TEMPERATURE CONTROL:
TD-4R
TD-5R
1. The controller(thermostat) is locatef at the right inside of the unit.
2. The factory setting for the control is Normal
3. To lower temperature, depress down button to incrase temperature, depress up button
4. This product is for controlling temperature from 34 ᵻ to 48ᵻ
5. The thermostat controls compressor’s on/off by sensing inside temperature.
THERMOMETER: Display changes temperature approximately every two seconds.
NOTE:
Before placing goods to DELI-Case wait for unit to reach desired temperature. Product
must be could before placing in DELI-Case.
ANTI MOISTURE FANS:These fans run continuously when power switch is on. Two
fans are at front bottom of unit. The fans blew warm air through vents and prevent
from glass from getting moisture. Do not block vents because front glass will get moisture.
HOW TO PLACE PRODUCT:Check that display pans are positioned correctly before
placing goods in DELI-Case(see drawing). Do not overstock shelves. Display pans
should not hang over shelf. This will cause pan to block air flow and DELI-Case will
warm up in temperature. This will cause product to spoil.
SHELF PLACEMENT:
The shelves can be installed slanted or straight. To make the shelf slanted do the following;
a. Shelf needs to be removed from shelf support.
b. Shelf support needs to be held at each end.
c. Shelf support needs to be lifted at the back till bracket can inserted into shelf standard slots.
Refer to drawing of pages4.
ADJUSTING SHELF LEVEL
Shelves can be sdjusted up or down. To move shelves do the following;
a. Lights must be turned off.
b. Grasp plug for light cord and unplug.
c. Shelves must be removed from shelf support.
d. Hold onto each end of shelf support.
e. Shelf support needs to be moved up until it can removed from shelf standard.
f. Shelf can be repositioned in increments of two inches.
REPLACEMENT OF LIGHT
When replacing lights use same model of light installed in DELI-Case. Using wrong
wattage can cause ballast to burn out or light not work.
To remove light there is two lamp holders one at each end of light. One has a spring in
socket. Push light toward spring loaded lamp holder till other end of light pops out of
other lamp holder.
Remove light from lamp shield and insert ner light into lamp shield. Reinsert into lamp
holders. Never install lamp without shield.
MAINTENANCE & CLEANING
!!! Always before cleaning DELI-Case unit should be turned off at power switch and lights
should be turmed off. Removed product and allow display to resch room temperature.
!!! Do not wet electrical components.
DELI-CASE SHOULD BE CLEANED THOROUGHLY BEFORE FIRST USE.
CLEANING DAILY
a. Do not clean with detergents. Use a mild soap.
b. If door track is dirty remove doors. Keeping door track clean allows for doors to slide
easily. Food silicone can be sprayed on rollers and track.
c. Clean glass with window cleaner.
d. Exterior and interior can be cleaned with warm water and mild detergent.
e. Wipe with damp cloth. Do not leave residue of soap.
CLEANING WEEKLY
This procedure is necessary to keep a sanitized DELI-Case. Procedure may have to be done
more than once a week if necessary.
EXTERIOR CLEANING
a. Clean front glass with window cleaner.
b. Clean exterior with warm soapy water. Wipe down with damp cloth.
INTERIOR CLEANING
a. Grasp plug for light cord and unplug.
b. Remove shelves.
c. Remove shelf support from shelf standard slots.
d. Remove both thumb screws holding shelf standard and removed shelf standards.
e. Remove display pans.
f. Wash all parts with warm soapy water and rinse. Allow to dry.
g. Clean inside of unit with warm soapy water. Wipe down with damp cloth. Allow to dry.
h. Put unit back together in reverse order starting with step.
MAINTENANCE CONTINUED
CONDENSER COIL
a. Turn off unit at power switch. Disconnect power to unit.
b. Remove rear grill.
c. Clean condenser by either brushing off with stiff wire brush or vacuuming with
wet/dry vacuum. Condenser is black and looks like a radiator. This should be
cleaned every month or as necessary. Keeping clean allows for maximum cooling
of unit and long life of compressor.
LOAD LINE
TROUBLE SHOOTING
For any problems with DELI-Case please refer to following check list. If still having a
problem or need to ask a question please call Customer Service at 1-800-381-7770 or
1-800-627-0032
DELI-CASE NOT WORKING
a. Check to see if breaker is not tripped.
b. Check power gowing to unit.
c. Check thermostat is set at on position.
d. Check power switch is on.
DELI-CASE WARM
a. Check condenser to see if clean.
b. Check that doors and curved glass are closed tightly.
c. Check that shelves are installed properly.
b. Check that air flow inside of unit is not blocked with product or pans.
GLASS SWEATING
a. Check that there is nothing on top of curved glass.
b. Check to see that there are no overhead vents, air ducts, or fans.
c. Check temperature of room. DELI-Case is designed to operate in an ambient
temperature of 75 degrees Fahrenheit and 55% relative humidity.
d. Check temperature of DELI-Case. Unit should be between 37 and 40 degrees.
e. Check that air is flowing inside front of DELI-case. if there is no air flow or air
is felt on only one side this is due to anti moisture fans are not working. Customer
Service needs to be called.
LIGHTS NOT WORKING
a. Check that light switch is on.
b. Check that lamp cord is plugged in correctly.
c. Check that light is in lamp holder correctly.
WARRANTY STATEMENT
Warranty Claims
All claims for labor or parts must be made directly through Turbo Air.
If unit was manufactured more than one year, proof of purchase must be faxed in or sent
with claim.
All claims should include: model number of the unit, the serial number of the cabinet,
and all pertinent information supporting the existence of the alleged defect.
If compressor is replaced under warranty, Turbo air will either request the compressor or
compressor tag be returnd.
Compressor or tag must be returned with all information related to the unit.
Any action or breach of these warranty provisions must be commenced within one year
after said cause of action has occurred.
One Year Parts & Labor Warranty
Turbo Air warrants to the original purchaser of every new Turbo Air refrigerated unit, the
cabinet and all parts thereof, to be free from defects in material or workmanship, under
normal and proper use and maintenance service as specified by Turbo air and upon
proper installation and start-up in accordance with the instruction packet supplied with
each Turbo Air unit.
Turbo Air’s obligation under this warranty is limited to a period of one (1) year from the
date of original installation or 15 months after shipment date from Turbo Air, whichever
occurs first.
Any parts, covered under this warranty, that are determined by Turbo Air to have been
defective within one (1) year of original installation or fifteen (15) months after shipment
date from manufacturer, whichever occurs first, is limited to the repair or replacement,
including labor charges, of defective parts or assemblies.
The labor warranty shall include standard straight time labor charges only and reasonable
travel time, as determined by Turbo Air.
Additional Four Compressor Warranty
In addition to the one (1) year warranty stated above, Turbo Air warrants its hermeticallt
sealed compressor to be free from defects in both material and workmanship under
normal and proper use and maintenance service for a period of four (4) additional year
from the date of original installation, but not to exceed five (5) years and three (3)) months
sfter shipment from the manufacturer.
Compressor determined by Turbo Air to have been defective within this extended period
will, at Turbo Air’s option, be either repaired or replaced with a compressor or compressor
parts of similar design and capacity.
The four (4) year extended compressor warranty applies only to hermetically sealed parts
of the compressor and does not apply to any other parts or components, including, but not
limited to, cabinet, paint finish, temperature control, refrigerant, metering device, directs,
motor starting equipment, fan assembly or and other electrical component, etcetera.
404A / 134A Compressor warranty
The four-year compressor warranty detailed above will be voided if the following procedure
is not carefully adhered to:
1. This system contains R404A or R134A refrigerant and poly-ester lubricant.
The poly-ester lubricant has rapid moisture absorbing qualities.
2. Direct replacement is very important and must be changed when system is opened for
servicing.
A 620 copper drier or better is highly recommended.
3. Micron level vacuums must be achived to insure low moisture levels in the system.
500 microns or lower must be obtained.
4. When compressor is grounded, suction filter drier and 620 drier or better must be rep
laced.
5. Compressor must be obtained through Turbo Air Inc., unless otherwise specified in
writing, through Turbo Air’s warranty department.
What Is Not Covered By This Warranty
Turbo Air’s sole obligation under this warranty is limited to either repair or replacement
of parts, subject to the additional limitations below.
This warranty neither assumes nor authorizes any person to assume obligations other
than those expressly covered by this warranty.
No consequential damages.
Turbo air is not responsible for economic loss ; profit loss;
or special, indirect, or consequential damages, including without limitation, losses,
or damages arising from food or product spoilage claims whether or not because of
refrigeration failure.
WARRANTY IS NOT TRANSFERABLE
This warranty is not assignable and applies only in favor of the original
purchaser / user to whom delivered.
Any such assignment or transfer shall void the warranties herein made and shall void
All warranties, express or implied, including any warranty of merchantability or fitness
For a particular purpose.
IMPROPER USAGE.
Turbo air assumes no liability for parts or labor coverage for component failure or other
damages resulting from improper usage or installation or failure to clean and / or
maintain product as set forth in the warranty packet provided with the unit.
ALTERATION, NEGLECT, ABUSE, MISUSE, ACCIDENT, ADAMAGE DURING
TRANSIT OR INSTALLATION, FIRE, FLOOD, ACTS OF GOD.
Turbo Air is not responsible for the repair or replacement of any parts that Turbo Air
determines have been subjected after the date of manufacture to alteration, neglect, abuse,
misuse, accident, damage during transit or installation, fire, flood, or act of God.
IMPROPER ELECTRICAL CONNECTIONS
Turbo air is not responsible for the repair or replacement of failed or damaged component
Resulting from electrical power failure, the extension cords, low voltage, or voltage drops
to the unit.
NO IMPLIED WARRANTY OF MERCHANTABILITY OR FITNESS FOR A
PARTICULAR PURPOSE:
There are no other warranties, expressed, implied or statutory, except the one (1) year
Parts & labor warranty and the additional four (4) year compressor warranty as
described above.
These warranties are exclusive and instead of all other warranties, including implied
Warranty and merchantability or fitness for a particular purpose.
These are no warranties, which extend beyond the description on the face hereof.
OUTSIDE U.S.AND CANADA:
This warranty does not apply to, and Turbo Air is not responsible for, any warranty
claims made on products sold or used outside the United state and Canada.
1250 Victoria street
carson, CA 90746
U.S.A & Canada Toll Free 1-800-627-0032
For Service 1-800-381-7770
TEL:310-900-1000
FAX:310-900-1077
www.turboairinc.com