1
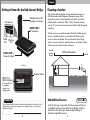
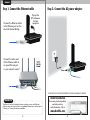
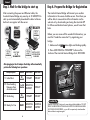
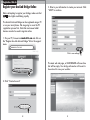
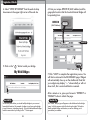
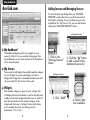
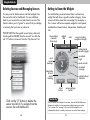
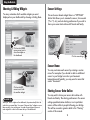
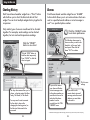
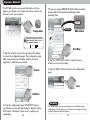
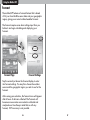
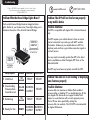
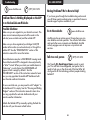
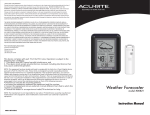
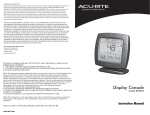
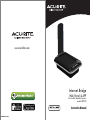
www.AcuRite.com
Internet Bridge
Web Portal & APP
®
for AcuRite Weather Sensors
model #09150
C O M P A T I B L E
ACU-LINK INST 010412
Instruction Manual
Contents
1
2
Introduction: About the Acu-Link Internet Bridge
Getting to Know the Acu-Link Internet Bridge
Section 1: Connect
3
Choosing a location
4
Connecting the cables
7
Prepare the Bridge for Registration
Section 2: Registration - Web site
8
Register online
Whatʼs in the box?
Internet
Bridge
Section 3: Using the Web site
12 Overview
13 Adding Sources & Managing Sensors
15 Widget Overview
16 Managing Widgets
17 Sensor Settings
18 Charting History
19 Alarms
20 Weather Select Widgets - Forecasting, etc..
22 Following a Friendʼs Bridge/ Sharing Your Bridge
Section 4: Registration - Mobile APP
26 Register using the mobile APP
Section 5: Using the APP
30 Overview
31 Records
32 Sensor Settings
33 Alarms
34 Dashboard Viewing Mode
36 Forecast
Ethernet
Cable
(included)
AC Power
Adapter
What do I need?
(not included)
1. Network router with an available Ethernet port
2. “Always On “Internet connection
3. PC or Smart phone for registration
4. AcuRite weather sensor(s)
How does it work?
AcuRite weather sensors collect and broadcast current conditions
such as temperature and wind speed. The Bridge receives weather
data from Acu-Link compatible AcuRite weather sensors. The
Bridge connects to your existing home internet router via a
standard network cable. The information is automatically streamed
to the internet to allow you to monitor home weather conditions
remotely on a smart phone and PC.
12:34 PM
Section 6: Troubleshooting and Information
38 Troubleshooting
43 Contact Us
44 Product Information & Registration
45 Warranty and FCC Information
www.AcuRite.com
Introduction
FREE APP for
Android and iPhone
FREE WEB SITE
for PC access
AcuRite Sensor(s)
Router
Bridge
(877) 221-1252
1
Connect
Getting to Know the Acu-Link Internet Bridge
Weather Sensor RF
Reception antennae
Connections
STATUS LIGHT 2
RF Reception
Power Ethernet
Port
Port
Choosing a location
The Acu-Link Internet Bridge receives data from sensors via
433mhz wireless radio frequency. Reception range of the
signal from sensors can be limited by very thick concrete or
metallic walls or materials. Other “noisy” electronic devices
such as TVʼs and microwaves may also interfere with the signal
reception.
To help ensure a successful reception from the AcuRite sensors,
choose a suitable location no more than 330 feet from the
sensor to place the Bridge. Choose a location free of large
stone or concrete surfaces, metallic surfaces, and place at least
3 feet away from other electronic devices.
Acu-Link
Internet
Bridge
STATUS LIGHT 1
Network Uplink
330 feet Maximum
(100 meters)
sensor(s)
(bottom)
Register Button
DEVICE I.D.
(MAC Address)
A unique ID that
is needed to
register your
bridge online.
Add Additional Sensors
Acu-Link Tip
You will need the MAC address number that is printed on the bottom of the
bridge when it comes time to register your bridge online, so write it down
and keep it handy!
2
C O M P A T I B L E
Look for this logo on products that have sensors that are
compatible with your Acu-Link Internet Bridge. Visit the
web site for the most up to date complete listing of
Acu-Link compatible sensors.
3
Connect
Step 1. Connect the Ethernet cable
Step 2. Connect the AC power adaptor
flip-up the
RF Antennae
for best
reception
Connect the Ethernet cable
to the Ethernet port on the
Acu-Link Internet Bridge
Connect the other end
of the Ethernet cable to
an open Ethernet port
on your network router*
YOUR PRODUCT MUST BE REGISTERED TO RECEIVE WARRANTY SERVICE
Acu-Link Tip
Acu-Link will work with standard routers, wireless routers, and Ethernet
hubs the same, as long as there is an available Ethernet port and an active
“always on” internet connection available.
4
PRODUCT REGISTRATION
To receive product updates,
warranty service,
and information, Go to
www.AcuRite.com
Register a Product
5
Connect
Step 3. Wait for the bridge to start up
Step 4. Prepare the Bridge for Registration
After connecting the power and Ethernet cable, the
Acu-Link Internet Bridge may need up to 30 MINUTES to
start up and automatically download the latest software
before it can register with the server.
The Acu-link Internet Bridge will transmit your weather
information to the secure AcuRite servers. From there you
will be able to view and track this information via the
web site or by downloading and using the Acu-Link APP
for iPhone and Android smart phones, we will cover that
later.
WAIT
READY
STATUS
LIGHT 2
STATUS
LIGHT 2
STEADY
BLINKING
Before you can access all this wonderful information, you
must first “make the connection” by registering your
bridge.
1. Make sure that BOTH status lights are blinking rapidly.
STATUS
LIGHT 1
BLINKING
STATUS
LIGHT 1
MAY TAKE
UP TO
30 MINUTES
BLINKING
BOTH LIGHTS
ALTERNATING
BLINKING
After plugging in the AC adapter the bridge will automatically
perform the following boot operations:
Startup Sequence
1 Initial Boot
2 Downloading
firmware from
Acu-Link server
3 Re-Booting
4 Ready for Use
duration
STEADY
STEADY
5 to 30
minutes
BLINKING
RAPIDLY
STEADY
30
seconds
STEADY
STEADY
6
BLINKING
STATUS LIGHT 1 STATUS LIGHT 2
30
seconds
READY
2. Press AND HOLD the “REGISTER” button on the
bottom of the Acu-Link Internet Bridge for 4 SECONDS.
BLINKING BLINKING
RAPIDLY
RAPIDLY
BLINKING
Acu-Link Tip
Press the “REGISTER” button only once during initial installation. DO NOT
PRESS THE REGISTER BUTTON AGAIN AFTER YOUR BRIDGE HAS BEEN
SUCCESSFULLY REGISTERED, or you will lose previously stored weather
data and have to register again!
7
Registration - Web site
Register your Acu-Link Bridge Online
Before attempting to register your bridge, make sure that
BOTH status lights are blinking rapidly.
3. Enter in your information to create your account. Click
“SAVE” to continue.
The Acu-Link Internet Bridge can be registered using a PC
or on your smart phone. We are going to cover the PC
registration process first. Note that most newer tablet
devices can also be used to register online.
1. On your PC, browse to www.AcuRite.com and click on
the “Register Acu-Link Internet Bridge” link in the support
menu.
www.acurite.com
Click to save settings
The main web site page, or DASHBOARD will now show
but will be empty. Your bridge information still needs to
be entered to view your weather.
2. Click “Create Account”
8
9
Registration - Web site
4. Select “SETUP MY BRIDGE” from the web site drop
down menu in the upper right corner of the web site.
6. Enter your unique DEVICE ID (MAC address) and the
geographic location that the Acu-Link Internet Bridge will
be operating from.
DEVICE ID
(MAC Address)
Acu-Link Tip
5. Click on the “ + ” button to add your bridge.
My Web Bridges
Click to save settings
7. Click “SAVE” to complete the registration process. You
will then be returned to the DASHBOARD page. Widgets
will automatically show up on the dashboard. Note that
your widgets may display “-- --” values initially or will not
show at all, this is normal until data is received.
After a minute or so, press your browserʼs “REFRESH” or
“RELOAD” button to refresh the page.
Acu-Link Tip
Acu-Link Tip
The Acu-Link system allows you to add multiple bridges to your account
from multiple locations (for example- a bridge at your home and a bridge
at your business or at another property). You would add additional bridges
from this same window by clicking on the “+” button again.
10
The “Name” that you type will appear on the dashboard as the bridge
name. It will also appear on the title bar of each widget. This helps to
identify multiple bridges and locations, as well as allowing you to
personalize your weather.
11
Using the Web site
Acu-Link.com
Adding Sources and Managing Sensors
For each Acu-Link web bridge there is a “MANAGE
SENSORS” window that shows you all the sensors that
the bridge is receiving. If you want these sensors to be
available in the “My Sources” list, you can add them by
clicking the “MANAGE SENSORS” button.
B
C
Manage Sensors
A
A
My Dashboard
The dashboard displays all of your widgets for your
sensor(s), think of it as your weather home page. From
the dashboard you can access and use all of the features
of the Acu-Link system.
B
2. Click the “ + ” button
to add a sensor to the
dashboard source list
My Sources
The sources list will display the available weather widgets
for your bridge. If you are subscribing to a friendʼs
bridge, that bridge and itʼs available shared sources will
show up under the “My Sources” list as well.
C
1. Click on the
“Manage Sensors”
button
Manage Sensors
Widgets
Each weather category is given itʼs own “widget” that
will display the latest information as well as the daily and
weekly records. Each widget also allows you to chart the
data and set alarms for that weather category. Most
widgets will also have a “settings” button which allows
you to rename the sensor, set sharing and unit
preferences (ºC or ºF, etc.)
12
3. Click “SAVE”
4. Sensor data
now available
13
Using the Web site
Deleting Sources and Managing Sensors
Getting to Know the Widgets
You may want to delete sensors and their widgets from
the source list and/or dashboard. You can add them
back to your sources list at a later time if you wish. This
function allows you to “ignore” a sensor that your bridge
is receiving that you have no interest in.
For each battery powered sensor there is at least one
widget that will show a specific weather category. Some
sensors will have more than one widget. For example, a
5-in-1 sensor will have a separate widget for wind speed
and direction (shown below), temperature, humidity and
rain.
PLEASE NOTE that the specific sensor history data and
charting will be ERASED from the server if you click the
red “X” button to remove it from the “My Sources” list.
close widget
(remove
from view)
widget
title
units
sensor wireless
reception strength
My Bridge - Wind
today/week
records toggle
recorded
high
most
recent
readings
reset records
recorded
average
time/date
of most
recent
reading
alarm button/
indicator
chart
button
Click on the “X” button to delete the
sensor and all of itʼs widgets from the
sources list and dashboard.
14
sensor settings
button
Acu-Link Tip
The 5-in-1sensor wind widget is shown here, there will be little differences
between the widgets, such as temperature widgets having a recorded
“low” instead of an “average”. Also note that the widgets do not
automatically refresh, so refresh your browser to see the latest readings.
15
Using the Web site
Showing & Hiding Widgets
Sensor Settings
You may customize which weather widgets you want
displayed on your dashboard by showing or hiding them.
For each sensor based widget there is a “SETTINGS”
button that allows you to rename the sensor, choose units
(ºF or ºC, etc), and set sharing preferences if you wish to
share your sensor data online with friends and family.
Wind - Backyard 5N1
My Bridge - Wind
SHOW
Click on the GREEN
arrow source icon to
show the widget on
the dashboard
Click to save settings
Sensor Name
You may customize each sensor by entering a custom
name. For example- if you decide to add an additional
sensor to your bridge to monitor your basement
temperature and humidity, you may want to name that
sensor “basement”.
HIDE
Click on the RED
arrow icon to hide
the weather widget
Acu-Link Tip
When you “show” widgets on the dashboard, they automatically tile in the
order that you expand them. You cannot ”drag and drop” widgets or move
them around in your web browser. So make sure and expand your most
used widget first so that it will be near the top of the dashboard.
16
Sharing Sensor Data Online
You may wish to share your sensor data online with
friends and family. The sharing preference in the sensor
settings panel determine whether or not a particular
sensor will be visible to people following your bridge.
This will be covered in greater detail in the “Sharing”
section of this manual.
17
Using the Web site
Charting History
Alarms
Each Sensor-based weather widget has a “Chart” button
which allows you to chart the historical data of that
widget. You can chart multiple widgets history together for
comparison.
Each Sensor-based weather widget has an “ALARM”
button which allows you to set custom alarms. Alerts are
sent to a specified e-mail address or a text message is
sent* to a specified phone number.
Only similar types of sensors are allowed to be charted
together. For example, wind readings can be charted
together, but not wind and temperature readings.
My Bridge - Wind
My Bridge - Wind
Click the “ALARM” button
to set alarm preferences
Click the drop down menu to
choose a value you wish to be
alerted to, in this case 1mph
wind speed. Then click the
alarm “ON” to activate.
Click the “CHART”
button to view chart
Click the “HIDE” button to
hide the chart temporarily.
Press “SHOW” to slide the
chart out again.
555 555 5555
[email protected]
AcuRite 5n1-Wind
The drop down menu allows you to
choose a charting period of either
Today, This Week, or This Month.
You may need to wait a moment
for the chart to draw after
changing the charting period, as
the historical data needs to be
processed.
If you wish to receive
your alarm notification
via text message, enter
in the phone number you
want alerts to be sent to
and select the phone
numbersʼ service
provider from the “CELL
CARRIER” menu.
Click to save
settings
If you wish to also
receive alerts via e-mail
message, enter the e-mail
address you want alerts
to be sent to.
* Standard text messaging and data rates apply, check with your phone service provider for pricing.
18
19
Using the Web site
Weather Select Widgets
Weather Select Widgets can be customized to show
additional weather information, like a weather forecast
based on your actual weather sensors connected to your
bridge. You may add multiple Weather Select widgets to
your dashboard.
1
Click on the GREEN
arrow source icon to
add a weather select
widget on the
dashboard
2
Choose which sensor you
want the forecast to use
for temperature and
humidity data. If you
only have one sensor,
only one will be listed.
Click “GEOGRAPHIC REGION”
to specify your geographic
region preset that will be used
to increase the accuracy of your
forecast.
Click on the drop down menu
to select which type of
weather select widget you
want.
Weather Select
4 Hr. Forecast,
4-8 Hr. Forecast,
8-12 Hr. Forecast,
...more to come!!
3
4
5
Weather Select
Click the “SETTINGS” to
specify a sensor to use for the
forecasting data source and
to select your geographic
region preset.
20
Click to save settings
Multiple weather select widgets can be added to the
dashboard. Please note that weather forecast widgets
need a few hours of history data to display a forecast.
21
Using the Web site
Sharing - An Overview
Acu-Link gives you the option of sharing your Acu-Link
Internet Bridge information with friends and also allows
you to publish your weather data to weather underground
(wunderground.com), a popular weather community web
site. We are going to cover following a Friendʼs Bridge
first.
Next, enter in the MAC address of the bridge you wish
to follow. Give the bridge a Nickname to differentiate it
from your own bridge or from other bridges you may be
following. This Nickname is only visible to you and your
account.
Follow a Friendʼs Bridge
To follow a bridge, click on “Follow my Friendʼs Bridge” in
the drop down menu.
Dadʼs Bridge
Click to save settings
My Bridge
The followed Bridge will now
show in “My Sources” list
and you will see sensors and
widgets that are being
shared.
Dadʼs Bridge
Acu-Link Tip
An Acu-Link Internet Bridge is not needed to simply follow a friendʼs
Bridge. For example, if you want your neighbor to be able to follow your
weather, simply have them CREATE AN ACCOUNT of their own. Then give
them your Bridge MAC address and have them follow your bridge.
22
23
Using the Web site
Share My Bridge
3 Fill in the required fields to begin sharing your data
Acu-Link features an option that allows you to publish your
weather data to a 3rd party weather community web site
www.weatherunderground.com.
1 To publish your Acu-Link data to weather underground,
you will first need to create an account on weather
underground. You can do this on
www.wunderground.com at this address:
with weather underground.
B. Select the sensor from the
drop down menu that you
wish to publish the data
from.
A. Select your bridge
from the drop down
menu. If you have more
than one bridge, they
will all be listed here to
choose from.
If you have multiple sensors,
they will all be listed here to
choose from.
http://www.wunderground.com/wxstation/signup.html
2 After successfully creating your weather underground
account and adding a weather station, return to
Acu-Link.com web site and click on “Share My Bridge”
in the drop down menu.
C. Type in your weather
station ID that was
provided by weather
underground.
E. Check the box to “Enable
Weather Underground
Sharing” then Click “SAVE”
to finish.
D. Type in the password
to your weather
underground account
24
25
Registration
Registration -- Mobile
Mobile APP
APP
Registering your Acu-Link Bridge on an
iPhone® or Android® Device
3. Tap the “CREATE NEW ACCOUNT” button. If you
already have an Acu-Link account simply enter your
e-mail and password and login.
The Acu-Link Internet Bridge can be registered on your
smart phone if you do not wish to register on a PC. You
will need to download and install the FREE Acu-Link APP.
Note that changes made on the APP will be reflected in
the web site as well - such as label name changes and
sharing options, etc.
If you already created an
account on the Acu-Link web
site, you do not need to
create another account on
the APP. Simply enter in the
e-mail and password you
created for the web site.
1. Download the Acu-Link APP from the Apple APP store
if you have an iPhone/ iPod Touch/ iPad. Download from
the Android Market if you have an android device.
acu-link
INSTALL
Acu-Link
4. Fill in your account information to create your account.
APP
2. After you have installed the Acu-Link APP, tap on the
icon to open the application.
The “Nickname” that you
enter will appear on the
dashboard as the bridge
name. It will also appear on
the title bar of each weather
page. This helps to identify
multiple bridges and
locations, as well as allowing
you to personalize your
weather. Note that if you
enter in a nickname or e-mail
address that is already taken
you will receive an error
message.
Acu-Link Tip
The iPhone APP is shown in this manual, the Android APP is similar. Android
specific operations will be highlighted with a “
” in this instruction manual
26
27
Registration - Mobile APP
The APP will not show any sensor information until you
register your bridge. Your bridge information needs to be
entered to view your weather.
7. Enter your unique DEVICE ID (MAC address) and the
location that the Acu-Link Internet Bridge will be
operating from.
123456000000
Configuration
Android Users press the “Menu”
button within the APP to access
the configuration menu
My Bridge
Acu-Link Tip
MAC Address
1234 Any Street
City
or
View Map
MA
5. Tap the “wrench” icon on the top right of the display
to access the configuration page. The configuration page
allows you to edit your nickname, location, Acu-Link
registration, notifications and e-mail.
Account
12345
8. Tap the “VIEW MAP” button to verify that your
location is correct on the map.
9. Tap the “SAVE” button to return to the configuration
page.
123456000000
Save
My Bridge
Activation
6. From the configuration page “ACCOUNT” tab you
can activate your Acu-Link web bridge or logout from the
APP. Tap the “Activation” button now to register your
web bridge.
28
Acu-Link Tip
The “Bridge Name” that you type will appear on the dashboard as the
bridge name. It will also appear on the title bar of each widget. This helps
to identify multiple bridges and locations.
29
Using the Mobile APP
Acu-Link APP
Records
The APP is available for iPhone and Android and
organizes your weather information into “Weather Pages.”
These pages are organized by category: temperature,
humidity, wind, rainfall, pressure, forecast. This allows you
to view your weather details in a familiar way- “what is the
temperature outside?” or “How windy is it?”
weather page
title
configuration
menu access
Android
most
recent
readings
time/date
of most
recent
reading
records
weather
page
refresh
button
or
*multi-sensor
navigation
sensor
reception
strength
todayʼs
records
*multi-sensor
navigation
66º
+10º
58 / 81
29 / 97
77 77 76 74 73 73
66º
alarm button/
indicator
sensor settings
+10º
hours/days
history toggle
Each weather page has
a quick glance at the
previous hours/days of
weather readings
quick history
chart
weather
page access
pages will have more than one sensorsʼ data to
* Weather
display if you have multiple sensors reporting to the
bridge. If you have multiple sensors available in any
weather page, you may browse between them using the
“multi-sensor navigation” arrows.
30
Each Sensor-based weather page shows a quick overview
of recent records as well as a “Records” button which
allows you to view long term records.
Touch the “Records” tab
for long term records
Touch the “Current” tab
to return to the current
readings view.
Acu-Link Tip
Note that if you remove a sensor using the APP or the web site
(www.acu-link.com) you will also lose the records associated with that
sensor.
31
Using the Mobile APP
Settings
Alarms
Each Sensor-based weather page has a “SETTINGS” tab
that allows you to view additional information about the
sensor. One of the options shown on the settings tab is
“SENSOR NAME”. This allows you to customize your APP
to organize where sensors are physically located within
their environment, this can be especially helpful if you
have multiple sensors. For example, you may have a
sensor located in the yard and another one located near a
deck- so you may name one “YARD” and the other
“DECK”.
Each Sensor-based weather page has an “ALARM” tab
that allows you to set custom alarms. Alarm messages are
sent to a specified e-mail
address or a text message is
sent* to a specified mobile
phone number.
Click the “ALARM”
button to set alarm
preferences and to
turn the alarm on
or off
Tap to edit the sensor label
name
Choose “ENGLISH” (ºF) or
“METRIC” (ºC) display units
Allow this sensor to be visible to
other users that you are sharing
your bridge with
Press “REMOVE” if you no
longer want to view or track
this sensorsʼ data. CAUTION:
REMOVING this sensor will
erase itʼs history information as
well.
Touch the “Settings” tab
to view and/or edit specific
sensor settings.
Touch the “Current” tab
to return to the current
readings view.
Tap “SAVE” to save alarm settings
when you are finished
Tap to adjust the HIGH alarm
trigger value (if applicable)
Tap to adjust the LOW alarm
trigger value (if applicable)
Tap to enter/edit an E-MAIL
address that you want alert
e-mail messages sent to.
Tap to enter/edit a mobile
phone number that you want
alert TEXT* messages sent to.
* Standard text messaging and data rates apply, check with your phone service provider for pricing.
32
33
Using the Mobile APP
The Dashboard
The mobile APP features a unique “DASHBOARD” view
that you may customize with weather pages that you view
most often. To view your dashboard, simply rotate your
smart phone or mobile device 90º so that the display is in
the landscape, or horizontal format.
The dashboard will then automatically remember which
weather pages you swiped to add. Every time you view
the APP in horizontal mode, you will see your favorites on
the dashboard.
Rotate display 90º to
horizontal orientation
to view the dashboard
By default, the dashboard will be empty. You need to
choose which weather information you would like to add
to the dashboard. To add pages, first navigate to the
desired page in normal view (when your device display is
in vertical format). Then simply “swipe” (Android Users:
Long Press) across the page from RIGHT TO LEFT to add
the weather page data to your dashboard. You may add
up to 5 weather pages to the dashboard.
If you wish to remove a weather page from your
dashboard, simply swipe (right to left) right on the one
you wish to remove from within the dashboard and the
item will be removed from view in the dashboard.
Swipe left to right to REMOVE an item from the dashboard
Android Users use “Long Press”
Acu-Link Tip
If the dashboard view is not showing when you rotate your device, you
may have your screen orientation locked- check your mobile device
settings. Alternatively, some older devices do not have an alternate
orientation option- in that case the dashboard feature will not be available.
Swipe left to right to ADD
to the dashboard
Android Users use “Long Press”
34
35
Using the Mobile APP
Forecast
The mobile APP features a forecast feature that is based
off of your local AcuRite sensor data and your geographic
region, giving you a more localized weather forecast.
The forecast requires some basic settings input from you
before it can begin calculating and displaying your
forecast.
Forecast Page
Forecast Settings
Tap the wrench just above the forecast display to enter
into forecast settings. You may then choose the outdoor
sensor and the geographic region you wish to use for the
forecast.
After saving your selections, the forecast icons will appear
after 4 hours of data are collected. The Forecast will
become more accurate as more data is collected and
analyzed over time. Keep in mind that as with any
forecast, 100% accuracy is not possible.
36
37
Troubleshooting
Use this Troubleshooting guide to help you through any
issues. If you are still having problems, check the web site
or give us a call and we will be happy to help you out.
www.AcuRite.com
(877) 221-1252
Problem: No Power to Bridge
Problem: Bridge is not “Seeing” any Sensor(s)
Possible Solutions:
If your sensor data is not showing up or if the wireless
signal is displayed with an “X” on the web site or on the
mobile APP, the bridge is not picking up the sensor signal.
Make sure that the power adapter and power cable is
firmly connected and that power is being provided to the
Acu-Link Internet Bridge.
Possible Solutions:
Problem: I Canʼt Register Bridge on the APP/Web
Possible Solutions:
Make sure you have pressed the “REGISTER” button once.
Itʼs located on the bottom of the Acu-Link Internet Bridge.
Newer firmware may need to be downloaded. RESET THE
ACU-LINK INTERNET BRIDGE by PRESSING AND
HOLDING the “REGISTER” button for at least 12 seconds
OR unplugging the power adaptor for at least 2 minutes.
Make sure that DHCP is enabled on the router that the
Bridge is connected to. Most routers have DHCP enabled
by default.
Check your network router settings- if MAC address
filtering security is enabled, your router may be “ignoring”
outbound communication from the Acu-Link Internet
Bridge. Consult your home network router manufacturers
instruction manual for more information.
If security is enabled on your network, temporarily disable
it and try registering the Acu-Link Internet Bridge again.
You may have a malfunctioning router, reset your router or
try a different network connection port on your router.
38
Make certain that the sensor(s) have fresh batteries
installed. NOTE that it may take up to 20 minutes for the
Acu-Link Internet Bridge to re-synchronize with the sensor
when batteries are replaced. ALWAYS use lithium batteries
in outdoor sensors when the temperature is BELOW -4ºF
(-20ºC).
Make sure sensor(s) are within the 330 ft. wireless range.
Minimize large metallic or thick stone surfaces between
the sensor(s) and the Acu-Link Internet Bridge.
Make sure that sensor(s) AND the Acu-Link Internet Bridge
are at least 3 ft. away from “noisy” electronic devices and
appliances like computers, microwaves, TVʼs, etc.
RESET THE ACU-LINK INTERNET BRIDGE by PRESSING
AND HOLDING the “REGISTER” button for at least 12
seconds OR unplugging the power adaptor for at least 2
minutes.
Relocate the Acu-Link Internet Bridge and/or the wireless
sensor(s). Both units must be within 330 feet (100m) from
each other.
39
Troubleshooting
Please DO NOT return product to the retail store.
For technical assistance and product return information
PLEASE CONTACT US
Problem: What do those Bridge Lights Mean?
The Acu-Link Internet Bridge features integrated status
lights. Similar to your home router, these lights help you to
determine the status of the Acu-Link Internet Bridge.
STATUS
LIGHT 2
SENSOR RECEIVE
RF ACTIVITY
NETWORK
ACTIVITY
1 Initial Boot
2 Downloading
firmware from
Acu-Link server
3 Re-Booting
4 Ready for Use
(877) 221-1252
Problem: The APP will not load or run properly
on my mobile device
Possible Solutions:
The APP is compatible with Apple iOS or Android devices
only.
The APP requires your mobile device to have an active
internet connection to provide you with ANY weather
information. Make sure your mobile device is NOT on
airplane mode and has a good data connection signal or
local wifi access.
You may need to manually update the APP to the latest
version available on either the Apple APP Store or the
Android Market.
STATUS
LIGHT 1
Startup Sequence
www.AcuRite.com
The APP may have been corrupted, re-install the APP.
duration
STATUS LIGHT 1 STATUS LIGHT 2
30
seconds
STEADY
STEADY
5 to 30
minutes
BLINKING
RAPIDLY
STEADY
30
seconds
STEADY
STEADY
READY
40
BLINKING BLINKING
RAPIDLY
RAPIDLY
Problem: The web site is not loading or displaying
some features properly
Possible Solutions:
www.acu-link.com requires an Adobe Flash enabled
browser- either on desktop PCʼs or mobile devices. At this
time, Apple iOS devices do not support Adobe Flash
content, so some features will not work properly on an
iPad or iPhone when specifically visiting the
www.acu-link.com web site. The iOS APP is recommended
for Apple iOS devices.
41
Troubleshooting
U.S. BASED SUPPORT
www.AcuRite.com
(877) 221-1252
Problem: There is Nothing Displayed on the APP
or on the Acu-Link.com Web site
Possible Solutions:
Make sure you are signed into your Acu-Link account. The
same account name and password will be used on the
web site (www.acu-link.com) and the mobile APP.
Make sure you have registered your bridgesʼ MAC/ID
number either online (www.Acu-Link.com) or through the
mobile APP. See the “REGISTRATION” section of this
instruction manual for more information.
The mobile device may be in DASHBOARD viewing mode.
The mobile Acu-Link APP is designed to be used primarily
in “letter” format. When you rotate your mobile device to
“landscape” or wide format, the DASHBOARD will
appear, which is empty by default. See the
“DASHBOARD” section of this instruction manual to learn
how you may populate the mobile APP dashboard with
your favorite weather information.
Having Problems? Weʼre Here to Help!
If you have gone through the troubleshooting section and
you still have questions about setup or operation there are
several support options available to you:
www.AcuRite.com
Go to the web site
AcuRite.com has an active support forum where you can
view bulletins and ask questions. You will also find videos
and read other users comments and feedback. AcuRite
actively engages users to improve our products and
services.
Talk to a real person
(877) 221-1252
Our friendly U.S. Based Support team is ready to assist
you! You will find a knowledgeable, real person that is
ready to help you on the other end of the line! After all,
what good is all this technology without people standing
behind it?
On www.acu-link.com, you may need to add “widgets” to
the dashboard if it is empty. See the “Showing and Hiding
Widgets” section of this instruction manual to learn how
you may populate the web site dashboard with your
favorite weather information.
Refresh the Mobile APP by manually quitting. Refresh the
web site with your browsers refresh button.
42
43
Product Information
LIMITED ONE YEAR WARRANTY
Chaney Instrument Company warrants that all products it manufactures to be of good material and workmanship and to be free of
defects if properly installed and operated for a period of one year from date of purchase. REMEDY FOR BREACH OF THIS
WARRANTY IS EXPRESSLY LIMITED TO REPAIR OR REPLACEMENT OF DEFECTIVE ITEMS. Any product which, under normal use
and service, is proven to breach the warranty contained herein within ONE YEAR from date of sale will, upon examination by
Chaney, and at its sole option, be repaired or replaced by Chaney. In all cases, transportation costs and charges for returned
goods shall be paid for by the purchaser. Chaney hereby disclaims all responsibility for such transportation costs and charges.
This warranty will not be breached, and Chaney will give no credit for products it manufactures which shall have received normal
wear and tear, been damaged, tampered, abused, improperly installed, damaged in shipping, or repaired or altered by others than
authorized representatives of Chaney.
Product Facts
AC Power: 5v adaptor Included
Internet Bridge Requirements
• High speed home internet connection (not included)
• Home network router with an available Ethernet port (not included)
• At least one (1) AcuRite 330 ft. (100 m) AcuRite wireless weather sensor
APP / PC Requirements
• A smart phone with access to Apps (not included)
and/or
• A Mac OS® or Windows® PC with internet access (not included)
NOTE: Setup and activation can take place solely on a smart phone or mobile device if desired,
a Desktop PC is NOT required to use this product.
Please DO NOT return product to the retail store.
For technical assistance and product return information
PLEASE CONTACT US
YOUR PRODUCT MUST BE REGISTERED TO RECEIVE WARRANTY SERVICE
PRODUCT REGISTRATION
To receive product updates,
warranty service,
and information, Go to
www.AcuRite.com
Register a Product
THE ABOVE-DESCRIBED WARRANTY IS EXPRESSLY IN LIEU OF ALL OTHER WARRANTIES, EXPRESS OR IMPLIED, AND ALL
OTHER WARRANTIES ARE HEREBY EXPRESSLY DISCLAIMED, INCLUDING WITHOUT LIMITATION THE IMPLIED WARRANTY OF
MERCHANTABILITY AND THE IMPLIED WARRANTY OF FITNESS FOR A PARTICULAR PURPOSE. CHANEY EXPRESSLY DISCLAIMS
ALL LIABILITY FOR SPECIAL, CONSEQUENTIAL OR INCIDENTAL DAMAGES, WHETHER ARISING IN TORT OR BY CONTRACT FROM
ANY BREACH OF THIS WARRANTY. SOME STATES DO NOT ALLOW THE EXCLUSION OR LIMITATION OF INCIDENTAL OR
CONSEQUENTIAL DAMAGES, SO THE ABOVE LIMITATION OR EXCLUSION MAY NOT APPLY TO YOU. CHANEY FURTHER DISCLAIMS
ALL LIABILITY FROM PERSONAL INJURY RELATING TO ITS PRODUCTS TO THE EXTENT PERMITTED BY LAW. BY ACCEPTANCE
OF ANY OF CHANEY’S EQUIPMENT OR PRODUCTS, THE PURCHASER ASSUMES ALL LIABILITY FOR THE CONSEQUENCES
ARISING FROM THEIR USE OR MISUSE. NO PERSON, FIRM OR CORPORATION IS AUTHORIZED TO ASSUME FOR CHANEY ANY
OTHER LIABILITY IN CONNECTION WITH THE SALE OF ITS PRODUCTS. FURTHERMORE, NO PERSON, FIRM OR CORPORATION IS
AUTHORIZED TO MODIFY OR WAIVE THE TERMS OF THIS PARAGRAPH, AND THE PRECEDING PARAGRAPH, UNLESS DONE IN
WRITING AND SIGNED BY A DULY AUTHORIZED AGENT OF CHANEY. THIS WARRANTY GIVES YOU SPECIFIC LEGAL RIGHTS, AND
YOU MAY ALSO HAVE OTHER RIGHTS WHICH VARY FROM STATE TO STATE.
For in-warranty repair, please contact:
Customer Care Department
Chaney Instrument Company
965 Wells Street
Lake Geneva, WI 53147
This device complies with part 15 of the FCC rules. Operation is subject to the following two conditions:
1- This device may NOT cause harmful interference, and
2- This device must accept any interference received, including interference that may cause undesired operation.
NOTE: This equipment has been tested and found to comply with the limits for a Class B digital device, pursuant to Part 15 of the FCC
rules. These limits are designed to provide reasonable protection against harmful interference in a residential installation. This
equipment generates, uses and can radiate radio frequency energy and, if not installed and used in accordance with the instructions, may
cause harmful interference to radio communications. However, There is no guarantee that interference will not occur in a particular
installation. If this equipment does cause harmful interference to radio or television reception, which can be determined by turning the
equipment off and on, the user is encouraged to try to correct the interference by one or more of the following measures:
• Reorient or relocate the receiving antenna.
• Increase the separation between the equipment and the receiver.
• Connect the equipment into an outlet on a circuit different from that to which the
receiver is connected.
• Consult the dealer or an experienced radio/TV technician for help.
NOTE: The manufacturer is not responsible for any radio or TV interference caused by unauthorized modifications to this equipment.
Such modifications could void the user authority to operate the equipment.
Patent numbers: 5,978,738; 6,076,044; 6,597,990; US 7,637,141 B2 and other patents applied for
Add Additional Sensors
C O M P A T I B L E
Look for this logo on products that have sensors that are
compatible with your Acu-Link Internet Bridge. Visit the
web site for the most up to date complete listing of
Acu-Link compatible sensors.
44
AcuRite and Acu-Link are trademarks and My Backyard Weather is a registered trademark of Chaney Instrument Co.
965 Wells St. • Lake Geneva, WI 53147
Mac OS, iOS, iPhone, iPad are trademarks of Apple, Inc.
Android and the android logo are trademarks of Google Inc.
Windows is a trademark of the Microsoft group of companies
All other trademarks are property of their respective owners.
45