1
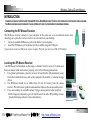
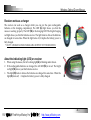
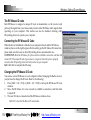
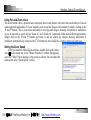
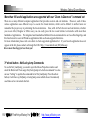
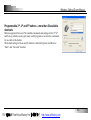
Wireless Optical Zoom Mouse
Wireless Optical Zoom Mouse
User’s Guide
-0PDF 檔案以 "FinePrint pdfFactory Pro" 試用版建立 http://www.pdffactory.com
Wireless Optical Zoom Mouse
THIS DEVICE COMPLIES WITH PART 15 OF THE FCC RULES. OPERATION IS SUBJECT TO THE FOLLOWING TWO CONDITIONS: (1) THIS
DEVICE MAY NOT CAUSE HARMFUL INTERFERENCE AND (2) THIS DEVICE MUST ACCEPT ANY INTERFERENCE RECEIVED, INCLUDING
INTERFERENCE THAT MAY CAUSE UNDESIRED OPERATION.
Federal Communications Commission Requirements
The equipment has been tested and found to comply with the limits for Class B Digital Device, pursuant to part 15 of the FCC Rules. These limits are
designed to provide reasonable protection against harmful interference in a residential installation. This equipment generates, uses and can radiate radio
frequency energy and, if not installed and used in accordance with the instruction, may cause harmful interference to radio communication. However, there
is no guarantee that interference will not occur in a particular installation. If this equipment does cause harmful interference to radio or television reception,
which can be determined by turning the equipment off and on, the user is encouraged to try to correct the interference by one or more of the following
measures:
l
l
l
l
Reorient of relocate the receiving antenna.
Increase the separation between the equipment and receiver.
Connect the equipment into an outlet on a circuit different from that to which the receiver is connected.
Consult the dealer or an experienced radio/TV technician for help.
The changes or modifications not expressly approved by the party responsible for compliance could void the user's authority to operate the equipment.
Declaration of conformity in Accordance with the Radio and Telecommunications Terminal Equipment Act (FTEG) and Directive 1999/5/EC
(R&TTE Directive)
-1PDF 檔案以 "FinePrint pdfFactory Pro" 試用版建立 http://www.pdffactory.com
Wireless Optical Zoom Mouse
INTRODUCTION
CONGRATULATIONS ON YOUR PURCHASE! YOUR NEW RF OPTICAL ZOOM MOUSE IS EASY TO INSTALL AND OFFERS YOU A COUNTLESS OF USEFUL FEATURES.
THE RADIO RECEIVER CAN BE CONVENIENTLY PLACED ANYWHE RE TO GIVE YOU THE FREEDOM YOU NEED WHILE WORKING.
Connecting the RF-Mouse Receiver
The RF-Mouse receiver connects to your computer in the same way as a conventional mouse does;
allowing you to place the receiver wherever is convenient on your desktop.
1.
Locate an available USB mouse port on the back of your computer.
2.
Insert the USB mouse port connector into the available computer USB port.
If you want to connect an USB mouse to your computer PS2 port, you must use a USB to PS2 adapter.
Locating the RF-Mouse Receiver
Your RF-Mouse has limitations on the range or distance from its receiver. To make sure
that your mouse sends and receives properly, refer to the following instructions:
1. For optimal performance, place the receiver at least 8 inches (20 centimeters) away
from other electrical devices, such as the computer, the monitor, or external storage
drives.
2. The RF-Mouse should be no farther than 3.3 feet (1.0 meter) from the mouse
receiver. This will ensure optimal communication between the mouse and receiver.
3. If you are working on a metallic surface, trying a mouse pad for better reception.
Switch frequency channels to prevent interference from other RF pointing devices.
(See the following section for more information.)
-2PDF 檔案以 "FinePrint pdfFactory Pro" 試用版建立 http://www.pdffactory.com
Wireless Optical Zoom Mouse
Selecting the Frequency Channel
The RF-Mouse operates on two frequency channels. To prevent interference when
using two RF Mice in close proximity, a different frequency channel should be
used for each mouse. Refer to the following instructions to change the frequency
channel for your mouse:
1. Set the frequency channel (B) on the receiver to 1 or 2.
2. Remove the battery cover from the mouse (see the following Inserting the
Batteries section).
3. Set the frequency channel (L) on the mouse to 1 or 2. (The frequency channel
for mouse and receiver must be the same).
B
L
Inserting the Batteries
The RF-Mouse uses two batteries. Refer to the following to insert the batteries:
1. Press the tab on the bottom of the mouse cover as shown here and remove
the cover.
2. Insert the two batteries. (The correct polarity is indicated on the battery
compartment casing.)
3. Replace the cover.
-3PDF 檔案以 "FinePrint pdfFactory Pro" 試用版建立 http://www.pdffactory.com
Wireless Optical Zoom Mouse
Receiver works as a charger
The receiver can work as a charger which you can put the spare rechargeable
batteries on the charging compartment. The LED (K) light shows you that the
mouse is working properly. The LED (M) is the charging LED. The bright charging
red light shows you that the batteries are low. The light turns to dim as the batteries
are charged for some time. When the light turns off, it implies the battery power is
fully charged.
*. DON’T CHARGE NON-RECHARGEABLE BATTERY TO THIS RECEIVER.
About the indicating light (LED) on receiver
1.
2.
3.
When using the mouse, the left working light(K) is blinking and in Green.
If the rechargeable batteries are charged, the left LED (M) is in red. The bright
red light(M) shows you that batteries are low.
The light(M) turns to dim as the batteries are charged for some time. When the
light(M) turns off, it implies the battery power is fully charged.
K
M
-4PDF 檔案以 "FinePrint pdfFactory Pro" 試用版建立 http://www.pdffactory.com
Wireless Optical Zoom Mouse
Installing the iZoomWorks Software
If there’re other mouse drivers installed on your computer, please have them uninstalled before you start the installation
process. Also please be sure you have completed above hardware setup.
Windows 95/98/ME/2000/XP/NT4.0 installation (Note: the USB Device does not support Windows 95/NT4.0)
1. Connect the mouse to your computer.
2. Insert the installation diskette into your floppy disk drive.
3. Click the Start button and then click Run.
4. In the Run dialog window, type A:\setup, where “A” is the letter of your floppy disk drive.
5.
Click OK and follow the instructions on your screen to complete the installation.
Checking the Batteries power
To check the battery power, right-click the mouse icon
in the System Tray. Choose
the “Check RF-Mouse Status” option to display the RF-Mouse Status window. The
current battery remain power percentage is shown.
Power On/Off switch
A power On/Off switch (N) is located on the bottom side as shown. You may turn off
the power when it’s not in use.
It saves battery power and prolongs battery life, which is convenient for traveling.
N
-5PDF 檔案以 "FinePrint pdfFactory Pro" 試用版建立 http://www.pdffactory.com
Wireless Optical Zoom Mouse
The RF-Mouse ID code
Each RF-Mouse is assigned a unique ID code at manufacture, so the receiver only
picks up the signal from your mouse and prevents other RF-Mouse radio signals from
operating on your computer. This feature can also be disabled, allowing other
RF-pointing devices to operate your computer.
Connecting the RF-Mouse ID Code
When the driver installation is finished your computer reboots and the RF-Mouse
window (shown on the right) appears. Before setting up the RF-Mouse ID connection,
please make sure there are no other RF pointing devices around and in use.
CONNECT ID: Move the RF-Mouse for a few seconds to establish a connection, and then click
Connect ID. The unique ID code of your mouse is recognized. Once this process properly
executed, other RF pointing devices will not function on your computer.
Exit: Click Exit to complete the ID setup.
Changing the RF-Mouse ID Code
You can use a new RF-Mouse on your computer without changing the Radio receiver;
you just need to change the ID code. Refer to the following:
1. Press [Shift + Alt + F11] or [Shift + Alt + F12] to call up the RF-Mouse ID Code
window.
2. Move the RF-Mouse for a few seconds to establish a connection, and then click
Connect ID.
3. The new ID code is connected and the RF-Mouse window closes.
Click Exit to close the RF-Mouse ID code window.
-6PDF 檔案以 "FinePrint pdfFactory Pro" 試用版建立 http://www.pdffactory.com
Wireless Optical Zoom Mouse
Why use iZoomWorks
There are a total of 5 buttons on the Zoom mouse. The
3rd Wheel button, 4th and 5th buttons are programmable
with more than 54 shortcuts/commands to make your
daily work easier. Not only that, office users will also
love iZoomWorks and its zoom features. What makes
this mouse different and unique from all other mice is
its 4th and 5th buttons, which work as the Zoom
function.
3rd Pan Button
5th Zoom Button
4th Zoom Button
The 3rd Pan Button:The wheel works as vertical scroll
and also can be used as 3rd button. Once the
iZoomWorks software is installed, the 3rd button is
working as the “Pan” function when the wheel button
is pressed while the mouse is moving.
4th and 5th buttons work as zoom in and zoom out and are programmable with more
than 54 various shortcuts/commands. These 2 buttons are convenient when editing images, drawings, documents
or worksheets as you can directly click on the 4th button to zoom in or the 5th button to zoom out.
The 4th & 5th Buttons :The
-7PDF 檔案以 "FinePrint pdfFactory Pro" 試用版建立 http://www.pdffactory.com
Wireless Optical Zoom Mouse
Using Pan and Zoom in/out
The Zoom button offers a powerful and convenient direct zoom feature with more than one hundred of various
zoom-supported applications. You can instantly zoom in and out images or documents by simply clicking on the
4th and 5th buttons. This is convenient and handy to view big-sized images, drawings, documents or worksheets,
as you do not need to search for the “Zoom in” and “Zoom out” commands within many different applications.
Simply click on the 4th and 5th buttons and zoom in and out almost any images, drawing, documents or
worksheets instantaneously. And press the 3rd Pan button to move easily the screen to where you want to go.
Setting the Zoom Speed
After you install the iWheelZoom software, double click on the mouse
in the system tray. In the ”Mouse Properties” window that appears,
icon
select the “Wheel” tab to display a setup screen as shown. You can adjust the
zoom speed in the “Zoom Speed” section.
-8PDF 檔案以 "FinePrint pdfFactory Pro" 試用版建立 http://www.pdffactory.com
Wireless Optical Zoom Mouse
More than 100 useful applications are supported with our “Zoom in-Zoom out” command set
There are so many different computer applications that provides zoom in and out functions. However, each of these
various applications uses different ways to execute the Zoom function, which can be difficult to neither learn nor
remember the proper way in performing the Zoom functions. Now, with A4 Tech Zoom in and out function, whether
you are an Artist, Designer or Office user, you can easily press the two zoom buttons to interactive with more than
hundreds of applications. We integrated and standardized different Zoom commands into our two office fingertips, and
this function can be use in all Windows applications that use Zoom-supported functions.
For more information please visit our website to check supported application list. If your favorite application does not
appear on the list, please contact us through the URL: http://www.a4tech.com/EN/tellus.asp
We are more than happy to hear from you!
3rd wheel button - Net/LuckyJump Commands
To use the Net/LuckJump, you need to open the Mouse Properties window and
select the Button tab. Then assign Net/LuckyJump in 3rd button command. You also
can use “Setting” to update the command list of Net/LuckJump. Press the wheel
button, it will show up NetJump or LuckyJump screen which shows 14 commonly
used tasks as for convenient shortcut.
-9PDF 檔案以 "FinePrint pdfFactory Pro" 試用版建立 http://www.pdffactory.com
Wireless Optical Zoom Mouse
Programmable 3rd, 4th and 5th buttons – more than 54 available
shortcuts
Button assignment lists out of 54 available commands and settings for the 3 rd, 4th
and 5th keys which you can open many useful programs or execute the commands
by one click on the button.
The default setting for the 4th and 5th buttons is Internet Explorer and Browser
“Back” and “Forward” function.
- 10 PDF 檔案以 "FinePrint pdfFactory Pro" 試用版建立 http://www.pdffactory.com