1
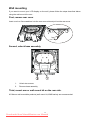
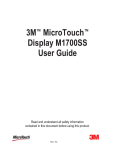
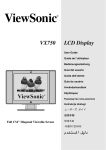
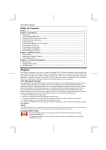
Downloaded from ManualMonitor.com Manuals
Table of Contents
Precautions............................................................................................................... 2
Notice .................................................................................................................... 2
Installation ............................................................................................................. 2
Warning on power connection ............................................................................... 2
Maintenance .......................................................................................................... 2
Transportation ....................................................................................................... 3
Adjusting Your LCD display Viewing Angle ........................................................... 3
Wall mounting........................................................................................................ 4
Getting Started.......................................................................................................... 5
Unpacking Your LCD Display ................................................................................ 5
Control Buttons...................................................................................................... 6
Installation ............................................................................................................. 7
Adjusting Your LCD Display .................................................................................. 8
Selecting OSD Features ........................................................................................ 8
Warning Messages and Troubleshooting................................................................ 11
Warning Messages.............................................................................................. 11
Troubleshooting Guide ........................................................................................ 12
Specification ........................................................................................................ 13
Regulations............................................................................................................. 14
FCC Declaimers .................................................................................................. 14
WEEE.................................................................................................................. 15
Hg........................................................................................................................ 15
1
Downloaded from ManualMonitor.com Manuals
Precautions
Notice
•
The product specifications and other information provided in this Users Manual are for
reference only. Provided information was correct at time of print. All information is subject
to change without notice. Updated content can be downloaded from our web site at
http://www.agneova.com.
•
To register online, please go to http://www.agneovo.com.
•
To protect your rights as a consumer, do not remove any stickers from this product. Doing
so may affect the determination of the product’s warranty period.
Installation
•
Do not cover or block the ventilation holes in the housing.
•
Do not place the monitor near a heat source, such as a space heater or exhaust vent, nor
in direct sunlight.
•
Do not place this device in any location subject to vibration or other physical shocks.
Warning on power connection
•
Use an appropriate power cord to connect the monitor to a power outlet.
•
The outlet should be installed near the monitor and be easily accessible.
•
Do not allow anything to rest on the power cord.
•
Disconnect the power plug from the power outlet in the following circumstances:
If you will not use the monitor for an indefinite period time.
When the power cord or plug is damaged of frayed.
If the product has been dropped or the housing has been damaged.
If the product exhibits a distinct change in performance, indicating a need for service.
Maintenance
•
Clean the housing, glass panel and controls with a soft cloth lightly moistened with a mild
detergent solution. Do not use any type of abrasive pad, scouring powder or solvent, such
as alcohol or benzene.
•
Do not rub, touch, or tap the surface of the screen with sharp or abrasive items such as a
pen or screwdriver. This type of contact may result in scratching the surface of the glass.
•
Do not insert sharp objects or spill liquid into the monitor through ventilation holes. This
may cause accidental fire, electric shock or failure of the device.
•
Do not attempt to service this product yourself, as opening or removing covers may
expose you to dangerous voltages or other risks.
2
Downloaded from ManualMonitor.com Manuals
Transportation
When you transport this monitor for repair or shipment, use the original carton and packing
materials.
Retracting the base stand
If you want to bend up the base to 90 degrees for transportation, please push the 2
metal pillars on the bottom of base and fold to 90 degrees as shown in the illustration
below.
The maximum tilt angle of the monitor is 25°; the monitor can not be pushed down any further
when the tilt angle is at the 25° position.
Adjusting Your LCD display Viewing Angle
You can adjust your LCD display between 5°~25° by holding the top of the panel with both
hands and pushing back and forth to adjust the viewing angle to the desired angle.
3
Downloaded from ManualMonitor.com Manuals
Wall mounting
If you want to mount your LCD display on the wall, please follow the steps described below
using the wall mount kit or arm..
First, remove rear cover
Insert a coin or flat screwdriver into the rear cover slot and pull out the rear cover.
Second, unlock base assembly
1.
Unlock two screws
2.
Remove base assembly
Third, mount arm or wall mount kit on the rear side.
AG Neovo wall-mountable products (wall mount kit, WMK series) are recommended.
4
Downloaded from ManualMonitor.com Manuals
Getting Started
Unpacking Your LCD Display
After you have unpacked your LCD display, make sure that the following items are included in
the package.
•
LCD display
•
Adaptor
E-17: Must use one of the following adaptors: Linearity LAD6019AB4, LAD6019AB5 or Li
Shin LSE9901B1260, 0217B1250.
E-19: Must use one of the following adaptors: Linearity LAD6019AB4, LAD6019AB5 or Li
Shin LSE9901B1260, 0218B1255.
•
Power cord
•
D-sub 15-pin VGA cable
•
DVI-D digital cable (Optional)
•
Audio cable
•
CD-ROM (containing Windows information file and user’s manual)
•
Quick Guide
5
Downloaded from ManualMonitor.com Manuals
Control Buttons
Front View
ON/OFF Button
Push once to turn your LCD display ON and push again to turn it OFF.
Power LED
The power LED will turn to green under normal operation and orange when in
standby mode.
The auto adjustment function will automatically tune your LCD display to the
optimal performance, including screen size, color, brightness and contrast.
We recommend that you use the auto adjustment function for the first time use,
after resolution or frequency change.
The Auto button also closes the OSD.
Move LEFT
Call out OSD menu.
Select OSD menu features from right to left, and bottom to top.
Move RIGHT
Call out OSD menu.
Select OSD menu features from left to right, and top to bottom.
Increase
Increases the volume and navigates within the display.
Decrease
Decreases/mutes the volume and navigates within the display
6
Downloaded from ManualMonitor.com Manuals
Installation
Connecting LCD Display to PC (Analog)—
1.
Remove all the packages from the panel.
2.
Place your LCD display in a suitable place. Make sure that there is enough
space for adjustment, especially the rear of the panel.
3.
Turn off your PC and connect the D-sub 15-pin VGA cable included in the
package to the VGA port on your PC.
4.
Connect the adaptor to the Adaptor IN socket at the back of your LCD display.
5.
Connect one end of the power cord to a power source and another end to the
adaptor.
6.
Turn on your PC.
7.
Turn on your LCD display. If the power LED is yellow and there is no display on
the screen, please refer to the Warning Messages and Troubleshooting Guide in
the User Manual.
8.
Change the display resolution to 1280X1024 pixels at 60Hz from your PC, and
then push the AUTO button on the panel. The panel will automatically tune to
the optimal performance.
Connecting LCD Display to a Digital Source (Digital, DVI)—
1.
Turn off the PC and connect one end of the DVI-D digital cable included in the
package to the DVI port at the back of the panel and another end to digital out
on your VGA card.
2.
Repeat steps 4-8 of the previous section.
7
Downloaded from ManualMonitor.com Manuals
Adjusting Your LCD Display
In the OSD menu, you will find all kinds of features to help you adjust your LCD display to the
optimal performance.
Important!
Though manual adjustment of the LCD display is available, we strongly
recommend that you use the panel’s auto adjustment function. This will
automatically tune your LCD display to the optimal performance. Simply
push the AUTO button to enable the auto adjustment function.
Additionally, we recommend that you use the auto adjustment function
every time after you have changed the resolution or frequency of your
display.
Selecting OSD Features
1.
Push
,
button to call out the OSD window.
2.
Push
3.
Then push
or
button to select a feature.
or
Brightness & Contrast
button to adjust the value of the selected feature.
/
•
Select Brightness and Contrast in the Display Adjust menu.
•
and
button to adjust value between 0 and 100; reading will display at the
Push
bottom of the OSD window.
Horizontal & Vertical Position
/
•
Select H-position and V-position in the Display Adjust menu.
•
Push
and
button to adjust value.
Sharpness
•
Select Sharpness to adjust sharpness of display.
•
Push
and
button to adjust value between 0 and 100.
8
Downloaded from ManualMonitor.com Manuals
OSD Transparency
•
Select Transparency OSD in the OSD Adjust menu to adjust the transparency of OSD
window.
•
Push
and
button to adjust value between 0 and 100.
Phase & Clock
/
•
Select Clock and Phase in the Display Adjust menu to modify the distortion of video signal.
•
Push
and
button to adjust value.
Color Temperature
Select Color Temperature
We recommend that you select different color temperature options for different purposes as
shown below.
Option
Push
and
Use
9300K
General Use
6500K
Color Management
USER
User color setting
Auto Color
Auto adjust to best ADC gain value.
button to choose 9300K, 6500K, User or Auto Color.
You can select USER in the color temperature menu to fine-tune the red/green/blue
picture settings according to your preference or specific application.
Push
and
button to adjust value between 0 and 100.
Horizontal & Vertical OSD Position
/
•
Select OSD Position in the OSD Adjust menu to adjust OSD window position according to
your preference.
•
Push
or
button to move OSD window to a desired position.
Graphic / Text
•
If you want to choose the sharpest automatic display, set Mode Text/Graphic.
•
Push
Attention!
and
button to switch between TEXT and GRAPHIC mode.
For optimal performance of your LCD display, set mode to TEXT when
the resolution is 720x400 or 720x350 pixels and to GRAPHIC when the
resolution is at 640x350 or 640x400 pixels.
9
Downloaded from ManualMonitor.com Manuals
Recall
•
Select Recall to reset all features to default settings.
•
Push
and
button to Recall.
Language
•
Select Language in the OSD Adjust menu to choose a desired language for the OSD.
•
Push
and
button to select; options are displayed at the bottom of the OSD window.
Auto and Input Select
•
Select Auto &Input Set
•
Press
button to choose Auto Adjustment, Use Analog Input or Use Digital Input.
•
Press
button to operate the selected function.
The Auto Adjustment function lets you adjust the display size, clock and phase to obtain the
best viewing settings. This process will take 3 ~ 5 seconds to complete.
Attention :
After Auto Adjustment, the display may display the wrong position or
size if it has received a pattern which has no screen border. You may
select either Analog or Digital Input video when VGA input and/or DVI
Input is/are available.
Exit
Select EXIT from the menu to exit the OSD menu.
10
Downloaded from ManualMonitor.com Manuals
Warning Messages and Troubleshooting
Warning Messages
When a warning message appears on the screen, check the following items to locate
the problem affecting your LCD display.
NO SIGNAL INPUT
When no input signal is detected from any input ports.
•
Check if your PC or video source is ON.
•
Check if the signal cable is correctly connected.
•
Check if any pin inside the connector is twisted or broken.
NO VIDEO SIGNAL FROM No signal is detected from ANALOG port.
ANALOG INPUT
• Check if your PC is ON.
•
Check if the D-Sub 15-pin cable is correctly connected to the
ANALOG port at the back of your LCD display.
•
Check if the D-Sub 15-pin cable is correctly connected to
your PC.
•
Check if any pin inside the D-Sub 15-pin cable connector is
twisted or broken.
NO VIDEO SIGNAL FROM No signal is detected from DIGITAL port.
DIGITAL INPUT
• Check if your PC is ON.
•
Check if the DVI cable is correctly connected to the DIGITAL
port at the back of your LCD display.
•
Check if the DVI cable is correctly connected to your PC.
•
Check if any pin inside the DVI cable is twisted or broken.
11
Downloaded from ManualMonitor.com Manuals
Troubleshooting Guide
Symptoms
Check
•
No display
•
Check if the power of your LCD display is ON.
•
Power LED is off
•
Check if the adaptor is correctly connected to your LCD
display.
•
Check if the power cord is correctly connected to the adaptor.
•
Check if the power cord is correctly connected to a power
source.
•
Check if the power source works normally. Use another
device to check for power supply.
•
Check if your PC is in standby mode (move the mouse or
push any key to wake up your PC).
•
Check if your PC or video source is ON.
•
Check if the signal cable is correctly connected.
•
Check if the resolution is set at 1280x1024.
•
Push
•
Adjust Clock and Phase in the OSD Display Adjust menu.
(See Adjusting Your LCD display section of this manual for
details.)
•
Adjust Sharpness from the OSD menu if the resolution is not
at 1280x1024. (See Adjusting Your LCD display section of
this manual for details.)
•
No display
•
Power LED is amber
•
Blurred text display
button to enable auto adjust.
•
No center screen
•
Push
•
Missing lines
•
Adjust H-Position and V-Position. (See Adjusting Your LCD
display section of this manual for details.)
•
Red, green, blue or
black spots on the
screen
•
There are millions of micro transistors on a TFT LCD display.
Each damaged transistor will lose a red, green or blue spot.
We accept a very small quantity of damaged transistors
during the manufacturing process. The globally accepted
tolerance is 3 spots.
button to enable auto adjust.
12
Downloaded from ManualMonitor.com Manuals
Specification
19”
Size
19’’ (480 mm) diagonal
Resolution (max.)
1280 x 1024
Frequency
Horizontal: 24kHz – 80kHz,
Vertical: 49Hz - 75Hz
Pixel Clock (max.)
135 MHz
Connector
Power Supply
3-Pin AC Plug
Swivel Range
Adjustable
5º - 25º
Weight
Net
7.3 Kg (16.1 lb)
Panel
Input Signal
100 ~ 240V,
50 ~ 60 Hz
< 50 W (ON)
< 2 W (Standby)
< 1 W (OFF)
AC
Power
Consumption
17”
Size
17.0" (431.8mm) diagonal
Resolution (max.)
1280 x 1024
Frequency
Horizontal: 24kHz - 80kHz
Vertical: 49Hz - 75Hz
Pixel Clock (max.)
135MHz
Connector
Power Supply
3-Pin AC Plug
Swivel Range
Adjustable
5º - 25º
Weight
Net
6.15 Kg (13.3 lb)
Panel
Input Signal
100 ~ 240V,
50~60Hz
< 40 W (ON)
< 2 W (Standby)
< 1 W (OFF)
AC
Power
Consumption
*The above specifications are subject to change without notice.
13
Downloaded from ManualMonitor.com Manuals
Regulations
This FCC Class-B compliant digital device complies with the Interference-Causing Equipment
Regulations of Canada.
FCC Declaimers
This device complies with Section 15 of the FCC listing. The operation procedures must meet
the following conditions: (1) this device must not cause any damaging interference; and (2)
this device must accept any received interference, including any unpredictable interference
that may possibly occur.
Dear users,
This device has passed the Class B digital device regulations and complies with Section 15 of
the FCC listing; these are intended to provide reasonable warranty against damaging
interference for home use. This device will produce, use and emit radio frequency energy;
therefore, installation or use without following the instructions given may cause damaging
interference to radio communication. Nonetheless, it is not possible to state with certainty that
interference will occur from specific installations. If this device has caused damaging
interference to radio or TV signals (simply turn the device on and off to check if such
interference is caused by the device), we recommend that you fix the interference using the
following methods:
•
Readjust the direction or location of the antenna.
•
Increase the distance between this device and the receiver.
•
Use a different power source other than the power source used by the receiver.
•
Consult your local dealer or an experienced radio/TV technician.
Warning: The making of changes or modifications to the device without permission
from an authorized dealer may void the warranty of this device.
14
Downloaded from ManualMonitor.com Manuals
WEEE
Information for users applicable in European Union countries
The symbol on the product or its packaging signifies that this product has to be
disposed separately from ordinary household wastes at its end of life. Please
kindly be aware that this is your responsibility to dispose electronic equipment at
recycling centers so as to help conserve natural resources. Each country in the
European Union should have its collection centers for electrical and electronic
equipment recycling. For information about your recycling drop off area, please
contact your local related electrical and electronic equipment waste management
authority or the retailer where you bought the product.
Hg
Lamp Disposal
LAMP(S) inside this product contain mercury and must be recycled or disposed of
according to local, state or federal laws. For more information, contact the
electronic industries alliance at www.eiae.org for lamp specific disposal
information check www.lamprecycle.org.
Vermont Hg directive
Title 10: Conservation and Development
Chapter 164: COMPREHENSIVE MERCURY MANAGEMENT
§ 7106. Labeling of mercury-added products
Contains Mercury, Dispose of Properly
15
Downloaded from ManualMonitor.com Manuals