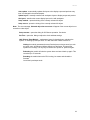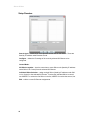
1
SIERRA VIDEO Sierra View SM-xx Multi-Viewer Models: SV-SM-8, SV-SM-12 and SV-SM-16 User’s Manual SIERRA VIEWSM-XXD MULTI-VIEWER User’s Manual Sierra Video P.O. Box 2462 Grass Valley, CA 95945 Tel: (530) 478-1000 Fax: (530) 478-1105 Email: [email protected] Version 5.0 Publication Date: February 2012 The information contained in this manual is subject to change by Sierra Video Table of Contents Introduction System Concept Features and Benefits Powerful Alarms Captions and UMDs Keeping Time Using GPI I/O Bargraph Scales Operation Introduction Local Operating Modes Normal Mode Configuration Mode Network Settings Keyboard Operation Using the Web Interface Object and Source Explorer Navigating the User Interface Main Menus Module Menu Setup Remotes Set Time Layout Menu Group Menu Object Menu GRID Menu Help Menu Module Properties Source Properties Window Edit Object Window 1 1 2 3 3 3 4 4 5 5 5 5 6 6 6 7 9 10 10 10 12 13 14 16 17 18 18 19 29 34 Installation Introduction Power and Fuses Health and Safety Considerations Disposal Connector I/O Video Inputs Video Outputs Audio I/O Serial Port Assignments Audio I/O Connector Pin Assignments Remote Panel Connection Network Connection and Setup Uploading Graphic Files Upgrading Firmware Updating the Scalers 49 49 49 50 50 51 51 51 51 52 53 54 54 54 54 55 56 Specifications Main Frame Embedded audio External audio OUTPUTS Alarms Metadata, Decoding/Monitoring GPI/O Scales and Ballistics Phase Correlation Display Mechanical Power Environmental Front Panel Rear Panel Remote Panel Interfaces GPI I/O Connector Audio IN/OUT Connector Audio Monitor Outputs Connector 57 57 57 57 57 58 58 58 58 59 59 59 59 59 59 60 60 61 62 63 Troubleshooting 65 Warranty 67 Sierra Video Introduction 1 Chapter The compact Sm-xx series multi-viewer enables up to 8, 12, or 16 (depending on model) channels of video to be viewed on a single display device. There are auto-sensing inputs for composite video, SDI and HD-SDI. In addition there is provision for component RGB/YUV or S-Video and two DVI-I video inputs. Up to 3G 1080p is supported. The SM-xx is designed to optimize monitoring flexibility within the multi-channel video environment, whether used for video production, television broadcast or CCTV. It is supplied as a 1U rack mounting frame with an optional remote control panel. It is easily controlled from a PC web browser hosted by the frame itself, either directly via an Ethernet cable or over a network. System Concept Each video input card handles up to 4 channels. Additionally, if external audio functionally is required, audio input or output cards may be fitted. The diagram below shows the overall concept. 1 Sierra Video Each scaler on the video card processes one of the possible inputs (CVBS, SDI/HD-SDI, DVI, etc) and scales it to the desired tile size for the selected position on the output. A mixer on each video card combines all the video tiles and sends the resulting image to the CPU card. The final display output comprises all of the tiles in a single picture. Possible inputs are: Composite, S-video, RGB, YUV, SDI, HD-SDI, DVI-I Overlay of audio and graphics information is performed inside each scaler, which receives control data from the main CPU in real-time for analog/AES/EBU/ channels, or from the video card itself in the case of embedded SDI/HD-SDI audio. To allow arbitrary layering of sources, the input board has information about all of the tile positions, allowing each tile to be displayed as required and enabling picture overlay with complex borders. DVI-I inputs replace inputs on BNCs 1 and 2. If DVI-I input 1 is enabled any SDI input on BNC 1 is replaced by the DVI-I input. Similarly, DVD-I input 2 will replace any SDI input on BNC 2. Features and Benefits 2 Up to 8, 12, or 16 auto-sensing monitored composite, SDI, HD/SDI, S-Video, and YUV inputs and two DVI-I video inputs (up to 3G 1080p). DVI-I output up to 1080p60 (1920x1080) in 16:9. Genlocked inputs for flicker-free and full frame operation. Teletext (analog), subtitles, AFD, WSS, VITC (SD- HD/SDI only) decoding and monitoring. Up to 256 channels of embedded audio may be displayed as industry standard bar-graphs with a choice of scales and ballistics. Support for additional external audio inputs analog, AES/EBU and Dolby Digital® is possible using the SV-Data-xx. 4 pairs of assignable analog audio monitor outputs. Outputs for up to 32 channels of demuxed audio, analog or AES/EBU. Alarms for video, audio, and metadata, with outputs to GPI O/Ps, LAN, and/or SNMP traps. Assignable tallies. Under Monitor Displays (UMD) entered via keyboard, LAN, or serial cable, supporting TSL and other protocols. Clock display receiving time information via NTP network protocol or LTC. 1RU compact design, ideal for OB-vans and other restricted installations. Optional front panel control. User-friendly set-up via system menu/browser software. SM-XX Powerful Alarms Alarms may be created for video sync loss, black (loss of luminance), freeze-frame, embedded audio loss, external audio loss, over level, out of phase (of chosen pairs), teletext loss, and closed caption loss. The colors used for on-screen alarms are as follows; Audio loss: Yellow- posistion (left or right) indicates channel. Audio Over: Yellow- posistion (left or right) indicates channel. Out of Phase: Cyan- middle alarm Carrier Loss: White- middle alarm If carrier loss occurs, only that alarm will flash, unless audio loss had already been active for the same channel. The decoding of closed caption is available on each scaler, together with an associated alarm. Analog teletext decoding is available in the scaler. On screen alarm indication may be a stationary or flashing colored tile border. External alarm indication may be via the GPI I/O or the LAN/software application. Optional triggering of SNMP traps for each alarm function or group are also supported. Tiles have an optional color coded border to provide status indication, such as tally or alarms. VITC loss is indicated by the burnt-in VITC display flashing. Burnt-in VITC is available from SDI sources only. Captions and UMDs Captions or Under Monitor Display (UMD) information may be generated manually from a keyboard connected to a front panel USB-2 port, the SV-Remote USB-2 port, or automatically from remote sources via the LAN, using browser software operating on a remote PC, or via the RS232/422 port using TSL or other protocols. Up to two lines of UMD text can be left, center, or right justified and may be placed anywhere in the tile. Keeping Time Clock/date display data can be derived from several sources. There is a set priority that determines which source is used. When there is LTC present, this becomes the exclusive reference for the clocks, regardless of how much it differs from the RTC time. Should there be no LTC present, the frame will search the network for a NTP server in the nearby internet region (pool.ntp.org). If a server is found, the clock reference will be taken from it. In the absence of any external clock reference, system time is used. A battery on the CPU board ensures that time data is retained should the unit be powered down. For each SDI/HD-SDI video input, there is the possibility to display VITC. Genlocking of the SM-xx is via SD color black or HD tri-level sync, using the genlock input. 3 Sierra Video Using GPI I/O Assignable GPI I/O with 16 inputs and 8 outputs for external alarm indication and tally functions. Bargraph Scales The following audio scales are supported: Colors used for the upper and lower ranges of each bar type can be customized to satisfy any in-house monitoring style for each of the six scale types. 4 Sierra Video Operation 2 Chapter Introduction The front panel user interface comprises a power switch, and 6 buttons for configuring the unit, 10 illuminated pre-set configuration buttons, a USB-2 interface and LED indicators for status reporting. For text insertion and additional functionality, a PC keyboard may be connected to the USB-2 socket. An optional 1U remote panel (SV-Remote) replicates the front panel of the SM-xx and is connected via LAN. The P1 and P2 LEDs should light green to indicate healthy power supplies. If the red F LED is lit after the unit has booted, failure of one or more ventilation fans has been detected. Under normal circumstances, the boot cycle takes about 70 seconds. The SM-xx can be configured and controlled via the LAN, using browser software operating on a remote PC. Local Operating Modes At the front or remote panel, normal or ‘locked’ is the normal operating mode. A special configuration or ‘menu’ mode is provided to allow initial IP address configuration for LAN control via a browser. The currently set IP address will appear to the top left of the display output during the boot cycle. Normal Mode In normal use, the configuration menu will be locked to prevent inadvertent operation and configuration menus are not available. In this mode, the 10 illuminated pre-set configuration buttons are active. A currently displayed configuration can be stored by holding down the desired pre-set button for more than 3 seconds. Stored presets are recalled by briefly pressing the desired pre-set button, which will illuminate. Should the frame lose power, it will restore the last known configuration settings on reboot and automatically reflect these in the browser. 5 Sierra Video Configuration Mode To enter the configuration mode from normal mode (with the red Lock LED off) hold the Lock button down for about 3 seconds. The configuration or ‘menu’ mode will be entered, an on-screen menu will appear and the red Lock LED will illuminate. If the Lock button is depressed again, any changed settings will be saved and the unit will return to normal. The currently loaded firmware version will be indicated at the top of the on-screen menu. The main ‘menu’ mode controls are as follows: Function keys (up/down arrows) scroll the menu cursor up and down to select the desired function. Select Parameter keys (left/right arrows) select settings to apply to the chosen parameter. Lock button exits 'menu' mode and saves settings. SYSTEM CONFIGURATION PARAMETERS Network Settings IP Address Netmask Gateway menu DNS Server 1 menu DNS Server 2 menu Set manually (using settings below) / Use DHCP Enter frame IP address byte at a time in the sub-menu Enter Subnet Mask byte at a time in the sub-menu If required, enter the Gateway address byte at a time in the subIf required, enter the DNS server address byte at a time in the subIf required, enter the DNS server address byte at a time in the sub- Network Settings These settings only need to be manually entered if DHCP is not to be used. This would be required for a network that uses fixed IP addresses and does not rely on a DHCP server to allocate them automatically. The IP address must be unique on the network. Please see your system administrator if these details are required. Keyboard Operation Any HID compliant USB keyboard can be used for the entry and editing of UMDs. The keyboard is connected to the USB port on the front panel of the SM-xx, or alternatively, the SV-Remote remote control unit. Note that a keyboard connected to a remote control unit that has been assigned to more than one multi-viewer at a time (‘collective mode’) can serve no function (see the Remote Panel section). The Tab key activates the cursor on the topmost UMD. Successive Tab key operation moves the cursor on to the next UMD in sequence. The Esc key deactivates the cursor. All multi-viewer factory default settings (including the IP address) are restored with the Ctrl-Alt-Del command. 6 SM-XX Using the Web Interface The QUAD multi-viewer is controlled via a browser using web pages hosted by the frame itself. Note that Java must first be installed on the PC or MAC that is to be used. This is available as a free download from: http://www.java.com/en/download/manual.jsp Note: The default IP Adress is 192.168.0.120 To access the web interface, type the IP Address configured for the frame into a browser and the Java application should launch immediately. Java certificates should not need to be imported, but if the certificate is not already on the system being used, then Java will ask for permission to continue before starting the applet (the certificate required is stored in the SM-xx). If ‘Run’ is selected without ticking the box for ‘Always trust content from this publisher’, then the certificate will not be installed, but the applet will run. It is best to tick the box so that the certificate is installed to avoid seeing the same message next time the browser is to be accessed (assuming that the same system is to be used). Note that depending on the system being used to access the web interface, one or more factors such as Windows security, third party security products, firewalls and browser security settings may prevent the applet loading from the SM-xx. For example, if using MS Internet Explorer 7, the security setting should be no higher than ‘Mid’. 7 Sierra Video The web interface comprises three areas, the Object and Source Explorer, the Editor Workspace and the Display Preview. Tile objects can be one of six basic types; None, Video, Audio, Text, Logo and Clock. The color of the tile as it appears in the Editor Workspace and Display Preview indicates the currently set object type, as listed in the table below. Object Type None Video Audio Text Logo Clock Tile Color Grey Blue Green Brown Red Black Operation is designed to be simple and intuitive. For example, object type can be selected by double clicking on a tile, selecting the Type tab from the Edit Object menu and choosing the desired tile type. Video and audio tiles can be assigned sources by double clicking on a tile, selecting the Properties tab from the Edit Object menu and selecting an available source. The currently selected tile object is highlighted with a blue border. Tiles can be moved and resized using conventional mouse operations. For example, multiple tiles may be selected for moving as a group by holding the Ctrl key while clicking on each tile in turn. A small square appears in the lower right corner of tiles grouped within a multiple selection. Tile borders may appear incomplete to indicate where they lie behind other objects. 8 SM-XX Object and Source Explorer The Objects folder contains the list of current objects and each object’s given name. The currently selected object is highlighted. The Sources folder contains the list of video and audio sources, with an indication of the source type. Those sources that are currently assigned to an object appear in red, whereas those that are currently unassigned to an object appear in black. A source that is assigned to the currently selected tile / object appears in yellow. The 'Valid Workspace' icon below the Editor Workspace confirms the validity of the configuration currently displayed in the browser. This is replaced by an error message should there be a conflicting setting. The tile with which the conflict is associated will be outlined in red. The Edit Object menu can also be displayed for a tile by double clicking on its entry in the Object Folder in the Explorer view. Audio and Alarm settings can be configured for each source by double clicking on its entry in the Source Folder in the Explorer view. Right-click context menus provide quick access to tile object menus and commonly used functions are presented in the top tool bar for ease of use. 9 Sierra Video Navigating the User Interface Settings for multi-viewer objects can be accessed from the Module, Layout, Group and Object menus, or by using the buttons on the toolbar. Main Menus Module Menu The Module Menu allows a module's global settings to be configured. Note: Some functions are only available from the toolbar. 10 SM-XX Auto update - automatically updates tile layout to the display output and preview every time it is changed in the edit workspace. Update layout - manually transfers edit workspace layout to display output and preview. Get layout - transfers the current display layout to the edit workspace. Setup module - opens the dialog of the currently selected tile object. Setup source - opens the dialog of the currently selected tile object. Note: The error message, Selected object has no source will appear if the current object is not an audio or video object. Setup remotes - opens the dialog for SV-Remote operation. See below. Set Time - opens the dialog to adjust the clock and date settings. Halt, Reboot, Reset Module - maintenance items for shutting down, rebooting the system, or resetting input/output cards. The task that each of these execute is: Halting the module guarantees that any files that have not been saved yet, such as layout ones, will get saved before powering off the frame. This stops the system from running. The only way to restart it is to power off power on again. Rebooting the module will shut the system down and start it back up again. This can take up to 70 seconds. Resetting the module leaves the CPU running, but resets and reloads the firmware into all the input/output cards. 11 Sierra Video Setup Remotes Search Again – searches for all SV-Remote control units on the network. These are listed by IP address under Remotes Found. Configure – allows the IP settings of the currently selected SV-Remote to be configured. Control Mode: All SM-xx's together – check to control two or more SM-xx units (listed by IP address under SM-xx's to Control) from the selected SV-Remote. Individual SM-xx Selection – assign a single SM-xx (listed by IP address under SMxx's to Control) to the selected SV-Remote. To select the individual SM-xx to control, use INSERT+1 to select the first SM-xx in the list, INSERT+2 to select the second, etc. Edit – edit the current SV-Remote assignments. 12 SM-XX Set Time Clock/date display data can be derived from several sources; the system clock, NTP synchronisation, LTC, or VITC from a chosen SDI input. The clock source is set by going to the Set Time item in the Module menu. Here there are two tabs, Timezone and Time. The timezone should be set to the appropriate region before adjusting the clock. To set the clock source, go to the Time tab and select the desired source – Manual, NTP, LTC or VITC. The setup procedures for each mode are: Manual: In this mode the time and date of the system clock will be shown and can be adjusted. Press the Get button to show the current time. To adjust the time enter the new time and date in the appropriate fields and then press the Set button. A battery on the CPU board ensures that time data is retained should the unit be powered down. NTP: In this mode the time is sourced from an NTP server (or multiple NTP servers can be entered). Press the Add button to add a new server, and enter the host name or IP address of the new server. LTC: In this mode the time is sourced from the LTC input on the rear of the frame. There is nothing to setup here; there just needs to be LTC present for this to work properly. If no LTC is present then the system clock will be used. (If LTC is present but later disappears then the clock will continue advancing without any discontinuity). VITC: Here the time can come from VITC that is present on any SDI input. Select the chosen SDI source number that contains VITC. If no VITC is present then the system clock will be used. (If VITC is present but later disappears then the clock will continue advancing without any discontinuity). 13 Sierra Video Layout Menu The layout menu allows layouts to be created, saved, deleted and layout settings to be chosen for new layouts. New layout - offers to save the current layout before removing all objects from the editor workspace ready to create a new layout. Load layout - loads a previously saved layout. Save layout - saves current layout. A name must be given if this is the first time the layout has been saved. Save layout as - saves current layout with a different name. Delete layout - delete a selected layout from the saved list. 14 SM-XX Setup layout - opens the Layout Properties window. Choose background type from transparent, color or bitmap. Also choose new layout style from Center, Tile or Scale. Background - set the display background color. Bitmap - apply selected bitmap to the background. Style - select bitmap style: Center (centers bitmap); Tile (display bitmap in multiple tiles); or Scale (scales bitmap to fit the display background). 15 Sierra Video Group Menu The group menu allows objects to be selected as a group. Select all objects - all objects in the layout will be selected and can be operated on as a group. Unselect all objects - cancels group all objects command. Cut objects – deletes all the tile objects in the group. Paste objects – pastes the object that is on the clipboard to all objects in the group. Move objects to front/back – moves all tile objects in the group to the front/back. Note: Objects can be selected individually to create a group by holding the Ctrl key down before clicking on them. 16 SM-XX Object Menu The settings for the tiles can be manipulated from the object menu. This is accessed either via the main menu, or by a right-click on the tile to be edited. New object - creates a new object and open the Edit Object Dialog described in the Edit Object Dialog section. Edit object - open the Edit Object Dialog for the tile object that is currently selected. Cut object - delete the currently selected tile object. Copy object - copy the display properties of the currently selected tile object (excludes source properties). Paste object - paste the copied display properties to the currently selected tile object. Paste new object - create a new object and paste to it any previously copied display properties. Move object to front - send the currently selected tile object in front of all other objects. Move object to back - send the currently selected tile object behind all other objects. Fit object on to grid – expands all edges of the currently selected tile object to the nearest grid. Size object to grid – sets the size of the currently selected tile object to the chosen grid pitch. Size object to screen - set the selected tile object to full-screen size. 17 Sierra Video GRID Menu The grid menu enables the Editor Workspace to be defined by a grid for ease of aligning tiles in a regular arrangement. The Size Object to Grid function in the main toolbar works in conjunction with this feature and automatically sizes the currently selected tile to the cell size of the grid that has been set. Fixed movement – check to enable tiles to be snapped to the nearest grid position when repositioning. The tip left corner of the tile is anchored to the top left corner of the grid position. 3 x 3 grid – check to define a 3 x 3 grid. 4 x 4 grid – check to define a 4 x 4 grid. 5 x 5 grid – check to define a 5 x 5 grid. 6 x 6 grid – check to define a 6 x 6 grid. Help Menu About This menu provides current status information on the Browser, CPU and scaler firmware versions. 18 SM-XX Module Properties Module Properties are opened from Setup Module in the Module menu. Boards Tab Select board - select a board to define sources. Card configuration - show selected card configuration. Source 1 to 4 - select source type from drop down list for each input. 19 Sierra Video Screen Tab Resolution - set the display output resolution. Aspect ratio - set the display output aspect ratio to match the display device. Genlock - lock the display output to the SM-xx external reference. Sources Tab Source Name – enables the naming of sources. These are not names that get transferred to UMDs or anything of that nature. They are simply user names to assist with identifying sources within the Web interface. 20 SM-XX Audio Monitors Tab Outputs 1 to 8 - audio monitor output channel selection controls. Select the source and source channel number to be directed to the monitor output. 21 Sierra Video Audio Outputs Tab Outputs 1 to 32 - audio output channel selection controls. Select the source and audio channel number to be directed to the output. 22 SM-XX GPIs Tab GPO Alarms Tab GPO Alarm Number – select GPI alarm output number 1 to 8. Alarm Source – assign alarm source to the selected GPI alarm output number. 23 Sierra Video GPI Inputs Tab This sets up the task to execute on each GPI input when activated. Some tasks are level sensitive (0 volts in = off, 5 volts in = on), whereas others are transition sensitive (a transition from 0 to 5 volts will toggle the current state). An example of a level sensitive task is the Hardware Tally: 0 volts will switch the tally off, 5 volts in will switch the tally on. An example of a transition sensitive task is the Full Screen Toggle: if the relevant window is currently at its normal size then a transition from 0 volts to 5 volts will switch it to full screen; if it is at its full screen size then the transition will switch it back to its normal size. Edge sensitive tasks can be identified as the ones that have "toggle" in their name. 24 SM-XX Network Tab Hostname - enter friendly name for SM-xx. Use DHCP - check to use DHCP for automatic acquisition of network settings. Uncheck for entry of fixed network settings. IP Address - enter fixed IP address. Netmask - enter network mask, if required. Gateway - enter gateway address, if required. DNS Server 1 - enter DNS server address, if required. DNS Server 2 - enter DNS server address, if required. Apply - applies fixed network settings to the frame. SNMP - check required SNMP version. Add - reveals dialog for entering SNMP IP address and adding to list. Delete - deletes selected SNMP IP address from the list. 25 Sierra Video AM-xx Tab (or DATA-xx Tab) The AM-xx (or DATA-xx) is a separate 1U based hardware device for converting multichannel audio into level data that can be distributed via a LAN. The AM-xx can be used in conjunction with the SM-xx as a means of providing additional external audio interfacing (up to 64 audio channels per frame). This tab enables the setup of one or more AM-xx units for use in audio server mode. A maximum of 20 AM-xx units can be assigned to a multi-viewer. However, network bandwidth requirements must also be carefully considered. Each AM-xx frame requires 285kbps for audio metering data. New - to add a new AM-xx. Delete - deletes the selected AM-xx from the list. When the Edit button is pressed, a dialog for entering the server name and IP address appears. AM-xx Server Name – displays the given name of the AM-xx audio server. A default name (e.g. ‘audio-server-0’) will be generated, which can be edited. IP Address – for entering the IP address of the AM-xx. 26 SM-XX Protocols- Serial Ports Tab This shows the serial ports that are available and the current settings applied to the ports. To change these settings press the Configure button. This allows editing of the serial port settings. The settings specified for the TSL protocol are baud rate = 38400, data bits = 8, parity = even, stop bits = 1, flow control = none. However, this can be changed if non-standard settings are being used by the TSL control unit. For other protocols, determine what the serial port settings are for the device attached, and set them accordingly here. If the Sierra Router protocol is selected then the physical connections from the router to the multiviewer table are as described below. 27 Sierra Video Sierra Router Tab This allows the TCP settings of a connection to a Sierra Video Systems Router to be configured. Once the connection to the router has been established, the first row of UMDs in each video window will acquire the applicable source names of the router according to the source that is feeding the destinations connected to the multiviewer. As cross-points are changed in the router, the UMDs will be updated. The Physical connections from Router to Multiviewer table allows setting up of the wiring between the router's physical outputs and the multiviewer's physical inputs. (This table also applies to the serial port settings if the router is being communicated with through the serial port). Enabled – Allows the multiviewer to attempt to connect to a Sierra router over Ethernet. (If this is ticked AND the serial port protocol is set to Sierra Router then the Ethernet port wins; the serial port will NOT attempt to connect to a router). IP Address – The IP address of the Sierra router. Port – TCP port to connect to the Sierra router with. Normally a Sierra router uses port 10001, however this can vary. Physical connections from Router to Multiviewer – table to set up to reflect the wiring between the router and the multiviewer. The columns are: MV Input – Lists all the inputs on the multiviewer. Fields in this column cannot be edited. Router Output – In these fields, enter the physical output number of the router that is connected to the multiviewer's input. Router Level – In these fields, enter the level in the router that the output comes from. Connected – Untick this field if the associated input does not come from the router. 28 SM-XX Source Properties Window Source Properties for a selected tile can be opened from the Module > Setup Source menu, or by double-clicking on a selected source in the source folder. Audio Tab Use this tab to assign audio channels to sources and make various global settings for phase bars and select reference levels for analog audio and analog scales. Audio Mode - selects the audio source; Embedded (from SDI video), External (from optional external audio input card), or AM-xx (audio over LAN. A list of available servers appears in the drop-down box below). Channel 1 to 16 Controls - select an audio input to display for the associated source bar. Phase Bar 1 and 2 – enable either or both phase bars and select two channels from the appropriate drop down box. Reset Button – press this button to reset all items in Channel/Phase bar drop-down lists to the first available item (which will be "None" in the list given by the protocol). A/D Reference – set the analog to digital reference level when applying an analog meter scale to a digital source, or a digital meter scale to an analog source. It can be set within the range of -30 to -3 dBfs. 0 dB Reference – set the 0dBu reference level with respect to analog meter scales. It can be set within the range of -12 to +12 dB. Note: Neither the A/D or the 0dB reference adjustments have any effect when digital audio is used with a digital scale. 29 Sierra Video Alarm Tab The Alarm Tab allows each video and audio alarm to be configured, enabled and displayed. The properties section of this window allows each alarm to be set individually for onset and auto-clear delay, logging status and visibility in objects and lists. To select an alarm to configure, click on it in the Select Alarm list on the left on the window. The selected alarm will appear with its descriptive text highlighted in red. Choose the required properties from the right hand section of the window and check the Enabled box to activate the alarm. Enabled alarms are shown with a green circle before the descriptive text. Select alarm - Click on one of the alarms listed to change the attributes of it using the controls listed under Properties. Enabled - tick this to enable the selected alarm. Delay - input a delay before the alarm starts. Automatic clearing - check this for alarms are cleared after the Automatic clearing delay. Automatic clearing delay - input the automatic clearing delay in seconds. Show in objects - display alarms in objects. Send SNMP - check to send SNMP trap in response to alarm. Use audio channel alarm settings – check to apply specified audio alarm detection criteria, as configured in the Setup Audio Alarms menu. Setup Audio Alarms – enters the audio alarm setup dialog. To setup audio alarms check the Use audio channel alarm settings box and click on Setup Audio Alarms from the Alarm tab of the Source Properties dialog. 30 SM-XX Audio Alarms Setup Check the boxes to activate individual audio alarms for channels or pairs of channels. Select the loss and over thresholds for analog and digital sources. Choose an anti-phase threshold for channel pairs. Select All to enable a specific alarm for all channels. Unchecked alarms remain disabled even if Use Audio Channel Alarm Settings is checked in theAlarm tab. Nominal threshold settings apply if individual alarms are enabled but Use Audio Channel Alarm Settings is not checked. Enable Alarms - to enable an individual audio loss or over alarm check the box in line with the audio channel. For phase or carrier loss alarms check the box in line with a pair of audio channels. Audio Loss Threshold - the level at which audio is considered lost – select values from the analog and digital drop down boxes. The range is 0dB to -50dB for analog and 18dBfs to -70 dBfs for digital. Audio Over Threshold - the level at which audio is considered over level - select values from the analog and digital drop down boxes. The range is 0dB to 20dB for analog and 0dBfs to -20 dBfs for digital. Antiphase Threshold - the phase values in degrees before a pair of channels is considered to be out of phase. The range is 90° to 180°. Note: The effective Alarm State for individual alarms depends on the Use audio channel alarm settings box check state and the applicable audio alarm state in the Alarm tab as explained below. If Use Audio Channel Alarm Settings is not ticked and audio loss alarm is enabled in the Alarm tab of the Source Properties dialog, then all the channels will have their audio loss alarms enabled with a nominal threshold set for the audio loss level. 31 Sierra Video If Use Audio Channel Alarm Settings is ticked and audio loss alarm is enabled in the Alarm tab of the Source Properties dialog, then the enabled state of each channel will depend on the settings in this Audio Alarms dialog and the threshold set for the audio loss level will also be determined here. If Use Audio Channel Alarm Settings is ticked but the audio loss alarm is disabled, then none of the audio loss alarms will be enabled. The following table summarises the various alarm status conditions. Individual alarm Use Audio Channel Alarm Settings Alarm state Enabled Enabled Enabled and uses user threshold settings Enabled Disabled Enabled but uses nominal threshold settings Disabled Enabled Disabled Disabled Disabled Disabled 32 SM-XX Copy Tab Audio - check to copy audio settings from selected source/s 1 to 40. Alarm - check to copy alarm settings from selected source/s 1 to 40. Select All - select all sources. Select None - deselect currently selected sources. Copy To - copy settings to selected source/s. 33 Sierra Video Edit Object Window The Edit Object menu is used to set up all the attributes of a tile. It can be opened using two methods: Double-click on the object to edit. Go to the Object menu and select Edit Object or New Object. The Edit Object menu comprises 4 tabs: Type, Border, Parent, Properties and UMD. Some controls, such as Properties, depend on the type of tile object. Type Tab Type - Defines object type. Choose from None, Video, Audio, Text, Logo, and Clock. Name - Name of the tile, can be up to 40 characters long. X, Y, Width, Height - size and position of the tile can be altered by entering figures here, and any adjustments will be reflected in the outline of the rectangles drawn to represent the tiles. Conversely, any resizing or repositioning of the tiles done graphically will be reflected in the figures presented here. Aspect Ratio - the aspect ratio can be set to fixed so that as either width or height are changed, height or width, respectively, will be automatically adjusted to retain the ratio. 34 SM-XX Border Tab Separator - number of pixels separating the edge of the video content from the tile border. Width - pixel width of the border. Color - color of the border. Visible - turns the border on and off. 35 Sierra Video Parent Tab Assigning a parent object to one or more tiles enables collective positioning and resizing of grouped tiles, which eases the configuration of objects that have a fixed association. Once a tile object has been assigned to a parent, it can no longer be moved independently. Name – for the currently selected tile, select the parent object by name. Position – set the anchor point of the currently selected tile relative to the parent object. X Offset / Y Offset – offset of the anchor point of the currently selected tile relative to the parent object. Note that using a zero offset value will cause the tile object to behind the parent object. Lock size – check to lock the scaling of the currently selected tile to that of the parent object. When this option is selected, the tile object cannot be resized independently. 36 SM-XX Properties Tab This tab will not appear if the object type is set to ‘None’ in the Type tab. For each of the other object type selections, a specific set of controls will appear on the Properties tab. Source Properties Tab (Video or Audio object) This tab only exists within the Properties tab of Video and Audio type tiles. Source - for a video tile, this selects the source of the video to display in the tile. For an audio tile, it selects the audio channels that have been set up to be associated with the chosen source. 37 Sierra Video Audio Properties Tab (Video or Audio object) This tab only exists within the Properties tab of Video and Audio type tiles. Width - sets the width of the audio meter bars. Scale - sets the scale type of all the audio meter bars on display in this tile. Scale Label Position - sets the positioning of the scale labelling on either side of the meter. Bar Colors - selects bar to which the color of the over, upper and lower range applies. Over Color - sets the over range color for the bar selected in the Bar Colors control. Upper Color - sets the upper range color for the bar selected in the Bar Colors control. Lower Color - sets the lower range color for the bar selected in the Bar Colors control. 38 SM-XX Labels - sets the display of the bar labels to either an enumerated format, or the labels as entered for the respective channels, or off. Color - sets the color of the bar labels. Alarm Indicators - enables the alarm indicators at the top of the bars. Transparent on Video - enables the transparency of the meter bars when they are on the in-picture area. Transparency Level - sets the transparency of the audio bars when they are on the inpicture area. Display outside of picture - extends the width of the tile and displays the meters to the left and right of picture area. Visible - enables / disables the audio bars. Split Bars - equally divides the audio bars either side of the picture. 39 Sierra Video Error Properties Tab (Video or Audio Object) This tab only exists within the Properties tab of Video and Audio type tiles. It determines the behavior of the tile when one of its enabled alarms gets triggered. Color - sets the border color of the tile when an alarm triggers. Clear - sets the border color of the tile when an alarm has been cleared by the user, but the conditions that caused the alarm to trigger still remain. Show alarm name - when ticked, all the alarms that are currently triggered will be listed in the tile. Visible - must be ticked if any of the alarm indications are to be shown in the tile. 40 SM-XX Tally Properties Tab (Video Object) This tab only exists in tiles that are of Video type. Tally - select hardware, or one of two software tallies. The hardware tally is related to the source of the video window. There are 16 GPI inputs; one for each source. The two software tallies operate in accordance with TSL protocol. This has up to 127 display addresses; each address comprising 4 tallies and a UMD. Address 0 of the protocol is assigned to the first video source. Address 1 is assigned to the second video source, etc. Each video window can use the first 2 tallies of its display address to trigger the 2 tallies available in its UMD bar, or the border tally if set up appropriately. Style - select red-green, green-red, red-red and green-green. Shape - select fill, square or round. Position - select UMD, border or UMD and border. Disabled - sets the disabled color to either default disabled color, UMD color, border color, or the user selected color set in the box below this control Color - selects disabled color if disabled color is set to the user-selected source. Visible - turns the display of the tally on / off. 41 Sierra Video VBI Properties Tab (Video object) This tab only exists in tiles that are of Video type. CC Indicator - enables an indicator to be shown in the tile if the selected closed caption type is present. CC Visible - displays the closed caption text in the tile if ticked. CC Channel - selects the channel of the closed caption to encode. XDS Visible - shows the information contained in the extended data services. TT Indicator - enables the indicator to be shown if teletext is present in the video. TT Visible - displays the teletext from the selected page in the tile if ticked. TT Page - selects which teletext page is to be viewed. VITC Visible - enables the display of the vertical interval timecode. This is only available on SDI inputs. 42 SM-XX WSS Properties Tab (Video object) This tab only exists in tiles that are of Video type. Mode - selects the type of WSS / AFD to decode. Color - sets the color of any cropping of the video that may be needed to display the correct aspect ratio. Aspect Ratio, Auto size - when ticked, the aspect ratio of the video will automatically respond to any changes in the selected WSS or AFD information. Aspect Ratio, Default - chooses the aspect ratio to use when the correct one is unknown (for example if WSS or AFD is not present). Aspect Ratio, Indicator - when ticked, this will present an indicator in the tile if there is aspect ratio information available. 43 Sierra Video SAG- Safe Area Generator Tab (Video object) Visible - when ticked, this will show the safe area outline in the video. Safe Area Cage - if a preset safe area cage is to be shown then choose the appropriate one from this list. Setup Custom Cage - when ticked, a custom sage area cage can be drawn using the vertical and horizontal border controls. Vertical Borders - adjust the vertical borders of the safe area. The slide bar can be used, or numbers manually entered. Horizontal Borders - adjust the horizontal borders of the safe area. The slide bar can be used, or numbers manually entered. Text Properties Tab (Text object) 44 SM-XX This tab only exists in tiles that are of Text type. Text - enter up to four lines of text and set it to hidden or visible. Alignment - justify text within the tile. Font - select font and point size. Foreground - set text color. Background - set text background color. 45 Sierra Video Logo Properties Tab (Logo object) This tab only exists in tiles that are of Logo type. File name – select one of the stored logo files. 46 SM-XX Clock Properties Tab (Clock object) This tab only exists in tiles that are of Logo type. Digital - check for digital clock type, uncheck for analog type. 24 hours - check for 24 hour clock (applicable to digital clock type only). Timezone - check to set clock time to GMT, or within the range of GMT -1 to GMT +12. Offset (hours) - applies offset from -12 to +12 hours (works in combination with Timezone setting, if checked). Foreground - set the clock color (digital clock only). Background - set the clock background color (digital clock only). 47 Sierra Video UMD Tab Text - enter UMD text and set it to hidden or visible. Font - choose font and font-size of the text. Foreground - sets the color of the text. Background - sets the color of the UMD background. Position - position of UMD relative to the tile. Separator - places a separator between the UMD and the object’s image and also between each line of text. The color of the separator can be chosen. Inside - places the UMD bar inside the tile (within the active picture). Transparent on video - enables the transparency of the UMD when it is in the picture area. Transparency level - sets the transparency of the UMD when it is in the picture area. Visible - enables / disables the UMD. 48 Sierra Video Installation 3 Chapter Introduction The Sm-xx 1U frame may be installed in 19 inch bays with 426mm depth (~450mm including connectors). Ventilation is produced in each frame with exhaust fans on the left hand side (viewed from front) and intake grilles at the right. Frames should be installed into bays such that airflow through these apertures is not impeded. Note: The front rack ears are intended to provide a means of retaining the unit in the rack.To ensure adequate support the unit must also be supported at the rear of the frame. Please ensure that ventilation is not impaired when selecting suitable supports. Power and Fuses The mains voltage (240/100 volts) will be auto detected provided it is in the range 90 – 240 V and 47 – 63Hz. A 5A fuse is fitted and a spare fuse should be located under the pull-out flap. 49 Sierra Video Health and Safety Considerations For your own Protection, observe the following safety precautions when installing, operating and servicing your device. The unit MUST BE DISCONNECTED & ISOLATED FROM THE MAINS INPUT and from other product outputs before undertaking maintenance. ELECTRIC SHOCK HAZARDS exist if conductive instruments, neck chains or fingers etc. are placed within the unit or in close proximity of the input/output terminals/connectors. Incorrect installation can cause internal components to rupture and particles to be ejected from the product. TOXIC FUME HAZARDS exist if the unit is subjected to direct flames or excessive temperature of above 100 Degrees Centigrade ambient. The mounting and installation of the unit must be arranged by the user to comply with all safety regulations by the indigenous authority. Disposal Do not incinerate as explosive and toxic fume hazards exist. Disposal must be by dismantling the product to component level and disposing of each component by an approved method. 50 SM-XX Connector I/O The SM-xx uses coaxial BNCs for the video inputs, LTC and sync inputs. Microcross connectors are fitted for the two DVI-I inputs and one output. The GPI I/O connector is a high density 26 way female 'D' connector. External audio connections (input or output) are via a pair of female 37 way ‘D’ connectors, with audio monitoring outputs on a male 25 way 'D’ connector. The serial port comprises a 9 way female 'D' connector. A standard RJ45 connector is provided for LAN connection and a USB connector on the front panel is provided for connecting a keyboard. (A pack of mating 'D' type connectors is supplied with the unit). Video Inputs All inputs (except DVI-I) are assigned to the 4 x BNC input connectors at the rear of the unit. Up to 4 inputs can be applied if the configured video format uses a single BNC (SDI, HD-SDI, composite). For S-Video, two connectors are required, for RGB/YUV three connectors are required. There are two DVI-I input connectors, as this is the maximum number of DVI-I inputs supported per frame. All input types are assigned within the unit's system menu. Component inputs such as YUV or RGB require three connections per channel and only one channel can be handled per input card. However, a further two channels can be fed via the analog pins of the two DVI input connectors (and suitably assigned in the unit's menu) making a maximum total of six channels. Any unused BNCs can be used for other video formats. For Y/C, two connections per channel are required. Therefore two channels can be handled. Any unused BNCs can be used for other video formats. Video Outputs The main DVI-I output supports resolutions up to HD 1080p60, 16:9 (1920 x 1080). Both digital and analog outputs are available on this connector. Images on the output screen can be varied continuously in size and position, cropped or displayed in pre-configured screen layouts on a chosen colored background. The main output is also used to display the unit's system menu when screen configuration and set-up options are selected. This is not necessary when using external control via the LAN. Audio I/O Audio levels may be displayed using up to 16 bargraphs in each tile, either superimposed on each video image or outside active video. Audio is derived from the incoming embedded audio (when using SDI or HDSDI inputs), or from up to 32 channels from external analog or AES/EBU sources, for which the appropriate audio input card option must be installed. Additionally, external audio may be monitored using level data from the AM-xx or MADIxx via the LAN. 51 Sierra Video Serial Port Assignments There is a single serial data port that can be configured for either RS232 or RS422 operation. The mode of operation is set by means of jumpers (J13 and J14) on the CPU board. The pin assignment of the connector is shown on page 57. Jumpers J1, J13 and J14 are located on the Controller (CPU) card. Access requires the removal of the CPU card from the front of the unit with the power removed. Jumper J1 J13 J14 Position 1/2 used for debugging RS422 RS422 Position 2/3 normal RS232 (set in conjunction with J14 RS232 (set in conjunction with J13) Note: Pin 1 is indicated on the PCB. Other CPU card settings and controls are for factory use only. 52 SM-XX Audio I/O Connector Pin Assignments AES/EBU inputs or outputs (depending on the card fitted) may be jumper selected per channel to be either balanced or unbalanced. The settings are set via jumpers on each digital audio input card. Position 1/2 2/3 Meaning balanced unbalanced Channel 1 2 3 4 5 6 7 8 Jumpers J2, J3, J4 J5, J6, J7 J26, J27, J28 J29, J30, J31 J32, J33, J34 J35, J36, J37 J38, J39, J40 J41, J42, J43 Channel 9 10 11 12 13 14 15 16 Jumpers J44, J45, J46 J47, J48, J49 J8, J9, J10 J11, J12, J13 J14, J15, J16 J17, J18, J19 J20, J21, J22 J23, J24, J25 53 Sierra Video Remote Panel The remote panel may be installed in 19 inch bays with 114mm depth (~140mm including connectors) and has the same control functions as the main frame. It is also fitted with rack mount ears but does not use forced cooling. Preset configurations already stored in the SM-xx can be recalled by briefly pressing the desired pre-set button (1–10 on the right side of the panel), which will illuminate. A current multi-viewer configuration may be stored as one of ten user presets by depressing the chosen button number for at least three seconds. A SV-Remote control panel may be set either to address single or multiple SM-xx units. When addressing multiple units (‘collective mode’), only the preset storage and recall buttons are operative and all systems will respond in parallel, eg., store or recall preset 110. Other control keys and the keyboard socket cannot be used in collective mode. Connection Communications between the SV-Remote and SM-xx are handled via the LAN. Where there is a requirement for two or more control panels in different areas, additional SVRemote units can be cascaded from the first via RS422. Network Connection and Setup Should the Remote Panel to be connected via the LAN, the network settings are configured entirely by the SM-xx. Multiple Remote Panel configurations can be present on the same network, therefore a SM-xx does not automatically acquire remote units that it finds on the network; this has to be done manually from the SM-xx menu or web interface. With the SM-xx and Remote Panel connected to the network, the following steps must be carried out to initialize communications: Note: If installing multiple Remote Panels, it is a good idea to connect them one at a time to the network, because they will all have the same default IP address and will therefore not be distinguishable from one another. Once the first Remote Panel has been connected to SM-xx via the LAN, any additional remote units may be cascaded from the first, by means of a pin-to-pin RS422 cable. The DATA OUT port of the first unit is connected to the DATA IN port of the second unit. Connections between multiple Remote panel units; Signal Remote Panel Data In GND 4, 5, 9 RX+/RX2 TX+/TX3 RX-/RX+ 7 TX-/TX+ 8 Remote Panel Data Out 4, 5, 9 2 3 7 8 Uploading Graphic Files Graphics files may be uploaded to the frame and assigned as tile objects for display. They might be used for channel identification purposes and up to four images may be displayed at any one time. 54 SM-XX Graphics files to be stored in the frame must be in the .bmp format. Uploading the files is performed using a PC connected to the SM-xx LAN port directly, or over a network. 1. Establish communication with the SM-xx frame by using Windows Explorer to search for the IP address of th 2.Right click in the right hand side of the Windows Explorer page and select from the menu. The FTP server w 3.Copy the graphics file or files to the clipboard and paste them into the right hand side of the Windows Explor 4. The file transfer will begin. 5. When the upload is complete, reboot the frame to update the file list. Note: The IP addresses of the frame and the PC must be in the same range. If necessary, the IP address of the frame can be changed within the on-screen configuration menu. Upgrading Firmware From time to time, firmware updates may become available. The current firmware status of the multi-viewer can be checked in the browser interface Help / About menu, or the onscreen Configuration Mode menu. Uploading new firmware files is easily performed using a PC connected to the SM-xx LAN port directly, or over a network. 1. Establish communication with the SM-xx frame to be upgraded by using Windows Explorer to search for the 2.Copy the replacement file or files to the clipboard and paste them into the right hand side of the Windows Ex 3.The file transfer will begin. 4.When the upload is complete, reboot the frame to enable the updates to take effect. This will take several mi Note: The IP addresses of the frame and the PC must be in the same range. If necessary, the IP address of the frame can be changed within the on-screen configuration menu. Other freely available or commercial FTP clients may be used as an alternative to Windows Explorer, eg. WinSCP. This may be required should difficulties be encountered using Windows Explorer, eg. should file transfer be blocked by some Windows security measures. The procedure when using other FTP clients is generally similar. 1.Open the FTP client. 2.Enter the IP address of the SM-xx as the Host Name. 3.Enter ‘ftp’ as the User Name (no password required). 4.Check that the file protocol is set for FTP and press Enter or Login (as required). 5.If prompted for a password, leave blank and press OK. 6.A window will appear. Copy the new firmware files from the left-hand side (PC) paste to the right-hand side (SM-xx). and 7.If in any doubt as to the procedure for your specific FTP client, consult the appropriate user guide or product vendor. 55 Sierra Video Updating the Scalers Some firmware updates may include additional revisions for the video board scalers. The requirement for updating the scalers can be determined by going to the - menu. If any scalers need updating, then there will be a tag "needs updating" next to the scalers listed. Where scaler updates are required, proceed with steps 1 to 3 above and continue as follows (note that this process takes approximately 25 minutes): Open a DOS command window. At the command prompt type; ‘telnet 192.168.0.120’, or whatever the current IP address is set to. Log in with the user name ‘root’, using the password ‘smv’. Type; ‘./update-scalers’ The status of the update will be indicated in the command window. Ensure that when the process is complete, all scalers have been updated (there are four scalers). 56 Sierra Video Specifications 4 Chapter Main Frame SIGNAL INPUTS - VIDEO Up to 8, 12,, or 16 video inputs Video I/P card HD-SDI – SMPTE292M - 1920x1080i60, 1920x1080i59.94, 1920x1080i50, 1920x1080p30, 1920x1080p29.97, 1920x1080p25, 1920x1080p24, 1920x1080p23.98, 1280x720p60, 1280x720p59.94, 1280x720p50, SMPTE424M - 1920x1080p60, 1920x1080p59.94, 1920x1080p50 (some connector related limitations apply) Auto-sense on composite, SDI and HD-SDI feeds Embedded audio Embedded audio derived from SDI/HD-SDI (up to 16 channels per source) External audio Via optional input cards: Analog – up to 32 channels (16 pairs) AES/EBU – up to 32 channels (16 pairs) with SRC (32kHz-96kHz resampled to 48kHz) Via the LAN: Audio delivered via the AM-xx or MADI-xx audio metering units via the LAN - up to 64/128 channels, analog, AES/EBU digital, Dolby Digital and MADI Outputs OUTPUTS One DVI-I output supporting resolutions; XGA, 720p60, 720p50, SXGA, SXGA+, 1080p60, and 1080p50 (as per the pixel aspect ratio, or other selectable options for non-square pixels). Processing delay approximately 1 video frame, depending on video source. Video sources fully scalable and displayed in native format (4/3, 16/9) Audio monitoring output, up to 8 analog output channels as standard Audio bars superimposed or external to video Genlocked video sources 57 Sierra Video Alarms Video inputs: Sync loss, Black, Freeze frame. Audio inputs: Loss of embedded or external audio, over-level, out of phase channel pairs. Metadata inputs: Loss of VITC, teletext (analog), subtitles, video non-sync detection. Alarm indication: Visual (in display), GPI, LAN, SNMP traps. Metadata, Decoding/Monitoring Teletext (analog), Subtitles, AFD driving aspect ratio, WSS driving aspect ratio, VITC. GPI/O 16 inputs and 8 outputs. Scales and Ballistics NORDIC: Overall dynamic range: 54dB (+12 to -42dB) Attack time: 10mSec Decay time: 1.7Sec per 20dB decay DIN PPM: Overall dynamic range: 55dB (+5 to -50dB) Attack time: 10mSec Decay time: 1.5Sec per 20dB decay BBC PPM: Overall dynamic range: 24dB +3dB down "Mark 1" (+12 to -12dB) Attack time: 10mSec Decay time: 2.8Sec per 24dB decay (from "Mark 7" to "Mark 1") VU: Overall dynamic range: 23dB (+3 to -20dB) Attack time: 300mSec Decay time: 300mSec per 20dB decay VU EXTENDED: Overall dynamic range: 60dB (+10 to -50dB) Attack time: 300mSec Decay time: 300mSec per 20dB decay AES/EBU: Overall dynamic range: 60dB (0 to -60dB) Attack time: < 5ms Decay time: 1.5Sec per 20dB decay Phase Correlation Display Attack time: 0.4Sec for zero to ±1 deviation Decay time: 0.4Sec for ±1 to zero deviation Input dynamic range: 45dB Minimum input level: -45dBu 58 SM-XX Phase Correlation Display Attack time: 0.4Sec for zero to ±1 deviation Decay time: 0.4Sec for ±1 to zero deviation Input dynamic range: 45dB Minimum input level: -45dBu Mechanical 1U 19” Rack Mount box. Outline Dimensions: 484mm(W) x 426mm(D) x 44.5mm(H) Weight: approximately 7.5kg Power Autosensing, 90 – 240VAC, 47 – 63Hz power supply Power supply and fan failure LED indicators on front panel Maximum power consumption approximately 190W depending on video sources (SM-16) Environmental Temperature 0°C to 30°C Humidity 70% max. Front Panel USB connector for keyboard 10 preset buttons 6 on-screen menu control buttons Rear Panel 2 x 32 way ‘D’ input connectors for audio inputs / outputs 2 x DVI-I connectors for digital or analog component inputs 1 x DVI-I connector for digital or analog display 16 x BNCs for autosensing video inputs 1 x BNC for LTC input 1 x BNC for video sync input 1 x 25 way 'D' connector for audio monitoring out 1 x RJ45 connector for Ethernet (LAN) for browser, NTP clock update and/or remote panel control 1 x RS232/RS422 connector for UMD tally via TSL, Image Video or other protocols 1 x 26 way 'D' connector GPI/O port 1 x BNC for LTC input 1 x BNC for video sync input 1 x 25 way 'D' connector for audio monitoring out 1 x RJ45 connector for Ethernet (LAN) for browser, NTP clock update and/or remote panel control 1 x RS232/RS422 connector for UMD tally via TSL, Image Video or other protocols 1 x 26 way 'D' connector GPI/O port 59 Sierra Video Remote Panel FRONT PANEL USB connector for keyboard 10 preset buttons 6 on-screen menu control buttons REAR PANEL 1 x RJ45 connector for Ethernet (LAN) for browser, NTP clock update and/or remote panel control 1 x RS422 DATA IN connector 1 x RS422 DATA OUT connector MECHANICAL 1U Remote Panel Outline Dimensions: 484mm(W) x 114mm(D) x 44.5mm(H) Weight: 2kg POWER Autosensing, 90 – 240VAC, 47 – 63Hz power supply. Power supply and fan failure LED indicators on front panel (for SM-XX) Interfaces Viewed from the rear of the SM-XX SERIAL INTERFACE CONNECTOR RS422, RS232 RS422 Pin # 1 2 3 7 8 60 Function Gnd RXTXRX+ TX+ RS232 Pin # 2 3 5 Function TX RX Gnd SM-XX GPI I/O Connector Pin # 1 2 3 4 5 6 7 8 9 10 11 12 13 14 15 16 17 18 19 20 21 22 23 24 25 26 Function GPI-I 1 GPI-I 4 GPI-I 7 GPI-I 10 GPI-I 13 GPI-O 0 GPI-O 3 GPI-O 6 GND GPI-I 0 GPI-I 3 GPI-I 6 GPI-I 9 GPI-I 12 GPI-I 15 GPI-O 1 GPI-O 4 GPI-O 7 GPI-I 2 GPI-I 5 GPI-I 8 GPI-I 11 GPI-I 14 GPI-O 2 GPI-O 5 5V,500mA 61 Sierra Video Audio IN/OUT Connector Pin # 1 2 3 4 5 6 7 8 9 10 11 12 13 14 15 16 17 18 19 62 Analog Signal Pin # GND 20 16+ 21 15+ 22 14+ 23 13+ 24 12+ 25 11+ 26 10+ 27 9+ 28 GND 29 8+ 30 7+ 31 6+ 32 5+ 33 4+ 34 3+ 35 2+ 36 1+ 37 GND Signal 16151413GND 12111098765GND 4321- Pin # 1 2 3 4 5 6 7 8 9 10 11 12 13 14 15 16 17 18 19 Digital Signal Pin # GND 20 21 8+ 22 23 7+ 24 25 6+ 26 27 5+ 28 GND 29 30 4+ 31 32 3+ 33 34 2+ 35 36 1+ 37 GND Signal 87GND 6543GND 21- SM-XX Audio Monitor Outputs Connector Analog Pin 1 2 3 4 5 6 7 8 9 10 11 12 13 Signal 8+ 8 GND 76+ 6 GND 54+ 4 GND 32+ 2 GND 1- Pin 14 15 16 17 18 19 20 21 22 23 24 25 Signal 87+ 7 GND 65+ 5 GND 43+ 3 GND 21+ 1 GND 63 Sierra Video Troubleshooting 5 Chapter The power switch should illuminate red whenever mains power is supplied. Always ensure that power is connected before using the problem solving guide. A spare fuse is supplied in space provided in the IEC mains connector before the unit leaves the factory. Always replace the fuse with one of the correct value as shown in the Installation section. In the event of a power supply failure there is front panel and remote panel indication. The second supply is able to sustain operation of the unit until it can be removed from service and the fault rectified. THERE IS NO VIDEO OUTPUT Check that there is power to the unit and that it is turned on. Check that the video output resolution is not beyond the capability of the display. (see answer to question below). An output should be seen once the unit has booted. THE IMAGE APPEARS FUZZY OR LACKING CLARITY If an analog or digital LCD/Plasma screen is used, check that the output resolution of the SM-XX is the same as the native resolution of the panel. This will avoid forcing the screen to rescale the image. Most LCD/Plasma screens produce artifacts when their internal scalers are active. Output resolution is set using the Screen Resolution function under the System menu. THE IMAGE IS NOT CENTERED ON THE SCREEN Use the monitor controls to align the image. If an analog LCD screen is used, use the auto-adjust facility. UNIT FAILS TO RESPOND CORRECTLY TO COMMANDS Power cycle the unit and/or perform a Master Reset. A Master Reset will restore all settings to the factory default. Turn off the power for a few seconds, then turn it back on while pressing both Fade/Function buttons during boot up. Follow any required configuration steps after reset. CAN DIGITAL AUDIO BE BALANCED OR UNBALANCED? Yes. AES/EBU inputs may be jumper selected per channel to be either balanced or unbalanced. 65 Sierra Video The settings are performed via jumpers on each digital audio input card as explained in the installation section. CAN I USE ANALOG BARGRAPHS FOR DIGITAL AUDIO INPUTS (OR DIGITAL SCALES FOR ANALOG INPUTS)? Yes. The range colors, break points and level references are set for the scale type and NOT the source assigned. For example, assuming the following settings: - Analog scale type: AES/EBU - Analog/Digital scale reference: -18dBfs - Analog 0dB reference: 0dBu - Digital upper range point: -18dBfs - Digital lower range point: -40dBfs Feeding analog AT 0dBu will produce a level of -18dBfs, with the color changes occurring at -40dBfs and -18dBfs. Changing the Analog 0dB reference to +4dBu will produce a level of -22dBfs, with the color changes unaltered. Changing the Analog/Digital reference to -20dBfs (with the analog ref still at +4dBu) will produce a level of -24dBfs, with color changes unaltered. The same applies to displaying digital channels on an analog scale; the color changes will adhere to the analog upper and lower settings. WHAT ARE THE RS232 & RS422 OPTIONS? RS232 or RS422 operation can be selected via jumpers on the controller (CPU card), as explained in the installation section. WHY ARE TIME, CLOCK, DATE SETTINGS LOST WHEN THE FRAME IS POWER CYCLED? This data is normally maintained by a rechargeable battery situated on the CPU board, which has a typical life of 6+ years. Loss of data indicates that the battery requires replacement. Please contact your local dealer. 66 Sierra Video Warranty 6 Chapter A. General Buyer assumes all responsibility for ascertaining the suitability of Sierra Video (hereinafter "SVS") products for Buyer's intended use. No product sold by SVS is designed or manufactured for use in any manner or under any conditions other than those described in SVS's instruction manuals and other printed material for each particular product. If any product is used or applied in a manner or under conditions not specifically authorized by such written materials or if any product is used by unqualified or improperly trained personnel, Buyer agrees that SVS shall have no liability of any kind arising from such use, and Buyer agrees to indemnify and hold SVS harmless from any claims of third parties arising from such use, and Buyer shall provide SVS with counsel of SVS's choice to defend against such claims. B. Limited Warranty 1. This warranty applies only to the original purchaser and is non-transferable. This warranty begins on the date of purchase and will be in effect for five (5) years for new equipment or and for three (3) years for "Factory Refurbished" equipment. Power Supplies and fans are warranted for three (3) years from the date of purchase for new equipment and two (2) years for “Factory Refurbished” units, from the date of purchase. Buyer must obtain a Return Material Authorization ("RMA") number from SVS prior to returning a product for repair. If, in SVS' sole discretion, the product is found to be defective during the term of this warranty, SVS will at its option: (a) provide free replacement parts, and/or (b) repair the unit at an SVS facility. During the warranty period, SVS will make every reasonable effort to support critical emergencies by supplying no-cost loan equipment while the defective unit is being repaired. SVS will provide replacement parts and/or factory service at no charge. Buyer bears the cost of shipping products returned to SVS under this warranty. SVS will bear the cost of shipping repaired products or replacement parts to the Buyer. This limited warranty shall not apply to any of SVS's goods which have been altered or which have been subjected to misuse, mishandling, improper storage or negligence. The aforementioned provisions do not extend the original warranty period of any goods which have been replaced by SVS. This limited warranty shall not apply to any goods not of SVS's manufacture, Buyer to be entitled only to the warranty set forth in the original manufacturer's limited warranty. 67 Sierra Video THIS LIMITED WARRANTY IS EXPRESSED IN LIEU OF ALL OTHER WARRANTIES, EXPRESS, IMPLIED OR STATUTORY, INCLUDING WITHOUT LIMITATION THE IMPLIED WARRANTIES OF MERCHANTABILITY AND OF FITNESS FOR A PARTICULAR PURPOSE, AND ALL OTHER OBLIGATIONS OR LIABILITIES ON SVS'S PART. SVS neither assumes nor authorizes any other person to assume for SVS any other liabilities in connection with the sale of products of its own manufacture. 2. SVS's liability hereunder on any claim of any kind, except as set forth herein for any loss, injury to person or property or damage, shall in no case exceed the price allocable to the goods which give rise to such claim. 3. In no event shall SVS be liable for any damages or injuries to person or property if any goods do not meet the above limited warranty, including, without limitation, incidental expenses or consequential or special damages, except as set forth in such limited warranty. The foregoing states the exclusive remedy of Buyer and the exclusive liability of SVS for any breach of the foregoing limited warranty. C. Cancellation Except as provided in paragraph B immediately above, all sales are final, and Buyer may cancel this order or return products only upon written consent of SVS. D. General In the event of a breach of any of the terms hereof, the non-breaching party shall be entitled to recover all of its costs, fees, and expenses, including, without limitation, reasonable attorney's fees, from the breach party incurred as a result of such breach, regardless of whether or not a suit is actually filed to enforce the terms hereof. The provision hereof shall be governed by the laws of the State of California (excluding its choice of law provisions). The headings are for convenience only and do not limit or amplify the terms and provisions hereof. In case any one or more of the provisions set forth herein shall be held to be invalid, illegal, or unenforceable in any respect, the validity, legality, and enforceability of the remaining provisions contained herein shall not in any way be affected or impaired thereby. No waiver, alteration, or modification of any of the provisions hereof shall be binding unless in writing and signed by an authorized Officer of SVS. NOTE: All products returned to SVS for service must have prior approval. Return authorization requests may be obtained from your SVS dealer. 68