1
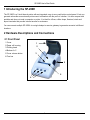
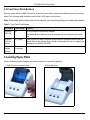
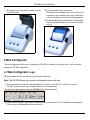
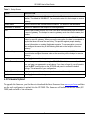
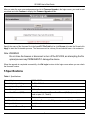
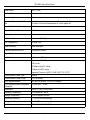
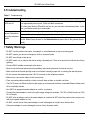
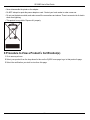
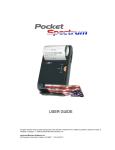
SP-200E
Statement Printer
User’s Guide
Version 1.00
7/2006
Edition 1
Copyright © 2006 ZyXEL Communications Corporation. All rights reserved.
SP-200E User’s Start Guide
1 Introducing the SP-200E
The SP-200E is a 2-inch thermal printer with an integrated, easy-to-use, push-button control panel. It lets you
generate subscriber accounts and print account information with the push of a button. It is also compact and
portable and does not need a computer or printer. It is ideal for offices, coffee shops, libraries, hotels and
airport terminals that provide Internet access for customers.
You can connect multiple SP-200Es to a single hotspot or service gateway to generate accounts in different
locations.
2 Hardware Descriptions and Connections
2.1 Front Panel
1 Cover
1
2 Paper roll housing
2
3 Printing head
4 Buttons A~C
3
5 Cover release button
6 Tear bar
5
6
4
2
SP-200E User’s Start Guide
2.2 Rear Panel
1 Reset button
2 Power switch
3 DC power socket
4 Ethernet port (RJ-45)
5 PS/2 keypad port
1
2
3
4
5
Table 1 Rear Panel Hardware
Label
Description
RST
Press this button for 10 seconds to restore the factory default settings. The default IP
address is 192.168.1.1.
ON OFF
Use this power switch to turn the printer on or off.
DC
Use the printer’s included power adaptor to connect this power socket to a power supply.
POE RJ-45 port
Use an Ethernet cable to connect this port to the gateway. You can use a mid-span POE
(Power Over Ethernet) injector (not included) instead of the power adaptor.
Yellow LED: 100 Mbps Link/ACT. This LED comes on when there is a 100 Mbps connection
and blinks when sending or receiving traffic.
Green LED: 10 Mbps Link/ACT, green. This LED comes on when there is a 10 Mbps
connection and blinks when sending or receiving traffic.
PS/2 keypad port
Connect an optional PS/2 keypad to this port. Refer to the hotspot gateway User’s Guide for
information on how to configure the gateway for use with the SP-200E and the optional PS/
2 keypad.
3
SP-200E User’s Start Guide
2.3 Front Panel Push-Buttons
Push the power switch to ON. The buttons on the front panel light up when the statement printer is receiving
power. The following table describes push-button’s LED status and functions.
Note: If the printer prints continuously for two minutes, you must stop printing for at least eight minutes.
Table 2 Front Panel Push-Buttons
LED Status Printer mode
Function
All Button
LEDs Off
Off
All of the printer’s functions are stopped.
All Button
LEDs On
(Green)
On (Ready)
Push a button to create a customer account with the configured account service
period. Refer to the gateway User’s Guide for information on how to configure the
gateway for use with the SP-200E.
Button A
Blinking
(Green)
Out of paper/
Cover open
No function.
Hold button A down while you turn on the power to have the printer print a selftest.
3 Loading Paper Rolls
Use the following steps to prepare the statement printer for use with a gateway.
1 Push the cover release button.
2 Open the cover.
4
SP-200E User’s Start Guide
3 Set a paper roll in the printer so that it unrolls
from the bottom.
4 Pull some paper out to start the roll.
Press down on the middle of the cover to close it (do
not press on only one side of the cover). Press firmly
until you feel the cover lock into the closed position.
5 Hold button A down to print a self-test. Pull the paper
down across the tear bar from one side to the other
to cut it.
4 Web Configurator
The web configurator allows you to change the SP-200E’s IP address or encryption key. You should also
change the SP-200E’s password.
4.1 Web Configurator Login
Follow the steps below to access and use the web configurator.
Note: The SP-200E allows only one web configurator session at a time.
1 Give your computer a static IP address between 192.168.1.1 and 192.168.1.254 (but do not use
192.168.1.7) and connect your computer directly to the Ethernet port.
2 Launch your web browser and type 192.168.1.7 as the web address..
3 A login screen displays. Type “admin” (default) as the user name and "1234" (default) as the password.
The user name and password are case sensitive.
5
SP-200E User’s Start Guide
• Click Setup to log in if you want to configure the SP-200E (see section 4.2).
• Click Firmware Upgrade if you want to upload firmware (see section 4.3).
Note: The SP-200E automatically logs you out if there is no activity for longer than five minutes after
you log in. If this happens, simply log back in again.
4.2 Configuration
The Setup screen displays after you enter the user name and password and click Setup.
6
SP-200E User’s Start Guide
Table 3
Setup Screen
LABEL
DESCRIPTION
IP Address
The SP-200E uses a static IP address. Enter the IP address in dotted decimal
notation. The default is 192.168.1.7. You must also enter it in the hotspot or service
gateway.
Subnet Mask
Enter the subnet mask in dotted decimal notation. The default is 255.255.255.0.
Destination IP address
Enter the IP address of the hotspot or service gateway.
Port
Enter the port number that the SP-200E uses when communicating with the hotspot
or service gateway. The hotspot or service gateway must also use the same port
number.
Encryption
Turn on the encryption to encode the communications between the SP-200E and the
hotspot or service gateway. When you use the encryption, the data is unreadable to
anyone that does not know the secret key. This protects against people stealing
account information or creating illegitimate accounts. To use encryption, you must
also configure the secret key in the following field and on the hotspot or service
gateway.
Secret key
When you use encryption, enter a code here. You can use up to 8 ASCII characters.
You must also configure the same code as the secret key on the hotspot or service
gateway.
Apply
Click Apply to save the changes.
Renew Password
Enter a new password for accessing the SP-200E. This field is case-sensitive. Make
sure you keep your password in a safe place. If you lose or forget it, you will need to
press the RST (reset) button on the SP-200E rear panel to restore the default
settings. This erases all of your configuration.
Confirm Password
Retype your password to make sure you have entered it correctly.
Apply
Click Apply to save the changes.
4.3 Firmware Upload
To upgrade the firmware, you first have to download the latest firmware from www.zyxel.com and then
use the web configurator to upload it to the SP-200E. The firmware will include the device name (SP200E) and end with a .bin extension.
7
SP-200E User’s Start Guide
After you enter the user name and password and click Firmware Upgrade in the login screen, you need to wait
a moment and click Continue to display the Firmware Upgrade screen.
Specify the name of the firmware file in the Local PC File Path field or click Browse to locate the file and click
Apply to start the file transfer process. The firmware must be a binary file and should have a .bin extension.
Note: WARNING!
Do not close the browser or disconnect or turn off the SP-200E, as interrupting the file
upload process may PERMANENTLY damage the device.
When the upgrade is completed successfully, click Re Login to return to the login screen where you can check
the firmware version.
5 Specifications
Table 4 Specifications
Power Adapter
MUT15-050250
Power Adapter Input Voltage
AC 100 ~ 240 Volts
Power Adapter Output Power
5V, 2.5A
Power Consumption
12 Watts Max.
Power Over Ethernet (POE)
Compatible with mid-span Power Over Ethernet (PoE) injectors (receives
power on pins 4, 5, 7 and 8)
Front Interfaces
3 Button x 3
Back Panel Interfaces
Reset button, Power switch, DC power input socket, RJ-45 port, PS/2 port
Printing method
Direct thermal
Recommended Thermal Paper
FD410
8
SP-200E User’s Start Guide
Paper Width
58(+0/-1) mm
Printing Width
48 mm
Paper Length
50 m max.
Number of Statements Per Paper
Roll
A single account statement is around 15 cm in length. You should be able to
print about 333 account statements on a 50 m paper roll.
Paper Roll Outside Diameter
63(+2/-2) mm
Paper Roll Inside Diameter
12(+0.5/-0) mm
Printing Speed
25.4 mm / second
Dot Resolution
8 dots / mm (203 dpi)
Dot Configuration
384 dots / line
Paper Detection
Photo interrupter
Thermal Head Service Life
108 pulses or 50 Km
Paper Thickness
65 um
Dot Resolution
8 (dots / mm) (203 dpi)
Communication Interface
Ethernet port (RJ-45)
LED on port
100 Mbps Link/ACT, yellow,
10 Mbps Link/ACT, green
Supported Protocols: ARP, IP, ICMP, UDP, TCP, HTTP
Communication Cable Type
Ethernet
Communication Cable Length
up to 100 meters
PS/2 Keypad Interface
PS/2 port for optional 16 Key, PS/2 keypad
PS/2 Keypad Interface Acceptable
Characters
0123456789+*/. “Enter”
Dimensions
109(W) × 155(D) × 90(H) mm
Operating Temperature
0 to 50 degrees Celsius
Storage Temperature
-20 to 60 degrees Celsius
Operational Humidity
10 ~ 80 RH (non condensing)
Storage Humidity
10 ~ 95 RH (non condensing)
Certification
VCCI, C-Tick, CE, FCC,CSA
9
SP-200E User’s Start Guide
6 Troubleshooting
Table 5 Troubleshooting
Problem
Corrective Action
The push-button
LEDs are off.
Make sure that you have the correct power adaptor connected to the printer and plugged in
to an appropriate power source. Check all cable connections.
If the front panel button LEDs still do not turn on, you may have a hardware problem. In this
case, you should contact your local vendor.
Check that the statement printer is connected to the gateway.
I cannot print the
account information Make sure there is enough printing paper in the statement printer.
using the statement
Make sure you set the gateway to require authentication before allowing Internet access,
printer.
see the Wizard Setup screens or the Authentication chapter (refer to the gateway User’s
Guide).
7 Safety Warnings
• Do NOT use this product near water, for example, in a wet basement or near a swimming pool.
• Do NOT expose your device to dampness, dust or corrosive liquids.
• Do NOT store things on the device.
• Do NOT install, use, or service this device during a thunderstorm. There is a remote risk of electric shock from
lightning.
• Connect ONLY suitable accessories to the device.
• Never touch the thermal printing head immediately after printing because it becomes very hot.
• Make sure that the thermal printing head is cool before inserting a paper roll or cleaning the thermal printer.
• Do not connect the statement printer’s RJ-45 connector to the telephone network.
• Make sure to connect the cables to the correct ports.
• Place connecting cables carefully so that no one will step on them or stumble over them.
• The PoE (Power over Ethernet) devices that supply or receive power and their connected Ethernet cables must
all be completely indoors.
• Use ONLY an appropriate power adaptor or cord for your device.
• Connect the power adaptor or cord to the right supply voltage (for example, 110V AC in North America or 230V
AC in Europe).
• Do NOT allow anything to rest on the power adaptor or cord and do NOT place the product where anyone can
walk on the power adaptor or cord.
• Do NOT use the device if the power adaptor or cord is damaged as it might cause electrocution.
• If the power adaptor or cord is damaged, remove it from the power outlet.
10
SP-200E User’s Start Guide
• Never disassemble the printer or the adapter.
• Do NOT attempt to repair the power adaptor or cord. Contact your local vendor to order a new one.
• Do not use the device outside, and make sure all the connections are indoors. There is a remote risk of electric
shock from lightning.
• This product is recyclable. Dispose of it properly.
8 Procedure to View a Product’s Certification(s)
1 Go to www.zyxel.com.
2 Select your product from the drop-down list box on the ZyXEL home page to go to that product's page.
3 Select the certification you wish to view from this page.
11