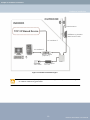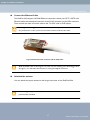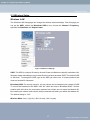
1
Notice: The changes or modifications not expressly approved by the party responsible for compliance could void the user’s authority to operate the equipment. OCT. 2005 IMPORTANT NOTE: To comply with the FCC RF exposure compliance requirements, no change to the antenna or the device is permitted. Any change to the antenna or the device could result in the device exceeding the RF exposure requirements and void user’s authority to operate the device. FCC Notice This equipment has been tested and found to comply with the limits for a Class B digital device, pursuant to Part 15 of the FCC Rules. These limits are designed to provide reasonable protection against harmful interference in a residential installation. This equipment generates, uses, and can radiate radio frequency energy and, if not installed and used in accordance with the instructions, may cause harmful interference to radio communications. However, there is no guarantee that interference will not occur in a particular installation. If this equipment does cause harmful interference to radio or television reception, which can be determined by turning the equipment off and on, the user is encouraged to try to correct the interference by one or more of the following measures: • Reorient or relocate the receiving antenna. • Increase the separation between the equipment and receiver. • Connect the equipment into an outlet on a circuit different from that to which the receiver is connected. • Consult the dealer or an experienced radio technician for help. Changes or modifications not expressly approved in writing by Wireless Interactive Comm. Inc. may void the user’s authority to operate this equipment. Wireless Interactive Comm. Inc. can not accept any financial or other responsibilities that may be the result of your use of this information, including direct, indirect, special, or consequential damages. Refer to warranty documents for product warranty coverage and specifics. Copyright Copyright © 2006 all rights reserved. No part of this publication may be reproduced, adapted, stored in a retrieval system, translated into any language, or transmitted in any form or by any means without the written permission of the supplier. About This Manual This manual includes install, configuration and troubleshooting for the RedFire 200e radios. It helps you in avoiding the unforeseen problems and using the outdoor radio correctly. Technical Support If you have difficulty resolving the problem while installing or using the RedFire 200e, please contact the supplier for support. Content SYMBOLS ........................................................................................................................................................... 3 CHAPTER 1 OVERVIEW ..................................................................................................................................... 5 1-1 FEATURES AND BENEFITS ...............................................................................................................................................................6 1-2 APPLICATIONS ................................................................................................................................................................................7 CHAPTER 2 HARDWARE INSTALLATION.......................................................................................................... 8 2-1 WARNINGS......................................................................................................................................................................................9 2-2 PACKAGE CONTENTS ................................................................................................................................................................... 11 2-3 SYSTEM REQUIREMENTS ............................................................................................................................................................. 12 2-4 MECHANICAL DESCRIPTION........................................................................................................................................................ 13 2-5 HARDWARE INSTALLATION .......................................................................................................................................................... 16 CHAPTER 3 CONFIGURING THE 802.11G RADIO .......................................................................................... 20 3-1 START-UP AND LOG IN ................................................................................................................................................................ 21 3-2 IP SETUP ...................................................................................................................................................................................... 24 3-3 WIRELESS SETUP ......................................................................................................................................................................... 28 3-4 AP STATUS .................................................................................................................................................................................. 43 3-5 MANAGEMENT ............................................................................................................................................................................ 45 CHAPTER 4 TROUBLESHOOTING ................................................................................................................... 51 4-1 GENERAL DESCRIPTIONS............................................................................................................................................................. 52 4-2 CONNECTION ISSUES................................................................................................................................................................... 53 4-3 CONFIGURATION ISSUES ............................................................................................................................................................. 54 4-4 COMMUNICATION ISSUES ........................................................................................................................................................... 55 2 Symbols This publication uses the following symbols to convey instructions and information: This symbol means reader take note. Notes contain helpful suggestions or references to materials not contained in this manual. This symbol means reader be careful. In this situation, you might do something that could result in equipment damage or loss of data. This warning symbol means danger. You are in a situation that could cause bodily injury. Before you work on any equipment, be aware of the hazards involved with electrical circuitry and be familiar with standard practices for preventing accidents. 3 Chapter 1 Overview Using advanced OFDM and power amp technology, the RedFire 200e has high output power and amazing throughput even at long distance transmission. Operating in 2.4GHz band, using IEEE 802.11g standard, the RedFire 200e can provide up to 54Mbps data rates communications. The Following contents of this chapter will show you Features and Benefits Applications 4 Chapter 1 Overview Features and Benefits 1-1 Features and Benefits ¾ LARGE AREA COVERAGE High output power using IEEE 802.11g up to 200mW and low noise figure extend the signal transmit distance and enlarge the coverage area as well. ¾ IMPRESSIVE DATA RATE AT LONG DISTANCE Unique OFDM technology breaks the distance limit of 802.11g standards. We succeeded in extending the signal up to 2~12 miles (3~20 Km) with the impressive 54Mbps (Max) data rate. ¾ MANAGEABILITY Through the Web-based utility the outdoor radio is fully manageable locally and remotely. In addition, built-in SNMP support let ISP and enterprise users expand the network infrastructure much easier. ¾ FLEXIBILITY This outdoor radio can play various roles in the wireless infrastructure due to the detachable antenna design. Customer can use the proper antenna according to the different environment, and make the wireless infrastructure deployment more flexible. ¾ RELIABILITY The outdoor radio is the most reliable IEEE 802.11g outdoor radio which provides a trustworthy passageway in the air with stable and robust design. ¾ SECURITY WEP 64 / 128 / 152bit encryption, WPA-PSK, WPA, 802.1x Authentication (EAP), disable broadcast the SSID, client isolation and MAC Access control build the highest security mechanism to prevent the malicious attacking from the internet. 5 RedFire 200e Radio User Manual Chapter 1 Overview Applications 1-2 Applications The outdoor radio offers a fast, reliable, high-speed, and high security solution for wireless clients access to the network. It’s easier and more cost effective to deploy the wireless access environment with the Wireless Distribution System (WDS) technology. Saving 30% ~ 50% cost for telecom operators, ISPs and enterprises. It’s really an ideal solution for enterprise / campus connectivity, Hotspot and next-generation broadband wireless Access. 1. Remote access to corporate network information E-mail, file transfer and terminal emulation. 2. Difficult-to-wire environments Historical or old buildings, asbestos installations, and open area where wiring is difficult to deploy. 3. Frequently changing environments Retailers, manufacturers and those who frequently rearrange the workplace and change location. 4. 5. Temporary LANs for special projects or peak time ♦ Trade shows, exhibitions and construction sites where a temporary network will be practical. ♦ Retailers, airline and shipping companies need additional workstations during peak period. ♦ Auditors requiring workgroups at customer sites. Access to database for mobile workers Doctors, nurses, retailers, accessing their database while being mobile in the hospital, retail store or office campus. 6. High security connection The secure wireless network can be installed quickly and provide flexibility. 6 RedFire 200e Radio User Manual Chapter 2 Hardware Installation This chapter describes warning, safety information and guideline to install the RedFire 200e. Please make sure to read all the contents of this chapter then start to install this radio. Warnings Package Contents System Requirements Mechanical Description Hardware Installation 7 Chapter 2 Hardware Installation Warnings 2-1 Warnings In order to comply with international radio frequency (RF) exposure limits, dish antennas should be placed at a minimum of 8.7 inches (22 cm) from the bodies of all persons. Other antennas should be placed a minimum of 7.9 inches (20 cm) from the bodies of all persons. Do not work on the system or connect or disconnect cables during periods of lightning activity. This equipment must be grounded. Never defeat the ground conductor or operate the equipment in the absence of a suitably installed ground conductor. Contact the appropriate electrical inspection authority or an electrician if you are uncertain that suitable grounding is available. Ultimate disposal of this product should be handled according to all national laws and regulations. Do not locate the antenna near overhead power lines or other electric light or power circuits, or where it can come into contact with such circuits. When installing the antenna, take extreme care not to come into contact with such circuits, as they may cause serious injury or death. For proper installation and grounding of the antenna, please refer to national and local codes (e.g. U.S.:NFPA 70, National Electrical Code, Article 810, in Canada: Canadian Electrical Code, Section 54). Only trained and qualified personnel should be allowed to install, replace, or service this equipment. 8 RedFire 200e Radio User Manual Chapter 2 Hardware Installation Warnings To meet regulatory restrictions, the radio and the external antenna must be professionally installed. The network administrator or other IT professional responsible for installing and configuring the unit is a suitable professional installer. Following installation, access to the unit should be password protected by the network administrator to maintain regulatory compliance. The RedFire 200e and PoE injector can be damaged by incorrect power application. Read and carefully follow the installation instructions before connecting the system to its power source. Follow the guidelines in this chapter to ensure correct operation and safe use of the 802.11g outdoor radio. 9 RedFire 200e Radio User Manual Chapter 2 Hardware Installation Package Contents 2-2 Package Contents The package you have received should contain the following items: • RedFire 200e ………….………..…………………………….....…………...……...……….x1 • PoE Injector. ……………….…………………………………………….……………..…….x1 • AC Power Code ………………………………..……………………………………….……x1 • 15V Power adaptor………………………………………..………………………………….x1 • Mounting Kit ...…………………………..……………………………..………………….….x1 • Product CD….……………………………………………………………………...…....……x1 • Quick Installation Guide………………………………………………………………..…….x1 If any item on the above list is not included or damaged, please contact your local vendor for support. 10 RedFire 200e Radio User Manual Chapter 2 Hardware Installation System Requirements 2-3 System Requirements Before installing the RedFire 200e, please make sure that these requirements have been met: A 10/100 Mbps Local Area Network device such as a hub or switch. (optional) Category 5 UTP or STP networking cable. (From the PC to PoE) Category 5 SSTP or SFTP networking cable. (From the radio to PoE) A Web browser for configuration: Microsoft IE 5.0 or later, or Netscape Navigator 5.0 or later version. Installing TCP/IP protocol to the computer. 11 RedFire 200e Radio User Manual Chapter 2 Hardware Installation Mechanical Description 2-4 Mechanical Description Please refer to the following table for the meaning of each feature. Grounding stud N- Jack Antenna RJ-45 Port Connector Figure 2-1 RedFire 200e 1 RJ-45 Port Use the SFTP cat.5 cable with weatherproof connector to connect to the “To ODU” side of PoE injector. 2 N- Jack Antenna Here you can attach the proper antenna with the RedFire Connector 200e to wirelessly connect to the 802.11g networks. In order to improve the RF signal radiation of your antenna, proper antenna installation is necessary. 3 Grounding stud Connect to the ground conductor with the ground wire. 12 RedFire 200e Radio User Manual Chapter 2 Hardware Installation Mechanical Description DC Input LED Indicator (Power) To Ethernet To Radio Figure 2-2 Power over Ethernet injector 1 To Ethernet RJ-45 port used to connect to the 10/100 Base T complied device such as switch, router or PC. 2 To ODU RJ-45 port used to connect to the ODU. 3 DC Input Connect to the Power adaptor for 15V DC input. 4 LED Indicator Power LED 13 RedFire 200e Radio User Manual Chapter 2 Hardware Installation Mechanical Description This equipment must be grounded. Never defeat the ground conductor or operate the equipment in the absence of a suitably installed ground conductor. Contact the appropriate electrical inspection authority or an electrician if you are uncertain that suitable grounding is available. The RedFire 200e and PoE injector can be damaged by incorrect power application. Read and carefully follow the installation instructions before connecing the system to its power source. Power Over Ethernet (PoE) Injector is not a waterproof unit, should not be exposed to outdoor without any protection. 14 RedFire 200e Radio User Manual Chapter 2 Hardware Installation Hardware Installation 2-5 Hardware Installation The RedFire 200e is a radio device, so it is susceptible to common causes of interference that can reduce throughput and range. Follow these basic guidelines to ensure the best possible performance: ¾ IF there is any other 2.4GHz RF device deployed around the outdoor radio, try to set the channel to the non-overlapping one. ¾ Install the bridge at a height sufficient place where structures, trees, or hills do not obstruct radio signals to and from the unit. A clear line-of-sight path can guarantee the performance of the RF link. Site Surveys Clear and flat area provide better RF range and data rate, on the contrary, physical obstructions such as trees, electric tower, hills or buildings can reduce the performance of RF devices. Do not deploy your radios in the location where there is any obstacle between the antennas. Configure and verify the RedFire 200e operations first before you mount the radio in a remote location. 15 RedFire 200e Radio User Manual Chapter 2 Hardware Installation Hardware Installation OUTDOOR INDOOR Panel Antenna IEEE802.11g Outdoor Multi-function radio 10/ 100 Base T 10/ 100 Base T Router / Switch ( Optional ) AC Outlet 110V~240V Power adaptor DC 15V PoE Figure 2-3 Hardware Installation Figure Power Over Ethernet (PoE) Injector is not a waterproof unit, should not be exposed to outdoor without any protection. 16 RedFire 200e Radio User Manual Chapter 2 Hardware Installation Hardware Installation Connect the Ethernet Cable The RedFire 200e support 10/100M Ethernet connection. Attach your SFTP / SSTP cat.5 Ethernet cable with waterproof connector to the RJ-45 connector on the ODU enclosure. Then connect the other end of the cable to the “To ODU” side on PoE injector. Welding the shielding parts of the SFTP cable and the RJ-45 connector well to ensure the performance of the system and avoid the moisture leak into the radio. Figure 2-4 Weld the RJ-45 connector with the SFTP cable Weld the SFTP cable as the Figure 2-4, make sure the welding parts NOT bigger than the figure, or it will affect the function of waterproof RJ-45 connector. Attached the antenna You can attach the proper antenna to the N-type connector on the RedFire 200e. To meet regulatory restrictions, the outdoor radio and the external antenna must be professionally installed. 17 RedFire 200e Radio User Manual Chapter 2 Hardware Installation Hardware Installation Connect the Power Cable Connect the 15V power adapter to the PoE injector, and plug the other end of the electrical outlet (AC 110V~240V). We cannot assume the responsibility for the damage from using with the other power adapter supplier. You should read and carefully follow the installation instructions before connecting the system to its power source. The outdoor radio and power injector can be damaged by incorrect power application. Connect the ground stud Connect the ground stud on the ODU enclosure with the ground wire. This equipment must be grounded. NEVER defeat the ground conductor or operate the equipment in the absence of a suitably installed ground conductor. Contact the appropriate electrical inspection authority or an electrician if you are uncertain that suitable grounding is available. Mounting the RedFire 200e The outdoor radio is usually installed on a rooftop, tower, wall, or a suitable flat surface. For detailed mounting instructions, please refer to the Quick Installation Guide. Only trained and qualified personnel should be allowed to install, replace, or service this equipment. Wind the water-resistant adhesive tape around the RJ-45 and N-type connector on the outdoor radio enclosure as the last step of the mounting procedures. 18 RedFire 200e Radio User Manual Chapter 3 Configuring the 802.11g Radio This chapter describes the web-browser interface that you can use to configure the RedFire 200e. The web browser interface contains management pages that you use to change the settings, upgrade firmware, monitor and configure other wireless devices on the network. This chapter contains these sections: Start-up and Log in IP Setup Wireless Setup Status Management 19 Chapter 3 Configuring the 802.11g Radio Start-up and Log in 3-1 Start-up and Log in In order to configure the RedFire 200e, you must use your web browser and please do the following: 1. Type the address http://192.168.1.1 of this radio in the Location (for IE) or Address field and press Enter. 2. Enter the system name (the default setting is “admin”) and password (the default setting is “password”). 3. Click on the “Login now” button. 4. The main page will appear. Figure 3-1 login page After you have logged-in the main page, the About, Basic Setup, Wireless Setup, AP Status, Management buttons will be shown. The main menu provides links to the whole sections of the web configuration interface. 20 RedFire 200e Radio User Manual Chapter 3 Configuring the 802.11g Radio Start-up and Log in About The About screen describes the product information briefly. The RedFire 200e information includes Access Point Name, MAC Address, Country / Region and Firmware Version. Figure 3-2 About page Basic Setup Figure 3-3 Basic Setup page The Access Point Name is used to give a name to your outdoor radio. This will enable you to manage your outdoor radio more easily if you have multiple outdoor radios on your network. 21 RedFire 200e Radio User Manual Chapter 3 Configuring the 802.11g Radio Start-up and Log in Country / Region: Allows you to select country domain in case there is any chances that you would use wireless network in other countries. Time: While you connect the outdoor radio to Internet, the outdoor radio could automatically synchronize the current time of the outdoor radio with the Time Server that you have set. Time Server: the central time of the Time Server. Time Server Port: the port of the Time Server. Time Zone: You may select the appropriate local time zone for the outdoor radio from a list of all available time zones. Figure 3-4 Time zone list If you complete the settings, please click on “apply” icon for the changes to take effect. 22 RedFire 200e Radio User Manual Chapter 3 Configuring the 802.11g Radio IP Setup 3-2 IP Setup WAN/LAN Setup The RedFire 200e can be configured as a Bridge or a Router. As a Bridge mode, you can assign a proper IP address to your radio manually by selecting Static IP. If you would like the radio to obtain the IP address from the DHCP server on your network automatically, select DHCP Client. Spanning Tree: You may Enable or Disable the Spanning Tree Protocol used in the RedFire 200e. IP Address: Type the IP address of the RedFire 200e. (Default: 192.168.1.1). IP Subnet Mask: Subnet Mask of the RedFire 200e’s must be the same as your Ethernet network. We recommended that you do NOT change the value. (Default: 255.255.255.0). Default Gateway: The outdoor radio will use this value for default Gateway. Primary DNS Server: The outdoor radio will use this value for primary Domain Name Server. Secondary DNS Server: The outdoor radio will use this value for secondary Domain Name Server. Figure 3-5 WAN / LAN Setup-Bridge mode 23 RedFire 200e Radio User Manual Chapter 3 Configuring the 802.11g Radio IP Setup If you complete the settings, please click on “apply” icon for the changes to take effect. As a Router mode, you can enable AnyIP and manage WAN Port: Ethernet and Wireless. Figure 3-6 WAN / LAN Setup-Router mode RADIUS Settings RADIUS (Remote Authentication Dial-In User Service) plays a central role in the network to provide the capabilities of authenticating, authorizing, accounting, auditing and alarming…etc and allows an organization to maintain user profiles in a central database that all remote servers can share. Since RADIUS is relatively complex to explain, we will focus here on how it acts as an 802.1x authentication server (EAP-aware RADIUS) and assists in enhancing security. 24 RedFire 200e Radio User Manual Chapter 3 Configuring the 802.11g Radio IP Setup RADIUS performs the authentication function required to check the credentials of users and intermediate Access Points and indicates whether the users are authorized to access the Access Points. Enabling RADIUS is therefore the first step toward building up an 802.1x-capable environment. Even more, it is also a must-do to accommodate the recently introduced Wi-Fi protected access (WPA-EAP) to wireless networks. When you finish adding RADIUS information, return to the Security page, where you will be allowed to continue configuring Legacy 802.1x and WPA with Radius to ensure even higher security in your wireless network. Authentication / Access Control of RADIUS Server Login This configuration is required for authentication using Radius Server. Here you may have two choices. Primary and Secondary. IP Address- The IP Address of the Radius Server. Default: 0.0.0.0. Port Number- The Port Number of the Radius Server. Default: 1812. Shared Secret- This is required between this RedFire 200e and the Radius Server while authenticating. You may input up to 31 characters. The Secondary Radius Server is used when the Primary Radius Server cannot be found. Accounting RADIUS Server Login The configuration is required for Accounting using Radius Server by viewing the logs generated at Radius Server. IP Address- The IP Address of the Radius Server. Default: 0.0.0.0. Port Number- Port number of the Radius Server. Default: 1813. Shared Secret- This is required between your outdoor radio and the Radius Server while authenticating. You may input up to 31 characters. 25 RedFire 200e Radio User Manual Chapter 3 Configuring the 802.11g Radio IP Setup Figure 3-7 Radius Settings The Secondary Radius Server is used when the Primary Radius Server cannot be found. If you complete the settings, please click on “apply” icon for the changes to take effect. 26 RedFire 200e Radio User Manual Chapter 3 Configuring the 802.11g Radio Wireless Setup 3-3 Wireless Setup Wireless LAN The Wireless LAN Setup page can change the wireless network settings. From this page you can set the SSID, enable the Broadcast SSID or not, choose the Channel / Frequency, specifies the Data Rate and Output Power. Figure 3-8 Wireless LAN page SSID: The SSID is a unique ID used by Access Points and Stations to identify a wireless LAN. Wireless clients associating to any Access Point must have the same SSID. The default SSID is “Wireless”. To change the SSID, type in the SSID you like to use. It is case sensitive and must not exceed 32 characters. Broadcast SSID: For security concern, you can choose not to broadcast your network’s SSID. To turn off the broadcast of the SSID, click “No” check box next to “Broadcast SSID”. And the outdoor radio will refuse the connection requests from whose are not aware the Network ID. But certainly the outdoor radio can be easily connected well when you realize the Network ID. The default setting is “Yes”. Wireless Mode: Auto (11g/11b) / 802.11b only / 802.11g only 27 RedFire 200e Radio User Manual Chapter 3 Configuring the 802.11g Radio Wireless Setup Channel / Frequency: Select the appropriate channel / Frequency from the list such as the following figure, to correspond with your network settings. Figure 3-9 Channel list (for reference only, different country has different channel list) Date Rate: The basic transfer rates should be set depending on the speed of your wireless network. Select the desired rate from the drop-down menu and choose “Best” to adapt the rate to the best available. Figure 3-10 Data Rate list Output Power: Set the transmit signal strength of this RedFire 200e. The options are full, half, quarter, eighth and min. Decrease the transmit power if necessary. The default is “full”. Figure 3-11 Output Power list 28 RedFire 200e Radio User Manual Chapter 3 Configuring the 802.11g Radio Wireless Setup If you complete the settings, please click on “apply” icon for the changes to take effect. Security Settings WEP / WPA To prevent unauthorized wireless stations from accessing data transmitted over the network, the Security Settings window of the RedFire 200e offers WEP / WPA features, making your data transmission over air more secure and allows you to specify Encryption Key(s) if you enable encryption for the outdoor radio. Figure 3-12 Security Settings Network Authentication Choose the Network Authentication Type. 29 RedFire 200e Radio User Manual Chapter 3 Configuring the 802.11g Radio Wireless Setup Figure 3-13 Encryption list Open System: Requires NO authentication, since it allows any device to join a network without performing any security check. The Authentication Type default is set to “Open System”. We recommend that you use the default setting. Shared Key: Requires that the station and the outdoor radio use the same WEP key to authenticate. This basically means that WEP must be enabled and configured on both the outdoor radio and the client with the same key. All devices on your network must use the same authentication type. Legacy 802.1x: The 802.1x authentication (EAP) is designed to enhance the security of wireless networks. The 802.1x provides an authentication framework for wireless LANs, allowing a user to be authenticated by a central authority. For wireless LANs, it also provides centralized, server-based authentication of end users. The standard is flexible enough to allow multiple authentication algorithms, and because it is an open standard, multiple vendors can innovate and offer enhancements. For wireless LANs, the 802.1x authentication has three main components: The supplicant (usually the client software, such as zero configuration in window XP), the authenticator (usually the access point), and the authentication server (usually a Remote Authentication Dial-In User Service server, although RADIUS although 802.1X does not specify it). This function will allowed to be configured after finished setting the Radius server and disable the WDS mode. WPA with Radius: (Wi-Fi Protected Access): Currently one of the highest levels of security a wireless network can achieve. Wi-Fi Protected Access is a subset of the security specification and has been introduced as an interim solution for most known security weaknesses in relation to plain WEP. TKIP, the successor to WEP, includes enhancements that eliminate the known vulnerabilities of WEP. Enterprises that already have RADIUS 30 RedFire 200e Radio User Manual Chapter 3 Configuring the 802.11g Radio Wireless Setup authentication in place can use WPA with 802.1x (WPA-EAP / Enterprise Mode). Small business and home wireless LAN can use WPA without 802.1x (WPA-PSK / Pre-Shared Key). In cooperation with RADIUS, systems with WPA-EAP will be used with a new encryption method called Temporal Key Integrity Protocol (TKIP) implementation with 802.1x dynamic key exchange. This function will allowed to be configured after finished setting the Radius server and disable the WDS mode. WPA-PSK: If selected, you must use TKIP encryption, and enter the WPA Pre-Shared Key. WPA Pre-Shared Key: In the WAP-Pre-Shared Key field, you may enter 8-63 characters ranging from “a-z”, “A-Z”, and “0-9”. Lagacy 802.1x and WPA with Radius are working in Access Point mode only (Disable the WDS), and allowed to be cinfigured after finish setting the Radius sever. Data Encryption: Select the desired potion. If enabled (64 bit WEP, 128 bit WEP, 152 bit WEP), the keys must have the same encryption strength and must be the same with the keys that other wireless stations use. The TKIP option is automatically activated when either “WPA with Radius”, or “WPA-PSK” is enabled. WEP Passphrase: There are two methods for creating WEP data encryption: z Using a Passphrase: Type in a passphrase and click “Generate Keys”. Passphrase can be a mixture of numbers and letters. When entering passphrase, you must not exceed 32 characters. As you type, this outdoor radio will use an algorithm to generate 4 keys automatically. Select one key from the 4 WEP keys. z Manually: 64 bits WEP: Enter 10 hexadecimal digits (between 0-9, a-f and A-F). 31 RedFire 200e Radio User Manual Chapter 3 Configuring the 802.11g Radio Wireless Setup 128 bits WEP: Enter 26 hexadecimal digits (between 0-9, a-f and A-F). 152 bits WEP: Enter 32 hexadecimal digits (between 0-9, a-f and A-F). The WEP key must be set up exactly the same on the outdoor radio and the wireless clients. If you set “0011223344” for the outdoor radio, the same WEP key “0011223344” must be assigned to other client stations. Advanced WPA / 802.1X Parameters Here you can use Re-authentication Time and Global-Key Update to check if any association is working well on the time and packets units you set. Enable Wireless Client Security Separator Enable this function to let associated clients be able to separate from each other when security is required. The default setting is “Disable”. If you complete the settings, please click on “apply” icon for the changes to take effect. Access Control The Access Control allows you to restrict wireless access by MAC Address. This provides an additional layer of security. 32 RedFire 200e Radio User Manual Chapter 3 Configuring the 802.11g Radio Wireless Setup Figure 3-14 Access Control page Follow these steps to set the Access Control page: 1. Click the check box next to “Turn Access Control on” to enable Access Control feature,. 2. Select the desired Access Control Database: Local MAC Address Database and RADIUS MAC Address Database. Local MAC Address Database: The outdoor radio will use the local MAC address table for Access Control. RADIUS MAC Address Database: The outdoor radio will use the MAC address table located on the external Radius server on the network for Access Control. 3. Then, either select from the list of available wireless stations that the outdoor radio has found or enter the MAC address for each client. After enter the MAC Address, click “Add” button in the MAC Address field to be managed. 4. Click “Delete” button if you wish to remove the MAC address from the list. If you complete the settings, please click on “apply” icon for the changes to take effect. 33 RedFire 200e Radio User Manual Chapter 3 Configuring the 802.11g Radio Wireless Setup WDS Mode WDS (Wireless Distribution System) which is a system that enables the interconnection of access points wirelessly. It is described in IEEE 802.11. An access point can be either a main, relay or remote base station. A main base station is typically connected to the wired Ethernet. A relay base station relays data between remote base stations, wireless clients or other relay stations to either a main or another relay main station. A remote base station accepts connections from wireless clients and passes them to relay or main stations. All base stations in a Wireless Distribution System must be configured to use the same radio channel, and share WEP keys if that is used. They can be configured to different service set identifiers. WDS may also be referred to as repeater mode because it appears to bridge and accept wireless clients at the same time (unlike traditional bridging). Click the check box of “Enable WDS Mode” to enable the WDS. There are four roles that this outdoor radio can play. Wireless Point-to-Point Bridge Wireless Point to Multi-Point Bridge Repeater with Wireless Client Association Smart WDS 34 RedFire 200e Radio User Manual Chapter 3 Configuring the 802.11g Radio Wireless Setup Figure 3-15 WDS Mode page Configure a Wireless Point-to-Point Bridge Line of sight Figure 3-16 Point-to-Point Bridge application 35 RedFire 200e Radio User Manual Chapter 3 Configuring the 802.11g Radio Wireless Setup To activate the Point-to-Point Bridge mode please do the following: 1. Enable WDS mode for both outdoor radios: ¾ Configure both radio1 on LAN Segment A and radio2 on LAN Segment B in Point-to-Point Bridge mode. ¾ Enter Mac address of radio 2 into the Remote MAC Address field of radio 1. ¾ Enter Mac address of radio 1 into the Remote MAC Address field of radio 2. 2. Enable Wireless Client Association: ¾ If enabled, your outdoor radio is functioning as a regular Access Point, which can provide the link services to wireless clients. Then, wireless clients can communicate with other wireless clients that are located in different LAN Segments. ¾ Verify that radio1 and radio2 are both configured in the same LAN network address range as wireless clients with which associated. ¾ Make sure that Mode, SSID, Channel and encryption settings are set the same for both of your WDS-compliant Access Points. If you complete the settings, please click on “apply” icon for the changes to take effect. 36 RedFire 200e Radio User Manual Chapter 3 Configuring the 802.11g Radio Wireless Setup Configure a Wireless Point to Multi-Point Bridge Figure 3-17 Point to Multi-Point Bridge application To activate the Point-to Multi-Point Bridge mode please do the following: 1. Enable WDS mode for all the outdoor radios: ¾ Configure radio 1, radio 2, and radio 3 in Point-to Multi-Point Bridge mode. ¾ Enter Mac address of radio 2 and radio 3 into the Remote MAC Address field of radio 1. ¾ Enter Mac address of radio 1 into the Remote MAC Address field of radio 2 and radio 3. 2. Enable Wireless Client Association: ¾ If enabled, your outdoor radio is functioning as a regular Access Point, which can provide the link services to wireless clients. Then, wireless clients can communicate with other wireless clients that are located in different LAN Segments. 37 RedFire 200e Radio User Manual Chapter 3 Configuring the 802.11g Radio Wireless Setup ¾ Verify that all outdoor radios are configured in Point-to Multi-Point Bridge mode. ¾ All IP addresses of the outdoor radios must be set in the same network. ¾ Make sure that Mode, SSID, Channel and encryption settings are set the same for all of your WDS-compliant Access Points. If you complete the settings, please click on “apply” icon for the changes to take effect. Under Point-to Multi-Point Bridge mode, you can extend this multi-point bridge by adding additional 802.11g Outdoor Bridges for each additional LAN Segment. Configure a Repeater with Wireless Client Association Non-line of sight Figure 3-18 Repeater with Wireless Client Association 38 RedFire 200e Radio User Manual Chapter 3 Configuring the 802.11g Radio Wireless Setup When the distance is too long or there is obstruction there between two points, you may need a Repeater in your net work. Please follow the steps below to activate the Repeater with Wireless Client Association: 1. Enable WDS mode for all the outdoor radios: ¾ Configure radio 1, radio 2, and radio 3 in Repeater with Wireless Client Association mode. ¾ Enter Mac address of radio 1 and radio 3 into the Remote MAC Address field of radio 2. ¾ Enter Mac address of radio 2 into the Remote MAC Address field of radio 1 and radio 3. If you complete the settings, please click on “apply” icon for the changes to take effect. Under Repeater Bridge mode, you can extend this repeater bridge by adding additional RedFire 200e for each additional LAN Segment. Enable Smart WDS If this feature is selected, a WDS Service Group ID is required and must be the same with the ID of other remote outdoor radios. You can input up to 32 characters. After you complete the settings, please click on “Apply” for changes to take effect. Wireless Parameters These parameters can be changed if needed, but the default advanced setting usually work well. It is recommended that you keep all these values in factory default. 39 RedFire 200e Radio User Manual Chapter 3 Configuring the 802.11g Radio Wireless Setup Figure 3-19 Wireless Parameters page Enable Super-A Mode: Enable Super-A may enhance the wireless throughput. The default setting is Disable. RTS Threshold: RTS Threshold is a mechanism implemented to prevent the “Hidden Node” problem. If the size of the packet transmitted is larger than the value you set, the RTS will be enabled. When the RTS is activated, the station and its Access Point will use a (RTS/CTS) mechanism for data transmission. The setting range is 0-2346. Fragmentation Length: Fragmentation mechanism is used for improving the efficiency when there is high traffic within the wireless network. If you transmit large files in a wireless network, you can enable the Fragmentation Threshold and specify the packet size. This specifies the maximum size a data packet will be before splitting and creating a new packet. The setting range is 256-2346. For example: If you set value as 256, it means the packet will be fragmented into “256” bytes while transmitting. Beacon Interval: This value indicates the frequency interval of the beacon. A beacon is a packet broadcast by the Access Point to keep the network synchronized. A beacon includes the wireless LAN service area, the AP address, the Broadcast destination addresses, a time stamp, Delivery Traffic Indicator Maps, and the Traffic 40 RedFire 200e Radio User Manual Chapter 3 Configuring the 802.11g Radio Wireless Setup Indicator Message (TIM). DTIM Interval: This value indicates the interval of the Delivery Traffic Indication Message (DTIM). A DTIM field is a countdown field informing clients of the next window for listening to broadcast and multicast messages. When the outdoor radio has buffered broadcast or multicast messages for associated clients, it sends the next DTIM with a DTIM Interval value. Clients can hear the beacons and awaken to receive the broadcast and multicast messages. Space In Meter: This space in meter is used for extending ACK time-out destination. The setting range is 0-36000. Preamble Type: The Preamble defines the length of the PLCP synchronization field for communication between the outdoor radio and Network Card. Select the appropriate preamble type and press the Apply button to set it. The default setting is ‘Auto’. 41 RedFire 200e Radio User Manual Chapter 3 Configuring the 802.11g Radio Status 3-4 AP Status Connections Figure 3-20 Connections page The connections page displays the association condition of AP includes Station ID, MAC Address, I P Address and Status. To display the Station List, follow these steps: 1. Choose the “Connections” option from AP Status which in the left page of the configuration page of the RedFire 200e. 2. The Station List window will display. 3. By clicking the “Refresh” button, the AP Browser will reload and show the associated wireless stations that are currently part of its Basic Service Set (BBS). 42 RedFire 200e Radio User Manual Chapter 3 Configuring the 802.11g Radio Status Statistics The Statistics screen provides various Ethernet and Wireless TX/RX packet statistics on the outdoor radio. Click the Refresh button to update the statistics on this screen. Figure 3-21 Statistics page 43 RedFire 200e Radio User Manual Chapter 3 Configuring the 802.11g Radio Management 3-5 Management Change Password Figure 3-22 Change Password page Here allow you to change the password of the RedFire 200e: 1. To change the current password, choose the “Change Password” option from the “Management” section in the outdoor radio’s left page. Key in the default password “password” in the “Current Password” filed. 2. Changing the password for the outdoor radio is as easy as typing the password into the New Password field. Then, type it again into the Retype New Password field to confirm. Click the “Apply” button to save the setting. After you change password, please take note of your new password. Otherwise, you will not able to access the outdoor radio. If you forget the password, you could restore the default password “password” by clicking the “Yes” check box in the “Restore Default Password” field. 44 RedFire 200e Radio User Manual Chapter 3 Configuring the 802.11g Radio Management Remote Management Figure 3-23 Remote Management page Remote Console Secure Shell (SSH) If Secure Shell is enabled, the RedFire 200e will only allow remote access via Secure Telnet. SNMP Enable SNMP to allow the SNMP network management software to manage the outdoor radio via SNMPv2 protocol. Read Community Name: Allow the SNMP manager to read the MIB objects of the outdoor radio. The default setting is “public”. Write Community Name: Allow the SNMP manager to write the MIB objects of the outdoor radio. The default setting is “private”. IP Address to Receive Traps: The IP address of the SNMP manager to receive traps sent from the outdoor radio. 45 RedFire 200e Radio User Manual Chapter 3 Configuring the 802.11g Radio Management If you complete the settings, please click on “apply” icon for the changes to take effect. Upgrade Firmware Browse Figure 3-24 Upgrade Firmware page The Upgrade Firmware menu will display the Upgrade Firmware window so that you could update the latest firmware on the outdoor radio. Please make sure that you have downloaded the latest and correct firmware from the website and store it in local drive before upgrading the firmware of the outdoor radio. To upgrade the latest firmware, complete the following: z Using browser to access the outdoor radio’s main page. 1. Select Upgrade Firmware from the Management section. 2. Input the exact file path and name by clicking Browse button, then press Upload button to upgrade the firmware. 46 RedFire 200e Radio User Manual Chapter 3 Configuring the 802.11g Radio Management 3. Please wait for 150 seconds. z If download fail, please repeat the step 1~3 to download again. Do not power off the unit when it is being upgraded. Backup / Restore Settings The current system settings can be backup as a file onto the local hard drive by clicking “Backup”. The saved file can be loaded back on the Radio by clicking “Browse”. When you have selected the settings file, click “Retrieve” to begin the process. Furthermore, you may click “Restore” to factory default settings. Browse Figure 3-25 Backup / Restore Settings page Event Log Enable SysLog if you have a Syslog Server on your network environment. If enable, you need to input the Syslog Server IP Address (default is 0.0.0.0) and the port number your Syslog Server is configured to use. The default port number is 514. Click “Apply” if you made any changes. 47 RedFire 200e Radio User Manual Chapter 3 Configuring the 802.11g Radio Management The Event Log Window lists outdoor radio events. Click on “Refresh” to update the network events or “Save As…” to save the event into a file on your computer. Figure 3-26 Event Log page Reboot AP The Reboot AP screen enables you to reboot your outdoor radio. If any changes are made and you want them to take effect, you need to reboot the outdoor radio. Select the “Yes” check box and click “Apply”. It will take you about 50 seconds to go through reboot. The Web-browser will not be accessible until the outdoor radio has finished its reboot process. 48 RedFire 200e Radio User Manual Chapter 3 Configuring the 802.11g Radio Management Figure 3-27 Reboot AP page 49 RedFire 200e Radio User Manual Chapter 4 Troubleshooting This chapter helps you to isolate and solve the problems with the RedFire 200e. Before you start troubleshooting, it is important that you have checked the details in the product user manual and quick installation guide. In some cases, rebooting the unit clears the problem. If the radio still does not perform as expected, please try to contact your local vendor or supplier. Chapter 4 Troubleshooting General Descriptions 4-1 General Descriptions To successfully use the radios, engineers must be able to troubleshoot the system effectively. This section will show you how an RedFire 200e could be analyzed in the case of “no link,” usually, we thinks that the link is down because there is no traffic being passed. The four main reasons that a link may not work are list as below: Configuration Path issues (such as distance, obstacles, RF reflection…) Personal reasons (careless mounting or the incorrectly connection.) Hardware (includes the radio, cable and connectors…etc. In few cases, the radio will conflict with the laptop or PC) Environment (anything that is outside the equipment and not part of the path itself) After verified the correct configuration, double-checked the path terms, ensure no personal reasons and the hardware works well in the office, but the user still report that the link does not work. Most likely, the problem reported is caused by the environment or by improper tests to verify the connection. Assumes that the test method, cabling, antennas, and antenna alignment have been checked, (Always ensure this before checking the environment.) then you can do the follow to check the environment. General Check Two general checks are recommended before taking any action: Check whether the software version at both sides is the most current Check for any reported alarm messages in the Event Log Analyzing the Spectrum The best way to discover if there is a source of interference is to use the spectrum analyzer. By turning the antenna 360 degrees, you can find out which direction is the interference coming from. it will also show the frequencies and the level of signal is detected. Avoiding Interference 50 RedFire 200e Radio User Manual Chapter 4 Troubleshooting General Descriptions When a source of interference is identified and when the level and frequencies are known, the next step is to avoid the interference. Some of the following actions can be tried: Change the RF channel to the one away from the interference source Change the polarization of the antenna; try to change to a polarization different from the interferer. A small beam antenna may helps. (Such as some grid or dish antenna, align the antenna in to the particular direction will reduce the affects from the interference source) This solution cannot help when the source of interference is right behind the remote site. Before checking for interference, ensure all the hardware works well and configurations are correct. The path analysis, cabling and antennas should be checked as well. 51 RedFire 200e Radio User Manual Chapter 4 Troubleshooting Connection Issues 4-2 Connection Issues This section describes several common troubles the customer might have while setting the radios. Radio Does Not Boot When the Radio does not Boot, do the following steps to check your whole system: 1. Ensure that the power supply is properly working and correctly connected. 2. Ensure that all cables are workable and connected correctly. 3. Check the power source. Cannot use the Web Interface If the radio boot, but can’t enter it via the Web site. 1. Open a command prompt window and enter ping <ip address unit> (for example: ping 192.168.1.1). If there is no response from the radio, make sure that you the IP address is correct. If there is response, the Ethernet connection is working properly, do the next step. 2. Make sure that you are using one of the following Web browsers: Microsoft Internet Explorer version 5.0 or later Netscape version 5.0 or later. 3. Ensure that you are not using a proxy server for the connection with your Web browser. 4. Double-check the physical network connections (includes the cables and the connectors). Use a well-known unit to ensure the network connection is properly functioning. 52 RedFire 200e Radio User Manual Chapter 4 Troubleshooting Configuration Issues 4-3 Configuration Issues The following problems relate to setup and configuration problems. Some basic configurations might make the link fail, below are the major ones: RF Channel SSID IP address Rule of MAC address filter Rule of security settings (such as WEP or WPA) Rule of authentication (such as settings of radius server and 802.1x) Configurations of WDS page Please check the detail configuration in Chapter 3 “Configuring the 802.11g Radio” 53 RedFire 200e Radio User Manual Chapter 4 Troubleshooting Communication Issues 4-4 Communication Issues If the link between the two radios works within close distance of each other, then there are two possible reasons why wireless connectivity is not possible while the RedFire 200es are at their desired locations: RF path, for example, a bad antenna alignment, the tower is not tall enough when the radios are installed in a long distance or the connector do not attachment well…etc (these are the most common problems in installations) Interference problem caused by a high signal level from another unit. The interference can be checked by changing the frequency and then see if another channel works better. Or you can change the polarization of the antenna as a way of avoiding the interfering signal. To know in advance how much interference is present in a given environment, a Spectrum Analyzer can be attached to a (temporary) antenna for measuring the signal levels on all available Channels. If the link still not works after resetting the configurations, checking the connectors and cables, double-check the path and environment issues, then the problem may be hardware related. Acquiring a third radio and then testing it amongst the existing units will help to find out the broken unit. Please contact your local vendor for advance technical support. wirelessinteractive.com 23112 alcalde drive, suite c : : laguna hills, ca 92653 phone: 949.215.6277 : : fax: 949.215.6278