1
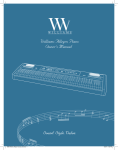
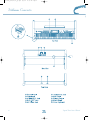
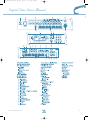
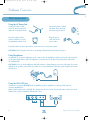
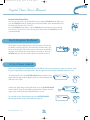
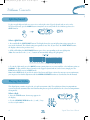
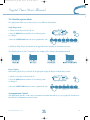
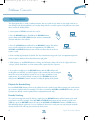
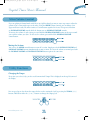
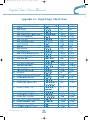
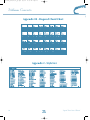
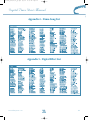
Williams_Concerto-2_Q5.qxd
8/3/04
11:03 AM
Page cvr1
Williams Concerto
User’s Manual
Digital Piano Users Manual
Williams_Concerto-2_Q5.qxd
8/3/04
11:03 AM
Page 1
Digital Piano Users’ Manual
Thank you for purchasing the Concerto digital piano. For optimal operation and security, please read this
manual carefully and keep it for future reference.
Important Safety Instructions
Please read the following carefully before use:
• Do not expose the piano to high temperatures, direct sunlight and excessively dusty places.
• Do not place the piano too close to other electrical appliances such as a television or radio, it may
cause interference.
• Do not place the piano in a high humidity area. Avoid putting containers with liquid on top of the piano
to prevent an accidental spill which could damage the internal electronics of the piano.
• Always unplug cables by gripping the plug firmly, but not pulling on the cable.
• Do not apply excessive force to the switches and buttons.
• When the piano is not in use or during a thunderstorm, disconnect the power supply.
• Avoid adjusting the volume level to the maximum or to the level that make you feel uncomfortable. We
recommend you limit the volume level to two-thirds of the max to prevent damage to the speakers and/or
headphones.
• Unplug the power cable before cleaning the piano and never connect or disconnect the power cable with
a wet hand.
• Check and clean the power plug periodically.
• To avoid damage to the piano and other devices to which it is connected, turn the power switches of all
related devices off prior to connecting or disconnecting cables.
• Clean the piano with a dry soft cloth. A slightly damp cloth may be used to remove dirt.
• Never use cleaners such as thinner or alcohol. Use a lens cleaning tissue to clean the surface of the
LCD display.
• If the piano cable is damaged, do not use the piano. Otherwise it may become a fire or electrical hazard.
• The piano may malfunction due to improper handling, if this occurs, switch off the piano and switch on
again after 30 seconds.
• Do not attempted to disassemble or repair the piano by yourself. Any modification of the internal parts may
void your warranty. If the piano is not working properly, please contact an approved repair facility.
WARNING: To reduce the risk of fire or electric shock, do not expose this instrument to rain or moisture.
CAUTION: This instrument should not be exposed to dripping or splashing and objects filled with liquids,
such as vases, should not be placed on the instrument.
www.williamspianos.com
1
Williams_Concerto-2_Q5.qxd
8/3/04
11:03 AM
Page 2
Williams Concerto
Thanks for choosing the Williams Concerto digital piano
Thank you for purchasing this Digital Piano. The use of high technology and the
most advanced sampling technique brings you high quality sound and enjoyment.
The combination of digital piano and electronic keyboard features let you perform
perfectly. We hope this skillfully built digital piano will able to explore your creativity,
and brings you unlimited happiness and music enjoyment.
Before you use the piano, we recommend you to read through this manual.
Please keep this instruction manual for future reference.
2
Digital Piano Users Manual
Williams_Concerto-2_Q5.qxd
8/3/04
11:03 AM
Page 3
Digital Piano Users’ Manual
Contents
Digital Piano Set-up Guide . . . . . . . . . . . . . . 4
General Guide . . . . . . . . . . . . . . . . . . . . . . . . . 5
The Connectors . . . . . . . . . . . . . . . . . . . . . . .6-7
Using the AC power jack
Using headphones
Using AUX.OUT jack
Using the foot pedals
Using the MIDI IN/OUT jacks
Basic Operation . . . . . . . . . . . . . . . . . . . . . . . .7
Power switch & volume
Demonstration
Voice and Effects . . . . . . . . . . . . . . . . . . . . .8-11
Select a voice
Dual voice
Harmony
Drum kit
Digital effects
Instant select piano voice
Touch Response Keyboard . . . . . . . . . . . . . .11
Octave Down Control . . . . . . . . . . . . . . . . . .11
Split Keyboard . . . . . . . . . . . . . . . . . . . . . . . .12
Playing the Styles . . . . . . . . . . . . . . . . . . . .12-14
Select a style
The chord recognition modes
Accompaniment control
Metronome . . . . . . . . . . . . . . . . . . . . . . . . . . .15
Jam Track . . . . . . . . . . . . . . . . . . . . . . . . . . . .15
One Touch Setting . . . . . . . . . . . . . . . . . . . . .15
Memorize Panel Settings . . . . . . . . . . . . . . . .16
How to store a memorized setting
www.williamspianos.com
The Sequencer . . . . . . . . . . . . . . . . . . . . . . . .17
Play back the recorded song
Record a new song
Mixer Volume Control . . . . . . . . . . . . . . . . .18
Muting the sections
Utility Functions . . . . . . . . . . . . . . . . . . . . .18-20
Change the Tempo
Restoring the memorized Tempo
Pan
Pitch
Transpose
MIDI . . . . . . . . . . . . . . . . . . . . . . . . . . . . . . . .20
MIDI channel selection
Control change filter
Specifications . . . . . . . . . . . . . . . . . . . . . . . . .21
Troubleshooting . . . . . . . . . . . . . . . . . . . . . . .21
Appendix
Appendix 1A - . . . . . . . . . . . . . . . . . . . . . .22
Single Finger Chord Chart
Appendix 1B - . . . . . . . . . . . . . . . . . . . . . .23
Fingered Chord Chart
Appendix 2 . . . . . . . . . . . . . . . . . . . . . . . .23
Style List
Appendix 3 . . . . . . . . . . . . . . . . . . . . . . . .24
Voice List
Appendix 4
Demo Song List
Appendix 5
Digital Effect List
3
Williams_Concerto-2_Q5.qxd
8/3/04
11:03 AM
Page 4
Williams Concerto
4
Digital Piano Users Manual
Williams_Concerto-2_Q5.qxd
8/3/04
11:03 AM
Page 5
Digital Piano Users’ Manual
www.williamspianos.com
5
Williams_Concerto-2_Q5.qxd
8/3/04
11:03 AM
Page 6
Williams Concerto
The Connectors
Using the AC Power Jack
Connect the power cable
to the AC power jack on the
underside of the piano body.
Ensure the piano is turned
off when connecting and
disconnecting the power.
Turn the volume switch
counter-clockwise to reach
the minimum volume level.
Plug the power
cable into an AC
power outlet.
If you have done the above procedures you are now safe to turn on the piano.
CAUTION: When the piano is not in use or during a thunderstorm, disconnect the power.
Using Headphones
An optional set of stereo headphones can be connected to the headphones jack located on the left underside
of the piano body. When a pair of headphones is connected to the jack, the internal speakers will switch
off automatically.
CAUTION: Never use the headphones with high volume, as it may damage your sense of hearing. To prevent
damage to the speakers, ensure that the volume is set to the minimum level before connecting the power and
other devices.
Using the AUX.OUT jack
Connect the rear-panel AUX.OUT jack to amplified speakers, amplifiers or domestic hi-fi units for
external amplification.
Note: Connect both left (L) and right (R) channels for the stereo result. If you only connect either one of the
channels, the connected channel will only take effect.
6
Digital Piano Users Manual
Williams_Concerto-2_Q5.qxd
8/3/04
11:03 AM
Page 7
Digital Piano Users’ Manual
Using the Foot Pedals
Connect the plug of the foot pedal unit to
the pedal jack on the rear panel.
Using the MIDI IN/OUT Jack
MIDI stands for Musical Instrument Digital Interface. MIDI is a worldwide
standard that makes it possible for various electronic musical instruments to
communicate with other MIDI devices.
MIDI IN: Data transmitted from other MIDI instrument via MIDI, is received at this terminal.
MIDI OUT: Data produced by the Digital Piano is transmitted to other MIDI instruments via MIDI from
this terminal.
Basic Operation
1. Power Switch & Volume
Turn the POWER switch on.
The LCD display lights up.
Use the volume control
switch to adjust the volume to
your desired level
2. Demonstration
This Digital Piano comes with 10 demo songs for showing
you the possibilities of the piano. To playback the demo
songs, follow the instructions below:
DEMO
Press the SONG button, the demo song start to play back.
There are 10 demo songs and they can play continually.
When you press the SONG button during
playback, the song playing currently will stop and will skip
to the next song. During the playback you can use the
numeric keypad or the (+) and (-) keys to select the songs.
To stop playback, press the START/STOP button.
Note: During the demo song playback, the digital piano is unable to play.
www.williamspianos.com
7
Williams_Concerto-2_Q5.qxd
8/3/04
11:03 AM
Page 8
Williams Concerto
Voices and Effects
Select a Voice
The Voice Select mode is the default mode every time
the piano is turned on and VOICE 01 is selected. At
this time you can use the numeric keypad or the (+)
and (-) keys to select another voice.
When you are choosing Voice 01-99 at the status of
VOICE 1 or VOICE 2, you can use the numeric keypad
to input the number of your desired voice directly.
Three digits voice number are entered by first pressing
the +100 button, then press the remaining two digits
in sequence.
Dual Voice
This digital piano features dual voice option which allow you to hear two different sounds for every note played.
1. When VOICE 1 is showing on the display, press the
DUAL button, and VOICE 2 appears in the display.
Now input the second voice digits.
2. Press the DUAL button again to turn this function off.
NOTE: Dual Voice function only works with full keyboard playing or right-hand playing.
8
Digital Piano Users Manual
Williams_Concerto-2_Q5.qxd
8/3/04
11:03 AM
Page 9
Digital Piano Users’ Manual
Harmony
The digital piano has three different harmony settings. It transforms simple one-note melodies into fully
orchestrated pieces.
1. When the piano is turned on, the harmony
function is in the off status, press the HARMONY
button once, then the word OFF will appear in the
display.
2. When OFF is showing in the display, press
HARMONY button once, at this time the select indicator
points to HARMONY in the display and the harmony
value switch goes from OFF to 01. Now play a key on the
left side of the keyboard to turn on the auto accompaniment,
then play a key on the right to hear the harmony effect.
3. When you are in harmony 01 status, press the HARMONY button once and 02 will appear in the display.
If you would like to switch to harmony 03, press the HARMONY button again. Now play a single note on the
right side of the keyboard. If you selected harmony type 01, you will hear two notes play.
Select harmony type 02 and play the same chord and single note again, this time you will hear a three note chord
on the right hand for every single note played.
Select harmony type 03 and play the same chord and single note again, this time you will hear an octave intervals
for every single note played.
4. To turn off the harmony function, press the HARMONY button until OFF appears in the display.
Note: If the keys on the left side are in Normal or Split mode, the harmony effect will not take effect. If the
Harmony function is turned on, the right side of the keyboard will take effect. During recording, the harmony
effect will not work. If you start recording when the harmony function is turned on, the function will turn off automatically.
Drum Kit
The digital piano features 7 drum sounds. Voices 141-147 are where the drum sets are located. To select a drum
set, please refer to the section “Select a Voice” on page 8.
www.williamspianos.com
9
Williams_Concerto-2_Q5.qxd
8/3/04
11:03 AM
Page 10
Williams Concerto
Digital Effects
The digital piano has 8 Reverb and 8 Chorus effects.
Reverb Effect
To adjust reverb type and levels:
1. Press the REVERB button, and two values appear on the
display. The one on the left is the reverb type, and the other
is the reverb level.
2. Press and hold the REVERB button, the reverb type will start to
flash, and you then can change the reverb type by selecting a
number(0-7) with the numeric keypad. When the reverb type is
selected, the reverb level will start to flash, now you can use the
same method as selecting reverb type to select reverb level (0-7).
Chorus Effect
To adjust chorus type and levels:
1. Press the CHORUS button, and two values will appear
on the display. The one on the left is chorus type, the
other is the chorus level.
2. Press and hold the CHORUS button, the chorus type
value will start to flash. You then can change the chorus
type by selecting a number (0-7) with the numeric keypad.
When the chorus type is selected, the chorus level will
start to flash. Now you can use the same method as selecting
chorus type to select chorus level (0-7).
Note: When the Reverb and Chorus levels are set to “0”, the effects are turned off. The default Reverb type and
level are both set to 4; the default Chorus type and level are both set to “0”, as in “off ” status.
10
Digital Piano Users Manual
Williams_Concerto-2_Q5.qxd
8/3/04
11:03 AM
Page 11
Digital Piano Users’ Manual
Instant Select Piano Voice
You can select the piano voices immediately by pressing the PIANO button. When you
press the PIANO button, the digital piano turns into Normal status automatically, and
the Dual voice function is de-selected.
Press the PIANO button again to exit the PIANO mode and return to the previously
selected voice. If you select a voice directly in the Piano status, the PIANO status will
exit automatically.
Touch Response Keyboard
The keyboard on this digital piano is velocity sensitive. This means
the harder you play on the keys, the louder the sound becomes, just
like an acoustic piano. The touch response can be turn on and off at
any time. At the default, the touch response is turned on. Press the
TOUCH button to turn the touch response on and off as desired.
Octave Down Control
When you are playing in Normal mode, you can shift the current voice down one octave in real time. In the
Fingered, Single Fingered and Split mode, only the right side of the keyboard will shift down one octave.
In Normal mode, press the OCTAVE DOWN button, and the octave
down indicator appears in the display. Now, the entire keyboard will
shift down one octave.
In Fingered, Single Fingered and Split mode press the OCTAVE DOWN
button, and the octave down indicator appears in the display. Now the
right section of the keyboard will shift down one octave.
To cancel the octave down function, press the OCTAVE DOWN
button again and the octave down indicator turns off.
www.williamspianos.com
11
Williams_Concerto-2_Q5.qxd
8/3/04
11:03 AM
Page 12
Williams Concerto
Split Keyboard
To play on a split keyboard with one or two voices on the right section (Upper keyboard) and one voice on the
left (Lower keyboard), press the MODE button as many times as necessary until the select indicator points to the
SPLIT function.
Select a Split Point
1. Press and hold the SPLIT POINT button. The display shows the current Split point setting expressed as a
note on the keyboard. The default setting corresponds to note F#3. (If you release the SPLIT POINT button,
the display returns to the previous view).
2. While still holding the SPLIT POINT button, press a key corresponding to the new Split point.
(Note: You can also use the (+) or (-) buttons to incrementally change the split point).
3. To exit the Split mode, press the MODE button as many times as necessary until the select indicator points to
NORMAL. To play with two layered sounds on the Upper keyboard and one on the lower, simply press the
DUAL button while you are in SPLIT mode.
Note: In the SPLIT mode, if you feel the ratio of the Lower and Upper sections does not meet your requirements,
you can proceed to further adjustment with the MIXER CONTROL function as described later in this manual.
Playing the Styles
This digital piano contains 99 styles (01-99) and 1 metronome (00). The sophisticated Auto Accompaniment
system can provide automated bass and chord backing that are perfectly matched to the selected accompaniment
arrangements.
Select a Style
1. Press the STYLE button, the message appears in
the display.
2. Use the NUMERIC KEYPAD or the (+) and (-) keys
to select a Style number.
12
Digital Piano Users Manual
Williams_Concerto-2_Q5.qxd
8/3/04
11:03 AM
Page 13
Digital Piano Users’ Manual
The Chord Recognition Modes
The digital piano allows you to choose between two different Chord modes:
Single Finger mode:
1. Choose a style that you desire (01-99).
2. Press the MODE button until the select indicator points
to “S.Finger”.
3. Press the START/STOP button to start to playback the style.
4. Follow the Single Finger Chord table in the appendix section and play the chord that you want.
The following shows C, Cm, C7 and Cm7 as the examples of the S.Finger Chord playing method:
Fingered mode:
In this mode, play the keys on the left of the Split point to play the Fingered Chord that you want.
1. Choose a style that you desired (01-99).
2. Press the MODE button until the select indicator points
to “Fingered”.
3. Press the START/STOP button to start to playback the style.
Accompaniment Control
This digital piano provides a wide variety of automatic functions that make it very easy to play. The functions are
found in the Accompaniment Control section.
www.williamspianos.com
13
Williams_Concerto-2_Q5.qxd
8/3/04
11:03 AM
Page 14
Williams Concerto
START/STOP
Press the START/STOP button to start/stop the style.
SYNC
1. The SYNC function allows you to synchronize the start of your
Style with a note or chord pressed on the keyboard without using
the START/STOP button. When you press the SYNC button, the
display shows the beat pattern and FILL-IN A indicators. This puts
the keyboard in standby mode.
2. If you are in Normal mode, you can start the style by playing any
key on the keyboard. If you are in Fingered, S.Finger or Split modes,
you have to play the chord that is corresponding to the style pattern
you selected.
3. To stop the style, press either the START/STOP button or the SYNC button. Before starting the Style, press
the INTRO button to place the piano on intro-start standby. The LED of the current Style pattern starts to flash
to indicate that the INTRO has been preset. Now press the START/STOP button and play a note or chord on
the lower part of the piano. The Style starts with an introductory pattern then it proceeds with the selected
auto accompaniment.
Fill in A/B
Each of the 99 styles have a standard fill FILL-IN A and variation FILL-IN B.
When you press the FILL-IN A or the FILL-IN B during playback,
the current pattern is interrupted by an appropriate Fill-in, then it
proceeds with the same pattern, depending on which button you press.
Fade
While playing your style, you can fade the overall volume down
simply by pressing the FADE button. After pressing the button,
the Style continues to play but the volume decreases gradually
until no volume is heard.
Ending
You can stop your Style automatically with a well-executed
ending pattern without using the START/STOP button.
While the style is playing, simply press the ENDING button.
The Style auto-accompaniment stops automatically with an
ending phrase.
14
Digital Piano Users Manual
Williams_Concerto-2_Q5.qxd
8/3/04
11:03 AM
Page 15
Digital Piano Users’ Manual
Metronome
At any time, you can activate the METRONOME for practicing purposes.
1. To activate the Metronome, press the STYLE button and insert the value “00”.
2. Press the START/STOP button to start the Metronome.
You can choose the metronome type (0, 2-9) by pressing the
METRONOME button.
3. When the Metronome is playing, you can adjust the speed by
pressing the TEMPO (+)/(-) buttons.
4. To stop the Metronome, press the START/STOP button.
Jam Track
1. While the electronic keyboard is playing the auto accompaniment, you press the JAM TRACK
button and the indicator lights up. In this case, the electronic keyboard will play the chord of the
style according to the previous setting. Press the JAM TRACK button again, the JAM TRACK
indicator turns off, and the electronic keyboard will return to normal mode.
2. In the JAM TRACK accompaniment pattern by pressing the
FILL-IN A or the FILL-IN B button, the JAM TRACK function
will cancel automatically.
One Touch Setting
The One Touch Setting is a quick and easy way of reconfiguring voices of Upper and Lower sections of a style by
pressing only one button while you are playing.
Selecting the One Touch Setting
1. Select a Style using the methods already described.
2. Press the OTS button. The display shows the select indicator
pointing to the OTS. Make sure one of the two chord recognition
modes is selected.
3. Press the START/STOP button to play the selected style.
While playing the style, you can press one of the ONE
TOUCH SETTING buttons - [M1], [M2], [M3], [M4] to select
the appropriate setting.
www.williamspianos.com
15
Williams_Concerto-2_Q5.qxd
8/3/04
11:03 AM
Page 16
Williams Concerto
Memorize Panel Settings
If you don’t want to use the factory style settings, you can save your own panel configurations to the MEMORY
buttons. This function allows you to store up to 6 user-defined configurations, including Style, Variation and
other selections, which you can then recall by simply pressing a button.
How to Store a Memorized Setting?
You are able to store the following values into your user-define settings:
1. Voice values
Voice Variation setting
Mixer Control setting
Touch Response On/Off
Reverb, Chorus and
Level setting
Harmony effect setting
Octave Down setting
Split Keyboard setting
2. Accompaniment values
Accompaniment style number
Mixer Control setting
FILL-IN A/B setting
Intro, Ending, Fade setting
Split Point setting
3. Tempo setting
Mode configuration
(Normal, Fingered,
Single Finger, Split
Keyboard)
You only need to change one aspect of any factory setting to be able to save as a new setting.
1. Press the STYLE button, then press the OTS button, use the numeric keypad or the (+)/(-) keys to choose
a style.
2. Press the VOICE button and select a different voice by using either the numeric keypad or the (+)/(-) keys.
3. Press the OTS button to deactivate the OTS function.
4. Hold down the WRITE button and press one of the
MEMORY button (M1-M6).
16
Digital Piano Users Manual
Williams_Concerto-2_Q5.qxd
8/3/04
11:03 AM
Page 17
Williams Concerto
The Sequencer
The digital piano has a 3-tracks recording function. You can record in Voice mode or Style mode with one or
two melody tracks. During playback, you can play along with the recorded sequence using different voices than
those used in the Melody tracks.
1. Set the piano to STYLE mode and select a Style.
2. Press the RECORD button. The LED of the RECORD button
starts to flash and the KEY START function activates automatically
(the Beat indicators start to flash).
3. Press the ACCOMP button followed by the MELODY 1 button. This allows
you to record a melody line with auto accompaniments. The LED of the
ACCOMP and MELODY 1 buttons start to flash to indicate that the tracks are
ready to record.
4. Start recording by playing the keyboard. The Key Start function triggers the Style accompaniment patterns
when you play a chord on the keyboard below the split point.
5. While playing, use the FILL-IN buttons to change the Variations, change Voices for the Upper and Lower
sections, activate Dual Mode, etc. Your actions will be captured by the sequencer.
6. To stop the recording, press the RECORD button and the LED will turn off.
At this point you will have a recorded sequence with a melody line and accompaniment. You can record the Melody 2 track or leave it empty, according to your
requirements. To record the Melody 2 track, press the RECORD button, and
then press the MELODY 2 button. Start the recording by playing the keyboard.
Playback the Recorded Song
Press the PLAY/STOP button to listen to the playback of your recorded song. Before starting, you can deactivate
one or more recorded tracks. For example, if you have recorded the ACCOMP and MELODY 1 tracks, you can
deactivate the Melody 1 track to playback the accompaniment track only.
Record a New Song
To record a new song and cancel the old one, simply press the RECORD button and the buttons of the track
you want to record. For example, if the ACCOMP and MELODY 1 buttons already contain recorded notes
(LEDs on), press the RECORD button, then press the ACCOMP and MELODY 1 buttons. All LEDs start to
flash indicating that the sequencer is set to record mode. Proceed to record your new song using the methods
already described. The old song is overwritten by the new one.
17
Digital Piano Users Manual
Williams_Concerto-2_Q5.qxd
8/3/04
11:03 AM
Page 18
Digital Piano Users’ Manual
Mixer Volume Control
If you are playing in Normal mode with Voices on a Split keyboard, you may at some stage want to adjust the
volume of one section with respect to the other. Using the MIXER Volume controls, you can balance your
Upper and Lower easily. The mixer consists of 7 twin buttons organized in 2 rows. The top row of buttons
are INCREASE VOLUME controls while the bottom row are DECREASE VOLUME controls.
To increase the volume of each section, press and hold the INCREASE VOLUME button on the top row until
you reach the volume you desire. To decrease the volume, press and hold the DECREASE VOLUME
control button.
Muting the Sections
You can use the MIXER control buttons to turn off a section. Simply press both INCREASE VOLUME and
DECREASE VOLUME buttons simultaneously to mute sections. To restore the volume to normal, press both
the INCREASE VOLUME and DECREASE VOLUME buttons again at the same time.
Utility Functions
Changing the Tempo
Every time you select a Style, you also recall a memorized Tempo. This is displayed on the top left corner of
the display.
You can speed up or slow down the tempo, before or after starting the Style by pressing the TEMPO (+)/(-)
buttons. Hold down either the (+) or (-) buttons to change the tempo speed.
www.williamspianos.com
18
Williams_Concerto-2_Q5.qxd
8/3/04
11:03 AM
Page 19
Williams Concerto
Restoring the Memorized Tempo
To restore the Style’s memorized tempo, press both the Tempo (+) and (-)
buttons simultaneously.
The Pan function allows you to change the stereo pan position of the overall sound, moving the sound at the
speakers either to the left or to the right.
If you press either the INCREASE or DECREASE PAN button once, the display will show the normal setting
corresponding to Pan at the center (00).
Press the INCREASE or DECREASE PAN repeatedly to pan the overall sound to the left
(max:07) or to the right (max:07).
To restore the normal Pan position (00), press both the INCREASE and DECREASE PAN buttons simultaneously.
The Pitch function allows you to fine tune the instrument.
Press the INCREASE or DECREASE PITCH buttons repeatedly to raise (max:50) or lower (min:50) the tuning
until you reach the value required.
To restore the normal Pitch position (00), press both the INCREASE and DECREASE
PITCH buttons simultaneously.
19
Digital Piano Users Manual
Williams_Concerto-2_Q5.qxd
8/3/04
11:03 AM
Page 20
Digital Piano Users’ Manual
Transpose
The TRANSPOSE function allows you to change the pitch of the instrument in semi-tone steps, up to a
maximum setting of 12 semi-tones above or below standard pitch.
To restore the normal Transpose position (00), press both the INCREASE and DECREASE
TRANSPOSE buttons simultaneously.
MIDI
The MIDI section consists of two functions, TRANSMIT or RECEIVE, which allows you to set the Transmission
and Reception channels independently for the keyboard as a whole. Both Reception and Transmission channels
also feature a Control Change filter (on/off).You can set the MIDI Transmission and Reception channels to any
value from 1-16, or off.
MIDI Channel Selection
If you press the MIDI TRANSMIT button, the display
shows the factory-set MIDI Transmission channel.
If you press the MIDI RECEIVE button, the display
shows the factory-set MIDI Transmission channel.
Use the (+) button in the numeric keypad to increase the Transmission or Reception
channel, or the (-) button to decrease it.
Control Change filter
To set the Control Change filter to either the Transmission
or Reception channel, press the TRANSMIT or RECEIVE
button twice. The display shows the current setting (Off).
To activate or deactivate the filter, use the (+) or (-) buttons of the numeric keypad.
www.williamspianos.com
20
Williams_Concerto-2_Q5.qxd
8/3/04
11:03 AM
Page 21
Williams Concerto
Specifications
Troubleshooting
21
Digital Piano Users Manual
Williams_Concerto-2_Q5.qxd
8/3/04
11:03 AM
Page 22
Digital Piano Users’ Manual
Appendix 1A - Single Finger Chord Chart
www.williamspianos.com
22
Williams_Concerto-2_Q5.qxd
8/3/04
11:03 AM
Page 23
Williams Concerto
Appendix 1B - Fingered Chord Chart
Appendix 2 - Style List
23
Digital Piano Users Manual
Williams_Concerto-2_Q5.qxd
8/3/04
11:03 AM
Page 24
Digital Piano Users’ Manual
Appendix 4 - Demo Song List
Appendix 5 - Digital Effect List
www.williamspianos.com
24
Williams_Concerto-2_Q5.qxd
8/3/04
11:03 AM
Page bcvr2
All trademarks and registered trademarks mentioned herein are recognized as the property of their respective holders. Made in China 0404-15-6762


![Overture 2 Owner`s Manual [US]](http://vs1.manualzilla.com/store/data/005690862_1-0f7bb48baaf3473aa086657512069e12-150x150.png)
![Rhapsody 2 Owner`s Manual [US]](http://vs1.manualzilla.com/store/data/005663417_1-92bddf67d752d586c47af9cd7ea47d7e-150x150.png)