1
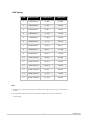
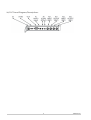
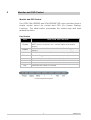
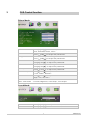
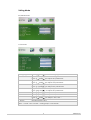
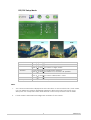
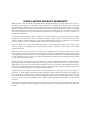
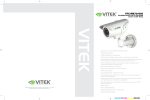
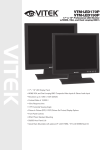
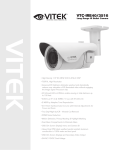
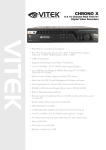
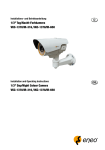
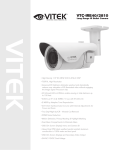
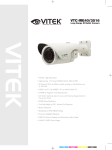
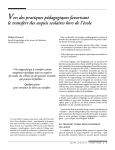
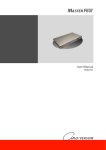
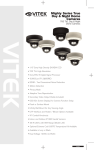
VTM-LED220P
VTM-LED240P
22” & 24” Professional LED Monitor
w/HDMI, VGA, and Dual Looping BNC’s
VITEK
• 22” / 24” Wide Screen LED Display Panel
• HDMI, VGA, and Dual Looping BNC Composite Video Inputs & Stereo Audio Input
• Resolution up to 1920 x 1080 (1080P)
• Contrast Ratio of 10,000:1
• <5ms Response time
• 170° Horizontal Viewing Angle
• Picture In Picture (PIP) / POP (Picture On Picture) Display Options
• Top Panel Controls with included IR Remote Control
• VESA 100mm Standard Mounting
• 50,000 Hour Panel Life
1
Introduction and Package Contents
Introduction
Congratulations on your VITEK LED Monitor purchase. You can expect
only the sharpest and most brilliant color images from this monitor.
Featuring OSD controls and built in speakers, you will find this monitor
both easy to use and a pleasure to view.
Please unpack your monitor with care, and verify that all the parts
listed below are included. If any parts are missing, please contact
your distributor immediately.
Please save the packing box for possible future return for service.
Package Contents
•
•
•
•
•
•
LED Monitor – VTM-LED220P or VTM-LED240P
12 Volt DC Power Adapter / Power cord
HDMI Cable
D-Sub 15-pin VGA connector Cable
User's Guide
IR Remote Controller
Hardware Installation
The following sections in this guide give clear, step-by-step
descriptions of the installation process and explain how to use the
monitor for optimum results.
Please pay attention to the Regulations and Warnings Section of this
user’s manual before setting up the display monitor. Failure to do so
may inadvertently result in personal injuries or product damage.
1
1DU00L7B-A.1
Specifications
Screen Size
VTM-LED220P
VTM-LED240P
21.5”
23.6”
Display Type
Aspect Ratio
Resolution
LED
16:9
16:9
1080P (1920x1080)
1080P (1920x1080)
Response Time
<5ms
Contrast Ratio
10,000:1
Display Color
16.7 Million
Brightness
300cd/m²
Pixel Type
Active Matrix TFT
Pixel Pitch
0.24825 x 0.24825 mm
0.2715 x 0.2715 mm
Viewing Angle (H/V)
170° / 160°
Video System
NTSC/PAL
Video In/Out
2 BNC Inputs / 2 BNC Outputs (Looping)
VGA In
1 (15Pin D-Sub)
HDMI In
1
Audio Input
Stereo RCA & 1/8" PC
Built In speaker
Yes (1.5W x 2 )
PIP / POP
Analog / Digital
Remote
Optional
3D Comb Filter
YES
3D De-Interlace
YES
Noise Reduction
YES
Multi-Language
English, Spanish, German, French, Italian, Russia, Turkish, Japanese, Polish
Stand Tilt
0°~15°
Vesa Mount Size
100mm x 100mm
Power Adapter
Power Consumption
Certifications
Operating
Temperature
Operating Humidity
Dimensions (w/Stand)
Weight
12VDC (AC100/240 [50/60])
30W Max
35W Max
UL, FCC-DOC, CE, ROHS
32° to 104° F (0° to 40° C)
10% to 90% relative, non-condensing
20.63” x 14.76” x 6.7” (524 x 375 x
22.83” x 16.02” x 6.7” (580 x 407 x
170mm)
170mm)
7.93 lbs (3.6Kgs)
9.7 lbs (4.4Kgs)
2
1DU00L7B-A.1
VGA Timing
ITEM
RESOLUTION
H FREQ.(KHZ)
V FREQ.(HZ)
1
640x400@70
31.460
70.080
2
640x480@60
31.469
59.940
3
640x480@72
37.861
72.809
4
640x480@75
37.500
75.000
5
720x400@70
31.460
70.080
6
800x600@56
35.156
56.250
7
800x600@60
37.879
60.317
8
800x600@72
48.077
72.188
9
800x600@75
46.875
75.000
10
1024x768@60
48.363
60.004
11
1024x768@70
56.476
70.069
12
1024x768@75
60.023
75.029
13
1280x1024@60
63.981
60.020
14
1280x1024@75
79.976
75.025
15
1920x1080@60
67.500
60.000
Note:
1. Please note, selecting frequencies outside these ranges may result in an abnormal
Images.
2. The resolution will be showed on the screen while VGA mode be selected.
For example:
3
1DU00L7B-A.1
IN/OUT Panel Diagram/Descriptions:
4
1DU00L7B-A.1
2
Monitor and OSD Control
Monitor and OSD Control
The VITEK VTM-LED220P and VTM-LED240P LED color monitors have a
simple control layout for control and OSD (On Screen Display)
functions. The table below summarizes the control keys and their
related functions.
Key Feature
KEYS
Power
FUNCTION DESCRIPTION
Toggle the display between standby mode and on.
(Press “Power” and wait 6 sec., monitor will be activated for
display )
Select
Switch mode ”AV1”, ”AV2”, “VGA”, “HDMI” - Toggle
using +/-
Menu
Enter the main menu of the on-screen display (OSD).
Select
Select to Toggle between functions to be adjusted
+
-
Vol +
Vol -
Increase the value of the chosen function.
Decrease the value of the chosen function.
Increase the value of volume.
Decrease the value of volume.
Control Diagram/Descriptions
5
1DU00L7B-A.1
Source Select
Press the
Select
button to bring up source selection
Use the - OR + keys to advance to the proper selection and press
Select button to confirm the setting.
Note:
The message
will be displayed on the
screen if there is no VGA signal detected in VGA mode, and the power will
shut off automatically after 10 seconds. Please press the
power button again to restart the monitor.
LED Status Display
The following table describes the various power states of the LED
monitor as represented by different LED colors.
Power State
LED Color
On
Green
Standby
Red
No power
Blank
Note: The LED will also be red if AV1, AV2 or HDMI is selected and there is no video
signal detected.
6
1DU00L7B-A.1
3
OSD Control Function
Picture Mode
1. Picture Mode
2. Contrast
3. Brightness
4. Tint
5. Saturation
6. Sharpness
7. Color Temp.
8. DNR
Press (- ) OR (+ ) to select the picture mode
“User, Standard, Movie, Vivid ”
This is used to set the brightness of the screen.
Press (- ) OR (+ ) to adjust the parameter.
This is used to adjust the image contrast.
Press (- ) OR (+ ) to adjust the parameter.
This is used to adjust the image Tint.
Press (- ) OR (+ ) to adjust the parameter.
This is used to adjust the image saturation.
Press (- ) OR (+ ) to adjust the parameter.
Adjust the sharpness. It makes the image become soft.
Press (- ) OR (+ ) to adjust the parameter.
Press (- ) OR (+ ) to adjust the color tones.
“ Cool , Warm , Normal “
Press (- ) OR (+ ) to adjust the noise reduction.
“High , Low, Off, Mid “
Note: VGA Mode - Contrast, Brightness, Color Temp., Auto Adjust.
Sound Mode
1. Volume
2. Mute
Press (- ) OR (+ ) to adjust volume level.
Press (- ) OR (+ ) to select sound “ Off, On ”.
7
1DU00L7B-A.1
Setting Mode
AV/HDMI Mode
VGA Mode
1. Language
Press (- ) OR (+ ) to select language.
2. H. Position
Move the display picture left or right.
Press (- ) OR (+ ) to adjust the parameter.
Adjust the H-size of the display picture
Press (- ) OR (+ ) to adjust the parameter.
Move the display picture up or down.
Press (- ) OR (+ ) to adjust the parameter.
Adjust the V-size of the display picture
Press (- ) OR (+ ) to adjust the parameter.
Press (- ) OR (+ ) to adjust the parameter.
Press (- ) OR (+ ) to adjust the parameter.
Adjust the V-size of the display picture
Press (- ) OR (+ ) to adjust “ Full, 16:9 ”.
Recall Default value.
3. H Zoom
4. V Position
5. V Zoom
6. Clock
7. Phase
8. Scale Mode
9. Reset
Note: “ Clock” and “Phase ” setting only in VGA Mode
8
1DU00L7B-A.1
PIP/POP Setup Mode
PIP
1. Multi Window
2. Sub Source
3. Size
4. Position
5. Border Color
6. Sound Source
7. Swap
POP
Press (- ) OR (+ ) to select “PIP, POP, Off ” mode.
Press (- ) OR (+ ) to select “AV, VGA” mode.
Adjust the size of Sub Source window.
Press (- ) OR (+ ) to select “Large, Small ”
Move the position of Sub Source window.
Press (- ) OR (+ ) to select “U L, B L, B R, U R” position.
Choose the border color of Sub Source window.
Press (- ) OR (+ ) to select “Black, Blue” color.
Press (- ) OR (+ ) to select “Main, Sub” mode.
Press S/Select to Swap the Source of Main and Sub.
Note:
1.
AV1 and AV2 cannot be displayed at the same time on the monitor in PIP / POP mode,
nor can HDMI and VGA be displayed together in PIP/POP mode. The Source must
always be one composite Video and the Sub- source may be either VGA or HDMI.
2.
If POP mode is selected both images are scaled to fit the screen.
9
1DU00L7B-A.1
4
Caring for Your LED Monitor
Caring for your LED Monitor
Your VITEK LED color monitor is a sensitive piece of electronic
equipment. Proper care can prevent accidentally damaging the
LED panel or the monitor itself. By following these guidelines you can
ensure many years of trouble free use.
1. The LED monitor's plastic casing and LED glass panel can be
cleaned with a soft, lint-free cloth. Never use scrub pads or other
cleaning materials with abrasive surfaces to clean your LED
monitor!
a. For the plastic case, a mild detergent may be used to clean
the surface. However, you should ensure not to use too
much detergent or water as this could leak into the interior
of the casing.
2. Do NOT use cleaning fluids based on alcohol, methylated spirit, or
ammonia. The glass plate has a hard surface coating to prevent
scratches. However, the use of strong chemical cleaning agents
may damage this coating. Use only a mild soap or detergent and
water or specially formulated cleaners made for cleaning glass
panels.
3. Avoid direct contact with water or other liquids. Never use your
LED monitor in or around areas where water may pose a potential
hazard to normal operation.
4. Only use your LED monitor indoors, and avoid monitor contact
with oil, vapor, steam, moisture and dust. Your LED monitor should
be used in a clean and low humidity environment.
5. Keep your LED monitor away from heaters or other heat sources
such as lighting equipment or direct sunlight.
6. Do not touch the Screen of your LED monitor with any sharp
object such as your fingernail or a pencil etc.
WARNING: Any unauthorized modification to this product could result in the
revocation of the authorization to operate the equipment and void the
product warranty.
10
1DU00L7B-A.1
5
Frequently Asked Questions/Troubleshooting
Power button does not respond
•
•
•
Check the power cord to ensure that it is securely plugged into
the monitor base and also into the electrical outlet.
Ensure there is electrical power coming from the AC outlet. Use
another device to check for power.
Unplug the power cord of the monitor from the AC outlet, wait a
few minutes, then to plug the power cord into the AC outlet
again. This will reset the monitor and power supply.
No image on the screen
•
•
•
•
•
•
Ensure that the signal cable is properly connected to the device
generating the video signal such as a DVR or Computer.
If using VGA, check the DB-15 signal cable connector on both
ends for bent or pushed-in pins.
If your signal generating device is a computer, the display card
should be properly seated in its card slot.
Ensure that the computer or image signal generating device's
power switch is ON.
Ensure that the monitor's power switch is ON.
Unplug the power cord of the monitor from the AC outlet, wait a
few minutes, then to plug the power cord into the AC outlet
again. This will reset the monitor and power supply.
Power LED is RED (with no image on the screen)
•
•
•
Check the signal cable to ensure that it is properly attached to
the image generating device or graphics display card.
If using VGA, Check the DB-15 signal cable on both ends for bent
or pushed-in pins.
Make sure the computer (or other device), is not in a powersaving mode (move the mouse or press a key on the keyboard).
No sound coming from the audio speakers
•
The audio cable should be connected to the lineout on the audio
card and the line-in on the monitor. Ensure that the audio cable is
properly connected.
11
1DU00L7B-A.1
•
Inspect the audio cable for any apparent damage. Double
check by switching to another audio cable to see if the audio
works.
12
1DU00L7B-A.1
6
Regulations and Maintenance
FCC compliance
This device complies with Part 15 of the FCC Rules. Operation is
subject to the following two conditions: (1) this device may not cause
harmful interference, and (2) this device must accept any
interference received, including interference that may cause
undesired operation.
NOTE: This equipment has been tested and found to comply with the
limits for a Class B digital device, pursuant to Part 15 of the FCC Rules.
These limits are designed to provide reasonable protection against
harmful interference in a residential installation. This equipment
generation, uses and can radiate radio frequency energy and, if not
installed and used in accordance with the instructions, may cause
harmful interference to radio communications. However, there is no
guarantee that interference will not occur in a particular installation.
If this equipment does cause harmful interference to radio or
television reception, which can be determined by turning the
equipment off and on, the user is encouraged to try to correct the
interference by one or more of the following measures:
• Reorient or relocate the receiving antenna.
• Increase the separation between the equipment and receiver.
• Connect the equipment to an outlet on a circuit different from
that to which the receiver is connected.
• Consult the dealer or an experienced radio/TV technician for
help.
Precautions
* Read all of these instructions and save them for later use.
* Follow all warnings and instructions on the product.
* Product
- Do not cover or block the vent holes in the case.
- Do not insert sharp objects or spill liquid into the LED monitor through cabinet
slots. They may cause accidental fire, electric shock or failure.
- Disconnect the power plug from the AC outlet if you will not use it for an
indefinite period of time.
- Do not attempt to service this product yourself, as opening or removing covers
may expose you to dangerous voltage potentials or other risks.
-
Do not touch the screen directly with your fingers. You may damage the
screen, and oil from your skin is difficult to remove.
Do not apply pressure to the screen. The LED is very delicate and may crack.
13
1DU00L7B-A.1
* Power
- Use the type of power indicated on the rear panel label.
* Plugs
- Do not remove any of the prongs of the monitor’s three-pronged power plug.
- Disconnect the power plug from the AC outlet under the following conditions:
◎ If you will not use it for an indefinite period time.
◎ When the power cord or plug is damaged or frayed.
◎ If the product does not operate normally when the operation instructions are
followed. Adjust only those controls that are covered by the operating
instructions. Improper adjustment of other controls may result in damage and
will often require extensive work by a qualified technician to restore the
product to normal operation.
◎ If the product has been dropped or the cabinet has been damaged.
◎ If the product exhibits a distinct change in performance, indicate a need for
service.
* Power and extension cords
-
Do not allow anything to rest on the power cord.
-
Do not locate this product where persons will walk on the cord.
Use the proper power cord with correct attachment plug type. If the power
source is 120 V AC, use a power cord that has UL and C-UL approvals. If the
power source is a 240 V AC supply, use the tandem (T blade) type attachment
plug with ground conductor power cord that meets the respective European
country’s safety regulations, such as VDE for Germany.
Do not overload wall outlets or power cords. Ensure that the total of all units
plugged into the wall outlet does not exceed 10 amperes.
Ensure that the total ampere rating of all units plugged into the extension cord
is not over the cord’s rating.
If the power supply cord, which came with your monitor, is to be connected to
the PC instead of the wall outlet, this equipment is to be used with UL/TUV
approved computers with receptacle rated 100~240V AC, 50/60Hz,
2.0A(minimum).
-
* Environment
- Place the monitor on a flat, level surface.
- Place the monitor in a well-ventilated area.
- Keep the monitor away from:
Extremely hot, cold or humid places, direct sunlight, dusty surroundings and/or
equipment that may generate strong magnetic fields.
14
1DU00L7B-A.1
The IRE Series Long Range Weather/
Vandal Resistant Bullet Cameras
VTC-IRE40/3516
Dual Glass Compartments
to Eliminate Glare
Day/Night IR Bullet Camera w/150’ Range
VTC-IRE70/650
Day/Night IR Bullet Camera w/300’ Range
VITEK Infrared Bullet Cameras are designed to help you FEATURES:
achieve any degree of night time surveillance with versatile • High Density 1/3” Sony EX-VIEW CCD & Effio-E
options to meet any budget. They offer the most advanced DSP
features available and simple, worry free installation that have • 700TVL High Resolution
come to be a cornerstone of all VITEK camera designs.
• E-WDR by Adaptive Tone Reproduction
These Ultra Clear, High Resolution cameras realize over • Integrated 840nm Infrared LEDs with up to 300’
700TV Lines of Resolution and produce crisp color images Range
by use of a Sony Ex-View HAD CCD II and an Effio-E image • 0.003 Lux (F1.2 @ 40IRE) / 0 Lux with IR LEDs On
signal processor. Among their several patented features, • Varifocal DC Auto Iris IR Lens
are Dual Array Dynamic Intensity LEDs allowing precision
images to be delivered in total darkness without “Wash Out” • True Day/Night by ICR - Infrared Cut Removal
from zero to 150’- IRE40 – and 300’ – IRE70 - in distance. • 2DNR Noise Reduction
Designed with the installer in mind, these state-of-the-art • Motion Detection, Privacy Masking & Highlight
cameras feature an externally adjustable focus and zoom with Masking
a clutch to eliminate over-tightening, secondary video output, • Dual Glass Compartments to Eliminate Glare
feed-thru wiring, versatile mounting options and an OSD - On • OSD (On Screen Display) menu and Camera ID
Screen Display for programming. Their IP68 NEMA rating
means that these Weather proof cameras will never leak or • Heavy Duty IP68 rated weather/vandal resistant
aluminum construction is 100% water and dust proof
condensate and cannot be permeated by dust or pests.
• 24VAC/12VDC Dual Voltage
VTC-IRE40/3516
Image Device
1/3” High Density Sony EX-VIEW CCD & Effio-E DSP (960H)
Resolution
700 TV lines
Minimum illumination
0.003Lux / F1.2 (0 Lux with IR LEDs ON)
Infrared LEDs
40 840nm IR LEDs
IR Distance
Over 150 Feet
Day/Night
True Day/Night by ICR
Built-In Lens
3.5-16mm DC A/I, Switched IR Cut Filter D/N Lens
Light Compensation
HLC (Highlight Compensation) / BLC (Backlight Compensation)
Noise Reduction
2DNR
E-WDR
YES by ATR (Adaptive Tone Reproduction)
Motion Detection
YES (24 x 16 Grid)
Privacy Mask
Up to 8 Programmable Mask Areas
Water Resistance
IP68
Mounting
Wall/Ceiling
Power Source
12VDC/24VAC (Dual Voltage)
Power Consumption (12VDC)
110mA / 450mA (IR OFF/ON)
Power Consumption (24VAC)
120mA / 460mA (IR OFF/ON)
Operating Conditions
-4ºF ~ 122ºF (-20ºC ~ 50ºC) / 85% RH Max
Length
Ceiling Mounted: 9.5” (241mm) / Wall Mounted: 11.375” (289mm)
Width
Camera: 3” (76mm) / Camera w/Sun Shield: 4.375” (111mm)
Height
Ceiling Mounted: 6” (152mm)
Weight
2.65 lbs. (1202g)
VTC-IRE70/650
1/3” High Density Sony EX-VIEW CCD & Effio-E DSP (960H)
700 TV lines
0.0035Lux / F1.2 (0 Lux with IR LEDs ON)
70 840nm IR LEDs
Over 300 Feet
True Day/Night by ICR
6-50mm DC A/I, Switched IR Cut Filter D/N Lens
HLC (Highlight Compensation) / BLC (Backlight Compensation)
2DNR
YES by ATR (Adaptive Tone Reproduction)
YES (24 x 16 Grid)
Up to 8 Programmable Mask Areas
IP68
Wall Only w/3 Axis Plate
12VDC/24VAC (Dual Voltage)
110mA / 800mA (IR OFF/ON)
120mA / 820mA (IR OFF/ON)
-4ºF~+122ºF (-20ºC~+50ºC) / 85% RH Max
11.25” (286mm)
Camera: 3.6” (91mm) / Camera w/Sun Shield: 4.7” (119mm)
8.5” (216mm)
4.4 lbs. (1996g)
Secondary Video
Output & OSD
Control Joystick are
accessible inside
a Gasket sealed
removable side panel.
Gasket sealed
externally adjustable
Focus & Zoom with
clutch to eliminate
over-tightening.
THE
MIGHTY
DOME
The ULTRA Versatile Dome Camera Series
The Mighty Series Dome cameras include models produced
with the new Pixim-Powered Seawolf Wide Dynamic Range
DSP and the Sony Effio Day Night DSP. The Highest
resolution Analog camera line up to date offers 700 TV Lines
of Resolution, up the coax OSD Control and low light capability
up to 0.00008 lux. Created to meet and solve the challenges
brought on by varying lighting conditions and display clear,
crisp images more accurately than ever before.
A long list of mounting and configuration options are
also available for this camera including extreme low
temperature Heater and
built in UTP.
PIXIM WDR
FEATURES:
• High Resolution of 700 TVL incorporating Pixim
Seawolf DSP for WDR & Sony Effio for Day/Night.
• Ultra Versatile Design with Infinity Ball Mount for Any
Viewing Angle
Mighty Domes
Conventional Cameras
• OSD (On Screen Display) with Joystick control for
Camera Function Setup
EFFIO DSP
• Secondary Video Output (Cable Included)
• True Mechanical Day/Night function available
• Options include 24VAC with Heater/Blower (down to
-60°F) & UTP Transmission options.
• Vandal Resistant Version is Fully Gasket Sealed with an
Mighty Domes
Conventional Cameras
UTP Interface, Standard
Heater/Blower kits available for
all weather protection all the
way down to -60*F!
Fully Gasket
Sealed IP68 Rated
Weatherproof Design.
(Outdoor Vandal
Version Only)
OSD Joystick Controls
Can be Surface
Mounted with Included
Surface Mount Casing
or Semi-Flush Mounted
for Sleek, Low Profile
Installation.
IP686 Water tight NEMA Rating
•
•
•
•
•
1” Conduit Knockout
Semi-Flush or Surface Mountable
EXTENSIVE mounting options available
With Night Watch DSS Low Light Color Technology
IR Corrected Lens Options Lens options: 2.9-10mm,
9-22mm, and 18-50mm
• 24VAC/12VDC Dual Voltage Operation
• Available in Ivory or Black
Secondary Video
Output Enables Ease
of Adjustment after
Installation.
Friction Fit Ball Mount
Camera Module Can
Achieve Virtually Any
Viewing Angle.
The Mighty Dome
Vandal base has been
designed to manage
and protect video and
power cables without
the need for external
adaptors.
VITEK LIMITED PRODUCT WARRANTY
VITEK products carry a three (3) year limited warranty. Digital recording and storage products are also warranted for 3 years except for the hard drives which carry their own independent factory warranty from the hard
drive manufacturer. VITEK warrants to the purchaser that products manufactured by VITEK are free of any rightful claim of infringement or the like, and when used in the manner intended, will be free of defects in materials
and workmanship for a period of three (3) years, or as otherwise stated above, from the date of purchase by
the end user. This warranty is non-transferable and extends only to the original buyer or end user customer of a
Vitek Authorized Reseller.
This warranty shall not apply to repairs or replacements necessitated by any cause beyond the control of VITEK,
including but not limited to, acts of nature, improper installation, excess moisture, misuse, lack of proper maintenance, accident, voltage fluctuations, or any unauthorized tampering, repairs or modifications. This warranty
becomes VOID in the event of alteration, defacement, or removal of serial numbers.
Within the first 6 months of purchase, VITEK will replace or credit any defective product at the request of the
customer (subject to availability) with a new product that equals or exceeds the performance of the original
product purchased.
Within the first 6 months of purchase, at its sole discretion, VITEK may issue an advance replacement for a defective product; however, all related costs including, but not limited to shipping and/or delivery charges will be
the responsibility of the customer. If upon return inspection a product is determined to be in good working order
or shows evidence of misuse, the customer will be responsible for full payment of the original product purchased
as well as the replacement product.
Beyond the first 6 month period for the remainder of the warranty, VITEK’S responsibility shall be limited to
repairing the defective product, including all necessary parts and related labor costs. At its sole discretion,
VITEK may choose to either exchange a defective product or issue a merchandise credit towards future product
purchases. Any replacement parts furnished in connection with this warranty shall be warranted for a period not
to exceed the remaining balance of the original equipment warranty.
A Return Authorization number or “RA” number must be obtained prior to the return of any item for repair, replacement, or credit. VITEK requires that this “RA” number be clearly printed on the outside of the shipping carton to avoid refusal of said shipment. The Return Authorization number expires after 30 days. Products returned
after the 30 day period will be subject to refusal. Shipping charges, if any, must be prepaid. A copy of the bill
of sale (or invoice of purchase), together with a complete written explanation of the problem must accompany
all returns.
Vitek makes no warranty or guarantee whatsoever with respect to products sold or purchased through unauthorized sales channels. Warranty support is available only if product is purchased through a Vitek Authorized
Reseller.
28492 Constellation Road Valencia, ca 91355
WWW.VITEKCCTV.COM | 888-VITEK-70