1
Lincoln Electric
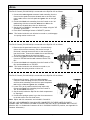
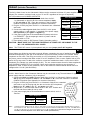
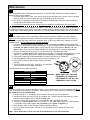
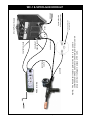
A Cobramatic Cabinet and Torch can be used in conjunction with the Lincoln PowerMig 255: If a user
already has a Prince Spool-gun with a WC-1 Control, The WC-1 would be hooked up the same.
1. Since there's no 115VAC easily available on the PowerMig 255, Plug the 115VAC plug from
the WC-1 or Cobramatic into a standard wall plug.
2. Connect the black and white contactor leads from the WC-1 or Cobramatic Cabinet to the
two solid pins on the 4-Pin (Same Plug as listed in L-3 ) Plug located inside the door of the
PowerMig 255. Place the contactor in the CLOSING CONTACTS position (see Appendix for
contactor information).
L-7
Note: The feeder inside the PowerMig 255 will also be turned on, so disengage the spring tension on
the drive roll assembly.
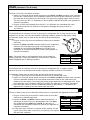
L-8
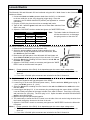
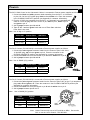
The WC-1 Weld Control or the Cobramatic Cabinet can be connected to All Lincoln TIG machines as
follows: Lincoln has used three types of contactor plugs over the years. The very old machines used a
two-prong plug; then came a 5-Pin amphenol, followed by a 6-Pin amphenol.
1. If the power supply has a two-prong twist lock, connect the black and white contactor leads from
the WC-1 or Cobramatic to the two-prong plug (color code not important). If the power supply has
either the 5-Pin or the 6-Pin amphenol the black and white contactor leads usually go to pins D
and E; black to D & white to pin E (consult unit owners manual).
2. Place unit in CLOSING CONTACTS position (see Appendix for contactor information).
3. Plug the 115VAC plug from the WC-1 or Cobramatic into a standard wall outlet.
4. *Connect the red and green leads from the WC-1 to the power supply positive (+) and negative
(-) terminals of the power supply; red to positive (+) and green to negative (-).
5. Place the Weld Control Switch to "INERT GAS or TIG" and the Remote Switch to "PANEL".
6. Set the Polarity Switch to "DC REVERSE POLARITY" (electrode positive).
7. Set the Soft Start to "OFF" and the High Frequency Switch to "OFF".
*See Appendix for Posa Start information.
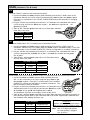
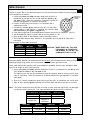
Required Plug
Check the owner's manual for the
correct plug part number. The plug
will be found on the end of the foot
control cable.
Lincoln 6-Pin Amphenol
MK Cord Clamp
S-12020-27
411-0191
CAUTION: MAKE SURE THAT THE HIGH FREQUENCY
IS TURNED OFF OR DAMAGE TO THE WC-1
OR COBRAMATIC WILL OCCUR.
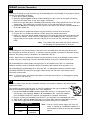
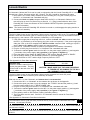
The WC-1 Weld Control or the Cobramatic Cabinet can be connected to Lincoln CC power
supplies that do not have contactors (stick machines) as follows:
L-9
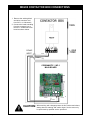
With both the WC-1 or the Cobramatic, a Contactor box is recommended:
1. Connect the WC-1 or Cobramatic to the contactor box as shown in the Appendix.
2. Connect the spool gun power lug to the contactor box "TORCH" side and the positive (+) lead
from the power supply to the "+ WELD POWER" side.
2. Plug the 115VAC plug from the WC-1 or Cobramatic into a standard wall outlet.
3. *Connect the red and green leads from the WC-1 to the power supply positive (+) and negative
(-) terminals of the power supply; red to positive (+) and green to negative (-).
4. Place polarity switch to DC Reverse Polarity (electrode positive).
5. The Posa Start must be used. See WC-1 or Cobramatic owner's manual for Posa Start
information.
*See Appendix for Cobramatic Posa Start information.
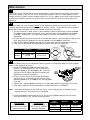
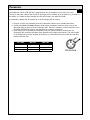
The PowerWave 450 Kit (P/N 005-0254) connects directly to the 120VAC Cobramatic Wire Feed
Cabinets, 150-003 and 150-004.
L-10
The PowerWave 450 Kit (P/N 005-0315) connects directly to the 42VAC Cobramatic Wire Feed Cabinets
150-203 and 150-204.
The PowerWave 450 Kit (P/N 005-0322) connects directly to the Lincoln Cobramatic Wire Feed Cabinets
K1587-1.
Weld Control Selector Guide - Page 17