1
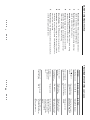
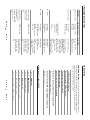
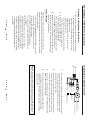
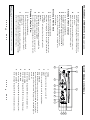
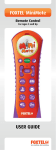
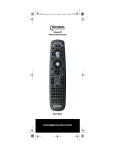
www.asaelectronics.com
DVD4000
12V Automotive DVD Player
SEL
Using Your FlexVision DVD4000
• Automotive-grade DVD mechanism
Features
• Full-function faceplate controls
• Back-lit control buttons
• Wireless remote control (included)
• Compatible with Flexvision flat-panel TV products
• Line-level A/V output
CAUTIONS AND WARNINGS
To obtain the best results and to avoid malfunctions, PLEASE READ CAREFULLY THE
DESCRIPTIONS AND OPERATING PROCEDURES CONTAINED IN THIS OWNER’S MANUAL
PRIOR TO OPERATING THE VIDEO CASSETTE PLAYER.
IMPORTANT NOTICES
• It is unlawful in most jurisdictions for a person to drive a motor vehicle which is
equipped with a television viewer or screen that is located in the motor vehicle at
any point forward of the driver's seat, or that is visible, directly or indirectly, to the
driver while operating the vehicle. Furthermore, and in the interest of safety, this VCP
should never be connected to a video monitor that is installed in a location where it
will be visible, directly or indirectly, by the operator of the motor vehicle.
• Please note that the state of Rhode Island forbids the installation of such a device in a
motor vehicle.
DVD4000
Store’s Name and Address:
Date Purchased:
Serial Number:
Model Number:
WARNING: TO PREVENT FIRE OR ELECTRIC SHOCK, DO NOT EXPOSE THIS
APPLIANCE TO RAIN OR MOISTURE.
For your protection, record the
model and serial numbers of your
video cassette player here. In the
event your player requires servicing or is stolen, you may need this
information.You may also wish to
clip or staple your sales receipt to
this page.
WARRANTY
90 DAY / 12 MONTH LIMITED WARRANTY
AUDIOVOX SPECIALIZED APPLICATION, LLC (the Company) warrants to the
original retail purchaser of this product that should this product or any part thereof,
under normal use and conditions, be proven defective in material or workmanship
within 90 days from the date of original purchase, such defect(s) will be repaired or
replaced (at the Company's option) without charge for parts and repair labor. After the
initial 90 day period and for a period of 12 months from the date of original purchase,
the Company will supply at no charge a replacement for any defective part(s), but will
charge for the labor to repair the product.
To obtain repair or replacement within the terms of this warranty, the product is to
be delivered with proof of warranty coverage (e.g. dated bill of sale), specification of
defect(s), transportation prepaid, to an approved warranty station, or the Company at
the address shown below.
This warranty does not extend to the elimination of externally generated static or
noise, to the correction of antenna problems, to costs incurred for removal or
reinstallation of the product, or to damage to any tapes, speakers, accessories, or
electrical systems.
This warranty does not apply to any product or part thereof which, in the opinion of the
Company, has been damaged through alteration, improper installation, mishandling,
misuse, neglect, or accident. THE EXTENT OF THE COMPANY'S LIABILITY UNDER
THIS WARRANTY IS LIMITED TO THE REPAIR OR REPLACEMENT PROVIDED
ABOVE, AND, IN NO EVENT, SHALL THE COMPANY'S LIABILITY EXCEED THE
PURCHASE PRICE PAID BY THE PURCHASER FOR THE PRODUCT.
This warranty is in lieu of all other express warranties or liabilities. ANY IMPLIED
WARRANTIES, INCLUDING ANY IMPLIED WARRANTY OF MERCHANTABILITY,
SHALL BE LIMITED TO THE DURATION OF THIS WARRANTY. ANY ACTION FOR
BREECH OF ANY WARRANTY HEREUNDER INCLUDING ANY IMPLIED
WARRANTY OF MERCHANTABILITY MUST BE BROUGHT WITHIN A PERIOD OF
30 DAYS FROM THE DATE OF ORIGINAL PURCHASE. IN NO CASE SHALL THE
COMPANY BE LIABLE FOR ANY CONSEQUENTIAL OR INCIDENTAL DAMAGES
FOR BREECH OF THIS OR ANY OTHER WARRANTY, EXPRESS OR IMPLIED,
WHATSOEVER. No person or representative is authorized to assume for the
Company any liability other that expressed herein in connection with the sale of
this product.
Some states do not allow limitations on how long an implied warranty lasts or the
exclusion or limitation of incidental or consequential damages so the above limitations
or exclusions may not apply to you. This warranty gives you specific legal rights and you
may also have other rights which vary from state to state.
AUDIOVOX SPECIALIZED APPLICATIONS, LLC
Visit us at www.asaelectronics.com
24
Supported Formats
Overall Dimensions
Weight
Current Draw
Video Display System
Storage Temperature
Operation Temperature
• CD, CD-Rom, CDR, CDR-W
• DVD, CD Audio, MP3
• 2 x 8.6 x 11.8 Inch (H x W x D)
• 2.9 Lbs
• 1.5A
• NTSC
• -40 ~ 85º C
• -20 ~ 65º C
SPECIFICATIONS
Media Type
23
Installation User Kits
Standard Connections
Installation
Features and Package Contents
Safety Instructions
6
5
4
3
2
1
TABLE OF CONTENTS
Front Panel Controls
12
8
How to Operate DVDs
16
Remote Control Functions
Main Menu Operation
16
21
• DVD Main Menu
Troubleshooting
23
19
Specifications
24
• Audio CD or MP3 Main Menu
Warranty
SYMPTOM
• Incorrect OSD
POSSIBLE CAUSE
• Certain functions may be
disabled by the DVD itself
during passages of a disc.
• Change OSD language
SOLUTION
CONTINUED
Read Instructions - All the safety and operating instructions
should be read before operating the DVD player.
The OSD menu is in
a foreign language.
• Requested function
not available at this
time
• Change aspect ratio
TROUBLESHOOTING
1
Retain Instructions - The safety and operating instructions
should be retained for future reference.
The
symbol
appears
• Incorrect match of
aspect-ratio settings to
disc
• Change both batteries.
• Clear path to sensor.
SAFETY INSTRUCTIONS
2
Heed Cautions and Warnings - All cautions and warnings
regarding the DVD player should be adhered to.
Picture is displayed
in the wrong aspect
ratio
• Weak batteries
• Sensor is blocked
slower rate.
• Re-record the CD at a
from scratches and dirt.
settings.
selection.
3
Cleaning - Unplug or turn off vehicle power to the DVD
player before cleaning. Do not use liquid cleaners or aerosol
cleaners. Use only a damp cloth for cleaning.
Remote control
inoperative
• Make sure the disc is free
Power Sources - The DVD player should be operated only from
a twelve volt negative ground source.
22
language
4
Use in Vehicles - The DVD player must be securely fastened.
• Damaged disc
7
5
6
The picture has
occasional distortion
• Copy protection
• Connect the DVD4000
directly to the TV/monitor.
The effect is caused by
copy protection circuitry
required on all DVD
players.
Ventilation - Slots and openings in the cabinet are provided for
ventilation to ensure reliable operation of the DVD player and to
protect it from overheating.
Brightness is
unstable or noises
are produced on
video
• Make sure CD is not
recorded with variable bit
rate.
MP3 discs won’t
read or they skip
• Incorrect record
format
1
POSSIBLE CAUSE
SOLUTION
TROUBLESHOOTING
SYMPTOM
• Main Power Switch
turned off
• Disc is loaded
improperly
• Load disc label-side up.
• No power
Unit does not turn
on.
• Press in Main Power
Switch.
• Check fuses and that the
ACC power is on.
Disc does not play.
• Incorrect disc type
• Check to see that disc is
CD, CD-R, CD-RW,VCD,
MP3-CD, DVD-R, and
DVD-RW or DVD-Movie:
other types will not play.
• Use Region 1 disc only.
• Enter password to over
ride or change rating
settings.
• Invalid Region Code
• Rating is above
parental preset
• Make sure the disc is free
from scratches and dirt.
• Dirty disc
• Check all video
connections.
• Check all audio
connectors.
• Check digital audio
settings.
• There is no audio playback
on DVD discs during fast
or slow modes.
TV or receiver.
• Intermittent
connections.
• Incorrect digital audio
selection
• DVD disc is in fast or
slow mode
No picture.
• Intermittent
connections
• Check input selection of
No sound.
• MPEG-2 decoding
• It is a normal artifact of
DVD playback for pictures
to jump or show some
distortion during rapid
play.
monitor
• Wrong input on
Picture is distorted
or jumps during fast
forward or reverse
play.
• MPEG-2 decoding
• It is a normal artifact of
DVD playback for pictures
to jump or show some
distortion during rapid
play.
Some remote buttons do not operate
during DVD play;
prohibited symbol
appears (see next
page)
21
FEATURES
CONGRATULATIONS on your purchase of the Flexvision DVD4000 automotive
DVD player.This product has been designed to give you and your family many years of
enjoyment. Please read the directions that follow to familiarize yourself with the
product operation and installation procedures.
• 12V, DIN-Chassis DVD player
• Automotive-grade DVD mechanism
• Full-function faceplate controls
• Back-lit control buttons
• Wireless remote control (included)
• Direct-wire (source-component) compatible with
Flexvision flat-panel TV products
• Universal line-level A/V output (RCA) use with most
TV/Video products
•
•
•
•
•
•
[1]
[1]
[1]
[1]
[1]
[1]
[1]
Owner’s Manual / Warranty Card
Mounting Hardware Bag
Wireless (IR) remote control
RCA patch cord
Power pigtail harness
DIN mounting sleeve
DVD player
PACKAGE CONTENTS
•
2
INSTALLATION
This unit is designed for installation in vehicle cabs with an existing radio
opening. In some cases, a special installation kit will be required to mount the
DVD4000 to the dashboard.These kits are available at electronics supply
stores and car stereo specialist stores. Always check the kit application before
purchasing to make sure the kit works with your vehicle.
1
2
3
4
5
6
Slide the mounting sleeve off of the chassis. If it is locked into
position, remove the end caps and use the removal tools
(supplied) to disengage it.
Check the dashboard opening size by sliding the mounting sleeve
easily slides into the opening. Do not force the sleeve into the
opening or cause it to bend or bow. Check that there is sufficient
space behind the dash board for the DVD player chassis wires
prior to actually installing the sleeve.Wiring on the DIN
power harness assembly should take place after hole size is
confirmed. Mount sleeve after wiring.
Follow the wiring diagram and instructions on page 4 and make
certain all connections of the wiring harness are properly secured
and insulated to ensure proper operation of this unit. After
completing the wiring connections, connect the DVD4000 and
turn the unit on to confirm operation is corrected. Once proper
operation is achieved, turn off the ignition switch, disconnect the
DVD4000, and proceed with installation of the mounting sleeve.
Locate the series of bend tabs along the top, bottom, and sides of
mounting sleeve.With the sleeve fully inserted into the dash
opening, bend as an tabs outward as necessary so that the sleeve
is firmly secured to the dash board.
Attach one end of the DIN mounting strap to the screw stud on
the rear chassis using the flange nut provided. Fasten other
end of the DIN mounting strap to a secure part of the dash
board, either above or below the DVD player using the screw
and flange nut provided. Bend strap to positioning as necessary.
Reconnect the wire harness of the DVD4000 to the wiring in the
vehicle installed in step 3. Carefully slide the DVD player into the
mounting sleeve, making sure it is right side up, until fully seated,
and that the spring clips lock into place.
3
MAIN MENU OPERATION (AUDIO/MP3)
Setting an Item to Repeat
1
2
3
In the Main menu, highlight Repeat Mode.The item that is
currently set to repeat is displayed next to the option.
Press SELECT to display a list of the possible items that can be
set to repeat.These are Disc,Title, Chapter,Track or Playlist
depending on the type of disc and the current settings.
Highlight the item that you want to repeat and press SELECT.
The selected repeat mode is the top right corner of the
screen and when the selected item finishes it will be repeat.
In the Main menu, highlight Time Display.The time that is
currently being displayed in the bottom bar is shown next to
the option.
Press SELECT to display a list of the possible type of time
display.These are:
• Total - the total time in the disc.
• Total elapsed - the total amount of time the disc has
been playing for.
• Single elapsed - the amount of time the track or title
has been playing for.
• Single remain - the amount of time remaining on the
track or title.
• Single - the total time if the track or title.
Highlight the item that you want to display and press SELECT.
The selected time is displayed in the bottom bar.
Changing the Time Display
1
2
3
20
MAIN MENU OPERATION (AUDIO/MP3)
Changing the Play Mode of Audio Discs
1
2
3
There are three different play modes available for audio disc:
• Normal Mode - plays the tracks on disc in the order
they appear or, if a playlist is being used, in the order
they appear in the list.
• Shuffle Mode - plays the tracks on the disc or in a
playlist in random order.
• Intro Mode - plays ten seconds of each of the tracks
on the disc or in a playlist if one is being used.
To change the play mode, follow these steps:
1 In the Main menu, highlight Play Mode.
2 The current play mode is displayed next to the option.
3 Press SELECT to display a list of the play modes.
Highlight the mode that is displayed in the top right corner of
the screen and next to the item.The disc starts playing again
using the selected play mode.
Using a Playlist
A playlist is a selection of tracks from the full track list of an
audio disc.The order that the tracks are selected in is the order in
which they are played. A playlist of audio tracks can be created and
edited as described below:
1 In the Main menu, highlight Playlist. If the Playlist is currently
being used, ‘On’ will be displayed next to the option.
Otherwise, ‘Off’ will be displayed.
2 Press SELECT to display the Playlist submenu.
3 To create or edit a playlist, highlight Edit Playlist and
press SELECT.
4 To add all of the tracks on the disc to the playlist,
highlight Add All Tracks to Playlist and press SELECT.
5 If a playlist is already setup and is not being Played,
highlight Enable Playlist and press SELECT to play it.
If a playlist is playing and you want to return to playing
the full list of tracks, highlight Disable Playlist and
press SELECT.
19
Video TV/Monitor and
audio amplifiers
STANDARD CONNECTIONS
WHITE – AUDIO-L
YELLOW – VIDEO
RED – AUDIO-R
1 BLACK – VEHICLE GROUND
3 GREEN – BATTERY B+ POWER
2 ORANGE – IGN (ACCESSORY B+) POWER
2
1
Connect the composite video output of the DVD player (yellow
RCA) to the selected video display.
Connect the green wire of the power harness extension to the
battery of the vehicle.The orange wire of the power harness
extension should be connected to the ignition or switched 12V.
Connect the power input harness with extension into the pigtail
on the back of the chassis.This harness has provision for audio
(left and right) and video output as well as input power and a
2-pin wired infrared connection.
To remote control output
on Flexvision monitors (optional)
3
1 BROWN – GROUND
2 YELLOW – IR
4
Connect the line level audio outputs (left and right) to the
corresponding line level audio inputs on the desired audio
amplification device. (Typically an audio amplifier or the audio
inputs on your TV.)
NOTE: A ‘noisy’ power supply can degrade the performance of your DVD player. Please take
steps to ensure that the unit is connected to a power circuit that does not have excessive
noise or ripple on it.
4
If your vehicle requires the use of an installation kit to mount
this DVD player, follow he instructions included with the
installation kit to attach the DVD player to the mounting plate
supplied with the kit.
Wire and test the DVD player as described in step 3 on page 3.
Install the DVD player/mounting plate assembly to the sub-dash
according to the instructions of the installation kit.
Attach the DVD player support strap to the player and the
dash board as described in step 5 on page 3.
Replace the dashboard trim panel.
INSTALLATION USER KITS
1
2
3
4
5
CAUTION: The rear of the DVD player must be supported with the strap to prevent damage
to the dashboard from the weight of the DVD player or improper operation due to vehicle
vibration.
5
MAIN MENU OPERATION (DVD)
Entering a Time to Play
1
2
3
CONTINUED
In the Main menu, highlight Time.
The time displayed next to the option is the total time of the
track for audio discs and the total time of the title for DVDs.
Press SELECT and enter the time that you want the play to
skip to in the format h:mm:ss, for example 0:27:30.This must
be less than the total time displayed.
Using Position Markers
The Markers option allows you to set markers at up to five
different places on the disc.When you then select a previously set
marker, the disc will skip to the place marked.To set a marker,
follow these steps:
1 In the main menu, highlight Marker.
2 Press SELECT to display the Marker submenu.
3 Highlight the marker that you want to set.This can be
Marker 1 to Marker 5.
4 When play reaches the point at which you want the
marker to be set, press SELECT. Details of the selected
marker are displayed. If you set the marker at the wrong
point you can delete it by pressing CLEAR.To delete all
of the set markers, highlight Clear All Markers and
press SELECT.
5 To jump to a marker that you have set, highlight it and
press SELECT.
18
CONTINUED
Press SELECT and enter the number of the chapter, title or
track that you want to play using the number buttons on your
remote control.
If there are more than nine available you must enter the
number the selected chapter, title or track is played.
MAIN MENU OPERATION (DVD)
3
4
Changing the Audio Language
1
2
3
4
In the Main menu, highlight Audio.
Press SELECT to display a list of the audio options.
Highlight the required language and press SELECT.
The selected language is displayed in the top right
corner of the screen and the audio is changed to the
selected language.
Selecting to View Subtitle
1
2
3
4
5
In the Main menu, highlight Subtitle.
If subtitles are currently being used the language that they are
being shown in is displayed next to the option, otherwise Off
is displayed.
Press SELECT to display a list of the possible subtitle
languages.
Either highlight the required language or highlight Off to
remove the subtitles and press SELECT.
The subtitle selection is displayed in the top right corner of
the screen and subtitles are displayed or removed as selected.
Changing the Angle of View
1
2
3
In the Main menu, highlight Angle.
The number of the current angle being used is displayed
separated from the total number available by a / symbol.
For example, 1/2.
Press SELECT and enter the number of the angle that you
want to view.The angles selection is displayed in the top right
corner of the screen and the angle of view changes.
NOTE: The angle function will not work unless the DVD disc contains material recorded
from multiple angles.
17
2
13
SEL
12
3
11
10
FRONT PANEL CONTROLS
1
14
9
Press button to turn the power on and off.
1 POWER
8
7
4
5
6
3
DISC OPENING
With the label surface up, gently insert the disc into the slot until
the soft loading mechanism engages and the DVD disc play begins.
A DVD disc can be loaded into the player even if the DVD player is
turned off.
DVD disc is stopped and ejected by pressing button.
2 EJECT
4
UP CURSOR
Used to navigate through OSD (On Screen Display) menus.
Used to navigate through the OSD (On Screen Display) menus.
5 DOWN CURSOR
6
LEFT CURSOR
Used to navigate through the OSC (On Screen Display) menus.
Used to navigate through the OSC (On Screen Display) menus.
7 RIGHT CURSOR
6
9
8
MENU
Select this button to access the DVD menus.Titles and Chapters
may be included on the DVD OSD menu press the menu along
with Camera Angles, Spoken language, and Sub-title options.To
remove the OSD menu press the menu button again.
SELECT
This button is used to choose the highlighted selection from
the OSD menu. (If the highlighted selections are numbered the
appropriate number key on the remote may be used.)
CONTINUED
10
STOP
Pressing this button will stop play of the DVD disc.
FRONT PANEL CONTROLS
11
PLAY/PAUSE
Pressing this button will start the DVD play, pressing again will
pause the DVD play.
13
NEXT
Pressing this button will skip forward to the next chapter.
Pressing this button will start the play to the previous chapter.
12 PREVIOUS
14
GO BACK
If pressed in the OSD menu mode this button will return you to
the previous screen.This works the same as the RETURN on
the remote control.
Pressing this button will mute the audio output.
15 MUTE
16
INFRARED SENSOR EYE
This eye picks up the IR signal from the remote. A blocked ‘eye’
will not allow the remote to function properly.
7
6
5
4
3
2
1
The Main menu can also be displayed in Stop mode by pressing
SELECT.
To display the Main Menu for the disc that is playing, press DISPLAY
on your remote control.
The Main Menu consists of three areas:
• The left panel displays the type of disc that is playing, the
current listening mode, in the bottom bar, the track or title
and chapter number, the time display, and the bit rate.
• The bottom bar displays the rack numbers that are playing
for an audio disc and the video that is playing for DVDs.
• The bottom box displays the options that can be changed
using the Main menu.These options are detailed in the video
that is playing for DVDs.
For example, you can change the chapter or track that is playing, or
the angle of view for DVDs.The language that the Main Menu
options are displayed in is set using the Language options in the
Setup Menu.
The Main Menu is available to change the options that effect the
way the disc is playing.
The Main Menu can also be displayed in Stop mode by
pressing SELECT.
To display the Main Menu for the disc that is playing, press
DISPLAY on your remote control.
MAIN MENU OPERATION (DVD)
7
Selecting a Chapter,Title or Track to Play
1
2
In the Main menu, highlight one of the following options:
• Chapter to change the chapter that is being played
on a DVD
• Title to change the title that is being played on DVD
• Track to change the track that is being played on an
audio disk
The number of the current chapter, title or track being played
is displayed separated from the total number available by
a / symbol. For example, 06/15.
16
HOW TO OPERATE DVDs
CONTINUED
Press A > B once to start selection.
Press A > B again to finish selection.
To cancel selection press A > B again.
Repeating a Section of any Disc
1
2
3
The facility is available to play a disc at different speeds in
both forward and reverse directions.
To play the disc at different speeds in a forward direction
use the Forward button on your remote control.The speeds
that can be achieved are:
Playing a Disc at Different Speeds
1
2
3
• x2, x4, x8, and x15 for DVDs and video CDs. (For
DVDs, at 2x, the subtitles are still displayed.)
• x2, x3, and x4 for audio discs and mp3s.The audio can
still be heard at all speeds.
To play the disc at different speeds in reverse use the Backward
button on your remote control.The speeds that can be achieved
in reverse are:
• x2, x4, x8
• x2 for audio disc and mp3s.The audio can be heard in
reverse at all speeds.
15
REMOTE CONTROL FUNCTIONS
1
3
4
2
7
5
6
9
11
14
12
16
18
21
28
27
23
26
25
24
22
20
19
17
15
13
10
8
8
REMOTE CONTROL FUNCTIONS
CONTINUED
Loading the Batteries into the Infrared Remote Control:
Open the battery compartment cover and insert two ‘AAA’ batteries inside the
battery compartment. Note polarity. Close cover door.
CAUTION: DO NOT MIX OLD AND NEW BATTERIES. NEVER MIX DIFFERENT
TYPES OF BATTERIES (STANDARD, ALKALINE, AND SO ON.)
1
POWER
Pressing this button will turn the DVD player on or set the player
on standby.
7
6
5
4
3
CLR (CLEAR)
Pressing this button will clear track numbers while in track
selection or search mode.
+10
This button will allow you to directly enter the tracks above 10.
For instance, track 17 is (+10) then (7).Track 21 is (+10), (+10),
then (1).
NUMBER (0-9)
These numeric keys allow you to directly enter the highlighted
menu chapter, or track selection.
TITLE
Pressing this button will go to the DVD title menu.
MENU
Pressing this button will enable user to select DVD main menu.
Pressing this button will open or close disc tray.
2 OPEN / CLOSE
8
SUBTITLE
This button controls the language selector and allows you to
choose whether subtitles are visible.
Pressing this button will silence the audio output.
9 MUTE
10
ZOOM
Pressing this button will allow you to zoom the video with
-/+ buttons (13, 14).
9
HOW TO OPERATE DVDs
CONTINUED
Skipping Through the Chapters or Tracks
beginning of the next chapter or track,
Next button.
beginning of the current chapter or track,
Previous button.
beginning of the previous chapter or track,
Previous button twice.
As you are playing a disc you can skip to the next or to a previous
chapter (on a DVD) or track (on a audio disk.).This carried out
using the Skip Next and Skip Previous buttons as follows:
• To skip to the
press the Skip
• To skip to the
press the Skip
• To skip to the
press the Skip
Using the Repeat Features
The entire disc
A playlist
A single track
A single chapter
A single title
A section of the disc between two selected points
The repeat feature allows you to repeat a section of a disc once it
has finished playing.The following items can be repeated:
•
•
•
•
•
•
Repeating a Track, Chapter, or Title
1
2
3
Play the track, chapter, or title that you want to repeat.
Press the REPEAT MODE button on your remote control
until the required repeat mode is displayed in the top right
corner of the screen.This can be Repeat Track, Repeat
Chapter, or Repeat Title.When the disc reaches the end of
the selected track, chapter, or title, it will start playing it again.
To stop the track repeating, press the REPEAT MODE
button again until Repeat Off is displayed in the top right
corner of the screen.
14
HOW TO OPERATE DVDs
3
CONTINUED
Use the directions to highlight the chapter that you want
to play and press SELECT.The menu is closed and the
chapter is immediately played.
Playing from a Specific Time in a Title or Track
• This facility is available for audio discs and other discs that
support the ability to move to a specific time in a track or
title. For example, if a track is 5 minutes and 38 seconds
long you can select to start playing form 5 minutes and 8
seconds so that you only listen to the last 30 seconds of
the track.
• There are two ways that you can move to a specific time,
(a) either use the Main Menu, as described in Entering a
time to play, or (b) follow the steps below:
1 Press the SEARCH MODE button on your remote control
until the Time option is displayed in the top left corner of
the screen.
2 Use the number buttons on your remote control to enter
the time that you want to move to in the format: mm:ss.
3 When you have finished entering the time, the Time option
is closed and the track or title is played from the time
entered.
Playing a Specific Track or Chapter and Title
There are two ways that you can move to a specific track or
chapter and title: (a) either use the Main Menu, as described in
Selecting a chapter, title, or track to play, or (b) follow the
steps below:
1
2
Press SEARCH MODE button on your remote control
until either the Track or Title and Chapter option is
displayed in the top left corner of the screen.The total
number of tracks or titles and chapters are displayed.
Use the number buttons on your remote control to enter
the track or title and chapter that you want to play.
13
CONTINUED
11
AUDIO
This button allows you to select the language you prefer from
the menu. Note that not all DVDs support this function.
REMOTE CONTROL FUNCTIONS
12
TIME
Pressing this button will select the time display model such as
single, single remain, total, etc.
Pressing this button will select the previous chapter.
13 PREVIOUS
14
NEXT
Pressing this button will select the next chapter.
Use this button to acknowledge the highlighted menu selection.
15 SELECT
16
UP
Use this icon to navigate through the menu selections. In play mode
this button will also pause play.
LEFT
Use this icon to navigate through the menu selections. In play mode
this button will also fast reverse.
RIGHT
Use this icon to navigate through the menu selections. In play mode
this button will also fast forward 4X.
17
<<
Pressing this button will allow you to select the playing speed. Fast
forward x2, x4, x8, x15.When in pause mode, will allow slow
forward 5%, 12%, 20%...90%.
DOWN
Use this icon to navigate through the menu selections. In play mode
this button will also allow the DVD to be reviewed in slow motion.
18
>>
Pressing this button will allow you to select the playing speed. Fast
reverse x2, x4, x8, x15.When in pause mode, will allow slow
reverse 50% and 75%.
10
20
19
PLAY/PAUSE
Pressing this button will start the play of the DVD disc. Pressing
again will pause the DVD disc.
STOP
Pressing this button will stop play of the DVD disc.
CONTINUED
21
DISPLAY
This button turns the on screen display on and off. In stop mode,
this button will allow for player settings such as aspect ratio and
so on.
REMOTE CONTROL FUNCTIONS
22
23
A >B
Multiple presses of this button will allow you to repeat a sequence
A to B audio or video.To set the beginning, press once, and to set
the ending point, press a second time.To cancel the repeat
sequence, press a third time.
PROGRAM
Pressing this button will allow you to make a favorite program list
with program button on CD or on MP3 disc.
24
RETURN
This button will allow you to go back one menu step.
27
26
ANGLE
If the DVD disc contains sequences recorded from different camera
angles, pressing the button causes the angle icon to appear and
show you the number of camera angles available and allows you to
change the angle if you wish.The angle function will not work with
DVD discs that do not have recorded multiple angles.
PLAY MODE
This button selects playing modes such as Shuffle, Intro, and
Normal.
This button will allow you to go back one menu step.
25 SEARCH MODE
28
REPEAT MODE
This button will select repeat mode such as Repeat disc, Repeat
track, and Repeat off.
11
HOW TO OPERATE DVDs
Playing a Disc
1
2
When you insert the disc it will automatically play if the AutoPlay
setup option is turned on.
If the AutoPlay option is turned off or if you have stopped a disc
that was playing, you can restart a disc by pressing the Play/Pause
button on the faceplate or your remote control.
Pausing a Disc
To pause a disc that is playing, press the Play/Pause button.
To stop a disc that is playing, press the Stop button on your
remote control.
For a short amount of time the disc can be restarted in the same
place as if Play/Pause had been pressed, by pressing Play/Pause.
Stopping a Disc
1
2
Selecting a Section of the Disc to Play
If you do not want to play the entire disc, you can select a section to play
using one of the following options:
•
•
•
•
For DVDs that are provided with a menu you can select the
chapter that you want to view.
Move to a specific time, title, chapter, or track.
Skip through the chapters or tracks.
For audio discs you can create a playlist of selected tracks that
you want to play.There are two methods of creating a playlist;
a) using playlist and (b) creating a playlist.
Selecting a Chapter Using the DVD Menu
Press the Menu button on either the remote control or the
front panel.The DVD menu is displayed.
Use the direction arrows to highlight the chapters option in the
menu and press SELECT.
Some DVDs are provided with a menu that, amongst other options, allows
you to select a specific chapter to play.To use the DVD menu to select a
chapter to play, follow the stops below:
1
2
12