1
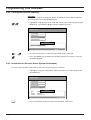
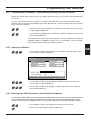
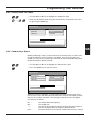
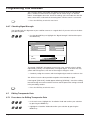
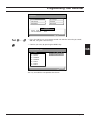
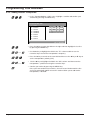
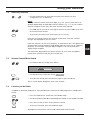
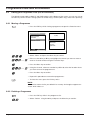
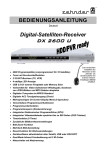
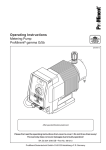
Users Guide
GB
Read these instructions carefully before using this appliance. • Retain for future reference.
RADIX shall not be liable for damages resulting from improper use of this appliance.
RADIX Electronic Vertriebs-GmbH • D-61381 Friedrichsdorf • F.R. Germany
Version 1.0
Page 1
Introduction
1
Introduction
Thank you for purchasing your RADIX E P S I L O N 1 FTA digital satellite receiver. In
doing so you have chosen an appliance built for the future, allowing you to take advantage of numerous programmes and additional services such as electronic programme
guides which will eventually replace conventional analogue transmissions.
All RADIX products are manufactured to the highest standards at our ISO 9002
accredted manufacturing plants.
In the unlikely event that you experience technical difficulties with your receiver, please note the
following:
If it is necessary to return your receiver, please send it together with all its accessories
and in its original packaging to your local dealer, from which you bought it and include a
copy of your invoice or receipt as well as a detailed description of the problem. Please
ensure you affix adequate postage to the package.
We hope you enjoy using RADIX digital satellite receiver!
Publisher’s statement:
EPSILON 1 FTA Instruction Manual
RADIX Electronic Vertriebs-GmbH • D-61381 Friedrichsdorf • F.R. Germany
© RADIX Electronic Vertriebs-GmbH, 1999
Subject to change without notice
Issue 07/99, Version 1.0
Printed in Korea
Technical Documentation: Bartha Docuteam • D-64625 Bensheim
Page 2
Version 1.0
Contents
2
Table of Contents
Section
Content
1
2
3
4
4.1
4.2
5
5.1
5.2
6
6.1
6.2
6.3
6.4
6.4.1
6.4.2
6.4.3
6.4.4
6.5
6.5.1
6.5.2
6.5.3
Introduction
Table of Contents
Important Safety Notes
Your Receiver and its Functions
Remote Control
Receiver
Installing Your Receiver
Before You Start
Connecting the Antenna and Other Devices
Programming your Receiver
Switching On
The Main Menu: Selecting a Language
The Main Menu: Setting the Correct Local Time
The Main Menu: Setting Decoder Status
Selecting a TV Aspect Ratio
Changing the DiSEqC Setting
Clearing the Receiver's Memory
Information on Decoder Status (System Information)
The Main Menu: Installation – Automatically Installing Television Channels
Selecting a Satellite
Entering Your LNB-Converter's Local-Oscillator Frequency
Adjusting the DiSEqC-Controller and/or Enabling/Disabling
the 22-kHz Control Signal
Automatic Channel Search
The Main Menu: Manual Search - Manually Installing TV-Channels
Entering TV-Channels' Frequencies
Entering the Symbol Rate
Selecting the Polarization
Setting Video PID-Codes
Setting Audio PID-Codes
Conducting a Search
Checking Signal Strength
Editing Transponder Data
Procedures for Editing Transponder Data
Adding Another Transponder
Adding Another Satellite
Editing Transponder Data
Deleting a Transponder
Using your Receiver
Switching you Receiver On
Selecting Channels
Volume Control/Mute Sound
Listening to the Radio
Selecting the Audio Mode
Programme Lists and Information
Displaying a Programme List
Full-Screen Mode
Compact View Mode
Editing your Programme Lists (List of Favourites)
Moving a Programme
Deleting a Programme
Programme Information
Trouble Shooting Your digital Receiver
Recycling and Disposal
Appendix
Time table
Technical specification
6.5.4
6.6
6.6.1
6.6.2
6.6.3
6.6.4
6.6.5
6.6.6
6.6.7
6.7
6.7.1
6.7.2
6.7.3
6.7.4
6.7.5
7
7.1
7.2
7.3
7.4
7.5
8
8.1
8.1.1
8.1.2
8.2
8.2.1
8.2.2
8.3
9
10
11
11.1
11.2
Version 1.0
Page
2
3
4
5
5
6
7
7
8
9
9
9
10
11
11
11
12
12
13
13
13
GB
14
15
16
16
17
18
18
19
19
20
20
20
22
23
23
24
24
24
24
25
25
26
26
26
26
27
28
28
28
29
30
30
I-II
I
II
Page 3
Important Safety Notes
3
Important Safety Notes
This appliance is designed exclusively for receiving satellite signals. It must not be used for any other
purpose. Keep the appliance out of reach of children. To avoid injury and to avoid damaging your receiver, please note the following:
DANGER:
Do not remove cover - risk of electric shock!
All repairs must be carried out by authorised service personnel.
DANGER:
Protect from moisture - risk of electric shock!
DANGER:
Do not place any objects into slots or ventilation holes - risk of electric
shock!
WARNING:
Do not cover ventilation holes - risk of fire through overheating!
WARNING:
Only use original spare parts or professionally recommended spare parts.
Failure to do so may result in damage or injury and will cancel the guarantee.
CAUTION:
Switch the appliance off during electrical storms or if it not used for long periods.
Disconnect the antenna cable in an electrical storm.
CAUTION:
Do not use any chemicals to clean the receiver - use a slightly damp cloth
only!
Page 4
Version 1.0
Your Receiver and its Functions
4
Your Receiver and its Functions
4.1
Remote Control
Power
Number Keys
Menu
Channel “+“
Volume “–“
Selector (backward)
Volume “+“
Selector (forward)
GB
Channel “–“
Programme List
Programme Information
Programme Guide
Exit
Audio-Mode (Channel Allocation)
Mute
Last Programme
TV/Radio
NOTE:
When fitting batteries, match the + and - signs on
the batteries to the signs on the inside of the remote control
Version 1.0
Page 5
Your Receiver and its Functions
4.2
Receiver
Power
Programme Select
4-Digit LED Programme
Number Display
Front of Receiver
Auxiliary
Video Output
SCART Socket
for TV
RF INPUT
+13V/+18V
400mA MAX.
VIDEO
WARNING:
WARNUNG:
AC95 265V
50Hz MAX30W
IF Input for Coaxial Antenna
Cable for Digital Signal
TV
AVERTISSEMENT:
L
CAUTION
RS 232
AUDIO
RF OUTPUT
R
AVIS:
VORSICHT:
DIGITAL
VCR
Mains Conection
(95 V-265 V )
SCART Socket
for VCR
Audio Jacks for HI-FI System
(analogue)
RS 232 for
Connection to PC
IF Output for
Analogue Receiver
Rear of Receiver
Page 6
Version 1.0
Installing Your Receiver
5
Installing Your Receiver
5.1
Before You Start
CAUTION:
Do not place the receiver near any heat sources or in strong sunlight.
Protect all cables from damage caused, for example, by sharp edges.
This appliance must only be used with a mains voltage of 230 V (± 10%), 50 Hz.
Install the antenna in accordance with the manufacturers instructions.
All of the information needed for programming the receiver will be automatically called up:
-
your time zone (= deviation from GMT – see appendix),
-
summer time yes/no,
-
picture format for your TV,
-
The appropriate LNB oscillator frequency (referred to in the “LNB Local-Frequency” menu),
-
Programme frequencies and polarities for manual programming (available in satellite magazines,
specialist stores).
You must program the EPSILON 1 FTA before use. Full instructions are provided in Section 6.
Version 1.0
Page 7
GB
Installing Your Receiver
5.2
Connecting the Antenna and Other Devices
CAUTION:
Do not connect the receiver to the mains until you have correctly connected your
VCR, TV and any other analogue receiver you may have.
Antenna
TV
F-Type Connector
WARNUNG:
AC95~265V
50Hz MAX30W
AVERTISSEMENT:
RF INPUT
+13V/+18V
400mA MAX.
DIGITAL
WARNING:
~
TV
L
CAUTION
RS 232
AUDIO
RF OUTPUT
R
AVIS:
VORSICHT:
DIGITAL
VCR
F-Type Connector
Auxiliary
VideoOutput
Hi-Fi
System
(analogue)
Video
Recorder
External
Receiver
(analogue)
• Use double-shielded coaxial cable to connect the LNB to the receiver.
CAUTION:
When assembling the F-type connector, make sure that no part of the inner wiremesh sheath touches the inner core (see diagram below). Failure to do so can
cause a short-circuit and damage your receiver.
Wire Mesh
Bent Wire
Core
• Tighten the safety nut on the F-type connector by hand only. Do not over
tighten!
Page 8
Version 1.0
Programming Your Receiver
6
Programming your Receiver
6.1
Switching On
• Press the Power button on your receiver.
The ON message appears on the receivers display and the following screen appears:
Press MENU key to setup
GB
•
6.2
Press the Menu key to confirm your choice.
The Main Menu: Selecting a Language
The Main Menu appears on your TV screen:
Main Menu
Language
Time Setting
Installation
Decoder Status
Setup Value
Language
English
Time Offset GMT+00:00
S
MENU/EXIT
This menu allows you to programme your receiver. You will only need to do this
when you set up your receiver for the first time or when adding new channels.
Version 1.0
Page 9
Programming Your Receiver
•
Use the CH-key to highlight the first field of the main menu, "Language."
•
Choose a language and confirm your choice by pressing the MENU-key.
Main Menu
1-1
Language
Time Setting
Installation
Decoder Status
Language
English
MENU/EXIT
• Scroll through the list of languages using the CH-key and CH-keys and
choose ”Deutsch”, ”English”, ”Français” or ”Italiano”. Now press the Menu key
to confirm.
6.3
The Main Menu: Setting the Correct Local Time
• Use the CH-key to highlight the "Time Setting" field of the main menu and
confirm your choice by pressing the MENU-key.
Main Menu
1-2
Language
Time Setting
Installation
Decoder Status
Time Setting
Offset
GMT
Summer
OFF
MENU/EXIT
• Use the CH-key or CH-key to set your local time zone (the departure of
your local time zone from Greenwich Mean Time (GMT)) in 30-minute increments. If necessary, use the table of time zones appearing in the addendum
to determine your local time zone. Once you have made your choice, confirm
it by pressing the MENU-key.
• Use the CH-key to highlight "Summer" (daylight-savings time) and confirm
your choice by pressing the MENU-key.
• Use the CH-key or CH-key to select "ON" or "OFF" and confirm your
choice by pressing the MENU-key.
Page 10
Version 1.0
Programming Your Receiver
6.4
The Main Menu: Setting Decoder Status
• Use the CH-key to highlight the "Decoder Status" field of the main menu and
confirm your choice by pressing the MENU-key.
6.4.1 Selecting a TV Aspect Ratio
• Use the -key or -key to highlight the "TV Aspect Ratio" field of the main
menu and confirm your choice by pressing the MENU-key.
Decoder Status
1-4-1
TV Aspect Ratio
DiSEqC Change
All Channel Clear
System Information
Setup Value
4:3
GB
16 : 9
MENU/EXIT
• Use the -key or -key to highlight the “Setup value” field, select your TV
Aspect Ratio an confirm your choice by pressing the MENU-key.
6.4.2 Changing the DiSEqC Setting
NOTE:
Your satellite system must be equipped with a DiSEqC-switch if you intend to
work with digital satellite equipment control (DiSEqC). (For detailed information
on DiSEqC, refer to Section 6.5.3, below.)
• Use the -key to highlight the "DiSEqC Change" field and confirm your choice
by pressing the MENU-key.
Decoder Status
1-4-2
TV Aspect Ratio
DiSEqC Change
All Channel Clear
System Information
Setup Value
OLD
NEW
1
1
LNB Polar
Vertical
Band
Low
Sat System
A
MENU/EXIT
• Use the -key or -key to switch between highlighting the "OLD" and "NEW"
fields and then use the -key or -key to select the desired setting.
• Confirm your choice by pressing the MENU-key.
• Press EXIT-key to exit this menu item.
EXIT
Version 1.0
Page 11
Programming Your Receiver
6.4.3 Clearing the Receiver's Memory
CAUTION:
Clearing the receiver's memory will delete all settings that have been made and
the receiver will have to be reprogrammed.
• Highlight the "All Channel Clear" field and confirm your choice by pressing the
MENU-key. The following display will then appear onscreen:
Decoder Status
1-4-3
TV Aspect Ratio
DiSEqC Change
All Channel Clear
System Information
Setup Value
Input password
MENU/EXIT
…
• Use the numerical keys to enter the password, which is 9-8-1-5.
• Press the MENU-key to confirm that all data stored in the receiver's memory
should be deleted.
6.4.4 Information on Decoder Status (System Information)
This menu item provides information on the status of your receiver's software.
• Highlight the "System Information" field and confirm your choice by pressing
the MENU-key.
Decoder Status
1-4
TV Aspect Ratio
DiSEqC Change
All Channel Clear
System Information
Setup Value
Data
: 6. MAY. 99
Revision
: ME 2.2 bNI
Firmware
: 2.08A / 0.30 / 0.83
MENU/EXIT
• Press the EXIT-key to exit the "System Information" menu item.
EXIT
Page 12
Version 1.0
Programming Your Receiver
6.5
The Main Menu: Installation - Automatically Installing Television Channels
Before the receiver will be able to receive any digital television channels, they will have to be loaded into
its memory.
To make searching for television channels as simple as possible, the most common reception mode
(ASTRA, General-Purpose LNB, DiSEqC A) has been preselected. If that preselection will serve your purposes, proceed as follows:
• Go to the main menu, highlight the "Installation" field, and confirm your choice
by pressing the MENU-key.
• Use the -key to highlight the "Auto Search" field and confirm your choice by
pressing the MENU-key.
If that preselection will not serve your purposes, or if you would like to read in the
reception mode for an additional satellite, such as "HOTBIRD," you may change
each individual parameter by proceeding as follows:
6.5.1 Selecting a Satellite
• Use the -key or -key to highlight the "Installation" field and confirm your
choice by pressing the MENU-key.
Installation
1-3
Satellite
Signal Strength
LNB Lokal-Freq
Auto Search
DiSEqC/22KHz
Manual Search
Setup Value
Satellite
ASTRA
LNB Lokal UNIVERSAL
DiSEqC
A
AUTO
MENU/EXIT
• Use the -key or -key to highlight the "Satellite" field and confirm your
choice by pressing the MENU-key.
• Use the -key or -key to highlight a satellite and confirm your choice by
pressing the MENU-key.
6.5.2 Entering Your LNB-Converter's Local-Oscillator Frequency
Commercially available satellite systems employ general-purpose LNB-converters that use local-oscillator frequencies
of 9,750 MHz for their lower band and 10,600 MHz for their upper band. If the local-oscillator frequencies of your
receiver's LNB-converter should differ from those values, you may readjust your receiver by proceeding as follows:
• Use the -key or -key to highlight the "LNB Local Freq." field.
• Confirm your choice by pressing the MENU-key.
Version 1.0
Page 13
GB
Programming Your Receiver
Installation
1-3-2
Satellite
Signal Stength
LNB Lokal-Freq
Auto Search
DiSEqC/22KHz
Manual Search
Setup Value
UNIVERSAL
MHz
MENU/EXIT
…
• Use the -key or -key to highlight one of the preset frequencies or enter
your LNB-converter's local-oscillator frequency using the numerical keys.
• Confirm your choice/entry by pressing the MENU-key.
6.5.3 Adjusting the DiSEqC-Controller and/or Enabling/Disabling the 22-kHz Control Signal
NOTE:
This adjustment selects the correct segment of the frequency bands. The
DiSEqC-controller (this feature will be available for use only if your satellite system is equipped with a DiSEqC-switch) incorporates all items of information
needed for making this setting, i.e., upper/lower frequency band, horizontal/vertical polarization, and the type of satellite system involved.
Impostazioni DiSEqC:
1
2
3
4
5
SAT A
6
7
8
9
SAT B
10
11
12
13
SAT C
14
15
16
SAT D
Polarizzazione:
orizzontale/verticale
14 V 14 V 18 V 18 V 14 V 14 V 18 V 18 V 14 V 14 V 18 V 18 V 14 V 14 V 18V 18 V
Banda LNB:
9,75 GHz/10,6 GHz
9.75 10.6 9.75 10.6 9.75 10.6 9.75 10.6 9.75 10.6 9.75 10.6 9.75 10.6 9.75 10.6
Tono DiSEqC:
A
A
A
A
B
B
B
B
A
A
A
A
B
B
B
B
Opzione:
1
1
1
1
1
1
1
1
2
2
2
2
2
2
2
2
The upper/lower frequency bands will have to be manually set by enabling or
disabling the 22-kHz control signal if the satellite system in use is not equipped
with DiSEqC. To make this setting, proceed as follows:
• Use the -key or -key to highlight the "DiSEqC/22 kHz" field and confirm
your choice by pressing the MENU-key.
Page 14
Version 1.0
Programming Your Receiver
Installation
1-3-3
Satellite
Signal Stength
LNB Lokal-Freq
Auto Search
DiSEqC/22KHz
Manual Search
Setup Value
22KHz
A
DiSEqC
AUTO
MENU/EXIT
• Use the -key or -key to switch the "22 kHz" option on or off or to select the
desired DiSEqC-controller and confirm your choice by pressing the MENU-key.
• In order to be able to receive the largest number of channels, you will have to repeat
the automatic channel-search procedure (cf. Section 6.5.4) for each setting of the
DiSEqC-controller and each status (ON/OFF) of the 22-kHz control signal.
6.5.4 Automatic Channel Search
Once the settings covered under Sections 6.5.1 through 6.5.3, above, have all been made, you may conduct an automatic channel search over those downlink frequency bands that have been set.
• Use the and -keys to highlight the "Auto Search” field:
Installation
1-3-5
Satellite
Signal Strength
LNB Lokal-Freq
Auto Search
DiSEqC/22KHz
Manual Search
Setup Value
Search complete
DF:3734 SR:5.832 3/26 New:5
EXIT
• Press the MENU-key to start the search.
While the search is in progress, a clock will appear at the lower right-hand corner
of the screen. You will also see a blue bar indicating the extent of the frequency
band that has thus far been searched. The other items appearing onscreen have
the following meanings:
DF: .... SR:.... .../... -
New:... Version 1.0
The satellite down-link frequency involved
The symbol rate
The ratio of the total number of transponders found to the total
number of transponders available within the preset frequency
band involved
The total number of new channels saved to the receiver’s memory
Page 15
GB
Programming Your Receiver
When the search has been concluded, the clock will disappear from the screen
and the message "Search OK" should appear onscreen. If instead of this message the message "Search fail” should appear onscreen, then the settings made
above will have to be checked, one after the other, in the order in which they were
made and corrected wherever necessary until the search is successful.
• Press the EXIT-key to exit this menu and view a list of those channels that were found.
EXIT
6.6
The Main Menu: Manual Search - Manually Installing TV-Channels
6.6.1 Entering TV-Channels' Frequencies
Once the settings/adjustments of Sections 6.5.1 through 6.5.4 have been concluded, you may manually
install any channel falling within the preset broadcast band involved by proceeding as follows:
• While in the "Installation" menu, use the -key or -key to highlight the
"Manual Search" field and confirm your choice by pressing the MENU-key.
• Use the -key or -key to highlight the "Video Frequency" field and confirm
your choice by pressing the MENU-key.
Manual Search
1-3-6
Down Frequency
Video PID
auto
Symbol Rate
Audio PID
auto
LNB Polarity
Start Search
Setup Value
LNB Lokal
10600MHz
DiSEqC
Video Freq
11837MHz
LNB Polar Horizontal
4
Symbol Rate
27.500MHz
22KHz
ON
MENU/EXIT
…
• Use the numerical keys to enter the desired downlink frequency (refer to
satellite-television magazines for lists of the downlink frequencies of the
various broadcast channels).
• Pressing the EXIT-key will delete the entire entry.
EXIT
• Pressing the -key will delete the rightmost digit of the entry.
• Once the entry is correct, press the MENU-key to confirm it.
Manual Search
1-3-6-1
DownFrequency
Video PID
auto
Symbol Rate
Audio PID
auto
LNB Polarity
Start Search
Setup Value
3700
MHz
MENU/EXIT
Page 16
Version 1.0
Programming Your Receiver
6.6.2 Entering the Symbol Rate
• Use the and -keys to highlight the "Symbol Rate" field and then press the
MENU-key to confirm your selection.
Manual Search
1-3-6-2
Down Frequency
Video PID
auto
Symbol Rate
Audio PID
auto
LNB Polarity
Start Search
Setup Value
28.100
MHz
MENU/EXIT
…
• Use the numerical keys to enter the desired symbol rate (SR) (refer to satellitetelevision magazines for lists of symbol rates).
• Pressing the EXIT-key will delete the entire entry.
EXIT
• Pressing the -key will delete the rightmost digit of the entry.
• Once the entry is correct, press the MENU-key to confirm it.
Version 1.0
Page 17
GB
Programming Your Receiver
6.6.3 Selecting the Polarization
NOTE:
If a DiSEqC-controller is in use, this setting will be preset by the controller and
thus need not be repeated.
• Use the and -keys to highlight the "LNB Polarity" field.
• Press the MENU-key.
Manual Search
1-3-6-3
Down Frequency
Video PID
auto
Symbol Rate
Audio PID
auto
LNB Polarity
Start Search
Setup Value
Horizontal
MENU/EXIT
• Use the and -keys to select either "Horizontal" or "Vertical" polarization
(listed in satellite-television magazines).
• Press the MENU-key to confirm your entry.
6.6.4 Setting Video PID-Codes
Many channels will remain undetected by either an automatic or a manual channel search due to their
poor identification, in which case you may manually enter their proportional-integral-differential codes
(PID-codes, which appear listed in satellite-television magazines), which will allow you to receive them.
• Use the -key or -key to highlight the "Video PID" field.
…
• Enter the desired PID-code using the numerical keys and confirm your entry
by pressing the MENU-key.
Manual Search
1-3-6-4
Down Frequency
Video PID
auto
Symbol Rate
Audio PID
auto
LNB Polarity
Start Search
Setup Value
0
EXIT
Page 18
Version 1.0
Programming Your Receiver
6.6.5 Setting Audio PID-Codes
• Use the -key or -key to highlight the "Audio PID" field.
…
• Enter the desired PID-code using the numerical keys and confirm your entry
by pressing the MENU-key.
Manual Search
1-3-6-5
Down Frequency
Video PID
auto
Symbol Rate
Audio PID
auto
LNB Polarity
Start Search
Setup Value
0
EXIT
GB
6.6.6 Conducting a Search
Before conducting a search, make certain that all selections from, or entries into,
the "Manual Search" menu have been concluded. Once they have been concluded, you may initiate an automatic search for all channels broadcasting within
the preset frequency bands involved.
• Use the -key or -key to highlight the "Start Search" field.
• Press the MENU-key to start the search.
Manual Search
1-3-6-6
Down Frequency
Video PID
auto
Symbol Rate
Audio PID
auto
LNB Polarity
Start Search
Setup Value
SETUP VALUE
DF:4000 SR:28.125 New:18
EXIT
While the search is in progress, a clock will be inserted at the lower right-hand
corner of the screen and a blue bar will indicate the extent of the frequency band
that has thus far been searched. The meanings of the other items that appear
onscreen are as follows:
DF: ....
SR: ...
.../...
New: ...
Version 1.0
The satellite downlink frequency.
The symbol rate.
The ratio of the number of channels found to the total number of
channels available within the frequency band involved.
The total number of new channels saved to the receiver's memory.
Page 19
Programming Your Receiver
The message "Search concluded" will appear onscreen when the clock disappears. However, if either of the messages "Out of search range." or "Search
failed." should appear onscreen, check the settings you have made one after the
other, correct them, and continue correcting them until the search is successful.
• Press the EXIT-key to exit this menu item.
EXIT
6.6.7 Checking Signal Strength
You should check the alignment of your satellite antenna on a regular basis if you want to have the bestpossible reception.
• Use the and -keys to highlight the "Signal Strength” field and then press
the MENU-key.
Installation
1-3-4
Satellite
Signal Strength
LNB Lokal-Freq
Auto Search
DiSEqC/22KHz
Manual Search
Setup Value
SNR
[STATUS]
EXIT
The legend "[STATUS]” will appear onscreen for a few seconds, when it will be
replaced by "[LOCK],” accompanied by a triangular figure. If the latter has only
yellow and red segments, then the received signal strength is weak.
• Cautiously realign the antenna until the triangular figure reaches maximum size.
You will then have the best-possible reception of the broadcast signal.
If the legend "[UNLOCK]” should appear following "[STATUS],” check the cabling
interconnecting the antenna and the receiver and the parameter settings covered
in the preceding sections.
• Press the EXIT-key to exit this menu.
EXIT
6.7
Editing Transponder Data
6.7.1 Procedures for Editing Transponder Data
• In the main menu, highlight the "Installation" field and confirm your selection
by pressing the MENU-key.
• Highlight the "Satellite" field and confirm your selection by pressing the
MENU-key.
Page 20
Version 1.0
Programming Your Receiver
Installation
1-3
Satellite
Signal Strength
LNB Lokal-Freq
Auto Search
DiSEqC/22KHz
Manual Search
Setup Value
Satellite
ASTRA
LNB Lokal UNIVERSAL
DiSEqC
A
AUTO
MENU/EXIT
INFO
…
• Press the Info-key on your remote control unit and then enter the password,
9-8-1-5, using the numerical keys.
• Confirm your entry by pressing the MENU-key.
GB
Transponderdate - Edit
01
ASTRA
02
EUTELSAT
03
ASIASAT2
04
PANAMSAT2
05
PANAMSAT4
06
INTEL602
07
INTEL604
08
INTEL703
\
TP
H/V
SR
MENU/EXIT
You may now edit the transponder data shown.
Version 1.0
Page 21
Programming Your Receiver
6.7.2 Adding Another Transponder
• In the "Transponderdate – Edit" menu, highlight a satellite and confirm your
selection by pressing the MENU-key.
Transponderdate - Edit
01
ASTRA
\
TP
H/V
SR
02
EUTELSAT
49
12582
V
22.000
03
ASIASAT2
50
12670
V
22.000
04
PANAMSAT2
51
-
-
05
PANAMSAT4
06
INTEL602
07
INTEL604
08
INTEL703
MENU/EXIT
• Press the -key to enter the table on the right and then highlight its last line
by pressing the MENU-key.
…
• Use the -key to highlight the field in the "TP" column and then use the
numerical keys to enter the transponder's frequency.
• Press the -key to transit to the next field and then use the -key or -key to
set the transponder's polarity (H/V).
…
•
Use the -key to highlight the field in the "SR" column and then enter the
transponder's symbol rate using the numerical keys.
• Confirm your entries by pressing the MENU-key.
Once you have confirmed your entries, the next vacant line beneath the line
you have entered will appear onscreen in order to allow you to add further
transponders, if desired.
Page 22
Version 1.0
Programming Your Receiver
6.7.3 Adding Another Satellite
If you would like to add another satellite to those that have been factory-installed, then you will have to
perform the following procedures before undertaking the procedures stated under 6.7.2 above:
• In the "Transponderdate – Edit" menu, highlight the line immediately beneath
the last satellite listed and confirm your selection by pressing the MENU-key.
Transponderdate - Edit
18
SIRIUS1 2
19
AMOS 1
20
TELECOM2B
21
NILESAT
22
-
A
B
\
C
TP
H/V
SR
8
MENU/EXIT
…
GB
• Enter the name of the satellite involved, which consists of a maximum of
12 alphanumeric characters, into the middle line by using the -key or -key
to highlight the position involved and then using the -key or -key to select
the letter required or the numerical keys to enter the numeral involved.
• Confirm your entry by pressing the MENU-key, which will automatically activate the revised table.
• Enter all of the necessary data, following the procedures stated under
Section 6.7.2, above
6.7.4 Editing Transponder Data
NOTE:
You may edit or delete only transponder data that you have entered yourself.
Factory-preset transponder data cannot be edited or deleted.
• To edit transponder data, first highlight the line to be edited and then proceed
as stated under Section 6.7.2 or 6.7.3, above.
• Overwrite the data listed, item by item.
EXIT
Version 1.0
• Either press the EXIT-key to abort editing or press the MENU-key to confirm
the editing you have done.
Page 23
Using your Receiver
6.7.5 Deleting a Transponder
NOTE:
Deleting all data for a satellite will delete the satellite.
• In the "Transponderdate – Edit" menu, highlight a satellite and confirm your
selection by pressing the MENU-key.
• Highlight a field in the table.
Transponderdate - Edit
01
ASTRA
\
TP
H/V
SR
02
EUTELSAT
49
12582
V
22.000
03
ASIASAT2
50
12670
V
22.000
04
PANAMSAT2
51
12260
H
22.000
05
PANAMSAT4
52
12222
V
27.500
06
INTEL602
53
-
-
-
07
INTEL604
08
INTEL703
Press
to delete, press
to change
MENU/EXIT
• Confirm your selection by pressing the MENU-key.
EXIT
7
• Either delete the highlighted data by pressing the -key or press the EXIT-key
to abort the deletion.
Using your Receiver
Once you have finished all of the basic settings described above, you can begin using your receiver.
NOTE:
Digital communications involve the transfer and processing of large amounts of
data simultaneously. This means that there may be a slightly longer delay when
changing channels compared to traditional TV.
7.1
Switching you Receiver On
• Press the Power button on your receiver. Now press the Power key on your
remote control.
Page 24
Version 1.0
Using your Receiver
7.2
Selecting Channels
…
• Use the number keys to select the channel of your choice (see also
”Programme Lists” in Section 8).
NOTE:
Although channel numbers have three digits, e.g., 001, you may enter either single-digit, double-digit, or triple-digit channel numbers, e.g., 1, 13, or 135, and the
receiver will adjust to your entry after three seconds have elapsed.
• Use CH-key to move to the next highest channel. Use the CH-key to move
to the next lowest channel.
• To go to the last channel you visited, press the ”Last” key.
LAST
Each time you change channel, the channel number, date, time and ”Channel
Change” are displayed on your TV screen.
If the new channel is on the same frequency as the previous one, it will appear and
the information mentioned above will be displayed. If the channel is on a different
frequency, the message ”Tuning HF Signal” appears. The new channel takes
slightly longer to appear.
The information displayed by the receiver remains on your screen for approximately three seconds or until you press the Exit key.
7.3
Volume Control/Mute Sound
• Use the or -keys to adjust the volume.
VOLUME
15
• Use the Mute key to mute the sound:
MUTE
MUTE
• To restore the sound, press the Mute key again or press the -key.
MUTE
The on-screen display disappears after a few seconds.
.
7.4
Listening to the Radio
In addition to television programmes, many broadcasters transmit their radio programmes in digital HIFI
format.
• Press the Radio key to switch from TV to Radio mode.
RADIO
• Use the channel keys or to scroll through the channels as you would in TV mode.
• Press the Last key to return to the previous channel.
LAST
• To return to TV mode, press the Radio key again.
RADIO
All programme list functions can be used in both Radio and TV mode.
Version 1.0
Page 25
GB
Programme Lists and Information
7.5
Selecting the Audio Mode
Several broadcasters transmit their TV programmes in different languages and audio formats.
AUDIO
• Press the Audio key and select the field on the left using the volume
keys or to choose one of the available languages:
Audio Modus
Stereo (L+R)
BL 1:
• Use the channel keys or to change the language setting.
• Use the volume keys or to select the field on the right.
• Select one of the following options using the channel keys or :
Stereo (L+R)
Mono1 (L+L)
Mono2 (R+R)
Swap (R+L)
– left and right
– left only
– right only
– alternating
• Press the Audio key again to return to TV mode.
AUDIO
8
Programme Lists and Information
Digital television offers you hundreds of channels and it’s easy to lose track of your favourites. To help
you find your favourite programmes quickly and easily, you can create programme lists (Favorite Menu).
8.1
Displaying a Programme List
8.1.1 Full-Screen Mode
• Press the FAV key while watching a programme:
FAV
Favorite Video
P001 GDTV
P002 Hunan SRTV
P003 DW-tv
P004 MCM
P005 RAI internation
FAV/RADIO/INFO/MENU
NOTE:
The current channel being displayed in the background is changed if the programme number is selected for more than a few seconds.
Page 26
Version 1.0
Programme Lists and Information
You can use the following functions:
• Use the volume keys or to scroll or to place a programme.
• Use the channel select keys or to select or to place a programme.
• Press the FAV key to create or change your list of favourites (see Section 8.2).
FAV
• Press the Radio key to switch to radio mode.
RADIO
• Press the INFO key to see programme information.
INFO
• Press the Menu key to store your programme list.
…
• Use the number keys to select a programme directly.
8.1.2 Compact View Mode
• Press the FAV and INFO keys while viewing a programme:
FAV
INFO
GB
Favorite Video
P001 GDTV
TV (PIG)
P002 Hunan SRTV
P003 DW-tv
P004 MCM
Information
P005 RAI internation
Networkname
Frequency
Symbol Rate
FAV/RADIO/INFO/MENU/EXIT
The same functions are available here as in full screen mode.
Version 1.0
Page 27
Programme Lists and Information
8.2
Editing your Programme Lists (List of Favourites)
The following steps apply to both TV and Radio modes. At the bottom of the screen, you can see a list of
function keys for this screen: Change (arrow or number keys), Confirm (Menu key), Close menu (Exit key).
8.2.1 Moving a Programme
• Press the FAV-key while viewing a programme to open the Favourite menu:
FAV
Favorite Video – Edit
P001 GDTV
TV (PIG)
P002 Hunan SRTV
P003 DW-tv
P004 MCM
Information
P005 RAI internation
Networkname
Frequency
Symbol Rate
MOVE
DELETE
• Select “Move“ and press the Menu key to confirm
…
• Either use the -key or -key to highlight the channel you want to move or
enter its channel number using the numerical keys.
• Press the Menu key to confirm.
…
• Using the channel, volume or number keys or , select the location where
you want to move the programme to.
• Press the Menu key to confirm.
• Repeat this procedure to move other programmes.
• To close the menu, press the Exit key twice.
EXIT
NOTE:
Your receiver stores the list you edited in its memory. An hourglass appears onscreen while it does so.
8.2.2 Deleting a Programme
• Press the FAV key while in the programme list.
FAV
• Select “Delete“ using the -key and press the Menu key to confirm.
Page 28
Version 1.0
Programme Lists and Information
Favorite Video – Edit
P001 GDTV
TV (PIG)
P002 Hunan SRTV
P003 DW-tv
P004 MCM
Information
P005 RAI internation
Networkname
Frequency
Symbol Rate
MOVE
DELETE
• Confirm the deletion by pressing the MENU-key.
Continue, following the procedures stated under Section 8.2.1, above.
8.3
Programme Information
GB
Digital television allows broadcasters to transmit an electronic TV guide and other additional information
along with the signal. Unfortunately this capability is not utilised by all TV broadcasters.
GUIDE
• While viewing a programme, press the GUIDE key to open the following
overview screen:
Program Guide – Video
Data
: 22/6/1999
Video
End time
: 10:30
Audio
:
:
Content
:
EBU data
:
Rating
:
Story
:
Press EXIT to stop search
In addition to the programme overview, the following information is also available:
Version 1.0
Video:
4:3
16:9
16:9 (pan vector)
> 16:9
Content:
Feature Film / Drama
News
Show / Gameshow
Sport
Kids / Teens
Audio:
Single mono
Dual mono
Stereo
Multilingual
Surround
Music / Dance
Art / Culture
Social / Politics / Economy
Education / Learning
Leisure
Special
Page 29
Trouble Shooting
EBU Information:
Teletext Subtitles
Teletext
Subtitles
Subtitles (4:3)
Subtitles (16:9)
Subtitles (2.21:1)
Suitability:
Over 7 years of age
Press the Exit key to stop the programme operation.
EXIT
• Use the channel select and volume keys , , or to select the appropriate options and display the additional information.
• Press the Exit key to exit the programme overview.
EXIT
9
10
Trouble Shooting Your digital Receiver
Problem
Possible Causes
Solution
No picture but
on-screen menus
appear
Satellite system is faulty
in correctly installed,
Faulty LNB
Check all connections and leads,
adjust satellite antenna,
Check LNB
High levels of signal loss
through cables
Replace cables or use a signal
booster
Faulty LNB
Replace LNB
Faulty connection
(Water/corrosion damage)
Repair connection
No stereo sound
Incorrect cable connecting
TV and receiver
Check SCART cable
Remote control not
working
Batteries exhausted
Replace batteries
Remote control not pointed
at device
When using remote control, make
sure it is pointing at device
Recycling and Disposal
Please dispose of the device, packaging such as polystyrene and all batteries in accordance with your
local regulations and recycle wherever possible.
Page 30
Version 1.0
+12 -12
-11
-10
-9
-8
-7
-6
-5
-4
-3
-2
-1
GMT
+1
+2
+3
+4
+5
+6
+7
+8
+9
+10
Zeitzonen
-3
-4
-10
+7
-9
-7
+10
+9
11.1 Time table
Version 1.0
+11
+11
+5
+1
+3
-8
+4
-10
-6
+1
-3.30
-5
+8
+2
+6
+3.30
+4.30
+8
+5.30 +6.30
+1
+4
+7
+3
-5
-4
+2
-3
+8
+9.30
+10
23h
Mitternacht
1h
2h
3h
4h
5h
6h
7h
8h
9h
10h
11h
12h
13h
14h
15h
16h
17h
18h
19h
20h
21h
22h
I
Appendix
Zeitzonen
Landeszeit
Gebiete mit Sommerzeit
17h Ortszeit der jeweiligen Zeitzone bezogen auf 12h GMT
+7 Zeitunterschied gegenüber GMT in Stunden
D
Appendix
11.2 Technical specification
TUNER
IF Input frequency
IF Loop through output
IF Bandwidth
Input impedance
Input signal level
LNB Polarization swiching voltage
Band switching
I/Q Output
FRONT-END DEMODULATOR
Demodulation capacity
Symbol rate
Viterbi decoding rate
Reed solomon decoding
TRANSPORT DEMULTIPLEXER
Demultiplex
max. input stream
PID Handling capability
SI Filtering
920...2150 MHz
920...2150 MHz
36 MHz
75 ohms
- 65 dbm...- 25 dbm
13/18 V DC @ max 400 mA, Short
Circuit Protection
22 kHz Tone
Unbalanced Output,
Controlled by AGC Input
QPSK Demodulation
2 ~ 35 Msps (SCPC, MCPC)
1/2, 2/3, 3/4, 5/6, 7/8, 8/9
FEC : 204, 188, t = 8
According to ISO/IEC 13818-1
60 MHz (serial) / 7,5 MHz (parallel)
32 PID
According to DVB-SI
spec (ETS 300 468)
VIDEO DECODING PARAMETERS
Video decoding
ISO/IEC 13818-2 MP@ML
Aspect ratio
4:3, 16:9, Pan&Scan, LetterBox
Resolution
max. 720 x 576
FRONT PANEL
4 digits LED Display
3 Buttons
IR Sensor
REAR PANEL
Digital IF-Input
Digital IF-Output (Loop-through)
RCA Output
RS 232 Port
2 Scart Output
SAT
IR Sensor
Power Cord
VCR, TV SCART OUTPUT
Video Output Impedance
Video Output Level
Audio Output Impedance
Audio Output Level
Channel Numbers Display
Power, Down, Up
38 kHz
F-Female Type
F-Female Type
3 RCA (left, right, Video)
9 Pin D Female Type
1 TV, 1 VCR
38 kHz
Europe Flexible Cord
75 ohms
1,0 Vpp by 75 ohms
600 ohms unbalanced
3,0 Vpp with Volume Control
REMOTE CONTROL UNIT (UNIVERSAL)
Universal Remote Control
IR (Carrier Freq. 38 kHz)
Battery
2 x 1.5 V AA
24 Keys
Power, 0...9, Audio, Mute,
Info, Up, Down, Left,
Right,Menu/Select, Exit,
Guide, Fav, Last, Radio
AUDIO DECODING PARAMETERS
Audio decoding
ISO/IEC 13818-3
Layer I & II
Operating mode
Mono, Dual, Stereo, Joint Stereo
Sampling frequency
16, 22.05, 24, 32, 44.1, 48 kHz
MICROPROCESSOR AND MAIN MEMORIES
Microprocessor type
MC 68340 (16 MHz)
Processing rate
4.7 MIPS
Flash ROM (for program memory) 512 Mbytes (256 K x 16)
DRAM
2 Mbytes (1 M x 16)
Flash ROM (for data memory)
128 Kbytes (64 K x 16)
DATA SERVICE PORT
Connector
Protocol
Data rate
9 Pin D-Female Type
RS-232 Asynch
max. 19200 bps
GENERAL DATA
Input power voltage
Power consumption
Dimension
Weight
Operation temperature
AC 190…260 V, 50 Hz
max. 30 Watts
337 x 240 x 69 mm
2,5 kg
0...40 Deg.
II
Version 1.0