1
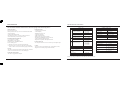
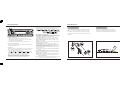
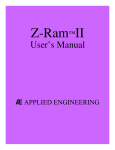
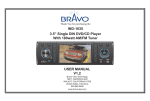
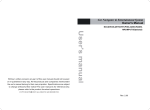
CSS-5930BT
AM/FM/WB/CD/MP3/WMA/Bluetooth,
4-CHANNEL, Public Address Capability
Custom Radio Corp
4012 Merchant Rd.
Fort Wayne, IN
Tel : 260-489-2062
www.customradio.net
Owner s Manual
Custom Radio Corporation
Table of Contents
Table of Contents --------------------------------------------------------------------------------------------------------------------------------- 1
General Features ---------------------------------------------------------------------------------------------------------------------------------- 2
Car Audio Wiring Configuration --------------------------------------------------------------------------------------------------------------- 3
Identification of Controls and Functions --------------------------------------------------------------------------------------------------- 4
General Operation ----------------------------------------------------------------------------------------------------------------------------- 5~6
Radio Operation ---------------------------------------------------------------------------------------------------------------------------------- 7
Compact Disc Operation ------------------------------------------------------------------------------------------------------------------------ 8
USB Operation ------------------------------------------------------------------------------------------------------------------------------------ 9
Bluetooth Operation ---------------------------------------------------------------------------------------------------------------------------- 10
Bluetooth MIC Operation ---------------------------------------------------------------------------------------------------------------------- 12
AUX INPUT Operation & Public Address (PA) -------------------------------------------------------------------------------------------- 13
Radio Reception ---------------------------------------------------------------------------------------------------------------------------- 14~17
Tips for Handling the Discs & CD Error Messages ---------------------------------------------------------------------------------------- 18
Specifications & Performance ----------------------------------------------------------------------------------------------------------------- 19
Please take a few moments to read this manual carefully to ensure you understand the operation of the unit before you start using it.
1
Specifications & Performance
General Features
This AM/FM/WB/CD/MP3/WMA/Bluetooth car audio unit is equipped with the following features.
1. Radio unit (Tuner)
- Electronic station search
- Memory function which you can store 15 FM Stations and 10 AM
stations in Memory.
- 7 WB (Weather Band) Stations
- A.PS (Auto Preset-Store) system selects and memorizes the
stations automatically in order of good reception.
2. COMPACT DISC PLAYER UNIT
- 5-1/4 (12cm) Discs available
- MP3/WMA disc can be applied
- CD Intro, Repeat, and Random Function
- Power Loading System
1> When disc is inserted, it starts playing automatically.
2> Even if the power is off, the unit is powered on automatically
when the disc is inserted, and it will start playing automatically.
3. AUX IN
- The radio is equipped with a Auxiliary Audio input jack, that allows
the user to listen to external sources, such as MP3 player.
4. USB (MP3, WMA playable)
- The radio is equipped with a USB port.
5. Bluetooth Feature
- Automatic phone connection
- Caller ID display
- Redialling for the last call
- Call transfer & pairing
- A2DP (Audio Streaming)
- AVRCP (Music play control via phone)
- Microphone included (Built into the Audio Unit)
- Front and Rear Microphone Selection
- High and Low Impedance Microphone Selection
6. Public Address (PA)
- Two four-pin connectors on the rear of unit accept microphone inputs.
COMPACT DISC UNIT
TUNER UNIT
Reception Frequency
FM
AM
WB
87.5 ~ 107.9MHz
Method
Optical
Number of Channels
4 Channels (Stereo)
Dynamic Range
Above 90 dB
Effective Sensitivity
(MONO) (30dB S/N)
Below 10dBu
S/N Ratio
Above 52dB
S/N Ratio
Above 50 dB
Stereo Separation (1KHz)
Above 30dB
Distortion factor
Below 1% (1KHz)
Frequency Characteristics
(-3dB)
80Hz ~ 10KHz
Channel Separation
Above 50 dB
WOW & Flutter
Below measured limit value
Reception Frequency
530 ~ 1710KHz
S/N Ratio
Above 45dB
162.400 MHz
162.425 MHz
162.450 MHz
162.475 MHz
162.500 MHz
162.525 MHz
162.550 MHz
Reception Frequency
7. Others
- Electronic volume control function. (Bass, Treble, Balance, Fader)
- High-Power external Amp design (45Wx4 channels)
AUDIO UNIT
Maximum Output Power
Frequency Characteristics
(-3dB)
POWER UNIT AND SPECIFICATIONS
Power Supply Voltage
4 - 8 ohms
Chassis Dimensions (WxHxD)
Commercial Fuse Spec.
178 x 50 x 151.7 mm
7.00 x 1.97 x 5.97
188 x 57 x 22.8 mm
7.40 x 2.24 x 0.90
250V 10A
Weight
Below 2kgs
Panel Dimensions (WxHxD)
45W x4CH
80Hz ~ 10KHz
Bass Control
10dB ± 3dB
Treble Control
10dB ± 3dB
13.8V (9.5 ~ 15.8V) available
Speaker Impedance
Caution: Any changes modifications to this audio unit will void its Warranty.
2
19
Car Audio Wiring Configuration
Tips for Handling the Discs & CD Error Messages
1. Connection diagrams
Please refer below for vehicle's audio connector wiring configuration...
Error Code
17 20
9
(ANT Jack)
SIGNAL
GROUND
3
4
SWITCH
PWR (+8VDC)
MIC #2
NO
DESCRIPTION
SHIELD
1
2
SIGNAL
3
4
SWITCH
GROUND
BLUETOOTH MIC
NO
1
2
DESCRIPTION
MIC +
MIC -
1
2
3
4
5
6
7
8
21
23
24
31
3
NOTE
No
ILL + (option)
IGNITION (+12VDC)
AUTO ANTENNA
ILL - (option)
MEMORY (BATTERY)
GROUND
ASWC
LEFT IN: AUX-2
SHEILD GND: AUX-2
REAR MIC+ (option)
31 34
11
12
14
16
3
5
7
6
8
No
NOTE
9
10
11
12
13
14
15
16
REAR RIGHT SPEAKER +
25
26
27
32
GND: AUX-2
C OMP A C T
DI G I T A L A U D I O
1> Loading is not completed after over 20 secs during the
loading operation (* twice trial)
2> Unloading is not completed after over 35 secs during
the unloading operation ( * Four times trial)
15
10
4
Err
30 33 36
13
1
2
(BT MIC)
DESCRIPTION
1
2
2
1
(MIC#1) (MIC#2)
MIC #1
NO
4 3
2 1
25 28
24 27
18 21
4 3
2 1
29 32 35
23 26
19 22
Reason
Err
1> Disc has been inserted upside down.
( remove and re-insert the correct way )
2> Disc is dirty or defective and be can not be read. (Clean
DISC and try again.) / (Try another known working Disc.)
Err
1> Pick up cann't move to the most inner circle after 10
secs. (Poor Quality CD-R)
REAR RIGHT SPEAKER FRONT RIGHT SPEAKER +
FRONT RIGHT SPEAKER FRONT LEFT SPEAKER +
FRONT LEFT SPEAKER REAR LEFT SPEAKER +
Note: Some CD-R’s may not play and may cause an ERROR CODE to appear.
If a CD becomes stuck inside your audio unit, press BAND and MODE buttons
simultaneously for about 2 seconds (reset function) or try the EJECT button again.
If a poor quality CD-R’s become stuck inside your audio unit, this will not be covered
by Warranty. Contact Your dealership to have the Disc removed.
CAS E
REAR LEFT SPEAKER -
RIGHT IN: AUX-2
ON/OFF: AUX-2
REAR MIC- (option)
18
Radio Reception
STRONG SIGNAL NOISE
Identification of Controls and Functions
STATION DRIFT NOISE
1
Strong Signal Noise may occur when you are very close to a
When a vehicle reaches an area where there are two strong
Transmitter Tower. The broadcast signals are extremely
stations broadcasting at similar frequencies, the original station
strong which causes noise and sound break-up at the radio
may lose it's reception and the second station will be
receiver.
broadcasted. At this time, there will be some noise present
20
2
3
4
5
7
6
8
which we call Station Drift Noise.
19
Station 1
88.1MHz
A
B
C
Station 2
88.3MHz
A
B
17
18
9
10
11
1. POWER ON/OFF, MODE button
2. VOLUME UP/DOWN knob, SEL button
3. TUNE UP/DOWN knob, BAND/LOUD button
4. Disc EJECT button
5. CALL and PAIR button
6. CALL END and MUTE button
7. SEEK UP button
8. TRACK DOWN button
9. WB (Weather Band), ALM (Alarm) button
10. T/F (Time/Frequency) button
12
13
14
15
16
17
11. Station Preset 1, Play/Pause button
12. Station Preset 2, Track Intro button
13. Station Preset 3, Track Repeat button
14. Station Preset 4, Track Random button
15. Station Preset 5 button
16. A.PS (Auto Preset Scan)
17. USB Port
18. AUX Jack
19. Microphone Hole
20. DISC Slot
4
Radio Reception
General Operation
1
3-2. Long push SEL to enter the 2nd menu which allows to adjust
BEEP, I-VOL, BT VOL, AREA, ILLUM, BT MIC F/R.
2
long
VOL push
BEEP
short
push
short
short
I-VOL push
BT R MIC VOL
BT VOL push
short
push
AREA
BT R H/L
short
push
BT F MIC VOL
short
push
short
push
BT R MIC
short
push
Turn VOL
BT F MIC
- BEEP: BEEP ON / BEEP 2ND.
1. POWER/MODE Button
- Simply press it for the first time to turn the unit ON.
- With the unit be turned on, repeatedly press it to select Radio,
CD, USB, AUX or BT MUSIC mode.
- Press and hold it for longer than 2s to turn the unit OFF.
2. VOLUME UP/DOWN Knob
Simply turn this knob clockwise or counter clockwise to increase
or decrease the volume level.
3. SEL Button
Electronic encoder type button which is used to select and control
all functions related to the volume and sound quality of the unit.
3-1. Short push SEL to adjust Audio level:
VOL
short
push
DSP
short
push
BAS
short
push
TRE
short
push
BAL
short
push
FAD
DSP: FLAT --> CLASSIC --> POP --> ROCK --> DSP OFF
BASS: From minimum BASS -10 to maximum BASS +10.
TREB: From Minimum TREB -10 to maximum TREB +10.
BALANCE: From BAL 10L (full left) to BAL 10R (full right).
FADER: From FAD 10F (full front) to FAD 10R (full rear).
5
FLUTTER/SKIP NOISE
Select BEEP ON if you want to hear beep sound every time when a
button is pressed. Select BEEP 2ND if you want to hear beep sound
when a button is held down for more than 2 seconds.
- I-VOL(initial volume): From VOL 00 to VOL 30. This feature
controls the maximum volume level desired when power it on.
- BT VOL (Bluetooth volume): From BT VOL 00 to BT VOL 30.
- AREA: USA or EUROPE.
- ILLUM: From ILLUM 01 to ILLUM 10. This feature controls the
illumination intensity of the unit.
- BT MICROPHONE: BT F-MIC (front) or BT R-MIC (rear).
Select BT MIC F if you want to talk with the microphone located
on front panel microphone hole (driver’s seat).
Select BT MIC R if you want to talk with the microphone located
on the rear of the unit which connected with a 5 meters extension
wire (passenger’s seat).
Note: BT MIC F/R options could not be selected while Bluetooth
talking.
- BT R MIC HIGH/LOW: With BT R MIC selected, press SEL
again, you can select MIC High or Low according to the impedence
of the Microphone you applied.
- BT MIC VOL: To adjust Bluetooth talking volume from 00 to 20.
Note: You can also adjust the volume by turning TUNE knob
during Bluetooth talking.
WEAK SIGNAL NOISE
Signals from a FM transmitter move in straight lines and become
In remote areas, broadcast signals become weak due to
weak in valleys, between tall buildings, in mountains, and around
the distance of the transmitter. Reception in such areas
other obstacles. When a vehicle passes through an area like this,
may experience Weak Signal Noise and sound break-up.
ILLUM
the reception conditions may change suddenly, resulting in Flutter
/ Skip Noise.
?
Remark: You have 5 seconds to adjust each feature, otherwise, it will
switch back to volume control mode automatically.
16
Radio Reception
General Operation
Signals from an FM transmitter are similar to beams of light
because they do not bend around corners, but they do reflect.
MULTI-PATH NOISE
Since FM signals can be reflected by obstructions, it's possible to
Unlike AM signals, FM signals cannot travel beyond the horizon.
receive both the direct signal and the reflected signal at the same
Therefore, FM stations cannot be received at great distances
time. This causes a slight delay in reception and may be heard as
compared to AM reception.
broken sound or distortion. This problem may also be encountered
Atmospheric conditions can also affect FM reception.
when in close proximity to the transmitter.
6
9
10
3
High humidity will cause poor reception. However, cloudy days
4. LOUD Button
When listening to music at low volume levels, this feature
will boost the bass and treble response. Press and hold
LOUD button (3) for about 2 seconds to activate loudness
feature. Press and hold again to deactivate loudness.
may provide better reception than clear days.
IONOSPHERE
Reflected
wave
FM
wave
AM
wave
Direct
wave
FM
wave
60-120miles (100-200km)
15
5. ALM (Alarm) Button
The alarm feature can be programmed as follows:
1. Press and hold the ALM button for about 2-3 seconds,
ALARM ON or OFF appears on the display.
2. If the alarm is off, rotate the volume control clockwise to
turn on the alarm (ALARM ON).
3. Momentarily press the ALM button again, the hours digit
flashes, rotate the volume control to set the hours.
4. Momentarily press the ALM button again, the minutes digit
flashes, rotate the volume control to set the minutes.
5. Press the ALM button again, and ALM SET will appear on
the display.
6. T/F (time / frequency) display button
In any mode, time display is default indication on LCD.
When T/F button is pressed while time is displayed, the
current frequency will appear for approximately 6 seconds
and then revert to time indication.
- SETTING THE CLOCK
1. Turn vehicle ignition on, then power up the radio.
2. Press and hold the T/F button until the time (hour)
display begins to flash.
3. With the hour display flashing, rotate Volume control
counter clockwise to decrement hour indication, rotate
Volume control clockwise to increment hour indication.
4. Press and hold the T/F button once again until the
minutes display begins to flash. Adjust the minutes
display by rotating Volume in the same manner as
described for hours indication in step 3.
5. Five seconds after the last hour or minute adjustment
is made, the time will be set into the unit and the time
indication remains steady.
7. MUTE Button
While playing, simply press MUTE button to mute volume.
Press it again to resume playback.
6
Radio Reception
Radio Operation
7
8
9
10
11
12
13
14
15
3
16
1. BAND Button
Each time you press this button, LCD displays as follows:
FM1 --> FM2 --> FM3 --> AM1 --> AM2.
2. T/F (time/frequency) Display Button
Simply press T/F button to display current frequency. It will
revert to time display after approximately 6 seconds.
3. MANUAL TUNE UP/DOWN Knob
To manually tune to a radio station, simply turn TUNE knob
left or right to increase or decrease the radio frequency.
4. AUTO TUNE UP/DOWB Button
To automatically select a radio station, simply press SEEK
UP (7) or TRACK DOWN (8) button.
5. Presets (Button 11~15)
To store your favorite radio stations into memory,
a. Select a radio station by pressing the SEEK / TRACK
Button or TUNE knob.
b. Once selected, simply press and hold one of the preset
buttons for more than 2 seconds until radio beeps. The
station is now stored on the preset selected.
Note: 15 FM and 10 AM stations can be stored in memory by
using the 5 preset buttons.(each band can store 5 stations.)
7
6. PRESET station tuning
To Select a station which is stored in memory, simply press
anyone of the PRESET Buttons 1 to 5. The Station stored in
the PRESET pressed, will automatically be selected.
(The LCD shows the CH number and frequency.)
7. A.PS (Auto Preset)
7-1. AUTO PRE-SET SCAN: Pressing this button momentarily
scans the stations preset 1-5 of the current radio band.
The unit will stop at each preset station for approximately
5 seconds before continuing to the next preset station.
Until all 5 presets have been scanned.
7-2. AUTO PRE-SET STORE: Press this button for more than
2 seconds and it will automatically preset 5 stations into
memory (presets 1 to 5) in order of strongest signal
strength.
8. WB (weather band) Button
Momentarily press WB/ALM button to change the radio to
WB mode. The unit will automatically lock in the strongest
WB station or you may select a WB station by selecting
preset buttons 1-5, SCAN button (station 6) and manually
tune to station 7.
The default mode of the WB function is seek tuning. In this
mode, tuning the VOL knob, the unit will search weather
band for next strongest signal station.
Turn the TUNE button right or left to set the WB function to
manual tuning.
When WB button is pressed again, radio operation returns
to the previous play mode. In WB mode, MODE button has
no function until you exit from WB mode.
Note: In WB Mode, when the unit is in Auto tuning, the
manual tuning has no effect.
AM
signals can bend around buildings or mountains and bounce off
FM (Frequency Modulation) CHARACTERISTICS
An FM broadcast range is usually about 25-30 miles (40-50Km)
the IONOSPHERE.
from the source. Because of extra coding needed to break the
This is why AM signals can reach longer distances than FM signals.
sound into two stereo channels. FM has even less range than
monaural (non-stereo) FM.
IONOSPHERE
FM STATION
25-30 miles
(40-50km)
STATION 1 STATION 2
14
Compact Disc Operation
AUX INPUT Operation & Public Address (PA)
- PUBLIC ADDRESS (PA)
- The Radio is equipped with two microphone inputs for public
address purposes.
18
AUX INPUT
It is possible to connect your portable media player to the
unit for playback of the audio tracks via the car spearers.
To get the best results when connecting the portable media
to the unit, follow steps:
- Use a 3.5mm stereo plug cable to connect the media player
headphone socket to AUX Jack.
- Adjust the portable media player to approximately 3/4
volume and start playback.
- Press the MODE button (1) to change into AUX mode.
- The volume and tone can now be adjusted on the unit.
NOTE:
- The audio quality of your media player and the audio tracks
on it may not be of the same sound quality as the CD player.
- If the sound of the media player is too low compared with
the radio or CD, increase the volume of the media player.
- When in AUX mode, only the Volume, Bass, Treble, EQ,
MUTE and MODE functions of the unit can be used.
- MICROPHONE ONE (MIC 1)
When the microphone press-to talk switch is activated on
microphone one(MIC 1), the current program audio output is
interrupted, “MIC 1”appears on the display and the microphone
voice input can be heard through the speakers. When the
microphone switch is released, the previous program audio
output is restored and “MIC 1”disappears from display. Output
level heard through the speakers, is controlled with MIC 1
volume control.
NOTE: MIC 1 input uses CSS/CRC-103M series microphones.
- MICROPHONE TWO (MIC 2)
When the microphone press-to-talk switch is activated on
microphone two(MIC 2), the current program audio output is
interrupted, “MIC 2”appears on the display and the microphone
voice input can be heard through the speakers. When the
microphone switch is released, the previous program audio
output is restored and “MIC 2”disappears from display. Output
level heard through the speakers, is controlled with the Radio
volume control.
NOTE: MIC 2 input uses CSS/CRC-105 series and gooseneck
type microphone.
MIC 2 volume levels will be memorized by the unit from previous
set level during normal operation and when radio is turned off.
4
7
8
11
12
13
14
15
16
17
1. Listening to your Disc
Insert a Disc into the disc slot with the label side facing up.
Once the Disc has been inserted, it will automatically start
playing Track 1. If there is a Disc already in the unit, simply
press the MODE button to select the Disc Function.
2. Eject Button
Press this button to eject the disc.
3. TRACK UP/DOWN Button
Simply press SEEK UP or TRACK DOWN button to select
the next or previous track.
Press and hold SEEK UP or TRACK DOWN button to skip
through the track in the forward or backward direction until
the button is released.
4. PLAY/PAUSE Button
Press this button to PAUSE the playback. Press it again to
resume the playback.
5. INT (INTRO SCAN) Button
- INT Playback: simply press INT button to play the first 10s
of each track.
13
- INT Folder: press and hold INT button for longer than 2s to
intro play the tracks in current folder.
- INT off: simply press it again to cancel INT feature.
NOTE: Function of INT Folder is only available for MP3/WMA
playing mode.
6. RPT (Repeat) Button
- RPT Playback: simply press RPT button to play current
track repeatedly.
- RPT Folder: press and hold RPT button for longer than 2s
to play the tracks in current folder repeatedly.
- RPT off: simply press it again to cancel RPT feature.
NOTE: Function of RPT Folder is only available for MP3/WMA
playing mode.
7. RDM (Random) Button
- RDM Playback: simply press RDM button to play the tracks
in a random sequence.
- RDM Folder: press and hold RDM button for longer than 2s
to play the tracks in current folder randomly.
- RDM off: simply press it again to cancel RDM feature.
NOTE: Function of RDM Folder is only available for MP3/WMA
playing mode.
8. Search via A.PS Button
8-1. Search Directory: Press it for the 1st time, then turn TUNE
knob to select Directory. At your desired Directory, press
BAND to confirm, turn TUNE again to select track and push
BAND to play the selected track.
8-2. Search Track: Press it for the 2nd time, then turn TUNE
knob to select track and push BAND to play the selected
track.
8
USB Operation
Bluetooth Operation
18
17
1. USB Playback
Get to USB mode, press MODE button (1) momentarily or
gently insert the USB driver or USB device. It will play the
audio files in the USB device automatically and show USB
READ on the LCD display.
No files or wrong file (text file) in USB device, it will be
converted back to the previous mode after display NO FILE.
2. USB Function
All of the USB file playback functions are the same as MP3
disc function.
Please refer to page 8 on how to use possible function for
USB file playback.
NOTE: The USB driver or USB device, or any USB cable
are option sold separately.
3. USB Audio File Structure
It is recommended folders be created with your favorite audio
files in them for easier search. The unit will number all audio
file in folders as follows.
Example: if you have 4 folders with 3 audio files in each folder.
D01 Folder Name
F001 (T01)
F002 (T02)
F003 (T03)
9
D02 Folder Name
F004 (T04)
F005 (T05)
F006 (T06)
D03 Folder Name
F007 (T07)
F008 (T08)
F009 (T09)
D04 Folder Name
F010 (T10)
F011 (T11)
F012 (T12)
4. USB Information and Notice
1) Playback FILE SYSTEM and Condition allowance:
- FAT, FAT12, FAT16 and FAT 32 in the file system.
- V1.1, V2.2 and V2.3 in the TAG (ID3) Version.
2) Display up to 32 characters in the LCD display.
3) No support any of MULTI-CAED Reader.
4) No High Speed playback but only playing with normal
full speed.
NOTE:
- DRM files in the USB may cause malfunction to playback
in the radio unit.
- The temperature below -10 Celsius, the Audio Unit with
USB hook up would be affected to play well.
9. To Make a Call by Cellular Phone
1) The Audio Unit activated automatically when you make a
call by Cellular Phone.
2) When you make a call by Cellular Phone, it shows
“CALLING” on the display.
3) When you receive a call, it shows “CALL FROM”, then the
phone number appear on the display.
10. Using the Audio Unit as Bluetooth Music
The Audio Unit supports A2DP (Audio Advanced Distribution
Profile) and AVRCP (Audio Video Remote Control Profile), and
both profiles are available to listen music at the Audio Unit via
cellular phone which is supporting the two profiles above.
1) To play Bluetooth music, press MODE button on the Audio
unit to change to BT MUSIC mode, it would begin to play the
music files in your Cellular Phone.
Note: For some Cellular Phones, you may need to open the
Music file in the phone before selecting the BT MUSIC
mode.
2. During BT MUSIC playing, you can select the previous or
next track by pressing Track UP/DOWN button on Audio
Unit or operate via your Cellular Phone.
3. To Pause music, press PLAY/PAUSE button briefly. To resume
music playing, press the Play button on your Cellular Phone or
PLAY button again.
NOTE:
- This function may be different depending on cellular phone.
Please follow the cellular phone menu. Some kinds of phones
need to pair once more for Bluetooth MUSIC connection.
- This function will cause to disconnect A2DP, AVRCP depending
on cellular phone.
- Information above songs (e.g: the elapsed playing time, song
title index, etc.) Cannot be displayed on this Audio Unit.
11. Bluetooth Microphone Operation & Gain Control
The unit offers a few microphone options for Bluetooth.
11-1. There is a Bluetooth mic integrated into the front panel of the
radio. This microphone is set at the factory as the default mic.
11-2. If a external mic is required, it must be selected via radio controls.
To select external mic option, push and hold Volume knob until
a beep is heard. Repeatedly press the VOL knob until radio panel
indicates “BT F-MIC” or “BT R-MIC”. Now rotate VOL knob
left or right until “BT R-MIC” is selected. Now press Volume
knob (select) again to return radio to normal play mode.
11-3. If front mic is preferred, repeat procedure 11-2 and select
“BT F-MIC”.
11-4. Also, the unit maybe configured to accept external low impedance
mics. Majority are high impedance. If external low impedance mic
is required repeat 11-2. Once “BT R-MIC” is selected press volume
knob (select) and then rotate left or right to select “BT-R-LOW”.
Press VOL knob one more time or after 5 second radio will return
back to normal play mode.
11-5. Radio also incorporates Bluetooth mic gain control.
Once a connection is established with another parties cell
phone. The Tuner knob may be used to control how loud the
audio is heard on the other persons cell phone.
12
Bluetooth Operation
Bluetooth Operation
5. Bluetooth Connection and Disconnection
1) When established Bluetooth connection between this unit and the
Cellular Phone, Bluetooth Icon on the display appears.
2) To disconnect Bluetooth Link
Press CALL END button for about 2s, it shows DISCONN and
disappears Bluetooth Icon on the display.
3) To connect Bluetooth Link
Simply press CALL button, it blinks Bluetooth Icon on the display
while Bluetooth is being connected. Once the connection is
completed, it appears Bluetooth Icon on the display.
NOTE:
- When your Cellular Phone battery is at low charge, the
Bluetooth connection may occasionally be lost. To keep
good connectivity ensure that your Phone battery is
adequately charged.
- In case of failure of Bluetooth pairing:
* Delete item in paired list on your cellular phone.
* Reset both phone by power off/on and the unit by ACC
off/on.
6. Using the Audio Unit as a Handsfree Device
1) When the Audio Unit is ringing, it appears “CALL FROM”
and then Phone Number on the display.
2) To accept call
To accept call, press CALL button, it appears “TALKING”
on the display.
3) To end call
To end call, press CALL END button, it appears “DROP
CALL” on the display.
11
4) To reject call
To reject call, press CALL END button when ringing, it
appears “REJECT CALL” on the display.
NOTE: If reject call is activated in your Audio unit, then your
cellular phone does not support Reject Call function.
7. Audio Transfer Between the Audio Unit and Phone
Simply press CALL button during conversation, it disappears
phone icon on the display and the calling being switched
from Audio unit to Cellular Phone. To switch back to the
Audio Unit, press CALL button again, it appears phone icon.
NOTE:
- This function will cause of a disconnection of Bluetooth
link in some Nokia phones, but you do not worry just press
CALL button during private conversation, then switch back
to the Audio Unit automatically.
- The quality of calling between Cellular Phone and Audio
Unit is better than calling between one Audio Unit and
another one.
8. Last Number Dialing
Simply press CALL button, it appears “REDIALING” and then
appears CALLING on the display. And automatically make the
last call.
NOTE: If you are using Samsung phone, then you may need
to press once more Send button. First press button
shows phone contact list in your phone, then second
press makes the last call.
5
6
19
1. Using a Bluetooth wireless connection
Your Unit supports Bluetooth wireless technology. You can set
up a wireless link with Bluetooth cellular phone.
2. Pairing Your Audio Unit and Bluetooth Phone
This Audio Unit supports Hand Free profile, Headset profile,
A2DP (Audio Advanced Distribution profile) and AVRCP
(Audio Video Remote Control profile).
3. Pairing in Hands Free modes
1) Press and Hold CALL button (5) for 2 seconds until you hear
beep sound, then PAIR STR appears and Bluetooth Icon blinks
on the display.
2) For the next procedure, go to “Cellular Phone Pair Mode”.
3) If it is in pairing status with Audio Unit and Cellular Phone,
PAIRING will show on the display.
4) If you want to exit pairing mode, press and hold CALL button
for 2 seconds while pairing, then it appears PAIR NG on the
display.
5) CONN OK appears on the display and Bluetooth Icon remains
steady when pairing is successful.
4. Cellular Phone Pairing mode
1) Browse your Cellular Phone menu to find the connectivity or
Bluetooth connection section.
2) Select “search for” a new Handsfree device function and allow
the phone to find the device.
3) CSS-5930BT should appear on your Cellular Phone screen.
4) Press connect menu among the Handsfree option on your
cellular phone.
5) The Cellular Phone should prompt for a pin code. Insert
pin code “0000”.
6) The Cellular Phone should confirm that it has established a new
paired connection.
7) Close the menu. The Pairing is now completed. CONN OK
appears on the display and Bluetooth Icon remains steady.
8) If the pairing failed, it appears PAIR NG on the display.
NOTE:
- Each cellular phone type has distinct phone menu, so you may need
to refer to your manufactures instruction for the correct procedure
on how to connect a new Bluetooth device.
- Please retry to the pairing instruction if CSS-5930BT not appear
on the cellular phone screen.
- Please select authorized, if there is authorized menu in the menu
of Bluetooth connection in your cellular phone.
- Once the Bluetooth pairing is completed between your cell phone
and the unit, the both units will be automatically recognized on its
pairing and when you turn on the key in your car even though this
unit is turned off.
- The connecting priority will be given to the last connected Cellular
Phone.
10