1
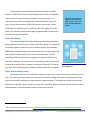
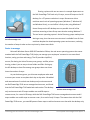
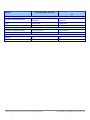
CHOOSING YOUR FIRST SERVER: THE DELL POWEREDGE T110 As your business grows, your computing needs grow as well. While your business has used desktop systems to perform certain server functions, investing in a real server, the Dell PowerEdge T110, will yield benefits now and support your business as it keeps growing. For only $177 more than a current-generation desktop, you can immediately reap the benefits of real server hardware and a real server operating system: better data protection, faster file sharing, easier management, and an easier path for growth. The Dell PowerEdge T110 eliminates the extra time and hassles surrounding your computer environment, letting you focus on your business. DECEMBER 2010 A PRINCIPLED TECHNOLOGIES TEST REPORT Commissioned by Dell Inc. To quantify the advantages of using a Dell PowerEdge T110 server rather than a desktop system functioning as a server, we conducted a number of tests in our labs. We configured the Dell PowerEdge T110 server with an Intel® Xeon® processor X3430 and Microsoft® Windows Server® 2008 R2 Foundation Edition, and compared it to an HP Compaq 6005 Pro Microtower PC desktop with an AMD Phenom™ II X3 B75 processor running Microsoft Windows® 7 Ultimate Edition. We based all test results on our comparison of these two systems as configured for a fictitious test company. The test company had a mix of client operating systems—Windows 7, Windows XP, and Windows Vista®—as a typical small business is likely to have. See Appendix A for the details of our system configurations and Appendix B for test results. In the sections below, we discuss the wide range of benefits you can expect to enjoy by investing in this entry-level server. Protection of data The Dell PowerEdge T110 server features a real server operating system—Microsoft Windows Server 2008 R2 Foundation Edition—with management features that allow you to better protect your data. Windows Server 2008 R2 Foundation Edition is only available by purchasing a real server that comes with it preconfigured. You cannot buy the operating system (OS) separately and simply install it on a desktop. Windows Server 2008 R2 Foundation Edition’s Active Directory security lets you manage all your users and user passwords in a single location, so you can easily control who has access to your data. When an employee leaves your company, you no longer need to worry about potential unwanted data access due to multiple copies of the same account residing on different systems in your office. With Active Directory, there is only one copy of any account. Because a real server uses a Redundant Array of Independent Disks (RAID) to make copies of your data automatically, you experience no immediate downtime in the event of a hard drive failure. To test this, we removed a hard drive from both the Dell The Dell PowerEdge T110 protects your data better with Active Directory Security, RAID technology, and a BMC alert system. Prevent unplanned downtime – With RAID technology you can recover the hard drive in around 6 minutes without losing productivity vs. at least an 1 hour of lost work without RAID. PowerEdge T110 server with two drives in RAID 1 and the HP Compaq 6005 Pro Microtower PC desktop with a single non-RAID drive, and measured the interruption such a failure would cause. The Dell server’s RAID Choosing your first server: The Dell PowerEdge T110 A Principled Technologies test report 2 prevented any unplanned downtime and it took only around 6 minutes to recover the hard drive at a later time, while the HP desktop’s single non-RAID drive created instant downtime when the hard drive failed. Without an extra drive available, you could be down for several hours or even days. At a minimum, there is at least 1 hour of lost work time while you replace the drive and copy the data from a backup source. There would also be permanent data loss for any new data since the most recent backup. Although RAID technology is no substitute for having an adequate backup solution, the Dell PowerEdge T110’s RAID technology eliminates downtime and lost productivity when a hard drive fails compared to a desktop without RAID. Another data protection feature of the Dell PowerEdge T110 server is the Baseboard Management Controller (BMC), which is a specialized service processor that monitors the physical state of the server. It alerts you if someone has tampered with your server. If someone tries to steal your data by opening your server system’s case and taking your hard drive, the server has an intrusion sensor that connects to the BMC. The BMC alerts you and you can take appropriate action should such a physical intrusion occur. A typical desktop system such as the HP Compaq 6005 Pro Microtower lacks this notification mechanism, leaving your data and hardware unmonitored and vulnerable to intruders. Design meant for continuous operation As the central repository for all your business data, your server needs to run morning, noon, and night. Using a real server is optimal for this kind of deployment. The Dell PowerEdge T110 features Error Correction Code (ECC) memory, which detects and autocorrects errors introduced during the storage or transmission of data. Because servers operate 24 hours a day, the likelihood of errors happening is high, and memory errors can lead to loss of data or to computer crashes. Memory in desktops, such as the HP system we tested, offer no such feature, and lack of ECC memory is likely to create problems for your data and your business. Intel® Xeon® server processors tuned for maximum server performance The Dell PowerEdge T110 features a real server processor—the Intel Xeon processor X3400 series— tuned for maximum performance for server related tasks. This quad-core Intel Xeon processor comes with Intel’s Turbo Boost Technology, which allows the processor to deliver bursts of extra performance when you need it most. Choosing your first server: The Dell PowerEdge T110 A Principled Technologies test report 3 Typical desktop system processors such as the triple-core AMD Phenom II X3 B75 that comes in the HP desktop do not offer this capability. The Intel Xeon Processor X3430 has a performance edge of more than 50% over the AMD Phenom II X3 B75. To get an idea of the performance capabilities of the processors, we researched online and found published CPU Mark PassMark® scores for each. An Intel Xeon processor X3430, like the one in our server, scored 3,638 while the AMD Phenom™ II X3 B75 scored 2,410; higher scores are better. This indicates a performance edge of approximately 51 percent for the Intel Xeon processor X3430.1 Faster file sharing The Dell PowerEdge T110 helps decrease potential frustration and boost productivity by letting your workers share files quickly. To compare its file sharing capability with that of the HP desktop system, we created an 80GB folder filled with sample office files and stored it on each system, and then shared the folder with all of the users in our test setup. The Dell PowerEdge T110 shared the files in roughly three-quarters of the time it took the HP desktop. The transfer took 1 minute 45 seconds, compared to 2 minutes 18 seconds on the HP system, a savings of 33 seconds. This means less office time wasted waiting for relatively simple operations to complete. Share files 24% faster with the Dell PowerEdge T110. Easier printer sharing setup Setting up printers for each individual computer or user can be a hassle that creates unnecessary time costs. The server operating system that comes with the Dell PowerEdge T110 makes setting up and sharing printers with specific employees or departments a simple procedure. To compare the printer sharing setup experience on the two systems under test, we set up a simulation where we shared a printer with the users in one department, and recorded the number of steps each one took. 1 Data referenced on December 20, 2010 from http://www.cpubenchmark.net/cpu_lookup.php?cpu=AMD+Phenom+II+X3+B75. Choosing your first server: The Dell PowerEdge T110 A Principled Technologies test report 4 Sharing a printer with our test users in a sample department on the Dell PowerEdge T110 took only 11 steps, versus 26 steps on the HP desktop, for a 57 percent reduction in steps. Because our client machines used a mix of operating systems (Windows 7, Windows XP, and Windows Vista), as a real office is likely to do, using Windows 7 Home Groups on the HP desktop was not possible since all of the machines accessing a Home Group must also be running Windows 7. The real server operating system’s Active Directory groups make printer Share printers in 57% fewer steps with the Dell PowerEdge T110. sharing a snap, since the same user structure is available from all client machines despite the mixed operating system environment, reducing the number of steps it takes to share a printer by almost two-thirds. Easier to manage Microsoft Windows Server 2008 R2 Foundation Edition, the real server operating system that comes standard with the Dell PowerEdge T110, helps you manage your employees’ accounts in one centralized location, saving you time and energy. The OS provides simplified, secure, file sharing via Active Directory user groups, and like printer sharing, makes it just as easy to share folders and files. Setting up the HP desktop to share files among user groups takes over three times the number of steps. As your business grows, you hire new employees who need to access your server to complete their day-to-day tasks. We added and removed users from both our desktop-only environment and our Dell PowerEdge T110 server-managed environment, and found that the Dell PowerEdge T110 made both tasks easier. The desktoponly environment took 32 steps to add a user and 28 steps to Add and remove users in 83% fewer steps with the Dell PowerEdge T110. remove a user, for a total of 60 steps, while the Dell PowerEdge T110 server-managed environment took 6 steps to add a user and 4 steps to remove a user, for a total of only 10 steps. That means that with the Dell PowerEdge T110 server, you need 83 percent fewer steps to add and remove user than with the desktop-only Choosing your first server: The Dell PowerEdge T110 A Principled Technologies test report 5 environment. With the management capabilities available with the Dell PowerEdge T110, you will spend less time managing your server and more time managing your business. Furthermore, with the Dell PowerEdge T110 as your server, employees have the flexibility of logging into their accounts from any system in the office while retaining the same access to their data. The desktop operating systems available for the HP system force you to create a new user account for each employee at each system they need access to in your office, and their work is available on only the machines to which they have they saved it. Easier path for future growth The Dell PowerEdge T110 sets you up for easier transitions in the future as your business grows. To test the expansion capabilities of the Dell PowerEdge T110 server and the HP desktop, we configured each with the largest available drive upgrade on each website’s configurator. Then, we used our sample office files to fill the added storage and compared the actual file capacity of each. The Dell PowerEdge T110 with the largest available RAID 1 drive upgrade offers 1TB of additional storage. The HP desktop’s largest available upgrade The Dell PowerEdge T110 has twice the expansion capacity and sets you up for easier growth transitions in the future. offers only up to 500GB of additional storage in a single non-RAID drive. In terms of files, that is over 750,000 more office files that the Dell PowerEdge T110 server can store. Furthermore, by purchasing a real server with Windows Server 2008 R2 Foundation, you are investing in an easier future transition as your business continues to grow. Upgrading to Windows Server 2008 R2 Standard Edition, an operating system edition that offers added capacity for a higher number of employees, can be as simple as a few clicks of a mouse. On the other hand, upgrading from Windows 7 to Windows Server 2008 R2 Standard Edition requires a complicated migration process. In our testing, we successfully upgraded the Dell PowerEdge T110 with Windows Server 2008 R2 Foundation Edition to Windows Server 2008 R2 Standard Edition in eight steps. This easy upgrade feature in the Windows Server 2008 R2 family is unavailable in Windows 7, and thus requires installing the operating system, reinstalling all of your programs, and then manually transferring all your data. Choosing your first server: The Dell PowerEdge T110 A Principled Technologies test report 6 Remote Access With the Windows Server 2008 R2 Foundation Edition OS that comes with the Dell PowerEdge T110, you and your employees will have the option of accessing your data even when you are not at the office. The Dell PowerEdge T110 offers added functionality in that you can configure the system as a router for your network using the Routing and Remote Access Service (RRAS). The Dell PowerEdge T110 configured with Windows Server 2008 R2 Foundation Edition allows 50 remote desktop sessions, far exceeding the single session allowed in Windows 7. This means that all your employees can separately log into a The Dell PowerEdge T110 configured with Windows Server 2008 R2 Foundation Edition allows 50 remote desktop sessions, far exceeding the single session allowed in Windows 7. remote desktop session and have access to data installed on the Dell PowerEdge T110 server from wherever they are, whether they are in the office, working from home, or on a business trip using a VPN connection. Pricing Considering the many ways the Dell PowerEdge T110 server will benefit your business, you’d likely expect it to cost much more than a desktop such as the HP system we tested. After all, your likely motivation for using a desktop to perform the function of a server, instead of buying a real server, would be to save money. In fact, the Dell PowerEdge T110 costs only $177 dollars more, according to the Dell and HP Web sites. On December 9, 2010, the Dell Web site listed the price of the Dell PowerEdge T110 at $1,2362, and the HP Web site listed the price of the HP Compaq 6005 Pro Microtower at $1,0593. For less than $200 more, your business can reap the many benefits of having a real server today and can be prepared for future expansion as your business grows. The time savings alone would quickly cover the addition dollars. HOW WE TESTED Here, we provide the necessary steps to replicate our testing. Preparing the Dell PowerEdge T110 Creating the RAID group 1. Power the server. 2 Source: http://configure.us.dell.com/dellstore/config.aspx?oc=beswlfs1&c=us&l=en&s=bsd&cs=04&model_id=poweredge-t110 Source:http://h71016.www7.hp.com/dstore/MiddleFrame.asp?page=config&ProductLineId=429&FamilyId=3095&BaseId=31409&o i=E9CED&BEID=19701&SBLID=&jumpid=re_R2515_store/smProdCat/PSG/Desktops/HP_6005_Pro_MT_CFG9 3 Choosing your first server: The Dell PowerEdge T110 A Principled Technologies test report 7 2. When prompted, press CTRL+R to enter the RAID BIOS. 3. Select Create Virtual Disk and press Enter. 4. Select the first drive and press Insert. 5. Select the second drive and press Insert. 6. Press Enter. 7. Select RAID 1 and press Enter. 8. Press Enter to confirm the default virtual drive size. 9. Press Enter to select the default caching policy. 10. Press C to confirm the virtual disk creation. 11. Select Continue to Boot and press Enter. Installing Windows Server 2008 R2 Foundation Edition on the Dell PowerEdge T110 server 1. Boot the server, and insert the Windows Server 2008 R2 installation DVD in the DVD-ROM drive. 2. At the Language Selection Screen, click Next. 3. Click Install Now. 4. Select Windows Server 2008 R2 Foundation (Full Installation), and click Next. Installing Active Directory Domain Services 1. Click on the Server Manager shortcut key on the taskbar. 2. In the right pane, click Add Roles in the Roles Summary section. 3. At the Before You Begin screen, click Next. 4. At the Select Server Roles screen, click Active Directory Domain Services. 5. When the Add Roles Wizard window pops up, click Add Required Features. 6. Click Next. 7. At the Introduction to Active Directory Domain Services screen, click Next. 8. At the Confirm Installation Selections screen, click Install. 9. At the Installation Results screen, click Close. 10. Click Start, type cmd and press Enter. 11. In the command window, type dcpromo.exe and press enter. 12. At the welcome window, click Next. 13. At the Operating System Compatibility window, click Next. 14. Select Create a new domain in a new forest and click Next. 15. At the Name the Forest Root Domain window, type the appropriate domain name (for our testing we chose test1.local) and click Next. 16. At the Set the Forest Functional Level window, accept the default of Windows Server 2003 and click Next. 17. At the Set the Domain Functional Level window, accept the default of Windows Server 2003 and click Next. 18. At the Additional Domain Control Options window, accept the defaults and click Next. 19. If you receive a pop-up warning at this stage, click Yes to continue. 20. At the Location for Database, Log files, and SYSVOL, accept the defaults and click Next. 21. At the Directory Services Restore Mode Administrator Password window, enter and confirm a password in the corresponding fields and click Next. 22. At the Summary window, click Next. Choosing your first server: The Dell PowerEdge T110 A Principled Technologies test report 8 23. When the Active Directory Domain Services wizard completes the installation, click Finish. 24. Click Restart Now when prompted. Creating a user 1. Click StartAdministrative ToolsActive Directory Users and Computers. 2. Expand your domain in the left pane and click Users. 3. In the right pane, right-click and click NewUser. 4. In the New Object – User window, enter the name of the user and a logon name and click Next. 5. Enter an appropriate password twice, check any password-related options as needed, and click Next. (For our testing, we unchecked User must change password at next logon and checked Password never expires.) 6. At the summary screen, click Finish. Creating a user group 1. Click StartAdministrative ToolsActive Directory Users and Computers. 2. Expand your domain in the left pane and click Users. 3. In the right pane, click New – Group. 4. In the New Object – Group window, enter a Group name, select the Global radio button for Group scope, select the Security radio button for Group type, and click OK. Adding a user to a group 1. Click StartAdministrative ToolsActive Directory Users and Computers. 2. Expand your domain in the left pane and click Users. 3. Right click on the user you wish to add to the group, and click Add to a group… 4. Enter the name of the group you wish to add the user to under Enter the object names to select, and click Check Names. If multiple matches are found, select the appropriate match and click OK. 5. Click OK. 6. When a pop-up window confirms a successful operation, click OK. Preparing the HP Compaq 6005 Pro Microtower PC Installing Windows 7 1. When prompted, press any key to boot from CD or DVD. 2. At the language and preference screen, accept the default options, and click Next. 3. Click Install now. 4. At the Please read the license terms screen, check the I accept the license terms checkbox, and click Next. 5. At the Which type of installation do you want? screen, select Custom (advanced). 6. Click Drive options (advanced). 7. Select the destination disk for the operating system, and click Format. 8. In the Install Windows dialog box, click OK. 9. Once the system finishes formatting the disk, click Next. 10. At the Set Up Windows screen, enter a user name and computer name, and click Next. 11. At the Set a password for your account screen, leave the default of no password, and click Next. 12. Do not enter a Product key. Uncheck Automatically activate Windows when I’m online, and click Next. Choosing your first server: The Dell PowerEdge T110 A Principled Technologies test report 9 13. At the Help protect Windows automatically screen, click Ask me later. 14. At the Review your time and date settings screen, choose Eastern Time (US & Canada) from the dropdown menu, set the clock to the correct time, and click Next. Replacing a failed drive on the Dell PowerEdge T110 with RAID 1 Timing methodology 1. Shut down the server. 2. Unplug the power cable from the system. 3. Pull the latch in the back of the Dell PowerEdge T110 to open the side panel. 4. Remove the power connection to the drive you wish the system to determine as failed. 5. Boot the server. 6. Log into Windows and observe for the “failed disk” warning. 7. Complete steps 1 through 18 in the next section, beginning timing when you click Shut down. 8. Stop timing when the Press CTRL+ALT+DELETE to log on screen appears. 9. Repeat steps 1 through 8 in this section twice more, for a total of three times. Steps 1. 2. 3. 4. 5. 6. Shut down the server. Unplug the power cable from the system. Pull the latch in the back of the Dell PowerEdge to open the side panel. Unplug the connections to the failed drive. Remove the plastic hard drive carrier from the slot. Remove the failed drive from the plastic hard drive carrier and insert the replacement drive into the carrier. 7. Replace the plastic carrier into the slot. 8. Plug in the SATA connections. 9. Replace the side panel. 10. Replace the power cable. 11. Power the server. 12. When prompted, press CTRL+R to enter the RAID BIOS. 13. Select Manage global hot spare, and press Enter. 14. Select Assign global hot spare, and press Enter. 15. Select the replacement drive, and press Insert. 16. Press Enter. 17. Press C to confirm. 18. Select Continue to boot, press Enter. Replacing a failed drive on the HP Compaq 6005 Pro Microtower PC desktop with a single non-RAID drive Creating a backup in Windows 7 1. Plug in the USB external drive that you will be using for your backup. 2. Click StartControl Panel. 3. Click System and Security. 4. Click Backup and Restore. Choosing your first server: The Dell PowerEdge T110 A Principled Technologies test report 10 5. 6. 7. 8. Click Set up backup. Select the USB external drive, and click Next. At the What do you want to back up? screen, leave the default selection, and click Next. At the Review your backup settings, click Save settings, run the backup, and wait for the backup operation to complete in the Back up or restore your files screen. 9. In the right pane, click Create a system repair disk. 10. Insert a blank disk into the CD/DVD writeable drive, and click Create disk. 11. At the Using the system repair disk window, click Close. 12. Click OK to close the Create a system repair disk window when the disk is complete. Timing a restore 1. Shut down the system. 2. Unplug the power cable from the system. 3. Remove the screws and open the side panel. 4. Unplug the connections from the drive. 5. Remove the drive and perform a quick format of the drive using another system. 6. Replace the formatted drive into the desktop. 7. Replace the connections to the drive. 8. Replace the side panel and screws. 9. Replace the power cable . 10. Complete steps 1 through 23 in the next section, beginning timing when you unplug the power connection. 11. Stop timing when the Windows 7 user log in screen appears. 12. Repeat steps 1 through 11 in this section twice more, for a total of three times. Replacing a failed desktop drive test 1. Unplug the power cable from the system. 2. Remove the screws and open the side panel. 3. Unplug the SATA cables from the drive. 4. Pull gently on the green latch and remove the drive from the bay. 5. Remove the four anchoring screws on either side of the drive. 6. Attach the anchoring screws onto the replacement drive. 7. Place the drive in the bay until you hear two clicks total. 8. Attach the SATA cables. 9. Replace the side panel and screws. 10. Replace the power cable. 11. Attach the USB external drive where the system restore is located. 12. Power the system. 13. If prompted, press the F1 key to save any hardware changes to the BIOS. 14. Press the F9 key to initiate the one-time boot option. 15. Insert the Windows 7 repair disk into the CD/DVD drive. 16. Select CD-ROM and press Enter. If prompted, press any key to boot from the CD-ROM. 17. At the System Recovery Options screen, leave the default keyboard input selection and click Next. Choosing your first server: The Dell PowerEdge T110 A Principled Technologies test report 11 18. Select the Restore your computer using a system image that you created earlier radio button, and click Next. The utility will then scan for any existing images on attached media. 19. At the Select a system image backup screen, select the Use the latest available system image (recommended), and click Next. 20. At the Choose additional restore options screen, click Next. 21. At the Re-image your computer screen, click Finish. 22. When a pop-up message appears asking if you want to continue, click Yes. 23. When prompted to restart, click Restart Now. Sharing a Folder in Windows Server 2008 R2 Foundation Edition 1. Right-click on the folder, select Share with, and click Specific people… 2. Type the name of the user, in this case Everyone and click Add. 3. Click on the drop-down menu under Permission level by the user name you added, and click the appropriate permission level you wish to grant that user, in this case Read/Write. 4. Click Share. 5. When the window pops up notifying you that the folder is shared, click Done to close the window. To time, begin when you right-click and end when the Your folder is shared window appears. Sharing a Folder in Windows 7 1. Right-click on the folder, select Share with, and click Specific people… 2. Type the name of the user, in this case Everyone and click Add. 3. Click on the drop-down menu under Permission level by the user name you added, and click the appropriate permission level you wish to grant that user, in this case Read/Write. 4. Click Share. 5. When the window pops up notifying you that the folder is shared, click Done to close the window. To time, begin when you right-click and end when the Your folder is shared window appears. Sharing a printer in a Dell PowerEdge T110 server-based environment For our testing purposes, we performed these steps on a Windows Vista client in the domain controlled by the Dell PowerEdge T110 running Windows Server 2008 R2 Foundation Edition. 1. Click StartControl Panel. 2. Click Hardware and Sound. 3. Click Printers. 4. Right-click on the printer you wish to share, and select Sharing… 5. Under the Sharing tab, click Change Sharing Options. 6. Enter an appropriate administrator username and password. 7. Check the Share this printer checkbox, enter a name for the Share name. 8. Click the Security tab. 9. Under group or user names, click Add. 10. Under Enter the object names to select, enter the name of the group you wish to share the printer with, click Check Names, and click OK. 11. Click OK to close the properties window. Choosing your first server: The Dell PowerEdge T110 A Principled Technologies test report 12 Sharing a printer in an HP Compaq 6005 Pro Microtower PC desktop-based environment For our testing purposes, we performed these steps on a Windows Vista client and shared the printer with the other desktop clients in the network to replicate the same functionality as a shared printer in a server-managed domain environment. Creating a Local User 1. Click Start, right-click Computer, and click Manage. 2. If a User Account Control warning appears, click Continue. 3. In the left pane, expand Local Users and Groups and click Users. 4. In the right pane, right-click and click New User… 5. In the new user window, enter a User name and Password and click Create. 6. When you are finished adding new users, click Close. Creating a Local Group 1. In the left pane under Local Users and Groups, click Groups. 2. In the middle pane, right-click and click New Group… 3. In the New Group window, enter a Group name. 4. Under Members, click Add… 5. In the Select Users window, enter the names of the users you wish to add to the group, separating each name with a semicolon. 6. Click Check Names. 7. Click OK. 8. Click Create. 9. Click Close. Sharing the printer 1. Click StartControl Panel. 2. Click Hardware and Sound. 3. Click Printers. 4. Right-click on the printer you wish to share, and select Sharing… 5. Under the Sharing tab, click Change Sharing Options. 6. Enter an appropriate administrator username and password. 7. Check the Share this printer checkbox, enter a name for the Share name. 8. Click the Security tab. 9. Under group or user names, click Add. 10. Under Enter the object names to select, enter the name of the group you wish to share the printer with, click Check Names, and click OK. 11. Click OK to close the properties window. Sharing a folder with a user group in a Dell PowerEdge T110 server-based environment 1. Click StartComputer 2. Double-click on Local Disk (C:). 3. Right-click the file you want to share, click Share with, and click Specific people… Choosing your first server: The Dell PowerEdge T110 A Principled Technologies test report 13 4. From the drop down menu, type the name of the group you wish to share the file with and click Add. 5. Click Share. 6. Click Done. Sharing a folder with a user group in an HP Compaq 6005 Pro Microtower PC desktop-based environment Creating a Local User 1. Click Start, right-click Computer, and click Manage. 2. If a User Account Control warning appears, click Continue. 3. In the left pane, expand Local Users and Groups and click Users. 4. In the right pane, right-click and click New User… 5. In the new user window, enter a User name and Password and click Create. 6. Repeat steps 4 and 5 for any additional users. 7. When you are finished adding new users, click Close. Creating a Local Group 1. In the left pane under Local Users and Groups, click Groups. 2. In the middle pane, right-click and click New Group… 3. In the New Group window, enter a Group name. 4. Under Members, click Add… 5. In the Select Users window, enter the names of the users you wish to add to the group, separating each name with a semicolon. 6. Click Check Names. 7. Click OK. 8. Click Create. 9. Click Close. Sharing a folder 1. Click StartComputer 2. Double-click on Local Disk (C:). 3. Right-click the file you want to share , click Share with, and click Specific people… 4. From the drop down menu, type the name of the local group you wish to share the file with and click Add. 5. Click Share. 6. Click Done. Adding a new user in a Dell PowerEdge T110 server-based environment 1. 2. 3. 4. Click StartAdministrative ToolsActive Directory Users and Computers. Expand your domain in the left pane and click Users. In the right pane, right-click and click NewUser. In the New Object – User window, enter the name of the user and a logon name and click Next. Choosing your first server: The Dell PowerEdge T110 A Principled Technologies test report 14 5. Enter an appropriate password twice, check any password-related options as needed, and click Next. For our testing, we unchecked User must change password at next logon and checked Password never expires. 6. At the summary screen, click Finish. Removing a user in a Dell PowerEdge T110 server-based environment 1. 2. 3. 4. Click StartAdministrative ToolsActive Directory Users and Computers. Expand your domain in the left pane and click Users. In the right pane, right-click the user you want to remove and click Delete. When asked Are you sure, Click Yes. Adding a new user in an HP Compaq 6005 Pro Microtower PC desktop-based environment Windows 7 1. Click Start, Control Panel 2. In Control Panel, click User Accounts and Family Safety. 3. Under User Accounts, click Add or remove user accounts. 4. On the following screen, click Create a new account. 5. Type in a name for the user account, select the Standard user radio button below the name, and click Create account. 6. Click on the newly created account. 7. Click Create a password. 8. Enter the password twice and click Create Password. Windows Vista 1. Click Start, Control Panel. 2. In Control Panel, click User Accounts and Family Safety. 3. In User Accounts, click Add or remove user accounts. If user account control displays a pop-up notification, click Continue. 4. On the following screen, click Create a new account. 5. Type in a name for the user account, select the Standard user radio button below the name, and click Create Account. 6. Click the newly created account. 7. Click Create a password. 8. Enter the password twice and click Create Password. Windows XP 1. Click Start, Control Panel. 2. In the Control Panel window, click on User Accounts. 3. On the following screen, click Create new account. 4. Type in a name for the new account, and click Next. 5. On the following screen, select the Limited radio button and click Create Account. 6. Click on the new user’s account. 7. On the following screen, click Create a password. 8. Enter the password twice and click Create Password. Choosing your first server: The Dell PowerEdge T110 A Principled Technologies test report 15 Removing a new user in an HP Compaq 6005 Pro Microtower PC desktop-based environment Windows 7 1. Click Start, Control Panel, User Accounts and Family Safety. 2. Under User Accounts, click Add or remove user accounts. 3. You will be advised Windows needs permission to continue. Click Continue. 4. On the following screen, click the user you want to remove. 5. Click Delete the account. 6. Click Delete Files. 7. Click Delete Account. Windows Vista 1. Click Start, Control Panel, User Accounts and Family Safety. 2. Click Add or remove user accounts. 3. You will be advised that Windows needs permission to continue. Click Continue. 4. On the following screen, click the user you want to remove. 5. Click Delete the account. 6. Click Delete Files. 7. Click Delete Account. Windows XP 1. Click Start, Control Panel. 2. In the Control Panel window, double-click on User Accounts. 3. On the following screen, click Change an Account. 4. Click the account you want to change. 5. On the following screen, click Delete the account. 6. Click Delete Files. 7. Click Delete Account. Adding an extra set of RAID-1 drives to the Dell PowerEdge T110 1. 2. 3. 4. Shut down the server. Unplug the power cable from the system. Pull the latch in the back of the Dell PowerEdge to open the side panel. Remove the two plastic hard drive carriers out of the two additional bays and insert the two 1TB drives into the carriers. 5. Replace the plastic carriers into their corresponding drive bays. 6. Plug in the SATA connections to each drive. 7. Replace the side panel. 8. Replace the power cable. 9. Power the server. 10. When prompted, press CTRL+R to enter the RAID BIOS. 11. Select Create Virtual Disk and press Enter. 12. Select the first 1TB drive and press Insert. 13. Select the second 1TB drive and press Insert. Choosing your first server: The Dell PowerEdge T110 A Principled Technologies test report 16 14. Press Enter. 15. Select RAID 1 and press Enter. 16. Press Enter to confirm the default virtual drive size. 17. Press Enter to select the default caching policy. 18. Press C to confirm the virtual disk creation. 19. Select Continue to Boot and press Enter. 20. At the Windows login screen, press CTRL+ALT+DELETE and log in. 21. Click the Server Manager icon in the taskbar. 22. In the left pane, expand Storage and click Disk Management. 23. When the Initialize Disk dialogue pops up, accept the default selection and click OK. 24. In the right pane, right-click over the unallocated space corresponding to the new virtual drive and select New Simple Volume… 25. At the welcome window, click Next. 26. At the Specify Volume Size window, leave the default selection and click Next. 27. At the Assign Drive Letter or Path window, leave the default selection and click Next. 28. At the Format Partition window, leave the default selection and click Next. 29. At the Completing the New Simple Volume Wizard window, click Finish. Adding an extra drive to the HP Desktop 1. Shut down the system. 2. Unplug the power cable. 3. Remove the screws and open the side panel. 4. Remove the four anchoring screws on the side of the drive carrier. 5. Attach the anchoring screws onto the new drive. 6. Place the drive in the bay until you hear two clicks total. 7. Attach the SATA cables. 8. Replace the side panel and screws. 9. Power the system. 10. If prompted, press the F1 key to save any hardware changes to the BIOS. 11. Log into the Windows administrator account. 12. Click Start, right-click on Computer, and click Manage. 13. When the Computer Management window opens, expand Storage in the left pane and click Disk Management. If prompted, click OK to initialize the disk using the default settings. 14. In the right pane, right-click over the unallocated space corresponding to the new drive and select New Simple Volume… 15. At the welcome window, click Next. 16. At the Specify Volume Size window, leave the default selection and click Next. 17. At the Assign Drive Letter or Path window, leave the default selection and click Next. 18. At the Format Partition window, leave the default selection and click Next. 19. At the Completing the New Simple Volume Wizard window, click Finish. Choosing your first server: The Dell PowerEdge T110 A Principled Technologies test report 17 Upgrading from Windows Server 2008 R2 Foundation Edition to Windows Server 2008 R2 Standard Edition on the Dell PowerEdge T110 server 1. 2. 3. 4. 5. 6. 7. 8. Insert the Windows Server 2008 R2 Standard DVD into the system’s DVD drive. When the Autoplay window appears, click run setup.exe. At the welcome screen, click Install Now. At the Get important updates for installation screen, click Go online to get the latest updates for installation (recommended). At the Select the operating system you want to install, select Windows Server 2008 R2 Standard (Full Installation) and click Next. At the Please read the license terms screen, check the I accept the license terms checkbox and click Next. At the Which type of installation do you want? screen, click Upgrade. At the Compatibility Report (saved to desktop) screen, click Next. Choosing your first server: The Dell PowerEdge T110 A Principled Technologies test report 18 APPENDIX A – SERVER CONFIGURATION INFORMATION Figure 1 provides detailed configuration information about the test servers. System Power supplies Total number Vendor and model number Wattage of each (W) Cooling fans Total number Vendor and model number Dimensions (h x w) of each Volts Amps General Number of processor packages Number of cores per processor Number of hardware threads per core System power management policy Processor Vendor Name Model number Stepping Socket type Core frequency (GHz) Bus frequency L1 cache L2 cache L3 cache (MB) Platform Vendor and model number Motherboard model number Motherboard chipset Dell PowerEdge T110 server HP Compaq 6005 Pro Microtower PC 1 Dell L305P-01 305 1 HP PS-4321-9HP 320 1 Delta Electronics EFC0912BF 3-5/8” x 3-5/8” 12 0.6 1 Foxconn PVA092G12H-P03-AE 2-3/4” x 2-3/4” 12 0.4 1 4 1 3 1 1 Balanced Balanced Intel Xeon X3430 B1 1156 LGA 2.40 2.5 GT/s 32 KB + 32 KB (per core) 1 MB 8 AMD Phenom II X3 B75 RB-C2 Socket AM3 (938) 3.00 HT Link 2000 64 KB + 64 KB (per core) 1.5 MB 6 Dell PowerEdge T110 Dell Inc. 0X744K Intel 3420 HP Compaq 6005 Pro Microtower 3047h AMD 785GX Hewlett Packard 786G6 v01.11 (08/04/2010) Default BIOS name and version Dell Inc. 1.4.1 (07/19/2010) BIOS settings Default Choosing your first server: The Dell PowerEdge T110 A Principled Technologies test report 19 System Memory module(s) Total RAM in system (GB) Vendor and model number Type Speed (MHz) Speed running in the system (MHz) Timing/Latency (tCL-tRCD-tRPtRASmin) Size (GB) Number of RAM module(s) Chip organization Rank Hard disk Vendor and model number Number of disks in system Size (GB) Buffer size (MB) RPM Type Disk controller Dell PowerEdge T110 server 8 Hynix HMT351U7BFR8C-H9 PC3-10600E 1,333 1,333 4 Hyundai HMT125U7BFR8C-H9 PC3-10600E 1,333 1,333 9-9-9-24 9-9-9-24 4 2 x 4GB Double-sided Dual 2 2 x 2GB Double-sided Dual Dell WD1602ABKS 2 160 8 7,200 SATA Seagate ST3160815AS 1 160 8 7,200 SATA Vendor and model Dell PERC S100 Controller cache N/A Controller driver Dell Inc. 1.0.1.21 (10/20/2009) Controller firmware RAID configuration Operating system 1.01-0021 RAID 1 Name Build number Service pack File system Kernel Language Graphics Vendor and model number Driver HP Compaq 6005 Pro Microtower PC Windows Server 2008 R2 Foundation 7600 N/A NTFS ACPI x64-based PC English Matrox® G200eW Matrox Graphics Inc. 1.1.3.0 (07/27/2009) Choosing your first server: The Dell PowerEdge T110 ATI Technologies SB700 SATA Controller N/A Microsoft 6.1.7600.16385 (06/21/2006) N/A N/A Windows 7 Ultimate 7600 N/A NTFS ACPI-x86 based PC English ATI Radeon HD 4200 ATI 8.730.0.0 (04/12/2010) A Principled Technologies test report 20 System HP Compaq 6005 Pro Microtower PC Dell PowerEdge T110 server Ethernet Vendor and model number Type Driver Optical drive(s) Vendor and model number Type USB ports Number Type Broadcom® NetXtreme® Gigabit Ethernet Integrated Broadcom 12.4.0.2 (10/11/2009) Broadcom NetXtreme Gigabit Ethernet Integrated Broadcom 14.2.0.5 (05/21/2010) PLDS DH-16D5S DVD-ROM HP TS-H653R DVDRW 6 2.0 10 2.0 Figure 1: Detailed configuration information for the systems we tested. Choosing your first server: The Dell PowerEdge T110 A Principled Technologies test report 21 APPENDIX B – DETAILED TEST RESULTS Below, we present the detailed test results for all tests we performed on the Dell PowerEdge T110 server and the HP Compaq 6005 Pro Microtower PC. Figure 2 shows the results of our three test runs, in minutes: seconds: milliseconds, to determine required downtime to replace a failed drive in each system. Downtime to replace a failed drive, timed runs Run 1 Run 2 Run 3 Median run Dell PowerEdge T110 server 6:32.3 6:36.4 6:22.9 6:32.3 HP Compaq 6005 Pro Microtower PC 59:14.9 61:54.0 59:56.6 59:56.6 Figure 2: Three timed runs, in minutes: seconds: milliseconds, for replacing a failed drive in each system. Lower numbers are better. Figure 3 shows the results for our three test runs, in minutes: seconds: milliseconds, for sharing an 80GB folder for each system. Sharing a folder timed runs Run 1 Run 2 Run 3 Median run Dell PowerEdge T110 server 1:45.5 1:45.3 1:40.8 1:45.3 HP Compaq 6005 Pro Microtower PC 2:16.9 2:18.0 2:19.7 2:18.0 Figure 3: Three timed runs for sharing a folder, in minutes:seconds: milliseconds, for each system. Lower numbers are better. Figure 4 shows the number of steps it took to add and remove a user in each system. Adding and removing users Number of steps for adding a user Number of steps for removing a user Total number of steps Dell PowerEdge T110 server HP Compaq 6005 Pro Microtower PC 6 32 4 28 10 60 Figure 4: Number of steps to add or remove a user on the Dell PowerEdge T110 server-based environment and an HP Compaq 6005 Pro Microtower PC desktop-based environment. Lower numbers are better. Choosing your first server: The Dell PowerEdge T110 A Principled Technologies test report 22 Figure 5 shows the number of steps to share a printer with a user group for each system. Sharing a printer with a user group Number of steps Dell PowerEdge T110 server 11 HP Compaq 6005 Pro Microtower PC 26 Figure 5: Number of steps to set up printer sharing on the Dell PowerEdge T110 server-based environment and the HP Compaq 6005 Pro Microtower PC desktop-based environment. Lower numbers are better. Figure 6 shows the number of steps to share a folder with a user group in each system. Sharing a folder with a user group Number of steps Dell PowerEdge T110 server 6 HP Compaq 6005 Pro Microtower PC 22 Figure 6: Number of steps to share a folder on the Dell PowerEdge T110 server-based environment and the HP Compaq 6005 Pro Microtower PC desktop-based environment. Lower numbers are better. Figure 7 shows the maximum file capacity for the largest drive upgrade available on each system. Drive upgrade file capacity Maximum number of files in each drive Dell PowerEdge T110 server HP Compaq 6005 Pro Microtower PC 1,503,771 752,298 Figure 7: Number of files that each system’s maximum drive upgrade can hold. Higher numbers are better. Files are on average 662KB in size. Higher numbers are better. Figure 8 shows the ease of upgrading to Windows Server 2008 Standard Edition in availability and number of steps. Upgrading to Windows Server 2008 R2 Standard Number of steps Dell PowerEdge T110 server 8 HP Compaq 6005 Pro Microtower PC Not supported Figure 8: Number of steps to upgrade to Windows Server 2008 R2 Standard Edition from the Dell PowerEdge T110 server running Windows Server 2008 R2 Foundation Edition and the HP Compaq 6005 Pro Microtower PC desktop running Windows 7. Choosing your first server: The Dell PowerEdge T110 A Principled Technologies test report 23 ABOUT PRINCIPLED TECHNOLOGIES We provide industry-leading technology assessment and fact-based marketing services. We bring to every assignment extensive experience with and expertise in all aspects of technology testing and analysis, from researching new technologies, to developing new methodologies, to testing with existing and new tools. Principled Technologies, Inc. 1007 Slater Road, Suite 300 Durham, NC, 27703 www.principledtechnologies.com When the assessment is complete, we know how to present the results to a broad range of target audiences. We provide our clients with the materials they need, from market-focused data to use in their own collateral to custom sales aids, such as test reports, performance assessments, and white papers. Every document reflects the results of our trusted independent analysis. We provide customized services that focus on our clients’ individual requirements. Whether the technology involves hardware, software, Web sites, or services, we offer the experience, expertise, and tools to help our clients assess how it will fare against its competition, its performance, its market readiness, and its quality and reliability. Our founders, Mark L. Van Name and Bill Catchings, have worked together in technology assessment for over 20 years. As journalists, they published over a thousand articles on a wide array of technology subjects. They created and led the Ziff-Davis Benchmark Operation, which developed such industry-standard benchmarks as Ziff Davis Media’s Winstone and WebBench. They founded and led eTesting Labs, and after the acquisition of that company by Lionbridge Technologies were the head and CTO of VeriTest. Principled Technologies is a registered trademark of Principled Technologies, Inc. All other product names are the trademarks of their respective owners. Disclaimer of Warranties; Limitation of Liability: PRINCIPLED TECHNOLOGIES, INC. HAS MADE REASONABLE EFFORTS TO ENSURE THE ACCURACY AND VALIDITY OF ITS TESTING, HOWEVER, PRINCIPLED TECHNOLOGIES, INC. SPECIFICALLY DISCLAIMS ANY WARRANTY, EXPRESSED OR IMPLIED, RELATING TO THE TEST RESULTS AND ANALYSIS, THEIR ACCURACY, COMPLETENESS OR QUALITY, INCLUDING ANY IMPLIED WARRANTY OF FITNESS FOR ANY PARTICULAR PURPOSE. ALL PERSONS OR ENTITIES RELYING ON THE RESULTS OF ANY TESTING DO SO AT THEIR OWN RISK, AND AGREE THAT PRINCIPLED TECHNOLOGIES, INC., ITS EMPLOYEES AND ITS SUBCONTRACTORS SHALL HAVE NO LIABILITY WHATSOEVER FROM ANY CLAIM OF LOSS OR DAMAGE ON ACCOUNT OF ANY ALLEGED ERROR OR DEFECT IN ANY TESTING PROCEDURE OR RESULT. IN NO EVENT SHALL PRINCIPLED TECHNOLOGIES, INC. BE LIABLE FOR INDIRECT, SPECIAL, INCIDENTAL, OR CONSEQUENTIAL DAMAGES IN CONNECTION WITH ITS TESTING, EVEN IF ADVISED OF THE POSSIBILITY OF SUCH DAMAGES. IN NO EVENT SHALL PRINCIPLED TECHNOLOGIES, INC.’S LIABILITY, INCLUDING FOR DIRECT DAMAGES, EXCEED THE AMOUNTS PAID IN CONNECTION WITH PRINCIPLED TECHNOLOGIES, INC.’S TESTING. CUSTOMER’S SOLE AND EXCLUSIVE REMEDIES ARE AS SET FORTH HEREIN. Choosing your first server: The Dell PowerEdge T110 A Principled Technologies test report 24