1
CDC 1520 | 1525 | 1532
INSTRUCTION HANDBOOK
DIGITAL MULTIFUNCTIONAL SYSTEM
BASIC
This Operation Guide is for models CDC 1520, CDC 1525 and CDC 1532. In this guide,
CDC 1520 refers to the 25/20 ppm (prints per minutes) model, CDC 1525 to the 32/25 ppm
model and CDC 1532 to the 32/32 ppm model.
NOTE: This Operation Guide contains information that corresponds to using both the inch and
metric versions of these machines.
The inch versions of these machines are shown in the screens in this guide. If you are using the
metric version, use the messages provided for the inch version as reference only. In the body
text, only the inch messages are given if these versions differ only in capitalization. When there
is even a slight difference in the message, we have listed the information for the inch version
followed, in brackets, by the corresponding information for the metric version.
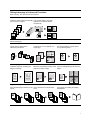
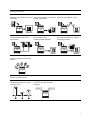
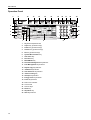
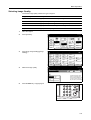
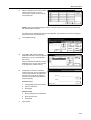
Taking Advantage of Advanced Functions
Basic Copying...See Operation Guide Chapter 3
Duplex Mode
Split Mode
Create two-sided copies automatically Copy double-sided or two-page
from any kind of original
originals onto separate sheets
automatically
5
1
4
2
2
1
5
3
3
4
1
2
2
1
1
2
2
1
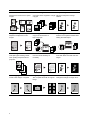
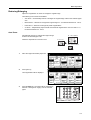
Advanced Copying
Offset Mode
Combine Mode
Margin Mode
Handy option to stack sets in
alternating orientations
Combine two or four originals on a
single page
Set up blank margin or gutter space
for your binding needs
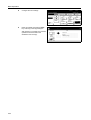
Centering Originals
Border Erase
Poster
Customize output by centering the
image on the page
Eliminate unnecessary borders on the Copy an enlarged image onto several
original for cleaner output
pages
Page Numbering
Cover Mode
3
2
1
3
2
1
3
2
1
3
2
1
Print sequential page numbers on the Use a distinctive front and/or back
copies
cover
Booklet
Copy pages for stacking and folding
into booklets
A
A
B
B
C
C
D
D
E
-1-
E
-2-3-4-5-
i
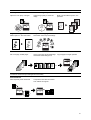
Memo Mode
Batch Scanning
Sharpness Adjust
Add space for notes next to copied
images
Copy high-volume originals in a single Adjust the sharpness of image
copy job
outlines
200
100
1
1
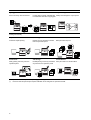
Background Exposure Adjust
Proof Copy
Repeat Copy
Adjust the background of color
images
Copy a test sheet before a
high-volume job
Produce more copies as needed after
making the initial copies
3
2
1
3
2
3
2
1
1
OHP Backing Sheet Mode
EcoPrint
Inverted Copying
Insert plain paper backing sheets
when printing transparencies for
projectors
Use toner more efficiently as
necessary
Invert both black and white and color
images
Mirror Copying
Image Repeat Copy
Color Balance Adjust
Create mirror images of originals
Tiles a copied sheet with an original
image
Change the strength of image colors
ii
Hue Adjust
One Touch Image Adjust
Color/B&W Selection
Adjust the color (hue) of images
Adjust image quality to match the
image
Make color and B&W copies in one
operation
Vivid
Dull
Sharp
Single Color Copy
Programmed Copying
Make copies in 1 other than black
Remember commonly used settings
Job Build
Set cover page, middle pages
and for each page set shrink/enlarge
and border erase settings and
copy all pages in single operation
7
7
8
6
1
2
3
4
8
5
5
5
6
3
4
3
4
1
2
1
2
Convenient document/output management functionality
Shared Data Box
Store frequently used documents
to reproduce them later as needed
even without the original
iii
Synergy Print Box
Output Management
Store commonly used documents...
to make them instantly available later Modify and manage the output queue
in combination with other copying jobs
1
2
3
4
1
4
3
2
Printing Functionality
Duplex Path
Quick Copy †
Proof and Hold ††
Automatic duplex printing
Reprint as many sheets as needed
from the operation panel
Bulk print after test print
3
2
3
1
2
1
5
3
4
1
2
3
2
1
Private Print ††
Job Storage †
Virtual Mailbox †
Delay printing until entry from the
operation panel
Enable printing commonly used data
any time from the operation panel
Save print data to a virtual mailbox
†
Optional hard disk required for quick copy, job storage, and virtual mailbox
††
Proof and hold and private print require RAM disk to be configured or optional hard disk
iv
Scanning Functionality
Full-color Scan
Scan to PC
Send E-mail
Make high quality scans of even color Send scanned images to a computer Send scanned images as e-mail
documents
as PDF or JPEG files
Scan to FTP
TWAIN
Database Connection
Upload scanned images to FTP
server directly
Import images using a
TWAIN-compliant application
Send scanned images to a computer
after adding text data
Programmed Scanning
Remember destination and feature
settings
Features for Easier Copying
Job Accounting
Language
Use department codes to manage
total copy volume
Choose the language to display
messages
English
A
B
Deutsch
C
v
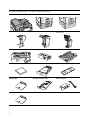
Full optional equipment lineup... See Optional Equipment on page 4-1
Document Processor
Paper Feeder
3000 Sheet Paper Feeder
Document Finisher
3000 Sheet Document Finisher
(When equipped with a mailbox and
folding unit)
Job Separator
Key Counter
Fax Kit
Memory Card (CompactFlash)
Hard Disk
Additional Memory
Security Kit
Network Interface Card
Serial Interface
PDF Upgrade Kit
vi
Legal and Safety Information
Please read this information before using your machine. This chapter provides information on
the following topics:
•
Legal Information...viii
•
Regarding Tradenames...ix
•
Energy Star (ENERGY STAR®) Program...x
•
Safety Conventions in This Guide...xi
•
Caution Labels...xii
•
Installation Precautions...xiii
•
Precautions for Use...xiv
vii
Legal Information
Notice
The information in this guide is subject to change without notification. Additional pages may be
inserted in future editions. The user is asked to excuse any technical inaccuracies or
typographical errors in the present edition.
No responsibility is assumed if accidents occur while the user is following the instructions in this
guide. No responsibility is assumed for defects in the printer’s firmware (contents of its read-only
memory).
This guide, any copyrightable subject matter sold or provided with or in connection with the sale
of the machine, are protected by copyright. All rights are reserved. Copying or other
reproduction of all or part of this guide, any copyrightable subject matter without the prior written
consent of UTAX GmbH is prohibited. Any copies made of all or part of this guide,
any copyrightable subject must contain the same copyright notice as the material from which the
copying is done.
Legal Restriction On Copying
viii
•
It may be prohibited to copy copyrighted material without permission of the copyright owner.
•
It is prohibited under any circumstances to copy domestic or foreign currencies.
•
Copying other items may be prohibited.
Regarding Tradenames
•
PRESCRIBE and ECOSYS are registered trademarks of Kyocera Corporation.
•
KPDL is trademark of Kyocera Corporation.
•
Windows and Windows Server are registered trademarks of Microsoft Corporation.
•
Windows NT is a trademark of Microsoft Corporation.
•
PCL and PJL are registered trademarks of Hewlett-Packard Company.
•
Adobe, Adobe Acrobat and Adobe Reader are registered trademarks of Adobe Systems
Inc.
•
PowerPC is a trademark of International Business Machines Corporation.
•
CompactFlash is a trademark of SanDisk Corporation.
All other brand and product names are registered trademarks or trademarks of their respective
companies. The designations ™ and ® will not be used in this Operation Guide.
ix
Energy Star (ENERGY STAR®) Program
We have determined as a participating company in the International Energy Star Program that
this product is compliant with the standards laid out in the International Energy Star Program.
About the International Energy Star Program
International Energy Star Program has as its basic goals the promotion of efficient energy use
and the reduction of the environmental pollution that accompanies energy consumption by
promoting the manufacture and sale of products that fulfill program standards.
International Energy Star Program standards require that multifunction devices come equipped
with a Low Power Mode where printer and fax functions remain in a waiting state but energy
consumption is still reduced after a certain amount of time elapses since the device was last
used, as well as a Sleep Mode where printer and fax functions remain in a waiting state but
power consumption is still reduced to a minimum when there is no activity with the device within
a set amount of time. This product is equipped with the following features as a result of its
compliance with International Energy Star Program standards.
Low Power Mode
The device automatically enters Low Power Mode when 15 minutes have passed since the
device was last used. The amount of time of no activity that must pass before Low Power Mode
is activated may be lengthened. See Low-Power Mode on page 3-35 for more information.
Sleep Mode
The device automatically enters Sleep Mode when 45 minutes have passed since the device
was last used. The amount of time of no activity that must pass before Sleep Mode is activated
may be lengthened. For more information see Sleep Mode on page 3-36.
Automatic 2-Sided Copy Function
The Energy Star Program encourages the use of 2-sided copying which reduces the load on the
environment and this device includes 2-sided copying as a standard function. For example, by
copying two 1-sided originals onto a single sheet of paper as a 2-sided copy, it is possible to
lower the amount of paper used. For more information refer to Duplex Mode on page 3-11.
Paper Recycling
The Energy Star Program encourages the use of environmentally friendly recycled paper. Your
sales or service representative can provide information about recommended paper types.
x
Safety Conventions in This Guide
Please read this Operation Guide before using the machine. Keep it close to the machine
for easy reference.
The sections of this guide and parts of the machine marked with symbols are safety warnings
meant to protect the user, other individuals and surrounding objects, and ensure correct and
safe usage of the machine. The symbols and their meanings are indicated below.
WARNING: Indicates that serious injury or even death may result from
insufficient attention to or incorrect compliance with the related points.
CAUTION: Indicates that personal injury or mechanical damage may result from
insufficient attention to or incorrect compliance with the related points.
Symbols
The
symbol indicates that the related section includes safety warnings. Specific points of
attention are indicated inside the symbol.
....
[General warning]
....
[Warning of danger of electrical shock]
....
[Warning of high temperature]
The
symbol indicates that the related section includes information on prohibited actions.
Specifics of the prohibited action are indicated inside the symbol.
....
[Warning of prohibited action]
....
[Disassembly prohibited]
The symbol indicates that the related section includes information on actions which must be
performed. Specifics of the required action are indicated inside the symbol.
....
[Alert of required action]
....
[Remove the power plug from the outlet]
....
[Always connect the machine to an outlet with a ground connection]
Please contact your service representative to order a replacement if the safety warnings in this
Operation Guide are illegible or if the guide itself is missing. (fee required)
Note
An original which resembles a bank note closely may not be copied properly in some rare cases
because this machine is equipped with a counterfeiting prevention function.
xi
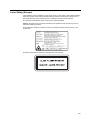
Caution Labels
Caution labels have been attached to the machine at the following locations for safety purposes.
Be sufficiently careful to avoid fire or electric shock when removing a paper jam or when
replacing toner.
Label 1, 2
High temperature inside. Do not
touch parts in this area,
because there is a danger of
getting burned.
NOTE: Do not remove these labels.
xii
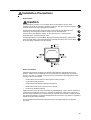
Installation Precautions
Environment
Caution
Avoid placing the machine on or in locations which are unstable or not level. Such
locations may cause the machine to fall down or fall over. This type of situation presents
a danger of personal injury or damage to the machine.
Avoid locations with humidity or dust and dirt. If dust or dirt become attached to the
power plug, clean the plug to avoid the danger of fire or electrical shock.
Avoid locations near radiators, heaters, or other heat sources, or locations near
flammable items, to avoid the danger of fire.
To keep the machine cool and facilitate changing of parts and maintenance, allow access
space as shown below. Leave adequate space, especially around the rear cover, to allow
air to be properly ventilated out of the machine.
3 15/16"
10 cm
11 13/16"
30 cm
11 13/16"
30 cm
39 3/8"
100 cm
Other precautions
Adverse environmental conditions may affect the safe operation and performance of the
machine. Install in an air-conditioned room (recommended room temperature: around 50 to
90.5 °F (10 to 32.5 °C), humidity: around 15 to 80 %) and avoid the following locations when
selecting a site for the machine.
•
Avoid locations near a window or with exposure to direct sunlight.
•
Avoid locations with vibrations.
•
Avoid locations with drastic temperature fluctuations.
•
Avoid locations with direct exposure to hot or cold air.
•
Avoid poorly ventilated locations.
Small amounts of ozone and other chemicals are released during copying, but the quantities do
not present any health risk to humans. If, however, the machine is used over a long period of
time in a poorly ventilated room or when making an extremely large number of copies, the smell
may become unpleasant. To maintain the appropriate environment for copy work, it is suggested
that the room be properly ventilated.
Do not install this machine beneath fluorescent lights. The original size may be detected
incorrectly.
xiii
Power supply/Grounding the machine
Warning
Do not use a power supply with a voltage other than that specified. Avoid multiple
connections in the same outlet. These types of situations present a danger of fire or
electrical shock.
Plug the power cord securely into the outlet. If metallic objects come in contact with the
prongs on the plug, it may cause a fire or electric shock.
Always connect the machine to an outlet with a ground connection to avoid the danger of
fire or electrical shock in case of an electric short. If an earth connection is not possible,
contact your service representative.
Other precautions
Connect the power plug to the closest outlet possible to the machine.
The power supply cord is used as the main disconnect device. Ensure that the socket/outlet is
located/installed near the equipment and is easily accessible.
Handling of plastic bags
Warning
Keep the plastic bags that are used with the machine away from children. The plastic
may cling to their nose and mouth causing suffocation.
Precautions for Use
Cautions when using the machine
Warning
Do not place metallic objects or containers with water (flower vases, flower pots, cups,
etc.) on or near the machine. This of situation presents a danger of fire or electrical shock
should they fall inside.
Do not remove any of the covers from the machine as there is a danger of electrical
shock from high voltage parts inside the machine.
Do not damage, break or attempt to repair the power cord. Do not place heavy objects on
the cord, pull it, bend it unnecessarily or cause any other type of damage. These types of
situations present a danger of fire or electrical shock.
Never attempt to repair or disassemble the machine or its parts as there is a danger of
fire, electrical shock or damage to the laser. If the laser beam escapes, there is a danger
of it causing blindness.
If the machine becomes excessively hot, smoke appears from the machine, there is an
odd smell, or any other abnormal situation occurs, there is a danger of fire or electrical
shock. Turn the main power switch off ( position) immediately, be absolutely certain to
remove the power plug from the outlet and then contact your service representative.
If anything harmful (paper clips, water, other fluids, etc.) falls into the machine, turn the
main power switch off ( position) immediately. Next, be absolutely certain to remove the
power plug from the outlet to avoid the danger of fire or electrical shock. Then contact
your service representative.
xiv
Do not remove or connect the power plug with wet hands, as there is a danger of
electrical shock.
Always contact your service representative for maintenance or repair of internal parts.
Caution
Do not pull the power cord when removing it from the outlet. If the power cord is pulled,
the wires may become broken and there is a danger of fire or electrical shock. (Always
grasp the power plug when removing the power cord from the outlet.)
Always remove the power plug from the outlet when moving the machine. If the power
cord is damaged, there is a danger of fire or electrical shock.
Always hold the designated parts only when lifting or moving the machine.
For safety purposes, always remove the power plug from the outlet when performing
cleaning operations.
If dust accumulates within the machine, there is a danger of fire or other trouble. It is
therefore recommended that you consult with your service representative in regard to
cleaning of internal parts. This is particularly effective if accomplished prior to seasons of
high humidity. Consult with your service representative in regard to the cost of cleaning the
internal parts of the machine.
Other precautions
If the optional fax kit is installed, when the main power switch is off ( position), fax send/receive
is disabled. To turn the power off, press the Power key on the operation panel.
Do not place heavy objects on the machine or cause other damage to the machine.
Do not open the front cover, turn off the main power switch, or pull out the power plug during
copying.
When lifting or moving the machine, contact your service representative.
Do not touch electrical parts, such as connectors or printed circuit boards. They could be
damaged by static electricity.
Do not attempt to perform any operations not explained in this handbook.
Caution: Use of controls or adjustments or performance of procedures other than those
specified herein may result in hazardous radiation exposure.
Do not look directly at the light from the scanning lamp as it may cause your eyes to feel tired or
painful.
This machine comes equipped with an HDD (hard disk). Do not attempt to move the machine
while the power is still on; Since any resulting shock or vibration may cause damage to the hard
disk, be sure to turn off the power before attempting to move the machine.
Cautions when handling consumables
Caution
Do not attempt to incinerate the toner container or the waste toner box. Dangerous
sparks may cause burns.
Keep the toner container and the waste toner box out of the reach of children.
If toner happens to spill from the toner container or the waste toner box, avoid inhalation
and ingestion, as well as contact with your eyes and skin.
•
If you do happen to inhale toner, move to a place with fresh air and gargle thoroughly
with a large amount of water. If coughing develops, contact a physician.
xv
•
If you do happen to ingest toner, rinse your mouth out with water and drink 1 or 2 cups of
water to dilute the contents of your stomach. If necessary, contact a physician.
•
If you do happen to get toner in your eyes, flush them thoroughly with water. If there is any
remaining tenderness, contact a physician.
•
If toner does happen to get on your skin, wash with soap and water.
Do not attempt to force open or destroy the toner container or the waste toner box.
Other precautions
After use, always dispose of the toner container and the waste toner box in accordance with
Federal, State and Local rules and regulations.
If the machine will not be used for an extended period of time, remove the paper from the
cassette and the MP tray (multi-purpose tray), return it to its original package and reseal it.
Don’t store the unit in a place exposed to:
xvi
•
Direct sunlight
•
High or rapidly variable temperature or humidity (limit: 104 °F or 40 °C)
Laser Safety (Europe)
Laser radiation could be hazardous to the human body. For this reason, laser radiation emitted
inside this machine is hermetically sealed within the protective housing and external cover. In
the normal operation of the product by user, no radiation can leak from the machine.
This machine is classified as Class 1 laser product under IEC 60825.
Caution: Performance of procedures other than those specified in this manual may result in
hazardous radiation exposure.
These labels are attached to the laser scanner unit inside the machine and are not in a user
access area.
The label shown below is attached on the right side of the machine.
xvii
Safety Instructions Regarding the Disconnection of Power
Caution: The power plug is the main isolation device! Other switches on the equipment are only
functional switches and are not suitable for isolating the equipment from the power source.
VORSICHT: Der Netzstecker ist die Hauptisoliervorrichtung! Die anderen Schalter auf dem
Gerät sind nur Funktionsschalter und können nicht verwendet werden, um den Stromfluß im
Gerät zu unterbrechen.
DECLARATION OF CONFORMITY
TO
89/336/EEC, 73/23/EEC, 93/68/EEC and 1995/5/EC
We declare under our sole responsibility that the product to which this
declaration relates is in conformity with the following specifications.
EN55024
EN55022 Class B
EN61000-3-2
EN61000-3-3
EN60950
EN60825-1
EN300330-1
EN300330-2
Radio Frequency Transmitter
This machine contains the transmitter module. We, the manufacturer hereby declare that this
equipment is in compliance with the essential requirements and other relevant provisions of
Directive 1999/5/EC.
Radio Tag Technology
In some countries the radio tag technology used in this equipment to identify the toner container
may be subject to authorization and the use of this equipment may consequently be restricted.
xviii
SAFETY OF LASER BEAM (USA)
1. Safety of laser beam
This machine has been certified by the manufacturer to Class 1 level under the radiation
performance standards established by the U.S.DHHS (Department of Health and Human
Services) in 1968. This indicates that the product is safe to use during normal operation and
maintenance. The laser optical system, enclosed in a protective housing and sealed within the
external covers, never permits the laser beam to escape.
2. The CDRH Act
A laser-product-related act was implemented on Aug. 2, 1976, by the Center for Devices and
Radiological Health (CDRH) of the U.S. Food and Drug Administration (FDA). This act prohibits
the sale of laser products in the U.S. without certification, and applies to laser products
manufactured after Aug. 1, 1976. The label shown below indicates compliance with the CDRH
regulations and must be attached to laser products marketed in the United States. On this
machine, the label is on the right.
3. Optical unit
When checking the optical unit, avoid direct exposure to the laser beam, which is invisible.
Shown at below is the label located on the cover of the optical unit.
4. Maintenance
For safety of the service personnel, follow the maintenance instructions in the other section of
this manual.
5. Safety switch
The power to the laser unit is cut off when the front cover is opened.
xix
Safety Instructions Regarding the Disconnection of Power
Caution: The power plug is the main isolation device! Other switches on the equipment are only
functional switches and are not suitable for isolating the equipment from the power source.
Attention: Le débranchement de la fiche secteur est le seul moyen de mettre l’appareil hors
tension. Les interrupteurs sur l’appareil ne sont que des interrupteurs de fonctionnement: ils ne
mettent pas l’appareil hors tension.
WARNING
This equipment has been tested and found to comply with the limits for a Class B digital device, pursuant to
Part 15 of the FCC Rules. These limits are designed to provide reasonable protection against harmful
interference in a residential installation. This equipment generates, uses and can radiate radio frequency
energy and, if not installed and used in accordance with the instructions, may cause harmful interference to
radio communications. However, there is no guarantee that interference will not occur in a particular
installation. If this equipment does cause harmful interference to radio or television reception, which can be
determined by turning the equipment off and on, the user is encouraged to try to correct the interference by
one or more of the following measures:
•
Reorient or relocate the receiving antenna.
•
Increase the separation between the equipment and receiver.
•
Connect the equipment into an outlet on a circuit different from that to which the receiver is connected.
•
Consult the dealer or an experienced radio/TV technician for help.
•
The use of a non-shielded interface cable with the referenced device is prohibited.
CAUTION — The changes or modifications not expressly approved by the party responsible for compliance
could void the user’s authority to operate the equipment.
This device complies with Part 15 of FCC Rules and RSS-Gen of IC Rules.
Operation is subject to the following two conditions; (1) this device may not cause interference, and (2) this
device must accept any interference, including interference that may cause undesired operation of the device.
* The above warning is valid only in the United States of America.
Radio Tag Technology
In some countries the radio tag technology used in this equipment to identify the toner container may be
subject to authorization and the use of this equipment may consequently be restricted.
MERCURY WARNING
THE LAMP(S) INSIDE THIS PRODUCT CONTAIN MERCURY AND MUST BE RECYCLED OR
DISPOSED OF ACCORDING TO LOCAL, STATE OR FEDERAL LAWS.
xx
xxi
xxii
About this Operation Guide
This Operation Guide contains the following chapters:
1 Part Names
Identifies machine parts and operation panel keys.
2 Preparation for Usage
Explains adding paper, placing original, connecting the machine, and necessary configurations
before first use.
3 Basic Operation
Describes the procedures for basic copying, printing and scanning.
4 Optional Equipment
Introduces the convenient optional equipment available for this machine.
5 Maintenance
Describes cleaning and toner replacement.
6 Troubleshooting
Explains how to handle error messages, paper jams, and other problems.
Appendix
Lists the machine specifications.
xxiii
Included Guides
The following guides are included with this machine. Refer to the proper guide based on your
requirements.
Operation Guide (This Guide)
Describes how to load paper, basic copy, print and scan operations, and troubleshooting.
Advanced Operation Guide
Explains copying, printing and scanning features in depth, as well as default settings. This guide
is contained on the CD-ROM as a PDF file.
Extended Driver User Guide
Explains how to install and setup the printer driver. This guide is contained on the CD-ROM as a
PDF file.
PRESCRIBE Commands Command Reference
Explains each command for realizing various features and controls through prescribed
commands. This guide is contained on the CD-ROM as a PDF file.
xxiv
Conventions in This Guide
The following conventions are used depending on the nature of the description.
Convention Description
Example
Bold
Press the Start key.
Indicates a message or button
displayed on the operation panel key or
a computer screen.
[Regular]
Indicates touch panel keys.
Press [Basic].
Italic
Indicates touch panel messages.
Ready to copy is displayed.
Note
Indicates supplemental information or
operations for reference.
NOTE: -
Important
Indicates items that are required or
prohibited so as to avoid problems.
IMPORTANT: -
xxv
Originals and Paper Sizes
This section explains the notation used in this guide when referring to sizes of originals or paper
sizes.
As in A4 and B5, which may be used either in the horizontal or vertical direction, in order to
indicate the orientation of the original/paper, horizontal orientation is indicated by an additional R
character.
Set direction
Indicated size †
Vertical direction
A4, B5, A5, B6, A6, 16K
B
A
B
A
Original
Size
For original/paper, dimension A is longer than B.
Horizontal direction
B
A
B
A4R, B5R, A5R, B6R, A6R,
16KR
A
Original
Size
For original/paper, dimension A is shorter than B.
†
xxvi
The size of original/paper that can be used depends on the function and source tray. For
further details, refer to the page detailing that function or source tray.
Contents
Legal and Safety Information ....................................................................................................................... vii
About this Operation Guide ....................................................................................................................... xxiii
1
Part Names .................................................................................................... 1-1
Body ........................................................................................................................................ 1-2
Operation Panel ...................................................................................................................... 1-4
Touch Panel ............................................................................................................................ 1-5
2
Preparation for Usage ................................................................................... 2-1
Loading Paper ......................................................................................................................... 2-2
Setting Paper Type and Size for the Cassettes and MP Tray ................................................. 2-7
Placing Originals ................................................................................................................... 2-16
Language .............................................................................................................................. 2-20
Connecting Cables ................................................................................................................ 2-21
Preparing the Printer ............................................................................................................. 2-22
Preparing the Scanner .......................................................................................................... 2-31
3
Basic Operation ............................................................................................ 3-1
Basic Copying Procedures ...................................................................................................... 3-2
Selecting Image Quality .......................................................................................................... 3-5
Adjusting Exposure ................................................................................................................. 3-6
Reducing/Enlarging ................................................................................................................. 3-7
Duplex Mode ......................................................................................................................... 3-11
Split Mode ............................................................................................................................. 3-14
Sort Mode .............................................................................................................................. 3-16
Interrupt Copy ....................................................................................................................... 3-17
Job Reservation .................................................................................................................... 3-18
Canceling a Print Job ............................................................................................................ 3-19
Scanner Operation ................................................................................................................ 3-20
Low-Power Mode .................................................................................................................. 3-35
Sleep Mode ........................................................................................................................... 3-36
4
Optional Equipment ...................................................................................... 4-1
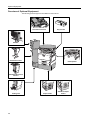
Overview of Optional Equipment ............................................................................................. 4-2
Document Processor ............................................................................................................... 4-4
Paper Feeder .......................................................................................................................... 4-4
3000 Sheet Paper Feeder ....................................................................................................... 4-4
Document Finisher .................................................................................................................. 4-5
3000 Sheet Document Finisher ............................................................................................... 4-5
Job Separator .......................................................................................................................... 4-5
Key Counter ............................................................................................................................ 4-6
Fax Kit ..................................................................................................................................... 4-6
Memory Card (CompactFlash) ............................................................................................... 4-6
Hard Disk ............................................................................................................................... 4-7
Additional Memory .................................................................................................................. 4-7
Security Kit .............................................................................................................................. 4-7
Network Interface Card ........................................................................................................... 4-8
Serial Interface ........................................................................................................................ 4-8
PDF Upgrade Kit ..................................................................................................................... 4-8
5
Maintenance .................................................................................................. 5-1
Cleaning .................................................................................................................................. 5-2
Toner Container and Waste Toner Box Replacement ............................................................. 5-5
xxvii
6
Troubleshooting ............................................................................................ 6-1
Solving Malfunctions ............................................................................................................... 6-2
Responding to Error Messages .............................................................................................. 6-4
Clearing Paper Jams ............................................................................................................ 6-15
Appendix .................................................................................................... Appendix-1
Specifications ............................................................................................................ Appendix-2
Index .................................................................................................................. Index-1
xxviii
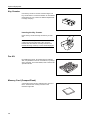
1
Part Names
This chapter identifies machine parts and operation panel keys.
•
Body...1-2
•
Operation Panel...1-4
•
Touch Panel...1-5
1-1
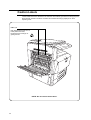
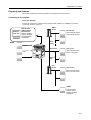
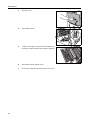
Part Names
Body
1
2
3
4
14 15
17
16
18
13
5
11
7
12
19
6
8
9
10
1
Original Platen (Option)
2
Platen
3
Original Size Indicator Plates
4
Operation Panel
5
MP Tray (multi-purpose tray)
6
Slider
7
MP Tray Extension
8
Cassette 1
9
Cassette 2
10 Paper Length Guide
11 Paper Width Guide
12 Paper Width Adjusting Tab
13 Interface Cover
14 Network Interface Connector (Printer)
15 USB Interface Connector
16 Parallel Port Interface Connector
17 Memory Card (CompactFlash) Slot
18 Network Interface Connector (Scanner)
19 Main Power Switch
20 Main Power Switch Cover
1-2
20
Part Names
21
25
26
27
28
22
30
23
29
31
24
21 Output Tray
22 Left Cover 1
23 Left Cover 2
24 Front Cover
25 Toner Container (Black)
26 Toner Container (Yellow)
27 Toner Container (Cyan)
28 Toner Container (Magenta)
29 Toner Container Lock Lever
30 Waste Toner Box
31 Carrying Handles
1-3
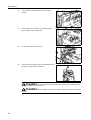
Part Names
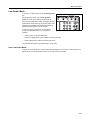
Operation Panel
1
10
6
11
2
Ready to copy.
3
11×8½"
Plain
11×17"
Color
4
5
9
8
12
13
14
16
Paper Size
Set
11×8½"
100%
( Full-Color )
APS
11×8½"
Plain
11×8½"
Plain
MP tray
Plain
Basic
User choice
Auto %
Staple Off
100%
Auto
Exposure
Staple
Left Top
Reduce
/Enlarge
Exposure
Mode
Staple
Function
Color func.
7
1
Brightness Adjustment Dial
2
Copier Key (Indicator/Lamp)
3
Printer Key (Indicator/Lamp)
4
Scanner Key (Indicator/Lamp)
5
Fax Key (Indicator/Lamp)
6
System Menu/Counter Key
7
Auto Color Key
8
Full-Color Key
9
Black&White Key
11 Print Management Key/Indicator
12 Repeat Copy Key/Indicator
13 Job Build Key/Indicator
14 Auto Selection Key/Indicator
15 Job Accounting Key
16 Interrupt Key/Indicator
17 Energy Saver Key/Indicator
18 Power Key/Indicator
19 Main Power Indicator
20 Touch Panel
21 Numeric Keys
22 Reset Key
23 Stop/Clear Key
24 Start Key/Indicator
Margin/
Centering
18
19
23
Sheet
Erase
24
Program
20
17
22
Combine
10 Document Management Key/Indicator
1-4
15
21
Part Names
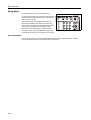
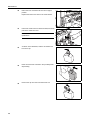
Touch Panel
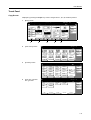
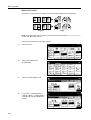
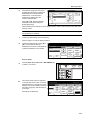
Copy Screen
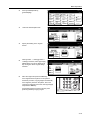
Displayed by pressing the Copier key. Screen changes when 1, 2, 3, 4, and 5 are pressed.
1
[Basic] screen
Ready to copy.
Paper Size
Set
11×8½"
100%
( Full-Color )
Combine
11×8½"
Plain
11×17"
Color
11×8½"
Plain
11×8½"
Plain
APS
MP tray
Plain
Basic
[User choice] screen
Staple Off
100%
Auto
Exposure
Staple
Left Top
Reduce
/Enlarge
Exposure
Mode
Staple
User choice
1
2
Auto %
Function
2
3
Ready to copy.
Sheet
Erase
Program
Color func.
4
Margin/
Centering
5
( Full-Color )
Paper Size
Set
11×8½"
100%
Combine
2 sided/
Separation
Orig.Image
Quality
Sort/
Offset
Margin/
Centering
Border
Erase
Margin/
Centering
Sheet
Erase
Combine
Basic
3
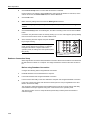
[Function] screen
[Color func.] ([Colour
func.]) screen
User choice
Ready to copy.
Booklet
Function
Cover
Mode
Color func.
( Full-Color )
Select
Orig.Size
Program
Paper Size
Set
11×8½"
100%
Select
Paper
2 sided/
Separation
Select
Orig.Size
Combine
Exposure
Mode
Reduce
/Enlarge
Auto
Selection
Batch
Scanning
Up
Margin/
Centering
Orig.Image
Quality
Margin/
Centering
Page #
Poster
Down
Sheet
Erase
Sort/
Offset
Border
Erase
Cover
Mode
Booklet
Basic
4
Page #
User choice
Ready to copy.
Color
balance
Adjust Hue
Mono
color
Background
exp. adj.
Function
Color func.
( Full-Color )
One touch
image
Combine
Program
Paper Size
Set
11×8½"
100%
Color/B&W
selection
Combine
Margin/
Centering
Sheet
Erase
Basic
User choice
Function
Color func.
Program
1-5
Part Names
5
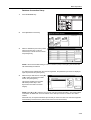
[Program] screen
Ready to copy.
Paper Size
Set
11×8½"
100%
( Full-Color )
Recall
Reg./Delete
list d
abc
Combine
Register
Margin/
Centering
list a
Sheet
Erase
Delete
list b
file 1
list c
file 2
Basic
User choice
Function
Change
Name
Color func.
Program
Printer Screen
Displayed by pressing the
Printer key.
Ready to print.
Printer
Menu
Cancel
GO
Scanner Screen
Displayed by pressing the
Scanner key.
Select scanner function.
08/08/’05 14:00
Recall Program
Edit
Addr. Book
1-6
Send
E-mail
Scan to PC
Database
Connection
Scan to
FTP
TWAIN
Change
User Info.
History
of Sending
2
Preparation for Usage
This chapter explains the preparations required before using the machine.
•
Loading Paper...2-2
•
Setting Paper Type and Size for the Cassettes and MP Tray...2-7
•
Placing Originals...2-16
•
Language...2-20
•
Connecting Cables...2-21
•
Preparing the Printer...2-22
•
Preparing the Scanner...2-31
2-1
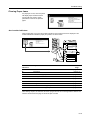
Preparation for Usage
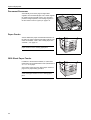
Loading Paper
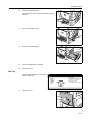
Load paper in the 2 cassettes, the MP tray, and/or the optional paper feeder or 3000 sheet paper
feeder.
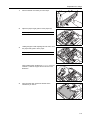
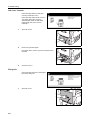
Before Loading Paper
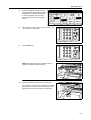
When you open a new package of paper, fan through the sheets to separate them slightly prior to
loading as described below.
1
Bend the stack of paper so that the
middle of the paper lifts upwards.
2
Gripping both ends of the paper, push
inward to cause the stack of paper to
fluff up.
3
Introduce air into the stack of paper by
alternately raising and lowering your left
and right hands.
4
Finally, align the edges of the paper
using a flat surface such as a
countertop.
If the paper is curled or folded, straighten it before loading. Overloading may cause paper jams.
IMPORTANT: If you copy onto used paper (paper already used for copying), do not use paper that
is stapled or clipped together. This may damage the machine or cause poor image quality.
If output paper curls or does not line up properly, try
flipping over the paper loaded into the cassette.
Avoid exposing opened paper to high temperatures
and high humidity as dampness may cause copying
problems. Seal any remaining paper after loading the
MP tray or a cassette in its original package. If the
machine will not be used for a prolonged period,
protect all paper from humidity by removing from the
cassettes and sealing in the original package.
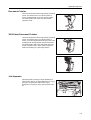
Loading Paper into Cassette 1, 2
Cassettes 1 and 2 support standard, recycled, and colored paper. 500 sheets of standard paper less
than 11 × 8 1/2" or A4 in size (80 g/m2), or 250 sheets of standard paper greater than 8 1/2 × 14" or B4
size (80 g/m2) may be loaded into Cassette 1. 500 sheets of standard paper (80 g/m2) may be
loaded into Cassette 2.
Supported paper sizes are 11 × 17", 8 1/2 × 14", 11 × 8 1/2", 8 1/2 × 11", 5 1/2 × 8 1/2", 8 1/2 × 13",
8 1/2 × 13 1/2", A3, B4, A4, A4R, B5, B5R, A5R, Folio, 8K, 16K and 16KR.
Load paper into the optional paper feeder (Cassettes 3 and 4) in the same manner.
IMPORTANT: When making color copies, use special color paper for best results.
Do not use inkjet printer paper or paper with special surface coatings. (They may cause a failure,
such as a paper jam.)
After loading paper, be sure to specify the type and size of the paper loaded in the cassettes on the
operation panel. For further details, refer to Specifying Paper Size on page 2-7 and Specifying the
Paper Type on page 2-8.
2-2
Preparation for Usage
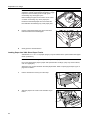
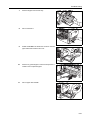
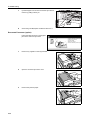
1
Pull the cassette out toward you until it stops.
2
Adjust the paper length guide to fit the paper size.
NOTE: Paper sizes are marked on the cassette.
3
Holding the paper width adjusting tab both ends, move
the paper width guide to fit the paper.
NOTE: Paper sizes are marked on the cassette.
When loading paper smaller than 11 × 8 1/2" or A4 into
Cassette 1, raise the support lever as shown in the
illustration.
4
Align the paper flush against the left side of the
cassette as you load it.
2-3
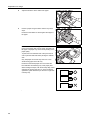
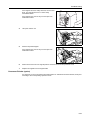
Preparation for Usage
IMPORTANT: Verify that the paper is pressed snugly
against the vertical and horizontal size guides. If a gap
is present, reset the width guide or length guide.
Overloading may cause paper jams.
Before loading the paper, be sure that it is not curled
or folded. Overloading may cause paper jams.
Ensure that the loaded paper does not exceed the
level indicated. Overloading may cause paper jams.
5
Insert the appropriate paper size card in the slot to
indicate the size of the loaded paper.
6
Gently push the cassette back in.
Loading Paper into 3000 Sheet Paper Feeder
3000 sheets of 11 × 8 1/2" or A4 paper (80 g/m2) may be loaded into the optional 3000 sheet paper
feeder (Cassette 3).
IMPORTANT: When making color copies, use special color paper for best results.
Do not use inkjet printer paper or paper with special surface coatings. (They may cause a failure,
such as a paper jam.)
Specify the type of paper loaded in the 3000 paper feeder. Refer to Specifying the Paper Type on
page 2-8 for details.
2-4
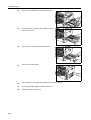
1
Pull the cassette out toward you until it stops.
2
Align the paper to the center of the cassette as you
load it.
Preparation for Usage
NOTE: Before loading the paper, be sure that it is not
curled or folded. Curled or folded paper may cause
paper jams.
Ensure that the loaded paper does not exceed the
level indicated.
3
Gently push the cassette back in.
Loading Paper in the MP Tray
In addition to standard and recycled paper, special paper (60 - 220 g/m2) may be loaded. 100 sheets
of 11 × 8 1/2" or A4 or smaller size paper (80 g/m2) or 50 sheets of 8 1/2 × 14" or B4 or larger paper
(80 g/m2) may be loaded.
Paper sizes 11 × 17" - 5 1/2 × 8 1/2", A3 - A6R, 8K, 16K, and 16KR can be loaded.
The capacity of the MP tray is as follows.
Paper types
Capacity
Standard paper (80 g/m ), recycled paper,
colored paper
11 × 8 1/2" or A4 or smaller: 100 sheets,
8 1/2 × 14"or B4 or larger: 50 sheets
Standard paper (120 g/m2, 160 g/m2, 200 g/m2)
or transparencies
10 sheets
2
IMPORTANT: When making color copies, use special color paper for best results.
Do not use inkjet printer paper or paper with special surface coatings. (They may cause a failure,
such as a paper jam.)
After loading paper, be sure to specify the type and size of the paper loaded in the MP tray on the
operation panel. For further details, refer to Specifying the Paper Size to the MP Tray on page 2-10
and Specifying the Paper Type to the MP Tray on page 2-15.
1
Open the MP tray.
When loading paper larger than 8 1/2 × 11" or A4R, pull
out the MP tray extension.
2-5
Preparation for Usage
2
Adjust the sliders to fit the width of the paper.
3
Insert the paper along the sliders into the tray until it
stops.
Ensure that the sliders are flush against the edges of
the paper.
IMPORTANT: Before loading postcards and other
types of thick paper that may be curled, straighten out
the paper. The paper may not be fed depending on the
paper quality.
To print both front and back side of the post card, be
sure to print the back side before printing the address
side.
Only load paper into the MP tray when it is in use.
Avoid leaving paper in the MP tray.
Ensure that the loaded paper does not exceed the
level indicated. Overloading may cause paper jams.
When loading envelopes, with the envelope flap closed
and keep the printing side face-up. Insert envelopes
against the guide with the flap on the front or right side
until they stop.
2-6
Preparation for Usage
Setting Paper Type and Size for the Cassettes and MP Tray
When loading paper into Cassette 1 and 2 and the optional paper feeders (Cassette 3 and 4), set
the paper size and type. Refer to Specifying Paper Size and Specifying the Paper Type on page 2-8
below.
When loading paper into the optional 3000 sheet paper feeder (Cassette 3), set the paper type.
Refer to Specifying the Paper Type on page 2-8.
After loading paper in the MP tray, specify both the paper type and size. Refer to Specifying the
Paper Size to the MP Tray on page 2-10 and Specifying the Paper Type to the MP Tray on
page 2-15.
Specifying Paper Size
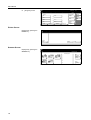
When loading paper into Cassette 1 and 2 and the optional paper feeders (Cassette 3 and 4), set
the paper size. To automatically detect the paper size, set to [Auto Detection] and select either
[Centimeter] or [Inch] units.
The following paper sizes are available.
11 × 17", 8 1/2 × 14", 11 × 8 1/2", 8 1/2 × 11", 5 1/2 × 8 1/2", 8 1/2 × 13 1/2", 8 1/2 × 13" (Oficio 2), A3, B4,
A4, A4R, B5, B5R, A5R, Folio, 8K, 16K, 16KR
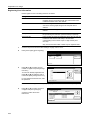
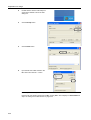
1
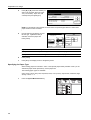
Press the System Menu/Counter key.
2
Press the [Machine Default] key.
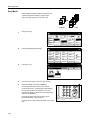
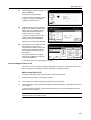
System Menu / Counter
System Menu
Copy
Default
3
Language
Job
Accounting
Scanner
Default
Printer
Default
MP tray
Setting
BOX
Management
Machine
Default
Document
Management
Register
Orig. Size
Print
Report
Use the numeric keys to enter the 4 digit management code. The default setting is 2500 for the
25/20 ppm model and 3200 for the 32/25 and 32/32 ppm models.
If the correct management code has been entered, the Machine Default screen will be displayed.
NOTE: If the optional security kit has been installed, the management code is 8 digits long. The
default setting is 25002500 for the 25/20 ppm model and 32003200 for the 32/25 and 32/32 ppm
models.
2-7
Preparation for Usage
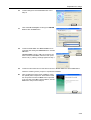
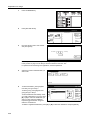
4
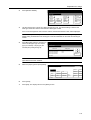
Press [S] or [T], select the cassette you
wish to set the paper size from Paper
size (1st cassette) - Paper size (4th
cassette) and press [Change #].
System Menu / Counter
Machine Default
Default menu
Auto cassette switching
Paper size (1st cassette)
Paper size (2nd cassette)
Paper size (3rd cassette)
Paper size (4th cassette)
Setting mode
On / All types of paper
Auto/Inch
Auto/Inch
Auto/Inch
Auto/Inch
Change #
System Menu
NOTE: 3rd cassette and 4th cassette are shown when the optional paper feeder or 3000 sheet
paper feeder have been installed.
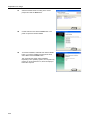
5
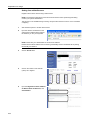
If [Auto Detection] is selected, choose
the unit type. If [Standard sizes] is
selected, choose the paper size.
Press [Close].
Back
Paper size (1st cassette)
Close
Select paper size.
A3
B4
5½×8½"
16K
Auto
Detection
A4
B5
8½×13½"
16K
Standard
sizes
A4
B5
8½×13"
A5
Folio
8K
System Menu
- Machine Default
Key
Description
[Close]
Keeps the settings and returns to the previous page.
[Back]
Cancels settings and returns to the previous page.
6
Press [Close].
7
Press [End]. The display returns to the [Basic] screen.
Specifying the Paper Type
When loading paper into Cassette 1 and 2 or the optional paper feeder (Cassette 3 and 4) or the
3000 sheet paper feeder (Cassette 3), set the paper size.
The following paper types are available.
Plain, Rough, Vellum, Recycled, Preprinted, Bond, Color (Colour), Prepunched, Letterhead, High
Quality, Custom 1 - 8
1
2-8
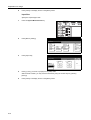
Press the System Menu/Counter key.
Preparation for Usage
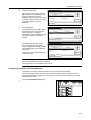
2
Press [Machine Default].
System Menu / Counter
System Menu
Copy
Default
3
Language
Job
Accounting
Scanner
Default
Printer
Default
MP tray
Setting
BOX
Management
Machine
Default
Document
Management
Register
Orig. Size
Print
Report
Use the numeric keys to enter the 4 digit management code. The default setting is 2500 for the
25/20 ppm model and 3200 for the 32/25 and 32/32 ppm models.
If the correct management code has been entered, the Machine Default screen will be displayed.
NOTE: If the optional security kit has been installed, the management code is 8 digits long. The
default setting is 25002500 for the 25/20 ppm model and 32003200 for the 32/25 and 32/32 ppm
models.
4
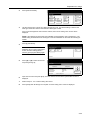
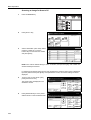
Press [S] or [T], select the cassette you
wish to set the paper type from Paper
type (1st cassette) - Paper type (4th
cassette) and press [Change #].
System Menu / Counter
Machine Default
Default menu
Paper type (1st cassette)
Paper type (2nd cassette)
Paper type (3rd cassette)
Paper type (4th cassette)
Store Paper Size for MPT
Setting mode
Plain
Color
Plain
Plain
Change #
System Menu
NOTE: 3rd cassette and 4th cassette are shown when the optional paper feeder or 3000 sheet
paper feeder have been installed.
5
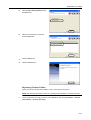
Select the paper type and press [Close].
Paper type (1st cassette)
Back
Select and display paper type.
Plain
Custom 1
Custom
Recycled
Color
Custom 2
Custom
Rough
Preprinted
Prepunched
Custom 3
Custom
Vellum
Bond
Letterhead
Custom 4
Custom
System Menu
6
Press [Close].
7
Press [End]. The display returns to the [Basic] screen.
High
Quality
- Machine Default
2-9
Preparation for Usage
Specifying the Paper Size to the MP Tray
Specify the paper size when using the MP tray.
The following paper sizes are available.
Setting method Unit
Paper size
Auto Detect
Inch
11 × 17", 8 1/2 × 14", 11 × 8 1/2", 8 1/2 × 11", 5 1/2 × 8 1/2"
Centimeter
A3, B4, A4, A4R, B5, B5R, A5R, B6R, A6R
Other Standard Sizes
ISO B5, Envelope DL, Envelope C5, Envelope C4, Comm. #10,
Comm. #9, Comm. #6-3/4, Monarch, Executive, OUFUKU
HAGAKI (return postcard), YOUKEI 2, YOUKEI 4, 8 1/2 × 13 1/2",
8 1/2 × 13" (Oficio 2), 8K, 16K, 16KR
Input Size
Inch models
Height: 3 7/8 - 11 5/8" (1/8" increments)
Width: 5 7/8 - 17" (1/8" increments)
Metric models
Height: 98 - 297 mm (1 mm increments)
Width: 148 - 432 mm (1 mm increments)
Custom Size
Pre-assigned paper size 1-4
Assignable paper sizes
Inch models
Height: 3 7/8 - 11 5/8" (1/8" increments)
Width: 5 7/8 - 17" (1/8" increments)
Metric models
Height: 98 - 297 mm (1 mm increments)
Width: 148 - 432 mm (1 mm increments)
Auto Detect
The paper size is automatically detected. Select between [Centimeter] ([Centimetre]) and [Inch]
measurement units.
1
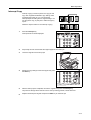
Press the System Menu/Counter key.
2
Press [MP tray Setting].
System Menu / Counter
System Menu
Copy
Default
2-10
Language
Job
Accounting
Scanner
Default
Printer
Default
MP tray
Setting
BOX
Management
Machine
Default
Document
Management
Register
Orig. Size
Print
Report
Preparation for Usage
3
Press [Auto Detection].
System Menu / Counter
MP tray Setting
Back
Unit
Paper Size
Paper Type
Auto
Detection
Centimeter
Input size
Inch
Plain
Others
Standard
4
Select [Centimeter] ([Centimetre]) or [Inch].
5
Press [Close]. The display returns to the [Basic] screen.
Other Standard Sizes
Specify special standard sizes.
1
Press the System Menu/Counter key.
2
Press [MP tray Setting].
System Menu / Counter
System Menu
Copy
Default
3
Press [Others Standard] and press
[Select size].
Language
Job
Accounting
Scanner
Default
Printer
Default
MP tray
Setting
BOX
Management
Machine
Default
Document
Management
Register
Orig. Size
Print
Report
System Menu / Counter
MP tray Setting
Back
Paper Size
Auto
Detection
Paper Type
EX
Select
size
Plain
Input size
Others
Standard
4
Select the paper size.
System Menu / Counter
Select size
Back
Cust
5
ISO B5
Comm.#10
EX
8½×13½"
Envelope
DL
Comm.#9
OUFUKU
HAGAKI
8½×13"
1111 /1
Envelope
C5
Envelope
C4
Comm.
#6-3/4
YOUKEI 2
8K
1111 /1
MO
YOUKEI 4
16K
1111 /1
16K
1111 /1
Press [Close].
2-11
Preparation for Usage
6
Press [Close]. The display returns to the [Basic] screen.
Input Size
Specify the required paper size.
1
Press the System Menu/Counter key.
2
Press [MP tray Setting].
System Menu / Counter
System Menu
Copy
Default
3
Press [Input size].
Language
Job
Accounting
Scanner
Default
Printer
Default
MP tray
Setting
BOX
Management
Machine
Default
Document
Management
Register
Orig. Size
Print
Report
System Menu / Counter
MP tray Setting
Back
(37/8~115/8)
Paper Size
Y
Auto
Detection
.1111/16
(57/8~17)
"
X
.169/16
Paper Type
"
Plain
Input size
Others
Standard
4
Press [+] and [–] to set the Y (height) and X (width) sizes.
With the metric models, you may enter the size directly using the numeric keys by pressing
[#-Keys].
5
2-12
Press [Close]. The display returns to the [Basic] screen.
Preparation for Usage
Custom Size
Store frequently used paper sizes as custom sizes. Also, the paper type can be set for each custom
size.
Assignment Method
1
Press the System Menu/Counter key.
2
Press [Machine Default].
System Menu / Counter
System Menu
Copy
Default
3
Language
Job
Accounting
Scanner
Default
Printer
Default
MP tray
Setting
BOX
Management
Machine
Default
Document
Management
Register
Orig. Size
Print
Report
Use the numeric keys to enter the 4 digit management code. The default setting is 2500 for the
25/20 ppm model and 3200 for the 32/25 and 32/32 ppm models.
If the correct management code has been entered, the Machine Default screen will be displayed.
NOTE: If the optional security kit has been installed, the management code is 8 digits long. The
default setting is 25002500 for the 25/20 ppm model and 32003200 for the 32/25 and 32/32 ppm
models.
4
Press [S] or [T] to select Store Paper
Size for MPT, and press [Change #].
System Menu / Counter
Machine Default
Default menu
Paper type (1st cassette)
Paper type (2nd cassette)
Paper type (3rd cassette)
Paper type (4th cassette)
Store Paper Size for MPT
Setting mode
Plain
Color
Plain
Plain
Change #
System Menu
5
Press [S] or [T], select the number to
register from Paper size (User reg. 1 - 4)
and press [Change #].
Store Paper Size for MPT
Stores Paper Size for MP Tray
Default menu
Paper
Paper
Paper
Paper
size (User
size (User
size (User
size (User
reg. 1)
reg. 2)
reg. 3)
reg. 4)
Setting mode
1111/16 ×169/16"
1111/16 ×169/16"
1111/16 ×169/16"
1111/16 ×169/16"
Change #
System Menu
- Machine Default
2-13
Preparation for Usage
6
Press [On] and press [+] or [–] to set the
Y (Length) and X (Width) sizes.
Back
Paper size (User reg. 1)
100%
Stores Paper Size for MP Tray
With the metric models, you may enter
the size directly using the numeric keys
by pressing [#-Keys].
Color/B&W selection
To specify a paper type, press [Select
Paper Type]. Select the paper type and
press [Close].
On
(37/8~115/8)
Y
1111/16
(57/8 ~17)
"
.169/16
X
Paper Type
"
Plain
Off
System Menu
7
Press [Close].
8
Press [Close].
9
Press [End]. The display returns to the [Basic] screen.
- Machine Default
- Store Paper Size for MPT
Setting Method
1
Press the System Menu/Counter key.
2
Press [MP tray Setting].
System Menu / Counter
System Menu
Copy
Default
3
Press [Others Standard] and press
[Select size].
Language
Job
Accounting
Scanner
Default
Printer
Default
MP tray
Setting
BOX
Management
Machine
Default
Document
Management
Register
Orig. Size
Print
Report
System Menu / Counter
MP tray Setting
Back
Paper Size
Auto
Detection
Paper Type
EX
Select
size
Plain
Input size
Others
Standard
4
Select the paper size from Custom Size
m Menu / Counter
(Use regist).
Back
Close
Custom Size
Comm.#10
EX
8½×13½"
e
Comm.#9
OUFUKU
HAGAKI
8½×13"
1111 /16 ×169/16"
e
Comm.
#6-3/4
YOUKEI 2
8K
1111 /16 ×169/16"
MO
YOUKEI 4
16K
1111 /16 ×169/16"
e
5
2-14
Press [Close].
16K
1111 /16 ×169/16"
Preparation for Usage
6
Press [Close]. The display returns to the [Basic] screen.
Specifying the Paper Type to the MP Tray
Set the paper type when using the MP tray.
The following paper types are available.
Plain, Transparency, Rough, Vellum, Labels, Recycled, Preprinted, Bond, Cardstock, Color
(Colour), Prepunched, Letterhead, Thick paper, Envelope, Coated, High Quality, Custom 1 - 8
NOTE: Paper type cannot be changed for MP tray paper size when a Custom size has been
selected that has already set the paper type.
1
Press the System Menu/Counter key.
2
Press [MP tray Setting].
System Menu / Counter
System Menu
Copy
Default
3
Press [Select Paper Type].
Language
Job
Accounting
Scanner
Default
Printer
Default
MP tray
Setting
BOX
Management
Machine
Default
Document
Management
Register
Orig. Size
Print
Report
m Menu / Counter
g
Back
Unit
Close
Paper Type
Plain
Centimeter
Select
Paper Type
Inch
4
Select the paper type.
System Menu / Counter
Select Paper Type
Back
Plain
Labels
Cardstock
Thick
paper
Custom 1
Custom
Transparency
Recycled
Color
Envelope
Custom 2
Custom
Rough
Preprinted
Prepunched
Coated
Custom 3
Custom
Vellum
Bond
Letterhead
High
Quality
Custom 4
Custom
5
Press [Close].
6
Press [Close]. The display returns to the [Basic] screen.
2-15
Preparation for Usage
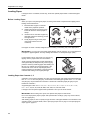
Placing Originals
This section explains how to place an original for copying or scanning.
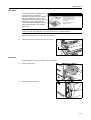
Loading Originals on the Platen
Open the original platen and place the original on the platen. You may also place non-sheet
originals such as books or magazines.
1
Open the original platen.
NOTE: If the optional document processor has been
installed, open the document processor. Before
opening the document processor, be sure that there
are no originals left on the original tray or on the
original eject table. Originals left on the original table or
on the original eject table may fall off the machine
when the document processor is opened.
For originals over 4 cm thick, leave the document
processor open during copying.
2
Place the original. Place the side to be copied face
down and starting from the back left corner, align flush
against the original size indicator plates.
Original size indicator plates
(Inch models)
2-16
Preparation for Usage
(Metric models)
3
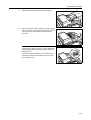
Close the original platen.
IMPORTANT: Do not push the original platen or document processor forcefully when you close it.
Excessive pressure may crack the platen glass.
Shadows may appear around the edges and in the middle of copies of open-faced originals such as
books.
Caution: Do not leave the document processor open as there is a danger of
personal injury.
2-17
Preparation for Usage
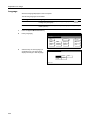
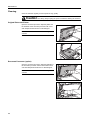
Loading Originals in the Document Processor (option)
Use the optional document processor to automatically read multi-page originals one page at a time.
Also automatically turn over and read both sides of two-sided originals.
The document processor supports the following types of originals.
Item
Specifications
Weight
1-sided original: 45 g/m2 - 160 g/m2
2-sided original: 50 g/m2 - 120 g/m2
Size
Maximum 11 × 17"/A3 - Minimum 5 1/2 × 8 1/2"/A5R
Capacity
Standard paper (80 g/m2, 11 × 8 1/2"/A4 or smaller), color paper (11 × 8 1/2"/A4
or smaller), recycled paper (11 × 8 1/2"/A4 or smaller): 100 sheets or less
(Auto Selection Mode: 30 sheets)
Standard paper (80 g/m2, 8 1/2 × 14"/B4 or larger), color paper (8 1/2 × 14"/B4
or larger), recycled paper (8 1/2 × 14"/B4 or larger): 70 sheets or less
Art paper: 1 sheet
Precautions on Types of Originals for Document Processor
Do not use the document processor for the following types of originals. Additionally, if originals have
punched holes or perforations, load them with the holes or perforations away from the leading edge.
•
Transparent films such as OHP transparencies
•
Delicate originals such as carbon paper, heavily crumpled paper, or vinyl sheets
•
Irregularly shaped (non-rectangular) originals, wet originals, or originals containing adhesive
tape or glue
•
Remove clips or staples and straighten any curls, wrinkles, or creases before loading. Failure to
do so may cause the originals to jam.
•
Originals with cut-out sections or with very slippery surfaces
•
Originals with correction fluid that has not dried
•
Straighten the folds of bent originals before loading. Failure to do so may cause the originals to
jam.
Document Processor Part Names
1
Original table
2
Original width guides
3
Original eject table
4
Document processor cover
5
Original loaded indicator
6
Cleaning cloth compartment
4
2
1
3
6
5
How to Load Originals
Follow these steps to load originals in the document processor.
IMPORTANT: Before loading originals, be sure there are no originals left on the original eject table.
Originals left on the original eject table may cause the new originals to jam.
2-18
Preparation for Usage
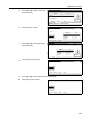
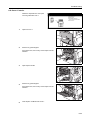
1
Adjust the original width guides to fit the originals.
2
Place the originals. Place the side to be read facing up
(the front side up for two-sided originals) and push the
front edge of the original deep into the document
processor.
IMPORTANT: Confirm that the original width guides
exactly fits the originals. If there is a gap, readjust the
original width guides. Failure to do so may cause the
originals to jam.
Ensure that loaded originals do not exceed the level
indicated. Exceeding the maximum level may cause
the originals to jam.
2-19
Preparation for Usage
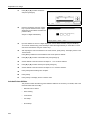
Language
Select the language displayed on the touch panel.
The following languages are available.
Model Type
Language
Inch models
English, French (Français), Spanish (Español), Japanese (
Portuguese (Português)
Metric models
English, German (Deutsch), French (Français), Spanish (Español),
Italian (Italiano)
1
Press the System Menu/Counter key.
2
Press [Language].
),
System Menu / Counter
System Menu
Copy
Default
3
Select the key for the language you
would like to set. The touch panel
display will change to that language.
Language
Job
Accounting
Scanner
Default
Printer
Default
MP tray
Setting
BOX
Management
Machine
Default
Document
Management
Register
Orig. Size
Print
Report
Language
English
Français
Português
System Menu
2-20
Español
Preparation for Usage
Connecting Cables
Connect to a computer to use the printer and scanner features. This device has the following
interfaces for connecting to computers.
Use the type of cable appropriate for the interface used.
Function
Interface
Printing
Functionality
Parallel port interface Parallel Port Cable (IEEE1284 specification, 1.5 m or
less)
Scanning
Functionality
Required cable
USB Interface
USB 2.0-compatible cable (Hi-Speed USB specification,
5.0 m or less) shielded cable
Network interface
Network Cable (10Base-T or 100Base-TX)
Network interface
Network Cable (10Base-T or 100Base-TX)
NOTE: Use shielded USB, 10Base-T and 100Base-TX cables.
1
Open the main power switch cover, and switch the
main power switch to off ( position).
Turn off the computer’s power when connecting a
parallel port cable.
2
Open the interface cover on the right side of the unit
and connect the cable to the interface.
A: Network interface (printer)
B: USB interface (printer)
C: Parallel port interface (printer)
D: Network interface (scanner)
A
B
C
D
3
Connect the other end of the cable to the computer or a hub (network switching device).
4
Open the main power switch cover, and switch the
main power switch to on ( | position).
NOTE: For network cable connections, configure the
network after connecting the cables. For details, refer
to Network (TCP/IP) Settings on page 2-22 and
Scanner Basic Settings on page 2-32.
2-21
Preparation for Usage
Preparing the Printer
Network (TCP/IP) Settings
To use this device as a network printer, first set the device IP address.
NOTE: Set the IP address according to the operating environment. Obtain this address from your
network administrator.
For environments that use DHCP or BOOTP to automatically assign the IP address, this setting is
not required because the DHCP or BOOTP setting is enabled by default.
1
Press the Printer key.
2
Press [Printer Menu].
Ready to print.
Printer
Menu
3
Press [Interface].
Cancel
Select item.
Printer menu
4
Press [Network].
Print Status Page
Font
Paper
Handling
Interface
Page Set
Color Mode
Emulation
Print
Quality
RAM DISK
Mode
Others
Interface
Setting Item
NetWare
TCP/IP
Ethertalk
Network Status Page
Value
On
On
On
Off
Change #
Parallel
Printer menu
2-22
Network
USB
Preparation for Usage
5
Press [S] or [T] to select TCP/IP and
press [Change #].
Interface
Setting Item
Value
On
On
On
Off
NetWare
TCP/IP
Ethertalk
Network Status Page
Change #
Parallel
USB
Network
Printer menu
6
Press [On] below TCP/IP.
Back
TCP/IP
TCP/IP
Setting Item
Off
On
Printer menu- Interface
7
Press [S] or [T] to select DHCP and
press [Change #].
Back
Setting Item
terface
Press [Off] and press [Close].
On
On
0. 0. 0. 0
0. 0. 0. 0
0. 0. 0. 0
- Network
DHCP
BOOTP
IP Address
Subnet Mask
Gateway
8
Value
DHCP
BOOTP
IP Address
Subnet Mask
Gateway
Close
Value
On
On
0. 0. 0. 0
0. 0. 0. 0
0. 0. 0. 0
Change #
- Network
Back
DHCP Setting
Off
On
Printer menu - Interface - Network
9
10
- TCP/IP
Press [S] or [T] to select BOOTP and press [Change #].
Press [Off] and press [Close].
Back
BOOTP Setting
Off
On
Printer menu - Interface - Network
- TCP/IP
2-23
Preparation for Usage
11
Press [S] or [T] to select IP Address
and press [Change #].
Back
Setting Item
DHCP
BOOTP
IP Address
Subnet Mask
Gateway
Close
Value
On
On
0. 0. 0. 0
0. 0. 0. 0
0. 0. 0. 0
Change #
Interface - Network
12
Enter the IP address using the numeric
keys. Input the address for the 3 digits
displayed in reverse black and white and
press the # key.
.10
Verify the 3 digits entered # key.
Printer menu- Interface
13
Back
IP Address
Confirm per 3 lines pressing # key.
- Network
.0
.0
.0
(with #key)
- TCP/IP
Input the address for the next 3 digits displayed in reverse black and white and press the # key.
To correct an address entry, press the # key to select the 3 digit address you would like to correct
and reenter the address using the numeric keys.
14
After inputting the rest of the address in the same manner, press [Close]. The display returns to the
TCP/IP screen.
Press [Back] to delete the entered address and set the previous address.
15
Press [S] or [T] to select Subnet Mask and press [Change #].
16
Set the address in the same manner as Steps 12 - 14 to set the IP address.
17
Press [S] or [T] to select Gateway and press [Change #].
18
Set the address in the same manner as Steps 12-14 to set the IP address.
19
Press [Close] after all settings are complete.
20
Press [Close].
21
Press [Close]. The display returns to Printer mode.
Included Printer Utilities
This product includes the following printer utilities Install them as necessary. For details, refer to the
manual included with each utility.
2-24
•
Network Tool for Clients
•
Direct Printing
•
Print Monitor
•
Port Setup
•
Quick Setup
Preparation for Usage
Installing the Printer Driver
Install the printer driver to connect this device to a computer. Install from the included Software
Library CD-ROM for connections via the parallel port interface, network interface or the USB
interface.
The following procedures are based on a Windows XP installation, but the same procedure may be
followed to install on other Windows operating systems.
NOTE: Installation on Windows XP, Windows NT 4.0/2000 and Server 2003 must be installed by a
user logged on with administrator privileges.
Plug and Play is disabled on this device when in Sleep Mode. Wake the device from Sleep Mode
before continuing. See Sleep Mode on page 3-36
1
Refer to Connecting Cables on page 2-21 to connect
this device to the computer. After connecting, switch
the main power switch to on ( | position) and switch on
the computer.
If a Plug and Play window like that shown at right
appears, click the Cancel button.
2
Insert the included Software Library CD-ROM into the
CD-ROM drive.
A usage agreement is displayed. Click the Accept
button to accept the agreement terms. The Main Menu
screen is displayed.
If the screen is not displayed even after loading the
CD-ROM, open the CD-ROM drive letter and
double-click on the setup.exe file shown in the
window.
3
Click on Install KX Driver.
2-25
Preparation for Usage
4
Click the Next button.
NOTE: If an older driver is already installed, the Install
Wizard will automatically detect it and display the
existing driver upgrade screen. Click the Next button
and follow the screen prompts to upgrade the driver.
2-26
5
Select Local connection and press the Next button.
For Network connection, refer to the IB-21E/IB-22
Operation Guide on the included CD-ROM.
6
Select the device and press the Next button. At this
point the Plug and Play window may reappear. Cancel
any Printer Found screens that appear.
Preparation for Usage
It is safe to proceed if the Hardware Installation
screen appears. Press the Continue Anyway button.
If the Network Printer Port Monitor screen is
displayed, select Yes and click the Next button.
7
The Select the Printer Port screen is displayed. Follow the procedure below for parallel port or
USB connection. Skip to Step 9 for network port connection.
8
For parallel port connection, select LPT1 in the Use
the following port list, click the Next button, and skip
to Step 19.
For USB connection, select the USB port (example:
USB001, KMUSB001), click the Next button, and skip
to Step 19. If the USB port to be used is not found, go
to Step 17.
9
Click on Create a new port. Set the type to KPrint
Port and click the Next button.
2-27
Preparation for Usage
10
Select Print using LPR and click the Next button.
The following steps may vary slightly if KPrint has been
installed before.
2-28
11
Input the IP address or host name for this device in IP
address or Host name and go to Step 14. If you don’t
know the IP address or host name for this device, click
Search and go to the next step.
12
A list of printers available on the network is displayed.
Select this device and click the OK button.
13
The IP address or host name selected in Step 12 is displayed in IP address or Host name.
14
Confirm the print server port and click the Next button.
15
Input the Destination printer port name and click the
Next button.
Preparation for Usage
16
Confirm settings and click the Finish button. Go to
Step 19.
17
Click on Create a new port. Set the type to KM USB
Port and click the Next button.
18
Confirm the Port name. The Serial number can be
confirmed after clicking the Advanced button. Click the
OK button.
If Serial number is empty, USB port recognition has
failed. Cancel the installation, switch the main power
switch to off ( position), and begin again from Step 1.
19
Confirm that the model name for this device is shown in Printer name and click the Next button.
Follow the remaining screen prompts to complete the installation.
20
After completing the printer driver installation, install
the optional printer components. Select Yes to install
the components and click the Next button to proceed
to the next step. Press No to skip installation, click the
Next button and proceed to Step 23.
2-29
Preparation for Usage
21
Select the desired items according to the screen
prompts and click the Next button.
22
Confirm selection and click the Install button. The
printer components will be installed.
23
To end the installation, select No and click the Finish
button. To continue installing another printer driver,
select Yes and click the Next button.
This concludes the printer driver installation.
Depending on the operating system, the computer may
prompt you to be restarted. If so, follow the display to
reboot the computer.
2-30
Preparation for Usage
Preparing the Scanner
This section explains the necessary operations to prepare the scanner function.
Connecting to a Computer
Connection Example
Connect the scanner and computer with a network cable (10Base-T or 100Base-TX). Refer to
Connecting Cables on page 2-21.
Administrator PC
Web Browser
Address Editor
DB Assistant
Network Settings
Scanner Settings
User/Destination
Registration
SMTP
Server
Send E-mail
Send scanned images
as e-mail attachments.
Send
E-mail
Printer
Parallel
Scan to PC
Send scanned image
files to a computer.
USB
Network
Scan to PC
Scan to
FTP
FTP
Server
Scan to FTP
Send scanned image
files to an FTP server.
TWAIN
Imports images
scanned from a
TWAIN-compliant
application.
2-31
Preparation for Usage
Scanner Basic Settings
The network settings for this device must be configured before using the scanner feature. The
setting items are as follows.
Configuration Item
Description
Host name
Input a scanner host name no longer than 32 characters.
IP address
Enter the scanner interface IP address in ‘XXX.XXX.XXX.XXX’
notation.
Subnet Mask
Enter the scanner subnet mask in ‘XXX.XXX.XXX.XXX’
notation.
Default Gateway
Enter the scanner default gateway in ‘XXX.XXX.XXX.XXX’
notation.
DHCP/BOOTP
Set DHCP and BOOTP to either [Valid] or [Invalid]. The default
setting is [Valid].
RARP
Set RARP to either [Valid] or [Invalid]. The default setting is
[Valid].
DNS Server (primary)
For sending data using host names in environments that have
DNS servers available, enter the primary DNS server IP
address in this field in ‘XXX.XXX.XXX.XXX’ notation.
DNS Server (secondary)
Enter the secondary DNS server IP address in
‘XXX.XXX.XXX.XXX’ notation.
DNS Domain name
Enter the domain name in less than 64 characters.
WINS Server (primary)
To use WINS (Windows Internet Name Service) to resolve
computer names from IP addresses, enter the primary WINS
server IP address in ‘XXX.XXX.XXX.XXX’ notation.
WINS Server (secondary)
Enter the secondary WINS server IP address in this field in
‘XXX.XXX.XXX.XXX’ notation.
SMTP
Enter into this field the SMTP server host name or IP address in
‘XXX.XXX.XXX.XXX’ notation.
DB Assistant
Enter the IP address or hostname (under 32 characters) of the
computer with DB Assistant installed.
Administrator’s E-mail ad
Enter the administrator e-mail address. Scanner status log files
and error reports will be via e-mail to this address.
IMPORTANT: E-mail cannot be sent if the SMTP and Administrator’s E-mail ad are not properly set.
NOTE: Set the IP address according to the operating environment. Obtain this address from your
network administrator.
Scanner basic settings may be also configured from a computer using a web browser.
1
2-32
Press the System Menu/Counter key.
Preparation for Usage
2
Press [Scanner Default].
System Menu / Counter
System Menu
Copy
Default
3
Language
Job
Accounting
Scanner
Default
Printer
Default
MP tray
Setting
BOX
Management
Machine
Default
Document
Management
Register
Orig. Size
Print
Report
Use the numeric keys to enter the 4 digit management code. The default setting is 2500 for the
25/20 ppm model and 3200 for the 32/25 and 32/32 ppm models.
If the correct management code has been entered, the Scanner setting menu screen will be
displayed.
NOTE: If the optional security kit has been installed, the management code is 8 digits long. The
default setting is 25002500 for the 25/20 ppm model and 32003200 for the 32/25 and 32/32 ppm
models.
4
Press [System Basic].
NOTE: If Unable to use scanner is
displayed, return to the System Menu
screen, and after waiting (about 2
minutes), press [System Basic] again.
System Menu / Counter
Scanner setting menu
System
Basic
Func. Def.
setting.
User
registr.
System Menu
5
Press [S] or [T] to select Host name
and press [Change #].
System Menu / Counter
System Basic
Default menu
Host name.
IP address
Subnet Mask
Default Gateway
DHCP/BOOTP
System Menu
Setting mode
Scanner.
10.181.125.31.
255.255.0.0.
10.181.125.1.
Valid
Change #
- Scanner setting menu
6
Input the host name and press [End]. The host name is saved and the System Basic screen is
displayed.
7
Refer to Steps 5 - 6 to continue setting other items.
8
Press [Close] after all settings are complete. Scanner setting menu screen is displayed.
2-33
Preparation for Usage
Registering User Information
Please register a user. The setting items are as follows.
Configuration Item
Description
E-mail address
For Send E-mail, mail will be sent to this address when
recipients reply to the received mail. Also, transmission error
notifications will be sent to this address.
IP address or host name
When selecting Scan to PC as the destination, select Save to
User PC to send a graphic image to the computer at this
address.
Name to display
Username shown during user selection. This value must be
entered.
User password
Input a password less than 8 characters long (numerals only) to
be input during user selection. (Password entry is optional)
Save folder No.
Folder number to specify as destination when Save to User PC
is selected. Use Scanner File Utility to set the folder
corresponding to this number. Input a 3 digit number (from
001-100).
Only one save location folder number may be registered here.
1
Continue the process Scanner Basic Settings on page 2-32 for 1 to 3.
2
Press [User registr.] ([User register]).
System Menu / Counter
Scanner setting menu
System
Basic
Func. Def.
setting.
User
registr.
System Menu
3
Press [S] or [T] to select the user
number to register and press [Change
User Info.].
End
elete
User
User A
To correct an already registered user,
press [S] or [T] to select the user to
correct and press [Change User Info.].
If a user password has been set, enter
the password.
Up
Change
User Info.
Delete
Down
- Scanner setting menu
NOTE: To delete a registered user, press [S] or [T] to select the user to delete and press [Delete].
4
Press [S] or [T] to select the item to
configure and press [Change #].
Continue to follow the screen
instructions.
Correct User Info.
Registration list:user list
Setting item
E-mail address
IP address or host name
Name to display
User password
Save folder No.
Information
User number : 2.
2-34
Setting value
(Not specified)
(Not specified)
(Not specified)
(Not specified)
(Not specified)
Change #
Preparation for Usage
Modifying Common Address Book
Register a destination in the common address book.
E-Mail Common Address Book ... address book used when sending e-mail attachments
Scan to PC Common Address Book ... address book used to directly send to recipient computer
FTP Common Address Book ... address book used to send data to an FTP server
NOTE: New addresses may also be registered.
A web browser can also be used to make additions to the Common Address Book.
Use Address Editor to add entries to the E-Mail Common Address Book and the Scan to PC
Common Address Book.
E-Mail Common Address Book and Scan to PC Common Address Book registration fields are as
follows.
Configuration Item
Description
E-mail address
For Send E-mail, sends graphic image as an e-mail attachment
to this address.
IP address or host name
For Scan to PC, sends graphic image data to the computer at
this address.
Name to display
Configure the destination name to be displayed in the Address
Book.
Save folder No.
For Scan to PC, the folder number set as the destination. Set
the folder corresponding to this number with the Scanner File
Utility on the destination computer.
Add dest.
For group registration, add the destination to be added to the
group from the Common Address Book.
The configuration items for the FTP Common Address Book are as follows.
Configuration Item
Description
IP address or host name
Graphic images are sent to the FTP server at this address.
Name to display
Configure the destination name to be displayed in the Address
Book.
Port
Enter the port number for the FTP server. (Usually 21)
Path
Enter the path to the folder to which you wish to upload. For
example, to save to a ScanData folder in the home directory,
input ScanData. Data will be saved to the home directory if
nothing is input.
User Name & Password
Input the user name and password used to logon to the FTP
server. This item is displayed if Skip Auth. info Input is set to
[On].
Skip Auth. info Input
If set to [On], users are not prompted for user name and
password when sending. To set to [On], register User Name &
Password.
2-35
Preparation for Usage
1
Press the Scanner key.
2
Press [Edit Addr. Book].
scanner function.
08/08/’05 14:00
Recall Program
Edit
Addr. Book
Scan to PC
Change
User Info.
TWAIN
Scan to
FTP
3
Input the sending user’s user number
and press [Enter].
History
of Sending
de.
Stop
User number
(with #key)
Clear
Enter
NOTE: Input the user number registered during user registration. For example, in the screen shown
in the process on page 2-34 for Step 3, the user number for User A is ‘001’.
If a password was set during user registration, enter that password.
4
Select the Common Address Book you
wish to edit.
Edit Address Book
Select the list to edit.
Common
Send Email
Common
Scan to PC
FTP Common
Add. Book
Select the list
5
To add a destination, press [Register
new dest.] and go to Step 6.
To add a group, press [Register new
group] and go to Step 7.
To edit a destination that already exists
or to add a destination to a group, press
[S] or [T] to select the destination you
wish to modify and press [Address
Properties] ([Correct Dest. Info]) and
make the modifications.
End
to PC
0-9
Destination
GHI
User B
O
PQR
UserGroup
X
YZ
Up
Delete
Register
new dest.
Down
t.
Address
Properties
Register
new group
# of register.
2/100
To delete a registered destination, press [S] or [T] to select the destination and press [Delete].
2-36
Preparation for Usage
6
Destination Registration
Select the item to be configured using
[S] or [T] and press [Change #]. The
settings configuration screen is
displayed. Follow the screen instructions
to make the changes. When done, press
[Complete entering] to save the
destination.
New Dest. Register
Registra.list:Scan to PC address book
Setting item
IP address or host name
Name to display
Save folder No.
Setting value
(Not specified)
(Not specified)
(Not specified)
Change #
Information
# of re
7
Group Registration
Press [Information], press [S] or [T] to
select the item to be configured and
press [Change #]. The settings
configuration screen is displayed. Follow
the screen instructions to make the
changes.
Register new group
Registra.list:Scan to PC address book
Setting item
Name to display
Password
Setting value
(Not specified)
(Not specified)
Change #
Information
Destination
# of re
Press [Destination] and press [Add
dest.]. The destination registration
screen is displayed. Press [S] or [T] to
select the destination to be added and
press [Add].
When done, press [Complete entering]
to save the group.
Register new group
Registra.list:Scan to PC address book
Display name
Destination
10.111.111.112
10.111.111.113
10.111.111.114
UserA
UserB
UserC
Delete
Add
dest.
Information
Destination
# of re
NOTE: Perform destination registration before group registration. Destinations will not be shown in
the list until destinations have been registered.
Group registration is not possible for Scan to FTP.
Configuring Date/Time and Time Difference
Configure the necessary regional information for the e-mail sending functionality.
The time the e-mail was sent from the scanner will be recorded as the transmission time in the
e-mail header. Follow the steps below to set the date, current time and time difference from GMT
(Greenwich Mean Time).
1
Press the System Menu/Counter key.
2-37
Preparation for Usage
2
Press [Machine Default].
System Menu / Counter
System Menu
Copy
Default
3
Language
Job
Accounting
Scanner
Default
Printer
Default
MP tray
Setting
BOX
Management
Machine
Default
Document
Management
Register
Orig. Size
Print
Report
Use the numeric keys to enter the 4 digit management code. The default setting is 2500 for the
25/20 ppm model and 3200 for the 32/25 and 32/32 ppm models.
If the correct management code has been entered, the Machine Default screen will be displayed.
NOTE: If the optional security kit has been installed, the management code is 8 digits long. The
default setting is 25002500 for the 25/20 ppm model and 32003200 for the 32/25 and 32/32 ppm
models.
4
Press [S] or [T] to select Time
difference and press [Change #].
System Menu / Counter
Machine Default
Default menu
Notify (Ready)
Notify (Attention)
Silent Mode
Date/Time
Time difference
Setting mode
On
On
On
‘05/07/20 14:00
GMT+01:00
Change #
System Menu
5
Press [+] and [–] to set the time
difference.
Back
Time difference
Example: Washington - GMT-5:00,
London - GMT 0:00
GMT+01:00
System Menu
6
Press [Close]. Settings are saved.
7
Press [S] or [T] to select Date/Time
and press [Change #].
- Machine Default
System Menu / Counter
Machine Default
Default menu
Notify (Ready)
Notify (Attention)
Silent Mode
Date/Time
Time difference
System Menu
2-38
Setting mode
On
On
On
‘05/07/20 14:00
GMT+01:00
Change #
Preparation for Usage
8
Press [+] and [–] to set the time and
date.
Back
Date/Time
Year
.2005
Month
.7
Day
.20
O
Time
14:00
O
S
System Menu
- Machine Default
NOTE: Set the date and time after setting the time difference.
Daylight savings time is disabled if daylight savings time and time/date are changed at the same
time.
9
Press [Close]. Settings are saved.
Installing the Scanner Utilities
The CD-ROM contains the following utilities for this scanner system.
•
Scanner File Utility
•
Address Book for Scanner
•
Address Editor (Administrator Tool)
•
DB Assistant (Administrator Tool)
•
TWAIN Source
The following procedures are based on a Windows XP installation, but the same procedure may be
followed to install on other Windows operating systems.
1
Start up Windows.
Close any other running applications.
2
Insert the included Software Library CD-ROM into the
CD-ROM drive.
A usage agreement is displayed. Click the Accept
button to accept the agreement terms. The Main Menu
screen is displayed.
If the screen is not displayed even after loading the
CD-ROM, open the CD-ROM drive letter and
double-click on the setup.exe file shown in the
window.
3
Click on Scanner Utilities.
2-39
Preparation for Usage
4
Click on the name of the utility you would like to install.
The installation screen for the utility is displayed. Follow the screen prompts to perform the
installation.
Using the Scanner File Utility
This section explains the necessary software installation and configuration steps to use the Scanner
File Utility to use the Scan to PC functionality.
Installing Scanner File Utility
This section explains how to install the Scanner File Utility.
2-40
1
Display the Scanner Utilities screen, referring to Steps 1-3 of Installing the Scanner Utilities on
page 2-39.
2
Click on Scanner File Utility.
3
Click the Next button.
4
Confirm the installation directory and
click the Next button.
Preparation for Usage
5
Select Install a desktop mode and click
the Next button.
6
Select the components to install and
click the Next button.
7
Click the Next button.
8
Click the Finish button.
Registering File Save Folders
Specify in Scanner File Utility which folders to use to save scanned documents.
NOTE: The following explanation is based on a Desktop Mode installation of Scanner File Utility.
1
Launch the Scanner File Utility by clicking on the start Menu and clicking Programs J Scanner
User Software J Scanner File Utility.
2-41
Preparation for Usage
2
Double-click the Scanner File Utility icon
shown in the taskbar to show the start
dialog box.
3
Click the Setup button.
4
Click the New button.
5
Input the file save folder number in the
No. column and click the ... button.
NOTE: Input a number (from 1-100) for the file save folder No. column.
Enter the file save folder number from the No. column (001 in this example) into Save Number in
Step 5 of Setting from a Web Browser on page 2-44.
2-42
Preparation for Usage
6
Choose a folder and click the OK button.
7
Click the OK button.
8
The save folder is registered. Click the
OK button.
9
Click the OK button.
2-43
Preparation for Usage
Setting from a Web Browser
Register users into this device using a web browser.
NOTE: The network configuration for this device must be done before performing this setting.
Contact your system administrator.
This function is not available during scanning. Verify that the scanner function is not in use before
configuring.
1
Start Internet Explorer or another web browser.
2
Input the device’s IP address into the
web browser’s address bar and press
the Enter key on the your keyboard.
NOTE: Check with your administrator for the device IP address.
Please note that the IP address set for scanning functionality and the IP address set for printing
functionality are different.
2-44
3
Click on Sender List.
4
Click on the number of the Sender
(User) List to register.
5
Input the Registration Name, Address
of Address Book installed PC, and
Save Number.
Preparation for Usage
NOTE: For Address of Address Book installed PC, enter the address of the computer on which
Scanner File Utility is installed.
For Save Number, enter the file save folder number you entered in the No. column in Step 5 of
Registering File Save Folders on page 2-41.
6
Click the Registration button.
NOTE: Be sure to click the Registration button. Settings are not saved if you change screens or
close the browser window without pressing Registration.
After the above settings have been completed, scanned images can be sent to user PCs
(computers registered in the Sender list) using Scan to PC.
To send to destinations other than User PCs, register the destination using a web browser, the
Address Editor, or Address Book for Scanner.
2-45
Preparation for Usage
2-46
3
Basic Operation
This chapter explains the following operations.
•
Basic Copying Procedures...3-2
•
Selecting Image Quality...3-5
•
Adjusting Exposure...3-6
•
Reducing/Enlarging...3-7
•
Duplex Mode...3-11
•
Split Mode...3-14
•
Sort Mode...3-16
•
Interrupt Copy...3-17
•
Job Reservation...3-18
•
Canceling a Print Job...3-19
•
Scanner Operation...3-20
•
Low-Power Mode...3-35
•
Sleep Mode...3-36
3-1
Basic Operation
Basic Copying Procedures
Follow the steps as below for basic copying.
1
Open the main power switch cover and move the main
power switch to on ( | position).
After warm-up is complete, the Start key’s Start
indicator will glow green.
2
Press the Copier key.
3
Place the original.
NOTE: Refer to Placing Originals on page 2-16 for
original placement instructions.
4
3-2
Press the Auto Color, Full Color or Black&White key
to select a color mode.
Color Mode
Description
Auto color mode
Automatically detects color and black and white originals and copies
color originals in color and black and white originals in black and white.
Full Color mode
Copies all originals in full color.
Black and White mode
Copies all originals in black and white.
Basic Operation
5
Confirm that [APS] is selected. In this
mode, paper that matches the size of the
originals will be selected automatically.
To change the paper size, press the
desired paper size to select the paper
source.
Ready to copy.
( Full-Color )
Paper Size
11×8
100%
11×8½"
Plain
11×17"
Color
APS
11×8½"
Plain
11×8½"
Plain
MP tray
Plain
Basic
User choice
6
Use the numeric keys to enter the copy quantity. You
can specify up to 999 copies.
7
Press the Start key.
Auto %
Staple Off
100%
Auto
Exposure
Staple
Left Top
Reduce
/Enlarge
Exposure
Mode
Staple
Function
Color func.
Program
NOTE: Adjust the angle of the operation panel by
pulling the operation panel lower lever.
8
Remove the finished copies from the output tray.
The output tray can hold up to 250 sheets of standard
paper (80 g/m2). However, the actual capacity varies
depending on the type and condition of the paper.
3-3
Basic Operation
Turning off the main power switch
Press the Power key on the operation panel, and after
verifying the Power indicator has gone off, switch off
the main power switch. Switching off the main power
switch before pressing the Power key may cause
damage to the internal hard disk.
If the optional fax kit is installed, when the main power
switch is off ( position), fax send/receive is disabled.
To turn the power off, press the Power key on the
operation panel.
3-4
Basic Operation
Selecting Image Quality
Choose the image quality suited to the type of original.
Image Quality
Description
Text+Photo
Appropriate for mixed text and photo originals.
Photo
Appropriate for photo originals taken with a camera.
Print
Appropriate for photo originals from magazines or printed media.
Text
Appropriate for document originals with large amounts of text.
Map
Appropriate for map originals.
1
Place the original.
2
Press [Function].
Ready to copy.
11×8½"
Plain
11×17"
Color
11×8½"
Plain
APS
MP tray
Plain
11×8½"
Plain
User choice
Basic
3
Press [Orig. Image Quality] ([Image
Quality]).
Ready to copy.
Select the image quality.
Staple Off
100%
Auto
Exposure
Staple
Left Top
Reduce
/Enlarge
Exposure
Mode
Staple
Function
Color func.
Program
Paper Size
11×8½
100%
( Full-Color )
2 sided/
Separation
Select
Orig.Size
Combine
Exposure
Mode
Reduce
/Enlarge
Auto
Selection
Batch
Scanning
Up
Orig.Image
Quality
Margin/
Centering
Page #
Poster
Down
Sort/
Offset
Border
Erase
Cover
Mode
Booklet
User choice
Ready to copy.
Orig.Image Quality
Text+Photo
Text
Photo
Map
Print
5
Auto %
Select
Paper
Basic
4
Paper Size
11×8
100%
( Full-Color )
Function
Color func.
( Full-Color )
Shortcut
Program
Paper Size
11×8½
100%
Back
Text+Photo:Text+Photo original.
Photo: For photographic prints
Print: For book and magazine ima
Text: For text, pencil,or fine lines
Map: For maps or pencil illustratio
Press the Start key. Copying begins.
3-5
Basic Operation
Adjusting Exposure
Adjust the exposure automatically or manually. The default setting is [Manual]. Follow the steps as
below for Manual mode.
1
Place the original.
2
Press the exposure adjustment key
( / ) to adjust the exposure level.
Press [Auto Exposure] to use Auto
Exposure mode. The machine
determines a suitable exposure level for
copying. To change the exposure mode
from [Auto] to [Manual], press the
exposure adjustment key ( / ).
Ready to copy.
11×8½"
Plain
11×17"
Color
11×8½"
Plain
APS
MP tray
Plain
11×8½"
Plain
Basic
User choice
( Full-Color )
Auto %
Paper Size
11×8
100%
Staple Off
100%
Auto
Exposure
Staple
Left Top
Reduce
/Enlarge
Exposure
Mode
Staple
Function
Color func.
Program
NOTE: Auto Exposure mode is only available for black and white copying. Also, copies will be made
in Manual Exposure mode if the Auto Color mode detects a full color original.
3
Press the Start key. Copying begins.
NOTE: Press [Exposure Mode] to display the
Exposure Mode screen. You can also adjust the
exposure from this screen.
3-6
Basic Operation
Reducing/Enlarging
Adjust the magnification to reduce or enlarge the original image.
The following zoom modes are available.
•
Auto Zoom – Automatically reduces or enlarges the original image suited to the selected paper
size.
•
Manual Zoom – Reduces or enlarges the original image in 1 % increments between 25 - 400 %.
•
Preset Zoom – Reduces or enlarges at preset magnifications.
•
XY Zoom – Independently adjust vertical and horizontal magnifications. Set zoom size in 1 %
increments between 25 - 400 %.
Auto Zoom
Automatically reduces or enlarges the original image
suited to the selected paper size.
11 × 17": 129 %
Follow the steps below to use auto zoom.
8 1/2 × 11"
A3: 141 %
5 1/2 × 8 1/2": 64 %
A4
A5: 70 %
1
Place the original and select paper size.
Ready to copy.
11×8½"
Plain
11×17"
Color
2
Press [Auto %].
APS
11×8½"
Plain
11×8½"
Plain
MP tray
Plain
Basic
User choice
Ready to copy.
( Full-Color )
Auto %
Staple Off
100%
Auto
Exposure
Staple
Left Top
Reduce
/Enlarge
Exposure
Mode
Staple
Function
Color func.
( Full-Color )
The magnification will be displayed.
11×8½"
Plain
11×17"
Color
3
APS
11×8½"
Plain
11×8½"
Plain
MP tray
Plain
Basic
User choice
Paper Size
11×1
100%
Auto %
Program
Paper Size
11×17
100%
Staple Off
100%
Auto
Exposure
Staple
Left Top
Reduce
/Enlarge
Exposure
Mode
Staple
Function
Color func.
Program
Press the Start key. The image will be automatically
reduced or enlarged for copying onto the selected
paper.
3-7
Basic Operation
Manual Zoom
Reduces or enlarges the original image in 1 %
increments between 25 - 400 %.
25 %
Follow the steps as below to use manual zoom.
400 %
1
Place the original and press
[Reduce/Enlarge].
Ready to copy.
11×8½"
Plain
11×17"
Color
11×8½"
Plain
APS
Auto %
MP tray
Plain
11×8½"
Plain
Basic
2
Press [+] and [–] to set the displayed
magnification.
Press [# keys] ([#-Keys]) to enter with
numeric keys.
User choice
Ready to copy.
3-8
Press the Start key. Copying begins.
Staple Off
100%
Auto
Exposure
Staple
Left Top
Reduce
/Enlarge
Exposure
Mode
Staple
Function
Color func.
( Full-Color )
Reduce/Enlarge
Shortcut
Program
Paper Size
11×8
100%
Back
Auto %
154%
5½×8½"J8½×14"
77%
11
Standard
Zoom
100%
129%
8½×11"J11×17"
64%
11
XY Zoom
400%
121%
8½×14"J11×17"
50%
11×
78%
8½×14"J8½×11"
25%
# keys
3
Paper Size
11×8
100%
( Full-Color )
200%
5½×8½"J11×17"
Basic Operation
Preset Zoom
Reduces or enlarges at preset magnifications.
Model Type
Zoom Level
Inch models
200 % (5 1/2 × 8 1/2"J11 × 17"), 154 % (5 1/2 × 8 1/2"J8 1/2 × 14"),
129 % (8 1/2 × 11"J11 × 17"), 121 % (8 1/2 × 14"J11 × 17"),
78 % (8 1/2 × 14"J8 1/2 × 11"), 77 % (11 × 17"J8 1/2 × 14"),
64 % (11 × 17"J8 1/2 × 11"), 50 % (11 × 17"J5 1/2 × 8 1/2")
Metric models
200 % (A5JA3), 141 % (A4JA3, A5JA4), 127 % (FolioJA3),
106 % (11 × 15"JA3), 90 % (FolioJA4), 75 % (11 × 15"JA4),
70 % (A3JA4, A4JA5)
Metric models (Asia
Pacific)
200 % (A5JA3), 141 % (A4JA3, B5JB4), 122 % (A4JB4, A5JB5),
115 % (B4JA3, B5JA4), 86 % (A3JB4, A4JB5),
81 % (B4JA4, B5JA5), 70 % (A3JA4, B4JB5)
Follow the steps as below to use preset zoom.
1
Place the original and press
[Reduce/Enlarge].
Ready to copy.
11×8½"
Plain
11×17"
Color
11×8½"
Plain
APS
Auto %
MP tray
Plain
11×8½"
Plain
Basic
2
Select the magnification.
NOTE: You can also adjust the
magnification in 1 % increments as
desired by pressing [+] and [–].
to copy.
3
User choice
Staple Off
100%
Auto
Exposure
Staple
Left Top
Reduce
/Enlarge
Exposure
Mode
Staple
Function
( Full-Color )
e
Shortcut
# keys
Paper Size
11×8
100%
( Full-Color )
Program
Color func.
Paper Size Set
11×8½"
100%
Back
Close
Auto %
154%
5½×8½"J8½×14"
77%
11×17"J8½×14"
100%
129%
8½×11"J11×17"
64%
11×17"J8½×11"
400%
121%
8½×14"J11×17"
50%
11×17"J5½×8½"
200%
5½×8½"J11×17"
78%
8½×14"J8½×11"
25%
Press the Start key. Copying begins.
3-9
Basic Operation
XY Zoom
Select vertical and horizontal magnifications
individually. Set zoom size in 1 % increments between
25 - 400 %.
Y
Follow the steps as below to use XY zoom.
X
1
Place the original and press
[Reduce/Enlarge].
Ready to copy.
11×8½"
Plain
11×17"
Color
11×8½"
Plain
APS
Auto %
MP tray
Plain
11×8½"
Plain
Basic
2
Press [XY Zoom].
3
Press [+] and [–] to set the X and Y
zoom ratios.
User choice
Ready to copy.
Staple Off
100%
Auto
Exposure
Staple
Left Top
Reduce
/Enlarge
Exposure
Mode
Staple
Function
Color func.
Program
Paper Size
11×8½
100%
( Full-Color )
Shortcut
Reduce/Enlarge
Press [# keys] ([#-Keys]) to enter with
numeric keys.
Paper Size
11×8
100%
( Full-Color )
Y
Back
Select Original I
Direction.
X
Standard
Zoom
XY Zoom
# keys
4
Under Select Original Image Direction,
select [Top Edge] ([Back Edge]) or [Left
Top Edge] ([Left top corner]).
to copy.
Shortcut
Y
3-10
Press the Start key. Copying begins.
Paper Size
Set
11×8½"
100%
Back
Close
Select Original Image
Direction.
X
# keys
5
( Full-Color )
e
Top Edge
# keys
# keys
Top Edge
Left Top
Edge
Basic Operation
Duplex Mode
Use Duplex mode to create two-sided copies from a
variety of originals, including facing pages (such as
books or magazines) and two-sided originals.
5
4
5
3
3
4
1
2
2
1
Original
Copy
One-sided to Two-sided
Produces two-sided copies from one-sided originals. The back side of the last copied page will be
blank for originals with an odd number of pages.
5
4
5
3
3
4
1
2
2
1
Original
Copy
The following binding options are available.
•
Original Left/Right Bind to Finish Left/Right Bind: Back side is copied with same orientation as
front side. ...A
•
Original Left/Right Bind to Finish Top Bind: Images are copied onto the back side rotated 180°.
Pages of the copied document are in the same orientation if pages are flipped upward. ...B
A
ghi
def
B
ghi
ghi
abc
abc
def
abc
def
Original
Copy
Two-sided to Two-sided
Produces two-sided copies from two-sided originals.
5
5
3
3
4
4
1
1
2
2
Original
Copy
NOTE: This operation requires the optional document processor.
Supported paper sizes for Two-sided to Two-sided operation are: 11 × 17", 8 1/2 × 14", 11 × 8 1/2",
8 1/2 × 11", 5 1/2 × 8 1/2", 8 1/2 × 13", 8 1/2 × 13 1/2", A3, B4, A4, A4R, B5, B5R, A5R and Folio.
3-11
Basic Operation
Book to Two-sided
Produces two-sided copies from originals such as books and magazines with facing pages.
4
2
1
4
3
3
1
1
2
2
1
0
3
4
2
3
2
1
3
4
3
1
0
2
Original
Copy
NOTE: Supported paper sizes for Book to Two-Sided operation are limited to: 11 × 17", 8 1/2 × 11",
A3, B4, A4R, B5R, A5R, and 8K.
Follow the steps as below to use duplex copying.
1
Press [Function].
Ready to copy.
( Full-Color )
Paper Size
11×8
100%
11×8½"
Plain
11×17"
Color
2
Press [2 sided/Separation]
([2-sided/Split]).
APS
11×8½"
Plain
11×8½"
Plain
MP tray
Plain
Basic
User choice
Ready to copy.
Select the desired Duplex mode.
Staple Off
100%
Auto
Exposure
Staple
Left Top
Reduce
/Enlarge
Exposure
Mode
Staple
Function
Color func.
( Full-Color )
Program
Paper Size
11×8½
100%
Select
Paper
2 sided/
Separation
Select
Orig.Size
Combine
Exposure
Mode
Reduce
/Enlarge
Auto
Selection
Batch
Scanning
Up
Orig.Image
Quality
Margin/
Centering
Page #
Poster
Down
Sort/
Offset
Border
Erase
Cover
Mode
Booklet
Basic
3
Auto %
User choice
2 sided mode.
Function
Color func.
Paper Size
11×8½
100%
( Full-Color )
Shortcut
2 sided/Separation
Program
Back
Finished
Select Original I
Direction.
1 sided
J1 sided
4
3-12
For [2 sided J 2 sided] ([2-sided J
2-sided]) or [Book J 2 sided] ([Book J
2-sided]), select the bind direction for
Original.
2 sided
J1 sided
1 sided
J2 sided
2 sided
J2 sided
Book
J1 sided
Book
J2 sided
2 sided mode.
Open from
Left/Right
Open from
top
Top Edge
Paper Size
11×8½
100%
( Full-Color )
Shortcut
2 sided/Separation
Original
Back
Finished
Select Original I
Direction.
1 sided
J1 sided
1 sided
J2 sided
2 sided
J1 sided
2 sided
J2 sided
Book
J1 sided
Book
J2 sided
Open from
Left/Right
Open from
top
Open from
Left/Right
Open from
top
Top Edge
Basic Operation
For [1 sided J 2 sided] ([1-sided J
2-sided]) or [2 sided J 2 sided] ([2-sided
J 2-sided]), select the bind direction for
Finished.
2 sided mode.
Paper Size
11×8½
100%
( Full-Color )
Shortcut
2 sided/Separation
Back
Finished
Select Original I
Direction.
1 sided
J1 sided
2 sided
J1 sided
1 sided
J2 sided
2 sided
J2 sided
Book
J1 sided
Book
J2 sided
For [Book J 2 sided] ([Book J 2-sided]),
set the copy page order for Finished.
2 sided mode.
Open from
Left/Right
Open from
top
Top Edge
Paper Size
11×8½
100%
( Full-Color )
Shortcut
2 sided/Separation
Original
Back
Finished
Set the book orig
top side direct to
1 sided
J1 sided
1 sided
J2 sided
Open from
left
BookJ
2 sided
2 sided
J1 sided
2 sided
J2 sided
Open from
right
BookJ
Book
Book
J1 sided
Book
J2 sided
For [1 sided J 2 sided] ([1-sided J
d mode.
2-sided]) or [2 sided J 2 sided] ([2-sided
J 2-sided]), set [Top Edge] ([Back
ation
Edge]) or [Left Top Edge] ([Left top
corner]) from Select Original Image
Direction.
1 sided
J2 sided
2 sided
J2 sided
Book
J2 sided
5
Paper Size
Set
11×8½"
100%
( Full-Color )
Shortcut
Original
Back
Close
Finished
Select Original Image
Direction.
Open from
Left/Right
Open from
top
Open from
Left/Right
Open from
top
Top Edge
Left Top
Edge
Place the original and press the Start key.
If the original has been placed on the optional
document processor, copying begins automatically.
If the original is placed on the platen, Scan next
original(s) is displayed. Place the next original page
and press the Start key.
If all original pages have been scanned, press
[Scanning finished]. Copying begins.
3-13
Basic Operation
Split Mode
Use Split mode to create single-sided copies from two-sided originals or originals with facing pages
(such as books or magazines) as follows.
Two-sided to One-sided
Copies each side of a two-sided original onto two individual sheets.
1
2
1
2
Original
Copy
NOTE: This operation requires the optional document processor.
The following binding options are available.
•
Open from Left/Right: The back side and front side of the original are copied with the same
orientation.
•
Open from top: The back side is copied rotated 180% from the orientation of the front side.
Book to One-sided
Copies each page of originals with facing pages (such as books or magazines) onto two individual
sheets.
1
2
2
1
Original
Copy
The following binding options are available.
•
Open from left: Originals with facing pages are copied from left to right.
•
Open from right: Originals with facing pages are copied from right to left.
NOTE: Original sizes for split mode copy mode are limited to 11 × 17", 8 1/2 × 11", A3, B4, A4R, B5R
and 8K. Paper sizes are limited to 11 × 8 1/2", A4, B5 and 16K. Change the paper size to fit the
original to that size.
Follow the steps as below to use Split mode.
1
Press [Function].
Ready to copy.
11×8½"
Plain
11×17"
Color
11×8½"
Plain
APS
MP tray
Plain
11×8½"
Plain
Basic
3-14
User choice
( Full-Color )
Auto %
Paper Size
11×8
100%
Staple Off
100%
Auto
Exposure
Staple
Left Top
Reduce
/Enlarge
Exposure
Mode
Staple
Function
Color func.
Program
Basic Operation
2
Press [2 sided/Separation]
([2-sided/Split]).
Ready to copy.
Select
Paper
2 sided/
Separation
Select
Orig.Size
Combine
Exposure
Mode
Reduce
/Enlarge
Auto
Selection
Batch
Scanning
Up
Orig.Image
Quality
Margin/
Centering
Page #
Poster
Down
Sort/
Offset
Border
Erase
Cover
Mode
Booklet
Basic
3
Paper Size
11×8½
100%
( Full-Color )
Select the desired Split mode.
User choice
Ready to copy.
Function
Color func.
Program
Paper Size
11×8½
100%
( Full-Color )
Shortcut
2 sided/Separation
Back
Original
Select Original I
Direction.
4
1 sided
J1 sided
1 sided
J2 sided
2 sided
J1 sided
2 sided
J2 sided
Book
J1 sided
Book
J2 sided
Specify the binding in the Original
section.
Ready to copy.
Open from
Left/Right
Open from
top
Top Edge
Paper Size
11×8½
100%
( Full-Color )
Shortcut
2 sided/Separation
Back
Original
Select Original I
Direction.
5
When [2 sided J 1 sided] ([2-sided J
1-sided]) is selected, select [Top Edge]
([Back Edge]) or [Left Top Edge] ([Left
top corner]) for Select Original Image
Direction.
1 sided
J1 sided
1 sided
J2 sided
2 sided
J1 sided
2 sided
J2 sided
Book
J1 sided
Book
J2 sided
to copy.
Top Edge
Paper Size
Set
11×8½"
100%
( Full-Color )
Shortcut
ation
Back
Close
Original
Select Original Image
Direction.
1 sided
J2 sided
2 sided
J2 sided
Book
J2 sided
6
Open from
Left/Right
Open from
top
Open from
Left/Right
Open from
top
Top Edge
Left Top
Edge
Place the original and press the Start key.
If the original has been placed on the optional
document processor, copying begins automatically.
If the original is placed on the platen, Scan next
original(s) is displayed. Place the next original page
and press the Start key.
If all original pages have been scanned, press
[Scanning finished]. Copying begins.
3-15
Basic Operation
Sort Mode
Scans multiple originals to deliver complete sets of
copies as required according to page number.
3
2
1
3
3
Follow the steps as below to use Sort mode.
2
2
1
1
3
2
1
Original
1
Press [Function].
Ready to copy.
11×8½"
Plain
11×17"
Color
APS
11×8½"
Plain
2
Press [Sort/Offset] ([Sort/Group]).
User choice
Ready to copy.
Staple Off
100%
Auto
Exposure
Staple
Left Top
Reduce
/Enlarge
Exposure
Mode
Staple
Function
Color func.
( Full-Color )
Program
Paper Size
11×8½
100%
2 sided/
Separation
Select
Orig.Size
Combine
Exposure
Mode
Reduce
/Enlarge
Auto
Selection
Batch
Scanning
Up
Orig.Image
Quality
Margin/
Centering
Page #
Poster
Down
Sort/
Offset
Border
Erase
Cover
Mode
Booklet
Press [Sort: On].
User choice
Ready to copy.
Sort/Offset
Offset
Sort:Off
Off
Sort:On
On
4
Use the numeric keys to enter the copy quantity.
5
Place the original and press the Start key.
If the original has been placed on the optional
document processor, copying begins automatically.
If the original is placed on the platen, Scan next
original(s) is displayed. Place the next original page
and press the Start key.
If all original pages have been scanned, press
[Scanning finished]. Copying begins.
Complete sets of copies will be delivered on the output
tray.
Function
Color func.
( Full-Color )
Shortcut
Sort
3-16
Paper Size
11×8
100%
Select
Paper
Basic
3
( Full-Color )
Auto %
MP tray
Plain
11×8½"
Plain
Basic
Copy
Program
Paper Size
11×8
100%
Back
Basic Operation
Interrupt Copy
Interrupt copying is useful to pause one copy job and
copy other originals with different copy settings. After
completing the urgent job, you can resume the
interrupted jobs according to their original settings. You
can also pause copy or print jobs to make emergency
copies.
Follow the steps as below to use interrupt copying.
1
Press the Interrupt key.
Interrupt Mode OK will be displayed.
2
Temporarily remove and set aside the original pages of the current job.
3
Place the original for the interrupt job.
4
Specify the copy settings for the interrupt job and press
the Start key.
5
After the interrupt job is completed, remove the originals and press the Interrupt key.
The previous settings will be restored. If there was a job being printed, it will be resumed.
6
Replace the interrupted original and press the Start key to restart the job.
3-17
Basic Operation
Job Reservation
Scan an original and reserve the next job even when a copy or print job is being outputted. The
reserved job will be started after the current job is completed. If the optional fax is installed, reserve
jobs even when received fax data is being printed.
Follow the steps as below to use Job Reservation mode.
1
Press [Reserve next copy].
opying.
Copying can be reserved will be
displayed.
Count/Set
Output
Reserve
next copy
11×8½"
Color, 1 side
Auto %
Plain
Pause
Top tray
2
Place the Job Reservation original.
3
Specify the copy settings for the
reserved job.
To cancel a reserved job, press [Finish
Job res.] ([Job resrv. finished]).
Copying can be reserved. ( Full-Color )
11×8½"
Plain
11×17"
Color
11×8½"
Plain
APS
MP tray
Color
11×8½"
Plain
Basic
4
Press the Start key. Scanning of the original begins.
After scanning all the originals, the touch panel will
return to output screen.
The reserved job will be started after the current job is
completed.
3-18
User choice
Auto %
Paper Size
11×8½
100%
Staple Off
100%
Auto
Exposure
Staple
Left Top
Reduce
/Enlarge
Exposure
Mode
Staple
Function
Color func.
Program
Basic Operation
Canceling a Print Job
Follow the steps below to cancel printing and clear data.
Canceling a Print Job Currently Being Processed
Use the printer screen to cancel a print job that is currently spooling.
1
Press the Printer key.
2
Press [Cancel].
Processing.
Orig. Page
11×8½"
Network
I/F
Cancel
User name: NO USER NAME
3
Select the interface to cancel.
Back
Select interface to cancel the job.
Current
Job
On
4
Parallel
Network
Serial
USB
Printing is canceled.
3-19
Basic Operation
Scanner Operation
This section explains basic scanner operation. The following 5 methods may be used to scan
originals.
•
Scan an Image for Send E-mail...3-20
•
Scan an Image for Scan to PC...3-23
•
Scan an Image Using TWAIN...3-27
•
Database Connection Setup...3-28
•
Scan an Image for Scan to FTP...3-32
Scan an Image for Send E-mail
Use Send E-mail to send a scanned original image to an e-mail recipient as an attachment.
Before using Send E-mail
This operation requires the scanner SMTP to be set (see Scanner Basic Settings on page 2-32).
Also, the Registered Name and E-mail Address for the destination must also be registered (see
Registering User Information on page 2-34).
NOTE: refer to Modifying Common Address Book on page 2-35 for how to add to the Common
Address Book from the operation panel.
Scan an image for Send E-mail
1
Press the Scanner key.
2
Press [Send E-mail].
Select scanner function.
08/08/’05
Recall Program
3
Select a destination (user name). Either
press the number key or use the
numeric keys to enter the user number
and press [Enter].
Send
E-mail
Scan to PC
Database
Connection
Scan to
FTP
name.
TWAIN
Stop
User number
(with #key)
Enter
3-20
Basic Operation
NOTE: If the scanner default setting for Selec. of senders (users) is set to [On], user number 001
will automatically be selected.
If a password was entered when the user was registered, the password input screen is displayed.
Input the password and press [Enter]. If the password is correct, the scanner settings screen is
displayed.
4
To input a mail address, press [Enter
dest.].
Ready to scan.
Place the original and select destination.
( Full-Color )
Register Prgrm
Send E-mail-Sending
Cont. TX to
Top Edge
Auto
Destination
Orig. Set
Direction
Select
Orig.Size
Auto size
Delete
Enter
dest.
5
Enter the e-mail address for the
destination (recipient). After inputting,
press [End] to display the sending
method screen.
Select
Send Size
Address
Book
Original
11×8½"
08/08
Basic
200dpi
Scanning
Resolution
Quality
End
Stop
s
Char.Limit:64 letters including #
Back
Del.
Space
6
Select whether to send as [To:], [CC:], or
[BCC:] and press [Enter].
d of receiver.
Back
Stop
To:
CC:
BCC:
7
Press [Address Book] to use a private
address book or common address book.
Enter
Ready to scan.
Place the original and select destination.
( Full-Color )
Register Prgrm
Send E-mail-Sending
Cont. TX to
Top Edge
Auto
Destination
Orig. Set
Direction
Select
Orig.Size
Auto size
Delete
Enter
dest.
8
Press [Common] ([Common book]) or
[Private] ([Private book]) to display the
destinations stored in the selected
address book. In this example a
destination is selected from the
Common Address Book.
Press [S] or [T] to select a destination
and select whether to send as [To:],
[CC:], or [BCC:].
Select
Send Size
Address
Book
Original
11×8½"
08/08
Basic
200dpi
Scanning
Resolution
Quality
Address Book
Symbol
ABC
0-9
DEF
Address
JKL
MNO
PQR
STU
VWX
YZ
Select:
1.
Up
User A
GHI
Down
Common
Private
When a destination is selected, an ⌧ is displayed next to it in the Select column to the right of the
Address column.
3-21
Basic Operation
NOTE: The private address book is not displayed if the Address Book for Scanner is not running on
the sender(user)’s computer.
9
Confirm the destination(s) and press [Close].
Return to Step 4 to continue adding recipients.
10
Confirm the destination(s). Press [S] or
[T] to confirm that all selected
destinations are correct. Press [Delete] if
a selected destination is not needed.
Ready to scan.
Place the original and select destination.
( Full-Color )
Register Prgrm
Send E-mail-Sending
Auto
Destination
To:
To:
Select
Orig.Size
User A
User B
Auto size
Delete
Enter
dest.
Address
Book
Select
Send Size
Basic
Original
11×8½"
08/08
Cont. TX to
Top Edge
Orig. Set
Direction
200dpi
Scanning
Resolution
Quality
Scanner Setup
11
Press the Auto Color, Full Color or Black&White key
to select a color mode.
12
The scanner setup screen is displayed
in the right side of the screen. Press the
appropriate keys to configure the various
settings. This section explains the setup
procedure using [Orig. Set Direction] as
an example.
to scan.
riginal and select destination.
ending
Register Prgrm
Auto
Select
Orig.Size
A
B
Auto size
Press [Orig. Set Direction].
Delete
Address
Book
13
If the original has been loaded with Top
edge set at the rear, select [Top Edge]
([Back Edge]). If the original has been
set to the left, press [Left Top Edge]
([Left top corner]). Press [Close] to save
the setting, or press [Back] to leave
settings as they are and return to the
screen shown in Step 10.
( Full-Color )
to scan.
Select
Send Size
Basic
( Full-Color )
riginal and select destination.
tion
Original
Send
11×8½"
8½×11"
08/08/’05 14:00
Cont. TX to
Top Edge
Orig. Set
Direction
Cancel
Auto
File Name
Input
200dpi
JPEG
Scanning
Resolution
File Type
Quality
Edit
Original
Send
11×8½"
8½×11"
08/08/’05 14:00
Back
Close
Select Original Image
Direction.
"Check direction of original" shown at
right side of display. Follow the steps.
If setting mode is wrong, incorrect send
will result.
Top Edge
Left Top
Edge
NOTE: The original may not be scanned correctly if original set direction is not correctly configured.
Be sure to confirm the original set direction when configuring the scanner.
3-22
Basic Operation
14
Confirm settings, place the original, and
press the Start key.
Now scanning originals.
Scanning of the original begins.
Orig. Page
08/08
Send
.3
If continuous scan is enabled, proceed
to Step 15. If continuous sending is
enabled, proceed to Step 16.
Send E-mail
11×8½"
1 sided
Top Edge
8½×11"
SCAN0006_nnn.jpg
User name: UserA
15
If [Batch Scanning] is set to [On] from
[Edit] from the scanner settings screen,
after scanning is complete, a screen
prompt appears asking whether to
continue scanning or to finish.
To continue scanning, place the next
original, select scanner settings as
necessary and press the Start key.
riginal(s).
riginals and press start key.
nning finished" key to finish scanning.
Step
08/08/’05 14:00
.2
Top Edge
Orig. Set
Direction
200dpi
Cancel
Auto
File Name
Input
JPEG
Scanning
Resolution
File Type
Quality
Edit
Original
1. Page
SCAN0004_nnn.jpg
Scanning
finished
When done, press [Scanning finished].
16
If [Continuous TX] is enabled from the
scanner settings screen, after a
transmission is complete, the scanner
settings screen is displayed with the
same settings used in the previous
transmission.
Ready to scan.
Place the original and select destination.
( Full-Color )
Send E-mail-Continuous TX
Register Prgrm
Auto
Destination
To:
Select
Orig.Size
User A
Auto size
To continue, place the next original,
select scanner settings as necessary
and press the Start key.
Delete
Enter
dest.
Address
Book
Select
Send Size
Basic
Original
11×8½"
08/08
Single Scan
Top Edge
Orig. Set
Direction
200dpi
Scanning
Resolution
Quality
To end the operation, press [Cancel] ([Job cancel]).
Scan an Image for Scan to PC
Use Scan to PC to save scanned original images as files to a folder on a computer. Access to this
feature is provided by installing the Scanner File Utility on the target computer.
Before using Scan to PC
Configure the following before using Scanner File Utility for the first time.
1
Install Scanner File Utility on the sending computer.
2
Launch Scanner File Utility and register the folders to save image files.
3
From the operation panel, register the IP address of the target computer, a registration name and a
save number.
In the save number entry field, enter the same number (from 001-100) as registered for the save
folder in Scanner File Utility.
NOTE: Refer to Modifying Common Address Book on page 2-35 for how to add to the Common
Address Book from the operation panel.
3-23
Basic Operation
Scanning an Image for Scan to PC
1
Press the Scanner key.
2
Press [Scan to PC].
Select scanner function.
08/08/’05
Recall Program
3
Select a destination (user name). Either
press the number key or use the
numeric keys to enter the user number
and press [Enter].
Send
E-mail
Scan to PC
Database
Connection
Scan to
FTP
TWAIN
name.
Stop
User number
(with #key)
Enter
NOTE: If the scanner default setting for Selec. of senders (users) is set to [On], user number 001
will automatically be selected.
If a password was entered when the user was registered, the password input screen is displayed.
Input the password and press [Enter]. If the password is correct, the scanner settings screen is
displayed.
4
To save a copy for the sender (user),
press [Save at User PC].
The sender (user) is displayed in the
destination column.
Ready to scan.
Place the original and select destination.
( Full-Color )
Register Prgrm
Scan to PC-Sending
Auto
Destination
Select
Orig.Size
Auto size
Delete
Save at
User PC
5
Press [Address Book] to use a private
address book or common address book.
Address
Book
Select
Send Size
Basic
Ready to scan.
Place the original and select destination.
( Full-Color )
Register Prgrm
Scan to PC-Sending
Auto
Destination
Select
Orig.Size
Auto size
Delete
Save at
User PC
3-24
Address
Book
Select
Send Size
Basic
Original
11×8½"
08/08
Cont. TX to
Top Edge
Orig. Set
Direction
200dpi
Scanning
Resolution
Quality
Original
11×8½"
08/08
Cont. TX to
Top Edge
Orig. Set
Direction
200dpi
Scanning
Resolution
Quality
Basic Operation
6
Press [Common] ([Common book]) or
[Private] ([Private book]) to display the
destinations stored in the selected
address book. In this example a
destination is selected from the
Common Address Book.
Close
0-9
O
Address
Select
GHI
Group A
PQR
Group B
1.
Up
Address
Properties
Down
Enter
User A
X
User B
Press [S] or [T], select the desired
destination to be added and press
[Enter] ([Add dest.]).
User C
Private
When a destination is selected, an ⌧ is displayed next to it in the Select column to the right of the
Address column.
NOTE: The private address book is not displayed if the Address Book for Scanner is not running on
the sender(user)’s computer.
7
Confirm the destination(s) and press [Close].
Return to Step 5 to continue adding recipients.
8
Confirm the destination(s). Press [S] or
[T] to confirm that all selected
destinations are correct. Press [Delete] if
a selected destination is not needed.
Ready to scan.
Place the original and select destination.
Scan to PC-Sending
( Full-Color )
Register Prgrm
Auto
Destination
Select
Orig.Size
Group A
Auto size
Delete
Save at
User PC
Address
Book
Select
Send Size
Basic
Original
11×8½"
08/08
Cont. TX to
Top Edge
Orig. Set
Direction
200dpi
Scanning
Resolution
Quality
Scanner Setup
9
10
Press the Auto Color, Full Color or Black&White key
to select a color mode.
The scanner setup screen is displayed
in the right side of the screen. Press the
appropriate keys to configure the various
settings. This section explains the setup
procedure using [Orig. Set Direction] as
an example.
to scan.
riginal and select destination.
ding
( Full-Color )
Register Prgrm
Auto
Select
Orig.Size
Auto size
Press [Orig. Set Direction].
Delete
Address
Book
Select
Send Size
Basic
Original
Send
11×8½"
8½×11"
08/08/’05 14:00
Cont. TX to
Top Edge
Orig. Set
Direction
Cancel
Auto
File Name
Input
200dpi
JPEG
Scanning
Resolution
File Type
Quality
Edit
3-25
Basic Operation
11
If the original has been loaded with Top
edge set at the rear, select [Top Edge]
([Back Edge]). If the original has been
set to the left, press [Left Top Edge]
([Left top corner]). Press [Close] to save
the setting, or press [Back] to leave
settings as they are and return to the
screen shown in Step 8.
to scan.
( Full-Color )
Send
Original
11×8½"
8½×11"
08/08/’05 14:00
riginal and select destination.
Back
tion
Close
Select Original Image
Direction.
"Check direction of original" shown at
right side of display. Follow the steps.
If setting mode is wrong, incorrect send
will result.
Top Edge
Left Top
Edge
NOTE: The original may not be scanned correctly if original set direction is not correctly configured.
Be sure to confirm the original set direction when configuring the scanner.
12
Confirm settings, place the original, and
press the Start key.
Now scanning originals.
Scanning of the original begins.
Orig. Page
08/08
Send
.3
If continuous scan is enabled, proceed
to Step 13. If continuous sending is
enabled, proceed to Step 14.
Scan to PC
11×8½"
1 sided
Top Edge
8½×11"
SCAN0004_nnn.jpg
User name: UserA
13
If [Batch Scanning] is set to [On] from
[Edit] from the scanner settings screen,
after scanning is complete, a screen
prompt appears asking whether to
continue scanning or to finish.
To continue scanning, place the next
original, select scanner settings as
necessary and press the Start key.
riginal(s).
riginals and press start key.
nning finished" key to finish scanning.
Step
08/08/’05 14:00
Cancel
.2
Top Edge
Orig. Set
Direction
200dpi
Auto
File Name
Input
JPEG
Scanning
Resolution
File Type
Quality
Edit
Original
.1 Page
SCAN0005_nnn.jpg
Scanning
finished
When done, press [Scanning finished].
14
If [Continuous TX] is enabled from the
scanner settings screen, after a
transmission is complete, the scanner
settings screen is displayed with the
same settings used in the previous
transmission.
To continue, place the next original,
select scanner settings as necessary
and press the Start key.
Ready to scan.
Place the original and select destination.
Scan to PC-Continuous TX
( Full-Color )
Register Prgrm
Auto
Destination
Select
Orig.Size
Auto size
Delete
Save at
User PC
Address
Book
Select
Send Size
Basic
Original
11×8½"
08/08
Single Scan
Top Edge
Orig. Set
Direction
200dpi
Scanning
Resolution
Quality
To end the operation, press [Cancel] ([Job cancel]).
NOTE: If Permit File Overwrite is checked in Scanner File Utility, files with already existing names
will be overwritten. Exercise caution when inputting file names during Batch Scanning mode.
3-26
Basic Operation
Scan an Image Using TWAIN
TWAIN provides method to connect to the scanner from within TWAIN-compatible applications.
Install the TWAIN driver together with the application you plan to use. This section only explains the
settings to be made to the machine to enable TWAIN usage.
Initiating the Connection from the Machine
1
Press the Scanner key.
2
Press [TWAIN].
Select scanner function.
08/08/’05
Recall Program
Send
E-mail
Scan to PC
Database
Connection
Scan to
FTP
3
Place the original.
4
Launch TWAIN Source from your application.
TWAIN
The TWAIN Source main dialog box appears.
5
Click the Scan. Setup button to confirm that this machine is selected.
If this machine is not selected, click the Edit button and input the IP address or host name, for the
scanner to be used, in Scanner Address, then click the OK button.
6
Click the OK button.
7
Make necessary settings here, click the Connect(s) button on the dialog box, and after connecting
to the scanner click the Scan button. Scanning begins.
Initiating the Connection from the Computer
1
Launch TWAIN Source from your application.
The TWAIN Source main dialog box appears.
3-27
Basic Operation
2
Click the Scan. Setup button to confirm that this machine is selected.
If this machine is not selected, click the Edit button and input the IP address or host name, for the
scanner to be used, in Scanner Address, then click the OK button.
3
Click the OK button.
4
Make necessary settings here and check the Waiting Scan checkbox.
NOTE: Scanning begins after pressing the Start key on the operation panel while Waiting Scan is
checked.
5
Click the Connect(s) button on the dialog box, and after connecting to the scanner click the Scan
button.
Connection may fail if the machine is currently starting up or in use. If this happens, press [TWAIN]
from the scanner function screen to enable TWAIN mode.
6
At the machine, place the original, and press the Start
key to begin scanning.
NOTE: Configure various settings from the operation
panel. Change settings as necessary. If a setting is
changed from both the computer and from the
operation panel, the settings from the operation panel
take priority.
Database Connection Setup
When originals are converted to data, Database Connection allows text information to be added and
the data stored in a folder on a computer. The image transmission method is the same as Scan to
PC.
Before using Database Connection
Configure the following before using Database Connection.
1
Install DB Assistant onto the administrator’s computer.
2
Launch DB Assistant and configure Database Connection.
3
Launch Scanner File Utility on the save destination computer and configure Database Connection.
In the save number entry field, enter the same number (from 001-100) as registered for the save
folder in Scanner File Utility.
The computer to which DB Assistant was installed and the computer to which Scanner File Utility
was installed must be pre-registered using from a web browser or the operation panel.
This section focuses on how to setup DB Assist (functionality to add keywords as text data to
scanned images).
3-28
Basic Operation
Database Connection Setup
1
Press the Scanner key.
2
Press [Database Connection].
Select scanner function.
08/08/’05
Recall Program
3
Select a destination (user name). Either
press the number key or use the
numeric keys to enter the user number
and press [Enter].
Send
E-mail
Scan to PC
Database
Connection
Scan to
FTP
TWAIN
nection
Stop
User number
(with #key)
Enter
me.
NOTE: If the scanner default setting for Selec. of senders (users) is set to [On], user number 001
will automatically be selected.
If a password was entered when the user was registered, the password input screen is displayed.
Input the password and press [Enter].
4
Select the input data source. Press [S]
or [T], select the desired input data
source, and press [Enter].
This section explains how to select
DB Assist (functionality to add
keywords as text data to scanned
images).
Cancel
ection
0-9
Dest. of input data
GHI
Up
File A
Information
PQR
YZ
Down
Enter
on from the list.
NOTE: Press [S] or [T], select the input source verify and press [Information]. This screen allows
confirmation of details such as the IP address of the data input source PC and the save folder
number.
Password entry is required if DB Assist (functionality to create CSV files from scanned image files
and text data) is selected and a password has been set from DB Assistant,
3-29
Basic Operation
5
Select the save folder for the desired
image. From the folder selection screen,
to save the image to the currently
selected folder, press [Enter]. The text
data screen is displayed (Proceed to
Step 7). To save to a subfolder of the
selected folder, press [Change inp.
Folder]. The contents of the specified
folder are displayed.
Back
\100.
0-9
Cancel
Change
inp.Folder
Up
[100].
Down
Enter
nation folder.
NOTE: Folder names may not be displayed correctly if in the safe folder selection screen if the save
folder name contains a period ( . ) .
The input source cannot be modified from DB Assist.
6
Press [S] or [T] to select the desired
save folder and press [Enter].
Back
\100.
0-9
Change
inp.Folder
Up
[up]
NOTE: To move to the next higher
folder level, select [up] and press
[Enter]. Folders higher than the folder
specified in Scanner File Utility cannot
be set as input sources.
Cancel
[A].
[B].
[C].
[D].
Down
Enter
nation folder.
7
Select the item to register and press
[Enter]. The settings screen is displayed
for the selected item. Here, Keyword is
selected.
Back
File Information
Indexing completed
Creator
File Name
Subject
Keyword
Comment
Please select item for setting. 003-006 can be set for PDF only.
NOTE: Use File Name to change the filename for the scanned image.
Keyword, Subject, Creator, and Comment may all be saved as text data keywords.
The configuration items may vary if DB Assist Function has been selected.
8
Select the keyword to add and press
[Enter].
Cancel
1
Keyword6
2
(Other)
Select:
Cancel all
keywords
3
4
5
Enter
word.
To input a new keyword other than those
included with DB Assistant, select
(Other) after the item and press [Enter].
New keywords may be entered. To enter
new letters, press [Type letter].
New Keyword
Type
letter
Please enter new keyword.
3-30
Basic Operation
9
Changed items are identified with a *
mark. When satisfied with changes,
select Indexing complete and press
[Enter].
Back
File Information
Creator
Indexing completed
File Name
Subject
Keyword
Comment
Please select item for setting. 003-006 can be set for PDF only.
10
At the machine, place the original, and press the Start
key to begin scanning.
NOTE: Configure various settings from the operation
panel. Change settings as necessary.
If a setting is changed from both the computer and
from the operation panel, the settings from the
operation panel take priority.
To reconfigure text data input, press [Try
again input data].
To end the operation, press [Cancel]
([Job cancel]).
to scan.
als then press Start key.
( Full-Color )
Original
Send
11×8½"
8½×11"
08/08/’05 14:00
ection
Cancel
Top Edge
Auto
ata
Select
Orig.Size
Orig. Set
Direction
Auto size
Select
Send Size
Try again
input data
11
The following screen is displayed when
scanning is complete. To finish scanning
originals, press [Input data complete].
The DB Assist function adds text the
previously registered text information
(keywords) to the scanned image and
saves to the specified folder.
The Database Assist function adds text
information from the scanned image as
a CSV file and save to the specified folder.
200dpi
PDF
Scanning
Resolution
File Type
Basic
Quality
Edit
Press 'Input data complete'key.
Select the method to continue
Dest. of input data:
08/08
How-continue
File A
Same mode
input data
Sel.folder
input data
Input of
new data
User name: 001.
NOTE: To re-use the database connection, press [Sel. folder input data]. Follow Step 4 from
page 3-29.
To re-use the database connection with the same settings, press [Same mode input data]. Follow
Step 6 from page 3-30.
To re-use the database connection with the same Assist function selection, press [Input of new
data]. Follow Step 5 from page 3-30.
3-31
Basic Operation
Scan an Image for Scan to FTP
Scan FTP is a feature that converts original data scanned using the machine to PDF or TIFF format
data and uploads directly to an FTP server.
Up to 10 destination FTP servers can be saved and data can be simultaneously uploaded to those
10 saved FTP servers.
If you already have a running FTP server, no additional software is necessary.
IMPORTANT: Connection to servers outside the local area network (LAN) may fail due to network
configuration.
Before using Scan to FTP
Before using Scan to FTP, confirm with your administrator the credentials to access the FTP server
and save these to the machine.
•
User name
•
Password
•
FTP Server hostname or IP address
•
Port number (Usually 21)
•
Path (Path from the FTP server home directory to the save folder)
NOTE: Refer to Modifying Common Address Book on page 2-35 for how to add to the Common
Address Book from the operation panel.
Scanning an image for Scan to FTP
1
Press the Scanner key.
2
Press [Scan to FTP].
Select scanner function.
08/08/’05
Recall Program
3-32
Send
E-mail
Scan to PC
Database
Connection
Scan to
FTP
TWAIN
Basic Operation
3
Select a destination (user name). Either
press the number key or use the
numeric keys to enter the user number
and press [Enter].
name.
Stop
User number
(with #key)
Enter
NOTE: If the scanner default setting for Selec. of senders (users) is set to [On], user number 001
will automatically be selected.
If a password was entered when the user was registered, the password input screen is displayed.
Input the password and press [Enter].
4
Press [Address Book].
Ready to scan.
( Full-Color )
Place the original and select destination.
Scan to FTP-Sending
Register Prgrm
Auto
Destination
Select
Orig.Size
Auto size
Delete
Select
Send Size
Address
Book
5
Press [S] or [T], select the desired
destination FTP server and press [Enter]
([Add dest.]). Log in to the destination
FTP Server.
When a destination is selected, an ⌧ is
displayed next to it in the Select column
to the right of the Address column.
6
If destination FTP server is selected
where in Skip Auth. info Input (Modifying
Common Address Book on page 2-35)
has been set to [Off], at the following
step enter the usename and password
and press [Close].
Press [Change #] for the username.
2
Input the username.
3
Press [End].
Cont. TX to
Top Edge
Orig. Set
Direction
200dpi
Scanning
Resolution
Quality
Close
0-9
Select:
Address
GHI
O
PQR
X
YZ
0.
Up
Address
Properties
Down
Enter
FTP01
User Name & Password
Back
User name
Change #
On
Password
Change #
Username entry
1
Basic
Original
11×8½"
08/08
Destination :ftp001
Password entry
7
1
Press [Change #] for the password.
2
Enter the password.
3
Press [End].
Press [Close].
3-33
Basic Operation
8
Configure the scan settings.
to scan.
riginal and select destination.
nding
( Full-Color )
Register Prgrm
Original
Send
11×8½"
8½×11"
08/08/’05 14:00
Cont. TX to
Top Edge
Auto
Orig. Set
Direction
Select
Orig.Size
Auto size
Delete
Address
Book
9
Place the original and press the Start
key. Scanning of the original begins.
After scanning is complete, the machine
uploads the scanned data to the
destination FTP server(s).
Basic
Auto
File Name
Input
200dpi
JPEG
Scanning
Resolution
File Type
Quality
Edit
Now scanning originals.
08/08
Orig. Page
3.
11×8½"
1 sided
Top Edge
User name: UserA
3-34
Select
Send Size
Cancel
Send
Scan to FTP
8½×11"
SCAN0004_nnn.jpg
Basic Operation
Low-Power Mode
To activate Low-Power mode, press the Energy Saver
key.
On the operation panel, only the Energy Saver,
Power, and main power indicators will remain lit.
The machine automatically wakes and begins printing
if print data is received during Low-Power mode. If the
optional fax is installed, the machine also wakes up
and begins printing when a fax is received.
To resume copying, perform one of the following
actions. The machine returns to a copy-ready
condition.
•
Press any key on the operation panel.
•
Open the original platen or the optional document processor.
•
Place originals in the optional document processor.
The machine will resume copy functionality in 10 seconds.
Auto Low-Power Mode
In Auto Low-Power mode, the machine automatically switches to Low-Power mode if left idle for a
preset period. The default period for Auto Low-Power mode is 15 minutes.
3-35
Basic Operation
Sleep Mode
To activate Sleep mode, press the Power key.
On the operation panel, only the Main Power indicator
will remain lit. The machine will use much less power
than Low-Power mode.
Without illuminating the operation panel, printing
begins automatically if print data is received during
Sleep mode. If the optional fax is installed, the machine
also wakes up and begins printing when a fax is
received, without illuminating the operation panel.
To resume copying, press the Power key again. The
machine will resume copy functionality in 45 seconds.
Auto Sleep Mode
In Auto Sleep mode, the machine automatically switches to Sleep mode if left idle for a preset
period. The default period for Auto Sleep mode is 45 minutes.
3-36
4
Optional Equipment
This chapter introduces the optional equipment available for the machine.
•
Overview of Optional Equipment...4-2
•
Document Processor...4-4
•
Paper Feeder...4-4
•
3000 Sheet Paper Feeder...4-4
•
Document Finisher...4-5
•
3000 Sheet Document Finisher...4-5
•
Job Separator...4-5
•
Key Counter...4-6
•
Fax Kit...4-6
•
Memory Card (CompactFlash)...4-6
•
Hard Disk...4-7
•
Additional Memory...4-7
•
Security Kit...4-7
•
Network Interface Card...4-8
•
Serial Interface...4-8
•
PDF Upgrade Kit...4-8
4-1
Optional Equipment
Overview of Optional Equipment
The following optional equipment is available for the machine.
Document Processor
Key Counter
Mailbox
Document Finisher
Job Separator
3000 Sheet Document
Finisher
Folding Unit
4-2
Paper Feeder
3000 Sheet Paper
Feeder
Optional Equipment
Additional Memory
Network Interface
Card
Fax Kit
Memory Card
(CompactFlash)
Hard Disk
Security Kit
PDF Upgrade Kit
4-3
Optional Equipment
Document Processor
Automatically scans each page of single sided
originals. Also automatically flips over 2-sided originals
for duplex copying and split copying. For document
processor usage operation, see Loading Originals in
the Document Processor (option) on page 2-18.
Paper Feeder
Add an additional 2 paper cassettes like Cassette 2 of
the main unit. Paper capacity and loading method is the
same as Cassettes 1 and 2. See Loading Paper into
Cassette 1, 2 on page 2-2.
NOTE: Left cover 3 is located on the left side of the
paper feeder for use in clearing paper jams.
3000 Sheet Paper Feeder
In addition to the standard cassettes, a 3,000 sheet
paper feeder can be added which holds 3,000 sheets of
11 × 8 1/2" or A4 paper.
See Loading Paper into 3000 Sheet Paper Feeder on
page 2-4 for paper loading operation.
NOTE: Left cover 3 is located on the left side of the
3,000 sheet paper feeder for use in clearing paper
jams.
4-4
Optional Equipment
Document Finisher
The document finisher holds a large quantity of finished
copies. The finisher offers a convenient means of
sorting. Sorted finished copies may also be stapled.
For further details, refer to the document finisher
Operation Guide.
3000 Sheet Document Finisher
The document finisher holds a large quantity of finished
copies. The finisher offers a convenient means of
sorting. It can also staple finished sets and punch holes
if equipped with the appropriate optional accessories.
For further details, refer to the 3000 sheet document
finisher Operation Guide. Other options include the
mailbox and folding unit. (See images below.)
Job Separator
Separates paper according to output destination for
easier sorting. Specify an output destination for copy or
print jobs. Or, specify the default mode output
destination for copying or faxing with the optional fax
kit.
4-5
Optional Equipment
Key Counter
Use the key counter to monitor machine usage. The
key counter offers a convenient solution for centralized
management of copy volume for different departments
in a large company.
Inserting the Key Counter
Insert the key counter securely into the key counter
slot.
NOTE: When the key counter function is activated,
copies can only be made when a key counter is
inserted into the machine. If the key counter is not
inserted securely, Insert key counter will be displayed.
Fax Kit
By installing the fax kit, fax send/receive is enabled.
Also, it is possible to use it as a network fax, by using it
with a computer. For further details, refer to the Fax kit
Operation Guide.
Memory Card (CompactFlash)
A microchip card for storing optional fonts, macros or
forms. Insert into the memory card slot on the
machine’s right side.
4-6
Optional Equipment
Hard Disk
The hard disk is used to store print queue data. Also,
the hard disk is required to use all e-MPS functionality.
Additional Memory
Increase the memory available to the printer. Additional
memory enables printing more complex data. An
additional 128 MB, 256 MB or 512 MB may be added.
Security Kit
This machine functions by temporarily storing scanned
data on an internal hard disk. After being used for
copying, this data is not accessible from the operation
panel, but a record of the data remains on the hard disk
until it is overwritten by other data. Thus, the data could
conceivably be retrieved by accessing the hard disk
using specialized tools.
For greater security, the security kit prevents this by
overwriting all unnecessary data in the storage area of
the hard disk so that it cannot be retrieved.
4-7
Optional Equipment
Network Interface Card
Like the machine’s standard network interface, the
network interface card supports TCP/IP, IPX/SPX,
NetBEUI and EtherTalk protocols to enable network
printing for Windows, Macintosh, UNIX, Netware and
other environments.
PDF Upgrade Kit
When saving scanned originals as PDF files, enables
the creation of high compression PDF files and PDF
encryption.
Use PDF file encryption to customize password-based
rights access.
4-8
5
Maintenance
This chapter describes cleaning and toner replacement.
•
Cleaning...5-2
•
Toner Container and Waste Toner Box Replacement...5-5
5-1
Maintenance
Cleaning
Clean the machine regularly to ensure optimum copy quality.
Caution: For safety, always unplug the power cord before cleaning the machine.
Original Platen and Platen
Open the document processor. Wipe the platen and
the backside of the document processor with a soft
cloth dampened with alcohol or mild detergent.
IMPORTANT: Do not use thinner or other organic
solvents.
Document Processor (option)
Open the document processor. Wipe the backside of
the document processor and the white rollers with a
soft cloth dampened with alcohol or mild detergent.
IMPORTANT: Do not use thinner or other organic
solvents.
5-2
Maintenance
Slit Glass
When black streaks or dirt appears in
copies when using the optional
document processor, clean the slit glass
with the included cleaning cloth. The
message: Clean the slit glass for original
fed from DP (Clean the slit glass for
original fed) may be displayed if the slit
glass requires cleaning. After cleaning,
press [End].
Clean the slit glass for original fed from DP.
1.Open the document processor.
2.Clean the surface of narrower glass
located at left with a dry cloth.
3.Please close the document processor.
4.Press END key
If the slit glass is dirty, black line
will appear on the copy.
IMPORTANT: Lightly wipe the slit glass with a dry cloth. To remove adhesive material or ink, apply
alcohol to a cloth and wipe lightly. Do not use water, thinner, or organic solvents.
1
Remove the cloth from the cleaning cloth compartment.
2
Open the document processor and wipe slit glass A.
A
Separator
If wrinkles appear in the output paper, clean the separator.
1
Open the front cover.
2
Remove the cleaning brush.
5-3
Maintenance
5-4
3
Open left cover 1.
4
Open duplex unit A1.
5
As shown in the figure, clean dirt from the separator by
moving the brush from side to side along the separator.
6
Close duplex unit A1 and left cover 1.
7
Put away the cleaning brush and close the front cover.
Maintenance
Toner Container and Waste Toner Box Replacement
This machine uses 4 types of toner:
cyan (C), magenta (M), yellow (Y) and
black (K). When the touch panel displays
Add toner. [C] [M] [Y] [K], replace the
toner container for the color shown.
Replace the toner without delay when
this message is displayed. When
replacing the toner container, also
replace the waste toner box.
Add toner.
[C][M]
Open the front cover of the machine
and replace the toner container
See the toner container box or
operation manual for replacement procedures
Replace the toner container only if this
messages appears.
NOTE: Press [Adding toner] to display the replacement instructions on the touch panel.
If you close the front cover without
installing toner containers, a screen
asking to check whether the toner
containers are installed is displayed on
the touch panel.
Open the front cover and check whether
all of four toner containers are installed.
If all of four toner containers are
installed, press [Yes].
Are all of four toner containers installed?
Yes
No
IMPORTANT: If you press [Yes] when one or more toner containers are not installed, the machine
may be damaged. Be sure to close the front cover after all of four toner containers have been
installed.
Also if toner containers other than specified by our company are installed, the same check screen is
displayed. The machine can be used by pressing [Yes]. To ensure quality, though, it is
recommended to use the toner containers specified by our company.
Replacement of black toner is explained here as an example.
Caution
: Do not attempt to incinerate the toner container or the waste toner box.
Dangerous sparks may cause burns.
Caution: Do not attempt to force open or destroy the toner container or the waste
toner box.
1
Open the front cover.
5-5
Maintenance
2
Turn the toner container lock lever to the vertical
position.
3
Push up the toner container top clip A and pull the
toner container down towards you.
4
Lift the toner container up and out.
5
Close the pickup opening, with the cap attached to the
back side, on the old toner container.
Caution
: Do not attempt to incinerate the toner container or the waste toner box.
Dangerous sparks may cause burns.
Caution: Do not attempt to force open or destroy the toner container or the waste
toner box.
5-6
Maintenance
6
Place the used toner container in the provided plastic
disposal bag.
7
Remove the new toner container from the box.
8
Hold the toner container with the toner container lock
lever positioned on the top, and tap the top side ten
times or more while keeping the container horizontal.
9
Holding the toner container in both hands, hold
vertically and shake up and down strongly at least ten
times to distribute the toner evenly.
IMPORTANT: Do not install the toner container
before shaking it sufficiently. This may cause errors
due to insufficient toner replenishment.
10
Insert the new toner container into the machine.
11
Press in the toner container upper portion. There will be
an audible ‘click’ when the container is inserted in the
correct position.
5-7
Maintenance
12
Return the toner container lock lever to its original
position.
Replace the other toner colors in the same fashion.
13
Hold down waste toner box release lever B, and slowly
pull out the waste toner box.
NOTE: Do not turn the removed old waste toner box
upside down.
5-8
14
As shown in the illustration, seal the old waste toner
box with a cap.
15
Place the used toner container in the provided plastic
disposal bag.
16
Remove the cap from the new waste toner box.
B
Maintenance
17
Install the new waste toner box.
18
Close the front cover.
After use, always dispose of the toner container and the waste toner box in accordance with
Federal, State and Local rules and regulations.
5-9
Maintenance
5-10
6
Troubleshooting
This chapter explains how to solve problems with the machine.
•
Solving Malfunctions...6-2
•
Responding to Error Messages...6-4
•
Clearing Paper Jams...6-15
6-1
Troubleshooting
Solving Malfunctions
The table below provides general guidelines for problem solving.
If a problem occurs with your machine, check the checkpoints and perform procedures indicated on
the following pages. If the problem persists, contact your Service Representative.
Symptom
Checkpoints
Corrective Actions
Reference
Page
The operation panel does Is the machine plugged in?
not respond when the
machine is turned on ( |
position).
Plug the power cord into an AC outlet.
Pressing the Start key
Is a message displayed on the touch
does not produce copies. panel?
Determine the appropriate response to page 6-4
the message and take action
accordingly.
The original size is not
detected properly.
When placing originals on the platen,
place them face-down and align them
with the original size indicator plates.
page 2-16
Place originals face-up in the optional
document processor.
page 2-18
Are the originals loaded correctly?
Is the machine installed beneath
fluorescent lights?
Blank sheets are output. Are the originals loaded correctly?
Is the machine installed beneath
fluorescent lights?
Printing is too light.
Do not install this machine beneath
fluorescent lights.
—
—
When placing originals on the platen,
place them face-down and align them
with the original size indicator plates.
page 2-16
Place originals face-up in the optional
document processor.
page 2-18
Do not install this machine beneath
fluorescent lights.
—
Is the machine set to Manual Exposure Use the exposure adjustment key to set page 3-6
mode?
the correct exposure level.
Is the toner distributed evenly within the Shake the toner container up and down page 5-5
toner container?
approximately 10 times.
Is there a message indicating the
addition of toner?
Replace the toner container.
page 5-5
Is the copy paper damp?
Replace the copy paper with new paper. page 2-2
Printing is too dark.
Is the machine set to Manual Exposure Use the exposure adjustment key to set page 3-6
mode?
the correct exposure level.
Copies have a moire
pattern (dots grouped
together in patterns and
not aligned uniformly).
Is the original a printed photograph?
Set the image quality to [Print].
page 3-5
Copies are not clear.
Did you choose appropriate image
quality for the original?
Select an appropriate Image Quality
mode.
page 3-5
Is the copy paper damp?
Replace the copy paper with new paper. page 2-2
Is special color copy paper being used? Use special color copy paper.
—
Copies are dirty.
Are the original platen or platen dirty?
Clean the original platen or platen glass. page 5-2
Printer output is fuzzy.
Is the copy paper damp?
Replace the copy paper with new paper. page 2-2
Is special color copy paper being used? Use special color copy paper.
6-2
—
Troubleshooting
Symptom
Checkpoints
Corrective Actions
Reference
Page
Printing is skewed.
Are the originals loaded correctly?
When placing originals on the platen,
page 2-16
place them face-down and flush against
the original size indicator plates.
When placing originals in the document page 2-18
processor, align the original width
guides securely before placing the
originals.
Paper jams frequently
occur.
Is the paper loaded correctly?
Check the position of the paper width
guides.
page 2-2
Is the paper loaded correctly?
Load the paper correctly.
page 2-2
Is the paper of the supported type? Is it Remove the paper, turn it over, and
in good condition?
reload it.
page 2-2
Is the paper curled, folded, or wrinkled? Replace the paper with new paper.
page 2-2
Are there any loose scraps or jammed
paper in the machine?
Remove any jammed paper.
page 6-15
Is the copy paper damp?
Replace the copy paper with new paper. page 2-2
Is special color copy paper being used? Use special color copy paper.
—
Copies from the optional Is the slit glass dirty?
document processor
have black lines.
Clean the slit glass.
page 5-2
Printing is wrinkled.
Is the separator dirty?
Clean the separator.
page 5-3
Is the copy paper damp?
Replace the copy paper with new paper. page 2-2
Is special color copy paper being used? Use special color copy paper.
—
Is the paper set in a proper orientation? Change the orientation in which the
paper is positioned.
—
Is the machine plugged in?
Plug the power cord into an AC outlet.
—
Is the machine switched on?
Turn the main power switch to on ( |
position).
—
Is the printer cable connected?
Confirm the printer cable is securely
connected.
page 2-21
Was the printer switched off when
connecting the printer cable?
Switch on the printer after connecting
the printer cable.
page 2-21
Is the device in Offline mode?
Press the Printer key and press [GO] to
restore Online mode.
Is the printer cable connected?
Confirm the printer cable is securely
connected.
Are the computer settings configured
correctly?
Confirm printer driver and application
software settings.
—
Print output is not correct. Are the computer settings configured
correctly?
Confirm printer driver and application
software settings.
—
Unable to print.
Characters are not
printed correctly.
—
page 2-21
6-3
Troubleshooting
Responding to Error Messages
If the touch panel displays any of these messages, follow the corresponding procedure.
Copy Error Messages
If the Copy mode touch panel displays any of these messages, follow the corresponding procedure.
Error Messages
Checkpoints
Corrective Actions
Reference
Page
Close ### cover.
Is the indicated cover open?
Close all covers securely.
—
Check the cover.
Are any covers open?
Close all covers securely.
—
Does the message indicate which
cover is open?
Close Document processor.
Is the optional document processor Close the document processor.
open while loading the original?
Close Document processor
cover.
Is the optional document
processor’s document processor
cover open?
Close the document processor
cover.
Set cassette #.
Is the indicated cassette not fully
closed?
Pull out the cassette and push in
securely.
—
Completely pull out the indicated
cassette and remove any paper
inside.
—
(Close paper cassette #.)
Open cassette #, check and
remove paper from inside of the
machine.
—
—
page 6-26
(Open cassette #, check and
remove paper from inside of
machine.)
Reset feeding unit for paper
cassette.
Is the paper feeder securely pushed Pull out the paper feeder and
page 6-19
into the machine?
securely push it all the way into the
machine.
Add paper in cassette #.
Is the indicated cassette out of
paper?
(Add paper cassette #.)
Add paper in the Multipurpose
tray.
## size
Load paper. If the same type of
paper is loaded in another cassette
in the same orientation, you can
press either one of paper selection
keys on the left of the touch panel to
switch to that cassette for copying.
—
Is paper of the specified size loaded Load paper of the size indicated in
in the MP tray?
the MP tray.
page 2-5
Has all the paper on the MP tray
been fed?
page 2-5
(Place paper on the
Multipurpose tray.
## size)
Add paper in the Multipurpose
tray.
Load paper in the MP tray.
(Add paper on the Multipurpose
tray.)
Place transparency in the
Multipurpose tray.
Are any transparencies loaded in the Place transparencies on the MP tray. page 2-5
MP tray?
(Place transparencies on the
Multipurpose tray.)
Change the size of MP tray.
6-4
Is the specified size paper loaded in Reconfigure the size of the MP tray. page 2-10
the MP tray?
Troubleshooting
Error Messages
Checkpoints
Corrective Actions
Check paper size.
Is the specified size paper loaded?
Load paper of a size that can be
used.
—
Reposition original.
Is the orientation of the specified
paper different from that of the
original?
Change the orientation of the
original. If you press the Start key
without doing so, the original will be
copied at the current size.
—
Load the specified paper. Adjust any
settings that are incorrect.
—
Change the orientation of the
original.
—
Do not install this machine beneath
fluorescent lights.
—
Check paper size. Copy paper is Is the specified paper loaded? Or
not the same size as original.
are the settings incorrect?
Reference
Page
(Paper size in cassette differs
from actual size.
Check paper size in cassette.)
Reposition original or change
cassette.
Is the orientation of the specified
paper different from that of the
original?
(Reset original or select another
Is the copier installed beneath
paper cassette.)
fluorescent lights?
Reset originals in processor.
—
Remove originals from the optional page 2-16
document processor, stack them
uniformly and reset them.
Reset all originals in processor.
—
Remove originals from the optional page 2-16
document processor, and reset them
in the original order.
(Reset originals in processor.)
Reset all originals in Document
Processor.
Are there any originals left in the
optional document processor?
Reset all originals in the optional
document processor.
—
(Reset originals in Document
Processor.)
Cannot copy this paper type.
Can the specified copy functions be Select another type of paper.
used with the selected paper type?
—
Cannot staple this paper type.
Did you select a paper type that
cannot be stapled?
Select another type of paper.
—
Cannot punch this paper type.
Did you select a paper type that
cannot be punched?
Select another type of paper.
—
Cannot staple this size.
Is stapling available for the size of
the loaded paper? For further
details, see the optional document
finisher or 3000 sheet document
finisher Operation Guide.
Change the paper size.
—
Is punching available for the size of Change the paper size.
the loaded paper? For further
(Cannot punch this paper size.)
details, refer to the optional 3000
sheet document finisher Operation
Guide.
—
Cannot staple.
## :maximum capacity (Staple)
Decrease the number of sheets to
be stapled to less than the maximum
staple sheet count.
—
Remove some pages from the
output tray and press the Start key.
Printing continues.
—
(Cannot staple this paper size.)
Cannot punch this size.
(Cannot staple.
## :Max. staples)
Is the maximum page quantity for
stapling exceeded? For further
details, see the optional document
finisher or 3000 sheet document
finisher Operation Guide.
The top tray is full of paper.
During copying, is the maximum
Remove paper, and press "Start" capacity of the output tray
key.
exceeded?
6-5
Troubleshooting
Error Messages
Checkpoints
Corrective Actions
The top tray is full of paper.
Remove paper, and press
"Continue" key.
During printing, is the maximum
capacity of the output tray
exceeded?
Remove some pages from the
output tray and press [Continue].
Printing continues.
—
Finisher paper capacity
exceeded. (Tray #)
Remove paper, and press "Start"
key.
During copying, is the maximum
capacity of the optional document
finisher or 3000 sheet document
finisher output tray exceeded?
Remove some pages from the
optional document finisher or 3000
sheet document finisher and press
the Start key. Printing continues.
—
Finisher paper capacity
exceeded. (Tray #)
Remove paper, and press
"Continue" key.
During printing, is the maximum
capacity of the optional document
finisher or 3000 sheet document
finisher output tray exceeded?
Remove some pages from the
optional document finisher or 3000
sheet document finisher and press
[Continue]. Printing continues.
—
Remove paper. Finisher tray.
Is the maximum capacity of the
optional document finisher output
tray exceeded?
Remove some pages from the
optional document finisher.
—
These functions cannot be
combined.
Have you selected functions that
cannot be used together?
Check the settings.
—
Insert key counter.
Is the key counter inserted
correctly?
Insert the key counter securely and
completely.
—
The current copy cannot be
processed because there is no more
copy memory free space, or the
number of original pages exceeded
the maximum 999 pages. When the
following message is displayed
select the resolution method.
—
Memory full
—
Reference
Page
[Cancel]: Cancels copying.
[Continue]: Copies up to the last
scanned page.
Toner will be empty soon. [C],
[M], [Y], [K]
—
The toner container will need to be page 5-5
replaced soon. Prepare the
replacement toner container for the
indicated color.
Ready to copy.
Add toner. [C], [M], [Y], [K]
—
page 5-5
The machine is running low on
toner; only one page may be printed
at a time. Prepare the replacement
toner container.
Add toner. [C], [M], [Y], [K]
—
Replace the toner container for the
indicated color.
Image cycle.
—
Toner replenishment is in progress.
Wait until the process is completed.
—
—
Performing internal maintenance.
Wait until the process is completed.
—
(Now adding toner.)
Please wait.
Now in the fusing temperature
adjustment process.
Check waste toner box.
Is the waste toner box securely
fastened?
page 5-5
Securely fasten the waste toner box. page 5-5
Replace the waste toner box.
—
Replace the waste toner box.
page 5-5
Clean the slit glass for original
fed from DP.
—
Rub the slit glass with the included
dry cleaning cloth.
page 5-3
(Clean the slit glass for original
fed.)
6-6
Troubleshooting
Error Messages
Checkpoints
Check the waste punch box.
Is the optional 3000 sheet document Refer to the optional 3000 sheet
finisher waste punch box securely document finisher Operation Guide
fastened?
to securely fasten the waste punch
box.
—
Empty waste punch box.
Is the container for hole punch waste Refer to the optional 3000 sheet
paper in the optional 3000 sheet
document feeder Operation Guide to
document finisher full?
empty the waste punch box.
—
Out of staples.
Add staples.
Is the optional document finisher or Refer to the optional document
3000 sheet document finisher out of finisher or 3000 sheet document
staples?
finisher Operation Guide to refill
staples.
—
(Check Punch Hole box.)
(Stapler empty.
Add staples.)
Corrective Actions
Reference
Page
Time for maintenance.
—
Periodic maintenance is required to
keep your machine in good
condition. Contact your Service
Representative or Authorized
Service Center promptly.
Paper misfeed.
—
If a paper jam occurs, the location of page 6-15
the jam will be indicated on the
touch panel and the machine will
stop. Leave the machine switched
on (| position) and follow the
instructions to remove the jammed
paper.
Remove paper from inner tray of Is there any paper left in the optional Remove all paper left in the optional
Finisher.
document finisher or 3000 sheet
document finisher or 3000 sheet
document finisher?
document finisher.
—
—
Remove paper from the folding
unit of the finisher.
Is there any paper left in the folding Refer to the optional 3000 sheet
unit of the optional 3000 sheet
document finisher Operation Guide
document finisher?
to remove all paper left in the
ejection section of the folding unit.
Staple jam.
Is the optional document finisher or Refer to the optional document
finisher or 3000 sheet document
3000 sheet document finisher
finisher Operation Guide to remove
experiencing a staple jam?
the jammed staple.
—
System error.
Call service.
Is it re-displayed after opening and
closing the front cover, turning off
and on the main power switch, and
plugging out and plugging in the
power plug in the power outlet?
Make a note of this message (C
followed by a number). Turn off the
machine ( position), unplug the
power cord, and contact your
Service Representative or
Authorized Service Center.
—
—
The cassette in use has a problem
and is temporarily unavailable.
Contact your Service Representative
or Authorized Service Center
promptly. To continue copying, use
another cassette.
—
—
A system error has occurred. Turn
the main power switch off and on
again.
—
Paper cassette is out of order.
Select another paper cassette.
(Paper cassette is out of order.
Select other paper cassette.)
System error.
Main Power Switch Off / On.
HDD error.
Is it re-displayed after opening and A hard disk error has occurred.
Cannot activate Job Accounting closing the front cover, turning off
Contact your Service Representative
mode.
and on the main power switch, and or Authorized Service Center.
plugging out and plugging in the
power plug in the power outlet?
—
6-7
Troubleshooting
Error Messages
Checkpoints
Corrective Actions
Please wait.
Remote edit.
Is Job account editing being done
from a network connected
computer?
Copying is not possible until editing
is complete.
Security key is not recognized.
Not available.
Is it re-displayed after opening and Contact your Service Representative
closing the front cover, turning off
or Authorized Service Center.
and on the main power switch, and
plugging out and plugging in the
power plug in the power outlet?
Reference
Page
—
—
Printer Error Messages
If the Printer mode touch panel displays any of these messages after pressing the Printer key,
follow the corresponding procedure.
Error Messages
Checkpoints
Corrective Actions
Reference
Page
Load Paper.
## size (##)
Does the print data match the feed
paper size and paper type?
Replace the size or type of source
paper.
page 2-2
To change the paper source, select
paper source from the touch panel
and press [GO].
To print on the loaded paper, press
the Printer key and press [GO].
To cancel printing, press the Printer
key and press [Cancel].
Use alternative?
Press GO.
—
Displayed when paper source is
changed. Press [GO].
—
Set paper Press GO.
—
This mode supplies paper one sheet
at a time even if multiple sheets
have been loaded. To feed each
sheet, press [GO].
—
Load Paper.
Is the paper source empty?
Out of staples.
Add staples.
Is the optional document finisher or Refer to the optional document
3000 sheet document finisher out of finisher or 3000 sheet document
staples?
finisher Operation Guide to refill
staples.
(Stapler empty.
Add staples.)
Load more paper.
page 2-2
—
Call service.
—
An internal error has occurred.
Contact your Service Representative
or Authorized Service Center.
—
Account ID mismatch.
—
No matching ID-code found. Verify
the registered ID-code using the
driver.
—
Error has occurred. Change to
printer screen and check.
—
Shown when a printer error has
occurred when other modes are
currently being displayed. Press the
Printer key to switch to the printer
screen and display the specific error
message.
—
Switch the main power switch to off
({ position) and install in the correct
slot.
—
Option interface error
Code: ##
6-8
Is the installed option interface slot
incorrect?
Troubleshooting
Error Messages
Checkpoints
Corrective Actions
Reference
Page
File not found Press GO.
—
A file error has occurred. Press
[GO].
—
Warning image adapt.
—
Printing not possible at currently set
resolution due to insufficient
memory. Add memory to the printer
or change the print resolution.
—
Print overrun Press GO.
—
Overrun has occurred due to
insufficient memory.
—
Press the Printer key to switch to
printer mode.
Press [GO] to continue printing.
Press [Cancel] to cancel printing.
If resume time has been configured
for Auto Continue, printing resumes
automatically after the set time has
elapsed. After displaying this
message, Page Protect mode is
automatically set to [On].
Memory overflow Press GO.
—
The current print job cannot be
processed due to insufficient free
memory.
—
Press the Printer key to switch to
printer mode.
Press [GO] to continue printing. The
remaining pages will be printed up to
the final processed data.
Press [Cancel] to cancel printing.
If RAM Disk is enabled, decrease
the RAM disk size. Additional printer
memory is recommended if this error
frequently occurs. For additional
printer memory, contact your Service
Representative or Authorized
Service Center. If resume time has
been configured for Auto Continue,
printing resumes automatically after
the set time has elapsed.
Interface is occupied.
Opt. ROM error Press GO.
Check the waste punch box.
(Check Punch Hole box.)
Is the selected interface currently in Try the operation again later.
use?
—
—
An option ROM read error has
occurred. Press the Printer key and
press [GO]. The error is cleared.
—
Is the optional 3000 sheet document Refer to the optional 3000 sheet
document feeder Operation Guide to
feeder waste punch box securely
fastened?
securely fasten the waste punch
box.
—
6-9
Troubleshooting
Scanner Error Messages
If the Scanner mode touch panel displays any of these messages after pressing the Scanner key,
follow the corresponding procedure.
Error Messages
Checkpoints
Corrective Actions
Reference
Page
Unable to use scanner.
Is the network cable connected
properly?
Confirm the network cable is
properly connected. If the scanner
has just been started, try again later
(approximately 2 minutes).
—
This name is already in use.
Input new name again.
—
Change the name and re-enter.
—
This number is already in use.
Input new number again.
—
Change the number and re-enter.
—
Registration full.
You can not add any more.
—
Delete unnecessary entries before
registering a new entry.
—
—
Resend after decreasing the number
of sheets to be transmitted or
decreasing resolution.
—
—
The specified number does not
exist.
—
(Registration full.
Cannot register anymore.)
E-mail size, exceeds data
capacity.
(E-mail size exceeds send
capacity limit.)
Destination address is not being
registered.
(This number is not registered.
Input number again.)
Check the number and try again.
Is the network cable connected
properly?
page 2-21
Confirm the network cable is
properly connected. If the scanner
has just been started, try again later
(approximately 2 minutes).
Is the SMTP server running?
Contact your system administrator
or support personnel.
—
SMTP Authentication error.
Contact Administrator.
Have the correct login account name Contact your system administrator
and password for SMTP
or support personnel.
authentication been set?
—
Unable to find PC for personal
address list.
Check the PC.
Is Address Book for Scanner
running on the computer?
Launch Address Book for Scanner.
—
Is the network properly connected
on the specified computer?
Confirm the computer is properly
connected to the network.
—
Is the network cable properly
connected to the scanner network
interface?
Confirm the network cable is
properly connected to the scanner
network interface.
Unable to find SMTP server.
Contact administrator.
Network scanner system error.
Communication error.
Destination PC’s system error.
6-10
—
page 2-21
Switch the device off and back on
again.
—
Scan to PC:
Sending computer status.
Try retransmitting.
—
E-Mail Send:
Is the SMTP server running?
Contact your system administrator.
—
Database Connection:
Save destination computer status.
An unsupported response was
received from DB Assistant. Check
the computer running DB Assistant.
—
Sending PC computer status.
Try retransmitting.
—
Troubleshooting
Error Messages
Checkpoints
Corrective Actions
The file was not saved.
Check the destination PC.
Has the maximum hard disk usage
set by Scanner File Utility at the
sending PC been exceeded?
Increase available space and try
again.
Are you trying to from multiple
Try again later or change the
scanners using the same filename? filename.
Destination PC is in use.
Try again later.
—
Reference
Page
—
—
A connection currently exists
between the sending PC and a
scanner. Try retransmitting later.
—
PC’s version of personal address Is the Address Book for Scanner
list is different.
version different?
Contact administrator.
Contact your system administrator
or support personnel.
—
PC of personal address list is in
use.
Try again later.
A connection current exists between
the specified Address Book for
Scanner and a scanner. Try making
the selection again later.
—
—
(PC’s version of personal
address list is in use.
Try again later.)
Sender (user) is not registered.
Contact administrator.
Is the sender (user) registered as
User No. 001 in the scanner’s
sender (user) list?
Create a new user number 001 entry page 2-34
or select another user after setting
the scanner default for Selec. of
senders (user) to [Off].
No Destination address being
registered.
Is the specified destination
registered?
Create a new entry or select another
destination.
—
Enter the correct password.
—
(Destination address has not
being registered.)
Wrong password.
—
(Incorrect password.)
Check domain name and host
name.
Scanner domain name, host name
not set.
Check if domain name and host
name have been configured.
page 2-32
Overflow of original pages.
Limit of 999 pages that can be sent Send the excess pages separately.
Scanned documents were sent. at 1 time has been exceeded.
Depending on 2-sided or book
original settings, the maximum
sheets that can be sent may be 998
pages.
—
Check the DB Assistant PC.
Contact administrator.
DB Assistant not found. Make sure
that DB Assistant is running on the
computer which has DB Assistant
installed.
—
Contact your system administrator
or support personnel.
—
DB Assistant Server version is
different.
Contact administrator.
—
Is the DB Assistant version
different?
DB Assistant Server error.
Contact administrator.
—
An error has occurred with DB
Assistant or the computer running
DB Assistant. Communication
cannot continue. Check the
computer running DB Assistant.
—
DB Assistant Server is in use.
Try again later.
—
DB Assistant currently connected to
another scanner. Try connecting
again later.
—
6-11
Troubleshooting
Error Messages
Checkpoints
Corrective Actions
Reference
Page
Unable to find FTP server.
Contact administrator.
Is the network cable connected
properly?
Confirm the network cable is
properly connected.
page 2-21
Is the FTP server running?
Contact your server administrator or
support personnel.
—
Unable to Log in to the FTP
Server.
—
FTP server login failed. Make sure page 2-35
username and password have been
configured.
The Path attempted to use for
saving does not exist.
—
Save folder does not exist or path to page 2-35
save folder is incorrect. Verify that
the FTP server save folder and the
path registered in the machine
match.
Error occurred at FTP Server.
Please contact Administrator.
—
FTP server returned an unexpected
error. Unable to save. Ask your
server administrator to verify that the
logged in user account has write
permissions.
Unable to find POP3 server.
Contact Administrator.
6-12
Is the network cable connected
properly?
Confirm the network cable is
properly connected.
Is the POP3 server running?
Start the POP3 server.
—
page 2-21
—
Troubleshooting
Scanner Error Codes
Below is a list of scanner send log error codes and their corrective actions.
Error code
Detail contents
Corrective Actions
E001
User initiated cancel during send.
E010
Connection to destination PC lost during
•
data transmission (an error greater than
E011 has occurred that cannot be further
categorized). Or, connection to the
•
computer running Address Book for
Scanner (Private Address Book) has been
lost.
Reference
Page
—
Confirm that there is no link fault by
checking whether the network cable is
properly connected.
page 2-21
Check that the destination PC is running
properly.
E011
Transmission aborted due to error in
transmitted image data.
Retry the operation.
—
E012
Access to Address Book for Scanner
(Private Address Book) data during image
transmission was lost due to a line fault.
Check that the computer running Address
Book for Scanner (Private Address Book) is
properly connected.
—
E020
Connection to SMTP server lost while
opening E-mail transmission.
Confirm that there is no link fault by
checking whether the network cable is
properly connected. Otherwise, ask your
system administrator or support personnel
to check that the SMTP server is working
properly.
page 2-21
E022
Recipient(s) list includes e-mail address not Check that the destination e-mail address
recognizable by SMTP server.
has been correctly entered.
—
E023
SMTP server not functioning correctly.
Ask system administrator or support
personnel to verify SMTP server is
functioning properly.
—
E030
Unable to recognize destination PC.
•
Verify that Scanner File Utility is running
on the destination PC and if it is
currently connected to another scanner.
•
Confirm that there is no link fault by
checking whether the network cable is
properly connected.
Scanner File Utility not running or already
connected to another scanner.
page 2-21
E031
Scanner password and destination PC
Check the destination PC password.
password do not match when preparing for
image transmission.
—
E032
During Scan to PC, destination PC hard
disk usage limit exceeded.
Try again after increasing available space
on the destination PC hard disk.
—
E033
Version of the Scanner File Utility is
different.
Check the Scanner File Utility version.
—
E034
Scanner File Utility connected to another
scanner. Send failed.
Try Scan to PC again after closing
connection to another scanner.
—
E035
No match for Scanner File Utility folder
number during group send. Configuration
change was made during send operation.
Check the Scanner File Utility settings.
—
E036
During scanned image compression,
compressed data overran available
memory.
Decrease data size as follows and try
again.
—
•
Decrease resolution.
•
Set image quality to OCR.
•
Decrease number of pages scanned in
one operation.
6-13
Troubleshooting
Error code
Detail contents
Corrective Actions
E039
Invalid command received from computer
during Scan to PC. An unexpected
condition has occurred on the destination
PC.
•
Check that the Scanner File Utility on
the destination PC is running properly.
•
Confirm that no other programs to
receive network data are running on the
computer other than Scanner File Utility.
•
Resolve the error condition on the
destination PC.
E059
Command received from computer is
•
invalid. An error condition on the computer
running Address Book for Scanner (Private
Address Book).
•
•
Confirm that Address Book for Scanner
(Private Address Book) is running
properly on the destination PC.
Reference
Page
—
—
Confirm that no other programs to
receive network data are running on the
computer other than Address Book for
Scanner (Private Address Book).
Resolve the error condition on the
destination PC.
E061
An error has occurred for one of the group Check the group member (destination)’s
members (destinations) when group is
computer and clear the error condition, if
selected during E-Mail Send or Scan to PC. any.
E080
The network cable is not connected
properly.
Confirm the network cable is properly
connected. Also, ask system administrator
or support personnel to verify FTP server is
functioning properly.
page 2-21
E081
FTP server login failed.
Make sure username and password have
been configured.
page 2-35
E082
Save folder does not exist or path to save
folder is incorrect.
Verify that the FTP server save folder and
the path registered in the machine match.
page 2-35
E083
FTP server returned an unexpected error.
Unable to save.
Ask your server administrator to verify that
the logged in user account has write
permissions.
—
E090
POP3 server not found.
•
Check that the POP3 server is running
properly.
•
Confirm that there is no link fault by
checking whether the network cable is
properly connected.
E101
6-14
Error occurred when multiple destinations
selected.
Check for error for each individual selection
and resolve the error condition.
—
page 2-21
—
Troubleshooting
Clearing Paper Jams
If a paper jam occurs, the touch panel
will display Paper misfeed and the
copying will stop. Refer to these
procedures to remove the jammed
paper.
Paper misfeed.
1.Remove paper.
2.Open duplex unit A1 and
remove any paper that is inside.
3.Open cassette 1.
4.Remove paper.
5.Reset the cassette and close the cover.
JAM 00
Jam Location Indicators
When a paper jam occurs, the jam location indicators and corrective action are displayed. Jam
location indicators indicate the paper jam position, as shown below.
Paper misfeed.
JAM 00
0
1.Remove paper.
2.Open duplex unit A1 and
remove any paper that is inside.
3.Open cassette 1.
4.Remove paper.
5.Reset the cassette and close the cover.
1
/
1
/
/
1
- 1
,
1
)
.
1 . *
+
1
+
1
1
1
,
,
Jam Location
Indicators
Paper Jam Location
Reference
Page
A
Cassette 1
page 6-16
B
Cassette 2
page 6-17
C
Cassette 3, 4 (option)
page 6-18
D
MP Tray
page 6-19
E
Left Cover 1 Interior
page 6-23
F
Left Cover 2 Interior
page 6-24
G
Fixing Unit
page 6-24
H
Document Processor (option)
page 6-26
I
Document Finisher (option)
page 6-27
After clearing the jam, the machine will warm up again and the error message will be cleared. The
machine resumes from the page on which the jam occurred.
6-15
Troubleshooting
Paper Jam Precautions
•
Do not reuse paper cleared from a jam.
•
If the paper was torn during removal, be sure to remove any loose scraps of paper from the
machine inside. Scraps of paper left in the machine may cause subsequent jamming.
•
Jammed paper from the document finisher (option) or 3000 sheet document finisher (option)
will be fed out again. Do not return this paper to the document finisher tray.
Caution
: The fixing unit of this product is extremely hot. Take sufficient care when
working in this area, as there is a danger of getting burned.
Cassette 1
Follow the steps below to clear Cassette
1 jams.
Paper misfeed.
JAM 00
1
Open left cover 1.
2
Remove any jammed paper.
If the paper tears, remove any loose scraps from the
machine.
3
6-16
Open duplex unit A1.
1.Remove paper.
2.Open duplex unit A1 and
remove any paper that is inside.
3.Open cassette 1.
4.Remove paper.
5.Reset the cassette and close the cover.
Troubleshooting
4
Remove any jammed paper.
If the paper tears, remove any loose scraps from the
machine.
5
Pull out Cassette 1.
6
Remove any jammed paper.
If the paper tears, remove any loose scraps from the
machine.
7
Securely push Cassette 1 back in place.
8
Close duplex unit A1 and left cover 1.
Cassette 2
Follow the steps below to clear Cassette
2 jams.
Paper misfeed.
1.Open left cover 2 of the machine
and remove any paper that is inside.
2.Open cassette 2.
3.Remove paper.
4.Reset the cassette and close the cover.
JAM 00
1
Open left cover 2.
6-17
Troubleshooting
2
Remove any jammed paper.
If the paper tears, remove any loose scraps from the
machine.
3
Pull out Cassette 2.
4
Remove any jammed paper.
If the paper tears, remove any loose scraps from the
machine.
5
Securely push Cassette 2 back in place.
6
Close left cover 2.
Cassette 3, 4 (option)
Follow the steps below to clear paper
jams when using the optional paper
feeder or 3000 sheet paper feeder and a
jam occurs in Cassettes 3 or 4.
Paper misfeed.
1.Open the left cover 3 of the machine
and remove any paper.
2.Open cassette 3.
3.Remove paper.
4.Reset the cassette and close the cover.
JAM 00
1
6-18
Open left cover 3.
Troubleshooting
2
Remove any jammed paper.
If the paper tears, remove any loose scraps from the
machine.
3
Pull out the cassette in use.
4
Remove any jammed paper.
5
Push the cassette back in securely.
6
Close left cover 3.
MP Tray
Follow the steps as below to clear paper
jams in the MP tray.
Paper misfeed.
JAM 00
1
1.Remove paper.
2.Open duplex unit A1 and paper feed
guide B1 to remove any paper.
3.Remove any paper from
the multi purpose tray.
4.Open cassette 1. Follow the guidance.
Open left cover 1.
6-19
Troubleshooting
2
Remove any jammed paper.
If the paper tears, remove any loose scraps from the
machine.
3
Open duplex unit A1.
4
Remove any jammed paper.
If the paper tears, remove any loose scraps from the
machine.
5
Open feed guide B1.
B1
Caution
: The fixing unit of this product is extremely hot. Take sufficient care when
working in this area, as there is a danger of getting burned.
6
Remove any jammed paper.
If the paper tears, remove any loose scraps from the
machine.
6-20
Troubleshooting
7
Remove all paper from the MP tray.
8
Pull out Cassette 1.
9
Rotate Handle B2 to the left at least 10 times. Jammed
paper will be fed inside the left cover.
10
Remove any jammed paper. Follow the steps below if
unable to remove jammed paper.
11
Pull out paper feed unit B3.
6-21
Troubleshooting
6-22
12
Open the cover B4 and remove the jammed paper.
13
If the paper tears, pull paper feed unit B3 out fully, lift
upward and remove.
14
Pull Cassette 1 out fully, lift upward and remove.
15
Remove any jammed paper.
16
Return Cassette 1 and paper feed unit B3 to their original positions.
17
Close feed guide B1, duplex unit A1 and left cover 1.
18
Reload the paper in the MP tray.
Troubleshooting
Left Cover 1 Interior
Follow the steps below to clear jams
occurring inside left cover 1.
Paper misfeed.
1.Open left cover 1.
2.Remove paper.
3.Open duplex unit A1 and
remove any paper that is inside.
4.Close the cover.
JAM 00
1
Open left cover 1.
2
Remove any jammed paper.
If the paper tears, remove any loose scraps from the
machine.
3
Open duplex unit A1.
4
Remove any jammed paper.
If the paper tears, remove any loose scraps from the
machine.
5
Close duplex unit A1 and left cover 1.
6-23
Troubleshooting
Left Cover 2 Interior
Follow the steps below to clear jams
occurring inside left cover 2.
Follow the steps below at left cover 3 to
clear paper jams when using the
optional paper feeder or 3000 sheet
paper feeder and a jam occurs in
Cassette 3.
1
Open left cover 2.
2
Remove any jammed paper.
Paper misfeed.
1.Open left cover 2 of the machine.
2.Remove the paper.
3.Close the cover.
JAM 00
If the paper tears, remove any loose scraps from the
machine.
3
Close left cover 2.
Fixing Unit
Follow the steps as below to clear paper
jams in the fixing unit.
Paper misfeed.
1.Remove paper.
2.Open duplex unit A1 and remove any
3.Open fixing cover A2 to check
paper inside.
4.Close the cover.
JAM 00
1
6-24
Open left cover 1.
Troubleshooting
2
Remove any jammed paper.
If the paper tears, remove any loose scraps from the
machine.
3
Open duplex unit A1.
4
Remove any jammed paper.
If the paper tears, remove any loose scraps from the
machine.
5
Open fixing unit cover A2.
Caution
: The fixing unit of this product is extremely hot. Take sufficient care when
working in this area, as there is a danger of getting burned.
6
Remove any jammed paper.
If the paper tears, remove any loose scraps from the
machine.
6-25
Troubleshooting
7
If jammed paper can be seen around the eject section,
remove by pulling toward you.
8
Close fixing unit A2, duplex unit A1 and left cover 1.
Document Processor (option)
Follow the steps as below to clear paper
jams in the document processor.
Paper misfeed.
1.Open the document processor top cove
2.Hold up the reverse unit.
3.Turn the left dial.
4.Remove the original.
5.Close the document processor top cove
JAM 00
6-26
1
Remove any originals on the original table.
2
Open the document processor cover.
3
Remove the jammed paper.
Troubleshooting
If the original cannot be easily removed, turn the feed
knob. The original will move to a more easily
accessible location.
If the original tears, remove any loose scraps from
inside the machine.
4
Lift up the reverse unit.
5
Remove the jammed paper.
If the original tears, remove any loose scraps from
inside the machine.
6
Return the reverse unit to its original position and close the document processor cover.
7
Replace the originals into the original table.
Document Finisher (option)
If a paper jam occurs in the optional document finisher or 3000 sheet document finisher, clear jams
according to the corresponding Operation Guide.
6-27
Troubleshooting
6-28
Appendix
This section explains the specifications of this device.
•
Body...Appendix-2
•
Copying Performance...Appendix-3
•
Printing Performance...Appendix-3
•
Scanning Performance...Appendix-4
•
Document Processor (option)...Appendix-4
•
Paper Feeder (option)...Appendix-5
•
3000 Sheet Paper Feeder (option)...Appendix-5
•
Document Finisher (option)...Appendix-5
•
3000 Sheet Document Finisher (option)...Appendix-6
•
Job Separator (option)...Appendix-6
•
Environmental Specifications...Appendix-7
Appendix-1
Appendix
Specifications
NOTE: These specifications are subject to change without notice.
Body
Copying System
Dry static transfer copy system (Laser), Tandem drum system
Supported Original Types
Sheet, Book, 3-dimensional objects (maximum original size:
11 × 17"/A3
Copy Sizes
Cassette 1, 2
MP Tray
During Duplex Usage
Non-Copying Margin
11 × 17", 8 1/2 × 14", 11 × 8 1/2", 8 1/2 × 11", 5 1/2 × 8 1/2", 8 1/2 × 13",
8 1/2 × 13 1/2", A3, B4, A4, A4R, B5, B5R, A5R, Folio, 8K, 16K, 16KR
11 × 17" - 5 1/2 × 8 1/2", A3 - A6R, 8K, 16K, 16KR, YOUKEI 2,
YOUKEI 4
11 × 17" - 5 1/2 × 8 1/2", A3 - A5R
4 mm or less
Paper Supply Capacity
Cassette 1
Cassette 3 and 4
MP Tray
500 sheets (80 g/m2, 11 × 8 1/2"/A4 or smaller), 250 sheets (80 g/m2,
8 1/2 × 14"/B4 or larger)
500 sheets (80 g/m2)
100 sheets (80 g/m2, 11 × 8 1/2"/A4 or smaller), 50 sheets (80 g/m2,
8 1/2 × 14"/B4 or larger)
Output Tray Capacity
250 Sheets (80 g/m2)
Warm-up Time
Less than 45 seconds
Recovery time from energy save mode: 10 seconds or less
Recovery time from sleep mode: 45 seconds or less
(Room temperature 71.6 °F/22 °C, humidity 60 %)
Memory
For Copying/
For Scanner
For Printing
Additional Memory
768 MB
256 MB
Printer: 128 MB, 256 MB, 512 MB
Operating Environment
Temperature
Humidity
Altitude
Brightness
Appendix-2
10 to 32.5 °C
15 to 80 %
2,500 m or less
1,500 lux or less
Power Supply
AC 120 V 60 Hz 12 A
AC 220 to 240 V 50 Hz 7.2 A
Dimensions
(W) × (D) × (H)
23 13/16 × 25 3/8 × 29 5/16"
605 × 645 × 745 mm
Weight
215.6 lbs./98 kg (excluding toner containers and waste toner box)
Space Required
(W) × (D)
34 1/2 × 25 3/8"
877 × 645 mm
Appendix
Copying Performance
Copying Speed
25/20 ppm model
32/25 ppm model
32/32 ppm model
Color copy
11 × 17"/A3: 10 sheets/min
8 1/2 × 14"/B4: 10 sheets/min
11 × 8 1/2"/A4: 20 sheets/min
8 1/2 × 11"/A4R: 14 sheets/min
B5: 20 sheets/min
B5R: 14 sheets/min
Color copy
11 × 17"/A3: 13 sheets/min
8 1/2 × 14"/B4: 13 sheets/min
11 × 8 1/2"/A4: 25 sheets/min
8 1/2 × 11"/A4R: 17 sheets/min
B5: 25 sheets/min
B5R: 17 sheets/min
Color copy
11 × 17"/A3: 16 sheets/min
8 1/2 × 14"/B4: 16 sheets/min
11 × 8 1/2"/A4: 32 sheets/min
8 1/2 × 11"/A4R: 22 sheets/min
B5: 32 sheets/min
B5R: 22 sheets/min
Black and White copy
11 × 17"/A3: 13 sheets/min
8 1/2 × 14"/B4: 13 sheets/min
11 × 8 1/2"/A4: 25 sheets/min
8 1/2 × 11"/A4R: 17 sheets/min
B5: 25 sheets/min
B5R: 17 sheets/min
Black and White copy
11 × 17"/A3: 16 sheets/min
8 1/2 × 14"/B4: 16 sheets/min
11 × 8 1/2"/A4: 32 sheets/min
8 1/2 × 11"/A4R: 22 sheets/min
B5: 32 sheets/min
B5R: 22 sheets/min
Black and White copy
11 × 17"/A3: 16 sheets/min
8 1/2 × 14"/B4: 16 sheets/min
11 × 8 1/2"/A4: 32 sheets/min
8 1/2 × 11"/A4R: 22 sheets/min
B5: 32 sheets/min
B5R: 22 sheets/min
First Copy Time
Full color: 7.9 seconds or less 1:1, 11 × 8 1/2"/A4
B/W - Single color: 5.9 seconds or less (1:1, 11 × 8 1/2"/A4)
Resolution
Scanning: 600 × 600 dpi
Printing: 600 × 600 dpi
Continuous Copying
1 - 999 sheets
Zoom Level
Any level of zoom from 25 - 400 % (in 1 % increments)
includes preset zoom levels
Printing Performance
Printing Speed
Same as Copying Speed
First Print Time
Same as First Copy Time
Resolution
300 dpi, 600 dpi, Fast 1200 mode
Supported Operating
Systems
Windows 95 OSR2, Windows 98 Second Edition,
Windows NT 4.0 Service Pack 5 or later,
Windows 2000 Service Pack 2 or later, Windows Me, Windows XP,
Windows Server 2003, Apple Macintosh OS 9.x/OS X 10.x
Interface
Parallel port interface: 1 IEEE1284
Network interface: 1
USB 2.0: 1 USB Hi-Speed
Network interface cards (option): 1
Serial interface (option): 1
Appendix-3
Appendix
Scanning Performance
Hardware
IBM PC/AT Compatible
Supported Operating
Systems
Windows 95 OSR2, Windows 98 Second Edition,
Windows NT 4.0 Service Pack 5 or later,
Windows 2000 Service Pack 2 or later, Windows Me, Windows XP,
Windows Server 2003, Mac OS 9.1-9.2.2, Mac OS 10.1.5-10.4
(TWAIN: Mac OS 10.2-10.4)
Operating Environment
CPU
Pentium 133 MHz or higher (Windows Me 150 MHz or
higher, Windows XP Celeron 600 MHz or higher,
Macintosh Power PC G3 or higher)
RAM
64 MB or greater (Windows XP 128 MB)
HDD
20 MB or greater
CPU
Celeron 266 MHz or higher (Windows XP Celeron
800 MHz or higher)
RAM
64 MB or greater
HDD
300 MB or greater
Recommended
Environment
CD-ROM
1 drive
Ethernet
10BASE-T/100BASE-TX
Network Protocol
TCP/IP
Communications Protocols Proprietary (image transferring, setting via utility), SMTP (e-mail
sending), HTTP (setting via web), FTP (When sending FTP), TWAIN
(When using TWAIN)
Document Processor (option)
Appendix-4
Original Feed Method
Automatic feed
Supported Original Types
Sheet originals
Paper Size
Maximum: 11 × 17"/A3
Minimum: 5 1/2 × 8 1/2"/A5R
Paper Weight
1-sided original: 45 - 160 g/m2
2-sided original: 50 - 120 g/m2
Original No. of Sheets
11 × 8 1/2"/A4 or smaller: 100 sheets or less 50 - 80 g/m2
8 1/2 × 14"/B4 or larger: 70 sheets or less 50 - 80 g/m2
Device Dimensions
(W) × (D) × (H)
22 1/2 × 19 3/16 × 5 1/4"
571 × 488 × 134 mm
Weight
Approx. 25.3 lbs./Approx. 11.5 kg
Appendix
Paper Feeder (option)
Paper Supply Method
Friction Feed (No. Sheets: 500, 80 g/m2, 2 cassettes)
Paper Size
11 × 17", 8 1/2 × 14", 11 × 8 1/2", 8 1/2 × 11", 10 1/2 × 7 1/4", 7 1/4 × 10 1/2",
5 1/2 × 8 1/2", 8 1/2 × 13", 8 1/2 × 13 1/2", A3, B4, A4, A4R, B5, B5R, A5R,
Folio, 8K, 16K, 16KR
Supported Paper
Paper weight: 60 - 105 g/m2
Paper types: standard, recycled, color
Dimensions
(W) × (D) × (H)
23 5/16 × 23 1/4 × 12 3/8"
585 × 590 × 315 mm
Weight
Approx. 57.2 lbs. / Approx. 26 kg
3000 Sheet Paper Feeder (option)
Paper Supply Method
Friction retard method (No. sheets: 3000, 80 g/m2)
Paper Size
11 × 8 1/2", A4
Supported Paper
Paper weight: 60 - 105 g/m2
Paper types: standard, recycled, color
Dimensions
(W) × (D) × (H)
23 5/16 × 23 5/8 × 12 3/8"
585 × 600 × 314 mm
Weight
Approx. 50.6 lbs. / Approx. 23 kg
Document Finisher (option)
Number of Trays
1 tray
Paper Size
(Non-stapling)
11 × 17", 8 1/2 × 14", A3, B4: 500sheets
11 × 8 1/2", 8 1/2 × 11", A4, A4R, B5, B5R, Folio: 1000 sheets
Supported Paper
Weight
Stapling: 80 g/m2 or less
Maximum Sheets for
Stapling†
11 × 17", 8 1/2 × 14", A3, B4: 20 sheets, 11 × 8 1/2", 8 1/2 × 11", A4, A4R,
B5: 30 sheets (Paper weight 80 g/m2 or less)
Dimensions
(W) × (D) × (H)
22 × 20 11/16 × 36 1/16"
558 × 526 × 916 mm
Weight
Approx. 55 lbs./Approx. 25 kg
†
When using color copy paper, stapling up to the number of allowed sheets may not be
possible due to paper quality.
NOTE: When using the document finisher or 3000 sheet document finisher, the optional job
separator must be installed.
Only paper that can be fed from the cassette can be ejected from the document finisher or 3000
sheet document finisher.
Appendix-5
Appendix
3000 Sheet Document Finisher (option)
Number of Trays
3 tray
Paper Size
Tray A (Non-stapling) 11 × 17", 8 1/2 × 14" A3, B4, 8K: 1500 sheets
11 × 8 1/2", 8 1/2 × 11", A4, A4R, B5, Folio, 16K: 3000 sheets
Tray B
11 × 17", 8 1/2 × 14" A3, B4, 8K: 100 sheets
11 × 8 1/2", 8 1/2 × 11", 5 1/2 × 8 1/2", A4, A4R, B5, B5R, A5, A5R, B6R, A6R,
Folio, 16K, 16KR: 200 sheets
Postcard: 50 sheets
Tray C
11 × 8 1/2", 5 1/2 × 8 1/2", A4, B5, A5, A5R, B6R, A6R, 16K: 50 sheets
Postcard: 10 sheets
Supported Paper
Weight
Stapling: 90 g/m2 or less
Punchingoption: 45 - 200 g/m2
Maximum Sheets for
Stapling†
11 × 17", 8 1/2 × 14", A3, B4: 30 sheets, 11 × 8 1/2", 8 1/2 × 11", A4, A4R,
B5: 50 sheets (Paper weight 90 g/m2 or less)
Dimensions
(W) × (D) × (H)
26 15/16 × 22 3/16 × 42 13/16"
684 × 563 × 1087 mm
Weight
Approx. 105.6 lbs. or less/Approx. 48 kg or less
†
When using color copy paper, stapling up to the number of allowed sheets may not be
possible due to paper quality.
NOTE: When using the document finisher or 3000 sheet document finisher, the optional job
separator must be installed.
Only paper that can be fed from the cassette can be ejected from the document finisher or 3000
sheet document finisher.
Job Separator (option)
Appendix-6
Number of Trays
1 tray
Maximum Sheets
100 sheets (80 g/m2)
Paper Size
11 × 17", 8 1/2 × 14", 11 × 8 1/2", 8 1/2 × 11", 7 1/4 × 10 1/2", 5 1/2 × 8 1/2",
8 1/2 × 13", 8 1/2 × 13 1/2", A3, B4, A4, A4R, B5, B5R, A5R, Folio
Paper Type
Paper weight: 60 - 105 g/m2
Paper type: standard, recycled, color, thin, letterhead
Device Dimensions
(W) × (D) × (H)
22 7/16 × 22 7/16 × 9 1/2"
570 × 570 × 240 mm
Weight
5.06 lbs. or less /2.3 kg or less
Appendix
Environmental Specifications
Recovery time from Low-Power mode
10 seconds or less
Time to Low-Power mode (factory default setting)
15 minutes
Time to Sleep mode (factory default setting)
45 minutes
Duplexing
Standard
Paper supply capability
Paper with 100 % recycled paper
content may be used
NOTE: Contact your Dealer or Service Representative for recommended paper types.
Appendix-7
Appendix
Appendix-8
Index
Index
Numerics
3000 sheet document finisher 4-5
Paper jams 6-27
Specifications Appendix-6
3000 sheet paper feeder 4-4
Loading paper 2-4
Paper jams 6-18
Specifications Appendix-5
Specifying the paper type 2-8
A
Additional memory 4-7
Adjusting exposure
Auto Exposure mode 3-6
Manual Exposure mode 3-6
Auto Low-Power mode 3-35
Auto Sleep mode 3-36
B
Background exposure adjust ii
Batch scanning ii
Booklet i
Border erase i
C
Cable connection
Network interface 2-21
Parallel port interface 2-21
USB interface 2-21
Canceling a print job 3-19
Carrying handles 1-3
Cassette
Cassette 1 1-2, 2-2
Cassette 2 1-2, 2-2
Loading paper 2-2
Paper jams 6-16, 6-17
Specifying paper size 2-7
Specifying the paper type 2-8
Caution labels xii
Centering originals i
Cleaning
Original platen, platen 5-2
Separator 5-3
Slit glass 5-3
Document processor 5-2
Color balance adjust ii
Color/B&W selection iii
Combine mode i
Conventions in this guide xxv
Copy
Adjusting exposure 3-6
Basic copying procedures 3-2
Duplex mode 3-11
Error message 6-4
Interrupt copy 3-17
Job reservation 3-18
Reducing/Enlarging 3-7
Selecting image quality 3-5
Sort mode 3-16
Specifications Appendix-3
Split mode 3-14
Copy screen 1-5
Copying speed Appendix-3
Cover mode i
D
Database connection v, 3-28
Document finisher 4-5
Paper jams 6-27
Specifications Appendix-5
Document processor 4-4
Cleaning 5-2
Loading originals 2-18
Paper jams 6-26
Part names 2-18
Precautions 2-18
Specifications Appendix-4
Duplex mode i, 3-11
Duplex path iv
E
EcoPrint ii
Energy Star program x
Environmental specifications Appendix-7
Error code 6-13
Error message
Copy 6-4
Printer 6-8
Scanner 6-10
F
Fax kit 4-6
First copy time Appendix-3
First print time Appendix-3
Front cover 1-3, 5-3, 5-5
Full-color scan v
G
Grounding the machine xiv
H
Hard disk 4-7
Hue adjust iii
Index-1
Index
I
N
Image repeat copy ii
Included guides xxiv
Installation precautions xiii
Interface cover 1-2, 2-21
Interrupt copy 3-17
Inverted copying ii
Names
Body 1-2
Operation panel 1-4
Touch panel 1-5
Network interface 1-2, 2-21
Network interface card 4-8
J
O
Job accounting v
Job build iii
Job reservation 3-18
Job separator 4-5
Specifications Appendix-6
Job storage iv
Offset mode i
OHP backing sheet mode ii
One touch image adjust iii
Operation panel 1-2, 1-4
Option
3000 sheet document finisher 4-5
3000 sheet paper feeder 4-4
Additional memory 4-7
Document finisher 4-5
Document processor 4-4
Fax kit 4-6
Hard disk 4-7
Job separator 4-5
Key counter 4-6
Memory card 4-6
Network interface card 4-8
Overview of optional equipment 4-2
Paper feeder 4-4
PDF upgrade kit 4-8
Security kit 4-7
Serial interface 4-8
Original
Loading on the platen 2-16
Loading originals in the document processor
2-18
Size xxvi
Original platen 1-2, 2-16
Cleaning 5-2
Original size indicator plates 1-2, 2-16
Output management iv
Output tray 1-3, 3-3
K
Key counter 4-6
How to insert 4-6
L
Language v, 2-20
Left cover 1 1-3, 5-4, 6-16, 6-19
Left cover 2 1-3, 6-17, 6-24
Legal and safety information
Caution labels xii
Energy Star program x
Grounding the machine xiv
Installation precautions xiii
Legal information viii
Power supply xiv
Precautions for use xiv
Regarding tradenames ix
Safety conventions xi
Symbols xi
Legal information viii
List of functions i
Low-Power mode 3-35
M
Main power switch 1-2, 2-21, 3-2, 3-4
Main power switch cover 1-2, 2-21, 3-2
Maintenance 5-1
Margin mode i
Memo mode ii
Memory card 4-6
Memory card slot 1-2, 4-6
Mirror copying ii
MP tray 1-2
Loading paper 2-5
Paper jams 6-19
Specifying paper size 2-10
Specifying the paper type 2-15
MP tray extension 1-2, 2-5
Index-2
P
Page numbering i
Paper
Loading paper in the MP tray 2-5
Loading paper into 3000 sheet paper feeder 2-4
Loading paper into Cassette 1, 2 2-2
Loading paper into paper feeder 2-2
Note 2-2
Size xxvi, 2-7, 2-10
Type 2-8, 2-15
Paper feeder 4-4
Loading paper 2-2
Paper jams 6-18
Specifications Appendix-5
Index
Specifying paper size 2-7
Specifying the paper type 2-8
Paper jams 6-15
3000 sheet document finisher 6-27
3000 sheet paper feeder 6-18
Cassette 1 6-16
Cassette 2 6-17
Document finisher 6-27
Document processor 6-26
Fixing unit 6-24
Jam location indicators 6-15
Left cover 1 6-23
Left cover 2 6-24
MP tray 6-19
Paper feeder 6-18
Paper jam precautions 6-16
Paper length guide 1-2, 2-3
Paper width adjusting tab 1-2, 2-3
Paper width guide 1-2, 2-3
Parallel port interface 1-2, 2-21
Part names 1-1
PDF upgrade kit 4-8
Platen 1-2, 2-16
Cleaning 5-2
Poster i
Power supply xiv
Precautions for use xiv
Preparation 2-1
Printer
Cancel 3-19
Error message 6-8
Included printer utilities 2-24
Installing the printer driver 2-25
Network Settings 2-22
Specifications Appendix-3
Printer driver 2-25
Printer screen 1-6
Printing speed Appendix-3
Private print iv
Programmed copying iii
Programmed scanning v
Proof and hold iv
Proof copy ii
Q
Quick copy iv
R
Reducing/Enlarging
Auto zoom 3-7
Manual zoom 3-7, 3-8
Preset zoom 3-7, 3-9
XY zoom 3-7, 3-10
Repeat copy ii
Resolution Appendix-3
S
Safety conventions xi
Scan to FTP v, 3-32
FTP Common Address Book 2-35
Scan to PC v, 3-23
Scan to PC Common Address Book 2-35
Scanner
Basic settings 2-32
Configuring date/time 2-37
Configuring time difference 2-37
Connection 2-31
Database connection 3-28
Error code 6-13
Error message 6-10
Installing utilities 2-39
Modifying Common Address Book 2-35
Registering user information 2-34
Scan to FTP 3-32
Scan to PC 3-23
Scanner File Utility 2-40
Send E-mail 3-20
Specifications Appendix-4
TWAIN 3-27
Scanner File Utility
Installing 2-40
Registering file save folders 2-41
Setting from a web browser 2-44
Scanner screen 1-6
Security kit 4-7
Selecting image quality 3-5
Map 3-5
Photo 3-5
Print 3-5
Text 3-5
Text+Photo 3-5
Send E-mail v, 3-20
E-mail Common Address Book 2-35
Separator
Cleaning 5-3
Serial interface 4-8
Shared data box iii
Sharpness adjust ii
Single color copy iii
Sleep mode 3-36
Slider 1-2, 2-6
Slit glass
Cleaning 5-3
Solving malfunctions 6-2
Sort mode 3-16
Specifications
3000 sheet document finisher Appendix-6
3000 sheet paper feeder Appendix-5
Body Appendix-2
Copying performance Appendix-3
Document finisher Appendix-5
Document processor Appendix-4
Environmental specifications Appendix-7
Index-3
Index
Job separator Appendix-6
Paper feeder Appendix-5
Printing performance Appendix-3
Scanning performance Appendix-4
Split mode i, 3-14
Symbols xi
Synergy print box iv
T
TCP/IP 2-22
Toner container 1-3
Replacement 5-5
Toner container lock lever 1-3, 5-6
Touch panel 1-5
TWAIN v, 3-27
Initiating the connection from the computer 3-27
Initiating the connection from the machine 3-27
U
USB interface 1-2, 2-21
V
Virtual mailbox iv
W
Warm-up 3-2
Waste toner box 1-3
Replacement 5-5
Index-4
For best results and machine performance, we recommend that you use only our original supplies for
your products.
E1
画質調整クイックガイド
Quick Guide to Adjusting Image Quality
Manuel d’utilisation rapide pour le rélage
de la qualité de l’image
Guía rápida para ajustar la calidad de
la imagen
Kurzanleitung zur Einstellung der
Bildqualität
Guida rapida alla regolazione
della qualità dell’immagine
2fz_color00.p65
Page 1
2006.1.17, 8:41 AM Adobe PageMaker 6.5J/PPC
はじめに
カラー画像の出力が満足できない状態の場合、本書を参考に調整をしてください。コピー画像はコピー編を、
プリント出力画像はプリンタドライバ編を参照してください。
カラーで印刷するときは、カラーコピー専用紙を使用してください。使用しない場合は、濃度、色合いなどの
印刷品質に影響が出るおそれがあります。
出力枚数が非常に多い、または少ない状態や、一枚あたりの印刷率が非常に高い、または低い状態で出力を続
けると、印刷品質に影響が出るおそれがあります。
Introduction
If you are not satisfied with the output quality of color images, refer to this manual and make adjustments
accordingly. For copy images, refer to the chapter on copies. For printer output images, refer to the chapter on
printer drivers. Make sure to use special color copying paper when printing in color. If you don’t, print qualities
such as density and hue could be affected.
If the number of copies printed is extremely large or extremely small, or if a single sheet is continuously printed
at an extremely high or extremely low print ratio, the print quality could suffer.
Introduction
Si la qualité de l’affichage des images en couleur ne vous satisfait pas, référez-vous à ce manuel et faites les
ajustements idoines. Pour la copie d’images, référez-vous au chapitre traitant des copies. Pour les images
sorties sur imprimante, référez-vous au chapitre traitant des pilotes d’imprimante. Assurez-vous d’utiliser du
papier à copier couleur spécial quand vous imprimez en couleur. Si vous ne le faites pas, les qualités
d’impression telles que la densité et la tonalité pourraient en être affectées.
Si le nombre de copies imprimées est très important ou très faible, ou si une seule feuille est imprimée en
continue à une cadence très élevée ou très faible, la qualité d’impression pourrait en pâtir.
Introducción
Si no está satisfecho con la calidad de salida de las imágenes en color, consulte este manual y realice los
ajustes necesarios. Para copiar imágenes, consulte el capítulo dedicado a las copias. Para imágenes de salida
de la impresora, consulte el capítulo sobre controladores de la impresora. Asegúrese de que utiliza papel
especial para copias en color cuando realice impresiones en colores. De no hacerlo, componentes de la calidad
de la impresión tales como la densidad y la tonalidad podrán verse afectados.
Si el número de copias que se imprimen es extremadamente grande o extremadamente pequeño, o si se
imprime una sola página continuamente a una tasa de impresión extremadamente alta o extremadamente baja,
podría verse afectada la calidad de la impresión.
Einführung
Wenn Sie mit der Ausgabequalität von Farbbildern nicht zufrieden sind, nehmen Sie die entsprechenden in
diesem Handbuch angegebenen Justierungen vor. Hinweise zum Kopieren von Bildern finden Sie im Kapitel
über das Kopieren. Hinweise zur Druckausgabe von Bildern finden Sie im Kapitel über Druckertreiber. Bitte
beachten Sie, dass beim Drucken in Farbe spezielles Farbkopierpapier verwendet werden sollte. Mit anderem
Papier könnte die Druckqualität in Dichte und Farbton vermindert werden.
Falls Sie extrem viele oder wenige Kopien drucken, oder falls ein einzelnes Blatt kontinuierlich bei extrem großen
oder kleinen Druckbild-Verhältnissen bedruckt wird, könnte die Druckqualität leiden.
Introduzione
Se la qualità delle immagini a colori ottenute non fosse soddisfacente, fare riferimento a questo manuale ed
eseguire le regolazioni necessarie. Per immagini fotocopiate, fare riferimento al capitolo Copia. Per immagini
inviate alla stampante, fare riferimento al capitolo Driver stampante. Verificare che venga utilizzata la carta
speciale per fotocopiatura a colori quando si stampa a colori. In caso contrario, si può avere un effetto negativo
sulle caratteristiche di stampa, come ad esempio la densità e la tonalità.
Se il numero di copie stampate è molto grande o molto piccolo, o se viene stampato un solo foglio in
continuazione con un rapporto di stampa molto grande o molto piccolo, la qualità di stampa può peggiorare.
日本語
コピー編 ....................................... 1
プリンタドライバ編 ................... 3
Español
Copia ...................................... 19
Controlador de la impresora ... 21
English
Copying .................................... 7
Printer Driver ............................ 9
Deutsch
Kopieren ................................. 25
Druckertreiber ........................ 27
Italiano
Copia ...................................... 31
Driver stampante .................... 33
Français Copie ...................................... 13
Pilote d’imprimante ................. 15
2fz_color00.p65
Page 2
2006.1.17, 8:42 AM Adobe PageMaker 6.5J/PPC
Quick Guide to Adjusting Image Quality (Copying)
Copying
Selecting Image Quality
Select the optimal image quality mode to match the type of original you are copying.
English
Text + Photo
Choose this setting when copying an original that combines text,
illustrations and photos. Each individual area is optimally processed.
Text is clearly copied and illustrations and photos are smoothly
rendered.
Ex: Presentation materials, business documents, catalogs, etc.
Photo
Choose this setting when copying a photo taken with a camera, etc. The
original photo is clearly copied.
Print
Choose this setting when copying photos printed in a catalog or
magazine in halftone dots. This setting reduces the moiré† effect.
Text
Choose this setting when copying an original that contains mainly text.
The text is clearly copied.
Ex: Business documents and materials with a lot of text
Map
Choose this setting when copying maps. Fine text and lines printed on a
background color are clearly copied.
1
Press [Function], and then [Orig. Image Quality] ([Image Quality]).
2
Choose the image quality setting that
corresponds to your original.
3
Press [Close].
Ready to copy. (Full-Color)
Orig.Image Quality
Text+Photo
Text
Photo
Map
Print
†
Patterns that are created by irregular distribution of halftone dots.
7
Shortcut
Text+Pho
Photo: Fo
Print: Fo
Text: For
Map: For
Quick Guide to Adjusting Image Quality (Copying)
Adjusting Color Balance
This setting allows you to adjust the overall color if the whole copy seems too red or yellow.
It allows you to increase/decrease the levels of yellow, magenta, cyan and black.
Ex: In the following situation…
The color balance adjustment allows you
to adjust the copy’s overall color.
The entire copy seems too yellow
NOTE: This feature can not be used together with Auto Exposure mode (see Operation Guide).
1
Press [Color func.] and then [Color balance] ([Colour balance]).
2
Press [On].
3
Use [O] or [P] to adjust the colors
indicated to the right (Cyan, Magenta,
Yellow, Black).
4
Press [Close].
Paper Size
11x
100%
o copy. (Full-Color)
Shortcut
Cyan
Magenta
Yellow
Black
8
Back
1x
%
Quick Guide to Adjusting Image Quality (Copying)
Other Functions
One-Touch Image Quality Adjustment
Adjusts the settings to a desired image quality that matches ‘Vivid’ and ‘Dull’ images.
Hue Adjustment
Adjusts the color tone (hue). This function allows you to copy an image and change its colors by
creating a red with strong yellow tones or creating a yellow that is closer to yellow-green.
Refer to the Advanced Operation Guide for further details.
Printer Driver
You can set various color printer settings on the printer driver’s Imaging tab. The Imaging tab is
displayed as indicated below.
NOTE: These settings can also be changed from an application’s Print menu.
The following procedure uses Windows XP as an example, but other operating systems use the
same procedure.
1
Click the Window’s start button. Click Printers
and Faxes to display the Printers and Faxes
screen.
2
Right-click on the icon of an available printer
shown on the Printers and Faxes screen and a
shortcut menu displays.
3
Click Printing Preferences to display the
Printing Preferences screen.
9
English
Adjusting Sharpness
Adjusts the strength/weakness of the image’s contours. This function allows you to clearly copy
text and lines by adjusting sharpness to [Sharpen] when the original you are copying was written
in pencil, or the text and lines are broken or unclear. You can also weaken the moiré effect by
softening the contours and adjusting sharpness to [Unsharpen]. Use this setting when copying
images with halftone dots such as photos in magazines.
Quick Guide to Adjusting Image Quality (Printer Driver)
4
Click the Imaging tab.
Color Mode
You can switch between color and monochrome printing. You can also use Custom to select
Continuous tone.
1
Select the following items from the Color mode
dropdown list.
Color (CMYK) ... Uses a four-color toner to print
text and graphics in color.
Monochrome ... Uses a black toner only to print in
black and white.
Custom ... Allows you to specify options from
Settings.
2
If you select Custom, select the following items
from Settings.
Print text as black ... If you are printing color or
gray text, the text that would normally be printed in
color or in gray is printed in black without the use of
gray scale. White text or color images and graphics
are not affected.
Continuous tone ... Pixels are rendered and
printed over a wide-ranging grayscale. This setting is
appropriate for printing photo images.
3
Once you have finished, click the OK button to save your settings.
10
Quick Guide to Adjusting Image Quality (Printer Driver)
Balance Adjustment
This function allows you to adjust the color tone if you have selected Color (CMYK) in Color
mode. You can save color adjustment settings under Custom 1, 2 and 3.
1
Select Color (CMYK) in Color mode and click the
Adjustment button. The Adjustment Settings
dialog box displays.
2
Select Custom 1, Custom 2, or Custom 3 from
the Custom color adjustment dropdown list and
click the Settings button. The Custom Color
Adjustment dialog box displays.
3
Select one of the following items from Select
color space.
English
Note: If you select Monochrome in Color mode, you can adjust the grayscale Brightness and
Contrast. Refer to the Extended D river User Guide for information on adjusting the
monochrome print settings.
HSL (hue, saturation and lightness) ... This setting allows
you to adjust the Hue adjustment (color), Saturation
(brightness), Lightness (luminosity), and Contrast
(sharpness).
RGB ... Adjusts the Red, Green and Blue balance.
Click the left/right arrow buttons on Click arrows to change image and choose from one of
the three image photos. The characteristics of the colors emphasized differs in each of the
image photos, making it easy to see the degree of color adjustment.
Crayons
Saturation or RGB
adjustment
Child
Skin color and half-tone
adjustment
11
Fruit
Hue adjustment
Quick Guide to Adjusting Image Quality (Printer Driver)
If HSL (hue, saturation and lightness) is selected.
Hue adjustment ... Use the slider to adjust the hue
balance. To adjust a specific hue, select Red, Yellow,
Green, Cyan, Blue or Magenta from the dropdown list.
You can adjust all hues as one by selecting Master. You
can also make adjustments by entering a value from
-180 to +180.
Saturation, Lightness, Contrast ... Use the slider to
adjust the color’s saturation, lightness and contrast. You
can also make adjustments by entering a value from
-10.00 to +10.00.
If RGB is selected
RGB level ... Move the various RGB sliders to adjust the
balance of the Red, Green and Blue that correspond to
monitor colors. You can also make adjustments by
entering a value from -10.00 to +10.00.
4
Once you have finished, click the OK button to save your settings.
Other Functions
Color Correction
‘Color Correction’ is a function that corrects the color space difference that exists between each
color printing system is order to maintain consistency during color reproduction among devices.
This function allows you to set the method used to make color adjustments during printing.
Color Reproduction
If you set Color Correction to Automatic, you can configure Color Reproduction settings. The
objects in the document that are to be printed are divided into images, texts and graphs to match
the Color Reproduction mode. This setting allows you to reproduce colors that are clearer and
closer to the colors displayed on the monitor.
Refer to the Extended Driver User Guide for further details.
12
UTAX GmbH, Ohechaussee 235, 22848 Norderstedt, Germany