1
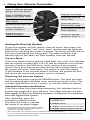
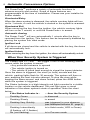
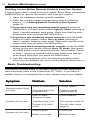
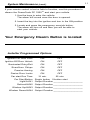
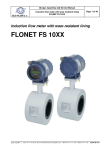
1
Remote Vehicle Control System
PC 7600
TM
Owner's Manual
Car Start, Security and
Convenience System
IMPORTANT NOTE: The operation of the Power Code as described in this
manual is applicable to most vehicles. However, due to the engine type
and configuration of some vehicles (i.e. diesel engines), some functions
AND/OR SAFETY PRECAUTIONS may not apply. Please see your
installing dealer for more information.
101517-1
2
Table of Contents
Features and Benefits of the PowerCode PC 7600TM ..................... 3
Using Your Remote Transmitter .............................................. 4
Arming the Security System
Pre-arm Mode
Disarming the Security System
Attempted Intrusion Identification
Disabling the IT-sTM Interior Theft Sensor ............................... 5
Two-Stage Door Unlock
Activating the Trunk Release Feature
Turning on the Vehicle Headlights
Windows up/AUX 3
Windows down/AUX 4
Using the Car Finder Feature
Personal Protection Alarm (Panic)
Remote Start / Stop Feature
Using Valet Mode
Using Your Remote Starter ...................................................... 6
Starting Your Vehicle
If your vehicle stalls or does not start
Remote Start Safety Features
Entering the Vehicle While it is Running via Remote Start
Pre-Heating or Pre-Cooling the Interior of the Vehicle
Turning on the Rear-Window Defroster
Using the “Quick-stop” feature
Automatic Convenience Options ............................................ 7
When Your Security System is Triggered ............................... 8
The Interior Status Indicator .................................................... 8
System Maintenance ................................................................ 8
Changing the Remote Control Battery
Adding Remote Controls to Your System
Deleting Lost or Stolen Remote Controls from Your System
Basic Troubleshooting ............................................................ 10
Emergency Disarm Procedure .......................................... 11
Emergency Disarm Button Location
Installer Programmed Options
Your Code-Alarm, Inc. Limited Lifetime Warranty ............... 12
Code Alarm Theft Protection Plan ............................................13
Features and Benefits of the Power Code PC 7600TM 3
Two Easy-to-Use Weather-Resistant Remote Controls
The remote controls included with the Power Code PC 7600TM
utilize durable, moisture resistant cases and sealed rubber buttons
for reliability and long life. Rolling code technology prevents the
transmitter signals from being duplicated. The button functions are
clearly labeled to make the Power Code PC 7600TM simple to operate.
All Entrances Protected
Opening any door or entrance protected by the security system
triggers the alarm’s 125db siren (or vehicle horn) and flashes the
vehicle parking lights.
Starter Disable
The Power Code PC 7600TM protects your vehicle from theft by
disabling the starter when the system is armed.
IT-sTM Interior Theft Sensor
This patented sensor uses infra-red technology to reliably detect
vehicle impact associated with attempted intrusion. The IT-s sensor
guards against vehicle body damage, and theft of the vehicle’s
equipment (such as airbags) and personal belongings.
Remote Keyless Entry
The Power Code PC 7600TM conveniently locks and unlocks vehicle
doors and opens the trunk or hatch by remote control.*
Personal Protection Features
Remote Panic Alarm, Headlight Control, Illuminated Entry,
and Car Finder are among an array of features that enhance
personal safety.**May require additional componets and/or labor
Interior Status Indicator
The bright-red warning light is an effective visual deterrent to a
would-be thief.
Remote Start
The Power Code PC 7600TM allows you to warm up your vehicle
and preheat or pre-cool the interior with the press of a button on the
remote control.
PowerRangeTM Antenna
This long-range antenna allows you to operate the Power Code PC
7600TM from distances of up to 1/8 mile. Remote-start your vehicle
from the safety of your home, apartment or office building.
E-Code Coded Override System
If this feature is enabled, it will allow you to enter a personal 4-digit
code that only you will know. This will be used for overriding the
system in the case of an emergency or a lost transmitter.
* If vehicle is equipped with power door locks and they are connected to the alarm system by your installer.
4
Using Your Remote Transmitter
Press to ARM the Security
System and Lock Doors
Press to DISARM Security
System and Unlock Doors
Press TWICE for Two-Stage
Door Unlock*
Press for Car Finder
Press and Hold for
Panic Alarm
Press and Hold to Open Trunk
Press and Hold for
Remote Start / Stop
Press and hold to
activate Auxilary 3
Press TWICE to turn on
Rear Defroster*
Press and hold to
activate Auxilary 4
Press for two-car
operation (SHIFT)
Arming the Security System
To arm the system, exit the vehicle, close all doors, then press* the
ARM button. The siren** will “chirp” twice† and the parking lights will
flash twice, indicating the system is armed. The doors will also lock at
this time (if equipped and connected). The status indicator (red
warning light on the dash) will blink steadily, once per second.
Pre-arm Mode
If the siren chirps and the parking lights flash only once, this indicates
that the vehicle courtesy light is on, or that an entrance is not closed
securely. Check to see that doors, hood, and trunk are properly
closed. Once all entrances are secured (and the courtesy light is off),
the system will chirp / flash again. The system is now fully armed.
(If the entrance is not secured within 4 minutes, the system will arm
and ignore the unsecured entrance until it is closed.)
Disarming the Security System
To disarm the system, press the DISARM button. The siren will chirp
and the parking lights will flash once, and the doors will unlock. The
courtesy light will turn on for 1 minute, or until the vehicle is started.
Attempted Intrusion Identification
If the siren chirps four times when disarming, this indicates that the
system was triggered in your absence. The status indicator will also
flash rapidly. Perform the following operation to determine the protected
zone that triggered the system:
After disarming, press the
emergency override button.
The siren will chirp to indicate
the cause of the alarm trigger:
* Throughout this manual, ‘press’ refers to pressing
for less than 1 second; ‘press and hold’ refers to
pressing for more than 1 second.
1 chirp IT-s Interior Theft Sensor
2 chirps Door
3 chirps Hood
4 chirps Trunk/Optional Sensors
5 chirps Ignition was turned on
** ’Siren’ also refers to the vehicle horn if it is used as the alarm sounding device.*
†
If you have chosen the Silent Arming Option, the siren will not sound when arming or disarming until the
appropriate button is pressed a second time.
Using Your Remote Transmitter (cont.)
Disabling the IT-s Interior Theft Sensor
It may be necessary at times to disable the IT-s Interior Theft Sensor,
especially when parking in areas (like parking garages) where
extreme vibration may cause false alarms. Press the ARM button and
then press the FIND/PANIC button within two seconds of pressing
ARM to disable the interior theft sensor. The siren will chirp three
times to indicate that the sensor is disabled. The sensor will become
enabled again the next time the system is armed normally.
Two-Stage Door Unlock
If this feature is enabled on your system, pressing DISARM one time
will unlock only the driver’s door. Press DISARM again within 1 minute
to unlock all doors.
Activating the Trunk Release Feature
Press and hold TRUNK to open the vehicle trunk or hatch (if equipped
and connected). If this button is used to operate another accessory,
the accessory will stay active for as long as the button is held.
Turning on the Vehicle Headlights
Press and hold the LIGHTS button to turn on the vehicle headlights.
(The alarm system will attempt to arm if not already armed, unless it is
in Valet Mode.) The lights will stay on for 20 seconds, or until LIGHTS
is pressed again.
Using Windows Up/AUX 3
If this feature is enabled on your system, pressing WINDOWS UP for
one second will raise the vehicle windows.
Using Windows/Down/AUX 4
If this feature is enabled on your system, pressing WINDOWS DOWN
for one second will lower the vehicle windows.
Using the Progressive Car Finder Feature
Press FIND on the remote control to locate your vehicle. The siren will
emit five short chirps at low volume, increasing in volume each of
three times the button is pressed.
Personal Protection Alarm (Panic)
Press and hold the PANIC button to activate the vehicle siren and
parking lights for 30 seconds. (If the vehicle horn is connected, the
horn will “pulse” for 30 seconds.) Press any remote control button to
turn off the Panic alarm.
Remote Start / Stop Feature
Press ARM, then press START within 2 seconds on the remote control.
If all safety parameters are correct, the engine will start within 5 seconds
(diesel engines will take longer.) Press and hold START again to turn
off the vehicle. (Turn to page 6 for more on remote start features.)
Using Second Car Mode
If this feature is enabled, one transmitter will control two vehicles equipped
with a Power CodeTM system. To operate the second vehicle, press the
shift button, then within two seconds, press the desired function button.
5
6
Using Your Remote Transmitter (cont.)
Using Valet Mode
If the Passive Arming feature is enabled on your system, Valet mode
temporarily prevents the alarm system from arming automatically.
This is useful when fueling or servicing your vehicle.
To enter Valet Mode:
With the vehicle ignition on, press the ARM button. The red dashboard
warning light (status indicator) will turn on for one second, then turn
off. This indicates that the system is in Valet mode. Once the ignition is
turned off, the status indicator will emit a quick double-flash pattern.
Note: In Valet mode, all keyless entry, convenience and remote start
features operate normally.
To exit Valet Mode:
With the vehicle ignition on, press the DISARM button. The red
dashboard warning light (status indicator) will turn on for one second,
then turn off. This indicates that the system has exited Valet mode.
Hint: To prevent your security system from automatically arming while
unloading or refueling your vehicle, without placing the system
inValet mode, simply press the disarm button on your remote control
transmitter after turning the ignition key off. Doing so places your
system into a temporary or one time Valet mode. Next time you exit
your vehicle the system will arm in the normal manner.
Using Your Remote Starter
Starting Your Vehicle
The remote start function is activated by pressing the ARM button,
then pressing the START button on the remote control within 2
seconds. The system will check the vehicle to ensure that it is safe to
start, and if all safety parameters are correct, the engine will start
within 5 seconds (diesel engines will take longer.) Press and hold
START again to turn off the vehicle.
If your vehicle stalls or does not start...
If the vehicle stalls or does not start, the Power Code PC 7600TM will
pause 5 seconds, then try 3 more times to start the vehicle (a total of
four attempts). The system pauses 5 seconds between each start
attempt. If the vehicle does not start after the fourth attempt, the Power
Code PC 7600TM will abort the start process.
Your vehicle can be started by remote control whether the alarm is
armed or disarmed. When the alarm is armed, the impact sensor turns
off when the vehicle is started to prevent the engine vibration from
setting off the alarm.
Using Your Remote Starter (cont’d)
Remote Start Safety Features
For safety and security reasons, the Power Code PC 7600TM will shut
off the vehicle during remote start if any of the following occur:
• The vehicle hood is opened
• The brake is pressed before the vehicle ignition is turned on
with the key
• The engine reaches 3 times its normal idle
• The alarm is triggered
As a safety precaution, the vehicle will shut off if left unattended for 15
or 24 minutes, depending on the time preset by your installer.
Entering the Vehicle While It is Running via Remote Start
1. Press DISARM to unlock the door(s) and turn off the alarm
system (if it is not already off).
2. Enter the vehicle. Do not press the brake pedal.
3. Insert the key into the ignition and turn to the ON position.
4. Press the brake pedal. The remote starter disengages and the
vehicle will operate normally.
Pre-Heating or Pre-Cooling the Interior of the Vehicle
Before exiting the vehicle, set the temperature controls to the desired
setting and operation. After the Power CodeTM starts the vehicle, the
heater or air-conditioning will activate and heat or cool the interior to
your setting.
Turning on the Rear-Window Defroster (if connected)
While the vehicle is running via remote start, press DEFRST on the
remote control. The vehicle defroster will activate and run for 10
minutes, or for your vehicle’s preset time limit.
Using the “Quick-stop” Feature
If you want to make a short stop and leave your vehicle running (to keep
the interior warm or cool, for instance), the quick stop feature allows
you to do this while keeping your vehicle secure and your keys with you.
To engage quick stop:
1. Stop the vehicle and place the transmission in PARK.
2. With your foot off the brake pedal, press the ARM button, then
press the START button on the remote control within 2 seconds
The parking lights will turn on, indicating that the vehicle is now
running via remote start.
3. Remove the keys from the ignition and exit the vehicle. Press
ARM to arm the alarm system if desired.
Note: Do not leave children or animals unattended in the vehicle
when using the quick stop feature.
7
8
Automatic Convenience Options
The PowerCodeTM performs a variety of automatic functions to
enhance security and comfort. Some of these features are
programmable at the time of installation. Please see your installer for
further details.
Illuminated Entry
When the alarm system is disarmed, the vehicle courtesy lights will turn
on for 1 minute, or until the vehicle is started or the system is re-armed.
Illuminated Exit
When removing the key from the ignition, the vehicle courtesy lights
will turn on for 1 minute, or until the PowerCodeTM is armed.
Automatic Arming
The Power CodeTM will arm automatically 1 minute after the key is
removed from the ignition. This feature can be temporarily disabled by
placing the system into Valet mode.
Ignition Lock
If all doors are closed and the vehicle is started with the key, the doors
will automatically lock.
Ignition Unlock
When removing the key from the ignition, the doors will automatically unlock.
When Your Security System is Triggered
The PowerCode PC 7600TM will trigger if one of the following events
occurs while the system is armed:
• Any protected entrance is opened
• The vehicle ignition is turned on
• The vehicle is jolted hard enough to signal the impact detector
Once the alarm is triggered, the siren (or horn) sounds and the
vehicle parking lights flash for 30 seconds. The system will then rearm, awaiting the next intrusion attempt. To stop the siren while
keeping the alarm armed and doors locked, press the ARM button
while the system is triggered.
The Status Indicator is a high-intensity red light mounted in a visible
location on the vehicle dashboard. This red light gives a visual
indication of the alarm system’s state of operation. Note the chart
below:
If the Status Indicator is...
....then the Security System
Flashibg Green
is disarmed
Flashing Slowly
is armed
Flashing Very Quickly
was triggered in your absence
(see Attempted Intrusion ID - page 4)
Flashing Intermittently
(2 flashes, off, 2 flashes)
is in Valet mode ( LED is Green)
On (not flashing)
is in Pre-arm mode
System Maintenance
Changing the Remote Control Battery
The two 3-v lithium batteries (CR2016) supplied in your remote
control should last approximately one year, depending on usage.
When the battery begins to weaken, you will notice a decrease in
range, or the distance from your vehicle that your remote transmitter
will operate. Follow the instructions below to change the remote
transmitter battery.
1. Insert the edge of a coin into the slot at the top of the remote
control. Twist the coin to pry the remote control halves apart.
2. Remove the old batteries and replace with new ones.
Be sure to observe the (+) and (-) signs in the battery compartment.
3. Carefully snap the case halves back together, then test the
remote control.
Adding Remote Controls to Your System
The PowerCodeTM has the ability to operate from up to eight (8)
remote controls. Follow these instructions to add a remote control to your
system.
1. Make sure the security system is disarmed and the ignition is off.
2. Open the driver’s door.
3. Turn vehicle ignition on.
4. Press and hold emergency override button.
After 15 seconds, the siren or horn will sound three (3) times.
This indicates that the unit has entered the remote control
programming mode.
5. Release the button.
6. Press the ARM button (button 1) on the remote control to be
programmed.
The siren or horn will sound once, indicating that the system
has “learned” that remote control.
7. Repeat step 6 for any additional remote controls.
8. Turn the vehicle ignition off to exit the programming mode. Test
all remote controls to ensure that they work properly.
9
10
System Maintenance (cont.)
Deleting Lost or Stolen Remote Controls from Your System
If one of your remote controls is lost or stolen, follow these instructions
IMMEDIATELY to remove the control code from your system.
1. Have all remaining remote controls available.
2. Enter the remote control programming mode by following
steps 1 - 5 of Adding Remote Controls to Your System
(page 8).
3a.If you have only one remaining remote control, press the
ARM button on that remote control eight (8) times, pausing at
least 1 second between each press. Make sure that the siren
chirps each time you press the ARM button.
3b.If you have two remaining remote controls, press the ARM
button on each remote control four (4) times, pausing at
least 1 second between each press. Make sure that the siren
chirps each time you press the ARM button.
3c.If you have three remaining remote controls, press the ARM
button on the two remote controls three (3) times, then press
the ARM button on the remaining remote control twice. Pause
at least 1 second in between each press. Make sure that the
siren chirps each time you press the ARM button.
4. Turn the vehicle ignition off to exit the programming mode.
When you are finished, the lost or stolen remote control will no
Basic Troubleshooting
This section outlines some of the basic issues you may experience
while becoming used to the PowerCode PC 7600TM. If you have a
problem that is not covered by this section, please consult your installer.
Sy m p t o m
Remote control does
not work
System will not arm
Pr o b l em
So l u t i o n
Weak or dead battery
Change battery
Remote control not
programmed
Program remote
control (page 8)
Door or other
entrance is open
Close entrance
Cour tesy light is on
Turn cour tesy light off
System is in Valet
mode
Turn off Valet mode
(page 6)
Hood is open
Close hood
Brake is pressed
Release brake
System will not star t
11
Emergency
System
Maintenance
Disarm Procedure
(cont.)
If your remote control is lost or fails to function, use this procedure to
disarm the PowerCode PC 7600TM and start your vehicle.
1. Use the keys to enter the vehicle.
The alarm will sound once the door is opened.
2. Insert the key into the ignition and turn to the ON position.
3. Locate and press the emergency override button.
The alarm will turn off and then you will be able to
start your vehicle.
Your Emergency Disarm Button is located:
Installer Programmed Options
Ignition On Door Lock
ON
OFF
Ignition Off Door Unlock
ON
OFF
Illuminated Entry/Exit
ON
OFF
Siren/Horn Chirps
ON
OFF
Passive Arming
ON
OFF
Pasive Door Locks
ON
OFF
Car start Run Time
12 min.
25 min.
Car Start Button Single button 2-button start
Light/AUX1 Output Duration _____________________
Defrost/AUX2 Output Duration _____________________
Window Up/AUX3 Output Duration _____________________
Window Down/AUX4 Output Duration _____________________
12
Using Your Selectable Options
A. What is Personalized Transmiiters option
Personalized Transmmiter’s when selected will active an auxilary
when the unit recieves an unlock command from the tranmitter.
This function would be used to activate memory seats or any
other device that you wanted activatedwhen unlocked .
B. How do Personalized Transmitters work??
Any Transmitter’s that are learned as #1 will Activate (AUX) Three
(3). When an unlock command is recveived
Any Transmitters that are learned as #2 will Activate (AUX) four (4).
Whenver a unlock command is recieved.
9. What is Turbo Timer Option?
IMPORTANT!
In order for this function to work properly the Neutral safety
must be installed correctly
Turbo Timer is a selectable option on the PC 7600 that will allow
your vehicle to remain running after the consumer has exited for
5 Minutes.
To achieve this feature you must have the option selected and a
tach programmed (unless tachless is selected)
10. How to activate Turbo Timer
1. The option must be selected & Car Start harness must be
installed
2.The module must see neutral safety change state from Drive to
park.
3.Push and hold brake for 5 seconds
4.Turbo Timer will activate and run for 5 minutes
CODE-Systems, INC. LIMITED LIFETIME WARRANTY
13
A CODE-Systems, INC. (“CODE”) vehicle security system sold to a retail consumer
purchaser by an authorized dealer of CODE and installed by an authorized dealer of CODE
is warranted by CODE to the original retail consumer purchaser to be free from defects in
workmanship and materials for the lifetime of the vehicle in which the security system was
originally installed.
A CODE vehicle security system sold to a retail consumer purchaser by an authorized
dealer of CODE and installed by a party other than an authorized dealer of CODE is warranted
by CODE to the original retail consumer purchaser to be free from defects in workmanship
and materials for a period of ninety (90) days. Defects caused by or related to the
improper installation of the security system are not covered by this or any other warranty.
The duration of this warranty described above applies to all components of the security system
except for: switches, indicator lights, transmitter(s) and accessories purchased separately.
Transmitters, exclusive of the transmitter case, are warranted by CODE to the original
retail consumer purchaser to be free from defects in workmanship and materials for the
lifetime of the of the vehicle in which the security system was originally installed.
Switches, indicator lights, and transmitter cases are warranted to the original consumer
purchaser for a period of one (1) year from the date of purchase when the system is
installed by an authorized CODE dealer.
Switches, indicator lights, and transmitter cases are warranted to the original consumer
purchaser for a period of ninety (90) days from the date of purchase when the system is
installed by a party other than an authorized CODE dealer.
Security system accessories are covered by the warranty supplied with the accessory.
Wiring harnesses altered by installation and transmitter batteries are not covered by this
or any other warranty.
This warranty is non-transferable, non-assignable and is completely voided when the
security system is removed from the car in which it was originally installed. If the vehicle
in which the security system was originally installed in is transferred to another party, this
warranty no longer applies.
This warranty does not apply to any product damaged by accident, physical or electrical
abuse, improper installation, alteration, any use contrary to its intended function,
unauthorized service (i.e. service by anyone other than CODE or its authorized service
personnel), fire, flood, lightning or other acts of God.
Should a product be found to be defective during the warranty duration, CODE will repair
or replace the product or any part of the product that CODE agrees is defective without
charge to the retail consumer purchaser of the product during the first year of the
warranty period. After the first year of the warranty period has expired CODE will repair or
replace the product or any part of the product that CODE agrees is defective for a fee of
$10.00 to cover shipping and handling charges.
In order for a product to be repaired or replaced under the terms of this warranty, the
defective product must be returned to an authorized CODE dealer and accompanied by a
copy of the original retail sales receipt. The date of purchase and year, make and model
of the vehicle in which the security system was originally installed in must be clearly
indicated on the sales receipt.
CODE shall not be held responsible for any removal and/or reinstallation charges of a
defective product, damage to or theft of the vehicle or its contents, or any incidental or
consequential damages caused by any failure of the product to function properly. Under no
circumstances should this warranty, or product covered by it, be construed as an insurance
policy against loss. CODE neither assumes nor authorizes any person or organization to make
ANY WARRANTIES or assume any liability in connection with the sale, installation, or use of
this product. This is the complete CODE warranty and no other warranty exists.
The warranty identified in this form is exclusive and CODE makes no other warranties
expressed or implied for any goods or services provided by CODE. CODE specifically and
expressly excludes any other warranties including the fitness for a particular purpose and
all warranties of merchantability. The customers sole and exclusive remedy for any and all
claims against CODE arising out to the customers use of any CODE vehicle security
system or component shall be as delineated in the warranty set forth above. CODE shall
not be liable to any customer or any other person or entity for any direct or indirect,
consequential, special or exemplary damages arising out of or in connection with the
customers use of, or inability to use, or misuse of any CODE provided product.
Some states do not allow the exclusion or limitation of incidental or consequential
damages, so the above limitation may not apply to you. This warranty gives you specific
legal rights, and you may also have other rights which vary from state to state.
14
CODE Systems, INC. Theft Protection Plan
The Theft Protection Program is designed to provide the retail purchaser of a security system provided by CODESystems, INC. (“CODE”)
an additional benefit, at no additional cost to the purchaser, should
their vehicle be stolen while protected by a CODE-ALARM security
system. While CODE has created this program as a way of showing
appreciation to its customers, CODE RESERVES THE RIGHT TO
UNILATERALLY CHANGE, ALTER, MODIFY, OR DISCONTINUE ALL
OR PART OF THIS THEFT PROTECTION PROGRAM WITHOUT
PRIOR NOTICE. THIS THEFT PROTECTION PROGRAM IS NOT AN
INSURANCE POLICY AND SHOULD NOT REPLACE AN AUTOMOBILE OR HOMEOWNERS INSURANCE POLICY. THIS THEFT PROTECTION PROGRAM DOES NOT COVER LOSSES ARISING FROM
THE THEFT OF ITEMS WITHIN THE AUTOMOBILE OR ANY DAMAGES ARISING FROM, RELEATED TO, AND/OR INCIDENTAL OR A
CONSEQUENCE OF A VEHICLE THEFT EXCEPT AS SPECIFICALLY
DELINEATED BELOW.
Plan duration: 1Year from the date of installation.
Plan amount: PowerCode PC 7600 .............$1000.00
Conditions of the Theft Protection Program:
1. The Theft Protection Program is non-transferable and non-assignable.
2. The system must be installed by an authorized CODE dealer.
3. Vehicle must be less than three (3) model years old at the time of
installation.
4. The security system must have been fully armed at the time of the vehicle
theft.
5. The vehicle in which the system is installed must be insured for theft by a
licensed insurance underwriter in the state in which the vehicle is
registered.
Terms of payment:
1. The vehicle must first be considered a total loss due to theft by your
insurance company.
2. Your insurance company has settled all claims arising from this theft and
there are no other pending legal actions as a result of this theft.
How to file a request for payment:
If the above conditions are met, make your request for payment by submitting
the following to CODE. The request for payment must be received by CODE no
later than sixty (60) days after the vehicle is reported stolen.
1. Copy of the retail sales receipt for the purchase of the security system,
clearing showing the model of system purchased and the year, make and
model of the vehicle in which the system was installed.
2. A copy of the police report for the stolen vehicle.
3. A copy of the paid insurance claim and reimbursement check from the
insurance company.
Send the above items to CODE by certified mail at the following address:
CODE Systems, INC.
Consumer Affairs Department
950 E. Whitcomb
Madison Heights, MI. 48071
1-800-421-3209
15
Notes:
FCC COMPLIANCE
This device complies with Part 15 of the FCC rules and with RSS-210 of Industry
Canada. Operation is subject to the following two conditions:
1. This device may not cause harmful interference, and
2. This device must accept any interference received, including any interference that
may cause undesired operation.
Warning!
Changes or modifications not expressly approved by the party responsible for
compliance could void the user’s authority to operate the equipment.
16