1
SEARS
OWNERS
MANUAL
MODEL NO.
919.162250
IMPORTANT:
Read the Safety Guidelines
and Af| Instructions
Carefully Before Operatrng
CRAFTSMAN
POWER WASHER
ASSEMBLY
OPERATION
MAINTENANCE
REPAIR PARTS
,,,,,
_
._
Sears, Roebuck and Co., Chicago,
81.2-45,1-A 2/88
,,
_
IL, 60684
U.S.A,
TABLE OF CONTENTS
WARRANTY
SAFETY
GUIDELINES
WARNING
CHART
GLOSSARY
..............................................................................
....................................................................................
INFORMATION
SPECIFICATION
CHART
NEEDED
OPERATING
4
........................................................................
...........................................................
FOR ASSEMBLY
THE CONTROLS
..........................
3
4
...............................................................................................
GENERAL
TOOLS
Page
3
..............................................................................................
i..............
................................
.................................................................
4
5
s
8
Air Control Knob .......................................................................................
6
Water Comrol Knob ...................................................................................
Soap/CttemicalControlKnob .......................................................................
6
6
6
Foliage Nozzle .........................................................................................
CONNECTING
THE HOSES .....................................................................
7
Bleeder/Non-Bleeder Connector .......... ;..........................................................
7
W_ter Hose .................................................................................................................
7
7
7
Air Hose .................................................................................................
ChemicalDraw Hose .................................................................................
WASHING
SPRAYING
WITH THE POWER
FOLIAGE
DEGREASING
WASHER
.................................................
WITH THE POWER WASHER
WITH THE POWER WASHER
CLEANING
AND STORAGE
TROUBLE
SHOOTING
POWER WASHER
...........................................
......................................................................
GUIDE
DIAGRAM
................................
REPAIR
8
9
9
..................................................................
10
....................................................................
11
Parts List ................................................................................................
ORDERING
e
PARTS .....................................................................
!1
12
FULL ONE YEAR WARRANTY
ON CRAFTSMAN POWER WASHER
If this Power Washer fails clue to a defect in material or workmatlship within one year from the
date of purchase, RETURN IT TO THE NEAREST SEARS SERVICE CENTERfDEPARTMENT
THROUGHOUT THE UNITED STATES AND SEARS WILL REPAIR IT, FREE OF CHARGE.
If this Power Washer is ueecl for commercial or rental purposes, the warranty will apply for ninety
days from the date of purchase.
This warranty gives you specific legal rights and you may have other rights that vary from state
to state,
Soars, Roebuck and Co., Sears Tower, Dept. 698!731A, Chicago, IL 80684
SAFETY GUIDELINES
This manual contains information that is important for you to know and understand. This information relates to your safety and preventing equipment problems. To help you recognize this information, we use the following symbols, Please reaa the manual and pay attention to those sections.
WARNING
IMPORTANT SAFETY ]NFORMATION - A HAZARD THAT
MIGHT
CAUSE
SERIOUS
iNJURY OR LOSS OF LIFE.
NOTE
Inlormation for preventing
damage to equipment.
information that you should
pay special attention to.
3
PLEASE READ THE FOLLOWING CHART.
WHAT TO
LOOK FOR
WHAT COULD HAPPEN
HOW TO PREVENT IT
Air and liquid
under pressure
Risk of eye injury,from air, water, chemicals, or
dislodged dirt sprayed under pressure,
Wear safety goggles when operating the power
washer.
Check for and remove debris that may be dogged
in the nozzle.
Keep children and pets away from the spray area,
Never point the power washer toward a person or
any part of the body,
Electrical
equipment
Spraying electrical equipment or power cords
Keep the air compressor and electric cordsaway
with water can cause a risk of electrical shocK, from areas where water or liquids are sprayed.
Sprayed
chemicals
Some chemicals may be toxic or irritating.
Read the safety label or instructions for every
chemical you spray. Carefully follow all instructions regarding skin, eye ancl respiratory
protection.
Equipment
maintenance
Damaged air fittings, Rose, electri0al cords or
plugs can break during usa and cause a risk of
injury,
Check all hoses, fittings, electrical cables and
plugs before use. RepEdror replace any damaged
item,
GLOSSARY
SCFM: (Standard Cubic Feet Per Minute;) a unit of
measure of air delivery,
GENERAL
4
PSIG: Pounds per square
measure of pressure,
INFORMATION
inch gauge; a unit of
Congratulations
onyourpurchase
ofaSears Crattsman
Power Washer! It isdurable and versatile ana willserve
you for years to come. Your Power washer combines
air pressurewith water, detergent or degreaser to clean
and degrease, it can also be used for spraying lawn,
garden, trees or bushes, It has a unique nozzle that
allows you to change from a direct, forceful blast to a
light, foliage mist with a push or a pull.
Your PowerWasher is designed-to spray in the following modes:
Air only
• Water only
• Water & air only
,_ AJr & chemicals together
It is not designed to mix water & chemicals internally.
Chemfcals should be diluted with water before entering the gun to achieve precise control of chemicals,
A bleeder type connector has been supplied so that the
power washer can be used with compressors that do not
have a pressure relief valve or a pressure switch.
SPECIFICATION
CHART
Your Power Washer is intended for use with a _,._Horsepower or larger tanl<-lype or tankless air compressors
delivering at least 2.2 SCFM at 50 PSIG. The larger the air compressor used the more powerful your washer
will be.
Minimum Air Pressure;
Maximum Air Pressure:
40 psig
17,5 psig
Minimum Water Pressure:
Maximum Water Pressure;
Maximum Water Temperature:
Maximum Chemical Draw Height:
(maximum distancewasher can be above
the chemical container.)
20 psJg
1O0 psig.
1406F
10 feet
Optimum Chemical Flow Rate in the Air/
Chemical Mode, with the air pressure
salting between 75 and 125 PSIG:
Approx, 10 oz, per minute with _ two foot draw height
Appmx. 7 oz. per minute with a five foot draw height
NOTE: Chemicals should have a viscosity(consistency
or thickness) similiar to water-dilute as
n_cessary.
TOOLS NEEDED FOR ASSEMBLY
2 Wrenches: a _/J"open end wrench for the Bleeder/
Non-bleeder connector and an adjustable wrench for
the air hose,
All other parts on the power washer are tighteneO by
hand,
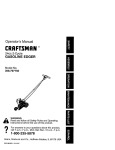
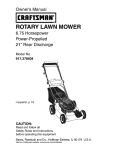
OPERATING
THE CONTROLS
Use moderate ham force when operating eontrola. Too much force could result in breakage
of the controls.
Air Control
Knob
Water Control
Knob
_'
Hose ConneCtor
Connector
Air Control Knob
To turn "On":Push in the controlknob and turn clockwise
towardsthe "On" indicator.
To turn "Off":Pueh in and turn the controlknob counter.
clockwiseto the "Off" indicator.
Air flov_ can be adjusted between the "On"
politic rt_,
and "Off"
Water Control Knob
To turn "On": Push in the controlknob and turn counterclockwisetowardsthe "On" indicator.
,
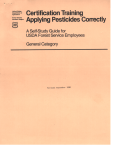
Chemical Draw
Soap/Chemical Control Knob
To turn "On": Turn the knob counterolockwise.
The knob
can be turnedcounterQIockwise
2_ turns only. Morethan
2_ turnsmay cause erraticflow or stopsoap/chemicalflow.
To turn "Off"; Turn the knobclockwise.
Soap/chemicalflow can be varied by adjustingthe con=
trol knob. When Beginning.to spray in the s0_p/chernical
mode, turn the knob gr_ually until you achieve the flow
rateyoudesire.
To turn "Off": Push in and turn lhe controlknob clock' wise to the "Off" position.
Foliage Nozzle
To sprayfoliage, push the nozzle out to get a light, mist
spray. You can _ontrol the mist pattern by pullingthe
nozzkpin slightly.
Waler flowcan be adjusted between the "On" and "Off"
posilions.
For washingand degreasing, pull the nozzle all the way
in towardsthe handle.
CONNECTING
Bleeder/Non-Bleeder
Connector
The power washer comes equ(ppea wittl an air hose
connector that is designed for use with air compressore having a pressure rstief valve or a pressure
switch.
Some small, limited capacity compressors OlD not
t_ave a pressure relief valve or a pressure switch.
In this situation, a bleeder type air hose connector
is required. One has been supplied with your power
washer and is located at the end of the 10' chemical
draw hose. It is identical to the non.bleeder conhector, except for a tiny hole located on its side.
This hole will relieve excess air pressure,
To ins_a!lthe b_eeder type connector
I. Using a _/_" open end wrench, unscrew the nonbleeder conneCtOrlocated at the base of tt_e power
washer, (middle fitting).
2. Remove the bleeder connector from the end of the
chemical draw hose.
3. Remove the "O" ring from the non.bleeder connector and install it on the bleeder connector,
The plastic threads in the base of the power
washer can be damaged by cross threading
or over.tightening. Do not overtighten.
4. Screw the bleeder connector into the base of the
power washer, T;ghten gently using a _* open end
wrench.
5, Slip the non.bleec_erconnector onto the enct of the
chemical draw hose, where it will serve as _ weight.
THE HOSES
Water Hose
Connect you garden hose to the Water Connector.
Tighten by hand.
Air Hose
To tighten ot loosen an air hose to this con=
hector you must use two wrenches or you
could damage the plastic threads on the
base of the power washer.
Using a _,_"open end wrench, hold the a_rhose connector. Connect your air hose and tighten the-hosewith an
adjustable wrench. Do not overtighten.
Chemical
Draw Hose
Never apply air pressure to the Chomlcal
Draw Hose ConneGtor. Doing so could damage the power washer.
Attach the chemical draw hose to the chemical draw
hose connector.Simply slipthe hose over the connector
with your hand.
Tits chemical draw hose €onnector is
designed for hand application of soft, flexible hoses, Do not use any type of hose
clamp or adhesive.
WASHING
WiTH THE POWER WASHER
The Power Washer works best usingSears spe0ially
formulated concentrateddetergent, 9-16420, which can
be purchased in the Sears hardware department or
from the Sears general catalog. Follow the directions
supplied with the detergent
for the proper
water/detergent mix ratio.
Most common householddetergents are not formulated
and concentrated for use in your Power Washer. They
are too heavy or thick to pass through your Power
Washer and ifthey are dilutedwith water, they lose their
cleaning efficiency,
NOTE: If you do not use Sears detergent, 9-16420, be
sure the detergent you do use is specially formulated
and concentrated for use with this type of equipment.
Mix the chosen detergent with water (1 part c{etergent
to 8 parts water) to reduce the viscosity (consistency
or thickness) of the mixture.
Prepare a mixture of detergent in a 1-gallon plastic
buQket or suitable container.
2. Attach the garden hose (cold or warm water), air
hose, and chemical draw hose to the power washer,
Place the free end of the chemical draw hose into
1.
For best performance, set your compressor to the
maximum pressure available from your air compres=
sor not to exceed 175 psig, Be sure the air and water
controls on the power washer are in the "Off"
position,
4,
Turn the water source fully on and turn on your air
compressor,
5, Begin the washing procedure by adjusting the air
control knob and the soap/chemical control knob
until they begin spraying the solution onto the surface to be washed, The water knob should be OFF.
Continue spraying until the surface is completely
covered with the solution.
To stop spraying, turn the soap/chemical control
knob and the air control knob to the "Off" position,
7. Let the soap remain on the surface for about 30
seconds, A certain amount of wipingwill be required
for most types of foreign matter,
,
Fully open both the air and water ¢ontrot knobs,
9. Rinse the soap and dirt from the surface you are
washing.
.
the detergent/water mixture.
SPRAYING
MANY
CHEMICALS
OR INSTRUCTIONS
ALL
INSTRUCTIONS
ARE
FOR
FOLIAGE WITH THE POWER WASHER
TOXIC
EVERY
REGARDING
OR IRRITATING.
CHEMICAL
YOU
SKIN,
!. Prepare a mixture of chemical and water in a
1-gaJIon bucket or suitable container. Carefully
follow the directions on the chemical container for
the proper waterlchemioal ratio.
NOTE: Thick or heavy chemicals must be mixed with
water to reduce their thickness, Heavy materials will
not pass through the Power Washer.
2. Attach the chemical draw hose and the air hose to
the Power Washer. Place the free end of the chemical draw hose into the chemica!/water mixture,
3. DO NOT attach a hose to the garden hose connector for foliage spraying, Be sure the water
control knob is in the "Off" position,
EYE
AND
READ
SPRAY.
THE SAFETY
LABEL
CAREFULLY
FOLLOW
RESPIRATORY
PROTECTION.
4. Foroptimum performance set your air compressor
5.
6.
7.
8.
pressure between 75 and 125 psig. Be sure the air
control knob is in the "Off" position.
Extend the Foliage Nozzle out as far as it will go.
Turn on the air compressor.
Begin the spraying procedure by adjusting the air
control knob and the soap/chemical control knob
until you are spraying a mist. You may vary the mist
pattern by pulling the foliage nozzl_ in slightly.
To stop spraying, turn the air control knob and
the soap/chemical control Knob to the "Off"
position.
DEGREASING
WITH THE POWER WASHER
The Power Washer works best using Sears specially
_rmulated concentrateddegrease_,9.16421, which can
be purchased in the Sears hardware department or
from the Sears general cata!og. Follow the directions
supplied
with the degreaser
for the proper
watertdegreaser mix ratio.
Most common householddegreasers, are not formu_atecl
and concentrated for use in your Power Washer. They
are too heavy or thick to pass through your Power
Washer and if they are dilutedwith water, they lose their
degreasing efficiency,
NOTE: If you do not use Sears degreaseE;9-16421, be
sure thedegreaser you do use is specially formulated
and concentrated for use with this type of equipment,
Mix the chosendegreaser with water (1 part degreaser
to 4 parts water) to reduce the viscosity (consistency
or thickness) of the mixture.
Do not clean a hot engine. Engine block can
crack or other damage can occur. Wait unlil
lhe engine has =ooled at least one hour.
Cover the battery and carburetor throat
when you clean the engine,
!, Prepare a mixture of degreaser in a 1.gallon
plastic buoket or suitable container.
2. Atta(_h the garden hose (cold or warm water), air
hose, and chemical draw hose to the Power Washer.
Place the free end of the chemioal draw hose into
the degreaser/water mixture.
3. For best degreasing performance, set your air compressor to the maximum pressure available from
your compressor not to exceed 175 psig. Be sure
the air and water controls on the power washer are
inthe "Off" position.
4. Turn on your airoompressor.
5. Begin the degreasing procedure by adjusting the
air control Imob and the soap/chemical controJknob
until they begin spraying the solution. The water
knob should be OFF. Continuespraying unlilthe surface is completely _overed with the solution.
6. To stop spraying, turn the soap/nhemical control
knob and the air control knob to the "Off" position,
7. Let the degreaser solution remain on the surface for
about 30 seconds. A certain amount of wiping will
be required for most types of foreign matter.
8. Fully open both the air' and water control knobs.
9, R_se the degreaser solution and dirt from the surface you are degreasing.
CLEANING AND STORAGE
Clean the exterior of the power washer and draw hose
with a damp cloth, soap and water.
Fill a container with clean water, insert the free end
of the chemical draw hose into the water & rinse the
internal system.
Disconnect all hoses from the power washer. Store the
power washer away from open flames and heat,
To preve_ freezing in cordweather,make sure aJlliquids
are drained from your power washer before storage.
Store with the air, water and chemical control knobs in
the open or "ON" position. Hang verticalJywith the
foliage nozzle down,
9
TROUBLE
L,
CAUSE
__J
1, Doesn't
GUIDE
,,!
PROBLEM
=,
SHOOTING
draw
chemioalldeter.
gent like it
should
,_
,
. Chemical control knob not open far
enough or too far open
,, Chemical/detergent not thinned
enough
. Chemicalldetergent not proper type
for suction use.
q Water control knob "ON"
,,,,,,
2. Sputters when
spraying
chemical/
detergent
CORRECTION
LI=
ii
ii
,,_,,
• Open knob gradually until you
achieve desired flow rate (2_ turns
maximum)
• Add water to thin the solution
• Use Sears speoial oleanerldegreaser
• Turn water control knob "OFF" Only
air and chemical Control knobs
should be "ON"
•
• Chemical control knob open too far
Ju_,uu
• Close knob until sputter stops
1
LLI
3. Not enough
spray force
J,, _
Water and/or air pressure too low
= Water and air control knobs not fully
open
* Surface heavily soiled
, ,,,_
LJ,L
4. Chemical/detergent doesn't
combine with
water pressure
inside of power
washer
10
,,1,
,, i
L J,,,
_J,,,J,L
* Use Maximum water and air pressure available (not to exceed 175
psig)
. Open both knobs fully
• Scrub surface with rag or sponge to
loosen dirt then rinse with air and
water control knobs "ON"
J,
• Power Washer is not designed to do
this
• To Wash or spray chemically usa
chemical and air control knobs ON
only. To Rfnse, use water and air
control knobs ON only.
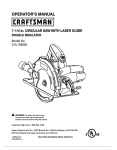
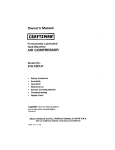
POWER WASHER DIAGRAM
PARTS LIST
KEY
NO.
I
2
3
4
5
8
7
8
9
10
PART NUMBER
DESCRIPTION
LA-1BB0
"Power Washer" label
LA-1881
"Sears Craftsman" label
SPW-t8
$oap/Chemical Control Knob
S$ G.8112 !_',,_
"O"-Rlng
$SG-8141
"O"-Ring (2 used).
SPW.12
Knobs (2 used) •
SSF-1319-ZN
Screw (2 used).
SSG-8091
"O"-Ring
--SPW,26
Non.Bleeder Connector
SSG-1403
Gasket
NOT ILLUSTRATED
SPW-29
Bleeder Connector
SPW-26
10' Cbemioal Draw Hose
11
SEAIRS
OWNERS
CRAFTSMAN POWER WASHER
MANUAL
SERVICE
MODEL NO,
919,162250
HOW TO ORDER
REPAIR PARTS
Now that you have purchased your Sears Power Washer, should a
need ever exist for repair parts or service, simply contact any' Sears
Servi_e Center and most Sears, Roebuck and Co. stores.Be sure
to provide all pertinentfacts when you call or visit.
The model number of your Sears Power Washer is 919,162250. This
number can _s found =tramped into the h_.ndle,
WHEN ORDERING REPAIR PARTS, ALWAYS GIVE THE
FOLLOWING INFORMATION:
• PART NUMBER
, PART DESCRIPTION
• MODEL NUMBER
• NAME OF ITEM
All parts listed may be ordered from any Sears Se_ce Center and
mo=t Seats stores.
If the part@you need are not stocked locally,your order will be electronioallytransmitted to a Sears Repair Parts DistributionCenter for
handting.
Sears,
SI-2-45-1-A 2f88
Roebuck
and Co., Chicago,
IL 60684
U.S,A.