1
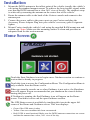
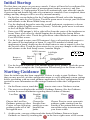
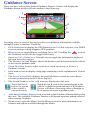
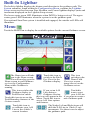
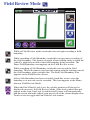
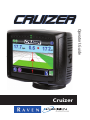
Operator’s Guide
Cruizer
Installation
1.
2.
3.
4.
Mount the DGPS antenna to the tallest point of the vehicle (usually the vehicle’s
cab) using the standard magnet mount. To achieve the best possible signal, make
sure that the DGPS antenna has a clear 360° view of the sky. The simplest setup
is achieved by mounting the antenna on the center-line of the vehicle.
Route the antenna cable to the back of the Cruizer console and connect to the
antenna port.
Connect the power cable to the power port on your Cruizer and plug the
Accessory Power Adaptor Plug into your vehicle’s accessory port or cigarette
lighter.
Mount Cruizer inside the vehicle’s cab using the supplied RAM mount arm and
suction cup. Note: Make sure the mounting surface is clean and provides an
adequate bond for the suction mount.
Home Screen
Touch the Start Guidance icon to begin a new Guidance session or continue a
session that is already in progress.
Touch this icon to access the Configuration Menu. The Configuration Menu is
only available from the Home screen.
When you turn the console on or when Guidance is not active, the Shutdown
icon will appear. Raven recommends that you shutdown the console before
turning the power off.
If Guidance is running, the End Guidance icon will appear on the Home
screen. Touch this icon to end the open Guidance session.
The GPS Status screen is available by touching this icon in the upper left
corner of the Home and Guidance screen. This icon displays:
• Green if the GPS status is okay
• Yellow if an error condition has been encountered.
• Red if GPS is non-functional. Make sure the DGPS antenna connections are secure
and that the antenna has a clear, 360° view of the sky.
Initial Startup
The first time you power on your new console, Cruizer will need to be configured for
your preferences, the desired units of measurement (inches or meters), and your
specific machine. A Configuration Wizard will automatically start when the console
is powered up and should only take a few minutes to complete. Once completed, these
settings and any changes will be saved by internal memory.
1. On the first screen displayed in the Configuration Wizard, select the language
and display units for your Cruizer. Touch the green arrow to accept your selection
and advance to the Boom Width Setup screen.
2. Use the displayed keypad to enter the overall implement, equipment, or boom
width in inches (English) or meters (Metric). Touch the green arrow to advance
to the Left/Right Offset screen.
3. Enter your GPS antenna’s left or right offset from the center of the implement or
boom. Enter a left offset by double tapping the decimal place button before
entering an offset value. Touch the green arrow when finished to advance to the
Fore/Aft Offset screen.
4. Use the keypad to enter your GPS antenna’s fore or aft position with respect to
the center of the implement or boom. If your GPS antenna is behind your
implement or boom, double tap the decimal button to enter a negative value for
the fore/aft offset. Touch the green arrow key to save any changes to this setting
and advance to the final Setup screen, Antenna Height.
DGPS Antenna
Boom or
Implement
5.
View from
Above
Left/Right
Offset
Fore/Aft
Offset
Center of Boom
or Implement
Use the keypad to enter the GPS antenna height above ground. Touch the green
Home icon to complete the Configuration Wizard and go to the Home screen.
Starting Guidance
Once the initial setup has been completed, Cruizer is ready to start Guidance. Note
that you may need to visit the configuration menu to verify additional system settings
before proceeding with an actual guidance application. See the Configuration Menu
section for more information on the settings contained within the Configuration
Menu.
1. On the Home screen, touch the
icon to start a new Guidance session.
2. The next screen displays the available Guidance Patterns (See the Guidance
section for more information regarding these Guidance Patterns).
Last Pass
Choose the Last Pass
Guidance pattern to allow
Cruizer to base following
guidance paths off of the
last applied area.
3.
Straight
Line
(A-B)
Choose the
Straight Line
pattern to create
parallel line
paths.
Pivot
Choose Pivot to create concentric
guidance paths starting from the
outside of the pattern and moving
toward the center in increments of
your boom width.
At this point, you may either touch the desired Guidance Pattern to begin
Guidance or cancel by touching the
in the lower right corner of the screen.
Guidance Screen
Once you have selected the desired Guidance Pattern, Cruizer will display the
Guidance Screen which will look similar to the following:
1
2
3
4
6
7
8
9
5
10
Touching icons or areas of the screen will access different information available
through Cruizer’s interface. Touch the:
1. GPS Status icon to display the GPS Status screen. Use this screen to view DGPS
receiver settings or help diagnose GPS problems.
2. History icon to toggle History recording On or Off. Touching the
icon on
the Guidance screen will also toggle this feature.
3. Speed or CoG (Course over Ground) area to toggle the information displayed
between these two options.
4. The Distance to Line Display shows the distance and direction from the vehicle
to the current guidance path.
5. Zoom In or Out icons to either zoom in or zoom out on any of Cruizer’s
Guidance screens.
6. Information icon to display a help page containing a brief explanation of Cruizer
icons.
7. The Area Covered tally displays the total field area covered by active boom
sections (painted area on the Cruizer display).
8. The Swath Number or Set A-B icons are displayed in this area.
Touch the Set A
icon to set a point
at the vehicle’s
current location.
Touch the Set B icon to set a second point at the
vehicle’s current location and start A-B Guidance.
Cruizer will draw a line using either a Straight or
Pivot pattern to create a guidance path.
Alternate Guidance Pattern icon to switch to the Guidance Pattern displayed in
this area. The available Guidance Patterns will depend upon the pattern selected
when starting Guidance.
10. Menu icon to open the Menu. See the Menu section for more information on
features and options available through the Menu.
9.
Built-In Lightbar
The built-in lightbar displays the distance and direction to the guidance path. The
System submenu, found within the Configuration Menu, contains the Lightbar
Setup screen to select between Fine, Medium, and Course lightbar displays (units and
increments displayed on the Lightbar Setup screen).
The lower center green LED illuminates when DGPS is being received. The upper
center green LED illuminates when the system is on the guidance path.
If an optional SmarTrax system is installed and engaged, the outside red LEDs will
illuminate.
Menu
Touch the Menu icon to display the available options for the current Guidance screen.
The Home icon will take
you to the Home screen.
You will need to go to the
Home screen to end Guidance
or view the Configuration
Menu while Guidance is
running.
Touch this icon to
This icon
switch to the Bird’s
switches to the
Eye View for the
Down Field
Guidance display. View (see screen
image above) on the
Guidance screen.
This icon switches the
Guidance display to
Field Review mode.
Touch this icon to access the
Field Boundary features of the
Cruizer console.
If you set an A-B
Touch this
icon to reset
Line during a
your A-B Line
Guidance session,
this icon will appear in the if you want to create a
Menu. Touch this icon to
new Guidance path.
access A-B Line options
and features.
Touch this icon to
re-calibrate your A-B
Line to the vehicle’s
current location.
The Nudge Left and Right icons will
shift the A-B Line in 1 inch (2 cm)
increments. Use these icons to adjust
the guidance path.
Field Review Mode
While in Field Review mode, touch this icon to begin recording a field
boundary.
While recording a Field Boundary, touch this icon to pause recording of
the field boundary. This feature is useful when refilling tanks or when the
vehicle’s path does not affect the field boundary being recorded. The
Pause Field Boundary icon appears on the Field Review screen.
While recording a Field Boundary, touch this icon to end the field
boundary. This will connect your current location with the starting point of
the field boundary with a straight line. The End Field Boundary icon
appears on the Field Review screen.
After a field boundary has been recorded, touch this icon to reset the
boundary so a new one can be recorded. This icon appears in the Menu
when in Field Review Mode.
When the Pan/Vehicle Lock is on, the vehicle position will always be
displayed on screen. In Field Review Mode, if the lock symbol does not
appear in this icon, Pan Lock is enabled and Cruizer will automatically
pan the screen when the vehicle icon moves off of the current display area.
Touch is icon to toggle the Pan/Vehicle Lock feature.
Configuration Menu
Sub-Menus
System submenu Touch this icon to display
the Light Bar, Tilt, and
Switch calibration screen
icons.
GPS submenu Touch this icon to display
the Output,
E-Dif, GPS Health, and
Differential calibration
screen icons.
Computer
submenu - Touch this
icon to access the
Display, Region, Updates,
Demo, and Favorites
setup screen icons.
Vehicle submenu Touch this icon to display
the Implement Width,
Fore/Aft, Left/Right, and
Height calibration screen
icons.
Show All - Touch
the Show All icon to
display all of the
submenu’s and each of
the configuration screen
icons.
Favorites - Touch
this icon to display your
favorite configuration
screen icons. Use the
Favorites setup screen
within the Computer
submenu to setup the
screen icons displayed on
this page.
Troubleshooting
The touchscreen
is not responding
to your touch.
Turn the Cruizer console power off, wait a few seconds and
turn the power back on. When the Cruizer start-up screen
displays, touch below the Cruizer logo to re-calibrate the
touchscreen. Follow the instructions on the screen and touch
the calibration mark everywhere it appears. When the system
is finished with the re-calibration, the Home screen displays
and the system is ready for operation.
Cruizer does not
start when
powered on.
Ensure that you have +12V DC to the Cruizer console. If the
Cruizer turns on, but does not start-up properly and has a
partially blank screen, you will need to ensure that voltage to
the Cruizer system is at least +9.5V DC and no greater than
+15V DC
The LED on the Accessory Power Adaptor Plug should be lit
green when inserted properly. If the LED is not lit, check that
the plug is fully inserted in the machine’s accessory port or
cigarette lighter. Check the fuse in the Adaptor Plug and
replace if necessary.
No GPS
Check the DGPS antenna cable connection on the Cruizer and
antenna. Tighten any loose connections.
Ensure that the DGPS antenna has a clear 360° view of the sky.
The machine should not be inside or near buildings, trees, and
other objects that may interfere with DGPS reception.
Updates
Updates for your Cruizer console will be made available periodically on the Raven
web site http://www.ravenprecision.com/us/Support/Software/ to download the latest
version of Cruizer software. Unzip or extract the download to your flash drive.
Note: Cruizer will not be able to locate the update files if you put them in a folder on
the flash drive. The files must be extracted to the flash drive’s root directory (X:\
where X is the letter of your flash drive.
Insert your flash drive into the USB port on the back of your Cruizer console and then
power on the console. Access the Updates screen in the Computer menu within the
Configuration Menu. Select the update to apply. After Cruizer has applied the
update, you will need to restart the console to finish the update procedure.
Raven Industries
Flow Controls Division
P.O. Box 5107
Sioux Falls, SD 57117-5107
Toll Free 800-243-5435
or Outside the U.S.: +1 605-575-0722
Fax 605-331-0426
www.ravenprecision.com
[email protected]
Notice: This document and the information provided are the property of Raven Industries, Inc. and
may only be used as authorized by Raven Industries, Inc. All rights reserved under the copyright laws.
Cruizer Operator’s Guide (P/N 016-0171-128 Rev A 11/07)