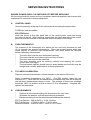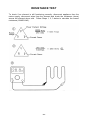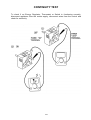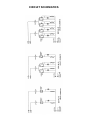
1
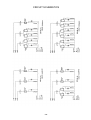
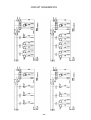
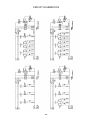
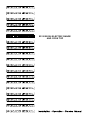
E51 E50 E56 ELECTRIC RANGE
AND COOK TOP
MANUFACTURED BY
Moffat Limited
P O Box 10-001
Christchurch
New Zealand
Ph:
(03) 3891-007
Fax:
(03) 3891-276
WORLD-WIDE BRANCHES
UNITED KINGDOM
Blue Seal
Units 6-7, Mount Street Business Park
Mount Street, Nechells
Birmingham B7 5 QU
Ph:
(121) 327-5575
Fax:
(121) 327-9711
UNITED STATES
Moffat Inc
3765 Champion Blvd
Winston-Salem
North Carolina 27115
Ph:
(336) 661 0257
Fax:
(336) 661 9546
CANADA
Lessard Agencies Ltd
P O Box 97
Stn D Toronto
Ontario M6P3J5
Ph:
(416) 766-2764
Fax:
(416) 760-0394
NEW ZEALAND
Christchurch
Moffat Limited
P O Box 10-001
16 Osborne Street
Christchurch
Ph:
(03) 3891-007
Fax:
(03) 3891-276
Auckland
Moffat Limited
4 Waipuna Road
Mt Wellington
Auckland
Ph:
(09) 574-3150
Fax:
(09) 574-3159
AUSTRALIA
Victoria
Moffat Pty Limited
740 Springvale Road
Mulgrave, Melbourne
Victoria 3171
Ph:
(03) 9518-3888
Fax:
(03) 9518-3838
New South Wales
Moffat Pty Limited
8/142 James Ruse Drive, Rose Hill
P O Box 913, Smithfield
Sydney, N.S.W. 2142
Ph:
(02) 8833 4111
Fax:
(02) 8833 4133
Western Australia
Moffat Pty Limited
P O Box 689
Joondalup Business Centre
WA 6027
Ph:
(08) 9305-8855
Fax:
(08) 9308-8838
Queensland
Moffat Pty Limited
30 Prosperity Place
Geebung, Brisbane
Queensland 4034
Ph:
(07) 3215-9155
Fax
(07) 3215-9170
South Australia
Moffat Pty Limited
28 Greenhill Road
Wayville
South Australia 5034
Ph:
(08) 8274 2116
Fax:
(08) 8274 2129
BLUE SEAL ELECTRIC HOBS & RANGES
- E51
- E50
- E56
ELECTRIC BOILING TABLES
ELECTRIC RANGES
ELECTRIC CONVECTION RANGES
CONTENTS
PAGE
SPECIFICATION
1
INSTALLATION
2
OPERATING INSTRUCTIONS
4
CLEANING
6
SERVICING INSTRUCTIONS
7
PROBLEM SOLVING
9
WIRING SCHEMATICS
12
SPARE PARTS
16
Date Purchased..................................................... Serial No......................................…
Dealer...............................................................................................................................
Service Agent............................................................................................................……
F10515-13
SPECIFICATION
RANGES INCLUDED IN THIS SPECIFICATION:
E51-4D
E51-4C
E51-4B
4 radiant elements, Boiling table
2 radiant elements plus 300mm griddle, Boiling Table
600mm griddle, Boiling Table'
E51-6D
E51-6C
E51-6B
E51-6A
6 radiant elements, Boiling table
4 radiant elements plus 300mm griddle, Boiling Table
2 radiant elements plus 600mm griddle, Boiling Table
900mm griddle, Boiling table
E50-D
E50-C
E50-B
E50-A
6 radiant elements plus static oven
4 radiant elements plus 300mm griddle plus static oven
2 radiant elements plus 600mm griddle plus static oven
900mm griddle plus static oven
E56-D
E56-C
E56-B
E56-A
6 radiant elements plus convection oven
4 radiant elements plus 300mm griddle plus convection oven
2 radiant elements plus 600mm griddle plus convection oven
900mm griddle plus convection oven
OVERALL DIMENSIONS
Height to Hob
Height to Splashback
Width
Depth
E51-4
E51-6
E50-56
915mm
915mm 915mm
1065mm 1065mm 1065mm
600mm
900mm 900mm
812mm
812mm 812mm
OVEN INTERNAL DIMENSIONS
Height
Width
Depth
E50/56
430mm
665mm
660mm
ELEMENT
KW
Hob Radiant Elements
Hob Solid Elements
Hob Griddle Elements
2.4
2.0
3.6
Oven Top Element E50
Oven Top Element E56
Oven Bottom Element
3.0
1.75
4.5
-1-
INSTALLATION
It is most important that the unit is installed correctly and that the operation is correct
before use. Installation must comply with national electrical installation codes and local
Health and Safety regulations.
IMPORTANT - FIXED WIRING INSTALLATIONS MUST INCORPORATE AN
ALL-POLE DISCONNECTION SWITCH.
A.
BEFORE CONNECTION TO POWER SUPPLY
Unpack and check unit for damage and report any damage to the carrier and
supplier. Report any deficiencies to your supplier.
Check that the available Power Supply is suitable. A rating plate adjacent to the
control panel shows the electrical requirements.
B.
LEG ASSEMBLY
Lift the unit and fit the roller-legs to the rear of the unit, and the non roller legs to
the front of the unit. Secure loosely with one bolt (supplied) each.
E51 models only: Fit the leg tray. Align the holes in the corners of the tray with
the threaded holes in the legs (approximately 150mm from floor) and secure with
four ¼” screws (supplied).
Tighten all bolts securing the legs.
Use a spirit level to ensure the unit is level from side to side and front to back.
C.
CABLE REQUIRED
When connecting a BLUE SEAL electric appliance to the main supply, ensure the
following:
*
*
*
*
*
An isolating switch is nearby and accessible
Supply wires are the correct size for the current drawn.
The fuse(s) on the wall are the correct current rating.
A grommet is fitted around the wiring entry holes into the appliance.
Wiring connection must be tight.
Below is a table indicating the size of cable that is to be supplied to an
appliance for the current drawn on that line.
Wire Area
(mm²)
1.0
1.5
2.5
4.0
6.0
10.0
16.0
Single Phase
Two Cables
Current (Amps, I)
14
17
24
32
41
55
74
-2-
3 Phase
Four Cables
Current (Amps, I)
12
14
21
29
37
51
-
INSTALLATION
Using the V P I triangle, total the loads on the one circuit (P) and divide by the
supply voltage () to determine the current (I) drawn. Look up the current drawn
and install the corresponding wire.
Example:
One Line: 3300W + (2 x 40W) + 180W + 5W = 3645 Watts
Elements 2 lights
Motor Buzzer
3645 = 15.19 Amps
240V
Therefore sizing up, use 1.5mm² wire.
D.
CONNECTION
Connection to power supply must be carried out by a Registered Electrician.
Undo the screw(s) at the top of the control panel and lower the panel downward.
E51 Models - Bring the power supply cable through the channel under the base
panel.
All other Models - Undo the screw at the right hand side of the control panel
cover and swing the cover to the left. Bring the power supply cable through the
entry hold in the base of the range and connect the conductors to the terminal
block. (Leave sufficient length of cable to enable the range to be moved for
service, cleaning etc).
Check wiring and refit control panel (Wiring Schematics Pages 12-17).
WARNING - THIS APPLIANCE MUST BE EARTHED
If supply cord is damaged, it must be replaced by a suitably qualified
person in order to avoid a hazard.
E.
INSTALLATION
Clean the equipment and switch the range on to check operation of all
controls, lights, elements and hot plates. If any fault is found, contact your
supplier.
This appliance must be installed with a minimum clearance of 25mm at rear and
50mm at sides from combustible surfaces.
Where this appliance is to be positioned in close proximity to a wall, partitions,
kitchen furniture, decorative finishes etc, it is recommended that they be made of
non-combustible material. If not, they shall be clad with a suitable noncombustible heat-insulating material, and that the closest attention be paid to fire
prevention regulations.
F.
BEFORE USE
Operate the oven for about one hour to remove any fumes or odours which
may be present.
Note: This unit is to be installed on legs with adequate ventilation underneath.
-3-
OPERATING INSTRUCTIONS
A.
RADIANT HOTPLATES
The controls for the radiant hotplates may be set at any position between high
and low to provide the desire level of heating. An individual pilot light for each
element will glow when the element cycles on and extinguish when the element
cycles off.
Start cooking at the highest setting, and change to a lower setting when the
desired temperature is reached.
For maximum speed and economy, it is most important that cooking
utensils should cover the hotplate completely, and have perfectly flat bases.
Any part of the hotplate which glows bright red is not making effective contact
with the base of the utensil, and this decreases the life and efficiency of the
hotplate.
Utensils which are significantly larger than the hot plate may also reduce
hotplate life and efficiency.
B.
GRIDDLE PLATE
Turn the thermostat control to the desired temperature. When the pilot light
goes out, the desired temperature has been reached and the griddle is ready for
use.
Turning the control to a higher setting than required will not shorten the heat up
time.
C.
STATIC OVEN (E50 SERIES)
The oven is fitted with top and bottom elements. The thermostat maintains the
oven temperature by controlling both elements. The top element is further
controlled by an energy regulator.
Place oven racks in desired position.
1. PREHEAT the oven by selecting the desired temperature, and turning the
top element control to maximum of 2. When the desired temperature is
reached, the pilot lights will go out.
2. COOKING - When the desired temperature has been reach, turn the top
element control OFF.
3. TOP HEAT - To obtain more top heat during cooking, turn the top element
control on. (The higher the setting, the more top heat).
4. FOR BROWNING - Turn the top element control to maximum, and the oven
temperature to a low setting (about 120°C) or just above the "light on"
position if previously working at higher temperatures.
-4-
OPERATING INSTRUCTIONS
D.
CONVECTION OVEN (E56 SERIES)
The oven is fitted with a fan, top and bottom elements.
maintains the oven temperature by controlling both element.
The thermostat
Place oven racks in the desired position.
1. PREHEAT the oven by selecting the desired temperature.
desired temperature is reached, the pilot light will go out.
When the
2. COOKING - When the desired temperature has been reached, proceed
cooking.
-5-
CLEANING
CAUTION: ALWAYS TURN THE POWER SUPPLY OFF AT THE WALL SWITCH
BEFORE CLEANING
THIS UNIT IS NOT WATER PROOF.
DO NOT USE WATER JET SPRAY TO CLEAN INTERIOR OR EXTERIOR OF THIS
UNIT.
A.
RADIANT HOTPLATES
Wipe the surface while still warm to remove spill-overs, grease etc. before they
harden. As soon as hotplates have cooled, wipe all over with a damp cloth.
Raise the side of the hotplate module and withdraw, clean and dry the spill-over
dish.
B.
GRIDDLE PLATE
Use warm water and cleaning abrasive regularly. Wash thoroughly to remove all
traces of cleaning agents. A fine grit griddle brick may preferred. Occasionally
the griddle plate may be bleached with vinegar (when cold).
The large drip tray under the hob should be removed and cleaned regularly to
prevent the build up of spill-overs.
C.
EXTERIOR
Clean with detergent. Baked on deposits or discolouration may require a good
quality stainless steel cleaner or stainless steel wool. Always apply cleaner when
the range is cool and rub in the direction of the "grain".
D.
OVEN INTERIOR
Do not use wire brushed, steel wool or other abrasive materials. Clean the oven
regularly with a good quality domestic oven cleaner. Once a week, remove and
clean built up grease, etc from the oven racks and bottom spill-over cover.
E.
MAINTENANCE
To achieve the best results, cleaning must be regular and thorough and all
control, wiring and mechanical parts checked and adjusted periodically by a
competent serviceman. If any small faults occur, have them attended to
promptly. Do not wait until they cause complete breakdown.
REMEMBER: The power supply must be OFF during cleaning or maintenance.
-6-
SERVICING INSTRUCTIONS
ENSURE POWER SUPPLY IS SWITCHED OFF BEFORE SERVICING.
All servicing should be carried out by a competent electrical appliance serviceman with
experience of commercial cooking equipment.
A.
CONTROL PANEL
Undo the screw(s) at the top of the control panel and swing the panel down.
FUSES are now accessible.
E50, E56 Series
Undo the screw at the right hand side of the control panel cover and swing
the cover to the left. When refitting, ensure that the right hand side of the control
panel fits over the outside of the stainless steel side panel of the range.
B.
OVEN THERMOSTAT
The purpose of the thermostat is to switch the fan and oven elements on and
off, to maintain the selected temperature. There are several factors which can
cause uneven or incorrect oven temperatures, and these should be checked
before calibrating a thermostat:
*
*
*
*
*
C.
The oven door must be shut and sealed correctly.
The oven must be level (side to side and front to back).
The oven vent must not be restricted.
The oven elements must be working correctly and drawing the correct
current (see next page).
The thermostat capillary should have no sharp bends and the bulb must be
straight and correctly positioned in its locating brackets.
TO CHECK CALIBRATION
Place an accurate thermometer or thermocouple in the centre of the oven.
Select a medium temperature, e.g 180°C. (For E50 models, leave the top
element OFF). Allow time for the temperature to stabilise and note the maximum
and minimum temperatures during a cycle. The average of these two readings
should be 180°C (a variation of plus or minus 15°C is acceptable). If beyond this,
replace the thermostat.
D.
OVEN ELEMENTS
*
*
*
Remove all the screws holding the elements to the oven liner.
Withdraw the element until the terminals are accessible.
Disconnect wiring from the terminals and withdraw the element.
E50 Top Element - 3kW at 240V = 12.5A 19 ohms
E56 Top Element - 1.75kW at 240V = 7.3A 33 ohms
Bottom Elements - 4.5kW at 240V = 18.8A 2 x 25.6 ohms
-7-
SERVICING INSTRUCTIONS
E.
RADIANT AND SOLID ELEMENTS
Tilt element sideways and remove spillage tray.
Lift front of element, pull forward approximately 30mm and turn on edge.
Remove terminal cover plate and disconnect wiring.
Radiant Element 2.4kW at 240V = 10A 24 ohms
Solid Elements 2.0kW at 240V = 8.3A 29 ohms
F.
ENERGY REGULATORS
These should be checked for positive OFF and MAXIMUM positions and for
correct cycling throughout the control range.
G.
GRIDDLE
Access to element and thermostat capillary
*
*
*
*
*
Lift up front edge of griddle plate.
Undo the four nuts and remove the cover panel underneath.
Remove the clamp plates and insulation.
Bend back the tabs to withdraw the capillary bulb or disconnect wires
to remove element.
Griddle Plate Element 3.6kW at 240V = 15A 16 ohms
To remove thermostat after capillary withdrawn.
*
*
Disconnect wiring.
Remove from control panel.
-8-
PROBLEM SOLVING
A.
FAILURE OF INDIVIDUAL ITEMS, e.g one element
Note: Switch off power supply or remove wall fuses for these tests.
Check individual fuses located behind control panel.
Check for an electrical short by checking there is NO continuity between any
"phase in" line and the metal appliance body itself.
Check for the item failing (element, control etc) by using a multimeter as
shown on following pages.
Ensure correct size supply wire as described on Page 2.
B.
COMPLETE POWER FAILURE TO THE APPLIANCE
*
*
*
*
C.
Check fuse connection at the wall.
Ensure fuse size is correct to carry the load.
Check for an electrical short to the appliance.
Ensure correct size supply wire as described on Page 2.
FAN FAILS TO OPERATE WHEN DOOR SHUT (E56)
Door microswitch requires adjustment.
Check continuity by pushing the lever in/out on the microswitch to ensure
power is going to the motor.
Motor failed and will therefore require replacing.
-9-
RESISTANCE TEST
To check if an element is still functioning correctly, disconnect appliance from the
mains supply, disconnect wires from the element and check the resistance (ohms)
across the element when cold. Follow Steps 1, 2, 3 below to calculate the correct
resistance (OHMS LAW).
-10-
CONTINUITY TEST
To check if an Energy Regulator, Thermostat or Switch is functioning correctly,
disconnect appliance from the mains supply, disconnect wires from the control and
check for continuity.
-11-
CIRCUIT SCHEMATICS
-12-
CIRCUIT SCHEMATICS
-13-
CIRCUIT SCHEMATICS
-14-
CIRCUIT SCHEMATICS
-15-
SPARE PARTS
BLUE SEAL E50/51/56 SERIES
Part No
Description
011654
010419
015710
010137
013600
010422
015533K
011987
015966
015500
013528
010909
019479
010866
010856
004094
017928
Oven Top Element 1.75kW (E56)
Oven Top Element 3kW (E50)
Oven Bottom Element 4.5kW
Radiant Surface Element 2.4kW
Cast Surface Element 2.0kW
Griddle Element 3.6kW
Griddle Thermostat Kit
Thermostat (Static and Convection Ovens)
Contactor
Energy Regulator
Neon Pilot Light
Capacitor
Motor
Cooling Disc
Fan
Fan Extractor
Microswitch
-16-