1
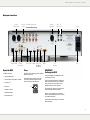
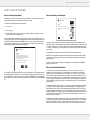
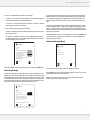
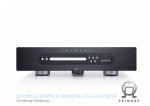
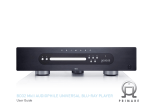
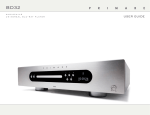
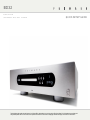
BD32 audiophile universal blu-ray player QUICK SETUP guide This Quick Setup guide explains the main features of your Primare BD32, and describes how to set it up using the Easy Setup Wizard. For full information about configuring and using the BD32 please refer to the User Guide, which is provided in electronic PDF format on the accompanying CD-ROM to save paper, and be kind to the environment. B D 3 2 Q uick setup G U I D E Using the Remote Control This page explains how to use the C23 remote control to operate the BD32, and how to fit the batteries into the remote control. When using the remote control, the front window of the remote control should be pointed to the infrared sensor on the front panel within an angle of ±30° and a range of about 26 ft. NOTE: When a button is pressed but its function is invalid or unavailable at the moment, the TV screen displays a circle with a diagonal line. Fitting the batteries Change the display brightness Switch on/off Before using the remote control you need to insert the two AAA batteries supplied with the C23. • Gently slide open the cover on the back of the remote control: Enter track number Clear numeric input Decrease volume of amplifier Move left on menu Hold down to RETURN from menu Press and hold for 6 seconds with the tray open to reset the remote code Select Blu-ray mode Press and hold for 1.5 seconds to select a source Increase volume of amplifier Move up on menu Select item on menu Move right on menu • Insert the two batteries, observing the polarity printed on the bottom of battery compartment: • Slide back the cover until it clips into place: Move down on menu Open or close the tray, or stop the disc Restart the current track, or skip to the previous track Display the Setup Menu Show/hide on-screen display Repeat the track or disc Choose camera angle Choose output resolution Zoom in/out and adjust aspect ratio Play or pause the disc Reverse scan Skip to the next track Forward scan Display Pop-up Menu/DVD Menu Display Top Menu/Title Menu Choose audio language/track Choose media source Choose subtitles Play from specified location Note: Replace only with alkaline batteries type AAA, LR03, or equivalent. When disposing of old batteries please be considerate to the environment. Select SHUFFLE or RANDOM B D 3 2 quick setup G U I D E Installation Front panel controls Power indicator Back Power Eject button button Disc tray Play Next Display (see below) Pause Stop Display Chapter/track Pause indicator Time display BD Media: BD DVD DVD-A SVCD SACD 2CH SACD M.CH CD USB M.CH Format: 2CH M.CH B D 3 2 Q uick setup G U I D E Back panel connections 2-channel balanced outputs Network HDMI 2-channel outputs Analogue video outputs Multichannel audio outputs USB e-SATA HDMI Optical Coax Balanced digital output RS232 Digital outputs Unpack the BD32 Phase Your BD32 comes with: The phase of the AC supply can make a significant difference to the sound. • This Quick Setup guide. • The User Guide in PDF format on CD-ROM. • AC power cord • C23 remote • 2 batteries for the C23 • USB wireless adaptor • USB extension cable Ensure that the live pin of the AC power cable is connected to the left-hand pin of the power connector, viewed from the back panel: Live Trigger IR in/out in/out RF Not active On/off Power IMPORTANT! Positioning the BD32 As the power supplies are completely linear, they can generate a lot of heat. In order to avoid the appearance of venting ducts, which would interrupt the clean lines of the BD32 design, we’ve opted to use the player’s entire aluminium chassis as an active heat sink. The underside of the player may therefore feel hot, which is completely normal and expected. However, we do recommend you to position the BD32 in a well ventilated place and not in a closed non-ventilated environment. Do NOT place the BD32 directly on or underneath another component. B D 3 2 quick setup G U I D E Easy Setup Wizard Access the Easy Setup Wizard Choose the Primary Video Output When the player is turned on for the first time, an Easy Setup Wizard screen will appear. It is a series of guided instructions designed to configure the basic settings for the player. Easy Setup To start the Easy Setup Wizard, please follow these steps: Step: 2/6 HDMI 1 HDMI 2 Choose the primary video output that you use. 1) Turn on the TV. Better performance will be provided over an HDMI connection. 2) Turn on the player. Analog 3) Switch the input selection on your TV so that the TV displays the signal from the player. You should see the first step of the Easy Setup Wizard. If the Easy Setup Wizard has previously been completed or canceled, it will no longer initiate when you turn on the player. Instead, you will see the background screen with the Primare and Blu-ray Disc logos. To access Easy Setup Wizard, please press the SETUP button on the remote control, select Device Setup, then Reset Factory Default. Select “OK” to confirm loading the factory default settings. Once the factory default settings are loaded the Easy Setup Wizard will appear. Easy Setup Step: 1/6 The Easy Setup Wizard will help you configure the basic settings for this player. More detailed settings can be accessed at the Setup Menu at any time after finishing or exiting the wizard. Press OK to initiate the Easy Setup Wizard, press Cancel to exit this Wizard immediately. Previous Enter Next The player can output video through its HDMI and component output terminals. By setting the “Primary Video Output” option, the player can optimize video output of the selected terminal. The choices are “HDMI 1”, “HDMI 2” and “Analog”. If you connect the player to the TV using an HDMI cable please select “HDMI 1” or “HDMI 2” correspondingly. If you connect the player to the TV using component video cables please select “Analog”. For more information see pages 3 and 4 in the User Guide on the accompanying CD-ROM. Please note: The best performance will be provided over the HDMI connection. Between the two HDMI outputs, HDMI 1 should be given priority for use since it benefits from the superior Marvell QDEO video processing solution. To make your selection, use the A and V buttons to highlight the choice, and then press the SELECT button to go to the next step. Select the Best Output Resolution The first step of the Easy Setup Wizard allows you to skip the entire wizard. If you are familiar with setting up audio/video equipment and would like to customize the player settings using its Setup Menu, you may use the < and > buttons to select the “Cancel” option, then press the SELECT key to exit the Easy Setup Wizard. Otherwise, to continue with the Easy Setup Wizard, select the “OK” option and press the SELECT key. The rule of thumb when selecting an output resolution is to match the “native resolution” of your TV or display device as closely as possible. The “native resolution” is the resolution of the actual display component in the TV, such as the Plasma panel, LCD panel, or DLP™ chip. The TV may accept input signals with lower or higher resolutions than its native resolution. In such cases the electronics in the TV will up-scale or down-scale the video to fit its display component. Unfortunately many TVs on the market only do an average job scaling the video. On the other hand, if you set the Primare Blu-ray Disc Player to output a resolution that matches or is very close to the native resolution of the TV, you are more likely to get a great picture. For the latest generation of 1080p, “Full HD” or “True HD” displays, the best output resolution will naturally be 1080p. (A few early model 1080p displays do not accept 1080p signal. For these displays the best output resolution to use is 1080i.) For all other digital televisions this will likely be 720p. For CRT tube or rear projection televisions this will likely be 1080i. For EDTV displays (very rare if they have HDMI or DVI) this will be 480p (NTSC) or 576p (PAL). These are general recommendations that work for most users, but there can be exceptions. Advanced users may want to try all supported resolutions and choose the one that provides the best visual result. The Primare Blu-ray Disc Player supports a special “Source Direct” output resolution on its HDMI output. This resolution is recommended for use with external video processors or high-end TVs. In “Source Direct” mode, the player works as a “transport”. It decodes video from the discs and then sends the raw video signal in its native resolution and format, without extra processing, to the external video processor or TV. B D 3 2 Q uick setup G U I D E The actual output resolution varies by content: Content NTSC DVD PAL DVD Most Blu-ray Movies (film-source) Most Blu-ray TV shows or Concerts (video-source) SACD and DVD-Audio Source Direct Output Resolution 480i 576i 1080p 23.976Hz or 1080p 24Hz 1080i 1080i NOTE If you cannot get a picture using the HDMI or Analog (component) output, please connect the player to the TV using the composite video output, and then use the Setup Menu to adjust the player settings. Video up-conversion over the Analog (component) output is only available for unencrypted discs such as home video and consumer-created contents. Most commercially pressed DVD discs are CSS-encrypted and will be limited to 480i/480p resolution. This restriction applies to the component output only. The HDMI output is protected with HDCP and has no such restriction. Easy Setup Auto Step: 3/6 the selected resolution, you may see a black screen or an error message. In this case please wait for 15 seconds and the Easy Setup screen will reappear. Select a different resolution that your TV can support. 1080p Choose the output resolution which best matches your TV. Change will be applied immediately. You will have 15 seconds to either save the new setting or rollback to the previous output resolution. 1080i Determine the Display Aspect Ratio 720p 480p/576p 480i/576i Source Direct Previous Enter Next Depending on your selection of “Primary Video Output”, the available output resolution selections will differ. For the HDMI 1 and HDMI 2 output, the following output resolutions are available: Auto, 1080p, 1080i, 720p, 480p/576p, 480i/576i, and Source Direct. If “Auto” is selected, the player will determine its output resolution based on the best signal resolution that the TV can display. For the Analog (component) output, the following output resolutions are available: 1080p, 1080i, 720p, 480p/576p and 480i/576i. Please note 1080p only applies to HDMI output, if it is selected for component video outputs, it will automatically be down-scaled to 1080i. Please refer to the specifications of your TV to find the best resolution to use. Easy Setup Step: 3/6 15s Change 15 seco rollback Wide screen, or 16:9 TV The aspect ratio is the proportional ratio of a TV screen’s width and height. Older television sets generally have a 4:3 aspect ratio – the width is 4/3 (or 1.33) times the height. Newer wide screen television sets have a 16:9 aspect ratio – the width is 16/9 (or 1.78) times the height. For best performance, the video output of your player needs to match the screen aspect ratio of your TV. Since almost all Blu-ray Discs and many DVD discs are released in the wide screen format, it is highly recommended that you use a wide screen TV with the player. The Aspect Ratio selections are 4:3 Letterbox, 4:3 Pan & Scan, 16:9 Wide and 16:9 Wide/Auto. Depending on your selection and the video format recorded on the discs, image appearance on the TV screen can be one of the following: Auto Confirmwhich Output Resolution Choose the output resolution best matches your TV. Standard Definition, or 4:3 TV 1080p TV Screen Appearance 1080i The output resolution has been changed. 720p Original Content Select OK to save the new setting. Select 480p/576p Cancel to rollback to the previous output resolution. 480i/576i 4:3 Letterbox 16:9 Pan & Scan Wide Wide/Auto 4:3 Source Direct Previous Enter Next 16:9 Press the A and V buttons to select the desired output resolution, then press the SELECT button. The player will apply the selected output resolution and ask you to confirm the selection. If your TV supports the selected resolution, you will see a dialog box with a count-down clock. Use the < button to highlight the “OK” option and press the SELECT button to save the resolution setting. If your TV does not support B D 3 2 quick setup G U I D E If you have a 4:3 or standard definition screen, select one of these options: • 4:3 Letterbox – 4:3 TV Letterbox. Choose when the display is 4:3. Widescreen image is displayed in “letterbox” format with black borders on top and bottom (preferred). • 4:3 Pan & Scan – 4:3 TV Pan and Scan. Choose when the display is 4:3. Both sides of a widescreen image are clipped (you lose about 30% of the picture). If you have a widescreen (16:9) display, select one of these options: • 16:9 Wide – 16:9 (widescreen) sources will be displayed in their native aspect ratio, and 4:3 sources will be horizontally stretched. • 16:9 Wide/Auto – 16:9 (widescreen) as well as 4:3 sources will be displayed in their native aspect ratio. Please note that in this mode 4:3 sources will be displayed with black borders on both left and right sides to maintain the correct 4:3 aspect ratio. Easy Setup The “Compatible” setting configures audio output in a way that is generally compatible with all types of equipment and content. If you connect the player to a television directly, or to a receiver with an HDMI 1.1/1.2 or optical/coaxial input, selecting the “Compatible” setting is recommended. When menu click sound and Secondary Audio Program are presented in the content, those will be mixed into the audio output. The “Advanced” setting configures audio output to send the original main audio content to a connected receiver for decoding and reproducing. It requires a receiver capable of decoding all high bit rate audio formats. If you connect the player to a receiver supporting HDMI 1.3 or higher version and high bit rate audio formats, selecting the “Advanced” setting is recommended. Menu click sound and Secondary Audio Program are turned off by default. Press the A and V buttons to select one of the audio setting choices, and then press the SELECT button. The two basic audio setting choices may not cover all situations. You can further customize the audio settings using the player’s Setup Menu. Complete the Easy Setup Wizard Easy Setup Step: 4/6 Choose the desired Aspect Ratio for your TV. 4:3 Letterbox: For 4:3 TV. Wide screen content will be displayed in a letterbox. 4:3 Pan & Scan: For 4:3 TV. Wide screen content may be cropped on the sides. 16:9 Wide: For 16:9 TV. 16:9 Wide/Auto: For 16:9 TV. 4:3 content will be displayed with side borders. Previous Step: 6/6 4:3 Letterbox 4:3 Pan & Scan Easy Setup Wizard completed. 16:9 Wide Press the Enter button to exit. 16:9 Wide/Auto Enter Next Previous Press the A and V buttons to select the proper aspect ratio for your TV, then press the SELECT button. Select the Audio Setting The Blu-ray Disc format brings not only high resolution video, but also high bit rate audio such as Dolby Digital Plus, Dolby TrueHD, DTS-HD High Resolution and DTS-HD Master Audio. Blu-ray Discs may also include additional audio features such as menu click sound and Secondary Audio Program (SAP – audio associated with the secondary video in Picture-in-Picture mode). Depending on the user preferences and other audio/video equipment connected to the player, the audio settings need to be adjusted to achieve the best result. The Easy Setup Wizard offers two basic selections to get you started. Enter Finish Once you have selected the audio setting, the initial Easy Setup Wizard is completed. Press the SELECT button to close the Easy Setup Wizard. Your player is now ready for use. You will see a background screen with an Primare and Blu-ray Disc logo. Please refer to the electronic User Guide on the accompanying CD-ROM for basic and advanced operations. Enjoy your new Primare Blu-ray Disc Player! Easy Setup Step: 5/6 Select the audio setting. Compatible Advanced Compatible: For televisions and receivers with HDMI 1.1/1.2 or Optical/Coaxial connections. Advanced: For receivers with HDMI 1.3 or higher version only. Secondary audio program is turned off by default. Audio settings can be further customized in the setup menu. Previous Enter Next the sound and vision of scandinavia p l e a s e v i s i t primare.net f o r m o r e information about our products primare ab sweden primare.net