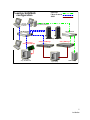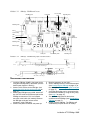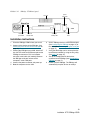
1
ATTO Technology, Inc.
iPBridgeTM 1500D/E
iPBridgeTM 1550D/E
Installation and Operation Manual
© 2005 ATTO Technology, Inc. All rights reserved. All brand or product names are trademarks of their respective
holders. No part of this manual may be reproduced in any form or by any means without the express written
permission of ATTO Technology, Inc.
4/2005
Document Control Number: PRMA-0351-000MD
Contents
Introduction: iSCSI provides storage options
Glossary
1 Setting up the iPBridge .....................................................................1
iPBridge1500 features
iPBridge 1550 features
1.1 ATTO iPBridge 1500E ..........................................................3
Dimensions
Environment
Power
Reset switch
SCSI port
Ethernet port
Serial port
LED indicators
Installation instructions
1.2 ATTO iPBridge 1500D ..........................................................5
Dimensions
Environment
Power
SCSI port
Ethernet port
LED indicators
Reset switch
Installation instructions
1.3 ATTO iPBridge 1550E ..........................................................7
Dimensions
Environment
Power
Reset switch
SCSI port
Ethernet port
Serial port
LED indicators
Installation instructions
1.4 ATTO iPBridge 1550D ..........................................................9
Dimensions
Environment
Power
SCSI port
Ethernet port
LED indicators
Reset switch
Installation instructions
1.5 Connecting SCSI devices to the SCSI port ........................11
Cabling
Cable types
Examples
1.6 Configuring the iPBridge .....................................................13
Connect using the GbE port
Using ATTO ExpressNAV
Connecting using the serial port
Use Telnet
2 Managing the iPBridge ......................................................................17
Change default username, password
SCSI configuration
Ethernet port configuration
iSCSI configuration
Mapping
OEM configuration services
2.1 ExpressNAV provides web-based interface ......................19
Status
Serial Port Configuration
Ethernet Port Configuration
SCSI Configuration
iSCSI Configuration
Bridge Configuration
Mapping
Advanced CLI Configuration
Restart Firmware
Help
2.2 CLI provides ASCII-based interface ...................................21
2.2.1 CLI commands summary .......................................23
2.2.2 General use commands .........................................25
Help
Password
ReadOnlyPassword
ReadOnlyUsername
RestoreConfiguration
SaveConfiguration
Username
VerboseMode
2.2.3 Diagnostic commands ...........................................27
BridgeModel
BridgeName
Help
IdentifyBridge
Info
IsReserved
OEMConfigFile
Ping
RMON
RouteDisplay
SCSIPortList
SCSITargets
CLI Error Messages
2.2.4 Maintenance commands ........................................29
FirmwareRestart
Password
Reserve
RestoreConfiguration
SCSIPortReset
SpeedWrite
SpeedWriteDefault
Username
2.2.5 SCSI configuration commands .............................31
SCSIInitID
SCSIPortBusSpeed
SCSIPortList
SCSIPortReset
SCSIPortResetOnStartup
SCSIPortSelTimeout
SCSIPortSyncTransfer
SCSIPortTermination
SCSIPortWideTransfer
SCSITargets
SpeedWrite
SpeedWriteDefault
2.2.6 Serial port configuration commands ....................33
SerialPortBaudRate
SerialPortEcho
2.2.7 Ethernet commands ...............................................35
DPMTU
EthernetSpeed
Exit
IPAddress
IPDHCP
IPGateway
IPSubnetMask
Password
Ping
ReadOnlyPassword
RMON
Username
ReadOnlyUsername
2.2.8 iSCSI commands ....................................................37
iSCSIAlias
iSCSIChap
iSCSIChapSecret
iSCSIPortNumber
iSCSITarget
iSNSLoginControl
iSNSServer
MultiTargetMode
2.2.9 Mapping commands ...............................................39
AutoMap
iSCSITarget
MultiTargetMode
Route
RouteDisplay
SCSIInitID
SCSITargets
2.2.10 Privileged OEM configuration services ..............41
AutoMapOnBoot
ColdReset
InquiryProductID
InquiryVendorID
IqnVendorPrefixID
ModelNumber
OEMConfigFile
ProductID
VendorID
2.3 Mapping devices ..................................................................43
Node names
Single target mode
Use Command Line Interface
Use the ExpressNAV interface
Multiple target mode
Use Command Line Interface
Example
2.4 Updating firmware ................................................................47
Appendix A Safety standards and compliances .................................i
Appendix B ATTO accessories .............................................................iii
Appendix C Contact ATTO Technology, Inc. ......................................v
Introduction: iSCSI provides storage options
The iSCSI protocol allows storage devices such as hard drives, tape drives and libraries and CD
jukeboxes to attach easily to Internet Protocol networks such as Gigabit Ethernet. The iPBridge 1500
and the ATTO iPBridge 1550 support the high throughput needs of streaming data transfers, optimizing
performance and management using ATTO Technology intelligent Bridging Architecture™.
The iSCSI protocol increases the capabilities and
performance of storage data transmission by
transmitting data over local area networks
(LANs), wide area networks (WANs), or the
Internet, providing location-independent data
storage and retrieval to enhance current and future
Storage Area Networks (SANs).
Gigabit Ethernet (GbE) is a transmission
technology based on the Ethernet format and
protocol used in local area networks (LANs). It
provides a data rate of 1 billion bits per second
(one gigabit) as defined in the IEEE 802.3
standard.
intelligent Bridging Architecture, the engine
within ATTO FibreBridge™ and iPBridge
products, uses ATTO Data Routing Fabric
topology and ATTO Virtual Device Manager to
optimize performance. For more information see
www.attotech.com/iBA.html.
Glossary
More information is available through the Storage Networking Industry Association
(www.snia.org/education/dictionary), the Network Data Management Task Force (www.ndmp.org), and
the IETF (www.ietf.org).
Term
Definition
Btl
Bus-Target-LUN: Identification for a parallel SCSI device
CHAP
Challenge-Handshake Authentication Protocol: If CHAP is enabled, the target
requires the initiator to negotiate CHAP authentication using the CHAP secrets
(passwords). An initiator may reject this negotiation.
DP
data port
GbE port used for data movement and management
firmware
Software stored in read-only memory (ROM) or programmable ROM (PROM);
firmware is often responsible for the behavior of a system when it is first
switched on
GbE
Gigabit Ethernet
A protocol for transferring block-level IO over Telnet networks; speed at which
data is passed over Ethernet
IETF
Internet Engineering Task Force: The standards body responsible for Internet
standards such as SNMP and Telnet through a community of network designers,
operators, vendors and researchers concerned with the evolution and smooth
operation of the Internet
initiator device
A component which originates a command
iSCSI
Internet SCSI (Small Computer System Interface), a protocol to link data storage
facilities over the Internet or an intranet developed by the Internet Engineering
Task Force (IETF); carries SCSI commands over IP networks to facilitate data
transfers over intranets and manage storage over long distances
LED
Light-emitting diode, a type of diode that emits light when current passes through
it; visible LEDs are used as indicator lights on all sorts of electronic devices
ATTO Technology Inc. iPBridge Installation and Operation Manual
Term
Definition
LUN
Logical Unit Number: a SCSI identifier of a device
NAS
Network Attached Storage: storage elements connected to a network to provide
file access services to computer systems; an NAS Storage Element includes an
engine to implement the file services and one or more devices to store data;
NAS elements may be attached to any type of network; an NAS host system
uses a file system device driver to access data and NAS systems interpret these
commands to execute the necessary internal file and device I/O operations
SCSI
Small Computer Systems Interface: a processor-independent standard for
system-level interface between a computer and intelligent devices including hard
disks, floppy disks, CD-ROM, printers, scanners, etc.
SNMP
Simple Network Management Protocol: a standard for monitoring and managing
systems and devices in a network; data is defined by a MIB; functions supported
include the request and retrieval of data
Tape Window
A fixed-size parameter indicating the maximum data length that can be written to
a tape in one Data Mover action; once the tape window is reached, the Data
Mover will pause until writes occur and the tape window becomes available.
TCP/IP
Abbreviation for the basic communication protocols used on the Internet
including Transmission Control Protocol (TCP), Internet Protocol (IP), File
Transfer Protocol (FTP), Simple Mail Transfer Protocol (SMTP) and Telnet.
Introduction
1 Setting up the iPBridge
The ATTO bridge family of products provides GbE-to-SCSI or Fibre Channel-to-SCSI bridges available
as embeddable boards, stand alone enclosures that can be fitted for rackmount integration, or desktop
units, depending on the model and your needs.
The ATTO iPBridge and ATTO FibreBridge
family of products share common configuration
options and functions to provide the most
versatile connectivity options available. Each
product has been engineered to address specific
customer needs. New capabilities are integrated
into products throughout the family as much as
possible, requiring only an upgrade of firmware to
incorporate them into your SAN (Storage Area
Network) or NAS (Network Attached Storage).
The ATTO iPBridge 1500E/D is a low cost singlechannel iSCSI-to-SCSI bridge that enables
existing Direct-Attached Storage solutions to be
integrated into an Ethernet network allowing IT
departments to leverage existing investment in
SCSI storage and Ethernet infrastructure and
expertise.
The ATTO iPBridge 1550E/D is a cost-effective
way of expanding your existing storage capacity
without sacrificing performance. The ATTO
iPBridge 1550E/D is ideally suited to the SME or
for corporate IT departments seeking to expand
storage requirements with minimal disruption
while making existing SCSI equipment accessible
over an Ethernet network to all network users.
To make sure you have the most up-to-date
version of the firmware, visit the ATTO
Technology website, www.attotech.com.
iPBridge1500 features
• One independent Gigabit Ethernet port and one
independent Ultra3 SCSI port
• Support for iSCSI protocol V1.0
• ATTO ExpressNAVTM, integrated web server for
configuration, upgrades, monitoring and
management
1
ATTO Technology Inc. iPBridge Installation and Operation Manual
• Available as a desktop or embedded form factor
• 10/100 Ethernet management port for LANbased monitoring and management
• Command Line Interface (CLI) for configuration
and management
• RS-232 serial port with RJ11 connector
• Diagnostic capabilities
• Support for manual and auto LUN mapping
• Intelligent Bridging ArchitectureTM for optimized
performance
• Up to 37MB/sec. throughput
iPBridge 1550 features
• One independent Gigabit Ethernet port and one
independent Ultra3 SCSI port
• Support for iSCSI protocol V1.0
• ATTO ExpressNAVTM, integrated web server for
configuration, upgrades, monitoring and
management
• Available as a desktop or embedded form factor
• 10/100 Ethernet management port for LANbased monitoring and management
• Command Line Interface (CLI) for configuration
and management
• RS-232 serial port with RJ11 connector
• Diagnostic capabilities
• Support for manual and auto LUN mapping
• Intelligent Bridging ArchitectureTM for optimized
performance
• Near wire speed sustained throughput
• Virtual Device Architecture for features such as
hardware RAID and Virtual Tape
• Ideal solution for connecting high performance
tape and disk devices to an IP Storage Area
Network (SAN)
• Up to 100 MB/sec. throughput
Possible SAN/NAS
configuration
Storage
Virtualization
Softw are
Ethernet
Fibre Channel
SCSI
Backup Software
Tape Backup Softw are
2-Gb FC Switch
Gb-E Switch
Storage Arrays
embedded
ATTO FibreBridge
Storage Media
Tape, CD, MO, DVD
ATTO iPBridge
ATTO FibreBridge
Tape Library
NDMP Storage
2
Installation
1.1 ATTO iPBridge 1500E
The ATTO iPBridge 1500E is a 1-Gigabit Ethernet to SCSI embeddable bridge for midrange
performance, cost effective solutions in SMB/SME environments.
The iPBridge 1500E includes a single Ethernet
port which may be used for either data transfer or
configuration, a serial management port and a
SCSI port.
Dimensions
Length: 6.4 inches
Width: 4.4 inches
Height of the tallest component: .536 inches
Environment
Operating Temperature: 5-40° C external
Ambient air should not exceed 40°C.
Humidity: 10-90% non-condensing
Recommended airflow: 11 cubic feet per minute
Power
The iP1500E board may be powered from a 4-pin
connector.
Input voltage: 12V DC ±10% derived from a 4pin connection.
Power draw: 12V, 1.7 amps
4- pin power connector pin outs
Pin
Description
1
12 volt input
2
Ground
3
Ground
4
No connect
Reset switch
A manual reset switch is mounted on the board
near the serial port.
SCSI port
The SCSI port on the iPBridge 1500E connects
storage devices into the Storage Area Network
(SAN). The port is an Ultra 3 LVD/SE SCSI bus
with 68-pin “P” interface: 160 MB/sec. maximum
throughput, downward compatible with all forms
of single-ended SCSI.
3
ATTO Technology Inc. iPBridge Installation and Operation Manual
The iPBridge supports SCSI devices including
hard disk drives, tape drives RAID controllers,
DVD, MO and CD libraries.
Ethernet port
The 10/100/1000 GbE RJ45 Ethernet port uses the
Intel 8254x family gigabit Ethernet to support
Telnet-based data transfer and management
through a an ASCII-based command line
interface or ATTO ExpressNAV, a browser-based
interface.
GbE cables must be at least CAT-5E certified for
1000 Mb/sec. use.
Serial port
The RS-232 serial port provides support for
remote monitoring and management through a
command line interface. It is set at the factory at
115,200 bps.
Pin outs of the RJ11
connector, part number
CBL-0911-001
Pin
Description
2
TXD
3
Ground
4
RXD
5
Ground
LED indicators
Activity: A green LED in the middle of the
iPBridge blinks to show the unit is ready and to
identify the iPBridge when the CLI command
IdentifyBridge is enabled. It goes dark when there is
SCSI activity.
SCSI Activity: the SCSI bus has an LED which is
lit when the iPBridge is ready and goes dark when
there is SCSI activity.
Exhibit 1.1-1
iPBridge 1500E board layout
Mounting hole
SCSI Activity
LED
Fault LED
Mounting hole
Mounting hole
Reset
SCSI Activity
LED
4-pin
power
connector
pin 1
Serial port
Mounting hole
Ethernet port
SCSI Activity LED
SCSI port
Exhibit 1.1-2
Mounting hole
iPBridge 1500E board profile and dimensions
E th e r n e t P o r t
S C S I P o rt
Pow er
.5 3 6
.3 4 3
L o n g B o a rd E d g e
.3 1 3
R J -1 1 P o rt
E th e r n e t P o r t
.3 3 1
.2 7 6
S h o rt B o a rd E d g e
Installation instructions
1
2
3
4
Install the iPBridge 1500E in the target device
using the mounting holes in the board. (See the
board layout diagram in Exhibit )
Connect SCSI devices to the iPBridge. (See
Connecting SCSI devices to the SCSI port on
page 11)
Connect the iPBridge to your SAN: attach CAT
6 or CAT 5E cables to the Ethernet port on the
iPBridge or connect an RJ11 and adapter
crossover serial cable (null modem) between
the iPBridge serial port and one of the
computer's serial COM ports.
Connect the power connector and power up.
5
6
7
8
9
Boot the computers on the SAN.
Access iPBridge Services via the Ethernet port.
(See Configuring the iPBridge on page 13) or
the serial port (Connecting using the serial port
on page 14)
Verify that the bridge can be accessed on the
local Ethernet network by using the Ping utility.
(See Step 7 on page 15)
Set up the configuration for the devices
connected to the iPBridge (See Managing the
iPBridge on page 17.)
Power cycle the iPBridge. The iPBridge will
automatically map the devices on startup
4
Installation: ATTO iPBridge 1500E
1.2 ATTO iPBridge 1500D
The ATTO iPBridge 1500D is a 1-Gigabit Ethernet to SCSI embeddable bridge for midrange
performance, cost effective solutions in SMB/SME environments.
The iPBridge 1500E includes a single Ethernet
port which may be used for either data transfer or
configuration, a serial management port and a
SCSI port.
Dimensions
Width: 7.5 inches wide
Depth: 5.0 inches long
Height: 1.76 inches
SCSI ID LED
Input voltage: 12.0V DC +10%
SCSI port
The SCSI port on the iPBridge 1500E connects
storage devices into the Storage Area Network
(SAN). The port is an Ultra 3 LVD/SE SCSI bus
with 68-pin “P” interface: 160 MB/sec. maximum
throughput, downward compatible with all forms
of single-ended SCSI.
The iPBridge supports SCSI devices including
hard disk drives, tape drives RAID controllers,
DVD and CD libraries.
Ethernet port
The 10/100/1000 GbE RJ45 Ethernet port uses
the Intel 8254x family gigabit Ethernet
controllers to support Telnet-based data transfer
and management through an ASCII-based
command line interface or ATTO ExpressNAV, a
browser-based interface.
GbE cables must be at least CAT-5E certified for
1000 Mb/sec. use.
Environment
Operating Temperature: 0-70° C external
Ambient air should not exceed 40°C.
Humidity: 10-90% non-condensing
Recommended airflow: 11 cubic feet per minute.
Power
Plug in the 12 volt, 20 Watt wall mount adapter to
the back of the unit, then into an appropriate
power source (100-240 VAC input, 50/60 Hz).
The power source must be connected to a
protective earth ground and comply with local
electrical codes. Improper grounding may result
in an electrical shock or damage to the unit.
5
ATTO Technology Inc. iPBridge Installation and Operation Manual
LED indicators
Activity: A green LED on the top of the iPBridge
blinks to show the unit is ready and to identify the
iPBridge when the CLI command IdentifyBridge is
enabled. It goes dark when there is SCSI activity.
SCSI Activity: the SCSI bus has an LED which is
lit when the iPBridge is ready and goes dark when
there is SCSI activity.
Reset switch
A manual reset switch is mounted on the board.
Insert a tool in the hole in the back panel to
activate the switch.
Exhibit 1.2-1
iPBridge 1500D back panel
power
connector
air vents
Ethernet
speed LED
SCSI port
activity LED
Ethernet
activity LED
Power
LED
Installation instructions
6
Access iPBridge Services via the Ethernet port.
(See Configuring the iPBridge on page 13) or
the serial port (Connecting using the serial port
on page 14)
Connect the iPBridge to your SAN: attach CAT
6 or CAT 5E cables to the Ethernet port on the
iPBridge or connect an RJ11 and adapter
crossover serial cable (null modem) between
the iPBridge serial port and one of the
computer's serial COM ports.
7
Verify that the bridge can be accessed on the
local Ethernet network by using the Ping utility.
(See Step 7 on page 15)
8
Set up the configuration for the devices
connected to the iPBridge (See Managing the
iPBridge on page 17.)
4
Connect the power connector and power up.
9
5
Boot the computers on the SAN.
Power cycle the iPBridge. The iPBridge will
automatically map the devices on startup.
1
Place the iPBridge 1500D where you want it.
2
Connect SCSI devices to the iPBridge. (See
Connecting SCSI devices to the SCSI port on
page 11)
3
6
Installation: ATTO iPBridge 1500D
1.3 ATTO iPBridge 1550E
The iPBridge 1550E includes a single Ethernet port which may be used for either data transfer or
configuration, a serial management port and a SCSI port.
Dimensions
Length: 6.4 inches
Width: 4.4 inches
Height of the tallest component: .536 inches
Environment
Operating Temperature: 5-40° C external
Ambient air should not exceed 40°C.
Humidity: 10-90% non-condensing
Recommended airflow: 11 cubic feet per minute
Power
The iP1500E board may be powered from a 4-pin
connector.
Input voltage: 12V DC ±10% derived from a 4pin connection.
Power draw: 12V, 1.7 amps
4- pin power connector pin outs
Pin
Description
1
12 volt input
2
Ground
3
Ground
4
No connect
Reset switch
A manual reset switch is mounted on the board
near the serial port.
SCSI port
The SCSI port on the iPBridge 1550E connects
storage devices into the Storage Area Network
(SAN). The port is an Ultra 3 LVD/SE SCSI bus
with 68-pin “P” interface: 160 MB/sec. maximum
throughput, downward compatible with all forms
of single-ended SCSI.
7
ATTO Technology Inc. iPBridge Installation and Operation Manual
The iPBridge supports SCSI devices including
hard disk drives, tape drives RAID controllers,
DVD, MO and CD libraries.
Ethernet port
The 10/100/1000 GbE RJ45 Ethernet port uses the
Intel 8254x family gigabit Ethernet to support
Telnet-based data transfer and management
through a an ASCII-based command line
interface or ATTO ExpressNAV, a browser-based
interface.
GbE cables must be at least CAT-5E certified for
1000 Mb/sec. use.
Serial port
The RS-232 serial port provides support for
remote monitoring and management through a
command line interface. It is set at the factory at
115,200 bps.
Pin outs of the RJ11
connector, part number
CBL-0911-001
Pin
Description
2
TXD
3
Ground
4
RXD
5
Ground
LED indicators
Activity: A green LED in the middle of the
iPBridge blinks to show the unit is ready and to
identify the iPBridge when the CLI command
IdentifyBridge is enabled. It goes dark when there is
SCSI activity.
SCSI Activity: the SCSI bus has an LED which is
lit when the iPBridge is ready and goes dark when
there is SCSI activity.
Exhibit 1.3-1
iPBridge 1550E board layout
Mounting hole
SCSI Activity
LED
Fault LED
Mounting hole
Mounting hole
Reset
SCSI Activity
LED
4-pin
power
connector
pin 1
Serial port
Mounting hole
Ethernet port
SCSI Activity LED
SCSI port
Exhibit 1.3-2
Mounting hole
iPBridge 1550E board profile and dimensions
E th e r n e t P o rt
S C S I P o rt
Pow er
.5 3 6
.3 4 3
L o n g B o a rd E d g e
.3 1 3
R J -1 1 P o rt
E th e rn e t P o rt
.3 3 1
.2 7 6
S h o rt B o a rd E d g e
Installation instructions
1
2
3
4
Install the iPBridge 1550E in the target device
using the mounting holes in the board. (See the
board layout diagram in Exhibit )
Connect SCSI devices to the iPBridge. (See
Connecting SCSI devices to the SCSI port on
page 11)
Connect the iPBridge to your SAN: attach CAT
6 or CAT 5E cables to the Ethernet port on the
iPBridge or connect an RJ11 and adapter
crossover serial cable (null modem) between
the iPBridge serial port and one of the
computer's serial COM ports.
Connect the power connector and power up.
5
6
7
8
9
Boot the computers on the SAN.
Access iPBridge Services via the Ethernet port.
(See Configuring the iPBridge on page 13) or
the serial port (Connecting using the serial port
on page 14)
Verify that the bridge can be accessed on the
local Ethernet network by using the Ping utility.
(See Step 7 on page 15)
Set up the configuration for the devices
connected to the iPBridge (See Managing the
iPBridge on page 17.)
Power cycle the iPBridge. The iPBridge will
automatically map the devices on startup
8
Installation: ATTO iPBridge 1550E
1.4 ATTO iPBridge 1550D
The ATTO iPBridge 1550D is a 1-Gigabit Ethernet to SCSI embeddable bridge for high performance,
cost effective solutions in SMB/SME environments.
The iPBridge 1550E includes a single Ethernet
port which may be used for either data transfer or
configuration, a serial management port and a
SCSI port.
Dimensions
Width: 7.5 inches wide
Depth: 5.0 inches long
Height: 1.76 inches
SCSI ID LED
Environment
Operating Temperature: 0-70° C external
Ambient air should not exceed 40°C.
Humidity: 10-90% non-condensing
Recommended airflow: 11 cubic feet per minute.
Power
Plug in the 12 volt, 20 Watt wall mount adapter to
the back of the unit, then into an appropriate
power source (100-240 VAC input, 50/60 Hz).
The power source must be connected to a
protective earth ground and comply with local
electrical codes. Improper grounding may result
in an electrical shock or damage to the unit.
Input voltage: 12.0V DC +10%
9
ATTO Technology Inc. iPBridge Installation and Operation Manual
SCSI port
The SCSI port on the iPBridge 1550E connects
storage devices into the Storage Area Network
(SAN). The port is an Ultra 3 LVD/SE SCSI bus
with 68-pin “P” interface: 160 MB/sec. maximum
throughput, downward compatible with all forms
of single-ended SCSI.
The iPBridge supports SCSI devices including
hard disk drives, tape drives RAID controllers,
DVD and CD libraries.
Ethernet port
The 10/100/1000 GbE RJ45 Ethernet port uses the
Intel 8254x family gigabit Ethernet controllers to
support Telnet-based data transfer and
management through an ASCII-based command
line interface or ATTO ExpressNAV, a browserbased interface.
GbE cables must be at least CAT-5E certified for
1000 Mb/sec. use.
LED indicators
Activity: A green LED on the top of the iPBridge
blinks to show the unit is ready and to identify the
iPBridge when the CLI command IdentifyBridge is
enabled. It goes dark when there is SCSI activity.
SCSI Activity: the SCSI bus has an LED which is
lit when the iPBridge is ready and goes dark when
there is SCSI activity.
Reset switch
A manual reset switch is mounted on the board.
Insert a tool in the hole in the back panel to
activate the switch.
Exhibit 1.4-1
iPBridge 1550D back panel
power
connector
air vents
Ethernet
speed LED
SCSI port
activity LED
Ethernet
activity LED
Power
LED
Installation instructions
6
Access iPBridge Services via the Ethernet port.
(See Configuring the iPBridge on page 13) or
the serial port (Connecting using the serial port
on page 14)
Connect the iPBridge to your SAN: attach CAT
6 or CAT 5E cables to the Ethernet port on the
iPBridge or connect an RJ11 and adapter
crossover serial cable (null modem) between
the iPBridge serial port and one of the
computer's serial COM ports.
7
Verify that the bridge can be accessed on the
local Ethernet network by using the Ping utility.
(See Step 7 on page 15)
8
Set up the configuration for the devices
connected to the iPBridge (See Managing the
iPBridge on page 17.)
4
Connect the power connector and power up.
9
5
Boot the computers on the SAN.
Power cycle the iPBridge. The iPBridge will
automatically map the devices on startup.
1
Place the iPBridge 1550D where you want it.
2
Connect SCSI devices to the iPBridge. (See
Connecting SCSI devices to the SCSI port on
page 11)
3
10
Installation: ATTO iPBridge 1550D
1.5 Connecting SCSI devices to the SCSI port
The ATTO iPBridge SCSI port connects SCSI storage devices to the network.
The SCSI port is a bus capable of supporting up
to15 devices in LVD mode and each bus is
capable of 40, 80 or 160 MB/sec. (Ultra, Ultra2 or
Ultra3) transfer rates.
The SCSI bus auto-negotiates the appropriate
sync rates with the connected devices. If slower
devices are mixed with faster devices, the bus will
communicate at the rate of the slowest device,
thus wasting the performance capabilities of the
faster devices.
The iPBridge supports a wide variety of SCSI
storage devices including stand-alone drives,
removable drives, JBODs, RAIDs, tape, CD and
DVD drives, changers and libraries.
To set SCSI port bus speed and transfer rates
Note
The preferred method to set parameters for
the iPBridge is to use ATTO ExpressNAV.
Refer to Configuring the iPBridge on page 13
and ExpressNAV provides web-based
interface on page 19.
1
2
Determine the current speed and transfer rates:
type
get SCSIPortBusSpeed
get SCSIPortSyncTransfer
3
To connect SCSI devices to the ATTO iPBridge
1
Connect the cable from the SCSI device to the
68-pin HD SCSI port on the iPBridge.
2
Check the type of cable, cable length limit and
number of devices recommended for the port.
See Exhibit 1.5-1.
3
SCSIPortBusSpeed controls the transfer rate at
which the iPBridge will attempt to negotiate with
its SCSI devices. Default is Ultra3
To change from the default or the current port
bus speed, type
set SCSIPortBusSpeed sb [fast|ultra|
ultra2|ultra3]
with sb being the SCSI bus number (0) and the
speeds being Fast, Ultra, Ultra2 or Ultra3. See
Exhibit 1.5-1.
Keep cable lengths as short as possible to
ensure the highest signal quality and
performance. These cable lengths include the
wiring inside the devices.
4
Set the IDs of the SCSI devices connected to
the bridge to a value other than 7.
If you have completed configuration operations,
type SaveConfiguration; if not, go on to
the next command.
5
Use a sequential ID starting at 0 for each
device. The SCSI port in the ATTO iPBridge
has an internal factory setting ID of 7, typical for
a SCSI initiator device.
SCSIPortSyncTransfer specifies whether
synchronous SCSI transfers should be
negotiated with devices on the SCSI port. The
default is enabled. To change the setting, type
set SCSIPortSyncTransfer sb disabled
Note
The entire SCSI bus will operate at the speed
of the slowest device on that bus.
4
Enter the Command Line Interface (see
Configuring the iPBridge on page 13)
Terminate the SCSI bus after the last device.
The iPBridge is terminated internally.
11
ATTO Technology Inc. iPBridge Installation and Operation Manual
6
When you have completed configuration
operations, type SaveConfiguration to save the
configuration for use after a power up or
firmware restart.
Cabling
Cables and devices must be chosen to maximize
performance and minimize the electrical noise
from the high-speed data transfers available with
the SCSI protocol. Cabling and termination
methods become important considerations for
proper performance. SCSI cables and devices are
subject to specific length and number limitations
to deal with electrical problems that arise at
increased operating speeds.
Cable types
Use high-quality cables rated for the type of SCSI
transfers required: well-insulated SCSI cables
ensure error free communications. Try to keep
cable lengths as short as possible to ensure higher
signal quality and performance.
Examples
The SCSI specification limits total bus cable
length for single-ended SCSI in a non-UltraSCSI
environment to 3 meters (combined length of both
internal and external cable lengths).
In an UltraSCSI workgroup environment with a 7drive tower, you are limited to 1.5 meters between
the host and the tower, including the cabling for
the tower. If the 7-drive tower requires 1 meter of
cabling to connect all of its drives, the distance
from the tower to the host must be .5 meters.
Note
UltraSCSI is very sensitive to SCSI bus noise,
cable distances and the number of devices
connected on the SCSI bus. Carefully connect
your devices when working with UltraSCSI.
Exhibit 1.5-1 Various types of SCSI operate at different speeds and require different bus lengths to support
a certain number of devices.
STA terms
Bus speed Bus width
Max. bus lengths in meters
MB/sec. max.
bits
Single-ended Differential
LVD
Max. device
support
Fast SCSI
10
8
3
25
n/a
8
Fast/WIDE SCSI
20
16
3
25
n/a
16
UltraSCSI
20
8
1.5
25
n/a
8
Ultra/WIDE SCSI
40
16
n/a
25
n/a
16
Ultra/WIDE SCSI
40
16
1.5
n/a
n/a
8
Ultra/WIDE SCSI
40
16
3
n/a
n/a
4
Ultra2 SCSI
80
16
n/a
n/a
12
8
Ultra2/WIDE SCSI
80
16
n/a
n/a
12
16
Ultra3/WIDE SCSI
160
16
n/a
n/a
12
16
12
Installation: SCSI connections
1.6 Configuring the iPBridge
Communicate with the ATTO iPBridge through the GbE port using ATTO ExpressNAV or Telnet or
through the serial port.
The preferred method to communicate with and
manage the iPBridge is through the GbE port
using ATTO ExpressNAV, a GUI web-based
interface. ATTO QuickNAV, a utility program,
automatically finds your iPBridge on the network
so that you can begin configuration.
You may use the Command Line Interface
through the serial port or through the GbE port
using Telnet.
Connecting using the GbE port
Before you begin installing the iPBridge, be
sure to check or complete the following
1 If you are managing your iSCSI system across
a WAN and your system uses a firewall, be sure
that the following ports are open and available:
6
Download the ATTO QuickNAV utility,
QuickNAV-windows.exe, from the ATTO
website, www.attotech.com, or from the
product CD.
7
Ensure the host running QuickNAV and the
iPBridge are on the same subnet.
8
Any switch in the IP SAN network must allow
UDP broadcast messages to be passed
through.
9
You do not have a router between the host
running QuickNAV and the iPBridge.
If you are using the TCP protocol
• telnet (port 23)
• http (port 80)
• ftp (ports 20 and 21)
• iscsi (port 3260)
• iSNS (port 3705)
If you are using the UDP protocol
• ntp (port 123)
• SNMP (port 161)
2
Be sure your host system(s) is set up and
configured. Your host system can use any of
three different types of cards:
• a network interface card (NIC)
• a TCP offload engine card (TOE) or
• a storage network interface card (SNIC).
3
For best performance, all cabling, network
interface cards (NICs), host bus adapters
(HBAs), and network switches must be Gigabit
Ethernet (GbE), and at least Cat 5e certified.
Most standard offices use 2-pair wiring which is
not compatible. GbE requires 4-pair wiring.
4
For best performance, support for 9014 byte
jumbo frames should be available for all
switches and host iSCSI equipment.
5
Ensure that the iPBridge has access to a DHCP
server.
13
ATTO Technology Inc. iPBridge Installation and Operation Manual
10 You have the iPBridge serial number.
To find the iPBridge
1 Using at least Cat5e cable, connect the
iPBridge Ethernet port to your network.
2
Power on the iPBridge.
3
Wait approximately one minute to insure the
iPBridge obtains an IP address from the DHCP
server.
4
Run the QuickNav Utility QuickNAVwindows.exe which you previously
downloaded from the ATTO website,
www.attotech.com, or from the product CD:
5
Follow the on-screen instructions. You will need
the iPBridge serial number.
6
Continue to configure and mange the iPBridge
using the ExpressNAV interface. Refer to Using
ATTO ExpressNAV on page 14
If any problem occurs, continue with Connecting
using the serial port below.
Using ATTO ExpressNAV
ATTO ExpressNAV is the recommended
management tool for the iPBridge. It is a webbased graphical user interface (GUI) that allows
you to manage the iPBridge by clicking choices
and commands in traditional GUI fashion or by
entering Command Line Interface commands
directly, as you would in a terminal emulation
session.
The minimum requirement for browsers is
Internet Explorer 5.5 or Netscape Navigator 6.2.
Access from any web browser that supports the
latest standards for XHTML 1.0 and CSS1. To
make ExpressNAV as compatible as possible with
as many browsers as possible, all pages are
written in pure XHTML 1.0 and CSS1.It is
compatible with the latest versions of Internet
Explorer, Netscape, Mozilla (including KMeleon, Camino, Mozilla Firefox, Epiphany and
Galeon), and KHTML (including Konqueror and
Safari).
To take full advantage of the ExpressNAV
interface, enable Java script through your
browser.
2
Select Internet Options
3
Select the Security tab
4
Select the Custom Level button.
5
On the menu presented, go to the Microsoft
VM, Java permissions and make sure
Disable Java is not selected.
6
Go to the Miscellaneous topic and select
METAREFRESH.
To use ATTO ExpressNAV
1 Once the iPBridge is found, click the Launch
button to open the ExpressNAV web browser.
2
The ExpressNav home page displays. Click
Enter.
3
Enter the username and password.
The default values are username “root” and
password “Password”.
Note
The username is case insensitive and the
password is case sensitive.
4
The ExpressNAV iPBridge Status page
appears. Configure your iPBridge using the
ExpressNAV interface. Refer to ExpressNAV
provides web-based interface on page 19,
ending with the SaveConfiguration Restart
from the Restart page.
To optimize ExpressNAV in Internet Explorer
1
Go to the browser toolbar and select Tools
Connecting using the serial port
1
Connect an RJ11 part number CBL-0911-001
and adapter crossover serial cable (null
modem) between the ATTO iPBridge serial port
and one of the computer's serial COM ports.
A gender changer or DB-9 to DB-25 converter
may be needed depending on the cables being
used.
2
3
Enable the computer’s serial port and initiate a
terminal emulation link.
• Terminal type: ASCII
• Echo: on.
4
Press Enter several times until the Ready
prompt is displayed.
5
Disable DHCP by typing
set ipdchp dp0 disabled
6
To configure the IP address, type
set ipaddress dp0 w.x.y.z
Set the following serial parameters in your
terminal program:
where w.x.y.z is an addressable address for
your network.
• Bits per second: 115200
7
• Data Bits: 8
set ipsubnetmask dp0 a.b.c.d
• Parity:, None
where a.b.c.d is the subnet you want the
iPBridge to be available.
• Stop Bits: 1
• Flow Control: None
To configure the subnetmask, type
8
To configure the gateway, type
14
Installation: Configuration
The iPBridge will save the changes and
perform a restart.
set ipgateway dp0 e.f.g.h
where e.f.g.h is a valid gateway.
9
To save the settings, type
saveconfiguration restart
10 Once rebooted, verify that the iPBridge can be
accessed by your network using standard
network techniques such as the ping
command.
Using Telnet
Up to three Telnet sessions can be conducted
simultaneously. Whichever session issues the first
“set” Command Line Interface command (refer to
CLI provides ASCII-based interface on
page 21) can continue to issue set commands,
while the other sessions can only issue “get”
commands or display information. Once a
connection is established, refer to CLI
commands summary on page 23 for lists of valid
commands.
To connect using Telnet
1 Connect through the GbE port as outlined in
Connecting using the GbE port using a
computer on the same Ethernet network.
2
Start a Telnet session.
Note
There is more than one way to connect to the
iPBridge using a telnet program.Your telnet
program may operate differently than in the
following instructions.
3
Obtain the iPAddress for the iPBridge from your
system administrator. The default address is
10.0.0.3
15
ATTO Technology Inc. iPBridge Installation and Operation Manual
4
At the telnet prompt, issue the open command:
telnet > open x.x.x.x
where x.x.x.x is the IP address of the iPBridge.
5
If you have to specify a port type, enter the port
type “telnet” and the terminal type “vt100”.
port type:telnet
terminal type: vt100
6
Enter the default values for the username,
“root”, and the password, “Password”.
Note
The username is case insensitive and
password is case sensitive.
7
To verify that you have connected successfully,
type help after the Ready prompt and press
Enter.
• If a list of all available commands does not
appear on the screen, review the steps in this
section, check the cable, or contact service
personnel until the problem is solved.
• If you wish to change the default username
and password for world wide web, Telnet and
FTP use, continue with the section To
change the default administrator password
on page 17.
16
Installation: Configuration
2 Managing the iPBridge
Default values are appropriate for most configurations, but may be modified for your needs using CLI
commands or ATTO ExpressNAV.
ATTO iPBridge Services configures and tunes the
iPBridge for many different environments and
applications, updates the firmware, configures the
addresses of the connected SCSI devices,
monitors status and reports on hardware.
Communicate with the ATTO iPBridge through
the GbE management port using ATTO
ExpressNAV or Telnet or through the serial port
using standard terminal emulation software.
Note
ATTO ExpressNAV is the recommended
management tool for the iPBridge
iPBridge. If you do so, record the new username
and password in a convenient place.
To change the default administrator password
1
For instructions, refer to To open an
ExpressNAV session on page 19.
2
3
• To use ExpressNAV, refer to ExpressNAV
provides web-based interface on page 19.
CAUTION
Any changes must be saved and will not
take effect until the ATTO iPBridge is
restarted.
Some completed configuration commands do not
take effect until you have issued the
saveConfiguration command. When this is the case,
the Ready prompt will be followed by asterisk.
You can issue the saveConfiguration command
after each such configuration command or wait
until you have entered all the parameters you wish
to change.
Change default username, password
It is best practice to change the default username
and password after you have configured your
17
ATTO Technology Inc. iPBridge Installation and Operation Manual
Click Bridge.
The Bridge Configuration page is displayed.
The username that you are currently logged in
with is displayed in the Username text box.
• Refer to Configuring the iPBridge on page 13 to
set up ExpressNAV and Telnet.
• To use the Command Line Interface during a
Telnet session or from the Advanced Page of
ExpressNAV, refer to CLI provides ASCII-based
interface on page 21.
If you have not already, open an ExpressNAV
session.
Enter appropriate information into the
Username, Current Password, Old
Password, New Password, and Confirm
Password text boxes.
Note
The username is case insensitive and
password is case sensitive.
4
Click Submit.
5
The username and password for all Telnet, FTP
and ATTO ExpressNAV sessions is changed.
You may also set a read only password or a read
only username. Refer to General use commands
on page 25.
SCSI configuration
Default values are appropriate for most
configurations, but may be modified for your
needs using CLI commands. Refer to SCSI
configuration commands on page 31 for more
information.
You may change the InitID, the port bus speed,
terminaton, sync transfers, type of transfers,
performance speed and the way the ports respond
to resets. You may also get information on these
parameters, a list of SCSI ports and their time
outs.
Ethernet port configuration
Default values are appropriate for most
configurations, but may be modified for your
needs using CLI commands. Refer to Ethernet
commands on page 35 for more information.
Commands control the MTU or Maximum
Transmission Unit, Ethernet speed, the IP
address, gateway and subnet mask, and set the
password and username.
Note
Ethernet speed settings in the host must be
the same as Ethernet speed settings in the
iPBridge. The iPBridge default Ethernet speed
is auto: your host must be set to auto. If you set
Ethernet speed to 10, your host must be set to
Ethernet speed 10, half duplex. If you set
Ethernet speed to 100, your host must be set
to Ethernet speed 100, half duplex.
iSCSI configuration
Commands set a human-readable name to the
iPBridge, provide passwords and authentication
for iSCSI sessions, and specify whether nor not
the iPBridge uses an ISNS server.
Note
If you are using Microsoft Intitiator, use the
latest drivers.
Note
If using Windows XP, make sure you have
Windows XP Service Pack 1 from Microsoft to
enable iSCSI.
Mapping
The iPBridge by default automatically maps
devices on startup. You may change mapping
using ExpressNAV, the web-based server, or by
using CLI through the Ethernet or serial port.
Refer to Mapping devices on page 43 and
Mapping commands on page 39.
OEM configuration services
Privileged OEM configuration services perform
OEM-specific product branding and labeling
functions only available to OEM customers such
as vendor, product, and model number
identification during power up display.
These commands may only be “set” from within
an OEM config file and the commands do not
result in reservation of the iPBridge. The
information in a “get” command may only be
displayed within a TTY CLI session. These
commands will not be displayed in the help menu.
Refer to Privileged OEM configuration services
on page 41 for more information.
18
Managing the iPBridge
2.1 ExpressNAV provides web-based interface
Each page in the ATTO ExpressNAV interface provides information and/or configuration parameters
based on a specific topic.
ATTO ExpressNAV is the recommended
management tool for the iPBridge. It is a webbased graphical user interface (GUI) that allows
you to manage the iPBridge by clicking choices
and commands in traditional GUI fashion or by
entering CLI commands directly, as you would in
a terminal emulation session.
Before opening an ExpressNAV session, you
must install the ExpressNAV interface. Refer to
Configuring the iPBridge on page 13.
To open an ExpressNAV session
1
Point your browser at the IP address of the
iPBridge. Refer to Configuring the iPBridge on
page 13.
2
The ExpressNAV home page is displayed.
Click Enter.
3
Enter the username and password values.
Serial Port Configuration
Configure the baud rate and echo parameters. See
Serial port configuration commands on page 33
for details on each option.
Ethernet Port Configuration
Configures each port independently for the
following parameters
•
•
•
•
•
•
Note
Ethernet speed settings in the host must be
the same as Ethernet speed settings in the
iPBridge. The iPBridge default Ethernet speed
is auto: your host must be set to auto. If you set
Ethernet speed to 10, your host must be set to
Ethernet speed 10, half duplex. If you set
Ethernet speed to 100, your host must be set
to Ethernet speed 100, half duplex.
Note
The default values are username: “root” and
password: “Password”. The username is case
insensitive and password is case sensitive.
The Status page appears.
Each page can be reached through the menu at the
side of each page An image on each page’s header
shows each port in the product faceplate. Each
port is clickable and will also take you to the
appropriate page.
Status
Displays iPBridge information
•
•
•
•
•
•
Vendor ID
Product ID
Firmware revision number
Serial number
Ethernet port IP addresses
Ethernet port status
19
ATTO Technology Inc. iPBridge Installation and Operation Manual
Enable/disable DHCP
IP address
IP gateway
IP subnet mask
Ethernet speed
MTU
See Ethernet commands on page 35 for details on
each parameter.
SCSI Configuration
Displays include a list of attached devices for the
SCSI bus. Configurable options are
•
•
•
•
•
•
•
Port Bus Speed
Synchronous Transfer
Wide Transfer
Initiator ID
Bus Reset on Startup
Bus Termination
SCSI Port Reset
See SCSI configuration commands on page 31
for details on each parameter.
A text field beneath the box will list the most
recent commands issued to the iPBridge
through this page.
iSCSI Configuration
Configurable options are
•
•
•
•
•
•
iSCSI Alias
iSCSI Port Number
iSNSLoginControl
iSNSServer
CHAP settings: account name and secret
CHAP direction (in, out)
If you enter an incorrect parameter, the CLI
help text will be displayed, showing the
parameters available.
3
See iSCSI commands on page 37 for details on
each parameter.
Bridge Configuration
Configurable options are
•
•
•
•
•
•
•
User name and current password
Old Password
New Password
Confirm Password
Bridge name
Identify Bridge
Restore Defaults
Restart Firmware
Implements a firmware restart of the bridge and
makes permanent any changes you have made
since the last firmware restart.
Note
Restarting the firmware may take a few
minutes.
1
See Maintenance commands on page 29 for
details on each parameter.
Advanced CLI Configuration
Allows you to input any CLI command available
through the iPBridge.
To use the Advanced Configuration page
1
Type in the CLI command
2
Click the Submit button: this is equivalent to
typing in the CLI command into a Telnet or
serial port CLI session.
Click the Restart button.
A box will tell you to wait until the counter gets
to 0 and then the browser will refresh.
2
Mapping
While the iPBridge maps devices automatically at
startup by default, you may change mapping
using the ExpressNAV Mapping page. See
Mapping devices on page 43 and Mapping
commands on page 39 for details.
If you are using a “set” command and the entry
was correct, type saveconfiguration restart to
make the changes persistent or click the
Submit button to implement changes
immediately.
If the browser does not refresh after the counter
gets to 0, click the link to refresh it manually.
Help
Gives help information about the command line
interface commands and troubleshooting tips via
links to pages with help text for each category of
options and one link to the Troubleshooting Tips
and FAQs page on the ATTO website,
www.attotech.com.
Contact information for ATTO technical support
is on the right.
Help is always available by pressing any word
shown in red on the screen.
20
Configuration & Management: ExpressNAV
2.2 CLI provides ASCII-based interface
The command line interface (CLI) provides access to the ATTO iPBridge Services through a set of
ASCII commands. CLI commands may be entered while in CLI mode.
iPBridge Services provide configuration and
monitoring for the iPBridge. CLI commands may
be entered while in a Telnet session or on the
ExpressNAV interface Advanced CLI page
using the Ethernet port or while in a Telnet or
standard emulation program using the serial port.
• CLI commands are context sensitive and
generally follow a standard format
[Get | Set] Command [Parameter 1 |
Parameter 2]
followed by the return or enter key
• CLI commands are case insensitive: you may
type all upper or all lower case or a mixture.
Upper and lower case in this manual and the
help screen are for clarification only.
• Commands generally have three types of
operation: get, set and immediate.
• The get form returns the value of a parameter or
setting and is an informational command.
• The set form is an action that changes the value
of a parameter or configuration setting. It may
require a SaveConfiguration command and a
restart of the system before it is implemented.
The restart can be accomplished as part of the
SaveConfiguration command or by using a
separate FirmwareRestart command. A number
of set commands may be issued before the
SaveConfiguration command.
Responses to set commands are either an error
message or Ready. *. The asterisk indicates you
must use a SaveConfiguration command to
finalize the set command. SaveConfiguration will
ask if you want to restart the system or not.
• Set commands which do not require a
SaveConfiguration command, defined as
immediate commands, are immediately
executed.
Responses to Immediate commands are either
an error message or data results followed by
Ready.
Responses to get commands are specified in the
Results field for each command, followed by
Ready.
Exhibit 2.2-1 Symbols, typefaces and abbreviations used to indicate functions and elements of the
command line interface used in this manual.
Command conventions
Symbol Indicates
Symbol
Indicates
[ ]
Required entry
Boldface
words
must be typed as they appear
< >
Optional entry
Italicized
words
Arguments which must be replaced by whatever
they represent
|
pick one of
Dp
Data port
…
Ellipses, repetition of preceding item
sb
SCSI bus number (0<= sb <= 1)
\n
end of line
sl
SCSI LUN ID (0 <= sl <= 7)
-
a range (6 – 9 = 6, 7, 8, 9)
st
SCSI target ID (0 <= st <= 15)
21
ATTO Technology Inc. iPBridge Installation and Operation Manual
22
Configuration & Management: CLI
2.2.1 CLI commands summary
A summary of the Command Line Interface commands, their defaults, an example of how they might be
used, and where you can find the specifics of the command. Commands which have no default values
associated with them have a blank entry in that column of the table.
Command
Defaults
Example
Page
AutoMap
automap
39
BridgeModel
get bridgemodel
27
BridgeName
iPBridge
set bridgename Omega6
27
DPMTU
1514
set dpmtu dp0 9014
35
EthernetSpeed
auto
set ethernetspeed dp0 100
35
Exit
exit
35
FirmwareRestart
firmwarerestart
29
Help
help exit
IdentifyBridge
disabled
Info
25, 27
set identifyBridge enabled
27
info
27
IPAddress
.10.0.0.1
get ipaddress dp0
35
IPDHCP
enabled
set ipdhcp dp0 disabled
35
IPGateway
0.0.0.0
set ipgateway dp0 1 200.10.22.3
35
IPSubnetMask
255.255.0.0
get ipsubnetmask dp0
35
ISCSIAlias
““
set iscsialias diamond
37
iSCSIChap
disabled
set iscsichap enabled
37
iSCSIChapSecret
“..... “
set iscsichapsecret in Data1 barbara556d12345
37
iSCSIPortNumber
3260
get iscsiportnumber
37
iSCSITarget
disabled
set iscsitarget enabled
iSNSLoginControl
disabled
set isnslogincontrol enabled
37
iSNSServer
0.0.0.0
get isnsserver
38
isreserved
27
IsReserved
37, 39
MultiTargetMode
disabled
get multitargetmode
38, 39
OEMConfigFile
ATTO
get oemconfigfile
27, 42
Password
Password
set password
29, 35
Ping
ping 192.42.155.155
36
ReadOnlyPassword
Password
get readonlypassword
36
ReadOnlyUsername
user
get readonlyusername
36
Reserve
reserve disabled
29
RestoreConfiguration
restoreconfiguration default
RMON
25, 29
36
Route
route iscsi 2 scsi 0 1 0
39
RouteDisplay
routedisplay iscsi
39
SaveConfiguration
saveconfiguration restart
25
23
ATTO Technology Inc. iPBridge Installation and Operation Manual
Command
Defaults
Example
Page
SCSIInitID
7
set scsiinitid 0 1
31
SCSIPortBusSpeed
Ultra3
set scsiportbusspeed 0 fast
31
SCSIPortList
scsiportlist
28, 31
SCSIPortReset
scsiportreset 0
29, 31
SCSIPortResetOnStartup enabled
set scsiportresetonstartup 0 disabled
31
SCSIPortSelTimeout
256ms
get scsiportseltimeout 0
31
SCSIPortSyncTransfer
enabled
set scsiportsynctransfer 0 disabled
31
SCSIPortTermination
enabled
set scsiporttermination 0 disabled
31
SCSIPortWideTransfer
enabled
get scsiportwidetransfer 0
31
SCSITargets
scsitargets 0
28, 31
SerialPortBaudRate
115200 baud set serialportbaudrate 19200
33
SerialPortEcho
enabled
get seriallportecho
33
get speedwrite scsi all
31
31
SpeedWrite
SpeedWriteDefault
disabled
set speedwritedefault enabled
Username
root
set username Barbara
VerboseMode
Enabled
set verbosemode disabled
Defaults
OEM configuration file
29, 36
25
Limits
Page
AutoMapOnReboot
Enabled
41
ColdReset
Enabled
41
InquiryProductID
iPBridge 1500
maximum 16 characters
41
InquiryVendorID
ATTO
maximum 8 characters
41
IqnVendorPrefixID
iqn.19995-12.com.attotech:ipbridge
ModelNumber
1500
maximum 8 characters
42
ProductID
iPBridge
maximum 16 characters
42
VendorID
ATTO
maximum 8 characters
42
41
24
Configuration: CLI
2.2.2 General use commands
These CLI commands are used in a variety of situations
Help
RestoreConfiguration
Displays a list of available commands. If command name
is specified, displays detailed command-specific
information.
Immediate command: Help [command name]
Restores configuration to either the default configuration
or the configuration last saved into non-volatile memory.
The saved option will undo any changes made since the
last save.
Password
Immediate command: RestoreConfiguration [Default |
Saved]
Specifies a password for all sessions: Telnet, FTP and
ExpressNAV web-based interface. You will be prompted
for the current password, to enter the new password, and
to confirm the new password. Passwords are case
sensitive, 0-32 characters with no spaces.An empty
password can be configured by entering the Password
confirmation prompts with no parameters. The command
RestoreConfiguration default sets the password to its
default value.
Default: Password
Set syntax: set Password
Requires a SaveConfiguration command
SaveConfiguration
Many commands require a SaveConfiguration command
to be executed. This will be indicated by the return
Ready. *.
When you invoke SaveConfiguration, the current
configuration is permanently saved in the iPBridge and
the new configuration becomes the active configuration.
If a firmware restart is required to make the requested
change permanent, you will see a prompt asking you to
confirm the restart. You can override this request by
indicating the override value on the command line.
ReadOnlyPassword
You may make several changes through commands and
Specifies a read only password for all sessions: Telnet,
FTP and ExpressNAV web-based interface. You will be
prompted for the current password, to enter the new
password, and to confirm the new password. Passwords
are case sensitive, 0-32 characters with no spaces.An
empty password can be configured by entering the
Password confirmation prompts with no parameters. The
command RestoreConfiguration default sets the
password to its default value.
SaveConfiguration before implementing the restart, but
Default: Password
Set syntax: set ReadOnlyPassword
Requires a SaveConfiguration command
ReadOnlyUsername
Specifies a read only username for all Telnet, FTP and
ExpressNAV web server sessions. Username is case
insensitive, 1-32 characters with no spaces.
Default: user
Set syntax: set ReadOnlyUsername [username]
Requires a SaveConfiguration command
Get syntax: get Username
25
ATTO Technology Inc. iPBridge Installation and Operation Manual
once you have restarted the iPBridge, all the command
changes created before the restart and save will be
implemented. If you select the restart option, the iPBridge
will execute its complete start up cycle.
Restart or no Restart parameter is optional
Immediate command: SaveConfiguration <Restart|
NoRestart>
Username
Specifies a username for all Telnet, FTP and ExpressNAV
web server sessions. Username is case insensitive, 1-32
characters with no spaces. You must be using the Admin
password to change Username.
Default: root
Set syntax: set Username [username]
Requires entering a password
Requires a SaveConfiguration command
Get syntax: get Username
VerboseMode
Specifies the detail of feedback for the command line
interface. Disabling this option removes parameter
names from action commands and removes descriptions
from information commands. Choices are enabled or
disabled
Default: enabled (returns have parameter information)
Set syntax: set VerboseMode [enabled | disabled]
Get syntax: get VerboseMode
26
Configuration: CLI
2.2.3 Diagnostic commands
ATTO iPBridge diagnostic commands help validate iPBridge operation and diagnose/isolate iPBridge
faults.
BridgeModel
Reports model information about a specific iPBridge
Get syntax: get BridgeModel
BridgeName
Specifies name used to identify individual iPBridge units.
May be up to a maximum of eight characters. It is not the
World Wide Name (WWN).
Set syntax: set BridgeName [value]
Requires a SaveConfiguration command
Get syntax: get BridgeName
Help
Displays a list of available commands. If command name
is specified, displays detailed command-specific
information.
IsReserved
Displays the reservation status of the current iPBridge
session/interface.
If set, the configuration image is being modified by
another iPBridge services session: set commands are
temporarily unavailable but information commands are
available.
Executing a SaveConfiguration, RestoreConfiguration or
FirmwareRestart RELEASES the iPBridge so that other
services users may access it.
When iPBridge services interface is RESERVED, set
commands from other users are unavailable.
At least one interface must always have access to the
iPBridge.
Immediate command: IsReserved
Immediate command: Help [command name]
IdentifyBridge
Enabling this option causes the LED on the top panel of
the iPBridge 1500/1550D or the activity LED on the
iPBridge 1500/1550E to blink until the parameter is
disabled.
Default: disabled
Set syntax: set IdentifyBridge [enabled|disabled]
Get syntax: get IdentifyBridge
Info
Displays version numbers and other production
information for key components within the iPBridge
Immediate command: Info
27
ATTO Technology Inc. iPBridge Installation and Operation Manual
OEMConfigFile
Reports the name of the OEM Configuration file stored in
persistent memory. If no file is present, ATTO is returned.
The file contains all the CLI commands that can be used
to override the factory default settings of the iPBridge.
Updates may be loaded via any of the current firmware
update methods.
Get syntax: get OEMConfigFile
Ping
Ping will send an ICMP echo request to the specified
host.
Immediate command: ping dp0 [xxx.xxx.xxx.xxx] <count
<size>>
RMON
RMON collects and stores Ethernet data on data ports at
specified intervals. You can display the entire table
requested, or a single entry based on the index (and
sample index for the Ethernet History table).
Entries in the Ethernet History table are not valid when
their Sample Index is 0.
Setting the history control entries take effect immediately,
but changes must be saved to be persistent over a reboot.
Valid range for EthernetStat index: 1-3
Valid range for historyControl and EthernetHistory
index: 1-6
Valid range for historyControl buckets requested: 1180
Valid range for historyControl interval: 1-3600
Default historyControl table (buckets and interval in
hexadecimal): Refer to Exhibit 2.2.7-1 on page 36.
Set syntax: set RMON idx bucketsRequest interval [valid|
invalid]
Get syntax for entire table: get RMON [ethernetStat |
historyControl] <idx>
Get syntax for single index entry: get RMON
ethernetHistory <idx sampleIdx>
optional Target Name parameter limits the list to the
maps which satisfy a search for the given target name. In
either mode, the optional LUN parameter will limit the
list to the map which satisfies a search for the given LUN.
NumEntries: decimal number of map lines displayed
Target Name: target name
Lun : target LUN
sb: decimal SCSI bus number
st: decimal SCSI target number
sl: decimal SCSI LUN number
Immediate command, single target mode:
RouteDisplay iSCSI <lun>
Immediate command, multiple target mode:
RouteDisplay iSCSI <Target Name> <lun>
SCSIPortList
Returns a list of available SCSI ports and their current
status
Immediate command: SCSIPortList
SCSITargets
Returns a list of SCSI devices operational on the SCSI
port.
Immediate command: SCSITargets 0
RouteDisplay
Displays a list of host protocol to SCSI address mappings
on the bridge.If MultiTargetMode has been enabled, the
CLI Error Messages
The following error messages may be returned by the Command line Interface:
ERROR. Invalid Command. Type 'Help'
for command list.
ERROR. Wrong/Missing Parameters
Usage: <usage string>
ERROR. Command Not Processed.
Exhibit 2.2.3-1 If you enter a parameter for a CLI command incorrectly, the CLI help file will display with
the error message:
Incorrect entry
Error message
including correct parameters
as listed in Help
Correct entry
Response
28
Configuration: CLI
2.2.4 Maintenance commands
The CLI commands outlined in this chapter may be used to get information or perform functions which
are used in a variety of situations with the ATTO iPBridge.
FirmwareRestart
Causes the iPBridge to reboot, then re-initialize its
firmware.
SCSIPortReset
Resets the specified SCSI bus.
Immediate command: SCSIPortReset [sb]
Immediate command: FirmwareRestart
Password
RestoreConfiguration default sets the password to the
default value
Passwords are case sensitive, 0-32 characters with no
spaces
When the password is all 0s, Telnet and ftp do not validate
the password and MD5 authentication are disabled.
Default: Password
Set syntax: set Password
Requires a SaveConfiguration command
Reserve
Reservation of the iPBridge is implicit: once the
configuration image is changed by any user of services,
the iPBridge becomes RESERVED. Executing a
SaveConfiguration or\ Restore configuration RELEASES
the iPBridge so that other services users may access it.
When iPBridge services interface is RESERVED, set
commands from other users are unavailable.
At least one interface must always have access to the
iPBridge.
Immediate command: Reserve
RestoreConfiguration
Restores configuration to either the default configuration
or the configuration last saved into non-volatile memory.
The saved option will undo any changes made since the
last save.
Immediate command: RestoreConfiguration [Default |
Saved]
29
ATTO Technology Inc. iPBridge Installation and Operation Manual
SpeedWrite
When enabled, improves the performance of FCP WRITE
commands to SCSI devices attached to the iPBridge.
Specify SCSI bus (sb), target (st), LUN (sl) of a mapped
SCSI device or (all) for each currently mapped device
Set syntax: set SpeedWrite SCSI [sb st sl | all]
[enabled|disabled]
Get syntax: get SpeedWrite SCSI [sb st sl|all]
SpeedWriteDefault
When enabled, SpeedWrite performance enhancement is
set as the default for any subsequent SCSI devices
mapped manually or via an AutoMap operation. If
disabled, the iPBridge will not attempt SpeedWrite
performance enhancement to newly-mapped SCSI
devices.
Default: disabled
Set syntax: set SpeedWriteDefault [enabled | disabled]
Get syntax: get SpeedWriteDefault
Username
Specifies username for all Telnet, FTP and ExpressNAV
web server sessions.The username is case insensitive, 132 characters, no spaces You must have the Admin
password to change Username.
Default: root
Set syntax: set Username [username]
Requires a SaveConfiguration command
Get syntax: get Username
30
Configuration: CLI
2.2.5 SCSI configuration commands
The SCSI ports are configured with default settings but may be customized to your specifications using
the CLI commands in this section.
SCSIInitID
Specifies the SCSI initiator ID to be used on the specified
SCSI port. All maps coinciding with the user-specified
SCSIInitID must be set to offline and will become invalid
upon issuing this command. Choices are 0 to 15.
SCSIPortSelTimeout
Indicates the time, in milliseconds, that the bridge waits
for a response from a SCSI device on the selected port
after a selection request.
Get syntax: get SCSIPortSelTimeout [sb]
Default: 7
Set syntax: set SCSIInitID [sb [0-15] ]
Requires a SaveConfiguration command
Get syntax: get SCSIInitID
SCSIPortSyncTransfer
Specifies whether synchronous SCSI transfers should be
negotiated with devices on the specified SCSI port.
SCSIPortBusSpeed
Controls the transfer rate at which the iPBridge will
attempt to negotiate with its SCSI devices. Ultra 2 SCSI
valid only if iPBridge has LVD-capable SCSI ports
Default: enabled
Set syntax: set SCSIPortSyncTransfer [[sb [enabled |
disabled] ]
Requires a SaveConfiguration command
Get syntax: get SCSIPortSyncTransfer [sb]
Default: Ultra3
Set syntax: set SCSIPortBusSpeed [sb [fast | ultra | ultra2
| ultra3]
Requires a SaveConfiguration command
Get syntax: get SCSIPortBusSpeed [PortNum]
SCSIPortTermination
Configures/reports the SCSI internal termination of the
SCSI port identified.
SCSIPortList
Returns a list of available SCSI ports and their current
status. Valid status values are O.K. and Failed.
Default: enabled
Set syntax: set SCSIPortTermination [sb [enabled |
disabled]]
Requires a SaveConfiguration command
Get syntax: get SCSIPortTermination [sb]
Immediate command: SCSIPortList
SCSIPortReset
Resets the specified SCSI bus.
Immediate command: SCSIPortReset [sb]
SCSIPortResetOnStartup
Specifies whether the SCSI port should be reset on powerup or not
Default: enabled
Set syntax: set SCSIPortResetOnStartup [sb [enabled |
disabled] ]
Requires a SaveConfiguration command
Get syntax: get SCSIPortResetOnStartup [sb]
31
ATTO Technology Inc. iPBridge Installation and Operation Manual
SCSIPortWideTransfer
Specifies whether wide SCSI transfers should be
negotiated.
Default: enabled
Set syntax: set SCSIPortWideTransfer [sb [enabled |
disabled] ]
Requires a SaveConfiguration command
Get syntax: get SCSIPortWideTransfer [sb]
SCSITargets
Returns a list of SCSI devices operational on the SCSI
port.
Immediate command: SCSITargets 0
SpeedWrite
When enabled, improves the performance of FCP WRITE
commands to SCSI devices attached to the iPBridge.
Specify SCSI bus (sb), target (st), LUN (sl) of a mapped
SCSI device or (all) for each currently mapped device
Set syntax: set SpeedWrite SCSI [sb st sl | all] [enabled |
disabled]
Get syntax: get SpeedWrite SCSI [sb st sl | all]
SpeedWriteDefault
When enabled, SpeedWrite performance enhancement is
set as the default for any subsequent SCSI devices
mapped manually or via an AutoMap operation. If
disabled, the iPBridge will not attempt SpeedWrite
performance enhancement to newly-mapped SCSI
devices.
Default: disabled
Set syntax: set SpeedWriteDefault [enabled | disabled]
Get syntax: get SpeedWriteDefault
32
Configuration: CLI
2.2.6 Serial port configuration commands
The ATTO iPBridge serial ports or serial headers are configured with default settings but may be
customized to your specifications using the CLI commands in this section.
SerialPortBaudRate
Configures/reports the baud rate for the iPBridge RS-232
serial port or serial header. The number of data bits per
character is fixed at 8 with no parity. Choices are 2400,
9600, 19200, 38400, 57600 and 115200.
Default: 115200
Set syntax: set SerialPortBaudRate [2400 | 9600 |19200
| 38400 | 57600 |115200]
Requires a SaveConfiguration command
Get syntax: get SerialPortBaudRate
33
ATTO Technology Inc. iPBridge Installation and Operation Manual
SerialPortEcho
Enables/disables/reports the echoing of keyboard input.
When enabled, all non-control character keyboard input
is output to the display.Local ASCII terminal (or terminal
emulator) echo settings should be set to disabled while
using SerialPortEcho enabled
Default: enabled
Set syntax: set SerialPortEcho [enabled | disabled]
Requires a SaveConfiguration Restart command
Get syntax: get SerialPortEcho
34
Configuration: CLI
2.2.7 Ethernet commands
These commands configure the management and data Ethernet ports including Telnet parameters.
DPMTU
Controls the MTU (Maximum Transmission Unit) used by
the data port: increasing the MTU may improve
throughput on the ipBridge data ports. The MTU for the
management port cannot be changed.
Default: 1514
Set syntax: set DPMTU dp0 [1514 | 9014]
Requires a SaveConfiguration command
Get syntax: get dp0 DPMTU
EthernetSpeed
Specifies the speed of the Ethernet ports. If auto is
enabled, the speed will be negotiated.10 and 100 speeds
are half duplex Ethernet speed settings in the host must be
the same as Ethernet speed settings in the iPBridge. The
iPBridge default Ethernet speed is auto: your host must
be set to auto. If you set Ethernet speed to 10, your host
must be set to Ethernet speed 10, half duplex. If you set
Ethernet speed to 100, your host must be set to Ethernet
speed 100, half duplex.
Choices are
10 = 10 baseT
100 = 100 baseT
1000 =1000baseT
Default: auto
Set syntax: set EthernetSpeed dp0 [10 | 100 | 1000| Auto]
Requires a SaveConfiguration command
Get syntax: get EthernetSpeed dp0
Exit
Exits the current Telnet CLI session; it has no effect if
used during a serial CLI session.
Immediate command: Exit
IPAddress
Controls the IP address of the iPBridge Ethernet data
ports. If IPDHCP is enabled, the get command reports
the current IP address assigned by the network DHCP
server, followed by the DHCP identifier.
Default IP address: 10.0.0.1
Set syntax: set IPAddress dp0 xxx.xxx.xxx.xxx
Requires a SaveConfiguration command
35
ATTO Technology Inc. iPBridge Installation and Operation Manual
Get syntax: get IPAddress dp0
IPDHCP
Selecting DHCP allows the iPBridge to request an IP
address from the network DHCP server. The network
must have at least one DHCP server
Default: enabled
Set syntax: set IPDHCP dp0 [enabled | disabled]
Requires a SaveConfiguration command
Get syntax: get IPDHCP dp0
IPGateway
Controls the current gateway. If IPDHCP is enabled (see
above), get command reports the current IP gateway
assigned by the network DHCP server
Default: 0.0.0.0
Set syntax: set IPGateway dp0 xxx.xxx.xxx.xxx
Requires a SaveConfiguration command
Get syntax: get dp0 IPGateway
IPSubnetMask
Controls the current subnet mask. If IPDHCP is enabled
(see above), get command reports the current subnet
mask assigned by the DHCP server
Default: 255.255.0.0
Set syntax: set IPSubnetMask dp0 xxx.xxx.xxx.xxx
Requires a SaveConfiguration command
Get syntax: get dp0 IPSubnetMask
Password
Specifies a password for all sessions: Telnet, FTP and
ExpressNAV web-based interface. You will be prompted
for the current password, to enter the new password, and
to confirm the new password. Passwords are case
sensitive, 0-32 characters with no spaces.An empty
password can be configured by entering the Password
confirmation prompts with no parameters. The command
RestoreConfiguration default sets the password to its
default value.
Default: Password
Set syntax: set Password
Requires a SaveConfiguration command
Ping
Ping will send an ICMP echo request to the specified
host.
Immediate command: ping dp0 [xxx.xxx.xxx.xxx] <count
<size>>
ReadOnlyPassword
Specifies a read only password for all sessions: Telnet,
FTP and ExpressNAV web-based interface. You will be
prompted for the current password, to enter the new
password, and to confirm the new password. Passwords
are case sensitive, 0-32 characters with no spaces.An
empty password can be configured by entering the
Password confirmation prompts with no parameters. The
command RestoreConfiguration default sets the
password to its default value.
Default: Password
Set syntax: set ReadOnlyPassword [password]
Requires a SaveConfiguration command
RMON
RMON collects and stores Ethernet data on data ports at
specified intervals. You can display the entire table
requested, or a single entry based on the index (and
sample index for the Ethernet History table).
Entries in the Ethernet History table are not valid when
their Sample Index is 0.
Setting the history control entries take effect immediately,
but changes must be saved to be persistent over a reboot.
Valid range for historyControl buckets requested: 1180
Valid range for historyControl interval: 1-3600
Default historyControl table (buckets and interval in
hexadecimal): Refer to Exhibit 2.2.7-1 below.
Set syntax: set RMON idx bucketsRequest interval [valid
| invalid]
Get syntax for entire table: get RMON [ethernetStat |
historyControl] <idx>
Get syntax for single index entry: get RMON
ethernetHistory <idx sampleIdx>
Username
Specifies a username for all Telnet, FTP and ExpressNAV
web server sessions. Username is case insensitive, 1-32
characters with no spaces.You must have an Admin
password to change Username.
Default: root
Set syntax: set Username [username]
Requires entering a password
Requires a SaveConfiguration command
Get syntax: get Username
ReadOnlyUsername
Specifies a read only username for all Telnet, FTP and
ExpressNAV web server sessions. Username is case
insensitive, 1-32 characters with no spaces.
Default: user
Set syntax: set ReadOnlyUsername [username]
Requires a SaveConfiguration command
Get syntax: get Username
Valid range for EthernetStat index: 1-3
Valid range for historyControl and EthernetHistory
index: 1-6
Exhibit 2.2.7-1
command.
Default historyControl table (buckets and interval in hexadecimal) for the RMON CLI
Idx DataSrc
BktReq
BktGrant Interval Owner
Status
====================================================================
001 43.6.1.2.1.2.2.1.1.1 00000032 00000032 0000001e monitor 00000004
002 43.6.1.2.1.2.2.1.1.1 00000032 00000032 00000708 monitor 00000004
003 43.6.1.2.1.2.2.1.1.2 00000032 00000032 0000001e monitor 00000004
004 43.6.1.2.1.2.2.1.1.2 00000032 00000032 00000708 monitor 00000004
005 43.6.1.2.1.2.2.1.1.3 00000032 00000032 0000001e monitor 00000004
006 43.6.1.2.1.2.2.1.1.3 00000032 00000032 00000708 monitor 00000004
36
Configuration: CLI
2.2.8 iSCSI commands
You may customize the iPBridge to your specifications using the CLI commands in this section.
iSCSIAlias
Provides a human-readable name assigned to the
iPBridge. Aliases may be 1 to 64 characters long and may
contain spaces if spaces are enclosed in quotation marks.
Entering the set iSCSIAlias command with no alias
parameter causes the alias to be removed.
Default: ““
Set syntax: set iSCSIAlias [Alias]
Requires a SaveConfiguration command
Get syntax: get iSCSIAlias
iSCSIChap
Enables/disables requiring CHAP (ChallengeHandshake Authentication Protocol) to be used for the
iSCSI protocol. If MultiTargetMode has been enabled, a
valid target name must be provided. If CHAP is enabled,
the target requires the initiator to negotiate CHAP
authentication using the CHAP secrets. An initiator may
reject this negotiation.
Default:disabled
In single target mode, set syntax: set iSCSIChap
[enabled | disabled]
In single target mode, get syntax: get iSCSIChap
In multiple target mode:, set syntax: set iSCSIChap
[Target Name] [enabled | disabled]
In multiple target mode, get syntax: get iSCSIChap
[Target Name]
iSCSIChapSecret
Specifies the incoming and outgoing passwords for iSCSI
chap sessions. RestoreConfiguration default sets the
CHAP secret passwords pair to default values.
Secrets are case sensitive, 12 (16 for Microsoft iSCSI
initiator) to 32 characters, and cannot contain spaces. In
and out secrets must be different.
When either secret is all 0’s, iSCSI CHAP authentication
is disabled. Additionally, an all ‘0’ secret can be
configured by entering the iSCSIChapSecret command
confirmation prompts with no parameters.
An in CHAP secret is for authentication of the server to
the iPBridge. The iPBridge can store up to 32 in secrets,
each with a unique Account Name (optionally the
37
ATTO Technology Inc. iPBridge Installation and Operation Manual
Initiator Name) and secret pair. The Account Name can
be 1 to 223 characters. Account Names are case
sensitive. Account name can not be all.
An out chap secret is for authentication of the iPBridge to
the rest of the network. There can only be one out secret.
The account name is ignored for out secrets and defaulted
to root.
In single target mode, set syntax: set iSCSIChapSecret
[in | out | delete] [Account Name] <Secret>
In single target mode, get syntax: get iSCSIChapSecret
[Account Name | all]
In multiple target mode, set syntax: set iSCSIChapSecret
[Target Name] [in | out | delete] [Account Name] <Secret>
In multiple target mode, get syntax: get iSCSIChapSecret
[Target Name] [Account Name | all]
iSCSIPortNumber
Specifies the port number whereby the iPBridge will
listen for iSCSI connections. The port number must be
between 1024 and 65535 except for port 860.
Default: 3260
Set syntax: set iSCSIPortNumber portnum
Requires a SaveConfiguration command
Get syntax: get iSCSIPortNumber
iSCSITarget
Creates/deletes an iSCSI target name. The target name
will act as a suffix to the standard bridge iSCSI-qualified
name. The target name may not exceed 24 characters. A
newly-created target has one LUN, the iPBridge LUN, at
LUN 0. If the target name already exists, this command
does nothing. MultiTargetMode must be enabled to use
this command. In verbose mode, overwriting a map
requires secondary confirmation of the action.
Immediate command: iSCSI [Target Name] <delete>
iSNSLoginControl
Specifies whether the iPBridge will delegate its access
control/authorization to an iSNS server.
Default: disabled
Set syntax: set iSNSLoginControl [enabled | disabled]
Requires a SaveConfiguration command
Get syntax: get iSNSLoginControl
iSNSServer
Specifies whether the IP address of a valid iSNS server
from which the iPBridge will attempt iSCSI initiator
discovery. Setting to 0.0.0.0 will disable iSNS server
lookup.
MultiTargetMode
Enables/disables iSCSI multiple target mode addressing
on the iPBridge. If enabled, all previous maps will be
deleted. In verbose mode, overwriting a map requires
secondary confirmation of the action.
Default: 0.0.0.0
Set syntax: set iSNSServer [xxx.xxx.xxx.xxx]
Requires a SaveConfiguration command
Get syntax: get iSNSServer
Set syntax: set MultiTargetMode [enabled | disabled]
Get syntax: get MultiTargetMode
38
Configuration: CLI
2.2.9 Mapping commands
You may map devices via the web-based server or through the management or serial ports.
AutoMap
Automatically assigns a subset of iSCSI LUNs to a subset
of SCSI target destination devices visible to the
iPBridge.Valid existing maps will not be deleted.
Immediate command: AutoMap
iSCSITarget
Creates/deletes an iSCSI target name. The target name
will act as a suffix to the standard bridge iSCSI-qualified
name. The target name may not exceed 24 characters. A
newly-created target has one LUN, the iPBridge LUN, at
LUN 0. If the target name already exists, this command
does nothing. MultiTargetMode must be enabled to use
this command. In verbose mode, overwriting a map
requires secondary confirmation of the action.
Immediate command: iSCSITarget [Target Name]
<delete>
MultiTargetMode
Enables/disables iSCSI multiple target mode addressing
on the iPBridge. If enabled, all previous maps will be
deleted. In verbose mode, overwriting a map requires
secondary confirmation of the action.
Default: disabled
Set syntax: set MultiTargetMode [enabled | disabled]
Get syntax: get MultiTargetMode
Route
Assigns a host protocol address to a target destination
device.If MultiTargetMode has been enabled, a valid
target name must be specified. If you try to map a new
SCSI BTL to the same iSCSI LUN, the new BTL
overwrites the previous map. Using the Delete identifier
removes the map from its map table. In verbose mode,
overwriting a map requires secondary confirmation of the
action.
Immediate command in single target mode:
Route iSCSI [lun] [SCSI [bb tt ll] | Delete]
Immediate command in multiple target mode:
Route iSCSI [Target Name] [lun] [SCSI [bb tt ll] | Delete]
RouteDisplay
Displays a list of iSCSI to SCSI Bus, Target, LUN
mappings. If MultiTargetMode has been enabled, the
optional Target Name parameter limits the list to the
maps which satisfy a search for the given target name. In
either mode, the optional LUN parameter will limit the
list to the map which satisfies a search for the given LUN.
NumEntries: decimal number of map lines displayed
Target Name: target name
Lun : target LUN
sb: decimal SCSI bus number
st: decimal SCSI target number
sl: decimal SCSI LUN number
Immediate command, single target mode:
RouteDisplay iSCSI <lun>
Immediate command, multiple target mode:
RouteDisplay iSCSI <Target Name> <lun>
SCSIInitID
Specifies the SCSI initiator ID to be used on the specified
SCSI port. All maps coinciding with the user-specified
SCSIInitID must be set to offline and will become invalid
upon issuing this command. Choices are 0 to 15.
Default: 7
Set syntax: set SCSIInitID [sb [0-15] ]
Requires a SaveConfiguration command
Get syntax: get SCSIInitID
SCSITargets
Returns a list of SCSI devices operational on the SCSI
port.
Immediate command: SCSITargets 0
39
ATTO Technology Inc. iPBridge Installation and Operation Manual
40
Configuration: CLI
2.2.10 Privileged OEM configuration services
Privileged OEM configuration services perform OEM-specific product branding and labeling functions
only available to OEM customers such as vendor, product, and model number identification during
power up display.
Privileged OEM Configuration commands may
only be “set” from within an OEM config file.
The OEM config file is an ASCII text file which
contains all the CLI commands that can be used to
override the factory default settings of the
iPBridge. It consists of a header record and a list
of CLI commands. Each line may contain up to
128 characters and must be terminated by any of
the standard EOL combinations such as \r, \n, or
\r\n. Updates may be loaded via any of the current
firmware update methods (see Updating
firmware on page 47).
The commands do not result in reservation of the
iPBridge. The information in a “get” command
may only be displayed within a TTY CLI session.
These commands will not be displayed in the help
menu.
To configure iPBridge product identifiers
1
Create an OEM configuration file containing
valid and applicable CLI commands.
2
Upload the OEM configuration file to the
iPBridge via any of the currently available
methods (see Updating firmware on page 47)
3
Initiate the OEM configuration file by typing
RestoreConfiguration default and pressing enter
at the CLI prompt, or by applying an NVRAM
default jumper to the circuit board.
4
Power cycle.
Note
To restore factory default settings, type
RestoreConfiguration ATTO, press Enter at
the CLI prompt, and cycle power.
AutoMapOnBoot
Enables or disables an automatic bus scan and device
mapping operation at boot time.
Default: enabled
Set syntax: set AutoMapOnBoot [enabled |disabled]
Get syntax: get AutoMapOnBoot
ColdReset
When enabled, the iPBridge will reboot when a Cold
Reset command is received. When disabled, the iPBridge
will not reboot, but will respond to the host with status
unsupported.
Default:enabled
Set syntax:set ColdReset [enabled | disabled]
Get syntax: ColdReset
InquiryProductID
Controls the product ID string displayed by the iPBridge
in response to a SCSI INQUIRY command. The ID is
padded with 0s to a maximum 16 characters
Default: iPBridge 1500 or iPBridge 1550
Set syntax: set InquiryProductID [string]
Requires a SaveConfiguration command
Get syntax: get InquiryProductID
InquiryVendorID
Controls the vender ID string displayed by the iPBridge
in response to a SCSI INQUIRY command. The ID is
padded with 0s to a maximum 8 characters
Default: ATTO
Set syntax: set InquiryVendorID [string]
Requires a SaveConfiguration command
Get syntax: get InquiryVendorID
IqnVendorPrefixID
Displays the vendor prefix ID of the iSCSI qualified name
(iqn). The vendor prefix includes iqn ID string, date code,
and naming authority.
Set syntax:set IqnVendorPrefixID [string]
Get syntax: get IqnVendorPrefixID
41
ATTO Technology Inc. iPBridge Installation and Operation Manual
ModelNumber
Controls the iPBridge model number string to an OEMspecific value. Displays during POST and by using the
Info CLI command. ID is padded with 0s to a maximum of
8 characters
ProductID
Controls the iPBridge product ID string to an OEMspecific value. Displays during POST and the CLI Info
command. ID is padded with 0s to a maximum of 16
characters
Default:1500 or 1550
Set syntax: set ModelNumber [string]
Requires a SaveConfiguration command
Get syntax: get ModelNumber
Default: iPBridge
Set syntax: set ProductID [string]
Requires a SaveConfiguration command
Get syntax: get ProductID
OEMConfigFile
Reports the name of the OEM Configuration file stored in
persistent memory. If no file is present, ATTO is returned.
The file is an ASCII text file which contains all the CLI
commands that can be used to override the factory default
settings of the iPBridge. It consists of a header record and
a list of CLI commands. Each line may contain up to 128
characters and must be terminated by any of the standard
EOL combinations such as \r, \n, or \r\n. Updates may be
loaded via any of the current firmware update methods
(see Updating firmware on page 47).
VendorID
Controls the iPBridge vender ID string to an OEMspecific value. Displays during POST and the CLI Info
command. is padded with 0s to a maximum of 8
characters
Default: ATTO
Set syntax: set VendorID
Requires a SaveConfiguration command
Get syntax: get VendorID
Default: ATTO
Get syntax: get OEMConfigFile
The following table lists the CLI commands supported in the OEM configuration (*.cfg) file. Any
command which displays information is not honored in the *.cfg file, i.e., only the set version of
commands will be honored.
OEM Config file supported commands
AutoMapOnBoot
iSCSIChap
Route
BridgeName
iSCSIChapSecret
SCSIInitID
ColdReset
iSCSIPortNumber
SCSIPortBusSpeed
DPMTU
iSCSITarget
SCSIPortResetOnStartup
EthernetControl
ISNSServer
SCSIPortSyncTransfer
EthernetSpeed
iSNSLoginControl
SCSIPortWideTransfer
InquiryProductID
iqnVendorPrefixID
SCSITermination
InquiryVendorID
ModelNumber
SerialPortBaudRate
IPAddress
MultiTargetMode
SerialPortEcho
IPDHCP
Password
SpeedWrite
IPGateway
ProductID
SpeedWriteDefault
IPSubnetMask
ReadOnlyPassword
Username
iSCSIAlias
ReadOnlyUsername
VendorID
RMON
42
Configuration: CLI
2.3 Mapping devices
SCSI devices are mapped using the designations for the SCSI bus, target and LUN. The iPBridge
automatically maps all devices during startup. If you wish to change mapping you may use the CLI or
the browser-based interface, ATTO ExpressNAV.
Note
To map devices, you should have a host
computer connected to the iPBridge Ethernet
port. Refer to Configuring the iPBridge on
page 13.
By default, a host or initiator will view the
iPBridge as a single iSCSI node with all available
SCSI devices shown as LUNs on a single iSCSI
target.
You may use multiple target mode to break the
single iSCSI node into multiple nodes. Multiple
target mode allows you to grant or deny access
between initiators and devices as needed.
Node names
iSCSI nodes are accessed through the Ethernet
ports on an iPBridge, each identified by its own IP
address.
The iPBridge uses the iqn name format,
referencing the device serial number, to guarantee
that the target name is world-wide unique:
iqn.1995-12.com.attotech:ipbridge:
serialnumber
CAUTION
Changing the device map can affect the
host’s view of devices and your application
configuration.
Single target mode
The SCSITargets command lists each device
and its corresponding SCSI address. In the
example in Exhibit 2.3-2, the first tape drive is
on SCSI Port 0 (on the IPBridge) at Target ID 4,
LUN 0.
Single target mode is the default. Use the CLI
commands or the ExpressNAV interface to map
devices automatically or manually.
Note
The iPBridge automatically maps all devices
on startup.
2
The Route command manually maps SCSI
devices through the bus/target/LUN.
•
Use Command Line Interface
To map devices automatically with CLI
1 At the command prompt, type
AutoMap
All the CLI commands necessary to enable
mapping and the command saveconfiguration
norestart will be performed.
The command assigns an iSCSI LUN
protocol address to a target destination
device.
• More than one iSCSI LUN may not be
assigned to a SCSI BTL. If you try to map a
new SCSI BTL to the same iSCSI LUN, the
new BTL will overwrite the original map.
Type
Route iSCSI <LUN> SCSI <sb> <st> <sl>
To map devices manually with CLI
1 Type SCSITargets 0 to list the SCSI devices
connected to the SCSI port.
• st and sl are the SCSI target ID and SCSI
LUN that the SCSI device is currently
configured for.
3
Type RouteDisplay iSCSI to display the current
mapping and the current status of the device for
iSCSI configurations.
RouteDisplay may be used at any time.
43
ATTO Technology Inc. iPBridge Installation and Operation Manual
Exhibit 2.3-1
Physical and virtual connection possibilities with the iPBridge
Physical connections
Initiator/Host to Network
Network to iPBridge Ethernet port
iPBridge SCSI port to SCSI device (target)
IP Address: 10.0.3.1
Host/Server 1
Ethernet
Network
IP Address: 10.0.3.0
Bridge SN 000123
SCSI device
Host/Server 2
Node
iqn.1995-12.com.attotech:ipbridgesn-ipb1500000123-dev0
Mapping: single vs. multiple target mode
SCSI device configuration
Single Target mode
SCSI device configuration
Multiple Target mode
LUN 0
LUN 0
Bridge SN 000123
LUN 1
Bridge SN 000123
LUN 1
Tape 0
LUN 2
Tape 0
Node 0
iqn. 1995-12.com. attotech:
ipbridge:sn- ipb1500000123-dev0
LUN 2
Tape 1
LUN 3
Tape 1
LUN 3
Tape 2
LUN 4
Media Chgr
LUN 0
Tape 3
Node 1
Bridge SN 000123
LUN 5
LUN 1
iqn. 1995-12.com. attotech:
ipbridge:sn- ipb1500000123-dev1
Media Chgr
Media Chgr
Node 0
iqn . 1995 - 12 . com . attotech :
ipbridge : sn- ipb 1500000123
: LUN 2
Tape 2
LUN 3
Tape 3
44
Configuration & Management: mapping
To remove mapping
2
Type
All the CLI commands necessary to enable
mapping and the command saveconfiguration
norestart will be performed.
Route iSCSI [lun] Delete
Use the ExpressNAV interface
The ATTO Technology ExpressNAV, a browserbased configuration tool, allows you to map
devices to the SCSI ports using a web-based GUI.
See ExpressNAV provides web-based interface
on page 19.
To map devices automatically with ExpressNAV
1 From the ExpressNAV main menu, click on the
Mapping menu item on the left side of the
screen.
Click AutoMap
To map devices manually with ExpressNAV
1 From the ExpressNAV main menu, click on the
Mapping menu item on the left side of the
screen.
2
Select the devices from the box on the right
hand side of the screen and drag to the
appropriate LUN on the left.
3
Click Submit.
All the CLI commands necessary to enable
mapping and the command saveconfiguration
norestart will be performed.
Multiple target mode
Multiple Target Mode breaks the single iSCSI
node of the iPBridge and replaces it with a much
more configurable mapping scheme. This new
mapping scheme allows you to segregate storage
into different iSCSI nodes within the iPBridge,
with each iSCSI target having its own set of
access criteria.
For example, if you have two servers and a library
with four tapes and a media changer, the default
mapping would provide both servers access to all
tapes and the media changer (single target mode).
If you configured multiple target mode, you
would be able to map some devices to one server
and other devices to the other server, requiring
separate usernames and passwords for access.
CAUTION
If actual storage is mapped to more than
one iSCSI target and a server has
authorization for both targets, the server
could show duplicate storage without any
warning to the user.
If multiple target mode is enabled, the Automap,
Route, RouteDisplay and CHAP CLI commands
behave differently. (Refer to Ethernet commands
on page 35.)
After enabling MultiTargetMode through the CLI
command set multitargetmode, you may map
devices using the CLI commands Automap or
45
ATTO Technology Inc. iPBridge Installation and Operation Manual
Route or by using the ExpressNAV interface. You
may also cycle power and the iPBridge will
automatically map all devices to separate nodes.
To control access, different CHAP account names
and CHAP secrets can be assigned to each target.
(Refer to iSCSI commands on page 37)
Use Command Line Interface
To map devices automatically with CLI
1 At the CLI prompt type
set MultiTargetMode enabled
Because current mapping will be deleted, you
are asked for confirmation to change mapping.
2 At the command prompt, type
AutoMap
• All the CLI commands necessary to enable
mapping and the command saveconfiguration
norestart will be performed.
• The iPbridge will its map itself as a device at
LUN 0.
• Each SCSI device will be placed at LUN 1
and a target name suffix will be added to the
iqn
bxtyy-vendorid-devicename
• x is the iPBridge SCSI port number
• yy is the SCSI device SCSI target ID
• vendorid is the SCSI device vendor ID
• devicename is the SCSI device’s inquiry
device name.
To manually configure MultiTargetMode
1 At the CLI prompt type
Route iSCSI <Target Name> <lun> SCSI <sb>
<st> <sl>
Because current mapping will be deleted, you
are asked for confirmation to change mapping.
• Target Name corresponds to the Target
Name created with the iSCSITarget
command.
Type SCSITargets to list the SCSI devices
connected to the SCSI port.
• lun is the iSCSI LUN the SCSI device is to
be mapped to
The SCSITargets command lists each device
and its corresponding SCSI address. In the
example in Exhibit 2.3-2, the first tape drive is
on SCSI Port 0 (on the IPBridge) at Target ID 4,
LUN 0.
• sb is the SCSI bus/port on the iPBridge the
device is connected to
set MultiTargetMode enabled
2
3
The command iSCSITarget creates each iSCSI
Target node. Type
iSCSITarget [name]
The name is a suffix appended to the standard
IPBridge iqn name. The suffix name can be up
to 24 characters.
4
Type RouteDisplay to see the results of the
iSCSITarget command.
5
The Route command performs the mapping.
Type
• st and sl are the SCSI target ID and SCSI
LUN that the SCSI device is currently
configured for.
To map the first tape device listed in the
scsitargets command in Exhibit 2.3-3, type
route iscsi tape0 scsi 0 4 0
To remove mapping
1 Type:
Route iSCSI [Target Name] [lun] delete
To remove an iSCSITarget
1 Type
iSCSITarget [Target Name] delete
Example
Refer to Exhibit 2.3-1. A SCSI library containing
a media changer and four tapes is connected to the
IPBridge through SCSI port 0.
In single target mode, the media changer is at 0, 0,
1 (port, target and LUN) and each of the tapes is
at a different LUN.
Exhibit 2.3-2
Result of typing SCSITargets 0
;
sl
0
0
0
0
sb
0
0
0
0
st
0
4
5
6
Exhibit 2.3-3
Device Type
Vendor ID
MediumChanger ATTO
Tape
Tape
Tape
The iPBridge occupies iSCSI LUN 0 by default,
In multiple target mode, the media changer is
mapped differently in each node: at iSCSI LUN 3
in node 0 and at iSCSI LUN 1 in node 1.
Product ID Rev. Serial Number
DVT 3.22 U0192529
IBM ULTRIUM-TD 38D0 1110094262 U
IBM ULTRIUM-TD 38D0 1110122312 U
IBM ULTRIUM-TD 38D0 1110122344 U
Result of typing RouteDisplay iSCSI
;Target Name
Lun
SB ST SL
;==========================================
tape0
0
Bridge
tape0
1
0 4
0
46
Configuration & Management: mapping
2.4 Updating firmware
Several processors control the flow of data in the ATTO iPBridge. The firmware to control these
processors can easily be upgraded in the field using the PUT command from an FTP connection.
The iPBridge firmware is distributed as a
compressed .zip file and can be obtained from the
ATTO Technology, Inc. web site at
www.attotech.com.
To use FTP over GbE to flash new firmware into
the iPBridge
1
Uncompress the .zip file obtained from the
ATTO Technology Inc. website
47
ATTO Technology Inc. iPBridge Installation and Operation Manual
(www.attotech.com) into an image file (.ima).
Note the filename.
2
Establish an FTP link to the bridge that is to be
flashed.
3
Use the PUT command to download the
firmware. For example
c:\bridge_firmware\I1500110.ima
4
Once the download is complete, cycle power on
the iPBridge to activate the new firmware.
48
Configuration & Management: firmware update
Appendix A Safety standards and compliances
The equipment described in this manual generates and uses radio frequency energy. If this equipment is
not used in strict accordance with the manufacturer's instruction, it can and may cause interference with
radio and television reception. See the Technical Specification sheet for a full list of certifications.
WARNING
Risk of explosion if battery is removed and/or replaced by an incorrect type. Dispose of used
batteries in accordance with your local environmental regulations.
No operator serviceable components inside the iPBridge 1500E/D or the 1550E/D.
Do not remove cover of iPBridge 1500D or the iPBridge 1550D. Refer servicing to qualified
personnel.
FCC Standards: Radio and Television Interference
WARNING
This equipment generates, uses, and can radiate radio frequency
energy and, if not installed and used in accordance with the instruction
manual, may cause interference to radio communications. It has been
tested and found to comply with the limits for a Class A computing device pursuant to Subpart J
of Part 15 of FCC rules, which are designed to provide a reasonable protection against such
interference when operating in a commercial environment. Operation of this equipment in a
residential area is likely to cause interference, in which case the user, at his own expense, will be
required to take whatever measures may be required to correct the interference.
If this equipment does cause interference to radio and television reception, which can be determined by
turning the equipment off and on, try to correct the interference by one or more of the following
measures
• Move the receiving antenna.
• Relocate the bridge with respect to the receiver,
or move the bridge away from the receiver.
• If necessary, consult an ATTO authorized
dealer, ATTO Technical Support Staff, or an
experienced radio/television technician for
additional suggestions.
• Plug the computer into a different outlet so the
computer and receiver are on different branch
circuits.
The booklet How to Identify and Resolve Radio/TV Interference Problems prepared by the Federal Communications Commission is a helpful guide. It is available from the US Government printing office, Washington, DC 20402, Stock No. 004-000-00345-4.
Canadian Standards
This Class A digital apparatus complies with Canadian ICES-003.
Cet appareil numérique de la classe A est conforme à la norme NMB-003 du Canada.
i
ATTO Technology Inc. iPBridge Installation and Operation Manual
European Standards
Declaration of Conformity
This following statement applies to the ATTO iPBridge.
This device has been tested in the basic operating configuration and found to be compliant
with the following European Union standards
Application of Council Directive: 89/336/EEC
Standard(s) to which conformity is declared: EN55022, EN50082-1
This Declaration will only be valid when this product is used in conjunction with other CE approved
devices and when the entire system is tested to the applicable CE standards and found to be compliant.
ii
Appendix
Appendix B ATTO accessories
The following accessories are available through ATTO Technology. Contact an ATTO Technology
authorized sales representative to order.
iSCSI Bridge board-level models
ATTO iPBridge 2500C
IPBR-2500-C00
3 Gigabit Ethernet by 2 LVD SCSI
ATTO iPBridge 1500E
IPBR-1500-E00
1 Gigabit Ethernet by 1 LVD SCSI
iSCSI Bridge desktop models & desktop models with rackmount kits
ATTO iPBridge 2500R/D
IPBR-2500-D00
3 Gigabit Ethernet by 2 LVD SCSI
ATTO iPBridge 1500D
IPBR-1500-D00
1 Gigabit Ethernet by 1 LVD SCSI 1,195
NDMP Bridge models
ATTO iPBridge 2500
IPBR-2500-CN0
IPBR-2500-DN0
3 Gigabit Ethernet by 2 LVD SCSI (board)
3 Gigabit Ethernet by 2 LVD SCSI (desktop)
ATTO FC Rack System (build to order)
FC Rack Enclosures with Power Supplies
FCRS-BAS1-000……
FCRS-BAS2-000……
Rack System with Single Power Supply
Rack System with Redundant Power Supplies
FibreBridge 3300
FCBR-3300-RL0
2-Gigabit FibreBridge to LVD Ultra SCSI Bridge
Field Replacement Units (FRU)
PWRA-0000-FRUPower Module for ATTO FC Rack System
FCBR-3300-RLF
ATTO FibreBridge 3300R LVD Replacement Unit
iii
ATTO Technology Inc. iPBridge Installation and Operation Manual
SCSI cables & accessories
Cables/SCSI
CBL-VHDC-003
Cable, SCSI External, VHDCI to VHDCI, 3m.125
CBL-V68E- 03X
Cable, SCSI, External, VHDCI to HD68, U320-rated, 1m 95
CBL-FP68-C3
68-pin “P” / 50-pin Centronics – 1m
CBL-FP68-C6
68-pin “P” / 50-pin Centronics – 2m
CBL-FP68-C25
68-pin “P” / 50-pin Centronics – 8m
CBL-FP68-C79
68-pin “P” / 50-pin Centronics – 24m
CBL-F68E-00X
68-pin “P” / 68-pin fine pitch “P” – 1ft
CBL-U68E-681
68-pin “P” / 68-pin fine pitch “P” – 1m
CBL-F68E-686
68-pin “P” / 68-pin fine pitch “P” – 2m
CBL-F68E-003
68-pin “P” / 68-pin fine pitch “P” – 3m
CBL-F68E-010
68-pin “P” / 68-pin fine pitch “P” – 10m
CBL-F68E-025
68-pin “P” / 68-pin fine pitch “P” – 25m
CBL-F68E-68X
68-pin “P” / 68-pin fine pitch “P” – 16m.
CBL-V68E-4868-pin offset VHDCI to 68-pin VHDCI
Accessories
TERM-V68E-002 Terminator, LVD SCSI, VHDCI, Active 125
ADAP- 50AF- 68P* Adapter, SCSI, 50pin “A” Female to 68pin “P” Female 60
iv
Appendix
Appendix C Contact ATTO Technology, Inc.
Customer service, sales Get syntax and technical support are available by phone Monday through
Friday, Eastern Standard Time 8:00 a.m. to 8:00 p.m., or by fax and web site 24-hours a day.
ATTO Technology, Inc.
155 CrossPoint Parkway
Amherst, New York 14068
(716) 691-1999 • voice
(716) 691-9353 • fax
http://www.attotech.com
ATTO Technology can also be reached via e-mail at the following addresses:
Sales Support: [email protected]
Technical Support:[email protected]
v
ATTO Technology Inc. iPBridge Installation and Operation Manual