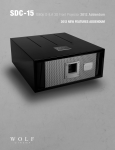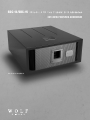
1
SDC-12/SDC-15
2013 NEW FEATURES ADDENDUM
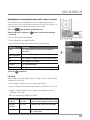
SDC-12 aka the “GrayWolf 4K”
SDC-12/SDC-15
Preface
ABOUT THIS MANUAL ADDENDUM
This 2013 Manual Addendum is designed for use with the Wolf Cinema SDC-12 and SDC-15 Home Cinema Projectors. This document
is intended to accompany and augment the original User’s Manual for this product.
Information in this document has been carefully checked for accuracy; however, no guarantee is given to the correctness of the
contents. The information and specifications in this document are subject to change without notice.
COPYRIGHT
© Copyright 2013 Wolf Cinema.
This document contains proprietary information protected by copyright. All rights are reserved. No part of this manual may be
reproduced by any mechanical, electronic or other means, in any form, without prior written permission of the manufacturer.
TRADEMARKS
All trademarks and registered trademarks are the property of their respective owners.
The lighting flash with arrow head within an equilateral triangle is intended to alert the user to the presence
of “dangerous voltage” within the product's enclosure that may be of sufficient magnitude to constitute a risk
of electric shock to persons.
The exclamation point within an equilateral triangle is intended to alert the user to the presence of important
operating and maintenance (servicing) instructions in the literature accompanying the appliance.
WARNING: TO REDUCE THE RISK OF FIRE OR ELECTRIC SHOCK, DO NOT EXPOSE THIS APPLIANCE TO RAIN OR MOISTURE.
DANGEROUS HIGH VOLTAGES ARE PRESENT INSIDE THE ENCLOSURE. DO NOT OPEN THE CABINET. REFER SERVICING TO
QUALIFIED PERSONNEL ONLY.
1
SDC-12/SDC-15
Notices
WARNING! To meet FCC requirements, a shielded power cord is recommended in order to prevent interference. It
is essential that only the supplied power cord is to be used. Use only shielded cables to connect I/O devices to this
equipment. You are cautioned that changes or modifications not approved by the party responsible for compliance
could void your authority to operate the equipment.
WARNING! High-brightness light source. Do not stare into the beam of light, or view directly. Be especially careful
and ensure that children do not stare directly into the beam of light.
WARNING! To reduce the risk of fire or electric shock, do not expose this product to rain or moisture.
CAUTION! For minimal servicing and to maintain high image quality, we recommend that you use the projector in
an environment that is smoke and dust free. When used in areas where there is a lot of smoke or dust, the filter
and lens should be cleaned often to lengthen the service life of the projector.
WARNING! IC chips or other technologies in the product include confidential and/or trade secret property belonging
to either Wolf Cinema or the Victor Company of Japan (JVC). Therefore you may not copy, modify, adapt, translate,
distribute, reverse engineer, reverse assemble or decompile the contents thereof.
WARNING! The ventilation slots and objects next to them may get extremely hot during operation. Do not touch
these areas until they have sufficiently cooled down.
DISPOSAL Do not use household or municipal waste collection services for disposal of electrical and
electronic equipment. EU countries require the use of separate recycling collection services.
CAUTION – Review all important safeguards, operating and installation instructions as provided in the accompanying
“WOLF CINEMA USER’S GUIDE” prior to using this product.
2
SDC-12/SDC-15
2013 New Features
Thank you for purchasing the Wolf Cinema SDC-12 or SDC-15 – next-generation stereoscopic (3D) home cinema projectors.
Starting in January, 2013 the SDC-12 and SDC-15 projectors will incorporate the following new features and upgrades, which are
described in further detail in this User’s Manual Addendum:
• V4K™ technology – an advanced 4K imaging process that converts standard HD sources into 3840 x 2160
on-screen resolution
• 2D->3D adaptive imaging – new video processing algorithms that can render, in real time, 3D imaging from
2D sources
• Adjustable 3D parallax and crosstalk cancellation – provides for improved stereoscopic [3D] imaging, reduced
“ghosting” artifacts and results in a more natural 3D image
• VariScope™ lens memories – multiple primary optics presets so that your favorite aspect ratios [i.e. 1.78:1,
1.85:1, 2.35:1 and more] can be instantly recalled without the need for an external anamorphic lens
[Full anamorphic lens support is also included]
• Advanced multi-zone pixel convergence – 1/16th pixel, 121 zone adjustment
• Advanced screen surface compensation driver – 255 memories
Please review this document to discover the details regarding these important feature enhancements, and contact your local Wolf
Cinema dealer for further information [or contact Wolf Cinema directly at 1.510.843.4500].
We hope you enjoy your Wolf Cinema home theater experience.
3
SDC-12/SDC-15
Features & Updates
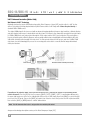
V4K™ Enhanced Resolution [3840 x 2180]
Wolf Cinema’s V4K™ Technology
Originally developed by Japan's NHK Engineering and the Victor Company of Japan [JVC] and also called “e-shift” in other
devices, this unique technology implementation by Wolf Cinema delivers an HD image with 4 times the pixel density of
standard 1920 x 1080 sources.
The original 1080p signal is first processed with an advanced imaging algorithm to improve edge transitions, eliminate aliasing
and stair-stepping, and increase contrast within each video frame. Each frame is then temporally separated into two sub-frames
[at 1920 x 1080 pixels each] and projected through the D-ILA engine and the V4K™ processing panel. This panel utilizes a
property of liquid crystals called bi-refringence and can rapidly switch between straight light and refracted light by 0.5 pixel,
shifted both vertically and horizontally. New “sub pixels” are thus generated based on this process and a true 3840 x 2160
video frame is created. Amazingly this process has no moving parts and results in a smooth, film-like image with minimal
visible pixel structure.
Depending on the projector model, you may be able to turn the V4K™ processor on and off via the following remote
control commands: Press the [OK] key, then in sequence [RIGHT] / [LEFT] / [RIGHT] / [LEFT]. A small window will appear in
the upper right hand corner of the screen, indicating the V4K processor is ON. Simply depress the [RIGHT] key to turn the V4K
processor to the OFF mode. Depress the [RIGHT] key again to turn it back on. Insure that you have the V4K engine turned ON,
then select the [BACK] or [MENU] button to end this demonstration.
Note: This V4K demonstration feature is only possible when watching 2D content.
Images and technology descriptions courtesy of the Victor Company of Japan [JVC]
4
SDC-12/SDC-15
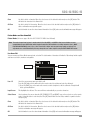
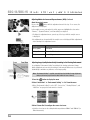
Remote Control
Your SDC-12 or SDC-15 projector remote controls have been modified to incorporate the following features:
ON
STAND BY
Projector Power On
Turns off the power
INPUT
HDMI 1
HDMI 2
COMP.
Switches the 3D format
Displays the 3D setting menu
3D FORMAT
3D SETTING
PC
For adjusting focus, zoom, and shift
LENS
CONTROL
LENS
MEMORY
C.M.D
Switches between saving, retrieving,
and editing of the lens memory
HIDE
LIGHT
Hides the image temporarily
Select an input from [HDMI 1],
[HDMI 2], [COMP.], and [PC]
[SDC-12: Switches the anamorphic mode]
For setting frame interpolation
[SDC-12: For setting the lens aperture]
To Illuminate Remote Buttons for 7 seconds
To Select or Confirm
For selecting an item
Displays the menu,
or hides the menu if it is displayed
BACK
MENU
To Return to the Previous Menu
PICTURE MODE
FILM
CINEMA
ANIME.
NATURAL
STAGE
3D
THX
USER
MPC
[SDC-12: Button positions]
For setting the gamma level
For setting the color temperature
GAMMA
COLOR
TEMP.
COLOR
P.FILE
PIC.
ADJ.
Switches the Picture mode to [FILM], [CINEMA],
[ANIME], [NATURAL], [STAGE], [3D], [THX], or [USER]
For setting the MPC level
Switches the items for adjusting the image quality,
such as contrast, brightness, etc.
Color Space Button
5
SDC-12/SDC-15
3D Format and Settings
For additional information about 3D viewing refer to the SDC-12 and SDC-15 2013 User’s Manual. (Reference pages: 56 and 62-64)
3D Format
This control selects the 3D input signal format. Use the [LEFT] and [RIGHT] keys to configure the desired
settings. Press the [OK] key to display the available settings list, then use the [UP]/[DOWN] keys to make your
selection. The [BACK] key returns you to the previous screen.
(*) Some signals may not be embedded with 3D information, thus the image projected may revert to 2D.
Reconfigure such selections manually.
Settings: Auto, Side by Side, Top & Bottom, 2D
Auto
Side by Side
Top and Bottom
2D
3D formats are determined automatically.
Select this if the 3D input signal is the side by side method.
Select this if the 3D signal is the top and bottom method.
Projected as a 2D signal.
2D/3D
This feature converts current 2D images into a quasi-3D video image. This effect may not be visible with
certain content.
On
Select to convert 2D video images to 3D
Off
Select to NOT convert 2D images into 3D
Parallax
This function enables fine adjustment of any misalignment of the left and right 3D video images. Adjust these
settings to your preference by using the [LEFT]/[RIGHT] keys. Press the [OK] key to display the adjustment
window. The [BACK] key returns you to the previous screen.
(*) Cannot be adjusted when the “2D/3D” feature is ON.
Settings: -15~15
Crosstalk Cancel This reduces cross-talk within 3D image content. Adjust these settings to your preference by using the
[LEFT]/[RIGHT] keys. Press the [OK] key to display the adjustment window. The [BACK] key returns you to
the previous screen.
(*) May be adjusted during 3D playback but not when the “2D/3D” feature is ON.
White
Settings: -8~8
Red
Settings: -8~8
Green
Settings: -8~8
Blue
Settings: -8~8
Intensity
This function adjust for image depth perception. Adjust these settings to your preference by using the
[LEFT]/ [RIGHT] keys. Press the [OK] key to display the adjustment window. The [BACK] key returns you to
the previous screen.
(*) May be adjusted when the “2D/3D” feature is ON.
Settings: 1~5
Sub Title Adjust
Select this to automatically identify subtitles and set 3D conversion to On or OFF. Adjust settings to
your preference.
(*) May be adjusted when the “2D/3D” feature is ON.
(*) There may be instances where automatic identification does not work, or certain images are identified
as subtitles. Use the [LEFT]/[RIGHT] keys to configure your desired settings. Press the [OK] key to display
the settings list, then use the [UP]/[DOWN] keys to make your selections. The [BACK] key returns you to
the previous screen.
Settings: On, Off
6
SDC-12/SDC-15
Viewing 3D Movies
1 Connect the 3D emitter as shown in SDC-12/SDC-15 user’s manual
(Reference page: 30 of the SDC-12/SDC-15 2013 User’s Manual)
2 Connect this unit to a 3D-compatible HDMI device, and turn on the power to
play back the 3D video image
• For details on how to play back 3D video images, please refer to the instruction manual
of the player or recorder in use.
• When 3D signals are received, the video image switches automatically to the 3D format.
If the image does not switch
to 3D automatically, press the
3D FORMAT button on the
remote control
• This unit supports the following 3D formats:
– Frame packing
– Side-by-side
– Top-and-bottom
• In the default setting, “3D Format” is set to “Auto” for automatic projection of 3D images.
• Pressing the 3D FORMAT button each time switches the mode in the following sequence:
“Auto” ➔ “Side by Side” ➔ “Top and Bottom” ➔ “2D” ➔ “Auto”...
3 Turn on the power of the 3D GLASSES (if required) and put them on
Format
Description
Side by Side
Select this setting if the 3D input signal is of the
side-by-side format.
2D
Select this setting if 2D images are falsely
recognized as 3D ones.
Auto
Top and Bottom
The format is detected and configured automatically.
Select this setting if the 3D input signal is of the
topandbottom format.
Converting 2D Movies to
3D Movies for Viewing
1 Press the 3D SETTING button to display
“3D Setting”
2 Select “2D to 3D conversion” followed by
“On”, and press the OK button
3 Press the
MENU
button to exit
Note: Depending on the movies, 3D effect may
be less than what you expected.
7
G
SDC-12/SDC-15
Adjusting 3D Movies
3D video images may appear differently to different viewers. It may also be
affected by your physical condition at the time of viewing.
You are therefore recommended to adjust the video images accordingly.
1 Press the
3D SETTING
button to display “3D Setting”
Adjusting parallax (Parallax)
Adjust the displacement of the image for the left and right eyes separately to obtain the
best 3D effect.
• To do so, use the
keys to move the cursor.
• Setting range: 15 to +15
Adjusting crosstalk (Crosstalk Cancel)
Double images (overlapping of the left image with the one on the right or vice versa) can
be reduced to deliver a clear quality.
• To do so, use the
keys to move the cursor.
• Setting range: 8 to +8
* Adjustment cannot be made when “2D to 3D conversion” is set to “On”.
Adjust the depth perception (Intensity)
The depth of the image can be adjusted to deliver the best 3D effect during 2D-3D
image conversion.
• To do so, use the
keys to move the cursor.
• Setting range: 1 to 5
* Adjustment can only be made when “2D to 3D conversion” is set to “On”.
Note: Depending on the movies, 3D effect may be less than what you expected.
Adjusting the subtitle display (Sub Title Adjust)
If distortion occurs in the subtitle during 2D-3D image conversion, set to “On”.
* Adjustment can only be made when “2D to 3D conversion” is set to “On”.
2 Press the
MENU
G
8
button to exit
SDC-12/SDC-15
Setting Other Aspect Ratios (Basic, with Anamorphic Lenses, etc.)
Image Sizing and Aspect Ratio (Reference page: 38 of the SDC-12/SDC-15 2013 User’s Manual)
You can quickly change the screen size (aspect ratio) of the projected image, or mask image borders as desired if the surrounding
edges of the image area are distorted.
Setting the Basic Screen Size (Aspect Ratio)
The projected image can be set to a desired screen size and aspect ratio.
1 Select Menu
Picture Adjust
Picture Mode
MENU
Color Profile
Color Temp.
Gamma
Film Tone
Contrast
Brightness
Color
Tint
Advanced
Film1
0
0
0
0
Reset
Operate
Exit
MENU
Film
Film1
Xenon1
Select
Back
BACK
2 Select “Input Signal” ➔ “Aspect [Video]”
Input Signal
HDMI
1 Select
COMP.
PC
Picture Position
2 Confirm
Aspect (Video)
4:3
Mask
off
Progressive
Auto
4:3
16:9
Custom
3D Setting
Operate
Exit
MENU
3 Set a Aspect Value
Select
Back
BACK
Input Signal
HDMI
1 Select
COMP.
PC
Picture Position
Aspect (Video)
2 Confirm
16:9
Mask
off
Progressive
Auto
4:3
16:9
Custom
3D Setting
Operate
Exit
MENU
Select
Back
BACK
9
SDC-12/SDC-15
Lens Control and VariScope™ Lens Memory
Lens Control
Use this remote button to adjust focus, zoom and shift. You can also turn the test pattern display ON and OFF and then save your
lens position settings during adjustment. Use the UP/DOWN keys to select an item to adjust. Press the [BACK] key to return to the
previous screen.
Focus This selection adjusts the image focus.
Zoom This selection adjusts the image overall size.
Shift
This selection enables you to move the image UP/DOWN/LEFT or RIGHT, using the center rosette.
Image Pattern
A test pattern for your use when adjusting focus, zoom and shift.
On
During adjustment, the test pattern is displayed.
Off
During adjustment, the external input signal is displayed [without the test pattern].
Lock
This locks out or enables use of the lens controls.
On
This effectively locks out the “LENS” functions on the remote control.
Off
This enables the “LENS” functions on the remote control.
VariScope™ Lens Memory
Select
This menu function [and via direct IR remote control button] recalls previously saved lens adjustment
memories. This is used to toggle between the primary lens VariScope™ aspect ratio memories, i.e. 1.78:1,
1.85:1, 2.35:1 and so forth [as created by you or your custom installer].
Save
This saves all focus, zoom and shift settings work into one of three available memories [the user memories
can be renamed].
Name Edit
Edit and change the lens memory / aspect ratio names.
(*) Number of characters is limited to 10, and may include capital and lower case letters, numbers and symbols.
Select the user memory name you wish to edit.
Press the [OK] button on the main unit or the remote control to confirm and enter the edit mode.
(*) A “-“ is displayed if the information is not saved.
(*) Press the [BACK] key on the main unit or remote control at anytime to exit the edit mode. Doing this will
delete your modifications.
Input Cursor
This highlights the edit area. The cursor will move automatically as you enter characters.
Select Cursor
Move the cursor using the [UP], [DOWN], [LEFT] and [RIGHT] keys on the projector or on the remote control. Select
the letter to enter and press the [OK] button. Make the next letter, number or symbol selection and press [OK].
Picture Adjust
>>
Select Cursor
User Name Edit
Name
User 1
B
C
D
E
F
G
H
I
J
K
L
N
O
P
Q
R
S
T
U
V
W
X
Y
Z
a
b
c
d
e
f
g
h
i
j
k
l
m
M
n
o
p
q
r
s
t
y
v
w
x
y
1
2
3
4
5
6
7
8
9
0
,
.
"
#
$
%
&
*
+
-
/
=
?
@
;
|
~
(
)
]
{
}
\
!
:
SPACE
Exit
MENU
10
Input Cursor
A
Select
Clear
<
>
[
All Clear
Operate Back
BACK
OK
z
^
Character List
SDC-12/SDC-15
Clear
Use this to delete a character. Move the select cursor to the desired location and press the [OK] button. This
will delete the character in the Name field.
All Clear
Use this to delete ALL characters. Move the select cursor to the desired location and press the [OK] button. A
delete confirmation message will appear.
OK
Use this function to save the entered name information. Select [OK] and a saved confirmation message will appear.
Picture Modes and User Name Edit
Picture Modes (Reference page: 49 of the SDC-12/SDC-15 2013 User’s Manual)
Note: The major change from last year’s remote control is that the USER 1 and USER 2 direct access buttons are now
combinedinto the one USER button, which toggles through the FIVE available user setting memories: User 1 [WOLF
FACTORY CALIBRATIONS], User 2, User 3, User 4 and User 5. Adjust and save your image quality as desired. Last
adjustments are saved automatically. You may change the user names anytime using the USER NAME EDIT feature.
User Name Edit
You can rename any Picture Mode memory bank, as below. The total number of characters is limited to 10, and may include capital
and lower case letters, numbers and symbols.
Picture Adjust
>>
Select Cursor
User Name Edit
Name
User 1
Input Cursor
A
B
C
D
E
F
G
H
I
J
K
L
N
O
P
Q
R
S
T
U
V
W
X
Y
Z
a
b
c
d
e
f
g
h
i
j
k
l
m
M
n
o
p
q
r
s
t
y
v
w
x
y
z
1
2
3
4
5
6
7
8
9
0
,
.
^
!
"
#
$
%
&
*
+
-
/
=
?
@
:
;
|
~
(
)
<
>
[
]
{
}
\
SPACE
Exit
MENU
Select
Clear
All Clear
Character List
OK
Operate Back
BACK
User 1-5
Select the user memory name you wish to edit.
Press the [OK] button on the main unit or the remote control to confirm and enter the edit mode.
(*) Press the [BACK] key on the main unit or remote control at anytime to exit the edit mode. Doing this will
delete your modifications.
Input Cursor
This highlights the edit area. The cursor will move automatically as you enter characters.
Select Cursor
Select and move the cursor using the [UP], [DOWN], [LEFT] and [RIGHT] keys on the projector or on the remote
control. Select the letter to enter and press the [OK] button. Make the next letter, number or symbol selection
and press [OK].
Clear
Use this to delete a character. Move the select cursor to the desired location and press the [OK] button. This
will delete the character in the Name field.
All Clear
Use this to delete ALL characters. Move the select cursor to the desired location and press the [OK] button.
A delete confirmation message will appear.
OK
Use this function to save the entered name information. Select [OK] and a saved confirmation message will appear.
11
SDC-12/SDC-15
Pixel Alignment and Fine Adjustment
Use this section to adjust, fine tune any slight errors in the horizontal/vertical pixel alignment. It is found under the [INSTALLATION]
menu tab.
Adjust
Select this function to turn the pixel alignment function ON and OFF.
Settings: Off, On
Adjust Area
Use this function to set the overall pixel adjustment range.
Settings: Whole, Zone
Whole Selects the entire screen as the adjustment area.
Zone The screen is divided into 11 x 11 sections for fine adjustment
(*) Note the size of the individual zones cannot be changed
Adjust Color
Adjust
Pattern Color
This function selects the color of the pixels you want to adjust.
Settings: Red, Blue
This function sets the pattern color.
Settings: White, Green + [Adjust Color]
White Sets the adjustment pattern to white.
Green + Sets the pattern to green and the color set using the [Adjust Color] items.
[Adjust Color]
Adjust [Pixel]
Use this to move the color selected previously [Adjust Color], pixel by pixel in the vertical and horizontal directions.
(*) This function is disabled with the [Adjust Area] is set to [Zone]
H (Horizontal) Settings: -2~2
V (Vertical) Settings: -2~2
Adjust [Fine]
Use this to move the color selected previously [Adjust Color], pixel by pixel in the vertical and horizontal directions.
H (Horizontal) Settings: -31~31
V (Vertical) Settings: -31~31
Reset
Returns all settings to the original default factory settings.
12
SDC-12/SDC-15
Pixel Alignment and Fine Adjustment Continued
The following steps are useful when re-aligning the projector’s visible pixel structure:
Enter the [PIXEL ADJUST] menu off the [INSTALLATION] tab. First set the [ADJUST AREA] to [WHOLE] and make your initial general
wholesale adjustments to the image alignment. Select [ADJUST COLOR] and [ADJUST PATTERN]. Move the cursor to [Adjust (Pixel)]
then press the [OK] button to display the pattern and adjustment window.
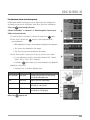
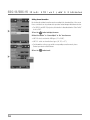
Adjust Pattern
Adjust (Pixel) Window
Vercital
Pixel Adjust
Whole Adjust (Pixel)
Red
H
V
Color A.
GAMMA
ADJUST.
COLOR.
TEMP
Color P.
COLOR.
P.FILE.
1
1
Select
A. Area
BACK
PIC.
ADJ.
Operate
BACK
H (Horizontal)
Press the [OK] button to enter the adjustment mode. Use the [UP], [DOWN], [LEFT] and [RIGHT] keys to align the pixels in both the
horizontal and vertical directions. Select the [BACK] key to exit this adjustment mode.
N Note: The operational window and the small remote control indicators, when you are in the pixel adjustment mode, certain
remote control buttons serve as dual use/dual function buttons.
Pixel Adjust
Whole Adjust (Pixel)
Adjust Color
Red
Pixel Adjust Setting
H
V
Color A.
GAMMA
ADJUST.
COLOR.
TEMP
Color P.
COLOR.
P.FILE.
1
1
A. Area
PIC.
ADJ.
Select
BACK
Operate
BACK
13
SDC-12/SDC-15
Pixel Alignment and Fine Adjustment Continued
REMOTE CONTROL DUAL USE BUTTONS
Use the [GAMMA] button to select [ADJUST COLOR], i.e. red or blue pixels
Use the [COLOR TEMP] button to change from the [ADJUST PIXEL] to the [ADJUST FINE] operational windows.
Use the [COLOR P.FILE] button to select [ADJUST PATTERN COLOR], i.e. white, green +.
Use the [PIC ADJUST] button to change from [ADJUST WHOLE AREA] to [ADJUST ZONE]
Use the [BACK] button to stop pixel alignment and exit this mode.
After making overall large scale window adjustments, proceed to fine-tuning. Press the [COLOR TEMP] button on the remote to
change from [ADJUST (PIXEL)] to [ADJUST (FINE)] operational windows. Or from the main menu, set the [ADJUST AREA] to [ALL]
and select [ADJUST COLOR] and [ADJUST PATTERN], then move the cursor to [ADJUST (FINE)] and press the [OK] button, which
will display the pattern and fine tuning operational window. Adjust the horizontal/vertical pixel structure as required. Maximum
deviation here is -31~31.
Next, set the [ADJUST AREA] to [ZONE] to make independent zone fine adjustments. There will be 11x11 smaller sections that can
be independently adjusted. For quick access to this menu press the [PIC ADJUST] button on the remote.
Use the [UP], [DOWN], [LEFT] and [RIGHT] keys to move the cursor to the position you want to adjust. Press the [OK] button to
enter the operation mode. Then use the [UP], [DOWN], [LEFT] and [RIGHT] keys to move and adjust the pixels within that zone, in
the horizontal and vertical directions. Press the [BACK] key to return to the previous screen or exit the alignment window.
Notes on pixel alignment:
(*) It is impossible to match all image pixels on the screen. Due to properties inherent to D-ILA technology, there will always be
some gaps and overlapping structure. Color errors may also result from screen type used and on-axis/off-axis viewing positions.
(*) In case the image is reversed, or upside-down, the horizontal and vertical directions are reversed.
(*) Please perform adjustments on a clear, still image.
(*) When fine tuning, the effects of adjustments may be limited and perhaps difficult to see on certain image types.
14
SDC-12/SDC-15
Fine Adjustment to Color (Color Management)
If CMS is made available in your projector, you can adjust each of the following colors
according to your preference: Red, Orange, Yellow, Green, Cyan, Blue, and Magenta.
1 Press the
MENU
button to display the menu
2 Select “Picture Adjust” ➔ “Advanced” ➔ “Color Management” from the menu
3 Adjust to the preferred color
1 A Select the item to set (Custom 1 to Custom 3), and press the
2 Select “Pause” and press the
current adjustment
OK
OK
button
button to set the background for the
G
• While adjustment is in progress, the input image is displayed as the background.
• “On”: pauses when inputting the video images.
• “Off”: does not pause when inputting the video images.
3 Select “Color Selection”, and press the H I keys to select the color to adjust
• For color adjustment, select the color from the following: “Red”, “Orange”,
“Yellow”, “Green”, “Cyan”, “Blue”, “Magenta”.
• Pressing the
HIDE
button enables you to check the image before adjustment.
4 Adjust the selected color
• Selecting “Reset” resets all the adjustment data.
Item
Setting Range
Description
Axis Position
-30 to 30
Finetune the position of the central
axis of the selected color
Saturation
-30 to 30
Adjusts the color saturation (vividness)
-30 (dull) to +30 (vivid)
Hue
Brightness
4 Press the
MENU
-30 to 30
-30 to 30
Adjusts the hue (colortone)
Adjusts the brightness
-30 (dark) to +30 (bright)
button to exit
G
15
SDC-12/SDC-15
Setting Screen Correction
By selecting the optimal correction mode according to the characteristics of the screen
in use, corrections can be performed to reproduce natural images with balanced colors.
• For SDC-12 and SDC-15 projectors, this function is disactivated when “Color Profile”
is set to “Off”.
1 Press the
MENU
button to display the menu
2 Select “Installation” ➔ “Screen Adjust” ➔ “On” from the menu
• SDC-15: select one from the 105 types (“1” to “105”).
• SDC-12 : select one from the three types (“A”, “B”, or “C”).
• For information on the screen and the corresponding correction mode, please
Contact your dealer or Wolf Cinema.
3 Press the
G
MENU
G
16
button to exit
SDC-12/SDC-15
Adjusting Movies for Increased Expressiveness (MPC - Multiple Pixel Control)
The new image processing algorithm helps to create a natural impression that is
sharper at areas in focus, and softer at areas that are not in focus. This enables you to
enjoy highly expressive V4K images with a greater sense of depth.
1 Press the
MPC
button to display the adjustment menu
2 Select “V4K Profile” and press the
are viewing
OK
button to select the content type you
* HD is the abbreviation for High Definition.
* SD is the abbreviation for Standard Definition.
• Select “SD” when viewing works broadcasted in the SD image quality.
Content Type
FILM
Description
High Resolution
HD
For viewing Bluray Disc content
For viewing TV broadcasting and recorded content
For viewing DVD content
SD
For enhanced effects
Dynamic
For displaying in the original resolution (2K)
Off
3 Press the
For viewing movies on Bluray disc produced
using films
MENU
button to exit
Fine Tuning
After selecting a content type, adjust “Enhance”, “Dynamic Contrast”, and “Smoothing”
according to your preference.
• By increasing the setting range, you can expect enhanced effects
• Images are displayed in the original resolution (2K) when “V4K Profile” is set to “Off”
G
• “Enhance”, “Dynamic Contrast”, and “Smoothing” can be adjusted even when
“V4K Profile” is set to “Off”
* MPC is the abbreviation for Multiple Pixel Control
Item
Setting Range
Description
Enhance
0 to 100
Enhances the sharpness of the image
Smoothing
0 to 100
Enhances the blurriness of the image
for a softer effect
Dynamic
Contrast
0 to 100
Enhances the contrast of the image
17
SDC-12/SDC-15
Adjusting Movies for Increased Expressiveness (MPC) Continued
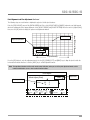
About the analysis screen
By press the MPC button while the adjustment menu in the step 1 is on screen, the
analysis screen is displayed.
In the analysis screen, parts where the effect appear are highlighted in colors when
“Enhance”, “Dynamic Contrast”, and “Smoothing” are adjusted.
• To display the adjustment menu, operate any of the keys while the analysis screen
is displayed.
• No adjustment can be made while the analysis screen is displayed. Make adjustments
after returning to the adjustment screen.
Highlighted Color
Blue, green
Enhance
Black
Smoothing
Red, yellow
Front View
Adjustment Resulting in Effects
Dynamic Contrast
Adjusting Image Quality Automatically According to the Viewing Environment
By configuring “Environment Setting” according to the viewing environment, image
quality adjustment and correction according to environmental differences are performed
automatically to minimize any influence on the image quality.
Note: “Environment Setting” is applied separately from the individual image adjustment
settings. (Reference page: 49 in the SDC-12/SDC-15 User’s Manual)
1 Press the
MENU
button to display the menu
2 Select “Installation” ➔ “Environment Setting” ➔ “On” from the menu
• When “Environment Setting” is set to “Off”, “Screen Size”, “Viewing Distance”, and
“Wall Color” are grayed out and cannot be selected.
G
3 Select “Screen Size” to configure the screen size to use
• Select the closest screen size setting from the range between “60inch” and “200inch” (in
10inch increments).
18
SDC-12/SDC-15
4 Select “Viewing Distance” toconfigure the viewing distance
(distance to the screen)
• Select the closest viewing distance setting from the range between
“1 m” and “10 m”.
• For more details on the height, please refer to “Screen Size and Projection Distance”.
(Reference page: 25 of the 2013 User’s Manual)
5 Select “Wall Color” to configure the wall color
• If the wall is black in color, select “Dark”. For walls with a color other than black,
select “Light”.
6 Press the
MENU
button to exit
Remote Control Code
Hexadecimal code is sent during communication
Remote Control Button Name
G
Hexadecimal Code
Remote Control Button Name
Hexadecimal Code
37 33 30 31
NATURAL
37 33 36 41
37 33 30 32
USER
37 33 44 37
BACK
37 33 30 33
THX
37 33 36 46
ON
37 33 30 35
HDMI 1
37 33 37 30
STAND BY
37 33 30 36
HDMI 2
37 33 37 31
HIDE
37 33 31 44
PIC.ADJ.
37 33 37 32
LENS.AP.
37 33 32 30
INFO.
37 33 37 34
MENU
37 33 32 45
GAMMA
37 33 37 35
OK
37 33 32 46
C.TEMP
37 33 37 36
LENS CONTROL
37 33 33 30
3D
37 33 38 37
37 33 33 34
COLOR PROFILE
37 33 38 38
37 33 33 36
C.M.D
37 33 38 41
PC
37 33 34 36
ANAMO
37 33 43 35
COMP.
37 33 34 44
COLOR SPACE
37 33 43 44
ANIME
37 33 36 36
LENS MEMORY
37 33 44 34
STAGE
37 33 36 37
3D SETTING
37 33 44 35
CINEMA
37 33 36 38
3D FORMAT
37 33 44 46
FILM
37 33 36 39
19
SDC-12/SDC-15
2013 Specifications
Product Name
Wolf Cinema SDC-12 and SDC-15, 3D D-ILA Home Cinema Projector
Model Name
Model Name SDC-12, aka “GrayWolf 4K”, and SDC-15, aka “The Cub”
Display Panel/Size
D-ILA device * 2 *3
0.7” (1920 pixels x 1080 pixels) x 3 (total no. of pixels: approx. 6.22 million)
Projection Lens
2.0 x power zoom lens (1.45:1 to 2.78:1) (zoom/focus: power)
VariScope™
Multiple user-adjustable lens presets aspect ratios [ex. 1.78:1, 1.85:1 and 2.35:1]
[NOTE: projector throw distance when utilizing the internal VariScope feature is appx. 1.45:1
to 2.1:1 x SW] [external VariScope FX™ anamorphic lens support also provided]
Light-source Lamp
230 W Ultra-high pressure mercury lamp [Part No.WC-LPU230]
Average Lifespan
3000-4000 hours (normal mode)
Screen Size
Approx. 60” to 200” (aspect ratio: 16:9)
Performance
1300 ANSI, ~70,000:1 CR performance [SDC-12], ~110,000:1 CR performance [SDC-15]
Resolution
1920 dots x 1080 dots
V4K™ Resolution
3840 dots x 2160 dots
2D->3D Algorithm
Real time conversion of standard 2D images into 3D
Projection Distance
Approx. 1.8m to 12m
Analog Video Input Format
480i, 480p, 576i, 576p, 720p/50 Hz, 720p/60 Hz, 1080i/50 Hz, 1080i/60 Hz
Digital Video Input Format
480i, 480p, 576i, 576p, 720p/50 Hz, 720p/60 Hz, 1080i/50 Hz, 1080i/60 Hz, 1080p/24 Hz,
1080p/50 Hz, 1080p/60 Hz
PC compatible signals (Reference page: 26 of the 2013 User’s Manual)
Input terminals
Video Input
1 system, RCA pin jack x3
Y:1.0Vp-p, 75Ω
Pb/Cb, Pr/Cr:0.7Vp-p, 75Ω
* Also supports R / G / B Sync on G
HDMI Input
2 system, HDMI 19 pin × 2 (HDCP compliant) * 4
Compatible with the HDMI v1.4a standard * 5
PC Input
1 system, D-Sub 15 pin VGA
Output Terminal
Trigger terminal
1 system, 3.5mm DC power jack (
3D Synchro
3D synchro emitter dedicated terminal (1 system, mini DIN 3pin)
Control Terminal
RS-232C terminal 1 system, D-sub 9-pin (male) x1 (external control)
Remote Terminal
1 system, stereo mini jack x1 (remote control)
LAN Terminal
1 system, RJ-45 plug x1
20
) DC OUT 12V, 0.1A
SDC-12/SDC-15
Power Requirements
AC 110V-240V 50/60Hz
Power Consumption
360W (3.4A) (standby mode: 0.4W)
Operation Environment
Temperature: 5ºC to 35ºC
Humidity: 20% to 80% (no condensation) (storage temperature: -10 C to 60 C)
Installation Height
Recommended below 5000 ft (1524 m). (high altitude operating mode available)
Dimensions (WxHxD)
19.5 x 8.8 x 22.5 in., 496 x 224 x 572 mm
Weight
60 lbs., 28 kg. net / 75 lbs., 34 kg. shipping
Accessories
(Reference page: 14 in the SDC-12/SDC-15 User’s Manual)
Notes:
* 2 D-ILA is the abbreviation for Direct-Drive Image Light Amplifier.
* 3 D-ILA devices are manufactured using extremely high-precision technology. Pixel effectiveness is 99.99%. Only 0.01% or
less of the pixels may be off or permanently lit and still be within spec.
* 4 HDCP is the abbreviation for High-bandwidth Digital Content Protection system.
* 5 Ethernet is not supported.
• Design and specifications are subject to change without prior notice.
• Please note that some of the pictures and illustrations may have been abridged, enlarged or contextualized in order to aid
comprehension. Images may differ from the actual product.
21
Wolf Cinema – The New Standard of Excellence
Wol f C i n ema
2431 Fif t h S t . Be r k e le y . C A 94710
Te l: 510. 843. 4500 . Fa x : 510. 843. 7120
© 2 013 W o l f C i n e m a
www.wolfcinema.com