1
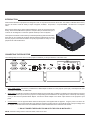
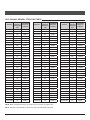
Q U I C K S E T U DCX-500i P G U DCX-1000i I D E DCX-1500i Table of Contents Introduction.......................................................................................................................................................................... 1 Connecting the Projector..................................................................................................................................................... 1 Installing the Primary Lens.................................................................................................................................................. 2 Connecting the Scaler......................................................................................................................................................... 2 The Projector's Channel Memories..................................................................................................................................... 3 The GPIO and VariScope 2.35 Memory Structure.............................................................................................................. 3 Adjusting the VariScope Lens System................................................................................................................................. 3 Copying Channel Memories................................................................................................................................................ 4 Changing the Numerical Location of Channel Memories.................................................................................................... 4 GPIO Channel Memory Structure Table.............................................................................................................................. 5 i Wolf Cinema Quick Setup Guide Introduction Wolf Cinema’s DCX line of projectors are designed to work in conjunction with the WC-Pro Scaler. The Scaler is calibrated at the factory and is to be used to route the variety of inputs it supports; 6 HDMI, 1 Component, 1 Component/RGB, 1 S-Video and 1 Composite Video. Each projector ships with 10 preset Channel Memories, which are programmed at the factory. These Channel Memories represent 10 aspect ratios per each Scaler input, 5 of which can be assigned to control the optional VariScope 2.35 Lens System. The Projector and Scaler can be remotely controlled separately by RS-232. Alternately, the Scaler can be controlled by the GPIO (General Purpose Input/Output) connection from the projector, which has the Scaler's 10 inputs programmed into every 10 of the projector's 99 Channel Memories. Connecting the Projector The following steps are to be done once the projector is installed, per the specifications of the sales order. Iso - Front Right View Side - Left View 1. DVI to HDMI adapter: Connect the provided DVI to HDMI adapter to INPUT 2 on the projector. (DVI input). This adapter will allow connection to the Scaler via HDMI cable. 2. GPIO Output: This allows connection to the Scaler’s GPIO input via serial cable. In addition, the GPIO connection allows the projector to switch the Scaler’s inputs when the projector's corresponding Channel Memories are changed. When a VariScope 2.35 is being used you will need the provided GPIO adapter. Connect the GPIO Adapter to the GPIO output located on the projector's input panel. 3. Connect Power: Use the approved North American-rated power cord supplied with the projector. Plug the power cord to the AC receptacle located on the right hand side of the projector and the 3-pronged end into a grounded AC outlet. The input voltage must be capable of 100-240 VAC for the DCX-500/DCX-1000 models and 200-240 VAC for the DCX-1500 models. *** DO NOT POWER THE PROJECTOR ON UNTIL THE LENS IS INSTALLED *** NOTE: If RS-232 is being used to control the Scaler, GPIO is not used. 1 Wolf Cinema Quick Setup Guide Installing the Primary Lens Before installing any lens, be sure the projector is off. If the projector has been running, be sure to let it cool down completely. Ensure the front lens cap is on during installation. NOTE: Remove the small rear lens cap before installing!! Keep the large front lens cap on. Lens release Lens retainer ring Projection Lens* Male connector assembly (on lens) Female floating connector assembly (on lens mount) View with Zoom Lens installed 1. Electrical Connector: Line up the male connector on the lens with the female connector on the slide assembly. 2. Insert Lens: Align the Tabs on the lens plate lock with the slots on the lens retainer ring. The lens should slide in about ½”. 3. Rotate Lens: Rotate the lens clockwise until the tabs are tightly secured and the lens release button locks the lens in place. 4. Secure lock-down screws (optional): For added stability, secure the adjustment screws provided on the lens-retaining ring. If you have installed a large zoom lens, one or more of the screws may be inaccessible — simply tighten those that are accessible. Connecting the Scaler 1. Connect all sources to the inputs of the Scaler. 2. Connect a HDMI cable from the video output of the Scaler to input 2(DVI) in the projector. 3. Connect power to the AC input using the provided power cable. The Scaler will automatically turn on. If a Red LED is shown on the right side of the front panel, the Scaler is receiving AC power but no signal is detected. If a Blue LED is shown, the Scaler is receiving AC power and a good video signal is being detected. No LED indicates there is no AC power within the Scaler. RS-232 GPIO Component 1 Y B-Y R-Y Sync H 1 V 2 Video Y B-Y R-Y Component 2 / RGBHV S-Video Output Service HDMI 1 HDMI 2 HDMI 3 HDMI 4 NOTE: If RS-232 is being used to control the Scaler, GPIO is not used. Wolf Cinema Quick Setup Guide 2 HDMI 5 Video / Audio Audio IR Control AC Input 110-240V, 50/60Hz The Projector Channel Memories All projectors come with 10 Channel Memories that are pre-set for the Scaler's inputs, the VariScope lens feature and VariScope 2.35 Anamorphic lens configurations; all based on the installation specifications supplied by the dealer. Once the 10 Channel Memories are calibrated at the installation, those Channel Memories can be copied to the remaining empty Channel Memory slots (11-99). See the entire Channel Memory Structure Table at end of this Quick Setup Guide. Channel Memory Setup Channel 01 HDMI 1 1.78 Channel 02 HDMI 1 1.85 Channel 03 HDMI 1 2.20 Channel 04 HDMI 1 2.35 Channel 05 HDMI 1 2.40 Channel 06 HDMI 1 2.35a Channel 07 HDMI 1 2.40a Channel 08 HDMI 1 2.60a Channel 09 HDMI 1 2.67a Channel 10 HDMI 1 2.70a The GPIO and VariScope 2.35 Memory Structure The Projector has 99 Channel Memory locations. Channel Memory 1-5 are to be used without the Anamorphic VariScope 2.35. Channel Memory 6-10 are to be used with the Anamorphic VariScope 2.35. Every block of 10 Channel Memory inputs will be structured in the same manor. (1-5 no anamorphic lens, 6-10 anamorphic lens.) Adjusting the VariScope Lens System The VariScope Lens System is enabled at the factory within the projector menus . This feature memorizes the Zoom and Focus settings for each of the projector's Channel Memories. This allows the calibrator to set each Channel Memory for a specific aspect ratio when using constant height with their screen system. Once the projector is installed, this feature will require some touch up for Channel Memory 1-10. Those Channel Memories can then be copied to the remaining Channel Memory slots as discussed in the Projector Channel Memory section. To adjust the VariScope lens setting for a particular Channel Memory: 1. To select a Channel Memory, press the “Channel” button on the remote. The projector's On Screen Display (OSD) will appear with the Channel Memory list. 2. Scroll with the Up or Down buttons; highlight and select the channel by pressing the Enter button. 3. Use the Zoom and Focus adjustments on the remote to achieve the desired aspect ratio. The settings will automatically be stored in memory. NOTE: The VariScope Lens System must be selected for this feature to operate and is enabled at the factory. If the feature is disabled, it can be re-enabled in the Geometry and Color sub-menu located within the Display Setup menu. 3 Wolf Cinema Quick Setup Guide Copying Channel Memories 1. To select a Channel Memory to be copied, press the Menu will appear. 2. Scroll with the Up or Menu button on the remote. The projector's On Screen Display (OSD) Down buttons; highlight and select “Channel Setup” by pressing the Enter button. 3. The Channel Memory list from the OSD will appear. or 4. Highlight the channel to be copied by scrolling with the Up Down buttons. 5. Once the Channel Memory to be copied is highlighted, select the Function Func button at the bottom of the remote control. 6. The OSD for copying the memory will appear. Please use care not to select any of the delete functions associated with this operation. 7. Highlight “Copy” and select the Enter button: The Channel Memory will copy to the next available Channel Memory slot plus one. For example, if the next available Channel Memory is channel 11, the copied channel will appear at channel 12. Changing the Numerical Location of Channel Memories As a channel is being copied, the Channel Memory should be assigned to its proper location. 1. Select the Channel Memory by pressing the Menu 2. Scroll with the Up or Menu button on the remote. The projector's OSD will appear. Down buttons; highlight and select “Channel Setup” by pressing the Enter 3. The channel list from the OSD will appear. 4. Highlight the desired channel and select the Enter button. The “Channel Edit” OSD will appear. 5. Scroll to the second slot that shows “Number” and select the Enter button. 6. Select the desired number location by entering it onto the remote control keypad. Wolf Cinema Quick Setup Guide 4 button. GPIO Channel Memory Structure TABLE Channel GPIO Control to VariScope 2.35 Input/GPIO Selection at Scaler Channel GPIO Control to VariScope 2.35 Input/GPIO Selection at Scaler Channel GPIO Control to VariScope 2.35 Input/GPIO Selection at Scaler Channel 01 No HDMI 1 Channel 34 No HDMI 4 Channel 67 Yes COMP 1 Channel 02 Channel 03 No HDMI 1 Channel 35 No HDMI 1 Channel 36 No HDMI 4 Channel 68 Yes COMP 1 Yes HDMI 4 Channel 69 Yes COMP 1 Channel 04 No HDMI 1 Channel 37 Yes HDMI 4 Channel 70 Yes COMP 1 Channel 05 No HDMI 1 Channel 06 Yes HDMI 1 Channel 38 Yes HDMI 4 Channel 71 No COMP 2 Channel 39 Yes HDMI 4 Channel 72 No COMP 2 Channel 07 Yes Channel 08 Yes HDMI 1 Channel 40 Yes HDMI 4 Channel 73 No COMP 2 HDMI 1 Channel 41 No HDMI 5 Channel 74 No COMP 2 Channel 09 Yes HDMI 1 Channel 42 No HDMI 5 Channel 75 No COMP 2 Channel 10 Yes HDMI 1 Channel 43 No HDMI 5 Channel 76 Yes COMP 2 Channel 11 No HDMI 2 Channel 44 No HDMI 5 Channel 77 Yes COMP 2 Channel 12 No HDMI 2 Channel 45 No HDMI 5 Channel 78 Yes COMP 2 Channel 13 No HDMI 2 Channel 46 Yes HDMI 5 Channel 79 Yes COMP 2 Channel 14 No HDMI 2 Channel 47 Yes HDMI 5 Channel 80 Yes COMP 2 Channel 15 No HDMI 2 Channel 48 Yes HDMI 5 Channel 81 No SVIDEO Channel 16 Yes HDMI 2 Channel 49 Yes HDMI 5 Channel 82 No SVIDEO Channel 17 Yes HDMI 2 Channel 50 Yes HDMI 5 Channel 83 No SVIDEO Channel 18 Yes HDMI 2 Channel 51 No HDMI 6 Channel 84 No SVIDEO Channel 19 Yes HDMI 2 Channel 52 No HDMI 6 Channel 85 No SVIDEO Channel 20 Yes HDMI 2 Channel 53 No HDMI 6 Channel 86 Yes SVIDEO Channel 21 No HDMI 3 Channel 54 No HDMI 6 Channel 87 Yes SVIDEO Channel 22 No HDMI 3 Channel 55 No HDMI 6 Channel 88 Yes SVIDEO Channel 23 No HDMI 3 Channel 56 Yes HDMI 6 Channel 89 Yes SVIDEO Channel 24 No HDMI 3 Channel 57 Yes HDMI 6 Channel 90 Yes SVIDEO Channel 25 No HDMI 3 Channel 58 Yes HDMI 6 Channel 91 No VIDEO Channel 26 Yes HDMI 3 Channel 59 Yes HDMI 6 Channel 92 No VIDEO Channel 27 Yes HDMI 3 Channel 60 Yes HDMI 6 Channel 93 No VIDEO Channel 28 Yes HDMI 3 Channel 61 No COMP 1 Channel 94 No VIDEO Channel 29 Yes HDMI 3 Channel 62 No COMP 1 Channel 95 No VIDEO Channel 30 Yes HDMI 3 Channel 63 No COMP 1 Channel 96 Yes VIDEO Channel 31 No HDMI 4 Channel 64 No COMP 1 Channel 97 Yes VIDEO Channel 32 No HDMI 4 Channel 65 No COMP 1 Channel 98 Yes VIDEO Channel 33 No HDMI 4 Channel 66 Yes COMP 1 Channel 99 Yes VIDEO NOTE: When using RS-232 control, all channels can be used for any aspect ratio. NOTE: The GPIO Channel Memory Structure is used only when GPIO is enabled. 5 Wolf Cinema Quick Setup Guide Wolf Cinema . 2431 Fifth Street . Berkeley . CA 94710 . Ph: 510.843.4500 . Fax: 510.843.7120 . www.wolfcinema.com