1
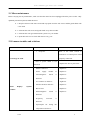
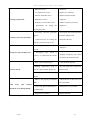
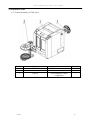
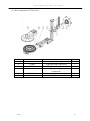
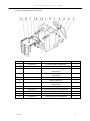
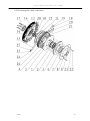
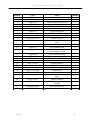
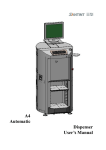
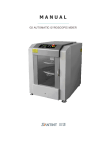
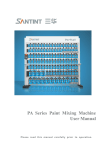
G360 Automatic Gyro Mixer User’s Manual G360 automatic gyro mixer user’s manual Contents Contents 1. General overview…………………………………………………………………………2 2. Technical features and parameters………………………………………………………2 3. Precautions………………………………………………………………………………..3 4. Equipment indtroductions……………………………………………………………….4 5. Control panels……………………………………………………………………………..4 6. Equipment installation……………………………………………………………………5 7. Instructions to control panel buttons…………………………………………………….6 8. Mixing ranges and speed selections………………………………………………………7 9. Mixer test and operations…………………………………………………………..7 10. Warnings and notices…………………………………………………………………….8 11. Mixer Maintenance………………………… …………………………………………………...9 12. Common troubles and solutions…………………………………………………………9 13. Exploded views……………………………………………………………………………11 14. Nameplate…………………………………………………………………………………16 15. Circuit diagram…………………………………………………………………………..17 G360 1 G360 automatic gyro mixer user’s manual 1. General overview G360 Automatic Gyroscopic Mixer is designed for paint mixing with the following main features: Ergonomic design and viewing door to facilitate observation of mixing process. Viewing door with electronic lock to protect the mixer from starting up while the door is open and to prevent the door from being opened in the process of operation. Tri-directional sliding door structure operated from the top, easy and comfortable to operate, saving more outer space Retractable loading plate for easy loading and unloading of paint cans. LCD control panel serves to display each step of operation or any possible issues. Convenient for operation. Integrated multifunctional buttons, simple to operate. Integrated control board can adjust speeds using multi-segment intelligent frequency conversion system. The mixer can automatically detect the height of paint can and select mixing speed accordingly. An electromagnetic brake mechanism provides protection to both operators and paint cans. A well-closed structure enables the mixer to work under more hazardous surroundings. The mixer is equipped with castors for easy transportation. 2. Technical features and parameters Equipment models Number Items G360 1 Power supply 2 Motor power 0.75kw 3 Power of frequency converters 0.75kw 4 Motion guide rail for lower tray Round guide rail with diameter 20 5 Mixing speed Medium speed 150 r/min high speed 200r/min 6 Opening and closing height of pressing plate 80mm~420 mm 7 Mixing ranges 1L~20 L cans 8 Applied cans Maximum swing diameter 50~360mm Height 90~400mm G360 220V ±5% 50Hz single phase alternative current 2 G360 automatic gyro mixer user’s manual 9 Mixing time setting Minimum time:30 sec Maximum time:900 sec Interval time:30 sec 10 Shape size (W×D×H) 780×860×1050 mm 11 Equipment weight 225kg 12 Equipment noise <70dB(A) 3. Precautions 3.1 Power supply: voltage 220V±5%, electric current: 15A, working environment temperature: 0℃~ 55℃, relative humidity: 15%~90%. 3.2 Read the manual carefully before installation and usage. Never allow young people near the mixer. 3.3 Before using the mixer, confirm the outlet has a ground. 3.4 Before carrying out any repairs or maintenance, remember to disconnect the mixer from the power source. It is prohibited to perform repairs or maintenance before disconnecting the mixer or while the mixer is in operation. 3.5 Do not use an improper extension cable. Please disconnect the mixer when not used for an extended period of time. 3.6 Adjust the four feet to level and secure the mixer to the ground. Do not let the castors touch the ground so to avoid vibrations. 3.7 Do not work in a flammable and explosive environment. G360 3 G360 automatic gyro mixer user’s manual 4. Equipment introduction Right side control panel Left side control panel Mobile top cover Master switch Cover Pressing plate Tray and box Viewing door G360 4 G360 automatic gyro mixer user’s manual 5. Control panels (下图为中文,且型号为 G420) The graphic representations above are of the G420 control panel. The G360 control panels are as same as G420 control panels except for the model listing. 6. Equipment installation The operation procedures are as follows: 1. Open the packing box and dismantle the four feet platens. Move the mixer to level ground and to final operating location. 2. Using the feet level and stabilize the mixer until the castors are no longer touching the ground. 3. Open the rubber snap-on cover on the top, remove the screw under the snap-on cover and reinstall the snap-on cover (once the screw is removed, the door can open). Fix the screw (to save for future use) onto the right upper corner of the right-side panel. Refer to the following figure. (Caution: when packing and transporting for a second time, refasten the screw so to lock and prevent door damage due to shock during transportation.) G360 5 G360 automatic gyro mixer user’s manual The screw dismantled from the top cover shall be fixed here. 7. Instructions to control panel buttons Time - + ● Minimum program set mix time is 30 sec. Maximum mix time is 900 sec. Minimum adjusting time interval is 30 sec. ● Time knob can be rotated clockwise and counterclockwise. ● Time knob rotates clockwise, time increases. When time increases to maximum 900 sec, if continued to rotate clockwise, time will start to re-increase progressively from 30 sec. ● Time knob rotates counterclockwise, time decreases. When time decreases to minimum 30 sec, if continued to rotate counterclockwise, time will begin to re-decrease progressively from 900 sec. ● Mixer-opening default mixing time is 180 sec. ● After adjusting the mixing time, the default mixing time woill be the same as the previous mixing time. Start·Stop·Reset ● When the mixer it at rest, the LCD will display Ready, press the Start/Stop/Reset button to begin operation. ● While the mixer is in operation, press the Start/Stop/Reset button to stop operation. ● When the emergency stop button is pressed the mixer will immediately stop operation. Once the emergency stop button is released, press the Start/Stop/Reset button, and the mixer will reset and the mixing assembly will reset itself to its normal position. G360 6 G360 automatic gyro mixer user’s manual ● When the equipment stops mixing or resets, the pressing plate will be open to its maximum position. ● The button is multi-functional, each function is independent, thus there is no interventions between functions. Easy and reliable to operate. Emergency stop ● When encountering any abnormities, press the emergency stop button at once to stop the mixer. The LCD will display “Emergency Button Pressed”. ● To restart the mixer, rotate the button clockwise to release it. Then press “Stop/Reset” button so that the mixer can reset to its normal operating position. 8. Mixing ranges and speed selections Can specifications High speed 200r/min 1 litre √ 5 litre √ 20 litre Medium speed 150r/min Remarks Minimum height 90mm √ Maximum weight G360 36kg 9. Mixer test and operations 9.1 Connect the power and turn on the power switch. The LCD displays “Wait A Moment Please” and moments later displays “Ready”. The mixer is now ready for use. If the emergency stop switch is not released, LCD will display “Emergency Stop Switch Pressed”. Releasing the emergency stop button by turning it clockwise. If the mixer position is correct, the LCD will display “Ready”. If the mixer position is incorrect, the LCD will display “Please Press The Reset Button To Reset”. 9.2 Ensure the paint can is well sealed and the handle is well fastened so to prevent rattling and damage to the can. 9.3 Open the viewing door, push the lock handle upwards on the bottom plate and pull out the bottom plate. Place paint can on the bottom plate taking into account can size and quantity. Make sure that the center of gravity of the can must be as center as possible of the bottom plate. Push back the bottom plate until it locks into place. G360 7 G360 automatic gyro mixer user’s manual Close the viewing door. If the door is not completely closed, the LCD will display “Door Open” when the start button is pressed. 9.4 Set the mixing time: the initial mixing time is 180 seconds, turn the time knob to adjust it until the desired value. When the mixing finished, the last time entered will be the default time. 9.5 Mixing speed: the mixing speed is set automatically by the program according to the can height. If the can height exceeds 200 mm, the mixing speed is set to medium. If the can height is less than or equal to 220 mm, the mixing speed is set to high. 9.6 The clamping plate clamps automatically and the mixer starts to mix. The LCD will display “Mixing” and the remaining time. You may press the stop button to stop the mixer during its operation. 9.7 In the process of mixing, pay attention to the working condition of the machine. The mixer will stop automatically displaying “Wait Please” on LCD when the time set is reached. Shortly after the LCD will display “Mixing Finished” and the clamping plate will release automatically. In case there is any abnormal noises, press the Emergency Stop button to stop the machine. 9.8 Open the viewing door, pull out the tray, take out the mixed can. 9.9 Repeat the above steps 2-9. 10. Warnings and notices 10.1 Make sure the paint can is well sealed and the handle is well fastened and secured to prevent rattling and damage to the can. 10.2 In case there is any abnormal noises, press the Emergency Stop button to stop the machine. Find and solve the problem before restarting the machine. 10.3 The can should have certain intensity and have no serious deformations. 10.4 The bottom plate must be secured in the lock position. Always confirm it is locked in place before starting the mixer. Serious damage or injury may occur if not properly locked in place. 10.5 In the process of mixing, if the speed is too low or there is any abnormity, press Emergency Stop button immediately. Otherwise this may damage the motor or the frequency converter. 10.6 If the door is difficult to open, pull the door forward gently and use a screwdriver to move the door. If the inner assembly is not positioned correctly, close the door and press the reset button to open the door. 10.7 Only qualified personnel are allowed to disassemble and test the mixer. 10.8 Place (a) paint can(s) on the bottom plate so that they are (it is) centered/symmetrical as well as can be. G360 8 G360 automatic gyro mixer user’s manual 11. Mixer maintenance Before carrying out any maintenance, make sure that the mixer has been unplugged from the power socket. Only qualified personel may disassemble the mixer. 11.1 Keep the interior of the mixer clean and wipe paint of on the side screws and the guide shafts with a wet cloth. 11.2 Lubricate the side screws and guide shafts every three months. 11.3 Lubricate the cone-gear transmission system every six months. 11.4 Open the back cover to check belt tension every year. 12.Common troubles and solutions Troubles Causes Solutions 1. No power. Check if the main switch is switched on or if main power chord is properly connected. No message on LCD. 2. Fuse or power chord is not 2. Replace the fuse or power line. connected. 1. Motor is defective. 2. Power 1. Replace it. supply module of 2. Replace it. electromagnetic clutch is 3. Replace it. defective. LCD displays 4. Replace it. 3. AC contactor is defective. 5. Tighten it. 4. Interface board is defective. 6. Replace it. 5. Belt is loose. 7. Replace it. “System Trouble”. 6. Electromagnetic clutch is 8. Replace it. defective. 7. Frequency converter is defective. 8. Optocoupler for testing the off-position is defective. G360 9 G360 automatic gyro mixer user’s manual Pressing system issues. 1. Motor has issues. 1. Replace it. 2. AC contactor has issues. 2. Replace AC contactor. 3. Interface board has issues. 3. Replace interface board. 4. Ribbed belt is loose. 4. Tighten it. 5. Frequency converter has issues. 5. Replace frequency converter. 6. Optocoupler for testing the 6. Replace it. pressing has issues. 1. Frequency converter protection 1. Turn off the power and restart the appears. mixer three minutes later. 2. Connection line for testing the 2. Reconnect the line. Frequency converter protection. frequency converter issue is off. 1. Emergency stop switch is 1. Release it. pressed. Emergency stop switch pressed. 2. Emergency stop switch is 2. Replace emergency stop switch defective or connection line breaks or reconnect the connection line. off. Door not closed. 1. Door is not closed properly. 1. Close the door properly. 2.Winding displacement plug is 2. Insert the plug well or replace the loose or connection line breaks off. connection line. 3. Microswitch is not making 3. Check and adjust microswitch. contact. Loud noise and 1. Mixer is not properly leveled and 1. Adjust the feet of the mixer so it stable. is level and stable. 2. Can is not placed centrically or 2. Readjust the can’s position. extreme vibrations occur during mixing. symmetrically. 3. Equipment overloaded. 3. Reduce the load. Contact your agent for any other issues! G360 10 G360 automatic gyro mixer user’s manual 13.Exploded views 13.1 General assembly of G360 mixer Number 1 2 3 G360 Code G360.02 G360.01 G5B.14 Name G360 outer components G360 inner components Electromagnetic clutch components Quantity 1 1 1 11 G360 automatic gyro mixer user’s manual 13.2 Inner components of G360 mixer Number 1 2 3 4 Code G5B.01 G5B.05 G5B.03 G5B.04 5 6 G360.01.01 G360.01.02 G360 Name G5B large flange components G5B main shaft components G5B guide rail components G5B upper pressing plate arm components G360 lower support arm components G360 sliding seat components Quantity 1 1 1 1 1 1 12 G360 automatic gyro mixer user’s manual 13.3 Outer components of G360 mixer Number 1 2 3 Code G360.02.01 4 G360.02.08 5 6 7 G360.02.04 8 9 10 11 12 G360.02.05 G360.02.02 G360.02.06 G360.02.03 G360.02.07 G360 G360.02.09 Name Quantity G360 box body components 1 Tensioner pulley components 1 G360 electrical mounting plate 1 components G360 pressing reset optocoupler 1 components G5B motor components 1 Multi-wedge belt 1 G360 door motion guide rail 2 components G360 door motion support components 1 G360 front top cover components 1 G360 control panel components 1 G360 door components 1 G360 electrolock components 1 13 G360 automatic gyro mixer user’s manual 13.4 Electromagnetic clutch components G360 14 G360 automatic gyro mixer user’s manual Number 1 2 3 4 5 6 7 8 9 10 11 Code GB/T 276-94 GB 893.1-86 G5B.14.01 G5B.14-08 G5B.14-06 G5B.14.04 G5B.14-05 G5B.14-02 GB/T1096-1979 GB/T 1096-1979 G5B.14.03 12 13 14 GB 894.1-86 G5B.14-03 G5B.14-10 15 16 17 18 19 20 21 22 23 24 G5B.14-04 G5B.14.05 G5B.14-01 GB/T 70.1-2000 GB/T 93-1987 G5B.14-07 G5B.14-09 GB/T 5783-2000 GB/T 93-1987 GB/T 818-2000 25 26 GB/T93-1987 G5B.14.02 27 28 GB/T848-2000 SHH-VI.01-04 G360 Name Bearing 6012 Circlip for hole 95 G5B assembly of brake disk G5B pressing plate spring G5B armature iron plate G5B centering plate components G5B pressing plate G5B hollow axle Flat key 10×22 Flat key C10×16 G5B assembly of dynamic friction plate Circlip for shaft 60 G5B adjustable pad G5B spacer bush of electromagnetic clutch G5B reset baffle board G5B moving plate components G5B pressing axle flange Inner hexagon screw M8×20 Elastic washer 8 G5B fixed block G5B guide pillar Bolt M6×20 Elastic washer 6 Cross recessed pan head screw M4×6 Elastcic washer 4 G5B electromagnetic plate assembly Small flat washer 4 Bevel gear adjustable pad Quantity 2 1 1 8 1 1 1 1 1 1 1 1 1 1 1 1 1 2 2 1 4 10 10 2 2 1 2 1 15 G360 automatic gyro mixer user’s manual 14.Nameplate 贴铭牌 G360 16 G360 automatic gyro mixer user’s manual 15.Circuit diagram 贴线路图 G360 17 Zhengzhou Sanhua Technology & Industry Co.,Ltd. Address: Xushui Industrial & Trading Park, Zhongyuan West Road, Zhengzhou City, Henan Province, P.R.C. Telephone:0371-65110760,800-8836987 website: www.santint.com P.C.450042 Fax:0371-67857219 e-mail: [email protected]