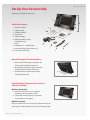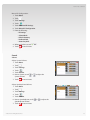
1
V E R I Z O N
L E TU
’ SS EG RE TG SUTI ADRET E D
© 2009 Verizon. All Rights Reserved.
Contents
Verizon Hub User Guide
Set Up Your Verizon Hub.................................................................................................................................. 1
Verify Box Contents......................................................................................................................................................... 1
Attach the Support Stand to the Base............................................................................................................. 1
Decide How You’ll Connect to the Internet (Wireless or Wired)................................................ 1
Wireless Connection............................................................................................................................................... 1
Wired Connection..................................................................................................................................................... 1
Other Considerations............................................................................................................................................. 2
Caution.................................................................................................................................................................... 2
Plug in Your Verizon Hub............................................................................................................................................ 2
Insert the Handset Battery........................................................................................................................................ 3
Place the Handset in Its Cradle.............................................................................................................................. 3
Attach Stickers..................................................................................................................................................................... 3
Set Up Verizon Hub and Digital Voice Service.......................................................................................... 4
How to Enter Information.......................................................................................................................................... 4
Connect to Wireless Network.................................................................................................................................. 4
Connect to Wired Network........................................................................................................................................ 5
Add Backup Number....................................................................................................................................................... 6
Take Tour................................................................................................................................................................................... 7
Set Up Voice Mail............................................................................................................................................................... 7
Transfer Existing Home Phone Number to Your Verizon Hub..................................................... 7
Handset Controls............................................................................................................................................................... 8
Front View........................................................................................................................................................................ 8
OK Button/Joystick.................................................................................................................................................. 8
Side Views........................................................................................................................................................................ 9
Volume Controls................................................................................................................................................................. 9
Ringer Volume............................................................................................................................................................. 9
Handset Speaker Volume..................................................................................................................................10
Keypad Button Volume.......................................................................................................................................10
Headset Jack........................................................................................................................................................................10
© 2009 Verizon. All Rights Reserved.
ii
Verizon Hub User Guide
Set Up Accessory Handset & Charging Cradle....................................................................11
Verify Box Contents.......................................................................................................................................................11
Insert the Handset Battery......................................................................................................................................11
Activate Accessory Handset With Base.........................................................................................................12
Plug in Accessory Handset Charging Cradle............................................................................................12
Verizon Hub Base....................................................................................................................................................13
Home Screen.......................................................................................................................................................................13
Weather...........................................................................................................................................................................13
Check Current Weather or Extended Forecast............................................................................13
Add Weather Location.................................................................................................................................14
Change Weather Location on Home Screen................................................................................14
Delete Weather Location............................................................................................................................15
Date & Time..................................................................................................................................................................15
Change Time Zone.........................................................................................................................................15
View Calendar....................................................................................................................................................15
Home Screen Settings/Widgets...................................................................................................................16
View Missed Calls.............................................................................................................................................16
Check New Voice Mail..................................................................................................................................16
View New Text, Photo and Video Messages.................................................................................16
Turn On Do Not Disturb..............................................................................................................................17
Turn Off Do Not Disturb..............................................................................................................................17
Turn On Call Forwarding............................................................................................................................17
Turn Off Call Forwarding............................................................................................................................18
Manage Calling Features............................................................................................................................18
Dial Pad...........................................................................................................................................................................18
Make a Call...........................................................................................................................................................18
View Calls...............................................................................................................................................................19
Locate Handset.................................................................................................................................................19
Intercom.................................................................................................................................................................19
Open Menu.................................................................................................................................................................. 20
Answer a Call.............................................................................................................................................................. 20
Block a Call................................................................................................................................................................... 20
Ignore a Call................................................................................................................................................................ 20
Answer Call Waiting...............................................................................................................................................21
© 2009 Verizon. All Rights Reserved.
iii
Verizon Hub User Guide
Make a 3-Way Call...................................................................................................................................................21
Adjust Speaker/Ringer Volume....................................................................................................................21
Use Speakerphone.................................................................................................................................................21
Communications............................................................................................................................................................. 22
Dial Pad.......................................................................................................................................................................... 22
Make a Call.......................................................................................................................................................... 22
View Calls.............................................................................................................................................................. 22
Calling Features............................................................................................................................................... 22
Locate Handset................................................................................................................................................ 23
Intercom................................................................................................................................................................ 23
PhotoDial...................................................................................................................................................................... 24
Add Contact to PhotoDial........................................................................................................................ 24
Call Contact With PhotoDial................................................................................................................... 24
Delete Contact From PhotoDial........................................................................................................... 24
Calls................................................................................................................................................................................... 25
View Calls.............................................................................................................................................................. 25
Delete a Call........................................................................................................................................................ 25
Delete All Calls.................................................................................................................................................. 25
Add Caller to Contacts................................................................................................................................ 26
Call a Person From Calls............................................................................................................................. 27
Contacts......................................................................................................................................................................... 27
View All Contacts............................................................................................................................................ 27
Add a Contact................................................................................................................................................... 27
Edit a Contact.................................................................................................................................................... 28
Delete a Contact.............................................................................................................................................. 29
Search for Contact......................................................................................................................................... 29
View Contacts by Group............................................................................................................................ 30
Call a Contact..................................................................................................................................................... 30
Send a Text or Picture Message to a Contact...............................................................................31
Map a Contact’s Location...........................................................................................................................31
Get Directions to a Contact’s Location............................................................................................ 32
Add Group........................................................................................................................................................... 32
Delete Group..................................................................................................................................................... 32
Voice Mail..................................................................................................................................................................... 33
Set Up Voice Mail............................................................................................................................................ 33
View Voice Mail Messages........................................................................................................................ 33
© 2009 Verizon. All Rights Reserved.
iv
Verizon Hub User Guide
Play a Voice Mail Message........................................................................................................................ 33
Delete a Voice Mail Message.................................................................................................................. 33
Call Back a Caller.............................................................................................................................................. 34
Reply to Voice Mail Message With a Text or Picture Message......................................... 34
Map a Caller’s Location............................................................................................................................... 35
Messaging.................................................................................................................................................................... 35
Text/Picture Messages................................................................................................................................ 35
View a Message......................................................................................................................................... 35
Send a New Text, Picture or Video Message......................................................................... 35
Reply to a Message................................................................................................................................. 36
Forward a Message................................................................................................................................. 37
Delete a Message..................................................................................................................................... 37
Verizon Messages........................................................................................................................................... 38
View Verizon Messages........................................................................................................................ 38
Delete a Verizon Message.................................................................................................................. 38
Delete All Verizon Messages............................................................................................................ 38
Contacts.................................................................................................................................................................................. 39
Messaging............................................................................................................................................................................ 39
Directories............................................................................................................................................................................ 39
Directories.................................................................................................................................................................... 39
Business Search............................................................................................................................................... 39
Search for a Business............................................................................................................................. 39
Get Directions to a Business............................................................................................................ 40
People Search.....................................................................................................................................................41
Search for a Person..................................................................................................................................41
Reverse Lookup.................................................................................................................................................41
Search for a Person or Business by Phone Number.........................................................41
Movies...................................................................................................................................................................................... 42
View Movies................................................................................................................................................................ 42
Now Playing in Your Area.......................................................................................................................... 42
Opening This Week in Your Area.......................................................................................................... 42
Coming Soon in Your Area....................................................................................................................... 43
Watch Movie Trailers.................................................................................................................................... 43
Purchase Tickets.............................................................................................................................................. 43
Theaters......................................................................................................................................................................... 44
© 2009 Verizon. All Rights Reserved.
v
Verizon Hub User Guide
Find a Theater Near Me.............................................................................................................................. 44
Search for Theaters in Other Areas..................................................................................................... 44
History............................................................................................................................................................................. 45
Chaperone®......................................................................................................................................................................... 45
Find Location of Contact.................................................................................................................................. 45
V CAST®.................................................................................................................................................................................... 46
Watch Videos..................................................................................................................................................... 46
Listen to Internet Radio.............................................................................................................................. 46
Verizon Relay.......................................................................................................................................................................47
View Messages..........................................................................................................................................................47
View All Members...................................................................................................................................................47
Add a Member Manually...................................................................................................................................47
Add a Member From Contacts..................................................................................................................... 48
Delete Member......................................................................................................................................................... 48
View Tiles Online..................................................................................................................................................... 49
Calendar................................................................................................................................................................................. 49
View Calendar........................................................................................................................................................... 49
View Event................................................................................................................................................................... 49
Add Event..................................................................................................................................................................... 50
Add Birthday.............................................................................................................................................................. 50
Add Anniversary.......................................................................................................................................................51
Edit Event...................................................................................................................................................................... 52
Delete Event............................................................................................................................................................... 52
Calculator.............................................................................................................................................................................. 52
Use the Calculator.................................................................................................................................................. 52
Traffic........................................................................................................................................................................................ 53
Check Local Traffic................................................................................................................................................. 53
View Traffic for Another Area........................................................................................................................ 53
Settings................................................................................................................................................................................... 53
General........................................................................................................................................................................... 53
Weather................................................................................................................................................................. 53
View Current Weather Location(s)............................................................................................... 53
Add Weather Location......................................................................................................................... 54
Change Home Weather Location................................................................................................. 54
Delete Weather Location.................................................................................................................... 55
© 2009 Verizon. All Rights Reserved.
vi
Verizon Hub User Guide
Home Screen Settings................................................................................................................................. 55
Add Weather Widget to Home Screen...................................................................................... 55
Remove Weather Widget From Home Screen..................................................................... 55
Add Date & Time Widget to Home Screen............................................................................. 56
Remove Date & Time Widget From Home Screen............................................................ 56
Add Call Features Widget to Home Screen........................................................................... 56
Remove Call Features Widget From Home Screen.......................................................... 57
Add Calls & Messages Widget to Home Screen................................................................. 57
Remove Calls & Messages Widget From Home Screen................................................ 57
Date & Time......................................................................................................................................................... 58
View Current Date & Time Settings............................................................................................. 58
Change Time Zone.................................................................................................................................. 58
Handsets............................................................................................................................................................... 58
View Activated Handsets................................................................................................................... 58
Activate Handset Automatically................................................................................................... 59
Activate Handset Manually............................................................................................................... 59
Delete Handset.......................................................................................................................................... 59
Verizon Hub Tour............................................................................................................................................. 60
Calling Features....................................................................................................................................................... 60
Call Forwarding................................................................................................................................................ 60
Turn On Call Forwarding—First Time Setup..........................................................................61
Turn On Call Forwarding—Already Set Up............................................................................61
Turn Off Call Forwarding.................................................................................................................... 62
Do Not Disturb.................................................................................................................................................. 62
Turn On Do Not Disturb...................................................................................................................... 62
Turn Off Do Not Disturb...................................................................................................................... 62
Incoming Call Block...................................................................................................................................... 63
Turn On Incoming Call Block........................................................................................................... 63
Turn Off Incoming Call Block........................................................................................................... 63
Simultaneous Ring........................................................................................................................................ 64
Turn On Simultaneous Ring............................................................................................................. 64
Turn Off Simultaneous Ring............................................................................................................. 65
Backup Numbers............................................................................................................................................. 65
Change Backup Number.................................................................................................................... 65
Call Waiting......................................................................................................................................................... 66
Turn On Call Waiting.............................................................................................................................. 66
© 2009 Verizon. All Rights Reserved.
vii
Verizon Hub User Guide
Turn Off Call Waiting.............................................................................................................................. 66
Caller ID Block....................................................................................................................................................67
Turn On Caller ID Block.........................................................................................................................67
Turn Off Caller ID Block.........................................................................................................................67
International Call Block...............................................................................................................................67
Voice Mail Settings........................................................................................................................................ 68
Change Number of Rings Before Going to Voice Mail.................................................. 68
Send Email Notification of New Voice Mail........................................................................... 68
Change Voice Mail Passcode........................................................................................................... 69
Change Voice Mail Greeting............................................................................................................. 69
Display............................................................................................................................................................................. 69
Wallpaper............................................................................................................................................................. 69
Change Wallpaper................................................................................................................................... 69
Screensaver......................................................................................................................................................... 70
Change Screensaver.............................................................................................................................. 70
Upload New Photos for Wallpaper and Screensaver............................................................. 70
Network......................................................................................................................................................................... 71
Check Wired Connection.......................................................................................................................... 71
Connect to Wired Network...................................................................................................................... 71
Check Wireless Connection..................................................................................................................... 71
Connect to Wireless Connection......................................................................................................... 71
Change Network............................................................................................................................................. 72
IP Address............................................................................................................................................................. 72
Obtain IP Automatically...................................................................................................................... 72
Manual IP Configuration.................................................................................................................... 73
Sound............................................................................................................................................................................... 73
Volume................................................................................................................................................................... 73
Adjust System Volume......................................................................................................................... 73
Adjust Speakerphone Volume........................................................................................................ 73
Adjust Ringer Volume............................................................................................................................74
Adjust Media Volume.............................................................................................................................74
Ringtone................................................................................................................................................................74
Listen to Current Ringtone................................................................................................................74
Change Ringtone......................................................................................................................................74
System..............................................................................................................................................................................75
System Information.......................................................................................................................................75
© 2009 Verizon. All Rights Reserved.
viii
Verizon Hub User Guide
View System Information....................................................................................................................75
Check if Verizon Hub is Online........................................................................................................75
Version Information.......................................................................................................................................75
View Version Information...................................................................................................................75
System Resets.....................................................................................................................................................76
Verizon Hub Reset....................................................................................................................................76
Apps............................................................................................................................................................................................76
Download Apps........................................................................................................................................................76
View My Stuff..............................................................................................................................................................76
Remove App............................................................................................................................................................... 77
Using Apps................................................................................................................................................................... 77
Horoscopes......................................................................................................................................................... 77
Internet Radio................................................................................................................................................... 77
Listen to Internet Radio....................................................................................................................... 77
Add Station to My Favorites............................................................................................................. 78
Remove Station From My Favorites............................................................................................ 79
Photo Viewer...................................................................................................................................................... 79
View Album.................................................................................................................................................. 79
Play Slideshow........................................................................................................................................... 80
Create New Album.................................................................................................................................. 80
Edit Album.....................................................................................................................................................81
Delete Album..............................................................................................................................................81
Change Wallpaper....................................................................................................................................81
Make Screensaver.................................................................................................................................... 82
Upload New Photos for Wallpaper and Screensaver...................................................... 82
Puzzle Games.................................................................................................................................................... 82
Play Number Puzzle............................................................................................................................... 82
Play Picture Puzzle.................................................................................................................................. 83
Play Sudoku................................................................................................................................................. 83
Recipes................................................................................................................................................................... 84
Feedback............................................................................................................................................................................... 84
Verizon Hub Handset(s)................................................................................................................................. 85
Volume Controls.............................................................................................................................................................. 86
Ringer Volume.......................................................................................................................................................... 86
Handset Speaker Volume................................................................................................................................. 86
© 2009 Verizon. All Rights Reserved.
ix
Verizon Hub User Guide
Keypad Button Volume...................................................................................................................................... 86
Headset Jack....................................................................................................................................................................... 87
Menu......................................................................................................................................................................................... 87
Received Calls............................................................................................................................................................ 87
View Received Calls....................................................................................................................................... 87
View Received Calls Details..................................................................................................................... 87
Received Calls – Add New Contact.................................................................................................... 88
Received Calls – Update Existing Contact.................................................................................... 88
Delete Received Call..................................................................................................................................... 89
Delete All Received Calls Information............................................................................................. 89
Dialed Calls.................................................................................................................................................................. 89
View Dialed Calls............................................................................................................................................. 89
View Dialed Calls Details........................................................................................................................... 90
Dialed Calls – Add New Contact.......................................................................................................... 90
Dialed Calls – Update Existing Contact............................................................................................91
Delete Dialed Call............................................................................................................................................91
Delete All Dialed Calls................................................................................................................................. 92
Contacts......................................................................................................................................................................... 92
Edit Contact........................................................................................................................................................ 93
View Contact Details.................................................................................................................................... 94
Delete Contact.................................................................................................................................................. 94
Delete All Contacts........................................................................................................................................ 95
Call Contact......................................................................................................................................................... 95
Settings.......................................................................................................................................................................... 96
Set Background................................................................................................................................................ 96
Ringtones............................................................................................................................................................. 96
Set Ringtone Type................................................................................................................................... 96
Set Ringtone Volume............................................................................................................................ 97
Set Contrast........................................................................................................................................................ 97
Keypad Volume................................................................................................................................................ 98
Registration........................................................................................................................................................ 98
Activate Handset Automatically................................................................................................... 98
Activate Handset Manually............................................................................................................... 99
Delete Handset.......................................................................................................................................... 99
Version.................................................................................................................................................................... 99
© 2009 Verizon. All Rights Reserved.
x
Verizon Hub User Guide
View Version Information.................................................................................................................. 99
Intercom............................................................................................................................................................. 100
Intercom From Verizon Hub Base to Handset......................................................................... 100
Intercom From Handset to Verizon Hub Base......................................................................... 100
Intercom from Handset to Handset................................................................................................101
Answer Incoming Call While Using Intercom...........................................................................101
Making Calls.....................................................................................................................................................................102
Place a Domestic Call........................................................................................................................................102
Place an International Call............................................................................................................................102
Automatically Blocked Numbers.............................................................................................................102
Collect Calls...............................................................................................................................................................102
Important 9-1-1 Emergency Response Information................................................................103
Important Digital Voice Service Information................................................................................ 104
Moving and Updating Your 9-1-1 Service Address.............................................................. 104
Prior to Moving............................................................................................................................................. 104
New Address....................................................................................................................................................105
Update Your 9-1-1 Emergency Response Service Address.............................................105
Digital Voice Calling Features.............................................................................................................. 106
Voice Mail........................................................................................................................................................................... 106
Set Up Voice Mail Account............................................................................................................................107
Change Personal Greeting............................................................................................................................107
Change Passcode..................................................................................................................................................108
Retrieve Voice Mail Messages............................................................................................................................109
Listen to Voice Mail.............................................................................................................................................109
Listen to Voice Mail Away from Home.................................................................................................110
Recover a Deleted Message......................................................................................................................... 111
Visual Voice Mail........................................................................................................................................................... 111
Listen to Voice Mail from your Computer......................................................................................... 111
Customizing Your Mailbox................................................................................................................................... 112
Select Message Preferences......................................................................................................................... 112
Change Ring Count............................................................................................................................................. 113
Set Up Voice Mail Email Notification..................................................................................................... 113
4-1-1 Directory Assistance................................................................................................................................... 113
© 2009 Verizon. All Rights Reserved.
xi
Verizon Hub User Guide
Caller ID With Name................................................................................................................................................... 114
Call Waiting........................................................................................................................................................................ 114
Use Call Waiting..................................................................................................................................................... 114
Temporarily Disable Call Waiting............................................................................................................. 114
Permanently Disable Call Waiting........................................................................................................... 115
Call Waiting With Caller ID.................................................................................................................................... 115
Caller ID Block................................................................................................................................................................. 115
Return Call *69................................................................................................................................................................116
Do Not Disturb................................................................................................................................................................ 117
3-Way Calling................................................................................................................................................................... 117
Start a 3-Way Call.................................................................................................................................................. 117
End a 3-Way Call.................................................................................................................................................... 117
Speed Dial 10...................................................................................................................................................................118
Add/Change Number on Speed Dial 10 List...................................................................................118
Domestic Numbers..............................................................................................................................118
International Numbers......................................................................................................................118
Make a Call Using Speed Dial 10.............................................................................................................. 119
Call Forwarding.............................................................................................................................................................. 119
Activate Call Forwarding................................................................................................................................120
Cancel Call Forwarding....................................................................................................................................120
Quick Reference Guide............................................................................................................................................121
Web Management Site..................................................................................................................................122
Registering Account on Web Management Site..........................................................................122
Checking Your Text Messages.....................................................................................................................123
Home.......................................................................................................................................................................................124
View Missed Calls.................................................................................................................................................124
View New Voice Mail..........................................................................................................................................124
Check New Messages........................................................................................................................................124
View All Calling Features................................................................................................................................124
View Today’s Calendar Events....................................................................................................................125
View New Verizon Relay Messages.........................................................................................................125
Change Wallpaper................................................................................................................................................125
Verizon Hub Photos............................................................................................................................................125
© 2009 Verizon. All Rights Reserved.
xii
Verizon Hub User Guide
View All Photos...............................................................................................................................................125
Upload Photos................................................................................................................................................126
Verizon Messages.................................................................................................................................................126
View All Verizon Messages.....................................................................................................................126
Transfer Your Number.......................................................................................................................................127
9-1-1 Emergency Response Service Address.................................................................................127
Communications...........................................................................................................................................................128
Calls.................................................................................................................................................................................128
View All Calls....................................................................................................................................................128
View Incoming Calls...................................................................................................................................128
View Outgoing Calls...................................................................................................................................128
View Missed Calls..........................................................................................................................................128
Delete Call..........................................................................................................................................................128
Add Caller to Contacts..............................................................................................................................129
Voice Mail...................................................................................................................................................................129
View All Voice Mail.......................................................................................................................................130
View Played Voice Mail.............................................................................................................................130
View Unplayed Voice Mail......................................................................................................................130
Play Voice Mail................................................................................................................................................130
Save Voice Mail Messages.......................................................................................................................131
Delete Voice Mail(s).....................................................................................................................................131
Messaging..................................................................................................................................................................131
View All Messages........................................................................................................................................131
View Sent Messages...................................................................................................................................131
View Received Messages.........................................................................................................................131
View Undelivered Messages.................................................................................................................131
View Unread Messages.............................................................................................................................132
Delete Message(s)........................................................................................................................................132
Verizon Relay....................................................................................................................................................................132
Add Member.............................................................................................................................................................132
Edit Member.............................................................................................................................................................133
View All Verizon Relay Messages.............................................................................................................133
View Verizon Relay Message.......................................................................................................................133
Delete Verizon Relay Message...................................................................................................................133
Contacts................................................................................................................................................................................134
View Contacts..........................................................................................................................................................134
© 2009 Verizon. All Rights Reserved.
xiii
Verizon Hub User Guide
Add Contact..............................................................................................................................................................134
Edit Contact..............................................................................................................................................................134
Delete Contact........................................................................................................................................................135
Add Group..................................................................................................................................................................135
Rename Group........................................................................................................................................................135
Delete Group............................................................................................................................................................135
Import Contacts.....................................................................................................................................................136
Import Contacts from .csv File............................................................................................................136
Create a .csv File............................................................................................................................................136
Search Contacts.....................................................................................................................................................137
Search Contacts by Name or Number...........................................................................................137
Calendar...............................................................................................................................................................................137
View Calendar.........................................................................................................................................................137
Add New Event.......................................................................................................................................................137
Edit Event....................................................................................................................................................................137
Delete Event.............................................................................................................................................................138
Directories..........................................................................................................................................................................138
Business Search.....................................................................................................................................................138
People Search..........................................................................................................................................................139
* Last Name is required for a White Pages search......................................................................139
Reverse Lookup.....................................................................................................................................................139
Look Up a Number................................................................................................................................139
Verizon Hub Photos....................................................................................................................................................139
View Photos..............................................................................................................................................................139
Save Photo as Contact Image.....................................................................................................................140
Add Photo to Screensaver. ..........................................................................................................................140
Set Photo as Wallpaper. ................................................................................................................................140
Delete a Photo. ....................................................................................................................................................141
Edit Photos. . ...........................................................................................................................................................141
Upload Photos........................................................................................................................................................141
Screensaver...............................................................................................................................................................142
Upload Screensaver Image....................................................................................................................142
Select From All Photos..............................................................................................................................142
Remove Photo................................................................................................................................................142
Wallpaper....................................................................................................................................................................143
Upload Wallpaper Image........................................................................................................................143
© 2009 Verizon. All Rights Reserved.
xiv
Verizon Hub User Guide
Select From All Photos..............................................................................................................................143
Settings.............................................................................................................................................................................144
Calling Features.....................................................................................................................................................144
Call Forwarding..............................................................................................................................................144
Turn On Call Forwarding...................................................................................................................144
Delete Call Forwarding Number.................................................................................................145
Turn Off Call Forwarding..................................................................................................................145
Do Not Disturb................................................................................................................................................145
Turn On Do Not Disturb....................................................................................................................145
Schedule Do Not Disturb.................................................................................................................145
Edit Do Not Disturb Schedule.......................................................................................................145
Delete Do Not Disturb Schedule................................................................................................146
Turn Off Do Not Disturb....................................................................................................................146
Incoming Call Block....................................................................................................................................146
Turn On Incoming Call Block.........................................................................................................146
Turn Off Incoming Call Block.........................................................................................................147
Delete Number From Block Caller List....................................................................................147
Simultaneous Ring......................................................................................................................................147
Turn On Simultaneous Ring...........................................................................................................147
Delete Simultaneous Ring Numbers.......................................................................................148
Turn Off Simultaneous Ring...........................................................................................................148
Backup Number.............................................................................................................................................149
View Backup Number.........................................................................................................................149
Edit Backup Number............................................................................................................................149
Call Waiting.......................................................................................................................................................150
Turn On Call Waiting............................................................................................................................150
Turn Off Call Waiting............................................................................................................................150
Caller ID Block.................................................................................................................................................150
Turn On Caller ID Block......................................................................................................................150
Turn Off Caller ID Block......................................................................................................................151
International Call Block............................................................................................................................151
Change International Call Block..................................................................................................151
View International Rates and Country Codes....................................................................151
Voice Mail Services......................................................................................................................................152
Change Voice Mail Ring Count.....................................................................................................152
© 2009 Verizon. All Rights Reserved.
xv
Verizon Hub User Guide
Set Up Email Notifications of New Voice Mail...................................................................152
Services........................................................................................................................................................................153
Service Address for 9-1-1 Emergency Response....................................................................153
View Service Address..........................................................................................................................153
Email Address..................................................................................................................................................153
View Email Address..............................................................................................................................153
Help..........................................................................................................................................................................................154
GoToAssist..........................................................................................................................................................................155
Send Feedback...............................................................................................................................................................155
Troubleshooting....................................................................................................................................................156
Important Customer Information...................................................................................................158
Warranty...............................................................................................................................................................................158
Open Source Licenses...............................................................................................................................................158
FCC Statement................................................................................................................................................................159
Important Note..............................................................................................................................................................159
FCC Radiation Exposure Statement.......................................................................................................159
Danger—Electric Shock and Fire...................................................................................................161
Caution—Disposal....................................................................................................................................162
Danger—Handset Battery Pack......................................................................................................162
Caution—Electromagnetic Interference.................................................................................162
Danger—Liquid Crystal Display (LCD).......................................................................................162
© 2009 Verizon. All Rights Reserved.
xvi
Verizon Hub User Guide
Set Up Your Verizon Hub.
Setting up your Verizon Hub is easy.
3
1
Verify Box Contents.
1.
2.
3.
4.
5.
6.
7.
8.
9.
10.
Verizon Hub base.
Support stand.
Cordless handset.
Power cord.
Handset battery.
Ethernet cable (for wired
connection only).
Stylus.
Emergency 9-1-1 sticker sheet.
Important battery information card
Let’s Get Started Guide
8
2
9
10
4
5
6
7
Attach the Support Stand to the Base.
1.
2.
3.
Slip one end of the support stand into one
of the holes on the back of the base.
Slip the other end of the support stand into
the other hole at the back of the base.
Confirm that the support stand is firmly
connected to the base.
Decide How You’ll Connect to the Internet
(Wireless or Wired).
Wireless Connection.
4.
5.
Place your Verizon Hub on a sturdy, flat
surface near an active power outlet.
It should be close enough to your wireless
router to get a strong signal.
Wired Connection.
Place your Verizon Hub on a sturdy, flat surface that’s near an
active power outlet and within reach of your Ethernet outlet.
© 2009 Verizon. All Rights Reserved.
1
Verizon Hub User Guide
Other Considerations.
•
•
Because the signal loses strength when it travels through
walls, we recommend keeping the number of walls and
ceilings between your Verizon Hub and other devices on
your network, such as your router, to a minimum.
Keep your Verizon Hub away from large metal objects,
which can affect signal quality and strength.
Caution.
• Keep your Verizon Hub at least 10 feet from a microwave.
• Position your Verizon Hub away from heat sources,
moisture and excessive dust.
Plug in Your Verizon Hub.
1.
2.
3.
Plug the small end of the power cord into the hole on the
back of the base marked “5V DC.”
Plug the other end into an outlet.
Your Verizon Hub touch screen will power up and turn on.
© 2009 Verizon. All Rights Reserved.
2
Verizon Hub User Guide
Insert the Handset Battery.
1.
2.
3.
Pick up the handset and slide the battery cover off the
back of it.
Insert the battery so the metal contacts on the battery
are touching the contacts within the handset. The
battery will snap into place.
Slide the battery cover back on. It will click when fully closed.
1
2
3
Place the Handset in Its Cradle.
1.
2.
3.
With the screen facing outward, place the handset in
its cradle.
You will see the battery icon in the top-right of the
screen. This shows that it’s charging.
Charge the battery completely before using the handset
for the first time. We suggest charging it for 2 hours.
Attach Stickers.
Place the 9-1-1 stickers on or near your Verizon Hub.
© 2009 Verizon. All Rights Reserved.
3
Verizon Hub User Guide
Set Up Verizon Hub and Digital Voice Service.
Once your Verizon Hub is powered on, an on-screen setup will
walk you through a few steps to connect to your Digital Voice
service. Simply follow the steps.
1.
2.
3.
After you plug in your Verizon Hub, the LCD screen will
display a Welcome screen.
Touch Next.
If you have an established home network, you can
connect your Verizon Hub to the wired or wireless network.
• If you have a wired home network, touch Use a
Network Cable.
• If you have a wireless home network, touch Use
My Wireless Network.
How to Enter Information.
To navigate the touch screen, touch the screen with your
finger or stylus to move through the steps.
To enter information into blank fields, touch the empty field,
which will launch a keyboard.
The keyboard is enabled with predictive text so it will assist
you in the words you enter. If Verizon Hub predicts the correct
word, touch the highlighted text to add the word to your message.
Connect to Wireless Network.
Be sure to have your Network Name (SSID) and
Encryption Key or Pass Phrase.
1.
2.
After Verizon Hub has scanned for available networks, choose your network from the list of available
wireless networks.
If your network isn’t listed, touch Add Network to manually enter your networking settings.
a. Touch Enter Network Name.
b. Use the keyboard to enter your network’s
Network Name (SSID) and touch Enter.
© 2009 Verizon. All Rights Reserved.
4
Verizon Hub User Guide
TIP:
The Network Name (SSID) is the name of your wireless
network. It may be found on your router or in the router’s
manual. If you’re unable to locate this information, please
contact your router manufacturer for assistance.
c. Touch Enter Encryption Key.
d. Use the keyboard to enter your network’s
Encryption Key or Pass Phrase.
e. Touch Enter.
TIP:
An Encryption Key or Pass Phrase is used to prevent
strangers from accessing your wireless network. It may be
found on the router or in the router’s manual. This may also
be identified as a WEP, WEP Key or Network Password. If you’re
unable to locate this information, please contact your router
manufacturer for assistance.
3.
4.
We recommend using a secure network for the Verizon
Hub, which will be indicated by a lock image next to the
network name.
Select the security type – None, WEP, WPA-PSK/WPA2.
Note: Use the default setting unless you know for sure your
security type is different.
5.
6.
7.
8.
To set Advanced settings, touch Advanced and select the Encryption Key Type and Index.
When you’re done, touch Save.
Verizon Hub will attempt to connect to your
wireless network.
Touch Next when the message displays saying you
have successfully connected to your network.
Connect to Wired Network.
1.
2.
3.
Locate the Ethernet cable provided in your box.
Connect one end of the Ethernet cable into the Ethernet port on the back panel of the Verizon Hub.
Connect the other end of the Ethernet cable into your network router or Ethernet wall jack.
© 2009 Verizon. All Rights Reserved.
5
Verizon Hub User Guide
4. Touch Next.
Note: If you’re having trouble connecting, you might
want to manually configure your connection.
a. Touch Manually Configure Connection.
b. Enter the IP Address, Primary DNS Server, Subnet Mask, Secondary DNS Server and Default Gateway. See Glossary of Terms
for details.
c. Touch Save. If the problem continues, please
call Customer Support at 1-800-922-0204.
5. When the screen displays saying you have
successfully connected to the network, touch Next.
Add Backup Number.
If you experience an interruption in service, you can have
your calls automatically forwarded to a Backup Number.
1.
2.
3.
4.
5.
During setup, you will be asked to enter a
Backup Number.
Touch the entry field, and the keyboard with launch.
Enter another phone number as a Backup Number.
Ex: Cell phone number.
Touch Enter.
Touch Save to finish.
IMPORTANT INFORMATION:
Backup Number cannot be used with international
numbers except those that belong to select Caribbean
and other neighboring destinations. International
long distance rates apply when using Backup Number
with these destinations: Anguilla, Antigua, Bahamas,
Barbados, Barbuda, Bermuda, Cayman Islands, Grenada,
Montserrat, St. Kitts and Nevis, St. Lucia, St. Vincent
and the Grenadines, Trinidad and Tobago, Turks and
Caicos Islands and Virgin Islands, British. There are no
additional charges for using Backup Number with these
destinations: American Samoa, Canada, Guam, Northern
Mariana Islands, Puerto Rico and Virgin Islands, U.S.
© 2009 Verizon. All Rights Reserved.
6
Verizon Hub User Guide
Take Tour.
When Verizon Hub is checking for and downloading updates,
you will be automatically taken through a tour of Verizon
Hub’s features.
Touch Replay Tour if you want to watch it again.
Set Up Voice Mail.
The final step of the set-up process lets you set up your Voice
Mail immediately.
Important Note: Prior to changing your Verizon Hub
telephone number or transferring your existing home phone
number to your Verizon Hub, you must set up Voice Mail first.
1.
2.
3.
4.
Touch Set Up Voice Mail.
This will dial the Voice Mail system.
Enter the last 4 digits of your phone number.
Follow the voice prompts.
Transfer Existing Home Phone Number to Your
Verizon Hub.
If you want to transfer your existing phone number, you can
contact Customer Support directly from your Verizon Hub.
Important Note: Prior to changing your Verizon Hub
telephone number or transferring your existing home phone
number to your Verizon Hub, you must set up Voice Mail first.
1. Touch Transfer Number.
2. This will dial Customer Support.
3. Follow the voice prompts.
Once you’re set up, you will see this screen. Touch OK to start
using your Verizon Hub.
© 2009 Verizon. All Rights Reserved.
7
Verizon Hub User Guide
Handset Controls.
Front View.
Option Keys
Option Keys
Talk
End
Up
OK Button/Joystick
Down
Left
Right
Speakerphone
Mute
OK Button/Joystick.
Press down on the OK Button/Joystick to select OK.
You can move the OK Button/Joystick Left, Right, Up and
Down to navigate the Menu and select options.
© 2009 Verizon. All Rights Reserved.
8
Verizon Hub User Guide
Side Views.
Volume
Controls.
Headset
Jack.
Volume +
Volume -
Headset Jack
Left
Right
Volume Controls.
Ringer Volume.
While NOT on a call, press Volume + or Volume - on the side of
the handset to adjust the ringer volume.
© 2009 Verizon. All Rights Reserved.
9
Verizon Hub User Guide
Handset Speaker Volume.
During a phone call, press Volume + or Volume - on the side
of the handset to adjust the speaker volume.
Keypad Button Volume.
While navigating the handset Menu, press Volume + or
Volume - on the side of the handset to adjust the keypad
button volume.
You will hear the button volume increase and decrease as you
press Volume + and Volume -.
Headset Jack.
The handset is compatible with all 2.5mm telephone headsets
with a built-in microphone.
Simply insert the headset plug into the right side of
the handset.
You will be able to make and receive phone calls using
your headset.
© 2009 Verizon. All Rights Reserved.
10
Verizon Hub User Guide
Set Up Accessory Handset &
Charging Cradle.
You can add up to three additional handsets to use with your
Verizon Hub, and place the charging cradles anywhere your
home has AC power.
Accessory Handset & Charging Cradle sold separately.
Verify Box Contents.
1.
2.
3.
4.
Cordless handset.
Charging cradle.
Power cord.
Handset battery.
1
3
2
4
Insert the Handset Battery.
1.
2.
3.
Slide the battery cover off the back of the handset.
Insert the battery so the metal contacts on the battery
are touching the contacts within the handset. The battery
will snap into place.
Slide the battery cover back on. It will click when fully closed.
1
2
3
© 2009 Verizon. All Rights Reserved.
11
Verizon Hub User Guide
Activate Accessory Handset With Base.
1.
2.
3.
4.
With the screen facing outward, place the cordless
handset in the cradle of your Verizon Hub base.
A beep tone will indicate it’s connected.
You will see “Activating handset…” displayed on
the handset screen, followed by the message
“Activated successfully.”
The handset Home screen will appear indicating
activation has been fully completed.
Plug in Accessory Handset Charging Cradle.
1.
2.
3.
4.
Plug the charging cradle into any AC power outlet in
your home.
With the screen facing outward, place the handset into
the cradle.
You will see the battery icon appear – this shows that the
handset is charging.
It’s important to charge the battery completely before
using the handset for the first time. We suggest charging
it for 2 hours.
Want to learn more?
Check out the Accessory Handset & Charging Cradle for Verizon
Hub User Guide online at verizonwireless.com/hub for
more information.
© 2009 Verizon. All Rights Reserved.
12
Verizon Hub User Guide
Verizon Hub Base.
Home Screen.
This section covers everything you can do from the Home screen.
You can move the Date, Weather and Call Settings widgets to anywhere you want on the screen –
simply touch the feature and drag it to the desired location.
You can also temporarily hide the Date, Weather and Call Settings widgets to use the Home
screen as a photo frame. Touch the Home screen to make everything disappear except for the
background photo; touch it again to make them re-appear.
You can always touch
to return Home from any screen.
Weather.
Check Current Weather or Extended Forecast.
1. Current Weather conditions will be available on
the Home screen.
2. Touch
to move to your next saved location.
3. Touch
to view the Extended Forecast.
4. Touch
to close the Extended Forecast.
5. Touch
to manage locations.
© 2009 Verizon. All Rights Reserved.
13
Verizon Hub User Guide
Add Weather Location.
1. Current Weather conditions will be available on the
Home screen.
on the Weather widget.
2. Touch
3. Touch Manage Locations.
4. Touch Add Location.
5. To add a U.S. location:
• Touch the U.S. Location tab.
• Enter the City and State or ZIP Code.
• Touch Done.
6. To add an international location:
• Touch the International Location tab.
• Enter the City and Province or Country.
• Touch Done.
7. The new location will be added to the bottom of the list.
8. If you want to change your Home location to this new
location, touch the location and touch the box next to
Make this your Home location.
9. Touch Back to return to the previous screen.
to return Home.
10. Touch
The location added will be displayed on the Home screen.
Change Weather Location on Home Screen.
1. Current Weather conditions will be available on the
Home screen.
on the Weather widget.
2. Touch
3. Touch Manage Locations.
4. Select a location from the list.
OR
If you only have one location listed, refer to Add
Weather Location of this guide to add a new location.
5. Touch the box next to Make this your Home location.
to return Home.
6. Touch
The location added will be displayed on the Home screen.
© 2009 Verizon. All Rights Reserved.
14
Verizon Hub User Guide
Delete Weather Location.
1. Current Weather conditions will be available on the
Home screen.
on the Weather widget.
2. Touch
3. Touch Manage Locations.
4. Select the location from the list.
5. Touch Delete.
6. A confirmation message appears. Touch Yes.
to return Home.
7. Touch
Note: You cannot delete your Home location. Therefore,
you must change your Home location first before you may
remove it.
Date & Time.
Change Time Zone.
1. Current Date & Time will be available on the Home screen.
on the Date & Time widget.
2. Touch
3. The current date and time will appear.
4. Touch Change Time Zone.
5. Select the new Time Zone and touch Save.
to return Home.
6. Touch
The changes you’ve made to your Time Zone will be
effective immediately.
View Calendar.
1. Current Date & Time will be available on the Home screen.
2. Touch
and/or today’s date to expand to Calendar view.
3. Touch
and
4. Touch
and/or today’s date to close the Calendar
to view previous and next months.
view on the Home screen.
Note: Touching a date within the Calendar view will open
the main Calendar.
Refer to the Calendar section for more information.
© 2009 Verizon. All Rights Reserved.
15
Verizon Hub User Guide
Home Screen Settings/Widgets.
From your Home screen, you can choose to have shortcuts
to many of the most popular features.
View Missed Calls.
.
1. Touch
2. A list of calls will appear – Missed Calls are identified
by a .
3. Touch the phone number you want to view.
Refer to the Calls section of this guide for more features
and instructions.
Check New Voice Mail.
.
1. Touch
2. A list of recent Voice Mail messages will appear.
3. Touch the Voice Mail message you want to hear
.
and then touch
4. Touch
to return Home.
Refer to the Voice Mail section of this guide for more Voice
Mail features and instructions.
View New Text, Photo and Video Messages.
.
1. Touch
2. The Text/Picture Messages tab will be open.
3. A list of messages will appear in order of when they were received. New Messages are listed as (unread).
4. Touch a phone number or Contact to see a list of
messages sent and received with him/her.
5. Touch
to return Home.
Refer to the Messaging section of this guide for more
features and instructions.
© 2009 Verizon. All Rights Reserved.
16
Verizon Hub User Guide
Turn On Do Not Disturb.
.
1. Touch
2. Touch Manage Schedule to
set
TURN
OFFa time to turn on Do Not
Disturb. Touch Save.
3. When you’re done, touch TURN ON .
4. Touch
to return Home.
Note: Do Not Disturb will be turned on either immediately or
for when you scheduled it.
Refer to the Do Not Disturb section of this guide
for more information.
Turn Off Do Not Disturb.
.
1. Touch
2. Touch
3. Do Not Disturb will automatically turn off.
4. Touch
to return Home.
Refer to the Do Not Disturb section of this guide
for more information.
Turn On Call Forwarding.
.
1. Touch
2. If you’ve already saved a Call Forwarding Number, select
a number from the list.
OR
If you’ve not saved a Call Forwarding
Number, touch
TURN OFF
Manage Numbers, follow the steps and touch Done.
3. When you’re done, touch TURN ON .
4. Touch
to return Home.
Note: Your calls will be forwarded to the phone number you
selected. If you’re unable to answer the forwarded call, the
voice mailbox of the Call Forward Number will accept
the call.
Refer to the Call Forwarding section of this guide for
more information
© 2009 Verizon. All Rights Reserved.
17
Verizon Hub User Guide
Turn Off Call Forwarding.
.
1. Touch
.
2. Touch
3. Call Forwarding will automatically turn off.
4. Touch
to return Home.
Refer to the Call Forwarding section of this guide for more
information.
Manage Calling Features.
.
1. Touch
2. A list of Calling Features will appear.
3. Touch
to return Home.
Refer to the Calling Features section of this guide for
more information.
Dial Pad.
Make a Call.
.
1. Touch
2. The Dial Pad will open.
3. You can make a call several ways:
a. Select a phone number or person from the list of recent calls on the left.
b. Dial the phone number on the Dial Pad and
.
touch
c. Touch Search Contacts to find a Contact.
4. The call will be placed using the Speakerphone.
a. Touch Answer to answer Call Waiting.
b.Touch Mute to mute the call.
to end the call.
c. Touch
Note: If you want to switch to the handset, simply pick it up
on the handset.
and press
© 2009 Verizon. All Rights Reserved.
18
Verizon Hub User Guide
View Calls.
.
1. Touch
2. The Dial Pad will open.
3. Touch
.
4. A list of your recent incoming Calls will appear.
5. Touch Incoming Calls at the bottom of the screen to
view a list of:
• All Calls.
• Incoming Calls.
• Outgoing Calls.
• Missed Calls.
6. Touch Incoming Calls again to close it.
7. Touch
to return Home.
Locate Handset.
.
1. Touch
2. The Dial Pad will open.
3. Touch Locate Handset.
4. The handset will beep until you find it and press
on the handset.
5. Once you’ve located the handset, touch
to
return Home.
Intercom.
You can use the Intercom feature to call the handset so that
you can talk to another person in your house.
.
1. Touch
2. The Dial Pad will open.
3. Touch Intercom.
4. The Verizon Hub base will immediately call your
handset using the Speakerphone.
Note: If you have more than one handset activated with
your Verizon Hub, you will first need to select which
handset to call.
5. To answer the Intercom call from the Verizon Hub
on the handset. You may now use your
base, press
Verizon Hub as a home intercom system.
to end the call.
6. Touch
7. Touch
to return Home.
Refer to the Handset Intercom section of this guide for
more information.
© 2009 Verizon. All Rights Reserved.
19
Verizon Hub User Guide
Open Menu.
1.
2.
3.
4.
Touch Menu.
Page 1 of the Menu will open.
to open Page 2 of the Menu.
Touch
If you download several apps from Apps, the
to open
Menu will expand to three pages. Touch
Page 3 of the Menu.
5. Touch
to return Home.
Refer to Apps section of this guide for more information.
Answer a Call.
1.
2.
3.
4.
A Caller ID pop-up will appear for each incoming call.
Touch Answer.
The call will be answered using the Speakerphone. If you want to switch to the handset, simply pick it up
on the handset.
and press
to end the call.
Touch
5. When you’re done, touch
to return Home.
Block a Call.
1. A Caller ID pop-up will appear for each incoming call.
2. Touch Block.
3. The caller will be sent to Voice Mail but will be blocked
from making calls in the future. The next time they call
you, they will hear this message: “The party you’re trying
to reach is not accepting calls at this time.”
Ignore a Call.
1. A Caller ID pop-up will appear for each incoming call.
2. Touch Ignore.
3. The caller will be sent to Voice Mail.
© 2009 Verizon. All Rights Reserved.
20
Verizon Hub User Guide
Answer Call Waiting.
1.
2.
3.
4.
The Caller ID of the first caller will remain on the screen.
When a new Caller calls, another Caller ID will appear.
Touch Answer to answer Call Waiting.
to end your conversation with the second caller.
Touch
You will be returned to your original call.
Make a 3-Way Call.
1.
2.
3.
Touch
and then dial the phone number of the first
person. The Caller ID of the first caller will appear on
the screen.
Touch Add Call to put the first caller on hold.
You can add a call several ways:
a. Select a phone number or person from the list of
recent calls on the left.
b. Dial the phone number on the Dial Pad and
.
touch
c. Touch Search Contacts to find a Contact.
4. Once the second caller answers, touch Merge to combine
all callers.
to hang up with both callers.
5. Touch
Adjust Speaker/Ringer Volume.
1. Locate the volume buttons on your Verizon Hub base.
2. Press VOL + to increase the volume.
3. Press VOL - to decrease the volume.
Use Speakerphone.
1.
2.
3.
4.
5.
6.
button on your Verizon Hub base.
Press the
A dial tone will sound and the Dial Pad will open.
Dial the phone number on the Dial Pad.
OR.
Touch Search Contacts to select a Contact.
The call will be placed.
to end the call.
Press
© 2009 Verizon. All Rights Reserved.
21
Verizon Hub User Guide
Communications.
Dial Pad.
Make a Call.
1. Touch Menu.
2. Touch Communications.
3. Touch Dial Pad.
4. You can make a call several ways:
a. Select a phone number or person from the list of recent calls on the left.
b. Dial the phone number on the Dial Pad and
.
touch
c. Touch Search Contacts to find a Contact.
5. The call will be placed using the Speakerphone.
a. Touch Answer to answer Call Waiting.
b.Touch Mute to silence the call.
to end the call.
c. Touch
Note: If you want to switch to the handset, simply pick it up
on the handset.
and press
View Calls.
1. Touch Menu.
2. Touch Communications.
3. Touch Dial Pad.
4. A list of your recent Calls will appear.
• Incoming Calls are identified by
• Outgoing Calls are identified by
• Missed Calls are identified by .
5. Touch
.
.
to return Home.
Calling Features.
1. Touch Menu.
2. Touch Communications.
3. Touch Dial Pad.
4. Touch Calling Features.
5. A list of Calling Features will appear.
6. Touch
to return Home.
Refer to the Calling Features section of this guide
for more information.
© 2009 Verizon. All Rights Reserved.
22
Verizon Hub User Guide
Locate Handset.
1. Touch Menu.
2. Touch Communications.
3. Touch Dial Pad.
4. Touch Locate Handset.
5. The handset will beep until you find it and press
on the handset.
Intercom.
You can use the Intercom feature to call the handset. When
answered, you can talk to another person in your household.
1. Touch Menu.
2. Touch Communications.
3. Touch Dial Pad.
4. Touch Intercom.
5. The Verizon Hub base will immediately call your
handset using the Speakerphone.
Note: If you have more than one handset activated with
your Verizon Hub, you will first need to select which
handset to call.
6. To answer the Intercom call from the Verizon Hub base,
on the handset. You may now use your Verizon
press
Hub as a home intercom system.
to end the call.
7. Touch
Refer to the Handset Intercom section of this guide for
more information.
© 2009 Verizon. All Rights Reserved.
23
Verizon Hub User Guide
PhotoDial.
Add Contact to PhotoDial.
1. Touch Menu.
2. Touch Communications.
3. Touch PhotoDial.
4. Touch Add Contact:
a. Select a Contact to add to PhotoDial.
b.Touch Done.
5. Verizon Hub will return to the PhotoDial
screen with the new Contact added.
Call Contact With PhotoDial.
1. Touch Menu.
2. Touch Communications.
3. Touch PhotoDial.
4. Touch a Contact to dial.
• If the Contact has one number stored, he or she
will be called immediately.
• If the Contact has multiple numbers stored,
touch Cell, Home or Work.
5. Verizon Hub will display the Dial Pad screen for the
duration of the call.
to end the call.
6. Press
7. When the call is ended, Verizon Hub will return to the
PhotoDial screen.
Delete Contact From PhotoDial.
1. Touch Menu.
2. Touch Communications.
3. Touch Contacts.
4. Select the Contact you want to remove from PhotoDial.
.
5. Touch
6. Uncheck the box next to Add contact to Verizon Relay
and PhotoDial.
7. Touch Save.
© 2009 Verizon. All Rights Reserved.
24
Verizon Hub User Guide
Calls.
View Calls.
1. Touch Menu.
2. Touch Communications.
3. Touch Calls.
4. A list of your recent Calls will appear.
.
• Incoming Calls are identified by
.
• Outgoing Calls are identified by
• Missed Calls are identified by .
5. Touch the call you want to view.
OR
Touch the scroll bar to scroll through your list of Calls.
6. Touch
to return Home.
Delete a Call.
1. Touch Menu.
2. Touch Communications.
3. Touch Calls.
4. A list of recent calls will appear.
5. Touch the phone entry you want to view.
.
6. Touch
7. A confirmation message will appear. Touch Yes.
8. The call will be removed from your Calls.
9. Touch
to return Home.
Delete All Calls.
1. Touch Menu.
2. Touch Communications.
3. Touch Calls.
4. A list of recent calls will appear.
.
5. Touch
6. A confirmation message will appear. Touch Yes.
7. All calls will be removed from your Calls.
8. Touch
to return Home.
© 2009 Verizon. All Rights Reserved.
25
Verizon Hub User Guide
Add Caller to Contacts.
1. Touch Menu.
2. Touch Communications.
3. Touch Calls.
4. A list of recent incoming calls will appear.
5. Touch the call you want to add.
.
6. Touch
7. Touch Home Phone to expand the list. Choose
whether this is the caller’s Home Phone, Cell Phone or
Work Phone.
8. Touch the button next to:
• Create a new contact for this number.
OR
• Add this number to an existing contact
Note: If you choose this option, simply select the
Contact you want to assign the number to and
touch Save.
9. Update the entry in the First Name and/or Last Name
field, if necessary.
10. If you want, you can:
• Enter additional phone numbers.
• Touch the check box next to Add contact to
Verizon Relay and PhotoDial.
11. Touch Save if you’re done.
OR
Touch Next to enter more information.
12. Enter:
• Street Address.
• City.
• State.
• ZIP Code.
• Email Address.
13. Touch Save if you’re done.
OR
Touch Next to enter more information.
14. Select a Group from the list.
15. Touch Change to choose a Contact Image.
16. Touch Default Ringtone to select a ringtone for
this Contact.
17. Touch Save.
18. Touch
to return Home.
This caller will be added to your Contacts.
© 2009 Verizon. All Rights Reserved.
26
Verizon Hub User Guide
Call a Person From Calls.
1. Touch Menu.
2. Touch Communications.
3. Touch Calls.
4. A list of recent incoming calls will appear.
5. Touch the Phone number or Caller you want to call.
to Call.
6. Touch
to end the call.
7. Touch
Note: If you want to switch to the handset, simply pick it up
on the handset.
and press
Contacts.
View All Contacts.
1. Touch Menu.
2. Touch Communications.
3. Touch Contacts.
4. A list of all Contacts will appear alphabetically.
to return Home.
5. Touch
Add a Contact.
1. Touch Menu.
2. Touch Communications.
3. Touch Contacts.
4. A list of all Contacts will appear alphabetically.
.
5. Touch
6. Touch First Name – the keyboard will appear.
7. Use the keyboard to tap out the First Name.
Touch Enter when you’re done.
8. Repeat steps 6 and 7 to enter:
• Last Name.
• Home Phone.
• Cell Phone.
• Work Phone.
9. Touch the check box next to Add contact to
Verizon Relay and PhotoDial.
10. Touch Save if you’re done.
OR
Touch Next to enter more information.
11. Touch Street Address – the keyboard will appear.
© 2009 Verizon. All Rights Reserved.
27
Verizon Hub User Guide
12. Use the keyboard to tap out the Street Address. Touch
Enter when you’re done.
13. Repeat steps 11 and 12 to enter:
• City.
• State.
• ZIP Code.
• Email Address.
14. Touch Save if you’re done.
OR
Touch Next to enter more information.
15. Touch Family to select a Group from the list.
16. Next to Contact Image, touch Change.
17. A list of images will appear. Touch any image to select it
as the Contact Image.
18. Touch Default Ringtone to select a ringtone for
this Contact.
19. Touch Save.
to return Home.
20. Touch
This person will now appear in your Contacts.
Edit a Contact.
1. Touch Menu.
2. Touch Communications.
3. Touch Contacts.
4. A list of all Contacts will appear alphabetically.
5. Select a Contact to view his/her contact information.
.
6. The contact information will appear. Touch
7. Use the keyboard to tap out the First Name. Touch Enter
when you’re done.
8. Repeat steps 7 and 8 to enter:
• Last Name.
• Home Phone.
• Cell Phone.
• Work Phone.
9. Touch the check box next to Add contact to Verizon Relay
and PhotoDial.
10. Touch Save if you’re done.
OR
Touch Next to enter more information.
11. Touch Street – the keyboard will appear.
12. Use the keyboard to tap out the Street Address.
© 2009 Verizon. All Rights Reserved.
28
Verizon Hub User Guide
Touch Enter when you’re done.
13. Repeat steps 11 and 12 to enter:
• City.
• State.
• ZIP Code.
• Email Address.
14. Touch Save if you’re done.
OR
Touch Next to enter more information.
15. Touch Family to select a Group from the list.
16. Next to Contact Image, touch Change.
17. A selection of images will appear. Touch any image to
select it as the Contact Image.
18. Touch Default Ringtone to select a ringtone for this Contact.
19. Touch Save.
to return Home.
20. Touch
Delete a Contact.
1. Touch Menu.
2. Touch Communications.
3. Touch Contacts.
4. A list of all Contacts will appear alphabetically.
5. Touch a Contact to view his/her contact information.
.
6. Touch
7. A confirmation message will appear. Touch Yes.
to return Home.
8. Touch
This person will be deleted from your Contacts.
Search for Contact.
1. Touch Menu.
2. Touch Communications.
3. Touch Contacts.
4. A list of all Contacts will appear alphabetically.
.
5. Touch
6. Enter the first Letter of the Contact’s First or Last Name.
7. A list of Contacts will appear.
© 2009 Verizon. All Rights Reserved.
29
Verizon Hub User Guide
8. Select the Contact for which you’re looking.
9. The Contact’s information will appear and you can do
one of the following:
• Edit.
• Delete.
• Call.
• Text Message.
• Map Location.
• Send to VZ Navigator.
to return Home.
10. Touch
View Contacts by Group.
1. Touch Menu.
2. Touch Communications.
3. Touch Contacts.
4. A list of all Contacts will appear alphabetically.
5. Touch Filter By Group and select a Group from the list.
6. A list of Contacts in that group will appear alphabetically.
to return Home.
7. Touch
Call a Contact.
1. Touch Menu.
2. Touch Communications.
3. Touch Contacts.
4. A list of all Contacts will appear alphabetically.
5. Select a Contact to view his/her contact information.
6. Touch Call.
7. This Contact will be called.
OR
If you have more than one phone number saved for this
Contact, touch the number you want to call.
8. During the call:
• Touch Answer to answer Call Waiting.
• Touch Mute to silence your handset
or speakerphone.
to end the call.
9. Touch
to return Home.
10. Touch
© 2009 Verizon. All Rights Reserved.
30
Verizon Hub User Guide
Send a Text or Picture Message to a Contact.
This feature is only available with other Verizon
Wireless phones.
1. Touch Menu.
2. Touch Communications.
3. Touch Contacts.
4. A list of all will appear alphabetically.
5. Select a Contact to view his/her contact information.
6. Touch Text Message.
7. The New Message screen will appear.
OR
If you have more than one phone number saved for
this Contact, touch the number to which you want to
send a message.
Note: You must select a cell phone number or the
message will not be successfully sent.
8. Touch Enter Text Here – the keyboard will appear
9. Use the keyboard to tap out your message.
Touch Enter when you’re done.
OR
Touch Quick Text to select an emoticon or
message from the list.
10. Touch Attach – a list of pictures will appear.
11. Touch any Picture to attach it to your message and
then touch Done.
12. Touch Send.
13. A confirmation message will appear. Touch OK.
to return Home.
14. Touch
Map a Contact’s Location.
1. Touch Menu.
2. Touch Communications.
3. Touch Contacts.
4. A list of all Contacts will appear alphabetically.
5. Select a Contact to view his/her contact information.
6. Touch Map Location.
7. Touch Map By Number or Map By Address.
8. A map locating the Contact will appear.
to return Home.
9. Touch
© 2009 Verizon. All Rights Reserved.
31
Verizon Hub User Guide
Get Directions to a Contact’s Location.
This feature is only available with other Verizon Wireless
phones that have a subscription to VZ NavigatorSM service.
1. Touch Menu.
2. Touch Communications.
3. Touch Contacts.
4. A list of all Contacts will appear alphabetically.
5. Select a Contact to view his/her contact information.
6. Touch Send to VZ Navigator.
7. VZ Navigator will open.
8. Confirm the Contact’s information and enter the cell
number to which you want to receive the directions.
9. Touch Send.
to return Home.
10. Touch
The information will be sent to your Verizon Wireless phone
and will direct you to his/her location. If your Verizon
Wireless phone is not VZ Navigator-enabled, the message will
be text-only.
Add Group.
1. Touch Menu.
2. Touch Communications.
3. Touch Contacts.
4. Touch Filter By Group and select a Manage Groups
from the list.
.
5. A list of your Groups will appear. Touch
6. Touch Group Name – the keyboard will launch.
7. Use the keyboard to tap out the Group Name.
Touch Enter when you’re done.
8. Touch Save.
to return Home.
9. Touch
The Group will be added to your Contacts.
Delete Group.
1. Touch Menu.
2. Touch Communications.
3. Touch Contacts.
4. Touch Filter By Group.
5. Select Manage Groups.
6. Touch the Group and then touch Delete.
7. A confirmation message will appear. Touch Yes.
to return Home.
8. Touch
© 2009 Verizon. All Rights Reserved.
32
Verizon Hub User Guide
Voice Mail.
Set Up Voice Mail.
You should have set up your Voice Mail when you set up your
Verizon Hub. However, if you would like to alter your settings,
go to Voice Mail Settings to learn more.
Important Note: Prior to changing your Verizon Hub
telephone number or transferring your existing home phone
number to your Verizon Hub, you must set up Voice Mail first.
View Voice Mail Messages.
1. Touch Menu.
2. Touch Communications.
3. Touch Voice Mail.
4. Your list of Voice Mail messages will appear in the order
in which they were received.
to return Home.
5. Touch
Play a Voice Mail Message.
1. Touch Menu.
2. Touch Communications.
3. Touch Voice Mail.
4. Your list of Voice Mail messages will appear.
5. Touch the Voice Mail message you want to hear
.
and then tap
6. You will hear the Voice Mail message play.
to return Home.
7. Touch
Delete a Voice Mail Message.
1. Touch Menu.
2. Touch Communications.
3. Touch Voice Mail.
4. Your list of Voice Mail messages will appear.
5. Touch the Voice Mail message you want to delete
.
and then touch
6. A confirmation message will appear. Touch Yes.
to return Home.
7. Touch
Your Voice Mail message will be deleted from the list.
© 2009 Verizon. All Rights Reserved.
33
Verizon Hub User Guide
Call Back a Caller.
1. Touch Menu.
2. Touch Communications.
3. Touch Voice Mail.
4. Your list of Voice Mail messages will appear.
5. Touch the Voice Mail message you want to view.
6. Touch Call to call this person back.
to end the call.
7. Touch
to return Home.
8. Touch
Note: If you would rather talk on your handset, simply pick it
on the handset.
up and press
Reply to Voice Mail Message With a Text or Picture Message.
This feature is only available with Verizon
Wireless phones.
1. Touch Menu.
2. Touch Communications.
3. Touch Voice Mail.
4. Your list of Voice Mail messages will appear.
5. Touch the Voice Mail message you want to view.
6. Touch Text Message.
7. Touch Enter Text Here – the keyboard will appear.
8. Use the keyboard to tap out your message. Touch Enter
when you’re done.
OR
Touch Quick Text to select an emoticon or
message from the list.
9. Touch Attach – a list of pictures will appear.
10. Touch any Picture to attach it to your message and
then touch Done.
11. Touch Send.
12. A confirmation message will appear. Touch OK.
to return Home.
13. Touch
© 2009 Verizon. All Rights Reserved.
34
Verizon Hub User Guide
Map a Caller’s Location.
1. Touch Menu.
2. Touch Communications.
3. Touch Voice Mail.
4. Your list of Voice Mail messages will appear.
5. Touch the Voice Mail message you want to view.
6. Touch Map Location.
7. Touch Map By Number or Map By Address.
8. A map locating the caller will appear.
to return Home.
9. Touch
Messaging.
Text/Picture Messages.
This feature is only available with Verizon Wireless phones.
View a Message.
1. Touch Menu.
2. Touch Communications.
3. Touch Messaging.
4. The Text/Picture Messages tab will already be open.
5. A list of Messages will appear in order of when they were
received. New Messages are listed as (unread).
6. Touch a phone number or Contact to see a list of
messages sent and received with him/her.
7. Touch the message you want to view.
8. Touch Reply, Forward or Delete, or touch Back to return
to the previous screen.
to return Home.
9. Touch
Send a New Text, Picture or Video Message.
1. Touch Menu.
2. Touch Communications.
3. Touch Messaging.
4. The Text/Picture Messages tab will already be open.
.
5. Touch
6. Touch TO to select a Contact. Then touch Done.
7. Touch Enter Text Here – the keyboard will appear.
8. Use the keyboard to tap out your message. Touch Enter
when you’re done.
© 2009 Verizon. All Rights Reserved.
35
Verizon Hub User Guide
9.
10.
11.
12.
13.
OR
Touch Quick Text to select an emoticon or message
from the list.
Touch Attach – a list of pictures will appear.
Touch any Picture to attach it to your message and
then touch Done.
Touch Send.
A confirmation message will appear. Touch OK.
to return Home.
Touch
Reply to a Message.
1. Touch Menu.
2. Touch Communications.
3. Touch Messaging.
4. The Text/Picture Messages tab will already be open.
5. A list of Messages will appear in order of when they were
received. New Messages are listed as (unread).
6. Touch a phone number or Contact to see a list
of messages sent and received with him/her.
7. Touch the message you want to view and touch Reply.
8. Touch Enter Text Here – the keyboard will appear.
9. Use the keyboard to tap out your message. Touch Enter
when you’re done.
OR
Touch Quick Text to select an emoticon or message
from the list.
10. Touch Attach – a list of pictures will appear.
11. Touch any Picture to attach it to your message and
then touch Done.
12. Touch Send.
13. A confirmation message will appear. Touch OK.
to return Home.
14. Touch
© 2009 Verizon. All Rights Reserved.
36
Verizon Hub User Guide
Forward a Message.
1. Touch Menu.
2. Touch Communications.
3. Touch Messaging.
4. The Text/Picture Messages tab will already be open.
5. A list of Messages will appear in order of when
they were received. New Messages are listed
as (unread).
6. Touch a phone number or Contact to see a list of
messages sent and received with him/her.
7. Touch the message you want to view and
touch Forward.
8. Touch TO to select a Contact from your list, or touch
the keypad to enter another cell phone number.
9. Touch Done.
10. A confirmation message will appear. Touch OK.
to return Home.
11. Touch
Delete a Message.
1. Touch Menu.
2. Touch Communications.
3. Touch Messaging.
4. The Text/Picture Messages tab will already be open.
5. A list of Messages will appear in order of when they were
received. New Messages are listed as (unread).
6. Touch a phone number or Contact to see a list of
messages sent and received with him/her.
7. Touch the message you want to delete, and
touch Delete.
8. A confirmation message will appear. Touch Yes.
to return Home.
9. Touch
© 2009 Verizon. All Rights Reserved.
37
Verizon Hub User Guide
Verizon Messages.
Occasionally, informational messages will be sent to your
Verizon Hub from Verizon Wireless to let you know about
upcoming updates and features.
View Verizon Messages.
1. Touch Menu.
2. Touch Communications.
3. Touch Messaging.
4. Touch the Verizon Messages tab.
5. A list of Verizon Messages will appear.
6. Touch the message you want to view.
to return Home.
7. Touch
Delete a Verizon Message.
1. Touch Menu.
2. Touch Communications.
3. Touch Messaging.
4. Touch the Verizon Messages tab.
5. A list of messages will appear.
6. Select the message you want to delete.
7. Touch Delete.
to return Home.
8. Touch
Delete All Verizon Messages.
1. Touch Menu.
2. Touch Communications.
3. Touch Messaging.
4. Touch the Verizon Messages tab.
5. A list of messages will appear.
6. Touch Delete All.
to return Home.
7. Touch
The Verizon Messages will be deleted from the list.
© 2009 Verizon. All Rights Reserved.
38
Verizon Hub User Guide
Contacts.
You can access your Contacts by simply touching Menu and
then Contacts.
Refer to the Contacts section of this guide for more information.
Messaging.
You can access your Messages by simply touching Menu and
then Messaging.
Refer to the Messaging section of this guide for more information.
Directories.
You can access the business and people search by simply
touching Menu and then Directories.
Directories.
Business Search.
Search for a Business.
1. Touch Menu.
2. Touch Directories.
3. The Business Search tab will already be open.
4. Select a Category from the list, and then touch
a Sub-Category.
OR
Touch Keyword Search – use the keyboard to tap out
the Keyword or Business Name. Touch Enter when you’re
done, and then touch Find.
5. Your results will appear showing the business’ name, address, phone number and distance from your location.
Note: The business’ suite number may appear in the middle of the address.
6. Touch the business result and the map will zoom
to its location.
© 2009 Verizon. All Rights Reserved.
39
Verizon Hub User Guide
7. You can also touch:
• Map All to generate a map of all the business search results.
• Call to dial the business.
• Send to VZ Navigator to send spoken turn-by-turn
directions to your cell phone. If your Verizon Wireless
phone is not VZ Navigator-enabled, the message
will be text-only.
• Add to Contacts to add this business to
your Contacts.
8. Touch Back or Directories to start a new search.
to return Home.
9. Touch
Note: This feature will only map wireline phone numbers
listed in the business pages with an address.
Get Directions to a Business.
1. Touch Menu.
2. Touch Directories.
3. The Business Search tab will already be open.
4. Select a Category from the list, and then touch
a Sub-Category.
OR
Touch Keyword Search – use the keyboard to tap out the
Keyword or Business Name. Touch Enter when you’re
done, and then touch Find.
5. Your results will appear showing the business’ name,
address, phone number and distance from your location.
Note: The business’ suite number may appear in the
middle of the address.
6. Touch the business result and the map will zoom to
its location.
7. Touch Send to VZ Navigator to send spoken turn-by-turn
directions to your cell phone.
Note: If your Verizon Wireless phone is not
VZ Navigator-enabled, the message will be text-only.
8. Touch Back or Directories to start a new search.
to return Home.
9. Touch
Note: This feature will only map wireline phone numbers
listed in the business pages with an address.
© 2009 Verizon. All Rights Reserved.
40
Verizon Hub User Guide
People Search.
Search for a Person.
1. Touch Menu.
2. Touch Directories.
3. Touch People Search tab.
4. Touch First Name – the keyboard will appear.
5. Use the keyboard to tap out the First Name.
Touch Enter when you’re done.
6. Repeat steps 5 and 6 to enter:
• Last Name (required).
• City and State OR ZIP Code
7. Touch Find.
8. Your results will appear. Touch the person for which you
want to view details.
9. The person’s address and phone number will appear.
10. You can touch:
• Map All to generate a map of all the search results.
• Call to dial the person.
• Send to VZ Navigator to send spoken turn-by-turn
directions to your cell phone. If your Verizon
Wireless phone is not VZ Navigator-enabled, the
message will be text-only.
• Add to Contacts to add this person to
your Contacts.
11. Touch Back or Directories to start a new search.
to return Home.
12. Touch
Note: This feature will only map wireline phone numbers
listed in the people search with an address.
Reverse Lookup.
Search for a Person or Business by Phone Number.
1. Touch Menu.
2. Touch Directories.
3. Touch Reverse Lookup tab.
4. Touch Phone Number – the keypad will appear.
5. Use the keypad to tap out the Phone Number.
Touch Enter when you’re done.
6. Touch Find.
7. The person or business associated with this phone
number will appear – touch the results to view details.
© 2009 Verizon. All Rights Reserved.
41
Verizon Hub User Guide
8.
9.
The person’s or business’ address and phone number
will appear.
Note: The business’ suite number may appear in the
middle of the address.
You can touch:
• Map All to generate a map of all the search results.
• Call to dial the person.
• Send to VZ Navigator to send spoken turn-by-turn
directions to your cell phone. If your Verizon
Wireless phone is not VZ Navigator-enabled, the
message will be text-only.
• Add to Contacts to add this person to
your Contacts.
10. Touch Back or Directories to start a new search.
to return Home.
11. Touch
Note: This feature will only map wireline phone numbers listed in the phone directory with an address.
Movies.
You can view a list of movies playing in your area, look up
movies in another area and purchase tickets all from your
Verizon Hub!
View Movies.
Now Playing in Your Area.
1. Touch Menu.
2. Touch Movies.
3. A list of movies Now Playing in your area will appear.
4. Touch the Movie you want to preview.
5. Touch More Info, Showtimes or Trailer tabs.
to return Home.
6. Touch
Opening This Week in Your Area.
1. Touch Menu.
2. Touch Movies.
3. Touch This Week tab.
4. A list of movies opening soon will appear.
5. Touch the Movie you want to preview.
6. Touch More Info, Showtimes or Trailer tabs.
to return Home.
7. Touch
© 2009 Verizon. All Rights Reserved.
42
Verizon Hub User Guide
Coming Soon in Your Area.
1. Touch Menu.
2. Touch Movies.
3. Touch the Coming Soon tab.
4. A list of movies coming soon will appear.
5. Touch the Movie you want to preview.
6. Touch More Info, Showtimes or Trailer tabs.
to return Home.
7. Touch
Watch Movie Trailers.
1. Touch Menu.
2. Touch Movies.
3. A list of movies Now Playing in your area will appear.
4. Touch the Movie you want to preview.
5. Touch the Trailer tab and select a trailer.
6. The Trailer will appear in full-screen.
7. Touch anywhere on the screen to stop the trailer and
return to the list of trailers.
Purchase Tickets.
1. Touch Menu.
2. Touch Movies.
3. A list of movies Now Playing in your area will appear.
4. Touch the Movie you want to preview.
5. Touch the Showtimes tab.
6. Touch the Theater for which you want to purchase tickets.
7. Touch Purchase Tickets next to the showtime you want
to see.
or
to choose the number of tickets
8. Touch
you want to purchase, then touch Checkout.
9. Enter your credit card information, and touch Next.
10. Confirm your order information and touch Purchase Tickets.
11. A message and confirmation number will appear.
12. Touch Send Text to send this message and confirmation number to your Verizon Wireless cell phone.
to return Home.
13. Touch
Important Note: We recommend you write down the
confirmation number and take it with you to the theater.
© 2009 Verizon. All Rights Reserved.
43
Verizon Hub User Guide
Theaters.
Find a Theater Near Me.
1. Touch Menu.
2. Touch Movies.
3. Touch Theaters.
4. A list of theaters in your ZIP Code will appear.
5. Scroll through the list of theaters and select a Theater.
6. Touch:
a. Call to call the theater.
b.Showtimes to see a list of movies playing.
c. Send to VZ Navigator to send directions to your
Verizon Wireless phone. If your Verizon Wireless phone is not VZ Navigator-enabled, the message will be text-only.
d.View Map to see the theater’s location.
to return Home.
7. Touch
Search for Theaters in Other Areas.
1. Touch Menu.
2. Touch Movies.
3. Touch Theaters.
4. A list of theaters in your ZIP Code will appear.
5. Touch Change ZIP.
6. Touch the ZIP Code field, enter a new ZIP
Code in the keypad and touch Enter.
7. Touch Search.
8. A list of theaters in that area will appear.
9. Scroll through the list of theaters and select a Theater.
10. Touch:
a. Call to call the theater.
b.Showtimes to see a list of movies playing.
c. Send to VZ Navigator to send directions to your
Verizon Wireless phone. If your Verizon Wireless phone is not VZ Navigator-enabled, the message will be text-only.
d.View Map to see the theater’s location.
to return Home.
11. Touch
© 2009 Verizon. All Rights Reserved.
44
Verizon Hub User Guide
History.
Touch Menu.
Touch Movies.
Touch the History tab.
Your ticket purchase history will appear.
• Send as Text Message to send the details to your
Verizon Wireless phone.
• Send to VZ Navigator to send directions to your
Verizon Wireless phone. If your Verizon Wireless
phone is not VZ Navigator-enabled, the message
will be text-only.
to return Home.
5. Touch
1.
2.
3.
4.
Chaperone®.
Chaperone is a simple, secure service that allows you to locate
your children’s Chaperone-enabled Verizon Wireless phones.
Verizon Wireless Chaperone subscription required.
Find Location of Contact.
1.
2.
3.
4.
5.
6.
7.
8.
Touch Menu.
Touch Chaperone.
Enter Cell Phone Number and Password.
Note: Login with your Chaperone Parent cell phone,
and the password you use to sign in to
verizonwireless.com/chaperone.
.
Touch
Find the person in your list of Family and Friends and touch Locate.
A map will generate the location of the cell phone.
Touch Hide Details to hide location information.
to return Home.
Touch
© 2009 Verizon. All Rights Reserved.
45
Verizon Hub User Guide
V CAST®.
You have access to a variety of V CAST videos from your Verizon
Hub organized into four major categories – News & Sports,
Entertainment, Food & Dining and Lifestyle. You also have a
shortcut to your Internet Radio feature.
Watch Videos.
1. Touch Menu.
2. Touch V CAST. A video will automatically start playing.
3. Touch the Category you want to view.
4. Touch the Sub-category.
5. Touch the Channel you want to watch.
6. Touch the Topic you want to watch – it will start
playing immediately.
• Touch the screen once to make it full-screen.
• Touch the screen again to return it to normal view.
to pause the video.
• Touch
to resume the video.
• Touch
to restart the video.
• Touch
7. Touch Back to return to the previous screen.
to return Home.
8. Touch
Listen to Internet Radio.
Note: The IHEARTRADIO tab will be added once
you download the Internet Radio app.
1. Touch Menu.
2. Touch V CAST.
3. Touch the IHEARTRADIO tab.
4. Radio stations will be categorized by genre:
• Touch the genre to see a list of stations in that radio format.
• Touch ALL – Alphabetical to see a full list of stations.
• Touch ALL – Location to see a list of stations by city.
5. A list of radio stations will appear.
6. Select the radio station you want to hear, and it will begin
to play:
to stop the station.
• Touch
to play the station.
• Touch
7. Touch Back to return to the previous screen.
to return Home.
8. Touch
Refer to the Internet Radio section of this guide for
more information.
© 2009 Verizon. All Rights Reserved.
46
Verizon Hub User Guide
Verizon Relay.
Verizon Relay is a feature that lets you receive your Text,
Picture & Video Messages on your Verizon Hub. Simply add
friends or family, who are Verizon Wireless customers, as
Verizon Relay Members and their messages will appear on
your Verizon Hub.
And when you add a friend or family member as a Verizon Relay
member they will also be added to PhotoDial. PhotoDial is a
speed–dial–like feature that lets you quickly call contacts.
Refer to the PhotoDial section of this guide for
more information.
View Messages.
1.
2.
3.
4.
5.
6.
Touch Menu.
Touch Verizon Relay.
Touch Members.
If you have messages, they will appear.
Touch the Message you want to view.
to return Home.
Touch
View All Members.
1.
2.
3.
4.
5.
Touch Menu.
Touch Verizon Relay.
Touch Members.
A list of all your members will appear.
to return Home.
Touch
Add a Member Manually.
1.
2.
3.
4.
5.
6.
Touch Menu.
Touch Verizon Relay.
Touch Members.
Touch Add Member.
Touch First Name – the keypad will appear.
Use the keypad to tap out the First Name, and touch Enter when you’re done.
© 2009 Verizon. All Rights Reserved.
47
Verizon Hub User Guide
7. Repeat steps 5 and 6 to enter:
• Last Name.
• Home Number.
• Cell Number.
• Work Number.
8. Touch Change Image.
9. A selection of images will appear. Touch any image
to select it as the Contact Picture.
.
10. Touch
to return Home.
11. Touch
Add a Member From Contacts.
1.
2.
3.
4.
5.
6.
7.
8.
9.
10.
11.
Touch Menu.
Touch Verizon Relay.
Touch Members.
Touch Add Member.
.
Touch
A list of Contacts will appear alphabetically.
Touch the Contact you want to add to as a Member.
.
Touch
Touch any of the blank fields to enter more information.
.
Touch
to return Home.
Touch
Delete Member.
1.
2.
3.
4.
5.
6.
7.
8.
Touch Menu.
Touch Verizon Relay.
Touch Members.
Touch the Member you want to remove.
The Member’s information will appear.
Touch Remove Member.
A confirmation message will appear. Touch Yes.
to return Home.
Touch
© 2009 Verizon. All Rights Reserved.
48
Verizon Hub User Guide
View Tiles Online.
See a full-view list of your Verizon Relay messages when you’re
away from home.
1. Go to verizonwireless.com/welcome.
2. In the Cell Phone field, enter your Verizon Hub
phone number.
Note: If you also have a Verizon Wireless number,
DO NOT enter that number.
3. Create account information and follow the prompts.
4. Once signed in, click Verizon Relay.
5. You can view the tiles, View by Member and Delete tiles.
Calendar.
Use the Calendar to keep track of your household activities.
You can create events, set reminders and send them to your
Verizon Wireless cell phone.
View Calendar.
Touch Menu.
Touch .
Touch Calendar.
The monthly Calendar will appear, with the current
date highlighted.
Scheduled events will be listed on the date they occur.
Note: If there are multiple events scheduled, the
latest scheduled event will be displayed and the total
number of events for the day will appear in the corner.
or
to see other months.
6. Touch
1.
2.
3.
4.
5.
7. Touch
to return Home.
View Event.
1.
2.
3.
4.
5.
6.
Touch Menu.
Touch .
Touch Calendar.
On the Monthly Calendar, touch the date of the event.
Upcoming events will appear.
Touch the Event you want to view.
© 2009 Verizon. All Rights Reserved.
49
Verizon Hub User Guide
7. The event details will appear.
8. Touch Month View to return to the Monthly Calendar.
OR
to return Home.
Touch
Add Event.
1.
2.
3.
4.
5.
6.
7.
8.
9.
10.
11.
12.
13.
14.
Touch Menu.
Touch .
Touch Calendar.
On the Monthly Calendar, touch the date of the event.
Upcoming events will appear.
Touch New Event. The New Event screen will
be displayed.
If you need to change the date, touch the Event Date
to choose another date from the Monthly Calendar.
Touch Event Title. Use the keypad to type the title
and touch Enter.
Touch Event Time to select the time, and then touch OK.
Select a Reminder Time.
Touch Send To to select participants to send the event
to your Contact List.
Select the contacts and touch Done.
When you’re done, touch Save. The event will be
added to the list of events for the selected date.
Touch Month View to return to the Monthly Calendar.
OR
to return Home.
Touch
Add Birthday.
Touch Menu.
Touch .
Touch Calendar.
On the Monthly Calendar, touch the date of the event.
Upcoming events will appear.
Touch Add Birthday. The Birthday screen will
be displayed.
7. If you need to change the date, touch the Event Date
to choose another date from the Monthly Calendar.
8. Touch Event Title. Use the keypad to type the title
and touch Enter.
1.
2.
3.
4.
5.
6.
© 2009 Verizon. All Rights Reserved.
50
Verizon Hub User Guide
9. Touch Event Time to select the time, and then touch OK.
10. Select a Reminder Time.
11. Touch Send To to select participants to send the event
to from your Contact List.
12. Select the contacts and touch Done.
13. When you’re done, touch Save. The event will be
added to the list of events for the selected date.
14. Touch Month View to return to the Monthly Calendar.
OR
to return Home.
Touch
Add Anniversary.
1.
2.
3.
4.
5.
6.
7.
8.
9.
10.
11.
12.
13.
14.
Touch Menu.
Touch .
Touch Calendar.
On the Monthly Calendar, touch the date of the event.
Upcoming events will appear.
Touch Add Anniversary. The Anniversary screen
will be displayed.
If you need to change the date, touch the Event Date
to choose another date from the Monthly Calendar.
Touch Event Title. Use the keypad to type the title
and touch Enter.
Touch Event Time to select the time, and then touch OK.
Select a Reminder Time.
Touch Send To to select participants to send
the event to from your Contact List.
Select the contacts and touch Done.
When you’re done, touch Save. The event will be
added to the list of events for the selected date.
Touch Month View to return to the Monthly Calendar.
OR
to return Home.
Touch
© 2009 Verizon. All Rights Reserved.
51
Verizon Hub User Guide
Edit Event.
Touch Menu.
Touch .
Touch Calendar.
On the Monthly Calendar, touch the date of the event.
Upcoming events will appear.
Touch the Event you want to edit.
The details for the event will be displayed.
Make changes and touch Save.
The event will be updated in the list of events for
the selected date.
10. Touch Month View to return to the Monthly Calendar.
OR
to return Home.
Touch
1.
2.
3.
4.
5.
6.
7.
8.
9.
Delete Event.
1.
2.
3.
4.
5.
6.
7.
8.
9.
10.
11.
Touch Menu.
Touch .
Touch Calendar.
On the Monthly Calendar, touch the date of the event.
Upcoming events will appear.
Touch the Event you want to delete.
The details for the event will be displayed.
next to the event.
To delete an event, touch the
A confirmation message will appear. Touch Yes.
The event is deleted from the list of events for that date.
Touch Month View to return to the Monthly Calendar.
OR
to return Home.
Touch
Calculator.
Use the Calculator.
1.
2.
3.
4.
5.
Touch Menu.
Touch .
Touch Calculator.
Use the electronic keypad to perform calculations just as
you would on any other calculator.
to return Home.
Touch
© 2009 Verizon. All Rights Reserved.
52
Verizon Hub User Guide
Traffic.
You can check current traffic conditions in your area, or
lookup another U.S. metropolitan area. A video will
automatically play showing the current traffic jams and
areas to avoid.
View Traffic for Another Area.
1.
2.
3.
4.
5.
6.
7.
8.
Touch Menu.
Touch .
Touch Traffic.
Select a City from the list.
The traffic update for this city will start playing.
Touch the name of another city in the list.
The traffic update for this city will start playing.
to return Home.
Touch
MENU
MENU
TRAFFIC
TRAFFIC
Touch Menu.
Touch .
Touch Traffic.
Select a City from the list.
The traffic update for this city will start playing.
to return Home.
Touch
12:40p
12:40p
Chicago
Chicago
Dallas/Fort Worth
Worth
Dallas/Fort
Detroit
Detroit
Houston
Houston
MENU
MENU
1.
2.
3.
4.
5.
6.
TRAFFIC
TRAFFIC
TRAFFIC
Check Local Traffic.
12:40p
12:40p
Chicago
Chicago
Dallas/Fort Worth
Worth
Dallas/Fort
Detroit
Detroit
Houston
Houston
Settings.
General.
Weather.
View Current Weather Location(s).
1. Touch Menu.
2. Touch .
3. Touch Settings.
section will open, showing Weather.
4. The
5. A list of your current, saved Weather locations will appear.
to return Home.
6. Touch
© 2009 Verizon. All Rights Reserved.
53
Verizon Hub User Guide
Add Weather Location.
1. Touch Menu.
2. Touch .
3. Touch Settings.
section will open, showing Weather.
The
Touch Manage Locations.
.
Touch
To add a U.S. location:
• Touch the U.S. Location tab.
• Touch City, State or ZIP Code – the keyboard/
keypad will appear.
• Use the keyboard/keypad to enter the location, and
then touch Enter.
• Touch Done.
8. To add an international location:
• Touch the International Location tab.
• Touch City, Province or Country – the keyboard
will appear.
• Use the keyboard/keypad to enter the location, and
then touch Enter.
• Touch Done.
9. Touch the new Weather location in the list.
10. If you want, touch the box next to Make this your
Home location.
to return Home.
11. Touch
4.
5.
6.
7.
The location will be displayed on the Home screen.
Change Home Weather Location.
1. Touch Menu.
2. Touch .
3. Touch Settings.
4.
5.
6.
7.
8.
section will open, showing Weather.
The
.
Touch
Touch the Weather location you want to change to your
Home location.
The Weather location info will appear – touch the
box next to Make this your Home location.
to return Home.
Touch
The Weather location will be displayed on the Home screen.
© 2009 Verizon. All Rights Reserved.
54
Verizon Hub User Guide
Delete Weather Location.
1. Touch Menu.
2. Touch .
3. Touch Settings.
4.
5.
6.
7.
8.
9.
10.
section will open, showing Weather.
The
.
Touch
Touch the Weather location you want to delete.
Touch Delete.
A confirmation message will appear. Touch Yes.
The Weather location will be removed from the list.
to return Home.
Touch
Home Screen Settings.
On your Home screen you can choose to display or hide the
widgets for Weather, Date & Time, Calling Features, Calls &
Messages and Start Up.
Add Weather Widget to Home Screen.
1. Touch Menu.
2. Touch .
3. Touch Settings.
4.
5.
6.
7.
section will open, showing Weather.
The
Touch Home Screen Settings.
Touch to add a check in the box next to Display Weather
widget on Home screen.
to return Home.
Touch
Weather will now appear on your Home screen.
Remove Weather Widget From Home Screen.
1. Touch Menu.
2. Touch .
3. Touch Settings.
4.
5.
6.
7.
section will open, showing Weather.
The
Touch Home Screen Settings.
Touch to delete a check in the box next to Display Weather
widget on Home screen.
to return Home.
Touch
Weather will be removed from your Home screen.
© 2009 Verizon. All Rights Reserved.
55
Verizon Hub User Guide
Add Date & Time Widget to Home Screen.
1. Touch Menu.
2. Touch .
3. Touch Settings.
4.
5.
6.
7.
section will open, showing Weather.
The
Touch Home Screen Settings.
Touch to add a check in the box next to Display
Date & Time widget on Home screen.
to return Home.
Touch
Date & Time will now appear on your Home screen.
Remove Date & Time Widget From Home Screen.
1. Touch Menu.
2. Touch .
3. Touch Settings.
4.
5.
6.
7.
section will open, showing Weather.
The
Touch Home Screen Settings.
Touch to delete a check in the box next to Display
Date & Time widget on Home screen.
to return Home.
Touch
Date & Time will be removed from your Home screen.
Add Call Features Widget to Home Screen.
1. Touch Menu.
2. Touch .
3. Touch Settings.
4.
5.
6.
7.
section will open, showing Weather.
The
Touch Home Screen Settings.
Touch to add a check in the box next to Display
Call Features widget on Home screen.
to return Home.
Touch
Call Features will now appear on your Home screen.
© 2009 Verizon. All Rights Reserved.
56
Verizon Hub User Guide
Remove Call Features Widget From Home Screen.
1. Touch Menu.
2. Touch .
3. Touch Settings.
4.
5.
6.
7.
section will open, showing Weather.
The
Touch Home Screen Settings.
Touch to remove a check in the box next to Display Call Features widget on Home screen.
to return Home.
Touch
Call Features will be removed from your Home screen.
Add Calls & Messages Widget to Home Screen.
1. Touch Menu.
2. Touch .
3. Touch Settings.
4.
5.
6.
7.
section will open, showing Weather.
The
Touch Home Screen Settings.
Touch to add a check in the box next to Display Calls
& Messages widget on Home screen.
to return Home.
Touch
Calls & Messages will now appear on your Home screen.
Remove Calls & Messages Widget From Home Screen.
1. Touch Menu.
2. Touch .
3. Touch Settings.
4.
5.
6.
7.
section will open, showing Weather.
The
Touch Home Screen Settings.
Touch to delete a check in the box next to Display Calls & Messages widget on Home screen.
to return Home.
Touch
Calls & Messages will be removed from your Home screen.
© 2009 Verizon. All Rights Reserved.
57
Verizon Hub User Guide
Date & Time.
View Current Date & Time Settings.
1. Touch Menu.
2. Touch .
3. Touch Settings.
4.
5.
6.
7.
section will open, showing Weather.
The
Touch Date & Time.
The current date and time will appear.
to return Home.
Touch
Change Time Zone.
1. Touch Menu.
2. Touch .
3. Touch Settings.
4.
5.
6.
7.
8.
9.
section will open, showing Weather.
The
Touch Date & Time.
The current date and time will appear.
Touch Change Time Zone.
Select the new Time Zone and touch Save.
to return Home.
Touch
The changes you’ve made to your Time Zone will be
effective immediately.
Handsets.
View Activated Handsets.
1. Touch Menu.
2. Touch .
3. Touch Settings.
4.
5.
6.
7.
section will open, showing Weather.
The
Touch Handsets.
A list of activated handsets will appear.
to return Home.
Touch
© 2009 Verizon. All Rights Reserved.
58
Verizon Hub User Guide
Activate Handset Automatically.
1. Touch Menu.
2. Touch .
3. Touch Settings.
4.
5.
6.
7.
8.
section will open, showing Weather.
The
Touch Handsets.
To automatically activate the handset, place the handset
in the cradle with the screen facing outward. Once the
handset is activated, it will appear on the list here
in Settings.
A confirmation message will appear. Touch OK.
to return Home.
Touch
Activate Handset Manually.
1. Touch Menu.
2. Touch .
3. Touch Settings.
4.
5.
6.
7.
8.
9.
section will open, showing Weather.
The
Touch Handsets.
Touch Manual Activation.
Follow the instructions on the screen.
A confirmation message will appear. Touch OK.
to return Home.
Touch
Delete Handset.
1. Touch Menu.
2. Touch .
3. Touch Settings.
4.
5.
6.
7.
8.
section will open, showing Weather.
The
Touch Handsets.
Touch the Handset you want to delete.
Touch Delete.
A confirmation message will appear. Touch Yes.
The handset will be deactivated. It will no longer work with your
Verizon Hub unless you choose to activate it again.
© 2009 Verizon. All Rights Reserved.
59
Verizon Hub User Guide
Verizon Hub Tour.
You can replay the feature tour that first played when you set
up your Verizon Hub.
1. Touch Menu.
2. Touch .
3. Touch Settings.
4.
5.
6.
7.
8.
section will open, showing Weather.
The
Scroll to and then touch Verizon Hub Tour.
Touch Replay Tour.
The tour will launch and appear full-screen.
Touch the screen at any time to exit the tour.
to return Home.
Touch
Calling Features.
Call Forwarding.
Call Forwarding allows you to forward incoming calls
from your Verizon Hub to another phone. If you’re unable
to answer the forwarded call, the voice mailbox of the other
phone number will accept the call.
IMPORTANT INFORMATION.
Call Forwarding cannot be used with international numbers
except those that belong to select Caribbean and other
neighboring destinations. International long distance rates
apply when forwarding calls to these destinations: Anguilla,
Antigua, Bahamas, Barbados, Barbuda, Bermuda, Cayman
Islands, Grenada, Montserrat, St. Kitts and Nevis, St. Lucia,
St. Vincent and the Grenadines, Trinidad and Tobago, Turks
and Caicos Islands and Virgin Islands, British. There are no
additional charges for forwarding calls to these destinations:
American Samoa, Canada, Guam, Northern Mariana Islands,
Puerto Rico and Virgin Islands, U.S.
© 2009 Verizon. All Rights Reserved.
60
Verizon Hub User Guide
Turn On Call Forwarding – First Time Setup.
1. Touch Menu.
2. Touch .
3. Touch Settings.
4.
5.
6.
7.
8.
9.
10.
11.
12.
13.
14.
.
Touch
Touch Call Forwarding.
.
Touch
Touch
or
– the keyboard will appear.
Use the keyboard to enter a 10-digit phone number,
and touch Enter.
.
Touch
Touch Call
Forward Numbers and select the
TURN OFF
number from the list.
Touch TURN ON .
Your calls will be forwarded to the phone
number you selected.
To add more numbers, repeat steps 6-9.
to return Home.
Touch
Your calls will be forwarded to the phone number you
selected until you turn off Call Forwarding.
Turn On Call Forwarding – Already Set Up.
1. Touch Menu.
2. Touch .
3. Touch Settings.
4.
5.
6.
7.
8.
9.
.
Touch
Touch Call Forwarding.
Touch Call
Forward Numbers and select the number
TURN OFF
from the list.
Touch TURN ON .
Your calls will be forwarded to the phone number
you selected.
to return Home.
Touch
© 2009 Verizon. All Rights Reserved.
61
Verizon Hub User Guide
Turn Off Call Forwarding.
1. Touch Menu.
2. Touch .
3. Touch Settings.
4.
5.
6.
7.
.
Touch
Touch Call Forwarding.
Touch TURN OFF .
to return Home.
Touch
TURN ON
Your calls will no longer be forwarded until reactivated.
Do Not Disturb.
You can choose to send all calls directly to Voice Mail when you
don’t want to be disturbed. You can also schedule to turn this
feature on and off for a specific time frame.
Turn On Do Not Disturb.
1. Touch Menu.
2. Touch .
3. Touch Settings.
4.
5.
6.
7.
8.
.
Touch
Touch Do Not Disturb.
Touch Manage
Schedule to set a time to turn on
TURN OFF
Do Not Disturb. Touch Save.
Touch TURN ON .
to return Home.
Touch
Do Not Disturb will be turned on immediately.
Turn Off Do Not Disturb.
1. Touch Menu.
2. Touch .
3. Touch Settings.
4.
5.
6.
7.
.
Touch
Touch Do Not Disturb.
Touch TURN OFF .
to return Home.
Touch
TURN ON
© 2009 Verizon. All Rights Reserved.
62
Verizon Hub User Guide
Incoming Call Block.
You have the ability to block up to 12 phone numbers you
don’t want calling you, or block all anonymous calls.
Turn On Incoming Call Block.
1. Touch Menu.
2. Touch .
3. Touch Settings.
4.
5.
6.
7.
8.
9.
10.
11.
12.
.
Touch
Touch Incoming Call Block.
Touch the check box next to:
Reject all anonymous calls.
OR
Reject calls from certain numbers.
.
Touch
and the keypad will appear.
Touch
Use the keypad to enter the phone number,
and touch
TURN Enter.
OFF
.
Touch
TURN
ON
.
Touch
to return Home.
Touch
Turn Off Incoming Call Block.
1. Touch Menu.
2. Touch .
3. Touch Settings.
4.
5.
6.
7.
.
Touch
Touch Incoming Call Block.
Touch TURN OFF .
to return Home.
Touch
TURN ON
© 2009 Verizon. All Rights Reserved.
63
Verizon Hub User Guide
Simultaneous Ring.
Never miss another important call. When you activate
Simultaneous Ring, all incoming phone calls you receive
will ring on up to 3 different numbers, plus the Verizon Hub
number. The first phone that is answered connects you to
the caller.
However, if you aren’t able to answer the call, the caller will
be sent to Voice Mail for the phone that has the shortest
ring count.
Note: You will be charged airtime minutes if you choose to
answer a Simultaneous Ring call on your cell phone.
IMPORTANT INFORMATION.
Simultaneous Ring cannot be used with international numbers
except those that belong to select Caribbean and other
neighboring destinations. International long distance rates
apply when using Simultaneous Ring with these destinations:
Anguilla, Antigua, Bahamas, Barbados, Barbuda, Bermuda,
Cayman Islands, Grenada, Montserrat, St. Kitts and Nevis, St.
Lucia, St. Vincent and the Grenadines, Trinidad and Tobago,
Turks and Caicos Islands and Virgin Islands, British. There are
no additional charges for using Simultaneous Ring with these
destinations: American Samoa, Canada, Guam, Northern
Mariana Islands, Puerto Rico and Virgin Islands, U.S.
Turn On Simultaneous Ring.
1. Touch Menu.
2. Touch .
3. Touch Settings.
4.
5.
6.
7.
8.
9.
10.
11.
12.
13.
.
Touch
Touch Simultaneous Ring.
.
Touch
Touch
or
– the keyboard will appear.
Use the keyboard to enter a phone number, and touch Enter.
.
Touch
TURN OFF
To add up to 3 numbers, repeat steps 6-9.
When you’re done, touch TURN ON .
Your calls will be sent to the phone numbers you selected.
to return Home.
Touch
© 2009 Verizon. All Rights Reserved.
64
Verizon Hub User Guide
Turn Off Simultaneous Ring.
1. Touch Menu.
2. Touch .
3. Touch Settings.
4.
5.
6.
7.
.
Touch
Touch Simultaneous Ring.
Touch TURN OFF .
to return Home.
Touch
TURN ON
Backup Numbers.
If you experience an interruption in service, you can have
your calls automatically forwarded to a Backup Number.
Most likely, you chose a Backup Number when you first set
up your Verizon Hub, but you can add or change your Backup
Number at any time.
Change Backup Number.
1. Touch Menu.
2. Touch .
3. Touch Settings.
4.
5.
6.
7.
8.
9.
.
Touch
Scroll to and then touch Backup Number.
Touch Backup Number – the keypad will appear.
Use the keypad to enter the number, and touch Enter.
.
Touch
to return Home.
Touch
© 2009 Verizon. All Rights Reserved.
65
Verizon Hub User Guide
Call Waiting.
With Call Waiting, a call can get through when you’re on
another call. When someone tries to call you when you’re
on the phone, you will hear a Call Waiting tone. The person
calling you will hear ringing until you answer. You can either
answer the new call or let it go to Voice Mail.
Note: This feature default is On.
Turn On Call Waiting.
1. Touch Menu.
2. Touch .
3. Touch Settings.
4.
5.
6.
7.
Touch TURN OFF.
Scroll to and then touch Call Waiting.
Touch TURN ON .
to return Home.
Touch
Turn Off Call Waiting.
1. Touch Menu.
2. Touch .
3. Touch Settings.
4.
5.
6.
7.
.
Touch
Scroll to and then touch Call Waiting.
Touch TURN OFF .
to return Home.
Touch
TURN ON
© 2009 Verizon. All Rights Reserved.
66
Verizon Hub User Guide
Caller ID Block.
You can block your Caller ID on a per call basis by dialing *67.
Once you set up permanent Caller ID Block, all your calls are
anonymous until you disable the feature.
If you would like to show your Caller ID information on a
particular call, dial *82 prior to making a call. This function will
allow your Caller ID information to be displayed while Caller ID
Block is On.
Turn On Caller ID Block.
1. Touch Menu.
2. Touch .
3. Touch Settings.
4.
5.
6.
7.
8.
Touch TURN OFF.
Scroll to and then touch Caller ID Block.
Touch TURN ON .
Your Caller ID and Name will not be displayed when
you make outgoing calls.
to return Home.
Touch
Turn Off Caller ID Block.
1. Touch Menu.
2. Touch .
3. Touch Settings.
4.
5.
6.
7.
8.
.
Touch
Scroll to and then touch Caller ID Block.
Touch TURN OFF .
Your Caller ID and Name will be displayed when you
TURN ON
make outgoing calls.
to return Home.
Touch
International Call Block.
This feature prevents any international calls from being placed
from your phone.
For your protection, the default setting for International Call
Block is ON. Please visit verizonwireless.com/hub to deactivate
this feature if you’d like to make international calls.
Refer to the International Call Block section of this guide for
more information.
© 2009 Verizon. All Rights Reserved.
67
Verizon Hub User Guide
Voice Mail Settings.
Your Voice Mail allows callers to leave messages for you when
you’re away from your phone or when you are unable to take
the call. You can listen to Voice Mail messages directly from
your Verizon Hub or, when you’re away from home, you can
retrieve messages from the Voice Mail system or online from
the Web Management Site at verizonwireless.com/hub.
Important Note: Prior to changing your Verizon Hub
telephone number or transferring your existing home phone
number to your Verizon Hub, you must set up Voice Mail first.
Change Number of Rings Before Going to Voice Mail.
1. Touch Menu.
2. Touch .
3. Touch Settings.
4.
5.
6.
7.
8.
.
Touch
Scroll to and then touch Voice Mail.
Touch the Ring number to select 2, 3, 4, 5 or 6 Rings.
.
Touch
to return Home.
Touch
Send Email Notification of New Voice Mail.
1. Touch Menu.
2. Touch .
3. Touch Settings.
4.
5.
6.
7.
8.
9.
10.
11.
.
Touch
Scroll to and then touch Voice Mail.
Touch Enter Email Address – the keyboard will appear.
Use the keyboard to enter the Email
Address,
then
TURN
OFF
touch Enter.
Next to Email Notifications, touch TURN ON .
If you want, check the box next to Send for urgent
Voice Mail only.
.
Touch
to return Home.
Touch
© 2009 Verizon. All Rights Reserved.
68
Verizon Hub User Guide
Change Voice Mail Passcode.
1. Touch Menu.
2. Touch .
3. Touch Settings.
.
Touch
Scroll to and then touch Voice Mail.
.
Touch
Touch Enter Old Passcode – the keyboard will appear.
Use the keyboard to enter the Old Passcode, then
touch Enter.
Repeat steps 7 and 8 for:
• New Passcode.
• Confirm New Passcode.
.
10. When you’re done, touch
to return Home.
11. Touch
4.
5.
6.
7.
8.
9.
Your new Passcode has been activated.
Change Voice Mail Greeting.
1. Touch Menu.
2. Touch .
3. Touch Settings.
4.
5.
6.
7.
.
Touch
Scroll to and then touch Voice Mail.
and follow the voice prompts.
Touch
to return Home.
Touch
Display.
Wallpaper.
Change Wallpaper.
1. Touch Menu.
2. Touch .
3. Touch Settings.
.
Touch
Touch Wallpaper.
The current Wallpaper will appear.
If you want to rotate your Wallpaper images, touch the
checkbox next to Shuffle all Wallpaper images.
Note: The Wallpaper will change every 20 minutes.
8. Touch Change Wallpaper.
9. Touch the Wallpaper you want, and it will automatically
appear on your Verizon Hub.
4.
5.
6.
7.
© 2009 Verizon. All Rights Reserved.
69
Verizon Hub User Guide
Screensaver.
Change Screensaver.
1. Touch Menu.
.
2. Touch
3. Touch Settings.
4.
5.
6.
7.
8.
9.
10.
11.
12.
13.
14.
15.
.
Touch
Touch Screensaver.
The current Screensaver will appear.
.
Touch
Touch the option you prefer, and you’ll return to
the Screensaver page.
Touch Preview to see a preview of your selection.
Touch the screen again to return to the Screensaver page.
Select the Delay you’d like before the Screensaver turns on:
• 5 min.
• 10 min.
• 30 min.
Select Automatic Dimming ON or OFF.
If you want your screen to turn off and go black after
30 minutes, touch ON next to Turn Off Display.
.
When you’re done, touch
to return Home.
Touch
The new Screensaver will appear the next time your device rests.
Upload New Photos for Wallpaper and Screensaver.
You can upload new photos to use as Wallpaper or a
Screensaver on your Verizon Hub. You can do this from the Web
Management Site at verizonwireless.com/hub.
Refer to the Upload Photos section of this guide for
more information.
© 2009 Verizon. All Rights Reserved.
70
Verizon Hub User Guide
Network.
If you have an established home network, you can connect
your Verizon Hub to the wired or wireless network.
Check Wired Connection.
1. Touch Menu.
2.
3.
4.
5.
6.
.
Touch
Touch Settings.
Touch Network.
Your connection type and status will appear.
to return Home.
Touch
Connect to Wired Network.
1. Touch Menu.
2.
3.
4.
5.
6.
7.
8.
.
Touch
Touch Settings.
Touch Network.
Your connection type and status will appear.
Touch Change Network.
Touch Use a Network Cable.
Connect an Ethernet cable to your Verizon
Hub and then your home network.
Refer to the Connect to Wired Network section of this guide
for more information.
Check Wireless Connection.
1. Touch Menu.
2.
3.
4.
5.
6.
.
Touch
Touch Settings.
Touch Network.
Your connection type and status will appear.
to return Home.
Touch
Connect to Wireless Connection.
1. Touch Menu.
2.
3.
4.
5.
6.
.
Touch
Touch Settings.
Touch Network.
Your connection type and status will appear.
Touch Change Network.
© 2009 Verizon. All Rights Reserved.
71
Verizon Hub User Guide
7.
8.
9.
10.
11.
12.
Touch Use My Wireless Network.
Select a Wireless Network from the list.
Enter your Network Password.
Touch Connect.
A status message will appear to confirm connection.
to return Home.
Touch
Refer to the Connect to Wireless Network section of this
guide for more information.
Change Network.
1. Touch Menu.
.
2. Touch
3. Touch Settings.
4. Touch
5.
6.
7.
8.
9.
.
Your connection type and status will appear.
Touch Change Network.
Touch Use a Network Cable or Use My Wireless Network.
Follow the on-screen instructions.
Verizon Hub will connect to the Network, indicate
the connection and return to the Home screen.
Refer to the Connect to Wired Network or Connect to
Wireless Network sections of this guide for
more information.
IP Address
Obtain IP Automatically
1. Touch Menu.
.
2. Touch
3. Touch Settings.
4.
5.
6.
7.
8.
.
Touch
Your connection type and status will appear.
Touch Advanced IP Settings.
The IP Address will appear. Touch Renew IP to receive
updated IP information.
to return Home.
Touch
© 2009 Verizon. All Rights Reserved.
72
Verizon Hub User Guide
Manual IP Configuration.
1. Touch Menu.
.
2. Touch
3. Touch Settings.
.
Touch
Touch Advanced IP Settings.
Touch Manual IP Configuration.
Enter the following:
• IP Settings.
• Subnet Mask.
• Default Gateway.
• Preferred DNS.
• Secondary DNS.
.
8. When you’re done, touch
to return Home.
9. Touch
4.
5.
6.
7.
Sound.
Volume.
Adjust System Volume.
1. Touch Menu.
.
2. Touch
3. Touch Settings.
4.
5.
6.
7.
.
Touch
Touch Volume.
or
Next to System, touch
System Volume.
to return Home.
Touch
to adjust the
Adjust Speakerphone Volume.
1. Touch Menu.
2. Touch
.
3. Touch Settings.
4.
5.
6.
7.
.
Touch
Touch Volume.
Next to Speakerphone, touch
Speakerphone Volume.
to return Home.
Touch
© 2009 Verizon. All Rights Reserved.
or
to adjust the
73
Verizon Hub User Guide
Adjust Ringer Volume.
1. Touch Menu.
.
2. Touch
3. Touch Settings.
4.
5.
6.
7.
.
Touch
Touch Volume.
or
Next to Ringer, touch
to return Home.
Touch
to adjust the Ringer Volume.
Adjust Media Volume.
1. Touch Menu.
2. Touch
.
3. Touch Settings.
4.
5.
6.
7.
.
Touch
Touch Volume.
or
Next to Media, touch
to return Home.
Touch
to adjust the Media Volume.
Ringtone.
Listen to Current Ringtone.
1. Touch Menu.
.
2. Touch
3. Touch Settings.
4.
5.
6.
7.
8.
.
Touch
Touch Ringtone.
Your current Ringtone is listed.
to listen to the ringtone.
Touch
to return Home.
Touch
Change Ringtone.
1. Touch Menu.
2. Touch
.
3. Touch Settings.
4.
5.
6.
7.
.
Touch
Touch Ringtone.
Touch Change.
Scroll to view the full list of Ringtones. Touch any of
the Ringtones, then touch:
to preview the Ringtone.
•
© 2009 Verizon. All Rights Reserved.
74
Verizon Hub User Guide
to pause the Ringtone.
•
to replay the Ringtone from the beginning.
•
.
8. When you’re done, touch
to return Home.
9. Touch
Your new Ringtone will be effective immediately.
System.
System Information.
View System Information.
1. Touch Menu.
.
2. Touch
3. Touch Settings.
4.
5.
6.
7.
.
Touch
Touch System Information.
The Software Version will be listed.
to return Home.
Touch
Check if Verizon Hub is Online.
1. Touch Menu.
2. Touch
.
3. Touch Settings.
4.
5.
6.
7.
.
Touch
Touch System Information.
If you’re connected to your home network, the screen
will say: Verizon Hub is currently online.
to return Home.
Touch
Version Information.
View Version Information.
1. Touch Menu.
2.
3.
4.
5.
6.
7.
.
Touch
Touch Settings.
.
Touch
Touch Version Information.
All the Verizon Hub Version Information will be listed.
to return Home.
Touch
© 2009 Verizon. All Rights Reserved.
75
Verizon Hub User Guide
System Resets
Verizon Hub Reset
1. Touch Menu.
2.
3.
4.
5.
6.
7.
.
Touch
Touch Settings.
.
Touch
Touch System Resets.
Please follow the instructions on the screen to reset your
Verizon Hub.
to return Home.
Touch
Apps.
Apps allows you to select and download
new applications for your Verizon Hub.
Download Apps.
Touch Menu.
Touch .
Touch Apps.
The What’s New tab will display available apps.
Touch an app to view a description of the application.
Touch Download.
A confirmation message will appear. Touch Yes.
A message confirming the download will appear.
Touch OK.
9. The app will now appear in the My Stuff tab
and you can launch it from the Menu.
to return Home.
10. Touch
1.
2.
3.
4.
5.
6.
7.
8.
View My Stuff.
Touch Menu.
Touch .
Touch Apps.
The What’s New tab will display available apps.
Touch the My Stuff tab to see the apps you have
already downloaded.
to return Home.
6. Touch
1.
2.
3.
4.
5.
© 2009 Verizon. All Rights Reserved.
76
Verizon Hub User Guide
Remove App.
1.
2.
3.
4.
5.
6.
7.
8.
9.
10.
Touch Menu.
Touch .
Touch Apps.
The What’s New tab will display available apps.
Touch the My Stuff tab to see the apps you have
already downloaded.
Touch the App you want to remove and then
touch Remove.
A confirmation message will appear. Touch Yes.
A message confirming the deletion will appear. Touch OK.
The app will be removed from the Menu and the My Stuff
tab and will be available again in the What’s New tab.
to return Home.
Touch
Using Apps.
Horoscopes.
You must first download Horoscopes as described
in the Download Apps section.
1. Touch Menu.
to locate Horoscopes.
2. Touch
3. Touch Horoscopes.
4. Touch your astrological sign.
5. Your Horoscope will be displayed.
6. Touch Back to return to the previous screen.
to return Home.
7. Touch
Note: For entertainment purposes only.
Internet Radio.
You must first download Internet Radio as described
in the Download Apps section.
Listen to Internet Radio.
1. Touch Menu.
to locate Internet Radio.
2. Touch
3. Touch Internet Radio.
4. Radio stations will be categorized by genre:
• Touch the genre to see a list of stations in that
radio format.
© 2009 Verizon. All Rights Reserved.
77
Verizon Hub User Guide
5.
6.
7.
8.
• Touch ALL - Alphabetical to see a full list of stations.
• Touch ALL - Location to see a list of stations by city.
Select the radio station you want to hear
and it will begin to play.
to stop the station.
• Touch
to play the station.
• Touch
Touch Add to add the station to My Favorites.
Touch Back to return to the previous screen.
to return Home.
Touch
Add Station to My Favorites.
1. Touch Menu.
to locate Internet Radio.
2. Touch
3. Touch Internet Radio.
4. Radio stations will be categorized by genre:
• Touch the genre to see a list of stations in that
radio format.
• Touch ALL - Alphabetical to see a full list
of stations.
• Touch ALL - Location to see a list of stations by city.
5. Select the radio station you want to add and
it will begin to play.
6. Touch Add to add the station to My Favorites.
7. The station will now appear in My Favorites.
8. Touch Back to return to the previous screen.
to return Home.
9. Touch
© 2009 Verizon. All Rights Reserved.
78
Verizon Hub User Guide
Remove Station From My Favorites.
1. Touch Menu.
to locate Internet Radio.
2. Touch
3. Touch Internet Radio.
4. Touch My Favorites to view a list of stations.
5. Select the radio station you want to remove,
and it will begin to play.
6. Touch Delete.
7. A confirmation message will appear. Touch Yes.
8. The station will be removed from My Favorites
but will still appear in the iheartradio.com list.
9. Touch Back to return to the previous screen.
to return Home.
10. Touch
Photo Viewer.
You must first download Photo Viewer as described
in the Download Apps section.
View Album.
1. Touch Menu.
to locate Photo Viewer.
2. Touch
3. Touch Photo Viewer.
4. You will see a list of available photo albums.
5. Touch the album you want to view and the
first photo will appear on the right.
6. Touch that photo to open the album.
7. Touch Options to Play Slideshow or Save
the selected photo as your Wallpaper.
8. Touch Back to return to the previous screen.
to return Home.
9. Touch
© 2009 Verizon. All Rights Reserved.
79
Verizon Hub User Guide
Play Slideshow.
1. Touch Menu.
to locate Photo Viewer.
2. Touch
3. Touch Photo Viewer.
4. You will see a list of available photo albums.
5. Touch the album you want to view and the
first photo will appear on the right.
6. Touch that photo to open the album.
7. Touch Options and then touch Play Slideshow.
The album will play full-screen.
8. Touch the screen to view slideshow controls.
• Reverse.
• Forward.
• Stop.
• Play/Pause.
• Set as Wallpaper.
9. Touch Back to return to the previous screen.
to return Home.
10. Touch
Create New Album.
1. Touch Menu.
to locate Photo Viewer.
2. Touch
3. Touch Photo Viewer.
4. Touch New Album.
5. Touch the photos you want to add to the new album.
Note: Touch Back and Next to view more photos.
6. Touch Done.
7. Use the keypad to type the name of the new album
and touch Enter.
8. A confirmation message will appear. Touch Yes.
9. Choose the Delay between Slides – 5, 10 or 30 seconds.
10. Touch Preview to preview the album or touch Save
if you’re done.
11. The new album will appear in the list
to return Home.
12. Touch
© 2009 Verizon. All Rights Reserved.
80
Verizon Hub User Guide
Edit Album.
1. Touch Menu.
to locate Photo Viewer.
2. Touch
3. Touch Photo Viewer.
4. Touch an album from the list.
5. Touch Edit Album.
6. Touch photos to add them to the album or touch
highlighted photos to remove them.
7. Touch Edit Album Name and use the keypad to change
the album name and touch Enter.
8. Touch Done.
to return Home.
9. Touch
Delete Album.
1. Touch Menu.
to locate Photo Viewer.
2. Touch
3. Touch Photo Viewer.
4. Touch an album from the list.
5. Touch Delete Album.
6. A confirmation message will appear. Touch Yes.
7. The album will be removed from the list.
8. The new album will appear in the list.
to return Home.
9. Touch
Change Wallpaper.
1. Touch Menu.
to locate Photo Viewer.
2. Touch
3. Touch Photo Viewer.
4. Touch Change Wallpaper.
5. Touch a photo.
6. Verizon Hub will return to the Home screen and
the wallpaper will change to the selected photo.
© 2009 Verizon. All Rights Reserved.
81
Verizon Hub User Guide
Make Screensaver.
1. Touch Menu.
to locate Photo Viewer.
2. Touch
3. Touch Photo Viewer.
4. Touch the album in the list you want displayed
as a Screensaver.
5. Touch Make Screensaver.
6. Choose the Delay between Slides – 5, 10 or 30 seconds.
7. Touch Preview to preview the album or touch
Save if you’re done.
8. The new album will appear in the list.
to return Home.
9. Touch
Upload New Photos for Wallpaper and Screensaver.
You can upload new photos to use as Wallpaper or a
Screensaver on your Verizon Hub. You can do this from the
Web Management Site at verizonwireless.com/hub.
Refer to the Upload Photos section of this guide
for more information.
Puzzle Games.
You must first download Puzzle Games as
described in the Download Apps section.
Play Number Puzzle.
1. Touch Menu.
to locate Puzzle Games.
2. Touch
3. Touch Puzzle Games.
4. The 15 Puzzle tab will be highlighted.
5. Touch the Number Puzzle tab.
6. Slide the tiles to put the numbers in order from 1-15.
7. The timer will start when you slide the first tile.
• Touch Pause to stop the timer.
• Touch Resume to continue the game.
• Touch Reset to start the puzzle again.
• Touch New Game to start over.
8. When you complete the puzzle, Verizon Hub will
display your completion time.
to return Home.
9. Touch
© 2009 Verizon. All Rights Reserved.
82
Verizon Hub User Guide
Play Picture Puzzle.
1. Touch Menu.
to locate Puzzle Games.
2. Touch
3. Touch Puzzle Games.
4. The 15 Puzzle tab will be highlighted.
5. Touch the Picture Puzzle tab.
6. Slide the tiles to put the photo together.
7. The timer will start when you slide the first tile.
• Touch Pause to stop the timer.
• Touch Resume to continue the game.
• Touch Reset to start the puzzle again.
• Touch Change Picture to select a new photo.
8. When you complete the puzzle, Verizon Hub will
display your completion time.
to return Home.
9. Touch
Play Sudoku.
1. Touch Menu.
to locate Puzzle Games.
2. Touch
3. Touch Puzzle Games.
4. Touch Sudoku.
5. Select a level of play – Easy, Normal, Hard,
Very Hard – and touch Start.
6. Complete each row across or down and each box of
nine cells so they contain the numbers 1 through 9.
7. Touch an empty cell to select it. Then touch a number
from the keypad to fill the selected cell.
8. You can replace a number you entered by touching
the number and touching the keypad to replace
the number or Clear to remove the number. (Red
numbers cannot be changed or cleared.)
• Check your progress by touching Check Solution.
Incorrect numbers will be blue.
• Touch Play Again to clear the puzzle and
start again.
• Touch Solution to see the answer.
• Touch Start Over to start a new puzzle.
9. Fill all the cells to complete the puzzle. Your Verizon Hub
will indicate when you correctly complete the puzzle.
to return Home.
10. Touch
© 2009 Verizon. All Rights Reserved.
83
Verizon Hub User Guide
Recipes.
You must first download Recipes as described
in the Download Widget section.
1. Touch Menu.
to locate Recipes.
2. Touch
3. Touch Recipes.
4. Touch a category.
5. Select a recipe to view its description.
6. Touch View Full Recipe to view the details.
7. Touch Nutritional Information to view
nutritional breakdown.
8. Touch Back to return to the previous screen.
to return Home.
9. Touch
Feedback.
Tell us what you think of your Verizon Hub!
1. Touch Menu.
to locate Feedback.
2. Touch
3. Touch Feedback.
4. Touch Select a Feature Name to select a feature.
5. Touch the Feedback window and use the keypad
to enter your question or comment.
6. Touch Enter.
7. Touch Send.
8. Verizon Hub will direct you to verizonwireless.com/
hub/help for updates based on your feedback. Touch OK.
9. Verizon Hub will return to the Home screen.
© 2009 Verizon. All Rights Reserved.
84
Verizon Hub User Guide
Verizon Hub Handset(s).
Battery Strength.
Indicates the amount of handset battery strength.
Activation and In/Out
of Range Indicator.
Shows that the handset is activated and within
range. When the handset goes out of range,
a message will appear and this graphic
will disappear.
Syncing Indicator
Shows that the handset is receiving
updates for the correct date, time, data
and/or software, and syncing with
the Verizon Hub base Contacts.
Calls.
Lists your Received Calls.
Contacts.
Access all Contacts stored in your
Verizon Hub.
Talk.
Allows you to get a dial tone and
make a phone call.
OK Button/Joystick.
Opens the Menu.
End.
Ends a call or exits an application.
© 2009 Verizon. All Rights Reserved.
85
Verizon Hub User Guide
Volume Controls.
Ringer Volume.
While NOT on a call, press Volume + or Volume - on the side
of the handset to adjust the ringer volume.
Handset Speaker Volume.
During a phone call, press Volume + or Volume - on the side
of the handset to adjust the speaker volume.
Keypad Button Volume.
While navigating the handset Menu, press Volume + or
Volume - on the side of the handset to adjust the keypad
button volume.
You will hear the volume increase or decrease as you press
Volume + and Volume -.
© 2009 Verizon. All Rights Reserved.
86
Verizon Hub User Guide
Headset Jack.
The handset is compatible with all 2.5mm telephone
headsets with a built-in microphone.
Simply insert the headset plug into the right side of
the handset.
You will be able to make and receive hands-free calls
using your headset.
Menu.
Received Calls.
View Received Calls.
1. Press OK to open the Menu.
2. Received is the first Menu option and will already
be highlighted. Press OK.
3. Your list of Received Calls will appear.
4. Press Back to return to the previous screen.
to return to Home.
5. Press
View Received Calls Details.
1. Press OK to open the Menu.
2. Received is the first Menu option and will already
be highlighted. Press OK.
3. Your list of Received Calls will appear.
4. Move the OK Button/Joystick to highlight the call you
want to view and press OK.
5. You will see the following Call Details:
• Contact – Name and Phone Number
(if available).
• Date.
• Time.
• Duration.
6. Press Back to return to the previous screen.
to return to Home.
7. Press
© 2009 Verizon. All Rights Reserved.
87
Verizon Hub User Guide
Received Calls – Add New Contact.
1. Press OK to open the Menu.
2. Received is the first Menu option and will already
be highlighted. Press OK.
3. Move the OK Button/Joystick to select a Call and
press Options.
4. Add New Contact will already be highlighted.
Press OK.
5. If you want, use the OK Button/Joystick and keypad
to edit Call information. When you’re done, press Next.
6. Move the OK Button/Joystick to select a Ringtone
Type – Ringer 1-13. When you’re done, press Next.
7. The Contact Summary will appear. Press Save Contact.
to return to Home.
8. Press
Received Calls – Update Existing Contact.
1. Press OK to open the Menu.
2. Received is the first Menu option and will already
be highlighted. Press OK.
3. Move the OK Button/Joystick to select a Call and
press Options.
4. Add to Contacts will already be highlighted. Press OK.
5. Move the OK Button/Joystick to select Update
Existing Contact and press OK.
6. Move the OK Button/Joystick to select a Contact.
Press OK.
7. The Existing Contact information will appear.
8. If you want, use the OK Button/Joystick and keypad
to edit Contact information. When you’re done,
press Next.
9. A Contact Updated message will appear. Press OK.
to return to Home.
10. Press
© 2009 Verizon. All Rights Reserved.
88
Verizon Hub User Guide
Delete Received Call.
1. Press OK to open the Menu.
2. Received is the first Menu option and will already
be highlighted. Press OK.
3. Scroll to the call to delete and Press Options.
4. Move the OK Button/Joystick to select Delete Call
and press OK.
5. A confirmation message will appear.
6. Press Yes.
to return to Home.
7. Press
The Received Call information will be deleted.
Delete All Received Calls Information.
1. Press OK to open the Menu.
2. Received is the first Menu option and will already
be highlighted. Press OK.
3. Press Options.
4. Move the OK Button/Joystick to select Delete All
Calls and press OK.
5. A confirmation message will appear.
6. Press Yes.
7. Press OK.
to return to Home.
8. Press
All Received Calls information will be deleted.
Dialed Calls.
View Dialed Calls.
1. Press OK to open the Menu.
2. Move the OK Button/Joystick to select Dialed and
press OK.
3. Your list of Dialed Calls will appear.
4. Press Back to return to the previous screen.
to return to Home.
5. Press
© 2009 Verizon. All Rights Reserved.
89
Verizon Hub User Guide
View Dialed Calls Details.
1. Press OK to open the Menu.
2. Move the OK Button/Joystick to select Dialed and press OK.
3. Your list of Dialed Calls will appear.
4. Move the OK Button/Joystick to highlight the call you
want to view and press OK.
5. You will see the following Call Details:
• Contact – Name and Phone Number
(if available).
• Date.
• Time.
• Duration.
6. Press Back to return to the previous screen.
to return to Home.
7. Press
Dialed Calls – Add New Contact.
1. Press OK to open the Menu.
2. Move the OK Button/Joystick to select Dialed and
press OK.
3. Your list of Dialed Calls will appear.
4. Move the OK Button/Joystick to select a Call and
press Options.
5. Add to Contacts will already be highlighted. Press OK.
6. Add New Contact will already be highlighted. Press OK.
7. If you want, use the OK Button/Joystick and keypad
to edit Call information. When you’re done, press Next.
8. Move the OK Button/Joystick to select a Ringtone
Type – Ringer 1-13. When you’re done, press Next.
9. The Contact Summary will appear. Press Save Contact.
to return to Home.
10. Press
© 2009 Verizon. All Rights Reserved.
90
Verizon Hub User Guide
Dialed Calls – Update Existing Contact.
1. Press OK to open the Menu.
2. Move the OK Button/Joystick to select Dialed and press OK.
3. Your list of Dialed Calls will appear.
4. Move the OK Button/Joystick to select a Call and
press Options.
5. Add to Contacts will already be highlighted. Press OK.
6. Move the OK Button/Joystick to select Update
Existing Contact and press OK.
7. Move the OK Button/Joystick to select a Contact. Press OK.
8. The Existing Contact information will appear.
9. If you want, use the OK Button/Joystick and keypad
to edit Contact information. When you’re done,
press Next.
to return to Home.
10. Press
Delete Dialed Call.
1. Press OK to open the Menu.
2. Move the OK Button/Joystick to select Dialed and
press OK.
3. Your list of Dialed Calls will appear.
4. Move the OK Button/Joystick to select a Call and
press Options.
5. Move the OK Button/Joystick to select Delete Call
and press OK.
6. A confirmation message will appear.
7. Press Yes.
to return to Home.
8. Press
The Dialed Call information will be deleted.
© 2009 Verizon. All Rights Reserved.
91
Verizon Hub User Guide
Delete All Dialed Calls.
1. Press OK to open the Menu.
2. Move the OK Button/Joystick to select Dialed and
press OK.
3. Press Options.
4. Move the OK Button/Joystick to select Delete All
Calls and press OK.
5. A confirmation message will appear.
6. Press Yes.
to return to Home.
7. Press
All Dialed Calls information will be deleted.
Contacts.
You can add Contacts from your Received Calls, Dialed Calls
and Voice Mail.
View Contacts.
1. Press OK to open the Menu.
2. Move the OK Button/Joystick to select Contacts and
press OK.
3. Your list of Contacts will appear.
4. When a Contact is highlighted, you can press OK to
view Contact Details.
5. Press Back to return to the previous screen.
6. Press Options to Add New Contact, Edit Contact,
View Contact Details, Delete Contact, Delete All
Contacts or Call Contact.
to return to Home.
7. Press
© 2009 Verizon. All Rights Reserved.
92
Verizon Hub User Guide
Add New Contact.
You can add up to 128 Contact entries.
1. Press OK to open Menu.
2. Move the OK Button/Joystick to select Contacts and
press OK.
3. Your list of Contacts will appear. Press Options.
4. Add New Contacts will already be highlighted. Press OK.
5. Use the OK Button/Joystick and keypad to enter
Contact Name and Number. When you’re done,
press Next.
6. Move the OK Button/Joystick to select a Ringtone
Type – Ringer 1-13. When you’re done, press OK or Next.
7. The Contact Summary will appear. Press Save Contact.
8. Press Back to return to the previous screen.
to return to Home.
9. Press
Edit Contact.
1. Press OK to open Menu.
2. Move the OK Button/Joystick to select Contacts and
press OK.
3. Your list of Contacts will appear.
4. Move the OK Button/Joystick to select the Contact you
want to edit and press OK.
5. The Contact Details will appear. Press Options.
6. Move the OK Button/Joystick to select Edit Contact
and press OK.
7. Use the OK Button/Joystick and keypad to edit the
Name and Number. When you’re done, press Next.
8. Move the OK Button/Joystick to select a Ringtone
Type – Ringer 1-13. When you’re done, press OK or Next.
9. The Contact Summary will appear. Press Save Contact.
10. Press Back to return to the previous screen.
to return to Home.
11. Press
The edits will be saved in your Contacts.
© 2009 Verizon. All Rights Reserved.
93
Verizon Hub User Guide
View Contact Details.
1. Press OK to open Menu.
2. Move the OK Button/Joystick to select Contacts and
press OK.
3. Your list of Contacts will appear.
4. Move the OK Button/Joystick to select the Contact
you want to view and press OK.
5. The Contact Details will appear.
6. Press Back to return to the previous screen.
7. Press OK to call this Contact.
8. Press Options to Add New Contact, Edit Contact,
View Contact Details, Delete Contact, Delete All
Contacts or Call Contact.
9. Press Back to return to the previous screen.
to return to Home.
10. Press
Delete Contact.
1. Press OK to open Menu.
2. Move the OK Button/Joystick to select Contacts and
press OK.
3. Your list of Contacts will appear.
4. Move the OK Button/Joystick to select the Contact
you want to delete and press OK.
5. Press Options.
6. Move the OK Button/Joystick to select Delete Contact
and press OK.
7. A confirmation message will appear.
8. Press Yes.
9. Press OK.
to return to Home.
10. You will return to Contacts. Press
This Contact will be deleted from the handset.
© 2009 Verizon. All Rights Reserved.
94
Verizon Hub User Guide
Delete All Contacts.
1. Press OK to open Menu.
2. Move the OK Button/Joystick to select Contacts
and press OK.
3. Your list of Contacts will appear. Press Options.
4. Move the OK Button/Joystick to select Delete All
Contacts and press OK.
5. A confirmation message will appear.
6. Press Yes.
7. Press OK.
All Contacts will be deleted.
Call Contact.
1. Press OK to open Menu.
2. Move the OK Button/Joystick to select Contacts and
press OK.
3. Your list of Contacts will appear.
4. Move the OK Button/Joystick to select the Contact
you want to call and press OK.
5. The Contact Details will appear. Press OK.
6. The Contact will be called.
to end the call.
7. Press
© 2009 Verizon. All Rights Reserved.
95
Verizon Hub User Guide
Settings.
Set Background.
1. Press OK to open the Menu.
2. Move the OK Button/Joystick to select Settings.
Press OK.
3. Set Background is the first Menu option and
will already be highlighted. Press OK.
4. Move the OK Button/Joystick to select a Background.
5. When you’ve found the image you want to set as
the Background, press Select.
6. The new Background will appear on your handset
Home screen.
Ringtones.
Set Ringtone Type.
1. Press OK to open the Menu.
2. Move the OK Button/Joystick to select Settings.
Press OK.
3. Move the OK Button/Joystick to select Ringtones.
Press OK.
4. Ringtone Type is the first Menu option and will already
be highlighted. Press OK.
5. Move the OK Button/Joystick to select a Ringtone
Type – Ringer 1-13. Press OK.
6. The new Ringtone Type will be saved immediately.
7. Press Back to return to the previous screen.
to return to Home.
8. Press
© 2009 Verizon. All Rights Reserved.
96
Verizon Hub User Guide
Set Ringtone Volume
1. Press OK to open the Menu.
2. Move the OK Button/Joystick to select Settings.
Press OK.
3. Move the OK Button/Joystick to select Ringtones.
Press OK.
4. Move the OK Button/Joystick to select Ringtone
Volume. Press OK.
5. Move the OK Button/Joystick to select a Ringtone
Volume – Off, Low, Medium or High. Press OK.
6. The new Ringtone Volume will be saved immediately.
7. Press Back to return to the previous screen.
to return to Home.
8. Press
Set Contrast.
1. Press OK to open Menu.
2. Move the OK Button/Joystick to select Settings and
press OK.
3. Move the OK Button/Joystick to select Set Contrast.
Press OK.
4. Move the OK Button/Joystick to select the Contrast level:
• Low.
• Medium Low.
• Medium.
• Medium High.
• High.
5. Press OK.
6. Press Back to return to the previous screen.
to return to Home.
7. Press
© 2009 Verizon. All Rights Reserved.
97
Verizon Hub User Guide
Keypad Volume.
1. Press OK to open Menu.
2. Move the OK Button/Joystick to select Settings and
press OK.
3. Move the OK Button/Joystick to select Keypad Volume.
Press OK.
4. Move the OK Button/Joystick to select your preferred
keypad volume level:
• Off.
• Low.
• Medium.
• High.
5. Press OK.
6. Press Back to return to the previous screen.
to return to Home.
7. Press
Registration.
Activate Handset Automatically.
1. With the screen facing outward, place the cordless
handset in the cradle of your Verizon Hub base.
2. A beep tone will indicate it’s connected.
3. You will see “Activating handset...” displayed on
the handset screen, followed by the message
“Activated successfully.”
4. The handset Home screen will appear to indicate
activation has been fully completed.
© 2009 Verizon. All Rights Reserved.
98
Verizon Hub User Guide
Activate Handset Manually.
1. From your Verizon Hub base, touch Menu.
2. Touch Settings.
3. Touch Handsets.
4. Touch Manual Activation.
5. Follow instructions on the screen.
to return Home.
6. Touch
Note: If there is no dial tone but the handset successfully
registered with the base, verify that the Verizon Hub base is
connected to an active Internet connection and that this line is
plugged into the phone port on the back of the base unit.
Delete Handset.
1. Press OK to open Menu.
2. Move the OK Button/Joystick to select Settings and
press OK.
3. Move the OK Button/Joystick to select Registration and
press OK.
4. Move the OK Button/Joystick to select Delete Handset
and press OK.
This handset will no longer work with the Verizon Hub base.
Version.
View Version Information.
1. Press OK to open Menu.
2. Move the OK Button/Joystick to select Settings and
press OK.
3. Move the OK Button/Joystick to select Version and press OK.
4. The Version information will appear.
to return to Home.
5. Press
© 2009 Verizon. All Rights Reserved.
99
Verizon Hub User Guide
Intercom.
You can use the Intercom feature to call the handset or the
Verizon Hub base so that you can talk to another person in
your house.
Intercom From Verizon Hub Base to Handset.
.
1. From the Verizon Hub base, touch
2. The Dial Pad will open.
3. Touch Intercom.
4. If you have one handset, the handset will be
called immediately.
OR If you have more than one handset, select the handset you want to call.
5. The handset will ring. Press Ignore or Answer.
to end call.
6. Press
Intercom From Handset to Verizon Hub Base.
1. Press OK to open Menu.
2. Move the OK Button/Joystick to select Intercom and
press OK.
3. Base Station will already be highlighted.
4. Press Call.
5. The Verizon Hub base will ring. Press Accept or Cancel.
to end call.
6. Press
© 2009 Verizon. All Rights Reserved.
100
Verizon Hub User Guide
Intercom from Handset to Handset.
1. Press OK to open Menu.
2. Move the OK Button/Joystick to select Intercom
and press OK.
3. Move the OK Button/Joystick to select a Handset
and press OK.
4. The handset will ring. Press Ignore or Answer.
to end call.
5. Press
Answer Incoming Call While Using Intercom.
While using Intercom from the Verizon Hub base, touch:
• Accept to disconnect from Intercom and answer incoming call.
• Ignore to send the incoming call to Voice Mail.
While using Intercom from the handset, touch:
• Answer to disconnect from Intercom and answer incoming call.
• Ignore to send the incoming call to Voice Mail.
Press
to end call.
© 2009 Verizon. All Rights Reserved.
101
Verizon Hub User Guide
Making Calls.
Place a Domestic Call.
All of your domestic local and long distance calls within the
U.S. are dialed the same way.
Dial the 3-digit area code + the 7-digit phone number of the
person you are calling.
Place an International Call.
Dial 0-1-1 + the country code + the phone number of the
person you are calling.
Note: The following Caribbean and other neighboring U.S.
destinations do not require you to dial 0-1-1 when placing
an international call: American Samoa, Anguilla, Antigua,
Bahamas, Barbados, Barbuda, Bermuda, Canada, Cayman
Islands, Dominica, Dominican Republic, Grenada, Guam,
Jamaica, Montserrat, Northern Mariana Islands, Puerto Rico,
St. Kitts and Nevis, St. Lucia, St. Vincent and the Grenadines,
Trinidad and Tobago, Turks and Caicos Islands, Virgin Islands,
British and Virgin Islands, U.S.
Country codes can be found on the Web Management Site in
the Help section.
Automatically Blocked Numbers.
All 0, 00, 300, 500, 700, 900, 976 and 10-10-XXX calls are
automatically blocked and cannot be placed from any
Verizon Hub.
All N-1-1 calling is blocked with the exception of 4-1-1, 6-1-1,
7-1-1, 8-1-1 and 9-1-1 calling. Certain countries may also be
blocked from receiving calls from Verizon Hub.
An automatic reminder message will be played on your Verizon
Hub if any calls to blocked numbers are attempted.
Collect Calls.
Your Verizon Hub telephone cannot place or accept collect calls.
© 2009 Verizon. All Rights Reserved.
102
Verizon Hub User Guide
Important 9-1-1 Emergency Response Information.
Verizon Hub’s 9-1-1 service operates differently from
traditional, wireline 9-1-1 service. For correct emergency call
routing, you MUST provide Verizon Wireless with the Phone
Number and Service Address that corresponds to the physical
location where you are using your Digital Voice service.
If you use your Digital Voice service from a new location, you
MUST register the new Service Address so Verizon Wireless
can confirm whether it can provide you Service at the
new location. Verizon Wireless is not permitted to provide
service in an area unless it can provide you either E9-1-1
or Basic 9-1-1 service in a manner that meets government
requirements. If Digital Voice service cannot be provided
at your new location, then arrangements will be made to
disconnect your Verizon Hub account.
In most areas of the country, Verizon Hub with Digital Voice
service will provide you with Enhanced 9-1-1 (E9-1-1) service.
With E9-1-1 service, Verizon Hub with Digital Voice service will
automatically route your call to the appropriate emergency
response center and provide the emergency operator with
your Verizon Hub phone number and address. In the limited
number of areas where Verizon Wireless is authorized to
provide service but cannot provide E9-1-1 service, we will
provide you with Basic 9-1-1 service. With Basic 9-1-1 service,
your 9-1-1 call will be routed to the appropriate emergency
response center, but the center will not automatically receive
your Verizon Hub with Digital Voice service phone number
and address. Regardless of which service is provided, you
must be prepared to provide the emergency service operator
with your phone number and location.
If you have Call Forwarding, Do Not Disturb, Simultaneous
Ring or other features enabled at the time you dial a 9-1-1 call
and your 9-1-1 call is interrupted, the emergency dispatcher
may not be able to call you back at the phone from which you
dialed the call if your 9-1-1 call is interrupted. If for any reason
your Digital Voice service is out of service, you will not be able
to make 9-1-1 calls. For instance, your Digital Voice service will
not work during electrical or broadband outages, device or
telephone number changes, or during installation of software
upgrades, and you will not be able to make 9-1-1 calls. You
should have an alternative means of accessing traditional
wireline 9-1-1 services from your home.
© 2009 Verizon. All Rights Reserved.
103
Verizon Hub User Guide
Important Digital Voice Service Information.
Digital Voice as a Voice Over Internet Protocol (VoIP) service
differs from regular wireline telephone service. Digital Voice
service will not work in the event of electrical or broadband
outages, device or telephone number changes, or during
installation of software upgrades. A broadband connection
is required for service. Digital Voice calls travel over the
Internet. Network congestion or use of data services at the
same time may affect sound quality. Digital Voice service may
not support certain types of home security systems, satellite
television systems and other electronic devices. Digital Voice
service may not work behind some firewalls. Digital Voice
service does not provide operator services. Not all area codes
are available. If the area code you select for your primary
Digital Voice service telephone number is different from the
area code that normally corresponds to your service address,
then people making calls to you from within your normal
local calling area could be charged long distance rates.
Moving and Updating Your 9-1-1 Service Address.
To use the Verizon Hub, all that’s required is verification of 9-1-1
coverage and a broadband Internet connection. If you are
planning to move, you MUST register the new service address
before you use your Verizon Hub from a new location to enable
Verizon Wireless to confirm that it can provide service there.
Prior to Moving.
Call Customer Service at 800-922-0204 and they will check
if your new address has 9-1-1 coverage. If your new address
does not have 9-1-1 coverage then arrangements will be
made to disconnect your service on or prior to your
move date.
© 2009 Verizon. All Rights Reserved.
104
Verizon Hub User Guide
New Address.
Update your 9-1-1 Service address once you’ve moved. If you
did not check whether your new address has 9-1-1 coverage
prior to moving then you MUST register the new service
address before you use your Verizon Hub from a new location,
so Verizon can confirm that it can provide service there.
Until you register your new service address, your 9-1-1
calls will continue to be directed to the emergency
response center that supports the previously registered
service address.
If Verizon Wireless cannot provide service at the new
location, customer service will arrange to disconnect your
Verizon Hub account.
Update Your 9-1-1 Emergency Response Service Address
You can only update your 9-1-1 Emergency Response Service
Address by calling Customer Support at 800-922-0204.
To view your 9-1-1 Emergency Response Service Address:
1. Sign in to the Web Management Site at
verizonwireless.com/hub.
Home.
2. Open
3. Scroll to the bottom of the screen to see your
911 Emergency Response Service Address listed.
© 2009 Verizon. All Rights Reserved.
105
Verizon Hub User Guide
Digital Voice Calling
Features.
Your Verizon Hub provides a range of features that
make managing calls – and making calls – simple and
convenient. Just follow the easy steps to do everything
from listening to your Voice Mail to setting Call Forwarding
Voice Mail.
Your Voice Mail allows callers to leave messages for
you when you’re away from your phone or when you
are unable to take the call. You can listen to Voice Mail
messages directly from your Verizon Hub phone or,
when you’re away from home, you can retrieve messages
from the Voice Mail system or online from the Web
Management Site.
To get started, you need to initialize your Voice Mail
mailbox using your Verizon Hub phone. Upon ordering
the Verizon Hub service, your Voice Mail mailbox was
automatically assigned a default Passcode.
The default Passcode is the last 4 digits of your
Verizon Hub telephone number.
Callers will be able to leave you messages even while
your mailbox is un-initialized; however, you will not be
able to listen to your messages or use the other features
in your mailbox until you complete the setup process
described below.
Important Note: Prior to changing your Verizon Hub
telephone number or transferring your existing home
phone number to your Verizon Hub, you must set up
Voice Mail first.
© 2009 Verizon. All Rights Reserved.
106
Verizon Hub User Guide
Set Up Voice Mail Account.
1.
2.
3.
4.
Press
on handset, listen for a dial tone and dial *86.
Enter your default Passcode followed by the pound
# key. Your default Passcode is the last 4 digits of
your Verizon Hub telephone number.
Create a new 4-10 digit Passcode. Please enter your
new 4-10 digit Passcode followed by the # key
Important Note: Your new Passcode must be 4 to10
digits long. It should be easy for you to remember, but
difficult for others to guess. You cannot use repeating
digits (e.g., 1, 1, 1, 1), sequential digits (e.g.,1, 2, 3, 4 and
6, 5, 4, 3), or any part of your Verizon Hub phone number.
Follow the Voice Mail prompts to record your name
announcement, personal greeting and busy greeting,
and select the greeting callers will hear.
When you have finished following the voice prompts, your
Voice Mail account will be initialized and ready to use.
Note: If you exit the initialization process before completing
all the steps, the next time you call your Voice Mail you will
be required to complete the initialization process. However,
anything you have previously changed will be stored.
You can make changes to the setup of your Voice Mail
account at any time by going to the Main Menu after
logging in to the Voice Mail system with your Passcode.
Change Personal Greeting.
When Voice Mail answers, callers will hear a personal greeting
that you record or a system greeting that you select. You can
change your greeting as often as you’d like.
1.
2.
3.
4.
5.
on handset, listen for a dial tone and dial *86.
Press
When the system answers, enter your Passcode, then press the # key.
At the Main Menu, press 4 for Personal Options.
Press 2 for Name Recording and Greeting.
Press 1 for Name Recording.
2 for Busy Greeting.
3 for Personal or System Greeting.
4 for Extended Absence Greeting.
© 2009 Verizon. All Rights Reserved.
107
Verizon Hub User Guide
Change Passcode.
Your new Passcode must be 4 to10 digits in length. Also, it
should be easy for you to remember, but difficult for others
to guess. You cannot use repeating digits (e.g.,1, 1, 1, 1),
sequential digits (e.g., 1, 2, 3, 4 and 6, 5, 4, 3) or any part of
your Verizon Hub phone number.
1.
2.
3.
4.
5.
on handset, listen for a dial tone and dial *86.
Press
When the system answers, enter your Passcode, then
press the # key.
At the Main Menu, press 4 for Personal Options.
Press 1 for Personal Profile.
Press 1 to change the Passcode and listen for further
instructions.
You can also change your Passcode on the Web
Management Site:
1. Sign into your Web Management Site at
verizonwireless.com/hub.
2. From the Home Page, click Settings.
3. Click Calling Features.
4. Select Voice Mail and then click Change Passcode.
5. Enter your Old Passcode.
6. Enter your New Passcode.
7. Confirm your New Passcode.
8. Click Save to ensure your new Passcode has been created.
© 2009 Verizon. All Rights Reserved.
108
Verizon Hub User Guide
Retrieve Voice Mail Messages.
You will be alerted of new messages in your Voice Mail
mailbox by:
• A new Voice Mail alert shown on your Verizon Hub base screen.
• An audible signal will sound.
• A “stutter” dial tone.
• Email notification.
You can retrieve your Voice Mail messages at any time.
Once you listen to your messages, you have the option
to save or delete them. Your mailbox can store up to 50
messages that can be up to 3 minutes long. You can save
your Voice Mail messages for up to 30 days.
Listen to Voice Mail.
1.
2.
3.
4.
5.
6.
From the handset: Press
on handset, listen for a dial
tone and dial *86.
OR
to open to the Dial
From Verizon Hub base: Touch
.
Pad. Touch *86 and then
When prompted, enter your Passcode and press
the # key.
Enter your Passcode, then press the # key.
At the Main Menu, press 1.
Listen to your Voice Mail message.
Then, select any of these options:
1 Rewind a message in nine second intervals.
2 Pause a message.
3 Fast forward a message in nine second intervals.
4 Repeat a message.
5 Hear the time and date and sender of the message.
7 Delete a message.
9 Save a message.
# Skip to the next message.
© 2009 Verizon. All Rights Reserved.
109
Verizon Hub User Guide
Return to Main Menu.
After a message has been played, select any of these options:
1 Rewind a message in nine second intervals.
4 Repeat a message.
5 Hear the time and date and sender of the message.
7 Delete a message.
9 Save a message.
0 Hear Menu again.
* Return to Main Menu.
# Skip.
Listen to Voice Mail Away from Home.
1.
2.
3.
4.
5.
6.
Dial your Verizon Hub telephone number.
When the system answers, press the * key.
Enter your Passcode, then press the # key.
At the Main Menu, press 1.
Listen to your Voice Mail message(s).
Then, select any of these options:
1 Rewind a message in nine second intervals.
2 Pause a message.
3 Fast forward a message in nine second intervals.
4 Repeat a message.
5 Hear the time and date and sender of the message.
7 Delete a message.
9 Save a message.
# Skip to the next message.
* Return to Main Menu.
7. After a message has been played, select any of these options:
1 Rewind a message in nine second intervals.
4 Repeat a message.
5 Hear the time and date and sender of the message.
7 Delete a message.
9 Save a message.
0 Hear Menu again.
* Return to Main Menu.
# Skip to next message.
© 2009 Verizon. All Rights Reserved.
110
Verizon Hub User Guide
Recover a Deleted Message.
This option allows you to save (recover) all messages that
have been deleted during the current message review session.
1. After the final message is played where at least one
message has been deleted during the message
review, select:
1 Save deleted messages.
2 Main menu.
Note: Recovered messages are placed back in the inbox. If
you end the session (i.e., hang up) after deleting messages,
the messages are no longer recoverable.
Visual Voice Mail.
You can access your Voice Mail from any computer that is
connected to the Internet. Simply sign in to the Web
Management Site and select Voice Mail to view and play your
new Voice Mail messages, as well as view any messages you’ve
already listened to.
And that’s not all. You can enter an email address to receive
instant notification when a new Voice Mail message has
been left for you, and see the date and time the message was
received. Save messages for up to 30 days or delete them.
Refer to the Web Management Site section of this guide for
more information.
Listen to Voice Mail from your Computer.
1.
2.
3.
4.
5.
Sign in to your Web Management Site at
verizonwireless.com/hub.
Home, click Voice Mail.
From
A log of all your new and saved Voice Mail messages will
appear.
To listen to the message from your computer, simply select
the Play button on the line of the message you want to hear.
An audio player window will appear and your message will
play automatically. You will also have the option to stop,
pause, rewind or fast forward your message.
© 2009 Verizon. All Rights Reserved.
111
Verizon Hub User Guide
6. Every message will automatically be saved for 30 days,
unless it is deleted.
Note: This log includes the number of the caller, duration of the
message, and the date and time the Voice Mail message was left.
It will even display the name of the caller if the caller is listed in
your Contacts.
Customizing Your Mailbox.
Verizon Hub Voice Mail comes with several features that can
make your life easier. It’s easy to set them up. Here are some
of the special options you will have after you press 4 from the
Main menu, then press 1 for Personal Profile.
Select Message Preferences.
1.
2.
3.
4.
5.
Press
on handset, listen for a dial tone and dial *86.
OR
Move the OK Button/Joystick to select Voice Mail
and press OK.
OR
to open to the Dial Pad. From Verizon Hub base: Touch
.
Then touch *86 and then
Enter your Passcode, then press the # key.
At the Main Menu, press 4 for Personal Options.
Select 5 for Message Preferences.
Follow the Voice Mail prompts to select how your messages will play, such as: order, date and time stamp.
© 2009 Verizon. All Rights Reserved.
112
Verizon Hub User Guide
Change Ring Count.
With the Ring Count feature, you can choose to have your
phone ring two times, six times, or anywhere in between
before Voice Mail picks up. This is the number of rings you
will hear prior to the call being sent to Voice Mail.
1.
2.
3.
4.
5.
6.
7.
Sign in to your Web Management Site at
verizonwireless.com/hub.
Home, click Settings.
From
Click Calling Features.
Click Voice Mail.
Click Voice Mail Settings.
Select the number of times (between 2 and 6) that you want
the phone to ring.
Click Save.
Set Up Voice Mail Email Notification.
With Verizon Hub, you can setup Email notification to alert
you of new messages.
1. Sign into your Web Management Site at
verizonwireless.com/hub.
Home, click Settings.
2. From
3. Click Calling Features.
4. Click Voice Mail.
5. Click Email Notifications and select ON.
6. Enter your Email Address.
7. If you want, check the box next to Send for urgent
Voice Mail only.
8. Click Save.
4-1-1 Directory Assistance.
For Local and National Directory Assistance information,
dial 4-1-1 from your Verizon Hub phone to reach a Verizon
operator. Directory Assistance charges apply.
© 2009 Verizon. All Rights Reserved.
113
Verizon Hub User Guide
Caller ID With Name.
Caller ID With Name displays the name and phone number of
incoming callers you already have saved in your Contacts.
Call Waiting.
With Call Waiting, calls can get through when you’re on
another call. When someone tries to call you when you’re
on the phone, you will hear a Call Waiting tone. The person
calling you will hear a ring until you answer. You can either
answer the new call or let it go to Voice Mail.
Note: The default setting for this feature is ON.
Use Call Waiting.
From the handset:
1. Inform your first caller that you have another call.
2. Put the first caller on hold and answer the second call
.
by pressing
again to return to the first call
3. Press
and put the second caller on hold.
From Verizon Hub base:
1. Inform your first caller that you have another call.
2. Touch Answer to answer the second call.
3. Touch Swap Calls to return to the first call.
You can alternate between calls as often as you like.
Temporarily Disable Call Waiting.
1.
2.
3.
From the handset: Press
on the handset, listen for a dial tone and dial *70.
OR
to open the Dial Pad. From Verizon Hub base: Touch
.
Touch *70 and then
Listen for three short tones followed by a dial tone,
then dial the number you want to call.
Press *70.
© 2009 Verizon. All Rights Reserved.
114
Verizon Hub User Guide
4. Listen for three short tones followed by a dial tone,
then dial the number you want to call.
Note: Disabling Call Waiting from your Verizon Hub phone
works only for the length of one call. Call Waiting returns to
your phone automatically when you hang up.
Permanently Disable Call Waiting.
1.
2.
3.
4.
Sign in to your Web Management Site at
verizonwireless.com/hub.
Home, click Settings.
From
Click Calling Features.
Click Call Waiting, and then click Turn Off.
This will permanently disable Call Waiting on all calls until the
Turn Off button is turned On.
Call Waiting With Caller ID.
Call Waiting with Caller ID displays the number of the second
caller while you’re on another call. So you can decide whether
to take the call now or let it go to Voice Mail.
You have 3 options when a new call comes in.
• Press Ignore to send the call to Voice Mail.
• Press Block to send the call to Voice Mail and add the
number to your Call Block list.
• Press Answer to answer the call.
Caller ID Block.
Caller ID Block allows you to block your telephone number
from being displayed in the Caller ID of the person you are
calling on a per-call basis.
on the handset, listen for a dial 1. From the handset: Press
tone and dial *67.
OR
to open to the Dial Pad. From Verizon Hub base: Touch
.
Touch *67 and then
© 2009 Verizon. All Rights Reserved.
115
Verizon Hub User Guide
2. Wait for the tone, and then dial the 10-digit phone number of the person you are calling.
Caller ID Block works only for the duration of one call. After
that call is completed, Caller ID will return to its previous status.
Return Call *69.
Return Call allows you to quickly call the last party that called,
even if the call was not answered.
1.
2.
on the handset, listen for a dial From the handset: Press
tone and dial *69.
OR
to open the Dial Pad. From Verizon Hub base: Touch
.
Touch *69 and then
Wait for the phone to ring to be connected to your last inbound caller.
IMPORTANT INFORMATION.
*69 will not automatically return international numbers
except those that belong to select Caribbean and other
neighboring destinations. International long distance rates
apply when returning calls to these destinations: Anguilla,
Antigua, Bahamas, Barbados, Barbuda, Bermuda, Cayman
Islands, Dominica, Dominican Republic, Grenada, Jamaica,
Montserrat, St. Kitts and Nevis, St. Lucia, St. Vincent and the
Grenadines, Trinidad and Tobago, Turks and Caicos Islands
and Virgin Islands, British. There are no additional charges
for returning calls to these destinations: American Samoa,
Canada, Guam, Northern Mariana Islands, Puerto Rico and
Virgin Islands, U.S.
The following countries are included in the Digital Voice
unlimited calling scope: American Samoa, Canada, Guam,
Northern Mariana Islands, Puerto Rico and Virgin Islands, U.S.
© 2009 Verizon. All Rights Reserved.
116
Verizon Hub User Guide
Do Not Disturb.
Do Not Disturb prevents your Verizon Hub from ringing.
You can activate Do Not Disturb from the Verizon Hub base or
from the Web Management Site.
Refer to the Do Not Disturb on Verizon Hub Base and
Do Not Disturb on the Web Management Site sections
of this guide for more information.
3-Way Calling.
3-Way Calling allows you to add a third person to your
conversation, so you can get family or friends or co-workers
together any time you like.
Start a 3-Way Call.
1.
2.
3.
Press
on your handset to put the first caller on hold.
OR
From Verizon Hub base: Touch Add Call.
Listen for the dial tone.
Dial the number you want to add.
• For domestic numbers in the U.S.: dial the 3-digit area
code + the 7-digit phone number.
• For international numbers: dial 0-1-1 + the country code
+ the phone number.
on the handset once,
4. When that person answers, press
or Merge on the base, to connect all three of you.
End a 3-Way Call.
1.
2.
3.
Either of the two other people on the call can leave the
conversation by hanging up. You will still be connected to
the remaining person.
You can remove the third person at any time by pressing
Drop Call on your handset.
To disconnect the entire 3-way call, simply hang up or
press End on the base.
© 2009 Verizon. All Rights Reserved.
117
Verizon Hub User Guide
Important Information.
• If the second line is busy or there is no answer, you can
on your handset
return to the first caller by pressing
or press End on the base.
• To avoid placing a 3-way call accidentally, hang up your
phone for at least three seconds between every call,
whether it’s a 3-way call or not. This will allow your phone
line to reset itself.
Speed Dial 10.
Speed Dial 10 lets you make calls faster by dialing fewer
numbers. All Speed Dial settings can be saved or changed
from your Verizon Hub phone. Speed Dial 10 allows you to
store up to 10 numbers.
NOTE: Using Speed Dial to dial international numbers will
incur per minute rates to international locations.
Add/Change Number on Speed Dial 10 List.
1.
2.
Press
on the handset, listen to a dial tone and dial *75.
OR
to open to the Dial Pad. From Verizon Hub base, touch
.
Touch *75 and then
Enter the two digit Speed Dial location you wish to store
(01 to 10) + the domestic or international number you
wish to store followed by the # key.
For example, if you’re entering a number to be stored in
Speed Dial location 01:
Domestic Numbers.
1. Press *75 + (the two digit Speed Dial location 01) +
(the 3-digit area code + the 7-digit phone number)
and then press #.
2. Your Verizon Hub service will store the number.
International Numbers.
1. Press *75 + (the two digit Speed Dial location 01) +
(0-1-1 + the country code + the phone number) and
then press #.
2. Your Verizon Hub service will store the number.
© 2009 Verizon. All Rights Reserved.
118
Verizon Hub User Guide
Make a Call Using Speed Dial 10.
From the handset:
.
1. Press
2. Press # and the number of the stored location (01 to 10).
From Verizon Hub base:
to open the Dial Pad.
1. Touch
2. Touch the number of the stored location (01 to 10)
.
and then
Note: To change a Speed Dial entry, simply repeat the
process above.
Call Forwarding.
Call Forwarding allows you to forward incoming calls from your
Verizon Hub to another phone. If you’re unable to answer
the forwarded call, the voice mailbox of the other phone number
will accept the call.
IMPORTANT INFORMATION.
• Call Forwarding cannot be used with international
numbers except those that belong to select Caribbean
and other neighboring destinations. International long
distance rates apply when forwarding calls to these
destinations: Anguilla, Antigua, Bahamas, Barbados,
Barbuda, Bermuda, Cayman Islands, Grenada, Montserrat,
St. Kitts and Nevis, St. Lucia, St. Vincent and the
Grenadines, Trinidad and Tobago, Turks and Caicos
Islands and Virgin Islands, British. There are no additional
charges for forwarding calls to these destinations:
American Samoa, Canada, Guam, Northern Mariana
Islands, Puerto Rico and Virgin Islands, U.S.
• This feature will not override Do Not Disturb, Incoming Call
Block and Anonymous Call Rejection.
• You can make outgoing calls while Call Forwarding
is activated.
• Once you activate Call Forwarding, your Voice Mail will
be disabled.
• You cannot forward calls to numbers that are blocked from
your phone.
© 2009 Verizon. All Rights Reserved.
119
Verizon Hub User Guide
Activate Call Forwarding.
1.
2.
Press
on the handset, listen for a dial tone and dial *72.
OR
to open the Dial
From Verizon Hub base, touch
.
Pad. Touch *72 and then
You will hear a confirmation announcement that Call
Forwarding is active.
Cancel Call Forwarding.
1.
2.
Press
on the handset, listen for a dial tone and dial *73.
OR
to open the Dial
From Verizon Hub base, touch
.
Pad. Touch *73 and then
You will hear a confirmation announcement that Call
Forwarding has been disabled.
© 2009 Verizon. All Rights Reserved.
120
Verizon Hub User Guide
Quick Reference Guide.
FEATURE.
TO USE.
To CanCEL.
Get Account Balance.
#BAL.
Hang up.
Pay Bill.
#PMT.
Hang up.
Call Customer Support.
# 6-1-1 or *6-1-1.
Hang up.
Call National Domestic
Violence Hotline.
#4673.
Hang up.
Listen to Voice Mail.
*86.
N/A.
Cancel Call Waiting.
*70.
Hang up.
Caller ID Block.
*67.
N/A.
Return Call *69.
*69.
N/A.
Speed Dial 10 – Set Up.
*75 (Location 01 to 10)
Number – #.
N/A.
Speed Dial 10 – Dialing.
# – (Location 01 to 10).
N/A.
Call Forwarding.
*72.
*73.
Permanent Caller ID Unblock.
*82.
Hang up.
© 2009 Verizon. All Rights Reserved.
121
Verizon Hub User Guide
Web Management Site.
With just a few clicks, you can manage your calls — and even
manage your account — online. So you get a whole new level
of control over your voice communications.
Registering Account on Web Management Site.
When you first get your Verizon Hub, you will want to register
your account online.
1. Go to verizonwireless.com/welcome.
2. In the Cell Phone field, enter your Verizon Hub
phone number.
Note: If you also have a Verizon Wireless number,
DO NOT enter that number.)
3. Enter a User ID.
4. Enter a Greeting Name – this is the name that will appear
at the top of your account page.
5. Enter your Email Address.
6. Enter your Email Address again to confirm it.
7. Read the Terms and Conditions and check the box next
to them to accept them.
8. Click Continue. Keep your browser window open.
9. You will soon receive a text message from Verizon – on
your Verizon Hub – with a temporary password.
10. Once you retrieve your temporary password from the
text message, return to your computer.
11. Enter the temporary password into the Create New
Password page on your computer.
12. Create a new password and secret question.
OR
Use your temporary password and sign in to My Verizon
at a later time.
© 2009 Verizon. All Rights Reserved.
122
Verizon Hub User Guide
Checking Your Text Messages.
From the Home screen of your Verizon Hub.
1. Touch Messages widget.
2. Touch the Verizon Messages tab.
3. Open the newest message from Verizon. Your temporary
password will not expire and you can use it to log in at
anytime. Once you have logged in, you will be asked to
create your own password.
Note: If you do not receive the text message: We will try to
deliver the text message to your Verizon Hub for 24 hours.
However, there are a few things that could prevent
successful delivery, including the following:
• Your Verizon Hub is turned off for more than
24 hours.
• Your Verizon Hub has a Text Messaging Block on
the Verizon Wireless Network. (No Text Messaging
will work in this instance; contact Customer Service
by dialing *611 to remove this block.) Sign in to
your Verizon Hub account at anytime at
verizonwireless.com/hub.
© 2009 Verizon. All Rights Reserved.
123
Verizon Hub User Guide
Home.
The Home Page is the first page you see after signing in. It’s
the control center for your whole system. And each time you
sign in, it’s automatically refreshed so you get the most
up-to-date information available about your account.
View Missed Calls.
1.
2.
3.
4.
Home, you can see the number of
From
Missed Calls.
Missed Calls.
Move your cursor over
A list of Missed Calls will appear.
Click View Calls to be redirected to Calls.
View New Voice Mail.
1.
2.
3.
4.
Home, you can see the number of New
From
Voice Mail messages.
New Voice Mail(s).
Move your cursor over
A list of Voice Mail messages will appear.
Click View all Voice Mails to be redirected to Voice Mail.
Check New Messages.
1.
2.
3.
4.
Home, you can see the number of
From
New Messages.
New Messages.
Move your cursor over
A list of phone numbers who’ve sent New Messages
will appear.
Click View all Messages to be redirected to Messages.
View All Calling Features.
1.
2.
3.
4.
Home, you can see a summary of your
From
Calling Features.
Calling Features.
Move your cursor over
A list of Calling Features will appear, showing a
summary of features turned ON and OFF.
Click View all Calling Features to be redirected
to Calling Features.
© 2009 Verizon. All Rights Reserved.
124
Verizon Hub User Guide
View Today’s Calendar Events.
1.
2.
3.
4.
Home, you can see the number of
From
Calendar Events for today.
Events.
Move your cursor over
A list of today’s Events from your Calendar will appear.
Click View all Events to be redirected to your Calendar.
View New Verizon Relay Messages.
1.
2.
3.
4.
Home, you can see the number of new From
Verizon Relay Messages.
Verizon Relay.
Move your cursor over
A list of new Verizon Relay messages will appear.
Click View all Verizon Relay to be redirected to
Verizon Relay.
Change Wallpaper.
Home, you can view and update the
From
wallpaper appearing on your Verizon Hub.
Click Change Wallpaper.
Current wallpaper image will appear.
To change your wallpaper image you may either:
a. Click Upload Photos.
b. Click Add Files.
c. Select photos from your computer.
d. Click Start Upload.
e. Click Close.
OR
a. Click Select from All Photos.
b. Select the photo you’d like to use.
c. Click Set As Wallpaper.
to return Home.
5. Click
1.
2.
3.
4.
Verizon Hub Photos.
View All Photos.
Home, you can see a preview of your
1. From
Verizon Hub Photos.
2. Click View All.
3. All of your photos will appear.
© 2009 Verizon. All Rights Reserved.
125
Verizon Hub User Guide
Upload Photos.
You can upload photos online to have them displayed on
your Verizon Hub.
Note: You will need ActiveX downloaded to your computer to
upload photos properly.
1.
2.
3.
4.
5.
Home, you can see a preview of your
From
Verizon Hub Photos.
Click Upload Photos.
Click Add Files to select a photo from your computer.
Note: You can have a maximum of 215 photos saved in Hub Photos.
Click Start Upload. This may take a few minutes.
Click Close.
Your uploaded photos will appear in All Photos.
Note: All uploaded photos will be resized to 80 KB.
Verizon Messages.
View All Verizon Messages.
Home, you can see Verizon Messages
1. From
listed at the bottom of the page.
2. The 4 latest messages will appear here.
3. Touch View All.
4. All Verizon Messages will appear.
© 2009 Verizon. All Rights Reserved.
126
Verizon Hub User Guide
Transfer Your Number.
If you have a telephone number that you want to transfer
to use on your Verizon Hub, please call 800-922-0204 and
we will submit the request to your current provider.
To transfer your phone number, your number needs to
be working and operational with your local provider.
Please do not contact your local provider to disconnect
your service. The disconnect will take place automatically
when the transfer is complete.
Once the transfer is complete, you’ll receive a text
message that will appear on your Verizon Hub phone.
Also, numbers with restrictions (such as a PIC freeze, a
restriction that prevents unauthorized changes) cannot
be transferred until the restrictions have been removed.
In order to continue the transfer process, please contact
your current provider to remove the restrictions on the line
or to verify no restrictions exist on the line.
Important Notes:
• Prior to changing your Verizon Hub telephone
number or transferring your existing home
phone number to your Verizon Hub, you must
set up Voice Mail first.
• It may take up to 14 business days to complete
the transfer.
9-1-1 Emergency Response Service Address.
Your 9-1-1 Emergency Response Service Address will be
listed on the Home page. If you wish to change your 9-1-1
Emergency Response Service Address, you must contact
Customer Support at 800-922-0204.
© 2009 Verizon. All Rights Reserved.
127
Verizon Hub User Guide
Communications.
Calls.
View All Calls.
1. Click Communications.
2. In the View drop-down, select All.
3. All Calls will be listed by when they were received.
4. Click on the line item to view additional call detail.
View Incoming Calls.
1. Click Communications.
2. In the View drop-down, select Incoming Only.
3. All Incoming Calls will be listed by when they were received.
4. Click on the line item to view additional call detail.
View Outgoing Calls.
1. Click Communications.
2. In the View drop-down, select
Outgoing Only.
3. All Outgoing Calls will be listed by when they were sent.
4. Click on the line item to view additional call detail.
View Missed Calls.
1. Click Communications.
2. In the View drop-down, select Missed Only.
3. All Missed Calls will be listed by the date and time of the call.
4. Click on the line item to view additional call detail.
Delete Call.
1. Click Communications.
2. Check the box next to the Call you want to delete.
3. Click Delete.
4. A confirmation message will appear. Click Yes.
This call will be deleted from your list of Calls.
© 2009 Verizon. All Rights Reserved.
128
Verizon Hub User Guide
Add Caller to Contacts.
1. Click Communications.
2. Click the Caller you want to add to Contacts.
3. Click Add Caller to Contacts.
4. Enter the following information:
a. First Name.
b.Last Name.
c. Group.
d.Check the box next to Add to Verizon Relay.
e. Phone – Home, Cell and Work.
f. Email.
g.Street Address.
h.City.
i. State.
j. ZIP.
k. Click Change to change the contact image.
5. Click Save.
This caller will be added to your Contacts.
Voice Mail.
You can access your Voice Mail from any computer connected
to the Internet. View and play your new Voice Mail messages,
as well as any messages you’ve already listened to.
And that’s not all. You can enter an Email address to receive
instant notification when a new Voice Mail message has
been left for you, and see the date and time the message
was received.
You can save messages for up to 30 days or delete them.
© 2009 Verizon. All Rights Reserved.
129
Verizon Hub User Guide
View All Voice Mail.
1. Click Communications.
2. Click Voice Mail.
3. In the View drop-down, select All.
4. All Voice Mails will be listed by when they were received
and includes:
a. Number or Name of the caller.
b.Duration of the message.
c. Date and time the Voice Mail message was left.
View Played Voice Mail.
1. Click Communications.
2. Click Voice Mail.
3. In the View drop-down, select Heard Only.
4. All Played Messages will be listed by when they were
received and includes:
a. Number or Name of the caller.
b.Duration of the message.
c. Date and time the Voice Mail message was left.
View Unplayed Voice Mail.
1. Click Communications.
2. Click Voice Mail.
3. In the View drop-down, select Unheard Only.
4. All unheard Messages will be listed by when they were
received and includes:
a. Number or Name of the caller.
b.Duration of the message.
c. Date and time the Voice Mail message was left.
Play Voice Mail.
1. Click Communications.
2. Click Voice Mail.
.
3. Select the Voice Mail you want to play and click
4. An audio player window will appear and your message will play automatically. You will also have the option to Stop or Pause your message.
Note: Windows Media® Player is required to play Voice
Mail messages.
© 2009 Verizon. All Rights Reserved.
130
Verizon Hub User Guide
Save Voice Mail Messages.
Every message will automatically be saved for 30 days,
unless it is deleted.
Delete Voice Mail(s).
1. Click Communications.
2. Click Voice Mail.
3. Check the box next to the Voice Mail you want to delete.
4. Click Delete.
5. A confirmation message will appear. Click Yes.
The Voice Mail(s) will be deleted.
Messaging.
View All Messages.
1. Click Communications.
2. Click Messaging.
3. In the View drop-down, select All.
4. All Messages will be listed by when they were received.
View Sent Messages.
1. Click Communications.
2. Click Messaging.
3. In the View drop-down, select Sent.
4. All Messages will be listed by when they were sent.
View Received Messages.
1. Click Communications.
2. Click Messaging.
3. In the View drop-down, select Received.
4. All Messages will be listed by when they were received.
View Undelivered Messages.
1. Click Communications.
2. Click Messaging.
3. In the View drop-down, select Undelivered.
4. All undelivered Messages will be listed.
© 2009 Verizon. All Rights Reserved.
131
Verizon Hub User Guide
View Unread Messages.
1. Click Communications.
2. Click Messaging.
3. In the View drop-down, select Unread.
4. All unread Messages will be listed.
Delete Message(s).
1. Click Communications.
2. Click Messaging.
3. Check the box next to the Message(s) you want to delete.
4. Click Delete .
5. A confirmation message will appear. Click Yes.
The Message(s) will be deleted.
Verizon Relay.
Verizon Relay is a feature that lets you receive your Text,
Picture & Video Messages on your Verizon Hub. Simply add
friends or family, who are Verizon Wireless customers, as
Verizon Relay Members and their messages will appear on
your Verizon Hub.
Add Member.
1.
2.
3.
4.
Verizon Relay.
Click
Click Members.
Enter First Name and Last Name.
Enter the following information:
a. First Name.
b.Last Name.
c. Group.
d.Check the box next to Add to Verizon Relay Contact.
e. Phone – Home, Cell and Work.
f. Email.
g.Street Address.
h.City.
© 2009 Verizon. All Rights Reserved.
132
Verizon Hub User Guide
i. State.
j. ZIP.
k. Click Change to change the contact image.
5. Click Save.
This person will be added to your Verizon Relay list.
Edit Member.
1.
2.
3.
4.
5.
6.
Verizon Relay.
Click
Click Members.
Click the box next to the Member you want to edit.
Click on the name of the Member you want to edit.
Edit.
Click
Make your changes and click Save.
View All Verizon Relay Messages.
1.
2.
3.
4.
Verizon Relay.
Click
Click Tiles.
All Messages will appear on the screen.
Click View by Member to view all messages by each
Verizon Relay Member.
View Verizon Relay Message.
1.
2.
3.
4.
5.
6.
Verizon Relay.
Click
All Messages will appear.
Move your cursor over the message you want to view.
to View Details.
Click
The message will enlarge on the screen for you to view and/or play.
Click X to close the message.
Delete Verizon Relay Message.
1.
2.
3.
4.
5.
Verizon Relay.
Click
All Messages will appear on the screen.
Move your cursor over the message you want to delete.
.
Click
A confirmation message will appear. Click Yes.
Your Verizon Relay Message will be deleted.
© 2009 Verizon. All Rights Reserved.
133
Verizon Hub User Guide
Contacts.
Your Verizon Hub Contacts feature makes it easy for you to
find phone numbers you want. It’s simple to search through
your list and add, delete or edit entries. You can add up to 128
Contact entries.
View Contacts.
Contacts.
1. Click
2. Your list of Contacts will appear in alphabetical order.
3. Click a letter of a Contact’s last name to filter by that letter.
Add Contact.
Contacts.
1. Click
2. Select Add Contact.
3. Enter the following information:
a. First Name.
b.Last Name.
c. Group.
d. Check the box next to Add to Verizon Relay Contact
e. Phone – Home, Cell and Work.
f. Email.
g Street Address.
h.City.
i. State.
j. ZIP.
k. Click Change to change the contact image.
4. Click Save.
The person will be added to your Contacts.
Edit Contact.
1.
2.
3.
4.
Contacts.
Click
Select the Contact you want to edit.
Click Edit.
Edit any of the following information:
a. First Name.
b.Last Name.
c. Group.
d.Check the box next to Add to Verizon Relay Contact
e. Phone – Home, Cell and Work.
f. Email.
© 2009 Verizon. All Rights Reserved.
134
Verizon Hub User Guide
g.Street Address.
h.City.
i. State.
j. ZIP.
k. Click Change to change the contact image.
5. Click Save.
Delete Contact.
1.
2.
3.
4.
Contacts.
Click
Select the Contact you want to delete.
Click Delete.
A confirmation message will appear. Click Yes.
The Contact will be deleted.
Add Group.
1.
2.
3.
4.
5.
6.
7.
Contacts.
Click
Select Manage Groups.
A pop-up will appear.
Enter a Name for the new Group.
Click Add.
Scroll to view all Groups.
Click Close to return to Contacts.
The new Group will be added to your Contacts.
Rename Group.
1.
2.
3.
4.
5.
6.
Contacts.
Click
Select Manage Groups.
A pop-up will appear.
Click Rename next to the Group you want to rename.
Enter the new Group name and click Save.
Click Close to return to Contacts.
Delete Group.
1.
2.
3.
4.
5.
6.
Contacts.
Click
Select Manage Groups.
A pop-up will appear.
Click Delete next to the Group you want to remove.
A confirmation message will appear. Click Yes.
Click Close to return to Contacts.
© 2009 Verizon. All Rights Reserved.
135
Verizon Hub User Guide
Import Contacts.
You can import contact information from Address Books you
already have in an email program or on a mobile device.
Import Contacts from .csv File
1. Click Contacts.
2. Click Import Contacts.
3. Click Import Contacts from .CSV.
4. If you haven’t done so already, create a .csv file. See
Create a .csv File section of this guide for details.
5. Click Browse to select the .csv file from your hard drive.
6. Click Next.
The Contacts from the .csv file will be imported to your
Contacts in the group called Import Contacts.
Create a .csv File.
It’s easy to create a .csv file in a spreadsheet program like
Microsoft® Excel®.
1. Format file as a table, including a header, or first line, that
defines the fields in your table.
Example:
2.
3.
A
B
C
D
D
1
First Name
Last Name
Email Address
Street Address
Phone
2
John
Smith
[email protected]
55 Main St., Irving, TX 75038
214-555-1234
3
Kathy
Jones
[email protected]
23 Main St., Irving, TX 75038
972-555-1234
4
Mike
Ames
[email protected]
99 Main St., Irving, TX 75038
972-555-5678
Once you’ve entered all of your contacts into a table, save
the document and select CSV (.csv) as the type of file
you’d like to save.
If prompted to verify your selection, click Yes or OK.
© 2009 Verizon. All Rights Reserved.
136
Verizon Hub User Guide
Search Contacts.
Search Contacts by Name or Number.
Contacts.
1. Click
.
2. At the top of the Contacts section, locate
3. Enter the Name or Number for which you want to search.
4. Your results will appear.
Calendar.
View Calendar.
1.
2.
3.
Click
Calendar.
Your Calendar will open, showing the current month and
today’s scheduled Events.
or
to view previous the next months.
Click
Add New Event.
1. Click
Calendar.
2. Click New Event.
3. Enter the following information:
a. Event title.
b.Start Date and Time.
c. Select Reminder.
4. If you want, click Add Recipient to send a text message
regarding this Event.
5. Enter a phone number manually or click Select from
Contacts to choose a Contact. Click Add.
Note: You can only send a reminder message to a Verizon
Wireless cell phone.
6. Click Save.
Edit Event.
Click
Calendar.
Select the Event you want to edit.
Click Edit.
Edit any of the following information:
a. Event title.
b.Start Date and Time.
c. Select Reminder.
5. If you want, click Add Recipient to send a text message
regarding this Event.
1.
2.
3.
4.
© 2009 Verizon. All Rights Reserved.
137
Verizon Hub User Guide
6.
7.
Enter a phone number manually or click Select from
Contacts to choose a Contact. Click Add.
Note: You can only send a reminder message to a Verizon
Wireless cell phone.
Click Save.
Delete Event.
1.
2.
3.
4.
Click
Calendar.
Select the Event you want to delete.
Click Delete.
A confirmation message will appear. Click Yes.
The Event will be deleted.
Directories.
Business Search.
1.
2.
3.
4.
5.
6.
7.
8.
Directories.
Click
Select Business Search.
Enter the Keyword or Category.
Enter Street, City, State or ZIP.
Click Find It.
Your results will appear.
Note: The business’ suite number may appear in the
middle of the address.
Click Add to Contacts to save in your Contact list.
Click Send to VZ Navigator to send directions to a
Verizon Wireless cell phone.
Note: If your Verizon Wireless phone is not VZ Navigatorenabled, the message will be text-only.
© 2009 Verizon. All Rights Reserved.
138
Verizon Hub User Guide
People Search.
1.
2.
3.
4.
5.
6.
7.
Click Directories.
Select People Search.
Enter the Last Name*, First Name, Street, City, State or ZIP.
Click Find It.
Your results will appear.
Click on name to Add to Contacts to save in your Contact list.
Click Send to VZ Navigator to send directions to a
Verizon Wireless cell phone.
* Last Name is required for a White Pages search.
Note: If your Verizon Wireless phone is not VZ Navigatorenabled, the message will be text-only.
Reverse Lookup.
Look Up a Number.
Directories.
8. Click
9. Select Reverse Lookup tab.
10. Enter the 10-digit phone number (no dashes) and touch
Find It.
11. Your results will appear.
Note: If the phone number belongs to a business the
business’ suite number may appear in the middle of
the address.
12. Click on name to Add to Contacts to save in your
Contact list.
13. Click Send to VZ Navigator to send directions to a
Verizon Wireless cell phone.
Note: If your Verizon Wireless phone is not VZ Navigatorenabled, the message will be text-only.
Verizon Hub Photos.
View Photos.
1.
2.
3.
Hub Photos.
Click
All Photos will appear.
Move your cuarsor over a photo.
OR
Click a photo to show it full screen.
© 2009 Verizon. All Rights Reserved.
139
Verizon Hub User Guide
4. Select any of the icons.
•
Select the photo
•
Open the photo in a window
•
Delete the photo
•
Add the photo to Screensaver
•
Set the photo as Wallpaper
•
Assign the photo to a Contact
•
Edit the photo
•
View the next photo
•
View the previous photo
Save Photo as Contact Image.
1.
2.
3.
4.
5.
6.
7.
8.
Hub Photos.
Click
All Photos will appear.
Move your cursor over a photo.
Click the icon along the top of the photo to
Assign to A Contact.
Click the left radial button to Select a Contact, then
click Next.
Drag the red rectangles along each side to crop your
photo if desired, then click Preview.
Click Assign to A Contact.
A confirmation message will appear. Click Finish.
Add Photo to Screensaver.
Hub Photos.
1. Click
2. All Photos will appear.
3. Move your cursor over a photo and click
Add to Screensaver.
4. A confirmation message will appear. Click Yes. This photo will appear as the screensaver for your
Verizon Hub base.
Set Photo as Wallpaper.
Hub Photos.
1. Click
2. All Photos will appear.
© 2009 Verizon. All Rights Reserved.
140
Verizon Hub User Guide
3. Move your cursor over a photo and click
Set As Wallpaper.
4. A confirmation message will appear. Click Yes.
This photo will appear as the wallpaper for your Verizon
Hub base.
Delete a Photo.
Hub Photos.
1. Click
2. All Photos will appear.
3. Move your cursor over a photo and click
Delete.
4. A confirmation message will appear. Click Yes.
Edit Photos.
Hub Photos.
Click
All Photos will appear.
Edit Photo.
Move your cursor over a photo and click
Click one of the editing tools to.
•
Brightness & Contrast.
•
Color Mixer.
•
Draw.
•
Crop.
•
Effects.
Red Eye.
•
•
Text.
•
Add Border.
•
Rotate.
Undo.
•
5. When you’re done, click Save to save the changes.
to exit Edit mode.
6. Click
1.
2.
3.
4.
Upload Photos.
You can upload photos online to have them displayed on
your Verizon Hub.
Note: You will need ActiveX downloaded to your computer to
upload photos properly.
Hub Photos.
1. Click
2. All Photos will appear.
© 2009 Verizon. All Rights Reserved.
141
Verizon Hub User Guide
3.
4.
5.
6.
7.
Click Upload Photo(s).
A pop-up will appear.
Click Add Files to select a photo from your computer.
Note: You can have a maximum of 215 photos saved in
Hub Photos.
Click Start Upload. This may take a few minutes.
Click Close to exit.
Your uploaded photos will appear in Verizon Hub Photos.
Screensaver.
Upload Screensaver Image.
You can upload photos online to have them displayed on
your Verizon Hub.
Note: You will need ActiveX downloaded to your computer to
upload photos properly.
1.
2.
3.
4.
5.
6.
7.
Hub Photos.
Click
Click Screensaver.
Click My Slideshow, then click on Upload Photo(s).
A pop-up will appear.
Click Add Files to select a photo from your computer.
Click Start Upload. This may take a few minutes.
Click Close to exit.
Your uploaded photos will appear in Verizon Hub Photos.
Select From All Photos.
Hub Photos.
1. Click
2. Click Screensaver.
3. Click My Slideshow, then click Select From All Photos.
4. A pop-up window will appear.
5. Select an image and click Add to Screensaver.
Remove Photo.
Hub Photos.
1. Click
2. Click Screensaver.
3. Click My Slideshow.
4. Click on an image to delete.
5. Click Remove.
6. A confirmation message will appear. Click Yes.
© 2009 Verizon. All Rights Reserved.
142
Verizon Hub User Guide
Wallpaper.
You can either upload an image from your computer, or select
from any photo already loaded, to display as a Wallpaper on
your Verizon Hub.
Upload Wallpaper Image.
Hub Photos.
1. Click
2. Click Wallpaper.
3. Click Upload Wallpaper Photo.
4. A pop-up window will appear.
5. Click Add Files to select a photo from your computer.
6. Click Start Upload. This may take a few minutes.
7. Click Close to exit.
The Wallpaper image will be updated on your Verizon Hub.
Select From All Photos.
Hub Photos.
1. Click
2. Click Wallpaper.
3. Click Select From All Photos.
4. All photos will appear.
5. Select a photo and click Set As Wallpaper.
© 2009 Verizon. All Rights Reserved.
143
Verizon Hub User Guide
Settings.
Your Verizon Hub provides a range of features that make
managing calls simple and convenient. Just follow the easy
steps to do everything from listening to your Voice Mail to
setting Call Forwarding.
Calling Features.
Call Forwarding.
Call Forwarding allows you to forward incoming calls from
your Verizon Hub to another phone. If you’re unable to
answer the forwarded call, the Voice Mailbox of the Call
Forward Number will accept the call.
IMPORTANT INFORMATION.
• Call Forwarding cannot be used with international
numbers except those that belong to select Caribbean and
other neighboring destinations. International long distance
rates apply when forwarding calls to these destinations:
Anguilla, Antigua, Bahamas, Barbados, Barbuda, Bermuda,
Cayman Islands, Grenada, Montserrat, St. Kitts and Nevis, St.
Lucia, St. Vincent and the Grenadines, Trinidad and Tobago,
Turks and Caicos Islands and Virgin Islands, British. There
are no additional charges for forwarding calls to these
destinations: American Samoa, Canada, Guam, Northern
Mariana Islands, Puerto Rico and Virgin Islands, U.S.
• You can make outgoing calls while Call Forwarding
is activated.
• Once you activate Call Forwarding, your Voice Mail will
be disabled.
• You cannot forward calls to numbers that are blocked
from your phone.
Turn On Call Forwarding.
Settings.
1. Click
2. Click Calling Features.
3. Click Call Forwarding.
4. Select a Call Forward Number from the list.
5. Click Add/Delete Forwarding Numbers if you want to
add a new number.
6. Enter a phone number orTURN
click
OFF Select from Contacts.
Click Add.
7. When you’re done, click TURN ON .
© 2009 Verizon. All Rights Reserved.
144
Verizon Hub User Guide
Delete Call Forwarding Number.
Settings.
1. Click
2. Click Calling Features.
3. Click Call Forwarding.
4. Click Add/Delete Forwarding Numbers.
next to the phone number you want to remove.
5. Click
6. A confirmation message will appear on the top of the
page. Click Yes.
The phone number will be deleted from the Forward All My
Calls list.
Turn Off Call Forwarding.
Settings.
1. Click
2. Click Calling Features.
3. Click Call Forwarding.
4. Click TURN OFF .
TURN ON
Do Not Disturb.
Turn On Do Not Disturb.
Settings.
1. Click TURN OFF
2. Click Do Not Disturb.
3. Click TURN ON .
Schedule Do Not Disturb.
Settings.
1. Click
2. Click Calling Features.
3. Click Do Not Disturb.
4. Click Manage Schedule.
a. Enter Start Date and Time.
b. Enter End Date and Time.
c. Choose if you want to Repeat this event.
d. Select
TURN OFF options – Daily, Weekly or Monthly.
e. Repeat until date.
5. Click TURN ON .
Edit Do Not Disturb Schedule.
Settings.
1. Click
2. Click Calling Features.
3. Click Do Not Disturb.
© 2009 Verizon. All Rights Reserved.
145
Verizon Hub User Guide
4. Under Upcoming Schedules, click Edit.
5. Edit any of the following:
a. Start Date and Time.
b.End Date and Time.
c. Choose if you want to Repeat this Event.
d. Select options – Daily, Weekly or Monthly.
e. Repeat until date.
6. When you’re done, click Save.
7. Click Update.
Delete Do Not Disturb Schedule.
Settings.
1. Click
2. Click Calling Features.
3. Click Do Not Disturb.
4. Under Upcoming Schedules, click Delete.
5. A confirmation message will appear. Click Yes.
Turn Off Do Not Disturb.
Settings.
1. Click
2. Click Calling Features.
3. Click Do Not Disturb.
4. Click TURN OFF .
TURN ON
Incoming Call Block.
You have the ability to block all anonymous calls, plus up to
12 phone numbers you don’t want calling you.
Turn On Incoming Call Block.
Settings.
1. Click
2. Click Calling Features.
3. Click Incoming Call Block.
4. Check the box next to:
• Reject all anonymous calls.
• Reject calls from certain numbers.
5. If you want to reject certain numbers, click Add Number
to Blocked Caller List. TURN OFF
6. Enter the Phone Number and click Add.
7. When you’re done, click TURN ON .
© 2009 Verizon. All Rights Reserved.
146
Verizon Hub User Guide
Turn Off Incoming Call Block.
Settings.
1. Click
2. Click Calling Features.
3. Select Incoming Call Block.
4. Click TURN OFF .
TURN ON
Delete Number From Block Caller List.
Settings.
1. Click
2. Click Calling Features.
3. Select Incoming Call Block.
4. Check the box next to Reject calls from certain numbers.
next to the phone number you want to remove
5. Click
from the list.
6. A confirmation message will appear. Click Yes.
The phone number will be deleted from the Blocked Caller List.
Simultaneous Ring.
When you activate Simultaneous Ring, all incoming phone
calls you receive will ring on up to 3 different numbers; plus
the Verizon Hub number. The first phone that is answered
connects to the caller.
However, if you aren’t able to answer the call, the caller will be
sent to Voice Mail for the phone that has the shortest
ring count.
Turn On Simultaneous Ring.
Settings.
1. Click
2. Click Calling Features.
3. Click Simultaneous Ring.
4. Enter aTURN
Phone
Number and click Add.
OFF
5. Repeat this for up to 3 numbers.
6. Click TURN ON .
© 2009 Verizon. All Rights Reserved.
147
Verizon Hub User Guide
Delete Simultaneous Ring Numbers.
Settings.
1. Click
2. Click Calling Features.
3. Click Simultaneous Ring.
4. Next to the phone number you want to remove, click Delete.
5. A confirmation message will appear. Click Yes.
The phone number will be removed from Simultaneous Ring.
Turn Off Simultaneous Ring.
Settings.
1. Click
2. Click Calling Features.
3. Click Simultaneous Ring.
4. Click TURN OFF .
TURN ON
IMPORTANT INFORMATION.
Simultaneous Ring cannot be used with international
numbers except those that belong to select Caribbean and
other neighboring destinations. International long distance
rates apply when using Simultaneous Ring with these
destinations: Anguilla, Antigua, Bahamas, Barbados, Barbuda,
Bermuda, Cayman Islands, Grenada, Montserrat, St. Kitts and
Nevis, St. Lucia, St. Vincent and the Grenadines, Trinidad and
Tobago, Turks and Caicos Islands and Virgin Islands, British.
There are no additional charges for using Simultaneous Ring
with these destinations: American Samoa, Canada, Guam,
Northern Mariana Islands, Puerto Rico and Virgin Islands, U.S.
© 2009 Verizon. All Rights Reserved.
148
Verizon Hub User Guide
Backup Number.
You can set up and save a phone number (your cell phone
or work number) where your calls can be automatically
forwarded in the event of a power outage or if your
broadband connection fails.
Your Backup Number will be stored on our Verizon Hub server
and automatically activated only if you experience a power
outage or if your broadband connection fails.
View Backup Number
Settings.
1. Click
2. Click Calling Features.
3. Select Backup Number.
4. Your Backup Number will be listed.
Edit Backup Number
Settings.
1. Click
2. Click Calling Features.
3. Select Backup Number.
4. Click Edit.
5. Enter your new Backup Number.
6. Click Save.
IMPORTANT INFORMATION.
Backup Number cannot be used with international numbers
except those that belong to select Caribbean and other
neighboring destinations. International long distance rates
apply when using Backup Number with these destinations:
Anguilla, Antigua, Bahamas, Barbados, Barbuda, Bermuda,
Cayman Islands, Dominica, Dominican Republic, Grenada,
Jamaica, Montserrat, St. Kitts and Nevis, St. Lucia, St. Vincent
and the Grenadines, Trinidad and Tobago, Turks and Caicos
Islands and Virgin Islands, British. There are no additional
charges for using Backup Number with these destinations:
American Samoa, Canada, Guam, Northern Mariana Islands,
Puerto Rico and Virgin Islands, U.S.
Call Forwarding and Simultaneous Ring will temporarily
override the calls being forwarded to your Backup Number.
© 2009 Verizon. All Rights Reserved.
149
Verizon Hub User Guide
Call Waiting.
With Call Waiting, a call can get through when you’re on
another call. When someone tries to call you when you’re on
the phone, you will hear a Call Waiting tone. The person calling
you will hear ringing until you answer. You can either answer
the new call or let it go to Voice Mail.
Note: The default setting for this feature is ON.
Turn On Call Waiting.
Settings.
1. Click
Features.
2. Click TURNCalling
OFF
3. Click Call Waiting.
4. Click TURN ON ..
Turn Off Call Waiting.
Settings.
1. Click
2. Click Calling Features.
3. Click Call Waiting.
4. Click TURN OFF .
TURN ON
Caller ID Block.
Caller ID Block allows you to block your telephone number
from being displayed on the Caller ID of the person you are
calling on a per-call basis or permanently.
If you’d prefer to block your Caller ID information every time
you make an outbound call, use this option.
Once you set up Caller ID Block, all your calls are anonymous
until you disable the feature. If you would like to show your
Caller ID information on a particular call, dial *82 prior to
making a call. This function will allow your Caller ID
information to be displayed while Caller ID Block is on.
Turn On Caller ID Block.
Settings.
1. Click
2. Click Calling Features.
TURN OFF
3. Click Caller ID Block.
4. Click
TURN ON
© 2009 Verizon. All Rights Reserved.
.
150
Verizon Hub User Guide
Turn Off Caller ID Block.
Settings.
1. Click
2. Click Calling Features.
3. Click Caller ID Block.
4. Click TURN OFF .
TURN ON
International Call Block.
This feature allows you to block international calling
from your Verizon Hub phone except numbers in select
Caribbean and other neighboring U.S. destinations. This
feature’s default is ON. Once International Call Block is
turned off, it will take up to 6 hours before you can place
international calls.
For your protection, International Call Block can only be
activated from the Web Management Site.
Change International Call Block.
Settings.
1. Click
2. Click Calling Features.
3. Select International Call Block.
4. By default, this feature is turned ON.
OFF to allow international calls to be placed
5. Click TURN
TURN OFF
from your Verizon Hub.
TURN ON
6. Click TURN ON to block international calls from being
placed from your Verizon Hub.
View International Rates and Country Codes.
Settings.
1. Click
2. Click Calling Features.
3. Select International Call Block.
4. Click International Rates.
5. A pop-up will appear with the International Rates and
Country Codes listed.
OR
1. Click Help.
2. Select International Rates.
3. A pop-up will appear with the International Rates and
Country Codes listed.
© 2009 Verizon. All Rights Reserved.
151
Verizon Hub User Guide
IMPORTANT INFORMATION.
When International Call Block is ON, you still have the ability
to dial select Caribbean and other neighboring destinations.
International long distance rates apply when calling these
destinations: Anguilla, Antigua, Bahamas, Barbados, Barbuda,
Bermuda, Cayman Islands, Dominica, Dominican Republic,
Grenada, Jamaica, Montserrat, St. Kitts and Nevis, St. Lucia,
St. Vincent and the Grenadines, Trinidad and Tobago, Turks
and Caicos Islands and Virgin Islands, British. There are no
additional charges for calling these destinations: American
Samoa, Canada, Guam, Northern Mariana Islands, Puerto Rico
and Virgin Islands, U.S.
Voice Mail Services.
Change Voice Mail Ring Count.
With the Ring Count feature, you can choose to have your
phone ring two times, six times, or anywhere in between
before Voice Mail picks up. This is the number of rings your
caller will hear prior to being sent to Voice Mail.
1.
2.
3.
4.
5.
6.
Settings.
Click
Click Calling Features.
Click Voice Mail.
Click Voice Mail Settings.
Select number of Rings before sending caller to Voice
Mail – 2, 3, 4, 5, or 6 Rings.
Click Save.
Set Up Email Notifications of New Voice Mail.
Settings.
1. Click
2. Click Calling Features.
3. Click Voice Mail.
4. Click Email Notifications and select ON.
5. Enter your Email Address.
6. If you want, check the box next to Send for urgent
Voice Mail only.
7. Click Save.
You will receive an Email alerting you that you have a
new Voice Mail.
© 2009 Verizon. All Rights Reserved.
152
Verizon Hub User Guide
Services.
Service Address for 9-1-1 Emergency Response.
Verizon Hub’s 9-1-1 service operates differently from
traditional, wireline 9-1-1 service. For correct emergency call
routing, you MUST provide Verizon Wireless with the Phone
Number and Service Address that corresponds to the physical
location where you are using your Verizon Hub service.
View Service Address.
Your Service Address can be viewed from the Home Page or
by going to Manage My Service.
1.
2.
3.
4.
Settings.
Click
Click Services.
Click Service Address for 9-1-1 Emergency Response.
Your current service address will be displayed.
Note: Contact Customer Support at 800-922-0204 to update
your 9-1-1 Emergency Response Service Address.
Email Address.
View Email Address.
Settings.
1. Click
2. Click Services.
3. Click Email Address.
4. Your current Email Address will be displayed.
© 2009 Verizon. All Rights Reserved.
153
Verizon Hub User Guide
Help.
With Verizon Hub, help is always just a click away. Simply click
Help from anywhere on the Web Management Site to access
any of these resources.
Guided Tour of Features
Troubleshooting Tips
Setup Help
FAQs
Resources
User Guide
Let’s Get Started Guide – Hub
Let’s Get Started Guide – Handset
Terms of Service
Warranty Policy
Open Source Licensing
Helpful Links
Glossary of Terms
International Rates
© 2009 Verizon. All Rights Reserved.
154
Verizon Hub User Guide
GoToAssist
Please access GoToAssist ONLY when directed by a Customer
Support Representative. This option allows Customer Support
to provide advanced technical support via remote access.
Send Feedback
We want to know what you think of Verizon Hub. Click Send
Feedback, enter your Name, Email Address and Comment. Click
OK to share your feedback with us.
© 2009 Verizon. All Rights Reserved.
155
Verizon Hub User Guide
Troubleshooting.
If you need help with your Verizon Hub, try these
troubleshooting tips:
1. Check your connection.
Make sure your cable and power cords are securely connected.
2. Check your Internet connection.
From your personal computer, check your home’s Internet
access. Launch a browser, such as Internet Explorer or Firefox,
and confirm that you can reach your usual home page.
Contact your Internet provider if you believe your broadband
connection is down.
3. Check home network connection.
If you are using a wireless connection, check your Verizon
Hub Wi-Fi signal strength. If your Verizon Hub isn’t receiving
a strong signal, try moving it closer to your wireless router to
capture a stronger signal.
If you are using a wired connection, make sure the Ethernet
cable is securely connected at both ends.
4. Restart your Verizon Hub.
Unplug the power cord from the outlet, wait 15 seconds, then
plug the power cord back in. Your Verizon Hub will restart.
© 2009 Verizon. All Rights Reserved.
156
Verizon Hub User Guide
5. Check out the FAQs.
If you’re still having problems with your Verizon Hub, read
through the FAQs available on the Web Management Site at
verizonwireless.com/hub.
6. Call customer support.
If you are unable to solve your issue by trying the steps above,
please call Customer Support at 800-922-0204.
We will be happy to help get your Verizon Hub back on track
right away.
© 2009 Verizon. All Rights Reserved.
157
Verizon Hub User Guide
Important Customer
Information.
Verizon Hub is continually going through updates. Therefore,
there may be steps in this user guide that are no longer
accurate. If you are unable to find the correct steps for a
feature and still require assistance, please contact Customer
Support at 800-922-0204.
Warranty.
If your Verizon Hub malfunctions as a result of a
manufacturing defect after the return period but within
the first year you own it, Verizon Wireless will replace it for
a like unit or one of comparable quality at no cost to you.
The replacement device you receive may be refurbished
equipment.
The full warranty policy for your Verizon Hub is available
online at verizonwireless.com/hub. You can also
receive a copy of the policy by calling a customer service
representative at 800-922-0204.
Open Source Licenses.
The Verizon Hub may contain programming, scripts, tools,
modules, libraries, components, or other items that were
developed using “open source” code (the “Open Source
Software”). All Open Source Software is provided to you
under one or more open source license agreements (the
“Open Source Licenses”). The individual Open Source Licenses
contain important information concerning ownership, terms
of use, and rights/limitations/restrictions for the applicable
element of the Open Source Software. Copies of the Open
Source Licenses are available at verizonwireless.com/hub/
opensource. Additional information about the Open Source
Software, including source code, dates of modification and/
or instructions for accessing, downloading, using and/or
copying the source code for the Open Source Software are
also set forth at verizonwireless.com/hub/opensource.
By obtaining, accessing, downloading, using, and/or copying
the Verizon Hub or the Open Source Software, you agree that
you have read, and understood, and will comply with, the
terms and conditions of the applicable Open Source Licenses.
© 2009 Verizon. All Rights Reserved.
158
Verizon Hub User Guide
FCC Statement.
This product has been tested and complies with the
specifications for a Class B digital device, pursuant to Part
15 of the FCC Rules. These limits are designed to provide
reasonable protection against harmful interference in a
residential installation. This equipment generates, uses,
and can radiate radio frequency energy and, if not installed
and used according to the instructions, may cause harmful
interference to radio communications. However, there is
no guarantee that interference will not occur in a particular
installation. If this equipment does cause harmful interference
to radio or television reception, which is found by turning the
equipment off and on, the user is encouraged to try to correct
the interference by one or more of the following measures:
• Reorient or relocate the receiving antenna.
• Increase the separation between the equipment
and receiver.
• Connect the equipment into an outlet on a circuit different from that to which the receiver
is connected.
• Consult the dealer or an experienced radio/TV
technician for help.
This device complies with Part 15 of the FCC Rules. Operation
is subject to the following two conditions: (1) This device
may not cause harmful interference, and (2) This device must
accept any interference received, including interference that
may cause undesired operation.
FCC Caution: Any changes or modifications not expressly
approved by the party responsible for compliance could void
the user’s authority to operate this equipment.
Important Note.
FCC Radiation Exposure Statement.
To ensure the safety of users, the FCC has established criteria
for the amount of radio frequency energy various products
may produce depending on their intended usage. This
product has been tested and found to comply with the FCC’s
exposure criteria.
This transmitter must not be co-located or operating in
conjunction with any other antenna or transmitter.
© 2009 Verizon. All Rights Reserved.
159
Verizon Hub User Guide
The installation of the base unit should allow at least
20 centimeters between the base and persons to be in
compliance with FCC RF exposure guidelines. For body worn
operation, the portable part (handset) has been tested and
meets FCC RF exposure guidelines.
This equipment has been SAR-evaluated. The Maximum
average SAR(1g) test value for the head is 0.0223W/kg and
the body is 0.0337W/kg. Verizon Wireless declares that Verizon
Hub is limited in CH1~CH11 for 2.4 GHz by specified firmware
controlled in U.S.A. The FCC ID is located on your Verizon Hub
Handset device.
Please read the following important safety notices and
instructions before installing or using the product.
•
•
A DANGER warning refers to situations that could cause
bodily injury.
A CAUTION warning refers to situations that could result
in equipment malfunction or damage.
1.
2.
3.
4.
Follow all warnings and instructions marked on
the product.
Unplug this product from the wall outlet before cleaning.
Do not use liquid cleaners or aerosol cleaners. Use a
water-moistened cloth for cleaning.
Do not use this product near water.
Do not place this product on an unstable cart, stand or
table. If the product falls, it could be seriously damaged.
This product should be operated using the type of power indicated on the marking label. If you are not sure of the
type of power available, consult your dealer or local
power company.
Do not allow anything to rest on the power cord. Do not
locate this product where people will walk on the cord.
Never push objects of any kind into this product through
cabinet slots as they may touch dangerous voltage
points or short-out parts that could result in a fire or
electric shock.
Never spill liquid of any kind into or onto the product.
Do not attempt to service this product yourself, as
opening or removing covers may expose you to
dangerous voltage points or other risks.
Refer all questions regarding servicing of this product to
qualified service personnel.
5.
6.
7.
8.
9.
10.
© 2009 Verizon. All Rights Reserved.
160
Verizon Hub User Guide
Danger—Electric Shock and Fire.
Electric current from power, telephone, and communication
cables is hazardous, and could result in electric shock
and/or fire.
To avoid electric shock, use caution when connecting cables.
For example, do not connect safety extra-low voltage (SELV)
circuits to telephone-network voltage (TNV) circuits. LAN
ports contain SELV circuits, and WAN ports contain TNV
circuits. Some LAN and WAN ports both use RJ-45 connectors.
To avoid electric shock, do not operate the product or connect
or disconnect cables during electrical storms. To avoid electric
shock, do not use this product in or near water.
To reduce the risk of fire or overheating, keep this product
in well-ventilated areas, away from radiators or other heat
sources. Do not block cooling vents.
The plug-socket combination must be accessible at all times
because it serves as the main power-disconnecting device.
Use only the manufacturer-provided AC adaptor approved for
use with this product. Use of another AC adaptor may cause a
fire or explosion.
This product relies on short-circuit (overcurrent) protection
installed in your home or office. Ensure that a fuse or circuit
breaker no larger than 120 VAC, 15A U.S. is used on the phase
conductors (all current-carrying conductors).
Unplug this product from the wall outlet and refer servicing
to qualified service personnel under the following conditions:
a. When the power cord or plug is damaged or frayed.
b.If liquid has been spilled into the product.
c. If the product has been exposed to rain or water.
d.If the product does not operate normally when
the operating instructions are followed. Adjust
only those controls that are covered by the operating instructions, since improper adjustment
of other controls may result in damage and will
often require extensive work by a qualified technician to restore the product to normal condition.
© 2009 Verizon. All Rights Reserved.
161
Verizon Hub User Guide
Caution—Disposal.
This product contains harmful substances. Ultimate
disposal of this product should be handled according to all
applicable laws and regulations. Do not put the product or its
components (including the LCD or the rechargeable battery
pack) in trash that is disposed of in landfills.
Danger—Handset Battery Pack.
The wireless handset uses a rechargeable battery pack. There
is a danger of an explosion if the battery pack is replaced with
an incorrect battery or if the battery is inserted improperly.
The battery pack contains a small amount of harmful
substances.
To avoid possible injury:
• Replace only with a battery of the type recommended
by the manufacturer, or an equivalent type.
• Keep the battery pack away from fire.
• Do not expose the battery pack to water or rain.
• Do not attempt to disassemble the battery pack.
• Do not short-circuit the battery pack.
• Keep the battery pack away from children.
Caution—Electromagnetic Interference.
This product generates, uses, and can radiate radio frequency
energy and, if not installed or used in accordance with the
manufacturer’s instruction manual, may cause interference
with radio and television reception. This product has been
tested and found to comply with the limits set forth in Part 15
of the Federal Communications Commission Rules.
Danger—Liquid Crystal Display (LCD).
The LCD is made of glass and could break if subject to
mishandling or dropping. Care should be used in handling
broken glass to avoid injury. If the LCD breaks and internal
fluid gets into your eyes or on your hands, immediately wash
the affected areas with water for at least 15 minutes; if any
symptoms are present after washing, seek medical care.
© 2009 Verizon. All Rights Reserved.
162