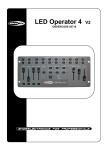
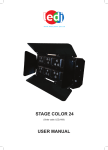
1
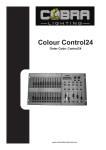
Colour Control4
Order Code: Control4
www.cobrainternational.com
User Manual
COBRA Colour Control 4
Dear Customer,
Thank you for purchasing the COBRA Colour Control 4. Cobra is one of the leading manufacturers of
professional equipment and has decades of experience in design and production.
To meet all your requirements, this unit has been designed and built to the highest of standards so you can
be assured you have made a good investment.
Please read this manual fully for your safety and to take full advantage of the COBRA Colour Control 4.
Product Description:
The Colour Control 4 is a DMX controller suitable for four 4-channel LED par cans (with the DMX layout of
red, green and blue plus dimmer). It will allow scenes and chases to be stored.
Safety Advice:
1. Read manual completely before using this product.
2. Keep manual for future reference.
3. Carry and transport this product with care as violent mechanical shock or dropping this product will
damage it mechanically.
4. The manufacturer takes no responsibility for injury or damage caused as a result of not following the
manual provided.
Protection from Electric Shock:
1. Do not connect the AC power plug to the unit before connecting your lights.
2. Only connect this unit to a mains socket with suitable trip protection and RCD protection.
3. Never pull the mains cable to disconnect from the mains socket – always pull by the mains plug.
4. Always disconnect the unit from the mains before cleaning. Cleaning should be carried out with a soft,
dry cloth.
5. Do not expose this unit to any liquids. Do not operate near exposed water or high humidity.
6. Choose a suitable route for mains cables, ensuring the mains lead is not a trip hazard or at risk from
being crushed.
7. Do not open unit to service. There are no user serviceable parts inside the unit and this will void your
warranty.
Protection from Fire:
1. Do not place near sources of heat.
2. Do not block any ventilation holes.
3. Check your AC wall socket will take the load you are applying to avoid any overloading.
4. Make sure you are using the correct voltage DC power supply, set to the correct polarity.
Protection from Injury and Damage:
1. Never try to modify this unit.
2. Always install the unit in a suitable location where vibrations to the unit are avoided.
3. Check this unit matches the mains voltage and frequency before plugging it in to your mains socket.
4. If any liquids or objects have entered the unit, switch it off immediately and consult a qualified engineer.
5. If the unit malfunctions or there is damage to the mains cable, disconnect immediately and consult a
qualified engineer.
6. All parts should be replaced with genuine spare parts and carried out by a qualified engineer.
Unpacking:
1. The box should contain Colour Control 4, DC power supply, 19” rack kit and user manual.
2. If there is any damage or missing parts, please contact your dealer immediately.
Specifications:
Name:
Code:
Power Supply:
Power Consumption:
Output:
Size:
Weight:
Colour Control 4
Control 4
DC 12v 500mA
20 watts
DMX 512 (3-pin XLR)
372 x 156 x 58mm
1.74kg (1.90kg including 19” rack kit)
Features:
The Colour Control 4 is a DMX controller suitable for independent control of four 4-channel LED par cans.
Features include:
1. Controls 4 RGB LED fixtures.
2. Up to 16 scenes can be stored.
3. Up to 16 chases can be stored.
4. A chase can contain up to 99 steps.
5. 16 chases can contain a maximum of 392 steps in total.
6. Chases can be run with adjustable speed.
7. Chases can be run with adjustable fade.
8. Chases can be run to the beat of the music.
9. Strobe functions on scenes and chases.
Note: An understanding of DMX is required to fully use this product.
1
2
3
9
10
11
4
5
6
7
8
12
13
14
15
16
17
18
19
Controller Front:
1. Fixture buttons and LED indicators 1-4: Use fixture button 1-4 to select a fixture.
2. Scenes buttons and LED indicators 1-8: Push a scene button to activate a scene.
3. Chase buttons and LED indicators 1-8: Push a chase button to activate a chase.
4. Red fader: Use the fader to manually set the intensity of the colour red.
5. Green fader: Use the fader to manually set the intensity of the colour green.
6. Blue fader: Use the fader to manually set the intensity of the colour blue.
7. MASTER fader: Use the Master fader to manually control over all intensity.
8. Page button + page 1 & 2 LED indicators: When the page 1 indicator is lit, scenes 1-8 and chases 1-8 are
active.
9. Record button: Use the Record button to enter Record Mode.
10. TAP SYNC button: Allows you to manually move through the steps of the chase.
11. LCD display.
12. Blackout button: Press the Blackout button to cut all output.
13. Mode/Up button: Allows selection between auto/music and manual mode.
14. Auto/Music/Manual LED.
15. Strobe button: Use the Strobe button to activate the strobe function at any time during playback.
16. Patch/Down button.
17. AUDIO Fader: Use the Audio fader to set the audio intensity.
18. SPEED Fader: Use the Speed fader to manually set the chase speed during playback.
19. FADE TIME Fader: Use the Fade time fader to manually set the fade time during playback.
20
21
22
23
Controller Rear:
20. DMX Polarity Switch.
21. DMX OUT
22. DC power
23. ON/OFF
First Time Operation:
1. Remove all packaging materials.
2. Connect a DMX cable from the controller to the first light, then from the first light to the second. Do
this until all four lights are connected to the controller.
3. Plug the controller in to the mains using the supplied AC/DC power supply then plug your four LED lights
in to the mains.
4. Set the first light to DMX address 1, set the second to DMX address 9, the third to DMX address 17 and
the forth to DMX address 25. (Some LED lights will have a digital display and some will have small dip
switches).
5. Check Blackout light is not lit. If it is, press the Blackout button.
6. Press fixture buttons 1-4. The corresponding blue LEDs will light up.
7. Move red, green, blue and master sliders up – your LED cans should light up. If they do not, try switching
the polarity switch on the rear of the controller.
8. Follow the rest of the manual for all your programming options.
Enter Programme Mode:
1. Press and hold the Record button for 5 seconds.
Exit Programme Mode:
1. Press and hold the Record button for 5 seconds.
Record a Scene:
1. Press and hold the Record button for 5 seconds to enter the Programme Mode. (The red Record light
will light up).
2. Select the fixture you want to programme by pressing the desired Fixture button.
3. Set the faders to the desired values.
4. Decide what page of scenes you are going to save on. You can select Page 1 or 2.
5. Press the Record button then press the desired Scene button you want to record.
6. Press and hold the Record button for 5 seconds to exit Programme Mode.
**Any existing scenes will be overwritten**
Play Scenes:
1. Deselect all fixtures. All LEDs next to the 4 fixture buttons must be OFF.
2. Select the correct page by pressing the Page button.
3. To select the desired scene press the Scene button.
4. Scenes can be stored on 2 pages. Each page contains 8 scenes.
**Multiple scenes can be mixed together**
By pressing the Page button between 1 & 2 you can see which scenes are still active on which page. The LEDs
will be lit on the active scenes.
Delete a Scene:
1. Press and hold the Record button for 5 seconds to enter the Programme Mode.
2. Select the page with the scene you wish to delete.
3. Press and hold the TAP/SYNC button. Now press the corresponding Scene button that you want to delete.
4. All LEDs will flash, indicating your scene has been deleted.
5. Press and hold the Record button for 5 seconds to exit Programme Mode.
Record a Chase:
1. Enter Record mode by pressing and holding the Record button for 5 seconds until red LED is lit.
2. Select the correct page by pressing the Page button.
3. Select the desired chase by pressing Chase button 1-8.
4. Select the desired fixture by pressing Fixture 1-4.
5. Set the faders to the desired values.
6. Press the Record button. All LEDs will flash 3 times, indicating your operation has been successful.
7. The display will show 01, meaning Step 1 in your chase has been recorded.
8. For further steps repeat 5, 6 & 7 until you have completed all the desired steps in your entire chase.
9. Exit Record Mode.
More than one fixture can be programmed or selected when creating steps.
Playing a Chase:
1. Deselect all fixtures. All LEDs next to the 4 fixture buttons must be OFF.
2. Select your desired chase by pressing the Chase button.
3. By using the Mode/Up button you can select Auto Mode, Music or Manual Modes. In Auto mode you
can use the Speed and Fade slider and Strobe button. In music mode you can use the Audio fader. In
manual mode you can use the TAP/SYNC button.
Delete a Chase.
1. Enter Record Mode by pressing the Record button.
2. Select the correct page by pressing the Page button.
3. Press & hold the TAP/SYNC button. Now press the corresponding Chase button that you wish to delete.
4. Exit Record Mode by pressing the Record button for approx. 5 seconds.
Add an Extra Step to an Existing Chase.
1. Enter Record Mode by pressing the Record button for approx. 5 seconds.
2. Select the chase you want to add a step to.
3. Use the Mode/Up and Patch/Down buttons to scroll through the chase. The display will show the
current step.
4. Select the fixture you want to programme by pressing the desired Fixture button.
5. Set the faders to the desired values.
6. Press the Record button to save a new step. All LEDs will flash 3 times, indicating your operation has
been successful.
7.
If you want to add additional steps, repeat 4, 5 & 6 until you have added all the desired steps in your
entire chase.
8. Exit Record Mode.
**There are maximum of 99 steps in 1 chase. 16 chases can hold a maximum of 392 steps**
Delete a Step from an Existing Chase:
1. Enter Record Mode by pressing the Record button.
2. Select the chase from which you want to delete a step.
3. Use the Mode/Up and Patch/Down buttons to scroll through the chase and select the step you want to
delete.
4. Push the TAP/SYNC button to delete the step. All LEDs will flash 3 times indicating the step has been
successfully deleted.
5. Continue this procedure (steps 2, 3 & 4) if you want to delete multiple steps.
Auto/Music/Manual Mode:
Auto:
1. Press the Mode button until the LED in front of Auto lights up green.
2. You can control the speed and fade time but adjusting the Speed and Fade Time fader.
Music:
1. Press the Mode button until the LED in front of Music lights up green.
2. You can control the audio sensitivity by adjusting the Audio fader.
**Fade Time is not available in Music Mode**
Manual:
1. Press the Mode button until the LED in front of Manual lights up green.
2. With TAP/SYNC you can manually go through the chase steps.
**Fade Time is not available in Manual Mode**
Strobe Mode:
1. Press the Strobe button to enter Strobe Mode.
2. You can control the strobe speed with the Speed fader.
3. To exit the Strobe Mode, make sure the speed fader is at 0. Now press the Strobe button to exit the Strobe
Mode.
**Strobe cannot be recorded in a scene or chase**
The fixture channel sliders are patchable to different DMX addresses. See below on how to assign these:
Channel Assignment:
1. Scene buttons 1-8 are DMX channels 1-8.
2. Press and hold the Patch/Down button for 5 seconds. The Patch LED will light up red.
3. Press the fixture button you desire. The Fixture LED will light up blue. You can choose 4 different fixtures.
4. Press and release the channel flash button (red, green, blue or dimmer) and push the Scene button that
refers to the channel you want to patch. First, press the channel flash button then press the Scene
button to save the DMX channel. All LEDs will flash.
5. Press Patch button for 5 seconds to exit Patch Mode.
Factory Reset:
1. Turn off the device.
2. Press and hold the Record button & TAP/SYNC together.
3. Switch the device back on.
4. The display will show 88 for 10 seconds.
5. After that all LEDs will flash 3 times.
6. The display will now show 00
**After the factory reset the fixture is auto patched**
Fixture 1
Red:
Green
Blue
Master
CH1
CH2
CH3
CH4
Fixture 2
Red CH9
Green CH10
Blue CH11
MasterCH12
Fixture 3
Red CH17
Green CH18
Blue CH19
MasterCH20
Fixture 4
Red CH25
Green CH26
Blue CH27
MasterCH28
Unpatch Channels:
1. Press and hold the Patch button for 3 seconds.
2. Select the fixture by pressing the Fixture button
3. Press and hold the TAP/SYNC button. Now press the corresponding scene button that you want to
unpatch. Scene buttons 1-8 are DMX channels 1-8.
4. All LEDs will flash to show your operation was successful.
5. Press the Patch button for 3 seconds to exit.
Maintenance:
The COBRA Colour Controller 4 requires almost no maintenance. However, you should keep the unit clean.
Disconnect the mains power supply then wipe the cover with a dry cloth. Do not immerse in liquid. Do not
use alcohol or solvents.
Keep connections clean. Disconnect electric power then wipe the DMX and audio connections with a dry
cloth.
Troubleshooting:
COBRA Colour Controller 4
This troubleshooting guide is meant to help solve simple problems. If a problem occurs, carry out the steps
below in sequence until a solution is found.
1. Fixture does not respond to controller: Check the DMX address of the fixture and the controller. Make
sure they match. Make sure the connections are correct.
2. Interference between chases: If the same channel is assigned to different running chases, the one with
the highest channel value will take precedence.
3. If the device does not operate properly disconnect the mains power.
4. Check all power connections and other cables.
5. If all of the above appears to be okay plug the unit in again.
6. If nothing happens after 30 seconds unplug the device.
7. If none of the above appear to work consult your dealer.