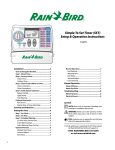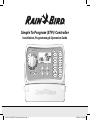
1
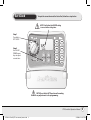
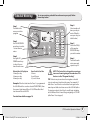
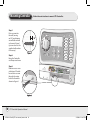
Simple To Program (STPi) Controller
Installation, Programming & Operation Guide
637418-01 Rev B (STP user manual) source.indd 1
3/7/2008 5:23:54 PM
Hole provided to hang manual next to controller.
637418-01 Rev B (STP user manual) source.indd 2
3/7/2008 5:23:54 PM
Welcome!
Simple To Program (STPi) Controller
Thank you for Purchasing the Rain Bird Simple To Program Controller! In the following pages, you
will find step by step instructions on how to use every function included in your STPi Controller.
Thanks again and we hope you enjoy your new Controller.
Contents
Controller Functions............................................................ 2
Set Clock............................................................................... 3
Set Date................................................................................ 4
Schedule Watering.............................................................. 5
Water Now............................................................................ 6
Rain Delay............................................................................ 7
Adjust Water......................................................................... 8
Normal Operation................................................................ 9
Mounting Controller......................................................... 10
Connecting Power Cord.................................................... 11
Master Valve or Pump Start Relay.................................... 12
Connecting Rain Sensor.................................................... 14
Troubleshooting................................................................ 15
Programming Chart.......................................................... 16
STPi Controller Operation Manual
637418-01 Rev B (STP user manual) source.indd 1
1
3/7/2008 5:23:54 PM
Controller Functions
OFF
Turns off
ALL watering
AUTO
Set dial here to run your
programmed settings
RAIN DELAY
Delays watering
up to 72 hours
ADJUST WATER
Adjusts watering
amount (%) as
seasons change
ZONES 1-9
Program watering
for each zone (4 Zone
model shown)
WATER NOW
Manually waters
any zone
The diagram below shows the controls and displays for your new
Controller. Use this to become familiar with the Controller functions.
SET CLOCK
Set current
time of day
SET DATE
Set current date
DISPLAY
SCREEN
WATERING DAYS
Select which day(s)
the displayed zone
is watered
ZONE OFF
Shuts off the
displayed watering
zone
WATERING TIMES
Select how many
times per day the
displayed zone is
watered
UP/DOWN
ARROWS
Use UP/DOWN
arrows on left or
right to set time,
date, run time,
start time, etc.
!!
NOTE: Always begin by turning the dial to the position you want to make a change to and then make your changes
using the options and information displayed to the right of the dial. For example, if you want to set a schedule for
Zone 1 in your yard, first turn the dial to “1” and then make your changes using the buttons to the right and below the
display screen.
2
STPi Controller Operation Manual
637418-01 Rev B (STP user manual) source.indd 2
3/7/2008 5:23:56 PM
Set Clock
To input the current time into the Controller, follow these steps below:
!!
NOTE: Verify that the AM/PM setting
is correct when setting time
Step 1
Turn dial to
SET CLOCK
Step 2
Use left UP/
DOWN arrow
keys to adjust
current time
!!
NOTE: Reset dial to AUTO position after making
any adjustments to the programming.
STPi Controller Operation Manual
637418-01 Rev B (STP user manual) source.indd 3
3
3/7/2008 5:23:57 PM
Set Date
To input the current date into the Controller, follow these steps below:
Step 1
Turn dial to
SET DATE
Step 2
Use left UP/
DOWN arrow
keys to select
current year
Step 3
Use right UP/
DOWN arrow
keys to select
current month
and day
!!
NOTE: Reset dial to AUTO position after making
any adjustments to the programming.
4
STPi Controller Operation Manual
637418-01 Rev B (STP user manual) source.indd 4
3/7/2008 5:23:59 PM
Schedule Watering
To set up a watering schedule for each zone in your yard, follow
these steps below:
Step 4
Select number of
times per day to
water. Default is
once per day (see
table below)
Step 1
Turn dial to the
zone you wish to
program
Step 2
Use left UP/DOWN
arrow keys to select
1st start time to
water
Step 5
Select the DAY(s)
of the week or
ODD/EVEN days
you wish to water
Step 3
Use right UP/
DOWN arrow keys
to select the run
time for each zone
Watering Times Per Day Options
2 times per day
3 times per day
4 times per day
Hours From First Start Time
6 hours
4 and 8 hours
3, 6 and 9 hours
Example: If the first start time for Zone 1 is programmed
for 8:00 AM and the user has selected THREE TIMES, then
the second start time will be at 12:00 PM and the third
start time will be at 4:00 PM.
For start time details see page 16.
!!
Step 6
Turn dial to each
active zone and
repeat steps 2-5
NOTE: The Controller is designed to prevent any
two zones from irrigating at the same time. This
feature is called “Program Stacking”
TIP: The best way to condense the irrigation schedule
is to set each zone’s start time the same. For example: If
both Zone 1 and Zone 2 are scheduled to irrigate on the
same day and both start times are set for 8:00 AM (with a
10 minute run time), then Zone 1 would begin irrigating
at 8:00 AM and Zone 2 would begin irrigating at 8:10 AM
(after Zone 1 has stopped).
STPi Controller Operation Manual
637418-01 Rev B (STP user manual) source.indd 5
5
3/7/2008 5:24:01 PM
Water Now
!!
This option allows you to water any single zone on demand instead of
waiting for the programmed schedule.
NOTE: Any watering you do with this
function will not affect your normal
schedule.
Step 1
Turn the dial to the
zone you wish to
water
Step 2
Press WATER NOW.
The zone will start
watering for a default
10 minutes
6
Current Watering Zone
Step 3
Use the UP/
DOWN
arrows to adjust
the number of
minutes
Step 4
To stop watering
before the time is
up, return dial to
AUTO position
STPi Controller Operation Manual
637418-01 Rev B (STP user manual) source.indd 6
3/7/2008 5:24:02 PM
Use this function to suspend watering for up to 3 days (72 hours) due to
weather or other reasons.
Rain Delay
!!
NOTE: Once the Controller has waited the amount of time you select for Rain Delay, it will resume
normal scheduled watering. Any scheduled watering that falls into the delay period will not occur.
Step 3
Return dial to
AUTO position
Step 1
Turn the dial to
RAIN DELAY
Step 2
Use the right UP/
DOWN arrows to
adjust the amount
of delay time
Screen displays
current time and the
number of rain delay
hours that are left until
regularly scheduled
watering resumes.
!!
NOTE: Reset dial to AUTO position after making
any adjustments to the programming.
STPi Controller Operation Manual
637418-01 Rev B (STP user manual) source.indd 7
7
3/7/2008 5:24:03 PM
Adjust Water
Use this simple option to make run time adjustments that account for
seasonal variation, without changing all of the initial zone settings.
!!
NOTE: Instead of changing the settings for each zone, you can adjust the amount of time you water for each
zone with one simple adjustment using the WATER ADJUST function. Your scheduled start times will not
change, but the actual zone run time will be adjusted.
TIP:
Automatically adjust
watering of each
individual zone by
using left UP/DOWN
arrows to adjust from
-90% to+100%. It is
important to note that
the baseline schedule
is set at 0% and not
100%.
Step 1
Turn the dial to
ADJUST WATER
Step 2
Use the left UP/
DOWN arrows
to adjust the
percentage
increase or
decrease to the
initial zone run
time setting
EXAMPLE:
If Zone 1 is scheduled
to water for 10 minutes
and you set ADJUST
WATER to +50% then
Zone 1 run time will
be increased to 15
minutes.
!!
NOTE: Reset dial to AUTO position after making
any adjustments to the programming.
8
STPi Controller Operation Manual
637418-01 Rev B (STP user manual) source.indd 8
3/7/2008 5:24:05 PM
Normal Operation
Below are different screens your Controller might display while in AUTO
position mode.
Normal Operations
Screen displays current time, the zone that is
scheduled to be watered next, and the date
and time it will be watered.
Watering Now
Screen displays current time, which zone is
currently being watered, and the number of
minutes remaining in the cycle for that zone.
With Rain Delay
Screen displays current time and the number
of rain delay hours that are left until regularly
scheduled watering resumes.
Error Detected
When an error is detected, screen displays the
affected Zone # in upper-left corner.
STPi Controller Operation Manual
637418-01 Rev B (STP user manual) source.indd 9
9
3/7/2008 5:24:06 PM
Mounting Controller
Follow these instructions to mount STPi Controller:
Step 1
Drive a screw into
the wall, leaving
an1/8” gap between
screw-head and wall
as shown in Figure 1
(you can also use the
supplied wall anchors
if necessary).
Step 2
Hang the Controller
on the exposed screw.
Step 3
Remove access cover
at bottom of Controller and drive a screw
through the center
hole into the wall as
shown in Figure 2.
10
STPi Controller Operation Manual
637418-01 Rev B (STP user manual) source.indd 10
3/7/2008 5:24:07 PM
Connecting Power Cord
Follow these instructions to connect the power cord:
Step 1
Attach the transformer connector to
the 24VAC POWER pin connection on
the Controller.
Step 2
Plug transformer into the wall socket.
!!
NOTE: DO NOT plug in the
transformer until you have
completed and checked
all wiring connections.
Also, do not attempt to link
two or more Controllers
together with a single
transformer.
!!
NOTE: Do not plug
Controller into socket
that is controlled by a
secondary ON/OFF light
switch.
STPi Controller Operation Manual
637418-01 Rev B (STP user manual) source.indd 11
11
3/7/2008 5:24:08 PM
Master Valve or Pump Start Relay
This example shows what a Master Valve connection would look like.
A Pump Start Relay would connect differently at the water source.
!!
NOTE: STPi Series Controllers allow a
Master Valve or Pump Start Relay to
operate whenever a valve is operating
(pumps are used in some places to draw
water from a well or other source). If you
are activating a pump from the Controller,
you must also install a Pump Control Relay
Step 1
Connect the color-coded “Hot”
Wire from the Master Valve (or
Pump Relay) to the Controller
terminal marked MSTR VALVE.
Step 2
Connect the Common Wire
(usually White) from the Master
Valve (or Pump Start Relay) to
the Controller terminal marked
COMMON.
12
STPi Controller Operation Manual
637418-01 Rev B (STP user manual) source.indd 12
3/7/2008 5:24:09 PM
Master Valve or Pump Start Relay
Note these additional instructions when connecting a Pump Start Relay:
Step 3
To avoid possible pump damage
when using a Pump Start Relay,
connect a short jumper wire from
any unused zone terminal(s) to
the nearest zone terminal screw
in use.
For example: if you have a 4
Zone Controller with only two
zones in use, route the terminals
for Zones 3 and 4 to the nearest
active terminal (in this example,
Zone 2).
!!
NOTE: Make sure that
the total draw of the
Master Valve or Pump
Start Relay, plus the
draw of the valves does
not exceed 0.650 Amps
at 24VAC, 60 Hz.
!!
NOTE: This Controller
does not provide main
power for a pump.
STPi Controller Operation Manual
637418-01 Rev B (STP user manual) source.indd 13
13
3/7/2008 5:24:10 PM
Connecting Rain Sensor
Follow these instructions if you wish to connect a Rain Sensor to the
STPi Controller.
Step 1
Remove the jumper wire from the
Rain Sensor terminals.
Step 2
Connect both Rain Sensor
delay wires to the terminals
marked RAIN SENSOR.
14
STPi Controller Operation Manual
637418-01 Rev B (STP user manual) source.indd 14
3/7/2008 5:24:11 PM
Troubleshooting
Watering Issues
Problem
Possible Cause
Possible Solution
Automatic and Manual
cycles do not begin
watering.
Water source not supplying water.
Make sure the main water line and all supply lines are open and operating properly.
Wires not properly connected.
Make sure all field wires and master valve/pump start relay wiring is connected properly.
Wires loose or cut; corroded connections.
Check field wiring for broken, cut, or “skinned” wires and replace if necessary. Check all wire
connections and replace with watertight splice connectors as needed.
Dial not set to AUTO position.
Make sure the dial is on AUTO position—not any other dial position.
If you have a Rain Sensor, it may be
activated.
You can either wait until the Rain Sensor dries out, or disconnect the Rain Sensor from the
yellow terminals on the Controller and replace it with a wire connecting the two yellow
terminals.
If you do not have a Rain Sensor, the wire
connecting the two yellow Rain Sensor
terminals may be damaged or missing.
Connect the two yellow Rain Sensor terminals in the Controller’s terminal bay with a short
length of 14 to 18 gauge wire.
An electrical surge may have damaged
the Controller’s electronics.
Press the reset button under the wiring cover. If there is no permanent damage, the
Controller should resume normal operation. You will need to input the current time and
date, but your watering schedule should remain intact.
Problem
Possible Cause
Possible Solution
LCD Display is blank.
Transformer not plugged in or wall
socket not supplying power (Red light on
the transformer is not illuminated).
Make sure the two-prong connector is connected and the transformer is securely plugged in.
An electrical surge may have damaged
the Controller’s electronics.
Unplug the Controller for 3 minutes. Plug the Controller back in. If there is no permanent
damage, the Controller will accept programming and resume normal operation.
Electrical Issues
LCD Display is “frozen”
and Controller will not
accept programming.
Make sure the main AC power supply is working properly.
STPi Controller Operation Manual
637418-01 Rev B (STP user manual) source.indd 15
15
3/7/2008 5:24:11 PM
Programming Chart
Total Start
Times
Run
Time
(circle days that apply)
1
___ Min
M T W T F SA SU ODD EVEN
___:___ AM PM
1
2
3
4
2
___ Min
M T W T F SA SU ODD EVEN
___:___ AM PM
1
2
3
4
3
___ Min
M T W T F SA SU ODD EVEN
___:___ AM PM
1
2
3
4
4
___ Min
M T W T F SA SU ODD EVEN
___:___ AM PM
1
2
3
4
5
___ Min
M T W T F SA SU ODD EVEN
___:___ AM PM
1
2
3
4
6
___ Min
M T W T F SA SU ODD EVEN
___:___ AM PM
1
2
3
4
7
___ Min
M T W T F SA SU ODD EVEN
___:___ AM PM
1
2
3
4
8
___ Min
M T W T F SA SU ODD EVEN
___:___ AM PM
1
2
3
4
9
___ Min
M T W T F SA SU ODD EVEN
___:___ AM PM
1
2
3
4
Zone
Zone Description
Watering Days
(Max 240 min.)
* Start Time #1
(15 min. increments)
(circle no. of starts)
Note: A total of 4 start times can be assigned for each zone (this can be helpful for zones irrigating tight soils and slopes).
* Start Time Sequence (hours after first programmed start time)
No. of Start Times
1st Start Time
2nd Start Time
3rd Start Time
4th Start Time
One Time
as programmed
n/a
n/a
n/a
Two Times
as programmed
6 hours
n/a
n/a
Three Times
as programmed
4 hours
8 hours
n/a
Four Times
as programmed
3 hours
6 hours
9 hours
Example: If the first start time for Zone 1 is programmed for 8:00 AM and the user has selected THREE TIMES, then the
second start time will be at 12:00 PM and the third start time will be at 4:00 PM.
16
STPi Controller Operation Manual
637418-01 Rev B (STP user manual) source.indd 16
3/7/2008 5:24:11 PM
Notes:
637418-01 Rev B (STP user manual) source.indd 17
3/7/2008 5:24:11 PM
The Intelligent Use Of Water
RAIN BIRD CORPORATION
6991 E. Southpoint Road
Building 1
Tucson, AZ 85706
RAIN BIRD EUROPE, S.A.R.L
900, rue Ampere · BP72000
13792 Aix en Provence Cedex 3
France
© 2008 Rain Bird Corporation
® Registered trademark of Rain Bird Corporation
® Marca registrada de Rain Bird Corporation
www.rainbird.com
Technical services (U.S. and Canada only)
1-800-RAIN-BIRD
P/N: 637418-01
637418-01 Rev B (STP user manual) source.indd 18
3/7/2008 5:24:11 PM