1
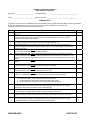
You can also refer to the instructions in Section 7 of the ASME Boiler Code for more detail on cleaning pressure vessels. Depending on the age and condition of the system, the system may require several cleaning cycles Replace the control transformer fuse which was previously removed. 2. Remove element access panel(s) and open the doors to the electrical control panel(s). Run an inspection of the tightness of all elecgrical connections (ie)at fuse lugs, power entrance lugs, contactors, and heating elements). PRE-STARTUP INSPECTION Minimum equipment required for startup and troubleshooting: Volt-Ohm Meter Clamp-On Ammeter Megohm Meter Torque Wrench - inch lbs Torque Wrench - foot lbs Mechanical System Checks: Note: See Maintenance Section on rechecking the torque on these components after an initial break-in period. Typically one to two weeks after startup and then at least annually. Plumbing Connections Completed Inlet/ Makeup water? Discharge/Outlet? Drain/Blowdown? Relief/Safety Valve discharge? Feed pumps/Circulating Pumps Pumps wired, connected and checked for proper rotation? Is the boiler filled to the proper level with water? System Flush Has the System been flushed? Has the unit been cleaned construction debris? All branch circuit connections should be tightened to 40-50 inch lbs. (actual value listed on components). Torque to avoid component damage from heat buildup. This tightness inspection is vital, because the vibration during shipment can often loosen electrical connections. If this is not done, damage may occur to component parts when power is switched on, and those damaged parts will not be covered under the manufacturer’s warranty. of all Valves Are all valves in the proper open or closed positions? Electrical System Checks WARNING! All POWER Supplying boiler should be off and locked out! 3. With an ohmmeter, check the resistance between the phases on the load side of the contactors. Each should read the same and approximately what is shown on the wiring diagram. 4. Check the electrical panels for loose material, dust and/or moisture. Thoroughly vacuum the panels if dust or foreign materials have accumulated. If there has been severe exposure to dust, the contactors should be disassembled and cleaned. Dust in the contactors will cause contactor chattering and eventual destruction of the contacts. All components should be clean and free of dust, moisture, and foreign matter. 5. Verify that field-installed control and load connections have been properly completed. 6. Check the tightness of all control circuit connections. HEATING ELEMENT: When the unit's main power switches are OFF and locked out: CAUTION Moisture in the elements may result in damage to the elements. 1. Remove one of the unit’s control circuit transformer primary fuses. Then check the resistance phase-to-phase or phase-to-ground. With a megger (500VDC minimum) check contactor load side terminals to ground. If a reading of <1 megohm is obtained, consult with the Factory. NOTE: There is a possibility that during shipment or storage prior to operation the elements may accumulate moisture. The moisture will turn to steam when the elements are turned on and may rupture the element casing. INSTALLATION SECTION III