1
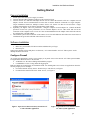
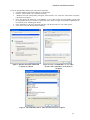
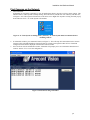
Arecont Vision Camera Installation Guide
and Reference
(AV2100, AV3100, AV3130)
February 1, 2006
Installation And Software Manual
Table of Contents
Table of Contents............................................................................................................................................ 2
Introduction .................................................................................................................................................... 3
Technical Support ...................................................................................................................................... 3
System Requirements ..................................................................................................................................... 4
Dedicated PC ............................................................................................................................................. 4
Network Switch or Router ......................................................................................................................... 4
Camera Location and Environment ........................................................................................................... 5
Camera Mounting ...................................................................................................................................... 5
Camera Power Supply ............................................................................................................................... 5
Camera Optics ........................................................................................................................................... 5
Auto-Iris Lenses......................................................................................................................................... 5
Getting Started................................................................................................................................................ 6
Camera Installation .................................................................................................................................... 6
Software Installation .................................................................................................................................. 6
Configure Firewall ................................................................................................................................ 6
Find Cameras on the Network ................................................................................................................... 8
Camera Reference........................................................................................................................................... 9
Introduction................................................................................................................................................ 9
Connectors ................................................................................................................................................. 9
Power ......................................................................................................................................................... 9
Housing and Mounting ............................................................................................................................ 10
Network Cabling...................................................................................................................................... 10
Optics....................................................................................................................................................... 10
Using a Manual Iris Lens .................................................................................................................... 10
Using an Auto-Iris Lens ...................................................................................................................... 10
Day/Night Operation................................................................................................................................ 11
Supported Network Services.................................................................................................................... 11
Ping ..................................................................................................................................................... 11
ARP..................................................................................................................................................... 11
TFTP ................................................................................................................................................... 11
Troubleshooting and Useful Tips ................................................................................................................. 12
Connecting Directly To Laptop or PC ..................................................................................................... 12
Switches and Routers............................................................................................................................... 12
Low Sharpness......................................................................................................................................... 12
p.2
Installation And Software Manual
Introduction
Thank you for purchasing Arecont Vision mega-pixel IP video cameras. AV2100, AV3100 and AV3130 are state-ofthe-art IP designed to deliver full motion high definition digital video across local area networks. Delivering over 40
Mpixels/sec of crystal-clear imagery, AV cameras represent a vastly superior alternative to low resolution analog and
digital video. To accommodate this level of performance certain minimum system requirements have to be met. Please
make sure to read this entire Manual and to follow installation instructions given below.
To resolve problems efficiently we recommend:
• Taking a picture of the scene in question, “Photo->Save”, and attaching it to the email
• Checking software and camera firmware version, “About”
• Execute “Settings->Dump” and attach file named LocalMachine.ini from the installation directory to the
email
• Attach the file named lmlog.dat from the installation directory to the email
p.3
Installation And Software Manual
System Requirements
Dedicated PC
A dedicated PC is needed to receive image streams from cameras for archiving and display. The suggested minimum
computer requirements are as follows.
•
Standard Performance, 16-17 FPS (frames per second) of full-resolution video
CPU: 3.4 GHz
RAM: 512 MB
Video Card: 1600x1200, 64 MB RAM
Hard Disk
7 MB for application
Extra storage for image archives
Network card: 100 base-T
•
High Performance, 24FPS at full resolution for AV2100
CPU: Dual 3.2 GHz
RAM: 512 MB
Video Card: 1600x1200, 64 MB RAM
Hard Disk:
7 MB for application
Extra storage for image archives
Network card: 100 base-T, 2 network cards – one for cameras and one for remote viewing
A PC with single, slower CPU is sufficient in the case when images are to be archived, but not displayed.
HDD size according to the desired capacity of the video archives (approximately 200Kbytes/image). As an example,
two 400GB drives will yield approximately 6 days of archiving capacity for an 8-camera system recording at 1 frame
per second
Network Switch or Router
Using a 100 Mbps network switch or router is recommended. Simple hubs do not provide collision management and
are not suitable for multi-camera AV system. Suggested models:
•
•
•
Netgear ProSafe 8PT 100Base-TX Switch with POE #FS108PNA
10/100Base-TX w/4 POE 100Base-TX
MSRP $110 (www.netgear.com)
•
•
•
Netgear ProSave 16PT 100Base-TX Switch with PoE #FS116P
10/100Base-TX w/8 PoE 100Base-TX
MSRP $210 (www.netgear.com)
•
•
•
Netgear ProSafe 24+2 Gigabit Switch with POE
1 Gigabit output w/12 POE 100Base-TX
MSRP $380 (www.netgear.com)
•
•
•
D-Link Web Smart #DES-1316
10/100Base-TX w/8 POE ports and 8 non-POE ports
MSRP $388 (www.compuplus.com)
•
•
•
TRENDnet #TPE-S88
10/100Base-TX w/8 POE ports and 8 non-POE ports , POE Single port hub
MSRP $250 (www.provantage.com)
p.4
Installation And Software Manual
•
•
•
•
PowerDsine #PD-3001/AC
10/100Base-TX
Single Midspan POE port
MSRP $49 (www.provantage.com)
Camera Location and Environment
Outdoor installation requires an appropriate enclosure to protect the camera.
Operating ambient temperature is 0ºC to 50ºC.
Camera Mounting
Cameras are mounted using a ¼” x 20 threaded hole at the bottom of the housing. When mounting the camera make
sure the screw that goes into the hole is short, ¼” or less, and does not touch the camera board.
The camera is to be installed according to the applicable code. The mounting means should be adequate for mounting
a 1 lb camera plus the weight of the lens.
Camera Power Supply
AV2100 and AV3100 cameras should be powered from 9V to 12V DC power source providing at least 4W per camera.
AV3130 requires 5W. 12V – 1A is recommended. Alternatively, the cameras can be powered over Ethernet with 48V.
A UL-approved isolated supply is required for use in the US. In the European Community the power supply must meet
the requirements of the Low Voltage Directive and be CE marked.
Camera Optics
A wide variety of C/CS mount ½” lenses may be used with AV cameras. Note that some CS lenses and all C-mount
lenses may require an adaptor ring. Our lens suggestions include:
• Xavee L-04510MVF (4.5-10 mm), L-1040MVF-IR (10-40 mm)
• Tamron 12FM04T (4mm), 12FM06T (6mm), 12FM12T (12mm)
• Fujinon DF6HA-1B (6mm), HF9HA-1B (9mm), HF12.5SA-1 (12.5mm), CF12.5HA-1(12.5mm)
• Computar M0814-MP (8mm), M1214-MP (12mm), H3Z451CS (varifocal 4.5-12mm)
Auto-Iris Lenses
Standard DC auto-iris lenses can be used with AV2100 and AV3100 cameras equipped with the auto-iris feature.
Arecont Vision recommends high-resolution optics. Our suggestions for auto-iris lenses are:
• Xavee L-04510AVF (4.5-10 mm), L-1040AVF-IR (10-40 mm)
• Computar HG3Z4512FCS (varifocal 4.5-12mm)
• Tamron 12FG04T-SQ (4 mm), 12FG06T-SQ (6 mm) and 12FG12T-SQ(12mm)
p.5
Installation And Software Manual
Getting Started
Camera Installation
1.
2.
3.
4.
5.
Attach optics and connect power supply to cameras
Connect network cables with RJ45 connector to the camera LAN port
Connect cameras to a dedicated 100 Mbps network switch. Connect the network switch to a computer network
adaptor. Arecont Vision recommends that no more than 8 cameras should be connected to a single computer.
Larger installations should use multiple 8-camera clusters. All clusters can then be accessed from a single
computer using Remote Access feature described later in this manual
Optionally, for highest video rate performance, configure computer network adaptor for a HALF DUPLEX
operation. For the best system performance use two network adapters: one for video traffic and one for the
connection of the computer/server to LAN. It is also recommended that network adapter connected to the cameras
be configured for a fixed IP address.
Check that the yellow LED on the back of the cameras is on. This LED indicates that a link to the router has been
established. The green LED will blink when camera is accessed
Software Installation
To install AV software:
1. Make sure your Windows XP/2K account has administrative privileges
2. Run setup.exe
Setup process installs software and places two shortcuts, “AV Camera Installer” and “AV Video System” on the
desktop and in the Start menu.
Configure Firewall
As you start AV applications, your PC is may prompt you to permit access to the network. AV Video System includes
two applications that need access to the network:
• AVInstaller.exe: the camera finding and installation program
• LocalMachine.exe: the viewing and archiving program
Both executables are located in the AV installation folder. You should grant access to these two applications when the
firewall prompts you. For example:
• For Norton Internet Security choose “Permit Always” and click Ok, see Figure 1
• For McAfee Personal Firewall click “Grant Access”, see Figure 2.
Figure 1. Open Norton Internet Security firewall for AV
Camera Installer application
Figure 2. Open McAfee Personal Firewall for
AV Video System application
p.6
Installation And Software Manual
If you are using Windows XP firewall, follow these instructions:
1. Click the Windows Start button and select “Control Panel”
2. From the “Control Panel” open “Windows Firewall”
3. “Windows Firewall” settings dialog will appear. If the firewall is “on”, make sure “Don’t allow exceptions”
is unchecked, see Figure 3
4. Click “Exceptions” tab. Make sure “Local Machine” or “AV Video System” and “AVInstaller” appear in the
list of programs and services and have a checkmark next to them, see Figure 4. If both these applications are
not in the list, click “Add Program” button
5. Find “AVInstaller” in the list of programs and click “Ok”. Repeat same for “AV Video System”
6. Click “Ok” to close the Windows Firewall dialog
Figure 3. Windows firewall is enabled and
exceptions are allowed
Figure 4. Verify "LocalMachine" or “AV Video
System” and “AVInstaller” are in the list of
exceptions
Figure 5. Add AVInstaller and AV Video System to the list of exceptions
p.7
Installation And Software Manual
Find Cameras on the Network
1.
Start AVInstaller
AVInstaller can respond by requesting to close all applications that are currently receiving camera images. This
indicates that AV Video System is already running. Go to the task bar, find the AV icon in the tray and click on it,
see Figure 6. AV Video System will maximize to the entire screen. Right-click anywhere to bring the main pop-up
menu and select “Exit”. AV Video System will terminate.
Figure 6. AV Video System is running in the system tray. AV Video System must be terminated before
installing cameras
2.
3.
In AVInstaller window, press Automatic button (see Figure 7.). This will setup all connected and active cameras.
Cameras will be assigned IP addresses from those that are currently un-assigned to other devices. Found and
configured cameras will be displayed in the Present Cameras window
Press Alt-F4 to close the AVInstaller window. AVInstaller will prompt you to save information about detected
cameras. Answer “Yes” to save the configuration
Figure 7. Find cameras using AVInstaller
p.8
Installation And Software Manual
Camera Reference
Introduction
AV2100, AV3100 and AV3130 are mega-pixel resolution IP cameras capable of delivering crisp, low-noise images at
a video frame rate.
AV2100 is a 2-megapixel resolution camera having maximum resolution of 1600 by 1200 and achieving a maximum
frame rate of 24.
AV3100 is a 3-megapixel resolution camera. Its maximum resolution is 2048 by 1536. AV3100 is typically viewed at
1920 by 1200 resolution with the frame rate up to 20 FPS.
AV3130 is a dual-sensor, day-night camera featuring a 3-megapixel color sensor paired with a 1.3-megapixel
grayscale sensor. The 3-megapixel sensor has a maximum resolution of 2048 by 1536. The camera is typically viewed
at a resolution of 1920 by 1200 with the maximum frame rate of 20 FPS. The 1.3-megapixel sensor has a resolution of
1280 by 1024. The color high-resolution sensor is used at times when illumination is plentiful, such as daytime. The
lower resolution grayscale sensor is used at low illuminations, for example during night time. The sensor is sensitive to
near infrared.
All cameras are equipped with LAN connector and can deliver image data at a maximum data rate of up to 45 Mbps.
Images are sent over the network in a compressed Motion JPEG format using TFTP protocol.
All cameras feature:
• Automatic exposure
• Automatic multi-matrix white balance
• 50/60Hz flicker avoidance
• Programmable brightness, saturation, gamma, sharpness, windowing and decimation
• Simultaneous delivery of full-field view and zoomed images at video frame rate
• Instantaneous electronic zoom, pan and tilt
• Electronic image rotation by 180 degrees
Connectors
AV2100, AV3100 and AV3130 have the following connectors on the back:
• LAN connector, accepting a network UTP or ScTP cable carrying 100 Base-T. The LAN connector also
accepts power-over-Ethernet
• DC jack, accepting 9V-12V DC supply
• Optionally, a DC auto-iris connector. AV3130 does not support auto-iris and does not have this connector
Power
Power for AV2100, AV3100 and AV3130 can be supplied as follows:
• Via DC jack, 9V-12V. A UL-certified, isolated power supply must be used. For power ratings see below. The
center contact in the power connector is positive
• Via LAN connector, 48V DC over spare wires or over data pairs. The polarity is arbitrary. A list of recommended
PoE switches includes
• PowerDsine PD-6001/AC (PoE single port hub)
• TRENDnet TPE-S88 (POE switch/hub with 8 POE ports and 8 non-POE ports)
• D-Link Web Smart DES-1316 (POE switch/hub with 8 POE ports and 8 non-POE ports)
Power consumption is varies depending on mode of operation. The maximum power consumption takes place when
the camera is polled at full frame rate and runs at full resolution. The consumption is approximately 4 Watts for
AV2100 and AV3100 and 4.5 Watts for AV3130.
p.9
Installation And Software Manual
Housing and Mounting
All camera models feature a durable aluminum housing that minimizes fire hazards. The housing is not hermetically
sealed. The camera is not to be used outdoors without appropriate protective enclosures.
Cameras are mounted using a ¼” x 20 threaded hole at the bottom of the housing. When mounting the camera make
sure the screw that goes into the hole is short, ¼” or less, and does not touch the camera board.
The camera is to be installed according to the applicable code. The mounting means should be adequate for mounting
a 1 lb camera.
Network Cabling
Category 5 cabling or better is recommended. All network cabling must be installed according to applicable codes and
regulations by a licensed network cabling professional.
Optics
AV2100 and AV3100 can be used with a manual or DC ½” auto-iris lens. AV3130 requires two manual iris lenses and
has a limitation on lenses size. The lens mount can be C or CS with an appropriate adapter.
Using a Manual Iris Lens
Using a lens correctly is very important for mega-pixel cameras. The image may look blurry when the lens iris is fully
open or closed too much. To deliver sharp mega-pixel resolution images you should
a)
use a mega-pixel-resolution lens
b)
obtain best resolution and depth of focus by having the iris slightly closed
You should use a manual iris lens whenever possible. When setting up the camera, direct the camera at the scene and
try closing the iris in the manual lens by several F-stops. At some point you will see that the image looks sharpest.
Leave the iris closed at this value.
Using an Auto-Iris Lens
AV2100 and AV3100 are available with DC auto-iris option. To use a DC auto-iris lens:
1.
2.
Attach it to the camera
Plug in the lens cable into the connector on the back of the camera. Make sure the lens cable is long enough.
Many DC lenses are available with a short and long cable options.
The camera will automatically detect the presence of an auto-iris DC lens and start using it. Auto-iris lens operation
typically proceeds as follows:
1.
2.
3.
If illumination is sufficient, the camera will typically close the iris within half-a-minute
When the iris is closed, the image should become visibly sharper. As the iris is gradually closed the image
may fluctuate slightly
The camera will use iris to control exposure
p.10
Installation And Software Manual
Day/Night Operation
AV3130 is a camera designed for day and night operation. The camera has two sensors, a 3-megapixel color sensor
and a 1.3-megapixel grayscale sensor which is sensitive to near infrared illumination. When the scene is wellilluminated the 3-megapixel sensor is selected to deliver color images of up to 2048x1536 in size. In dark conditions
AV3130 can automatically switch to the grayscale sensor. Combined with an external near-infrared illuminator the
camera can image under 0 Lux conditions.
See “AV Video Software Reference Manual” for details on configuring settings specific to AV3130.
Supported Network Services
AV2100, AV3100 and AV3130 implements Ping, ARP and TFTP network protocols.
Ping
Ping protocol checks if the network device is on, available on the network and can successfully receive and transmit
network packets. To ping a camera in Windows:
1. Open a command line interface window (click the “Start” button, choose “Run”, enter “cmd” and click enter)
2. For a camera with IP of 192.168.0.100 enter “ping 192.168.0.100”
ARP
ARP, the address resolution protocol, protocol provides means for translating IP addresses into MAC. It is used by
network housekeeping software.
TFTP
The camera delivers images and is configured via TFTP, the trivial file transfer protocol.
p.11
Installation And Software Manual
Troubleshooting and Useful Tips
Connecting Directly To Laptop or PC
In a typical scenario cameras are connected using network cables to a network switch. A camera can also be connected
to a PC or laptop directly. Be sure to use a cross-over network cable between the camera and PC when connecting in
this fashion.
When a camera is connected directly, in some cases you may need to change TCP/IP configuration on your PC. For
example, configure the PC to work with a static IP address.
When a PoE injector is used and connected directly to a PC there are two network cables. One cable connects the PC
to the PoE injector. The other connects the injector to the camera. Only one of these cables must be cross-over. The
other cable must be regular, not cross-over.
Switches and Routers
Note that some Gigabit switches and network adapters incompletely emulate 100BaseT signaling levels and may not
work correctly with high bandwidth 100BaseT equipment.
Low Sharpness
If you believe image sharpness is low:
• Check if the lens is in focus
• Check if the lens provides sufficient resolution for a mega-pixel camera
• Increase compression ratio
• Check if the lens iris is fully open or closed down substantially. For best resolution and depth of field the iris
– depending on lens make – should be closed by 2-3 F-stops
p.12