1
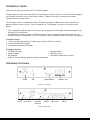
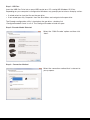
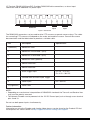
Installation Guide
Network Encoder Model TVI C300
Installation Guide
Thank you for purchasing your new TVI C300 Encoder.
The package you have received contains everything you need to set up an infrastructure to support
the Encoder, and allow you to view video streams, subject to having a camera and suitable
communications infrastructure.
This Encoder works in combination with a TVI Server to deliver video to end users and will not
operate without access to one. You will need to use TVI Manager to create an account on the
Server.
• This installation guide provides instructions for installing the TVI Encoder and connecting it to an
existing TVI Infrastructure.
• For guidance on how to setup a TVI Server please refer to the product documentation on the
Product CD that accompanies this unit or online via http://support.essential-viewing.com/support.
Installation Steps
1. Check the package contents listed in the Package Contents section
2. Install the Network Encoder
3. Configure the Network Encoder
Package Contents
• TVI C300 Encoder
• Terminal Block
• Power Adapter
• USB Pen Drive
• 3G Antenna
• Installation Guide (this manual)
• Product CD containing software and documentation
Hardware Overview
Network
USB
3G/GPRS SIM Slot
LED Status Lights
Figure 1: Front Panel
Video In
Audio In/ Out
DVR / PTZ
RS232 Port
Antenna
Figure 2: Rear Panel
I/O Terminal
Power In
Installing the TVI Encoder
The TVI Encoder has been designed to be used in indoor environments (or outdoor when located in
a suitable housing) and has four mounting points to secure it into position.
All deployments of a Network Encoder should ensure that the unit is not mounted:
•
•
•
•
Within
Within
Within
Within
explosive zones
0.5m of a powered transmitter and/or receiver antenna
the engine bay/compartment of a vehicle
1m of a vehicle fuel fill point (direct line of sight)
Connecting a Camera
1. Connect one end of a composite video cable to the ‘Video In’ connector on the Network Encoder.
2. Connect the other end of the composite video cable to the Video Out or Composite Out
connector on the camera.
3. (optional) Connect a line-level input audio source to the Audio connector on the Network encoder
using a standard DIN cable.
4. (optional) For PTZ cameras refer to the Network Encoder Connectors section for details on how to
make a cable that will allow the Encoder to steer a PTZ camera.
Connecting to a Network
Option 1: The Encoder will connect via the Network port to a LAN or to an external router
(e.g. a Satellite router):
1. Connect an RJ45 Ethernet cable (CAT5) cable to the Network connector on the Encoder.
2. Connect the other end of the cable to the network.
Option 2: The Encoder will connect via a mobile network using 3G/GPRS
1. Connect the supplied antenna to the antenna connector on the Network Encoder.
2. Insert a SIM card (not supplied) into the SIM slot on the Network Encoder.
3. Ensure that SIM is locked in the SIM slot by pushing the locking switch to the left.
Important!
• The SIM cannot be read unless the locking switch is fully in the locked position by pushing it to
the left.
• The Network Encoder is considered a heavy data usage product on mobile networks. It is
recommended that an unlimited data plan is set up with the Mobile Network Service Provider.
Configuring the TVI Encoder
This Encoder works in combination with a TVI Server to deliver video to end users and will not
operate without access to one.
For guidance on how to set up a TVI Server please refer to the product documentation
on the Product CD that accompanies this unit or online via
http://support.essential-viewing.com/support
The Encoder is configured using the USB Pen Drive supplied.
Step 1: USB Pen
Insert the USB Pen Drive into a spare USB socket on a PC running MS Windows XP/Vista.
Depending on your computer's configuration Windows may prompt you to take an Autoplay action:
• If asked select to view the files on the pen drive.
• If not asked open ‘My Computer’ from the Start Menu and navigate to the pen drive.
The Encoder configuration utility is located on the pen drive - double-click
‘ConfigureEncoder2.0.exe’ to run it. The Configure Encoder wizard will open.
Step 2: Encoder Model Selected
Select the ‘C300 Encoder’ option and then click
‘Next’.
Step 3: Connection Method
Select the connection method that is relevant to
your purpose:
Standard LAN (RJ45) Connection
The Encoder will connect to any network / device that
presents a standard LAN interface.
Internal 3G Modem
The Encoder has a built in 3G modem for mobile
communication that supports HSDPA, 3G, EDGE and
GPRS.
Hughes Inmarsat BGAN Terminal
The Encoder has special support built-in for Hughes
Inmarsat BGAN Terminals.
Thrane & Thrane /
Standard LAN BGAN Terminal
The Encoder has special support for Thrane & Thrane
BGAN Terminals.
Serial Port
The encoder has support for serial port transmission
which is beyond the scope of this document.
See the separate ‘Serial Radio Configuration’ guide.
Step 4: Encoder Name and Server Address
Encoder Name
Each TVI Encoder requires an account be created on
your TVI Server (using TVI Manager). Please refer to
the TVI Manager Guide for instructions on how to
create Encoder accounts.
Enter the name of the Encoder account that was
created for this Encoder.
TVI Server Address
Enter the IP Address or Domain Name that the
Encoder will use to communicate with the Server.
This can either be an IP Address (e.g. 12.87.54.255)
Step 5: Encryption and Authentication
Encoder Password
Enter the password that was assigned to the Encoder
account.
Encryption
If Encryption support is enabled on your TVI Server all
communication between the Encoder and Server can
be encrypted by enabling ‘Encrypt the link between
Encoder and Server’. Use of this feature requires the
Encryption Pack (refer to the TVI Server Guide for
further details).
Step 6: Encoder Time Zone
Select the Time Zone on the Encoder correctly so
that the video playback time displayed in the
viewing application will be correct.
Step 7: VPN Configuration
The TVI Encoder has an IPSEC VPN Client built-in.
To utilise this feature tick ‘Connect to the Server
using IPSEC VPN’ and then enter the appropriate
VPN login details.
The ‘Advanced Settings’ button allows
customisation of the settings used to create the
VPN connection. Please consult with your VPN’s
Administrator for further information on how to
customise these settings.
Step 8: Network Configuration (LAN only)
In most situations the Encoder will obtain its
network settings automatically from the network
gateway using DHCP.
If the network does not provide a DHCP address to
the Encoder select ‘Use these settings’ and then
enter network settings that are valid for the network
the Encoder is joining.
A DNS Server and Domain is only required if the
supplied TVI Server address is a resolvable host
name (e.g. video.server.com) and not an IP
Address.
Step 9: Mobile Network Configuration (3G only)
The Encoder requires the details of the Mobile
Network that are to be used.
The wizard already has predefined settings for most
of the major UK Mobile Operators – to use one of
these simply select your Mobile Network from the
'Predefined Settings for' list box. The appropriate
details for your Mobile Operator will then be
entered automatically.
Otherwise enter the APN, username and password
that are applicable to your Mobile Network.
The predefined settings are correct as of January 2009 and may be changed by the
Mobile Operator at any time. Please confirm with your Mobile Operator that the
predefined settings entered are correct.
It is also possible to select which network technology the Encoder should use. The Encoder’s
internal 3G modem supports HSDPA (3G) and EDGE (GPRS). The Encoder can be configured to
auto-switch between 3G and GPRS. However due to the variety of different network conditions
encountered, auto-switching in marginal signal areas may result in an Encoder that spends a
significant amount of time switching between 3G and GPRS. In this situation we recommend setting
the Encoder to GPRS Only.
Step 10: Eject Pen Drive
Once the appropriate settings have been entered hit the ‘Finish’ button to close the wizard. Follow
the given instructions on how to safely eject the USB Pen from the computer.
Step 11: Apply Configuration to Encoder
Transferring the settings from the USB Pen Drive to the Network Encoder is a process that must be
performed when the Network Encoder is powered on.
1. Plug the USB Pen Drive into the USB Socket on the Encoder.
2. If the Encoder is being configured to use the 3G modem then insert the mobile network SIM card
into the SIM slot on the front panel of the Encoder. Remember to close the SIM Lock.
3. Power the Network Encoder.
4. Watch the Status Lights - the sequence should be:
Status Lights Colour
Approx Time
Indicates
Power Only (green)
10 seconds
Powering up and booting
Animated orange lights
5 seconds
Performing update
All status lights solid green
Indefinitely
Update completed successfully
All status lights solid red
Indefinitely
Update failed
If all the status lights stay red indefinitely then there was an error transferring the settings to the
Network Encoder. Power the Network Encoder down, plug the USB Pen Drive back into your PC
and check that the settings entered were correct.
Step 12: Reset Encoder
1. Remove the USB Pen Drive.
2. After a few seconds the Encoder will reset itself.
3. The Encoder should now attempt to connect to the TVI Server.
Boot Process
When powered the Encoder will move through each of the following light sequences:
Status Lights Colour
Indicates
Flashing orange IP-Link
Initialising connection
Flashing green IP-Link
(3G Only) connecting to Network
Solid green IP-Link
Connection successfully created
Flashing orange Server-Link
Connecting to Server
Flashing green Server-Link
Handshaking with Server
Solid green Server-Link
Successfully connected to Server
Once all three phases are complete the Encoder should show three solid green lights. This signifies
that the Encoder is now connected to its Network Server.
The 3G and GPRS lights are used to signify which network technology the Encoder is currently using
to connect to the Internet:
• HSDPA/3G illuminates green when HSDPA is in use, orange when 3G is in use
• EDGE/GPRS illuminates green when EDGE is in use, orange when GPRS is in use
If any red lights come on during the boot process or there are less than three green lights showing
after 90 seconds then a problem has occurred. The table below describes some of the common
problems that may occur:
Lights
Problem With
Reasons for Not Proceeding
No lights on
Power
• Encoder is not plugged in or is not switched on
• There is a problem with the power supply
Power (green)
No other lights
Initialising the
Encoder
• Possible problem with Network Encoder
hardware
• Corrupt firmware
IP-Link (solid red)
SIM Card
• SIM Card not detected
IP-Link
(flashing red)
Creating Network
Connection
• The network cable is not plugged in
• The Router is not powered
• The network settings are incorrect
• The Encoder is not getting a DHCP address
• Incorrect Mobile Settings
Server Link
(solid red)
Unable to connect
to Server
• The Server is not running
• The Server address is incorrect
• There is a firewall blocking access to
the Internet
Server-Link
(flashing red)
Server Rejected
Connection
• The encryption pack is wrong
• The supplied Encoder password is wrong
• Existing Encoder with same name on Server
Alternating between
red 3G light and
red GPRS light
Mobile signal
strength
• No 3G or GPRS signal detected
Fault Checklist
After 30-90 seconds (depending on the communications device) the Network Encoder should be
fully powered and connected to the Network Server.
If this has not happened then please check:
• The network settings on the USB Pen Drive are correct.
• The settings on the USB Pen Drive have been applied to the Network Encoder (Step 11 in
Configuring the Network Encoder).
• All the cables have been plugged in.
• The Internet connection that the Network Encoder is using is working correctly (if using the LAN
connection type).
• There is a mobile/satellite signal and that it is strong enough to maintain a full data connection
(if using the internal 3G modem or a satellite modem).
• If there is a firewall blocking access between the Network Encoder and the Network Server then
check that the necessary ports are open (see below).
• The Network Server is running.
Firewall Ports
The Encoder does not require any inbound ports opened on a firewall but will make outbound
connections to the server on the following ports:
• TCP port 9300
• TCP port 9301 (if using encryption)
• UDP ports 2048-2148
Network Encoder Connectors
Video In: Composite video cable
RS232: Provides RS232 data connectivity for connection to a DVR and certain types of PTZ camera.
3G/GPRS Antenna (RF): Antenna or antenna cable with an SMA connector.
Power: 12V DC power supply
Audio In/Out (stereo): DIN connector cable
common audio ground
right - in
out - right
left - in
out - left
Figure 3: Audio DIN Connector
I/O Terminal (RS485/422/Alarm/DC): Provides RS485/422 data connections, an alarm input
connection and an additional DC power input.
1
2
3
4
5
6
7
8
Alarm
Input
RS485 /422
9
10
Power
Input
Figure 4: I/O Terminal
The RS485/422 connectors can be used to drive PTZ cameras or operate camera relays. The cable
for connecting PTZ cameras will depend on the make and model of camera. Consult the camera
documentation and the table below to produce a suitable cable.
PIN
Description
1 (leftmost)
RS485/422 GND
2
RS485/422 Transmitted + (or B)
3
RS485/422 Transmitted – (or A)
4
RS485/422 GND (optional)
5
RS422 Received +
6
RS422 Received -
7
Alarm Trigger Input
8
Isolated GND for Alarm Input Trigger
9
Power Input
10 (rightmost)
Power GND
Specification
Off: 0V – 2.5V DC
On: 4.5V – 36V DC
0V – 36V DC
NOTE:
• Depending on manufacturer interpretation of RS485/422 standards the Transmit and Receive lines
may have the polarity reversed.
• The Network Encoder can be powered via the 12V DC Power Input jack or through screw terminal
pins 9 and 10.
Do not use both power inputs simultaneously.
Further Information
Information on using the Encoder and viewing video streams can be found on the Product CD that
accompanies this unit or online via http://support.essential-viewing.com/support.
Contact Details
Further information on the installation and operation of the TVI C300 Encoder is
available online at http://support.essential-viewing.com/support
You can also contact us by telephone or via our website at the following address:
Essential Viewing Ltd
Hillington Park Innovation Centre
1 Ainslie Road
Glasgow
G52 4RU
Tel: +44 (0)141 585 6370
Fax: +44 (0)141 585 6369
Email: [email protected]
www.essential-viewing.com