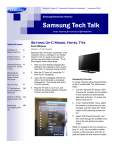
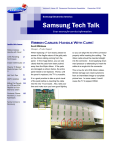
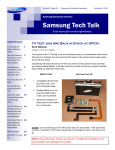
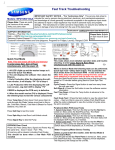
1
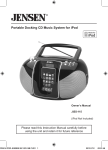
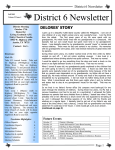
Volume 4, Issue 6 Home Appliances Newsletter June 2010 Samsung Electronics America Samsung Tech Talk Your source for service information Setting 2010 TV Option Bytes After Replacing a Main TV Board Inside this issue: Setting 2010 TV 1 Option Bytes After Replacing a Main TV Board Fixing 3D? It’s Easy! 2 Plasma TV Troubleshooting 101: No Video, But Audio OK 3 Scott Whitman Manager, Product Support If you have replaced a main board on a 2010 Samsung TV, you probably have already seen this popup window when powering on a customer’s TV. UNC9000 Techni- 5 cal Training—NOW! R232 Basics for Samsung TVs 6 Hot Tech Tips 7 Redo Tech Tips: 10 The UNB8000Series New RSE in the Western Zone 10 Maximizing Cus10 tomer Satisfaction Servicing the New UN9000 LED TV 11 Introducing the Online Service Center 12 2010 TV Training 15 Samsung’s Product Crossword 16 Adjust the settings is straightforward. The values are listed on GSPN under the repair tips sub-heading. But there are two things you should know and understand about the values and their effects. First of all, when setting the panel code, be aware that the settings do not take effect until you power cycle the TV. By changing just one setting, ―Panel Code‖, you are changing all of the option byte settings that match the panel. Therefore, a power cycle is required to ―boot‖ the new settings into operation. Second is the ―Front Color Option‖ which lets you select the bezel color of a TV. Lets briefly examine what this is and then you will understand the true importance of setting it correctly. New for this year is ―Eco‖ control. Unlike past years, in which the TVs main- tained the same picture look under changing ambient light by controlling the brightness, contrast, and color, the 2010 TVs control only the backlight. This directly effects the power consumption of the TV. As with past models, this ―picture look‖ process is controlled by a feed from a light sensor mounted behind the front bezel. The twist in 2010 is that the 2010 TVs have various colored bezels and the different color bezels impact the light sensor’s operation. For example, the light sensor in a model with a black bezel will sense a different light spread than a model with a TOC bezel. Because many Samsung TVs share the same Main Board, but have different colored bezels, we have added the Front Color Option to the options you set after replacing the main board. When you select the correct bezel type, the ―picture look‖ process functions correctly. However, setting the ―Front Color Option‖ to the wrong bezel type causes the TV to react incorrectly to changes in ambient light. Although this error might appear small, it could very well lead to another call by the customer to 1-800-Samsung and therefore a Redo. Volume 4, Issue 6 Home Appliances Newsletter Samsung Tech Talk Fixing 3D? It’s Easy! Michael Vigliotti Product Support 3D TVs and glasses may appear to be difficult to fix, but, in reality, if 3D starts to fail, most of the time there’s just a few things that could be wrong. In this article, we will show you how easy it is to troubleshoot 3D TVs and glasses and how to do most of your troubleshooting without even replacing any parts. To start with, you need to test the TV’s main board to see if it is working correctly. You can do this easily by accessing the TV’s menu system, and then adjusting the 3D depth. Set the TV to a regular channel, and then press the 3D button (on some remotes) or access 3D through the menu (Menu → Picture →3D, and then switch 3D from ―Off‖ to ―On‖). Next, select 2D to 3D, then select the Depth option and increase the depth to 10. If you see a distinct double image, you can assume the TV’s main board is working correctly - all without taking the TV’s back cover off. Even if the main board is working correctly, the TV could still have a problem. There is an IR emitter located in the TV that could be malfunctioning and preventing the customer from seeing the ultimate 3D experience. To test the emitter, enable the 3D function, then take a digital camera and focus on the lower left hand corner of the TV screen. If you see a red light blinking, you know the emitter is working properly. If the TV’s main board and the emitter are working properly, it is safe to assume that there are no obvious problems with the TV and you should begin troubleshooting the glasses. The glasses are easy to troubleshoot once you understand exactly how they operate. There is just one button on the glasses and one indicator light. Depending on how the indicator is blinking, you can tell exactly how the glasses are functioning: 0 blinks – means the batteries are dead. Replace or recharge the batteries accordingly. 1 blink - means the glasses are turned on and Page 2 should be working correctly. 3 blinks – means the glasses are turned off and you will not see 3D. If the TV is working correctly and the glasses are turned on correctly and you are still not seeing a 3D image, it is possible that the glasses are not working correctly. We recommend trying another set (if possible). We also recommend that you carry a few extra CR2025 batteries in your truck. They are very inexpensive and customers can forget that these batteries are only rated for 30 hours of 3D viewing. If the TV and glasses are working correctly and the customer is not satisfied with his/her 3D viewing experience, then this could be a customer education issue. It is important to note that currently (May, 2010), there is only one Native 3D disc available on the market and that is ―Monsters vs. Aliens 3D‖. This disc has the ―Bluray 3D‖ logo and only discs with this logo will play native 3D. We bring this to your attention because only discs filmed (or in this case drawn) in native 3D will give you those amazing pop out and WOW effects that you see when watching a 3D movie in a movie theater. If the customer is mainly using 2D to 3D conversion, then he/ she will only see depth to the image. This is normal operation and as more 3D content becomes available, this problem will become less of an issue. Please Send Us Your Comments! Something you’d like to see in the Samsung Tech Talk Newsletter? If there is a topic/issue we haven’t covered that you’d like to see, LET US KNOW! Please send your comments to: [email protected] Volume 4, Issue 6 Home Appliances Newsletter Samsung Tech Talk Plasma TV Troubleshooting 101: No Video, But Audio OK Adam Vogel Product Support Often when you face the ―No video, but audio is ok‖ symptom, you can easily find yourself guessing, or simply ―throwing parts‖ at the problem in order to solve it. This practice can be detrimental in many ways! Cost of repair skyrockets because of all the parts needlessly replaced, the chances of redo dramatically increase, and your first time fix rate decreases as well. If you remember back to your early training days, I’m sure whoever the trainer was told you to use all five of your senses: listen, ―carefully‖ touch, smell, look, and, OK, maybe not taste in this case. The same rules still apply for today’s troubleshooting processes. In fact, I’m going to share a valuable tool that simply involves your eyes (and a couple of LEDs)! NORMAL INDICATOR LED OPERATION First, let me explain how indicator LEDs normally operate on a Plasma TV logic board. Under normal operation (non-defective TV), the LED circled in red blinks rapidly (at least once per second). The LED in circled in blue remains unlit. INDICATOR LED OPERATION IF THERE IS A MALFUNCTION Here’s what happens if something goes wrong: When there is a malfunction, the LED circled in red remains unlit. The LED circled in blue blinks approximately once every ten seconds. Page 3 Volume 4, Issue 6 Home Appliances Newsletter Samsung Tech Talk Plasma Troubleshooting 101: No Video But Audio OK continued Now that you know how the indicator LEDs work, here are the steps you can follow to determine if the Y or X main boards are the source of the problem: 1. Remove the AC power cord. 2. Remove the flat ribbon cable running from the Logic board to the Y-main board. 3. Reinsert the AC power cord. 4. Test: Did the LEDs on the logic board return to normal blinking operation? IF YES: There is a defect on the Y-main. Replace accordingly. IF NO: Remove the AC power cord, and then go to the next step. 5. Reinsert the flat ribbon cable to the Y-main. 6. Remove the flat ribbon cable running from the Logic board to the X-main board. 7. Reinsert the AC power cord. 8. Test: Did the LEDs on the logic board return to normal blinking operation? IF YES: There is a defect on the X-main. Replace accordingly. IF NO: The problem does not lie on the Y or X-main boards. RECAP Basically, the logic board LED can easily show you if the Y-main and/ or X-main boards are the cause of a ―no video, but audio is ok‖ issue. By simply removing the flat ribbon cables and cycling the power, you can pinpoint the exact board causing the issue and fix it right, without guessing, and most importantly, fix it the first time! Page 4 Volume 4, Issue 6 Home Appliances Newsletter Samsung Tech Talk UNC9000 Technical Training – NOW! UNC9000 A revolutionary design in TV construction! A revolutionary design in Remote Control functionality! Servicer nightmare? No, not really! Relocation of the main board and power supply to the base only changes the method of testing, not the testing itself. Understanding how the TV functions directly relates to successful repairs. Over the next few months, the Product Support department will be providing technical education classes, both hands -on, and over the Internet, covering both the basics and the 2010 product. Registrations are being sent out NOW! Page 5 3” LCD Touch Screen Remote Control Volume 4, Issue 6 Home Appliances Newsletter Samsung Tech Talk RS232 Basics for Samsung TVs Scott Whitman Manager, Product Support Samsung TVs use the basic one-way functionality of RS232 control via the ―ex-link‖ port. This means you can send a command to the TV to perform a function, but there is no ―Status‖ return request from the TV available. The TV’s control is also limited to basic commands such as discrete power on and off, direct source change with channel, and volume control. The command structure is a 7 byte string including a check sum for error detection. See the table below. Byte1 0x08 Byte2 Byte3 Byte4 Byte5 Byte6 Byte7 0x22 Cmd1 Cmd2 Cmd3 Value CS The first two bytes are required as shown and should not be changed. Bytes 3 through 5 are the command bytes. The command bytes define the function to be controlled by the ―Value‖ byte. The 6 th byte or ―Value‖ byte sets the value of the function defined by bytes 3 through 5 (Cmd1 through 3). For example, the power ―Off‖ command uses 0x00 (Power) for each of the three command bytes and 0x01 (Off) as the ―Value byte. See the first entry in the table below. Byte 7 uses a check sum to verify the validity (i.e. error) of the command string. This is calculated by taking the 2’s compliment of the command string. In the example above, the CS byte 7 is 0xE0. Control Item Power Volume Mute Power Cmd1 Cmd2 Cmd3 Value 0x00 0x00 0x00 0x00 Off 0x01 On 0x02 Direct 0x00 0x00 (0-100) Up 0x00 Down 0x01 0x02 0x00 0x00 0x00 RS232 coding is used by various hardware control devices from companies such as Crestron or Extron. Samsung also used RS232 code to control the auto wall mount sold in previous years. For more information and access to an application that validates the functionality of the ex-link port, email [email protected]. Samsung Electronics America 105 Challenger Road Ridgefield Park, NJ 07660 The information in this newsletter is published for experienced repair technicians only and is not intended for use by the public. It does not contain warnings to advise non-technical individuals of possible dangers in attempting to service a product. Only experienced professional technicians should repair Phone: 201-229-4251 products powered by electricity. Any attempt to service or repair the product or products dealt with in this information by anyone else could result in serious injury or death. Information provided in this bulletin is subject to change or update without notice. Page 6 Volume 4, Issue 6 Home Appliances Newsletter Samsung Tech Talk Hot Tech Tips Jorge Tavora Product Support Manager/Tech Support Hotline/Triage Model: UN46C9000ZFXZA, UN55C9000ZFXZA Symptom: Customer states the touch panel / slide key is not coming out of the TV. Example: Wall mount view with the base installed. This problem is resolved by turning ON "Slide Key" in the menu settings. Ask the customer to: 1. Press Menu on their remote control. 2. Go down to Set Up. 3. Select General. 4. In the General screen (shown below), find the fourth setting, called 'Slide Key'. Select it, and then change the setting from 'On' to 'Off' using the up key. Immediately after, change the setting back to 'On' using the down key. 5. Once the customer has turned 'Slide Key' 'On', ask the customer to press the 'Exit' button. Slide Key will now work. Page 7 Volume 4, Issue 6 Home Appliances Newsletter Samsung Tech Talk Hot Tech Tips Continued Model: UN55B6000VFXZA Symptom: Distorted and violet or pink smear across top. Cure: Ask the customer to check the OSD menu. If the distortion affects the menu, change the panel. Tip: Before going, call the customer and ask the customer to bring up the menu to see if the distortion affects the menu. Model: UN32B6000VFXZA Symptom: Circles on the screen. Cure: Change the aspect ratio (P.Size),. If the circle remains in the same spot, change the panel. You can also check the internal test patterns. If it shows up, change the panel. Tip: Before going, call the customer and ask the customer to change the aspect ratios to see if the circle remains in the same spot. Page 8 Volume 4, Issue 6 Home Appliances Newsletter Samsung Tech Talk Hot Tech Tips Continued Model: LN46B610A5FXZA Symptom: When the unit is first powered on, the symptom can barely be seen. Over time, vertical lines appear, running through picture. Cure: As you can see in this example, the OSD is affected. Replacing the T_CON and the LVDS cable will NOT cure the problem. The panel is the problem. Tip: Before going, call the customer and ask the customer to bring up the menu to see if the lines affect the menu. Model: LN52B750U1FXZA Symptom: There are two vertical black lines. Cure: Check the OSD menu. If it affects the menu, change the panel. Tip: Before going, call the customer and ask the customer to bring up the menu to see if the lines affect the menu. Page 9 Volume 4, Issue 6 Home Appliances Newsletter Samsung Tech Talk Redo Tech Tips: The UNB8000 Series Maximizing Customer Satisfaction Scott Whitman Scott Whitman Manager, Product Support Manager, Product Support Symptom 1: Intermittent power off and then back on without an audible melody. 1. Contact the customer personally to introduce A quick way to troubleshoot this problem is to rotate the TV on its swivel base quickly to the end of rotation while the TV is powered on. If the TV turns off, then the problem is in the cable harness that routes along the bottom of the bezel. Replace the entire bezel. Below: The cable harness. yourself and to verify the problem a. Even though Samsung or your own service manager has communicated with the customer, it is a good practice for you to talk directly to the customer too. b. You may recognize the problem as a simple ―phone fix‖. Or you may realize you need different or additional parts already ordered and therefore may need to delay the call until the parts arrive. c. Most customers would prefer to ―change‖ their schedule instead of having to take an additional day off from work. 2. When you arrive on site, allow the customer to show you the problem. a. If the customer hands you the remote control, Symptom 2: There is a repeated failure to pair the RF remote control to the TV (The IR remote worked OK). instruct them to show you instead. Sometimes the problem may just be an operations issue. You replace and/or paired the RF remote again, but the unit fails again within days. Early production LED TVs that used an RF remote control module exhibited this symptom. Replace the RF module located in the TV. Once the RF module is replaced, pair the RF remote to the TV and test for proper operation. b. This also reinforces with the customer that you New RSE in the Western Zone Nelson Diaz and David Stiltz Western Zone RSEs The big news, besides the Zone realignment in late April, is the new RSE in our zone. David Stiltz joined the Samsung Field Service Team in late March. Going forward, the two of us (Nelson Diaz and David Stiltz) will be serving as your RSEs. From David: It will be a pleasure and honor to work with all of the servicers in the Western Zone. I have received a lot of emails and phone calls congratulating me on my new position with Samsung. I will be traveling throughout the Zone starting in June and I hope to be meeting with each of you in the near future. Page 10 did see and understand the problem 3. Record connections made to the TV. a. A simple drawing for minor connections. b. Better yet, using a digital camera, take a photo. This gives you an exact image. Keep this on file so you know how this customer has their TV connected for any future issues. 4. Do not change parts if you do not see the symptom a. If you don’t see the problem, you are only guessing. Also, if you do elect to replace parts, it creates the impression that there is in fact a problem with the TV which may not be true. b. Change parts or perform a firmware upgrade only if you are 100% sure that this will correct the problem. 5. Use signal substitution before removing the back a. This should be done on 100% of your service calls. Volume 4, Issue 6 Home Appliances Newsletter Samsung Tech Talk Maximizing Customer Satisfaction Servicing The New UN9000 LED TV continued Scott Whitman Manager, Product Support b. A reference signal will always be your best service tool, so know your tools. Know what to expect with your reference signal and increase your service efficiency. 6. When laying a TV down on its front, lay it on a clean pad or blanket. a. This prevents damage to the screen and bezel. b. Eliminates possible damage to customer’s home, including tables and carpet or wood flooring 7. Lay all tools you use or intend to use on a blanket or pad. a. Eliminates possible damage to customer’s home, including tables and carpet or wood flooring. b. It shows the customer you respect and care about their home and possessions. 8. Only replace the defective part. a. Replace the original board at the end of the re- If you haven’t already seen one, the UN9000 LED TV is just short of terrific. But this article isn’t about how great it is; rather, it is about how to service the new design TV. Over the next few months, I will show you some of the different troubleshooting methods required to repair the UN9000 efficiently. First of all, this TV uses an ultra-thin LED panel containing only the IR transmitter for the 3D, the IR receiver for the IR remote control function, the T-Con, and the interface docking station. All of the other major components (main, power supply, and speakers) are located in the base unit under the stand. One unique design item is the interconnect method used between the panel and the base unit. Located on the rear of the panel is a multi-pin connector that mates both to the base back support (when using the stand) or to the base module (when wall mounting the TV). Docking connection on the panel pair only if you are sure that replacing the board will correct the problem. Remember only one board will generally fail. b. If you replace a working board with a new board unnecessarily, it could just set you up for a Redo later 9. Clean the bezel and screen of any fingerprints. a. Use a blue Samsung cloth to clean the surfaces. Some service centers supply these to the customer as a ―WOW‖ factor. 10. Allow the customer to verify the problem has been corrected. a. Just as you did when you arrived, give control to the customer and allow them to verify the problem has been taken care of. b. Be positive and express how good the picture is and ask them if they agree. 11. Pack your tools and re-install the TV. a. Clean your area making sure not to leave any items behind. This includes not only tools, but dirt and/or debris. To replace the panel or to gain access to the T-Con or docking station on the panel, you need to remove the stand assembly. The screws on the back of the panel that attach the stand assembly are hidden behind a snap-on plastic cover. To remove the cover, pry the bottom of the cover away from the panel. There are plastic tab hangers at the top, so as you’re pulling the bottom away from the panel, lift up and away to remove the cover. Next month: Troubleshooting the base unit. Page 11 Volume 4, Issue 6 Home Appliances Newsletter Samsung Tech Talk Introducing the Online Service Center Jorge Tavora Product Support Manager/Tech Support Hotline/Triage Samsung’s On-Line Service Center is up and running. Here’s how to access the Center with a look at all its important pages. Log into GSPN Click ONLINE SERVICE CENTER Page 12 Volume 4, Issue 6 Home Appliances Newsletter Samsung Tech Talk Introducing the Online Service Center continued Product Category and Symptom codes Follow the repair scenario and order the parts recommended. Make sure you know the version of the unit first before ordering parts. If the primary part replaced takes care of the problem, the secondary parts need to be sent back to GPCA or vice-versa. OSC Link for Service Tickets Follow the repair scenario and order the parts recommended. Online Service Center link Page 13 To save you time when you use the OSC in the ticket screen, the system automatically populates the Model code and Symptom codes. Volume 4, Issue 6 Home Appliances Newsletter Samsung Tech Talk Introducing the Online Service Center continued Triage Decision Tree Follow the repair scenario and order the parts recommended. Make sure you know the version of the unit first before ordering parts. If the primary part replaced takes care of the problem, the secondary parts need to be sent back to GPCA or vice-versa. 7. 6. 8. 5. 1. 4. Refrigerator 3. Washer 2. PDTV LCDTV Across 1. Bluray Dryer Camcorder HomeTheater DigitalCamera LEDTV Down Crossword Answers Page 14 9. Choose the Product Category and Symptom Codes Volume 4, Issue 6 Home Appliances Newsletter Samsung Tech Talk 2010 TV Training Samsung Training Tour 2010 Coming to a city near you! Samsung has introduced a new concept in training and service: A mobile training facility. The mobile training facility will travel around the country providing hands-on training on new products, and troubleshooting and repair procedures. Local authorized service centers will receive an invitation by email automatically. Please keep your ASC profile up to date so you can receive the most up to date training details. Be advised that we invite all ASCs within a 50 mile zip code radius of the training location. You may be invited to more than one training city. You can reserve your seat in training by emailing [email protected]. You can always obtain the most up to date training list by sending an email to [email protected]. Additionally, TV training is available on-demand 24/7 at https://my.plus1solutions.net/clientPortals/samsung/ Date City Comments June 2, 2010 Houston, TX Training Bus June 3, 2010 Pflugerville, TX Training Bus June 8, 2010 Plano, TX Training Bus (Dallas area) June 10, 2010 Tulsa, OK Training Bus June 15, 2010 Olathe, KS Training Bus June 17, 2010 St. Louis, MO Training Bus June 22, 2010 West Dundee, IL Training Bus June 29, 2010 Minnetonka, MN Training Bus Page 15 Samsu ng El ect ronics Am eric a Samsung Electronics America SAMSUN G’S Vale ntine ’ s Da y Se arch SAMSUNG’S Product Crossword Name the Samsung product that matches the function or feature named in the clue. For example: Clue — ECO Power Management System; Answer — Home Theater. 1 2 3 5 6 7 8 9 Down Across 1. Auto-motion Plus (2 words) 1. Ultra thin (2 words) 5. 600 Hz subfield (2 words) 2. AF Function (2 words) 8. VRT 3. SRS (2 words) 9. Twin cooling 4. Smart OIS 6. NSF-Sanitized Certified 7. Video Streaming Answers are on page 14. Page 16 4