1
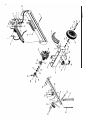
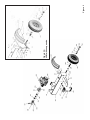
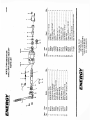
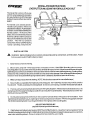
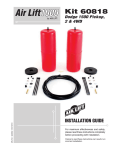
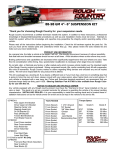
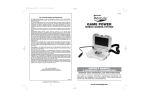
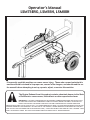
Operator's Manual
LSM75BVG, LSM55H, LSM80H
WARNING: READ ENTIRE MANUAL BEFORE ATTEMPTING TO OPERATE MACHINE!
If incorrectly used this machine can cause severe injury. Those who use and maintain this
machine should be trained in its proper use, warned of its dangers, and should read the entire manual before attempting to set up, operate, adjust, or service this machine.
The Engine Exhaust from this product contains chemicals known to the State
of California to cause cancer, birth defects or other reproductive harm.
IMPORTANT: THIS UNIT IS EQUIPPED WITH AN INTERNAL COMBUSTION ENGINE AND SHOULD NOT
BE USED ON OR NEAR ANY UNIMPROVED FOREST-COVERED, BRUSH-COVERED, OR GRASS-COVERED LAND UNLESS THE ENGINE'S EXHAUST SYSTEM IS EQUIPPED WITH A SPARK ARRESTER
MEETING APPLICABLE LOCAL LAWS (IF ANY). IF A SPARK ARRESTER IS USED, IT SHOULD BE MAINTAINED IN EFFECTIVE
WORKING ORDER BY THE OPERATOR. IN THE STATE OF CALIFORNIA, A SPARK ARRESTER IS REQUIRED BY LAW (SECTION 4442 OF THE CALIFORNIA PUBLIC RESOURCES CODE). OTHER STATES MAY HAVE SIMILAR LAWS. FEDERAL LAWS
APPLY ON FEDERAL LANDS. SEE YOUR AUTHORIZED SERVICE CENTER FOR A SPARK ARRESTER.
2
Important Rules for Your Safety
Before operating this machine read all the instructions for safe operation, as well as,
the instructions governing the engine and other components of this machine.
TRAINING
• Read the Owner's Manual carefully. Be thoroughly
familiar with the controls and the proper use of the equipment. Know how to stop the unit and disengage the controls quickly.
• Never allow children to operate the equipment. Never allow adults to operate the equipment without proper instruction.
• Operators should be mature enough to understand the
dangers of the equipment.
• Never use your log splitter for any other purpose than
splitting wood. Misuse can cause serious injury or death.
PREPARATION
• Always wear safety shoes. A dropped log can seriously
injure your foot.
• Keep the area of operation clear of all persons, particularly small children and pets.
• Do not operate the equipment without wearing adequate
outer garments.
• Loose clothing or jewelry may be caught by moving parts
on the machine or by the surrounding environment and
cause serious injury.
• Keep clothing away from all moving parts of your log
splitter. Wear proper head gear to keep hair away from
moving parts.
• Wear safety goggles to protect eyes from any debris or
objects that may be thrown from the splitter.
• Always wear protective hearing devices as needed.
• If you wear gloves, be sure they are tight fitting without
loose cuffs or draw strings.
• Handle fuel with care. It is highly flammable.
• Use only an approved fuel container.
• Never add fuel to a running engine or a hot engine.
• Fill fuel tank outdoors with extreme care. Never fill fuel
tank indoors.
• Replace gasoline cap securely and clean up spilled fuel
before starting.
• Never attempt to make any adjustments while the engine
is running (except where specifically recommended by
manufacturer).
• Do not operate splitter until you are familiar with all controls and safety symbols.
• Never operate your log splitter on slippery, wet, muddy, or
icy surfaces. Safe footing is essential to safety.
• Operate your log splitter on level ground only. It could tip
over. Rolling logs or poor footing could cause an accident.
• Always block wheels to prevent movement during operation.
• Never attempt to move the log splitter over hilly or uneven terrain without a tow vehicle or adequate help.
OPERATION
• Prepare logs properly. Both ends of each log should be
cut as square as possible to help prevent the log from riding out of the splitter during operation.
• Only operate the log splitter from the operator zone.
• NEVER place hands or feet between log and splitting
wedge or between log and ram during forward or reverse
stroke. To do so may result in crushed or amputated fingers, toes, or worse. You could lose an arm or foot.
• Never straddle the log splitter when using it. A slip in any
position could result in a serious injury.
• Never try to split two logs on top of each other. One may
fly out and injure you.
• Never allow one person to operate the valve while another is positioning log, as serious injury could result from
starting operation with the hands near the ram or wedge.
• Never operate the splitter indoors where exhaust from
engine can collect. It contains carbon monoxide which is a
tasteless, odorless, poisonous gas.
• Don't step over log splitter when the engine is running.
Walk around.
• Take all possible precautions when leaving the machine
unattended. Stop the engine.
• Never attempt to load your log splitter when the ram is in
motion. You may get caught by the ram and be injured.
• If the splitter should start to vibrate abnormally, stop the
engine and check immediately for the cause. Vibration is
generally a warning of trouble.
• Only use your hand to operate the control lever. Never
use your foot or a rope or any other extension device. This
could result in your inability to stop your log splitter quickly
and cause an injury.
• Do not put hands or feet near moving parts.
• Always keep fingers away from any cracks that open in
the log during splitting operation. They can quickly close
and pinch or amputate your fingers.
• Never move the log splitter while the engine is running.
• Operate equipment only in a well lit area. Do not use
splitter after dark without artificial light.
• Never operate equipment when under the influence of
drugs, alcohol, or prescription drugs which could cause
drowsiness or poor judgement.
• Keep work area clean. Immediately remove split wood
around your log splitter so that you do not stumble on it.
• Split wood with the grain. Do not attempt to split across
the grain.
ASSUMPTION OF RISK: THE OWNER AND/OR OPERATOR OF THIS LOG SPLITTER ASSUMES ALL THE RISKS
INCIDENT TO AND ARISING OUT OF THE OPERATION OF THIS MACHINE. BEFORE OPERATING THE LOG
SPLITTER, READ ALL THE INSTRUCTIONS GOVERNING THE ENGINE AND THE SPLITTER.
3
Safety Information continued from page 2
MAINTENANCE
• Keep machine in good working condition.
• Do not alter your log splitter in any manner. Such alterations could cause your splitter to be unsafe.
• Before cleaning, repairing, or inspecting the machine,
shut off the engine and make certain all moving parts have
stopped. Disconnect spark plug.
• Follow the recommendations for maintenance described
in this manual and the engine literature.
• Store gasoline only in an approved container.
• Never store machine with fuel in the fuel tank inside a
building where open flame or spark are present. Allow
engine to cool before storing in any enclosure.
• Frequently check all bolts and other connectors for
proper tightness before operating the equipment.
• Replace safety decals as needed.
TOWING SAFETY
• Never tow your splitter at road speeds unless it is
equipped with a suspension package.
• Obey all state and local regulations when towing on public roads and highways.
• Before towing, be certain that the splitter is correctly and
securely attached to the vechicle. Attach the safety chain
with slack for turning allowance.
• Don't allow anyone to sit or ride on your log splitter.
They can easily fall off and be seriously injured.
• Before using your log splitter, disconnect it from the towing vehicle. A log can easily be pushed forward onto the
vehicle.
• Never carry any cargo or wood on your log splitter. It
may fall off and injure bystanders.
PREVENT FIRE
• NEVER operate your log splitter near a flame or spark.
Hydraulic oil and gasoline are flammable and can explode.
• Don't fill the gas tank while the engine is hot or running.
ASSEMBLY
Allow the engine to cool before refueling.
• Never smoke while operating or refueling your log splitter.
Gas fumes can easily explode.
• If gasoline is spilled move machine away from the area of
the spill and avoid creating any source of ignition until the
spilled gas has evaporated.
• Take a class B fire extinguisher with you when operating
your log splitter in dry areas as a precautionary measure.
• COMPLETELY drain the fuel tank prior to storage. This
guards against accumulation of fuel fumes which could
result in a fire hazard.
HYDRAULIC SAFETY
• The hydraulic system of your log splitter requires careful inspection along with the mechanical parts. Be sure
to replace frayed, kinked, cracked or otherwise damaged
hydraulic components.
• Fluid escaping from a very small hole can almost be
invisible. Do not check for leaks with your hand. Escaping
fluid under pressure can have sufficient force to penetrate
skin, causing serious personal injury or even death. Leaks
can be located by passing a piece of cardboard or wood
over the suspected leak and look for discoloration.
• If injured by escaping fluid, see a doctor at once. Serious
infection or reaction can develop if proper medical treatment is not administered immediately.
• Should it become necessary to loosen or remove any
hydraulic fitting or line, be sure to relieve all pressure by
shutting off the engine and moving the control handle back
and forth several times.
• Don't remove the cap from the hydraulic tank or reservoir
while your log splitter is running. Hot oil under pressure
could result in serious injury.
• The pressure relief valve on your log splitter is preset at
the factory. Do not adjust the valve. Only a qualified service technician should perform this adjustment.
1. You will need help lifting. Get help before you start.
2. Cut Bands and remove top part of crate.
3. With help lift the reservoir and engine assembly from crate and turn to rest it across the crate.
4. Install wheels. Apply a good grade of wheel bearing grease. Grease is available from any hardware store or auto
parts store.
5. Install tongue using 1/2" x 4 1/2" capscrews (Ref. 52, Figure 2) and 1/2" (Ref. 13, Figure 2) nuts.
6. Lift assembly and put on level concrete or floor.
7. Never attempt to lift Beam assembly unaided. Stand I -Beam on end. Roll reservoir assembly to standing IBeam. Attach I-Beam to reservoir assembly using 5/8" x 7 1/2" bolt (Ref. 17) and 5/8" Nylon Lock Nut (Ref. 15).
8. Lift beam into horizontal position and lock in place with lynch pin.
9. Connect hydraulic hoses. Remove 3/4" plug from reservoir. Screw in 3/4" return hose. This hose goes from the
control valve to the reservoir.
10. Remove 1/2" plastic plug from pump. Attach high pressure hose going from control valve to pump.
11. Your log splitter is shipped with only enough fluid to prevent damage with accidental starting. There is not enough
fluid to split wood. Fill hydraulic reservoir 3/4 full.
12. Fill engine with oil according to engine manual.
4
Operation
Before Starting Your Log Splitter . . .
1. Check your Log Splitter. Be sure all bolts are tight. After several hours of operating and at periodic maintenance
intervals, check all fasteners and tighten securely as required.
WARNING : YOUR ENGINE IS SHIPPED WITHOUT OIL. YOU MUST FILL THE
ENGINE WITH OIL BEFORE ATTEMPTING TO CRANK YOUR ENGINE.
2. Check oil and fill according to the engine owner's manual.
• Read Engine manual for full instructions and safety warnings.
• Place splitter on level ground.
• Clean around oil fill area.
• Remove dipstick. Wipe with clean cloth.
• Reinsert dipstick and tighten. Remove dipstick and check.
• Oil should be at FULL level.
• If oil is required, add slowly. Recheck level.
• Tighten dipstick and clean around oil fill area before starting.
3. Fill engine with clean unleaded gasoline according to the engine owner's manual.
WARNING: GASOLINE IS FLAMMABLE. USE CAUTION WHEN HANDLING OR STORING GASOLINE. NEVER FILL THE GAS TANK WHILE THE ENGINE IS RUNNING OR HOT. ALLOW THE
ENGINE TO COOL BEFORE ADDING GAS. CLEAN ANY SPILLED GASOLINE.
4.
5.
6.
7.
Check hydraulic fittings and tubing. Do not operate splitter with defective hydraulic assembly.
Check hydraulic fluid level. Do not operate splitter without hydraulic fluid.
Check the air cleaner element. Insure that the air filter is clean.
Familiarize yourself with all operating controls.
Operating Controls
1. Throttle -• To crank engine pull throttle
all the way out to the choke
position.
• To operate engine position
the throttle to the 3/4 out position.
• To turn engine off push
throttle all the way in.
Operating Handle
Beam
Log Cradle
Splitting Wedge
Splitting Ram
Hydraulic Return Hose
Hydraulic Fluid Reservoir
Tongue
2. Operating Handle -Hitch
• To split logs push handle
forward towards the front of the
splitter.
• To stop splitting action release handle.
U Bracket and Clevis Pin
Hydraulic Fluid Filter
Safety Chain
Figure 1
DO NOT ATTEMPT TO START OR OPERATE THIS SPLITTER UNTIL YOU ARE COMPLETELY FAMILIAR WITH
LOCATION AND USE OF EACH CONTROL NECESSARY TO OPERATE THIS SPLITTER. YOU MUST KNOW
HOW TO STOP THIS MACHINE BEFORE YOU START IT. EACH TIME PRIOR TO STARTING, CHECK THE
THROTTLE ASSEMBLY TO INSURE IT IS WORKING PROPERLY.
5
Starting the engine
1. Read engine owner's manual for complete starting instruction. Do not operate this Splitter without reading
the engine owner's manual.
2. Move the throttle control lever out to the START position.
3. Grasp rope handle and pull slowly until resistance is felt. Then pull cord rapidly to overcome compression,
prevent kickback and start engine.
4. Operate engine in the 3/4 throttle position.
Splitting Wood
Logs may be split in either a vertical or horizontal position. To place splitter into the vertical position. Remove
clevis pin from u-bracket on tongue (see Figure 1) and push beam into position. Reattach clevis pin.
1. Always keep hands and feet from the splitting area.
2. To prevent severe injury only one person should operate the log splitter. Any helpers or bystanders should
remain at least 10 feet from the splitter.
3. Place log up to 26" long into log cradle.
4. Standing in the safe splitting zone, push long handle forward or down. When log is split release handle.
5. For best results and safety do not attempt to split across the grain of the wood.
6. Remove pieces and place a safe distance from the splitter.
7. Reload splitter.
Maintenance
There is very little maintenance with your Maxim Log Splitter.
Follow engine manual for taking care of your engine.
Before each use . . .
1. Check oil in engine.
2. Check hydraulic fluid.
3. Check to make sure all bolts holding the engine are tight.
4. Check to insure that all hydraulic fittings are tight.
After each use . . .
Clean dust and debris from engine.
After 25 splitting hours . . .
1. Check oil in engine.
2. Check hydraulic fluid.
3. Check and clean air filter.
After 100 splitting hours . . .
1. Change hydraulic fluid.
Hydraulic Fluid
1. To check fluid
• Place splitter on level ground.
• Remove fluid check plug (See figure 1).
• Insert clean dowel or other dip stick into hydraulic fluid tank. Level should be 1/2 to 3/4 full.
• Add fluid, if needed. Use any good universal tractor grade hydraulic fluid. You should be able to find the fluid at
any Co-op, tractor supply, and many hardware stores. Do not mix different types of fluid.
• Recheck level.
2. To change fluid
• Unscrew hydraulic fluid filter (See figure 1)
• Drain old oil into an appropriate container. Dispose of properly.
• After the old hydraulic oil is drained, replace filter (Figure 4, #47a) and refill reservoir with any good quality uni
versal tractor grade hydraulic fluid.
3. To remove air from the hydraulic line
• Lift rear wheels onto a raised surface.
• Block wheels.
• Start engine.
• Move operating handles forward and backward several times until the hydraulic ram moves smoothly.
Figure 2
6
Fitting, 45 degree 1" x 3/4"
Filter and Adapter Assembly
Hydraulic Filter Only
Wheel Assembly with Bearing
Seal
Dust Cap
Lynch Pin 1/4"
Capscrew, 1/2" x 4 1/2" NC5
Capscrew, 3/8" x 4 1/2" NC5
3/8" NC Nut
Latch Bracket
Stub Pin
Lockwasher 5/8"
Nut NF, 5/8"
PTO Pin
Safety Chain
Jack Stand
Tongue
Hitch Coupler
Flat Washer, 5/8"
1
1
1
2
2
2
1
4
2
2
1
1
1
1
1
1
1
1
1
1
600219
600222
600222-A
162050
140120
140121
461488
400250
400283
443110
358911
461487
446143
443814
461489
600259
358910
358909
600205
455051
46
47
47A
48
49
50
51
52
53
54
55
56
57
58
59
60
61
62
63
64
Lockwasher, 1/2"
Nut, 1/2" NC
Return Hose
5/8" NF Nylon Lock Nut
Nut, 1/4" NC
5/8" x 7 1/2" Bolt, NF
Beam Assembly
9/16" x 3" Bolt NC5
Nut, 9/16" NC Center Lock
Race
Bearing
1" Castle Nut
Cotter Pin
5/16" Lockwasher
Capscrew, 5/16" x 1" NC
Fender
Capscrew, 5/16" x 1 1/2" NC
Engine
4
4
8
1
1
4
1
1
1
1
4
4
2
2
12
4
2
4
1
400110
446145
443116
600221
443815
443101
162049
358902
400304
444728
140119
140118
443125
461470
446136
400186
600204
400194
11
12
13
14
15
16
17
18
19
20
21
22
23
24
25
26
27
28
Capscrew, 5/16" x 1" NF
Lockwasher, 1/4"
Pump Mounting Bracket (5.5-7 hp)
Pump Mounting Bracket (8hp)
1/2" ID Coupler
4
4
1
1
1
400189
446130
600210
600211
600206
31
32
33
34
Nut, 5/16" NC
8
443106
30
29
1" ID x 13" Suction Hose
1
600314
45
44
Clip Pin Only
461460
Capscrew 1/4" x 3/4" NC
Hose Clamp
2
600257
Spacer (As Required)
Axle Spacer
2
359309
43
Clevis Pin Only
461471
2
Tank Assembly
1
358901
42
Control Valve Only
600212-B
131107
Vent Plug
1
10
3/4" x 2" Nipple
1
1
600212
9
461486
Pressure Hose
1
600220
8
600372
Elbow Adapter, 45 degree
1
600218
39
3/4" Street Ell
1
600371
7
41
2 Stage Pump
1
600223
38
Capscrew, 1/2" x 2 1/2" NC5
4
400242
5
40
Flat Washer 1/4"
4
455040
Wedge Assembly
1
358906
3
Cylinder Only
1" ID Coupler (8hp)
1
600209
37
Spacer, Wedge
2
358907
2
Cylinder w/ Control Valve
3/4" ID Coupler
1
600212-A
Coupler Spider
1
600203
Description
600208
Quantity
36
Part#
35
Reference
Lower Slide, Wedge
Description
2
Quantity
358908
Part #
1
Reference
7
Figure 3 A
LSM with suspension
65
Figure 3
8
Limited Warranty
Maxim Manufacturing Corporation, through its dealers will repair or replace any part, or parts of the
LSM75BVG, LSM55H, or LSM80H frame that is defective in material or workmanship or both. Transportation charges on parts submitted for repair or replacement under this Warranty must be borne by
purchaser. The original sales receipt must be submitted as proof of purchase date. The sales receipt
will be returned. Maxim Manufacturing Corporation assumes no liability for labor charges made in performance of this warranty.
The Warranty period is one (1) year.
The Tires and Hydraulic Tubing are not warranted because during normal service they are subject to
normal wear.
The Warranty on the Log Splitter is Void if:
A. Frame is broken or bent due to abuse.
B. Wheels are bent or broken due to impact.
C. Altering of engine or its components has occurred.
All warranties are voided if the Splitter has been altered , rented, used under abnormal conditions, or subject to abuse, misuse, neglect, or improper maintenance.
The Engine is warranted by the engine manufacturer, not by Maxim Manufacturing Corporation. See
Engine Owner's Manual for information regarding engine warranty.
Should you experience problems with your Log Splitter take it back to your authorized Maxim
dealer or distributor to make warranty claims.
Maxim Manufacturing is not liable for any damage claim or liability claim, personal or otherwise, resulting from the operation of this splitter in any way.
Maxim Manufacturing Corporation • Sebastopol, MS 39359 • www.maximmfg.com • (601) 625-7471 • 10/2005