1
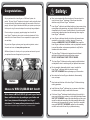
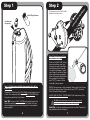
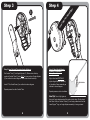
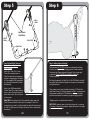
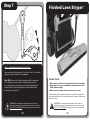
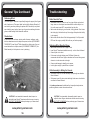
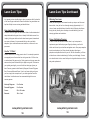
Owner ’s Manual
Visit www.patternyourlawn.com
MADE, ASSEMBLED AND PACKAGED IN AMERICA
Model No.
LM – 408111B
LM – 408111R
LM – 408111G
Patent Pending
S&B Lawn Systems, Inc.
W226N825 Eastmound Drive, Suite B
Waukesha, WI 53186-1690 USA
Copyright © 2008 S&B Lawn Systems, Inc.
Printed in the USA
Read, Understand and Follow ALL Instructions prior to use.
Lea, entienda y siga todas las instrucciones antes de usar.
MADE, ASSEMBLED AND PACKAGED IN AMERICA
S&B Lawn Systems, Inc. / W226N825 Eastmound Drive, Suite B
Waukesha, WI 53186-1690 USA / Visit www.patternyourlawn.com
Safety:
Congratulations...
•
Read, and understand all of the instructions in this manual prior to
using the Lawn StryperTM attachment. Follow those instructions
whenever using the Lawn StryperTM attachment.
•
Lawn StryperTM attaches to and follows behind your lawn mower during
normal grass-cutting operations, and should not affect the operating
characteristics of your mower. Carefully follow all of your lawn mower
manufacturer’s operating instructions and warnings when using the
Lawn StryperTM attachment.
•
Lawn StryperTM attachment should not interfere with normal mower
operations, such as cutting / mulching / bagging. If there is any
interference IMMEDIATELY SHUT OFF MOWER, then inspect the
Lawn StryperTM attachment installation, make any adjustments needed
to correct the problem, and reassess operations to verify that the
interference has been resolved.
•
The Lawn StryperTM attachment is designed to work with most
walk-behind, self-propelled and push-type lawn mowers.
DO NOT USE WITH ANY OTHER TYPE OF MOWER.
•
The Lawn StryperTM attachment must be properly installed, attached,
and adjusted in order to work along with your particular lawn mower.
•
Do not assemble, disassemble, attach, inspect, or adjust the
Lawn StryperTM attachment while the mower is running.
SHUT OFF THE MOWER before performing any of these actions.
•
Never stand on the Lawn StryperTM attachment, roller assembly,
cover, or clamps.
•
Keep hands and feet clear of the Lawn StryperTM attachment during
mowing operations.
Chance to WIN $1,000.00 Gift Card!!!
•
Install the Lawn StryperTM attachment on your mower so that it does
not interfere with your ability to walk behind the mower.
Get a chance to WIN a $1,000.00 gift card to your favorite
Home and Garden store by sending us your ‘before and
after’ lawn pictures while using the Lawn Stryper
attachment. Visit www.patternyourlawn.com for details.
•
If the Lawn StryperTM attachment should interfere with your ability to
mow around obstructions, walkways, or other tightly constrained areas,
SHUT OFF THE MOWER, remove the roller assembly, and then mow
around the obstructed area without the roller assembly attached (but
with clamp and tube assembly still in place). Once this is completed,
once again SHUT OFF THE MOWER, replace the roller assembly,
and then continue with the rest of your patterned mowing.
On your purchase of the Lawn StryperTM, a S&B Lawn Systems, Inc.
product. The Lawn StryperTM attachment is designed to easily and safely attach
to most walk-behind, self-propelled and push-type lawn mowers. When used
properly, the Lawn StryperTM attachment will allow you to pattern your lawn just
like the pros do at golf courses, landscape firms and major league ballparks.
Prior to creating an eye-popping, people stopping lawn of art with the
Lawn StryperTM attachment, make certain to read and understand all of the
instructions in this Owner’s Manual. You are responsible for proper product
use and safety.
For great Lawn StryperTM patterns, grass tips, product registration, contact
information and more visit www.patternyourlawn.com.
S&B Lawn Systems, Inc. thanks you for your purchase and we wish you and
your patterned lawn much happiness for years to come.
t Before
t
After
TM
Certain rules and regulations apply, see contest rules on website for details.
2
3
Lawn Stryper Parts View
Assembly:
TM
• TOOL Required: Phillips Screw Driver.
• Roller fills with approx. 16 to 20 lbs. of DRY sand.
(sand not included)
IMPORTANT: Work on a flat level surface – make
certain mower is NOT running.
C
B
A
I
A
B
C
K
I
J
F
F
Parts:
E
A. (2)
BSI-LNS-011
Lawn StryperTM Inner Clamp(s)
B. (2)
BSI-LNS-012
C. (2)
Lawn Stryper
TM
Outer Clamp(s)
BSI-LNS-015
Lawn Stryper
TM
Angle Adjuster(s)
D. (1)
BSI-LNS-003
Lawn StryperTM Hitch Tube
E. (2)
BSI-LNS-017
Lawn StryperTM Corner Tube(s)
F. (2)
BSI-LNS-013
Lawn StryperTM Vertical Tube(s)
G. (1)
BSI-LNS-022
Lawn StryperTM Roller Assembly
H. (1)
BSI-LNS-021
Lawn StryperTM Roller Plug
I.
2" Inch Phillips Pan Head Screw(s)
(2)
J. (2)
Hex Nut(s) – ALREADY ASSEMBLED in Inner
Handle Clamp(s), (A)
K. (4)
M5x20 Phillips Oval Head Screw(s)
E
D
G
H
CAUTION: Do not assemble, disassemble, attach, inspect, or
adjust the Lawn StryperTM attachment while the mower is running.
SHUT OFF THE MOWER before performing any of these actions.
DO NOT place clamp system over any type of existing wires/
cables that may be present on lawn mower handlebars.
4
5
Step 2
Step 1
Roller Plug Fastener
ar
This diagram shows the RIGHT-HAND
handlebar of the lawn mower.
d
er
H
Pour DRY sand
into opening.
b
le
n
Ha
ow
n
M
aw
B
L
K
A
G
Step 2: Attach Inner and Outer
Clamps to Handlebars.
e
Step 1: Fill Roller Assembly With Approximately 16 to 20 lbs.
of DRY Sand.
Completely fill Roller Tube (G), WITH SAND, via hole located on end
of tube. Once completely filled, thread and FULLY TIGHTEN Roller
Plug with provided Roller Plug Fastener.
User Tip! Failure to FULLY TIGHTEN roller plug will result in the
Roller Plug blocking the roller’s ability to turn. Failure to fill roller
with recommended amount of sand may result in a less dramatic
patterning effect.
6
D
e
UP
3
1/
UP
nc
ta
is
Within the LOWER THIRD of lawn
mower’s handlebar, place Inner
Clamp (A) on inside of handlebar
while attaching Outer Clamp (B)
on outside of handlebar. Connect
Inner Clamp (A) and Outer Clamp
(B) as outlined in above diagram.
Outer Clamp’s teeth (B) should be
facing outward. Check that the
word (KUPK), located on Outer
Clamp (B) is facing upward.
REPEAT same process on other handlebar. Make certain Outer Clamp’s
teeth (B) are facing outward. Check that the word (KUPK), located on
Outer Clamp (B) is facing upward.
INSERT AND PARTIALLY TIGHTEN M5x20 Oval Head Screws (K) as
outlined in above diagram.
DO NOT place clamp system over any type of existing wires/
cables that may be present on lawn mower handlebars.
User Tip! Line up the extended square inserts on Outer Clamp (B) for
easy attachment to Inner Clamp (A).
5
7
Step 3
Step 4
r
a
eb
I
dl
r
e
ow
n
aw
n
Ha
M
L
C
A
C
B
F
F
Step 3: Insert Vertical Tubes into Angle Adjusters.
Set Vertical Tube (F) into Angle Adjuster (C). Make certain that top
portion of Vertical Tube (F) rests FLAT on inner portion of Angle Adjuster
(C) as outlined in above diagram. Screw holes should match up.
Insert 2" Pan Head Screw (I) as outlined in above diagram.
Step 4: Attach Angle Adjuster
Assembly to Handlebar
Clamp Assembly.
Align, attach and PARTIALLY
tighten Angle Adjuster assembly
to Handlebar Clamp assembly as
outlined in above diagram.
Valco Holes
Repeat process for other Vertical Tube.
Repeat process on other handlebar.
User Tip! Do not fully tighten at
this point. Angle adjustments will be made in later steps. Double check
that Valco Holes, on Vertical Tubes (F), are facing outward and that the
Lawn StryperTM logo, on Angle Adjuster assembly, is facing outward.
8
9
Step 5
Step 6
Valco
Holes
F
Lawn Mower
Handlebars
F
Valco
Holes
Valco Pins
E
Valco Pins
D
E
3"- 4"
Step 6: Setting Angle and Height.
Step 5: Attach Hitch Tube and
Corner Tubes to Vertical
Mount System.
Attach Hitch Tube (D) to Corner
Tubes (E) by pressing down on
Valco Pins and locking into place as
outlined in diagram above. Set width
of U-bar assembly (D&E assembled)
to coincide with the width of Vertical
Bar assembly.
Swing assembly AS CLOSE to mower as possible without hitting
mower or impeding the mower bagging system*. Make certain left
Clamp and right Clamp angles are the same. Once proper angle
is achieved, FULLY TIGHTEN ALL SCREWS (6 total) with
Phillips screwdriver.
Set height of assembly, via Valco Pins, to NO LESS than 3 inches off
the ground. Make certain that heights are the same on left-hand side
and right-hand side.
Attach U-bar (D&E assembled) to
Vertical Tubes (F) by simply pressing
down on Valco Pins and locking into
place. Make certain Hitch is centered
to lawn mower.
Place protective vinyl caps (included) on threads of 2" Phillips Pan
Head Head Screws (I). Vinyl cap placement is ONLY necessary when
clamp system is attached to 7/8" handlebars. Vinyl cap placement
protects screw threads from brushing up against bagging system*.
User Tip! When setting width of U-bar assembly, make certain that
*Bagging system not supplied with all mowers.
Valco Pins are consistent on each side. For example, if Valco Pin is
coming through on hole 2 on left-hand side then Valco Pin should be set
for hole 2 on right-hand side. Doing so will ensure hitch is centered with
lawn mower.
IMPORTANT: Assembly must not be hitting the ground – a minimum
of 3 inches of clearance is needed for proper performance. Set height
adjustment to accommodate.
10
11
Step 7
Finished Lawn Stryper
TM
G
D
Step 7: - Attach Roller Assembly to Hitch Tube.
Attach sand filled Roller Assembly (G) onto Hitch Tube (D) by vertically
sliding onto hitch as outlined in above diagram.
User Tip! When you don’t want the patterning effect, or perimeter
cut is necessary, or when there are obstructions such as fence
line, retaining wall, or other objects, remove Roller Assembly (with
mower turned off) while keeping tubing and clamp system intact
(see helpful tips on page 16).
Double Check:
• Make certain stride does not impede with the roller assembly.
• Make certain Lawn StryperTM attachment is adjusted to the correct
height, width and angle.
• Make certain all clamps, tubes and screws are secure.
Additional width, height and angle adjustments may need to be made based
upon personal preference. Use previous guidelines for reference if adjustments
need to be made.
CAUTION: Do not assemble, disassemble, attach, inspect, or
adjust the Lawn StryperTM attachment while the mower is running.
SHUT OFF THE MOWER before performing any of these actions.
12
CAUTION: Do not assemble, disassemble, attach, inspect, or
adjust the Lawn StryperTM attachment while the mower is running.
SHUT OFF THE MOWER before performing any of these actions.
13
Lawn Stryper™ Warranty:
General Tips:
S&B Lawn Systems, Inc. shall repair any Lawn StryperTM attachment, when
used for residential use*, if defective in materials or if it ceases to function due
to a failure of it’s components. S&B Lawn Systems, Inc. will repair or replace,
at it’s sole discretion, a defective Lawn StryperTM unit. Owner is responsible
for shipping costs. The following time periods, for warranty, apply from date
of purchase:
Visual results may vary based upon health of grass, length of grass, available
sunlight and seasonal conditions. A less dramatic patterning effect can be a
result of insufficient sunlight, dormant grass, unhealthy grass, or when used on
warm-season grass such as Bermuda and St. Augustine.
Money-Back Guarantee:
Parts and Accessories:
30 Days
45 Days
Please visit www.patternyourlawn.com for obtaining warranty service or by mail to:
Cutting Perimeter:
Cut perimeter of grass plot once or twice. Doing so will allow for a consistent
turning area and a clean patterning path.
S&B Lawn Systems, Inc.
W226N825 Eastmound Drive, Suite B
Waukesha, WI 53186-1690
Change Mowing/Pattern Design:
Must include original date of purchase information, copy of invoice/receipt and
return mailing address.
‘Line of Sight’ – Admiring Your Patterns:
*Residential Use equates to the use of product solely at owner’s personal residence. Use of product
on more than one location, or to generate income, is considered commercial use. This product in not
intended for commercial use.
Owner Responsibilities:
You must maintain your Lawn StryperTM attachment by following the guidelines
contained in Owner’s Manual. You are responsible for proper product use.
Lawn StryperTM attachment is designed to work with most walk-behind,
self-propelled and push-type lawn mowers. DO NOT USE WITH ANY OTHER
TYPE OF MOWER. Lawn StryperTM assembly attaches to and follows behind
your lawn mower during normal grass-cutting operations, and should not affect
the operating characteristics of your mower. Carefully follow all of your lawn
mower manufacturer’s operating instructions and warnings when using
the Lawn StryperTM attachment.
Alternate mowing patterns and designs every few weeks.
A dark ‘stripe’ is created when patterning towards the viewer and a light ‘stripe’
is created by patterning away from the viewer. In order to view all of the
benefits, ‘line of sight’ patterning is recommended. For example, if you were
sitting on your front porch, looking out towards your lawn, consider patterning
lines that come straight to and away from your porch as seen in picture below.
If you were to view these same patterns from the side, visual results may be
less dramatic.
For a replacement Lawn StryperTM Owner’s Manual, contact S&B Lawn
Systems, Inc by visiting www.patternyourlawn.com or mail to:
S&B Lawn Systems, Inc.
W226N825 Eastmound Drive, Suite B
Waukesha, WI 53186-1690
General Conditions:
Lawn StryperTM, a S&B Lawn Systems, Inc. product is not liable for indirect,
incidental or consequential damages in connection with lawn mowers in which
the Lawn StryperTM attachment is attached to, including cost or expenses
of providing substitute equipment or service to the mowers in which it is
attached to. Some states do not allow exclusions of incidental or consequential
damages, so above exclusions and limitations may not apply.
www.patternyourlawn.com
14
15
General Tips Continued:
Troubleshooting:
Patterning Effect:
Roller Does Not Turn:
• With mower turned OFF, check to see if any type of debris such as bark,
The Lawn StryperTM attachment is specifically designed to properly ‘bend’ grass
after it has been cut. This proper ‘bend’ results in light reflecting differently off
each side of grass thus producing the pattern effect. Results may vary based
upon health of grass, length of grass, type of grass, dormant/drought stricken
grass, available sunlight and/or seasonal conditions.
Obstructions:
If obstructions such as fences, retaining walls, driveways, walkways, curbs,
ditches, embankments or other objects are present, remove (WITH MOWER
TURNED OFF) Lawn StryperTM Roller Assembly from hitch system. Once cut
around obstruction is complete, attach (WITH MOWER TURNED OFF) the
Roller Assembly to hitch system to return to patterning.
•
•
twigs, stones, or other objects have obstructed the roller’s ability to turn.
If so, with mower turned OFF, remove debris from the roller.
Make certain that roller plug, on roller tube, is fully tightened. Check to see
that roller plug is flush with end cap. A loose plug will impede roller’s ability
to turn properly.
Make certain that the roller is filled with approximately 16 to 20 pounds of
DRY sand. An empty or partially filled roller may not function properly.
Patterning Effect Does Not Show:
• Make certain to view with ‘line of sight’ in mind.
• Lawn StryperTM attachment installed incorrectly – refer to Owner’s Manual.
• Grass may be cut too short.
• For dormant or drought stricken grass. S&B Lawn Systems Inc.,
•
•
recommends that the Lawn StryperTM attachment not be used when grass is
dormant or is under stress due to drought.
Grass may be damaged, unhealthy or too sparse.
Lack of proper sunlight – partial/full sun is optimal.
U-Bar Assembly is Hitting the Ground:
• With mower turned off, set u-bar assembly to proper height as outlined in
•
Owner’s Manual.
With mower turned off, make certain that height is the same on both sides
as outlined in Owner’s Manual.
Visit patternyourlawn.com for additional tips, frequently asked questions,
product registration, contact information and more.
CAUTION: Do not assemble, disassemble, attach, inspect, or
adjust the Lawn StryperTM attachment while the mower is running.
SHUT OFF THE MOWER before performing any of these actions.
CAUTION: Do not assemble, disassemble, attach, inspect, or
adjust the Lawn StryperTM attachment while the mower is running.
SHUT OFF THE MOWER before performing any of these actions.
www.patternyourlawn.com
www.patternyourlawn.com
16
17
Lawn Care Tips:
Lawn Care Tips Continued:
It is important to have a healthy lawn in order to experience all of the benefits
Watering Your Lawn:
of the Lawn StryperTM attachment. Please find below a few general lawn care
tips that will help to ensure a strong and beautiful lawn.
Keep Lawn Mower Blade Sharp:
A common error is to neglect the lawn mower’s blade. A well maintained and
When your lawn begins to look stressed or when you step on and it does not
bounce back, it may be time for a thorough watering. Approximately 1 to 2
inches of water, equally distributed, should do the job. Watering should occur
during the early morning hours. As always, know and abide by your local
watering regulations and restrictions.
sharp blade enables the grass to be cut cleanly. A dull blade can result in a
‘scalping’ of the grass which can lead to lawn becoming weak, stressed and
even prone to disease. It is recommended that you have your blade
sharpened, by an authorized lawn mower technician, a minimum of once
per season.
Proper Fertilization Program:
In order to create and maintain a beautiful lawn, it may be important to
implement a proper fertilization program. Begin by obtaining a soil test kit
which can be found at your local lawn and garden center. Once proper samples
are taken and analyzed, you’ll have a better idea about the nitrogen,
Use the “1/3 Rule”:
phosphorus and potassium levels of your soil. With this information, you’ll have
Another common error is cutting grass too short. It is extremely important to
mow regularly as well as to refrain from cutting more than 1/3 off at a time,
no matter how tall the grass may be. Cutting grass too short may cause undo
a better idea as to what combination(s) of fertilizer you should apply. If unsure
as to what direction to take, consult with your local agricultural center or a lawn
and garden professional.
stress and may harm the lawn’s ability to support root growth. To determine
your optimal grass length, you must first find out what type of grass you
have. Common grasses include Kentucky Bluegrass, Perennial Ryegrass,
Bent, Fescue and Bermuda Grass. If you do not know what type of grass
you have, simply take a sample over to your local agricultural center for
identification. Listed below are a few recommended heights for some
common grasses.
Kentucky Bluegrass:
2 to 3 inches
Perennial Ryegrass:
2 to 3 inches
Fescue:
2.5 to 3.5 inches
Bermuda:
1/2 to 1 inch
www.patternyourlawn.com
www.patternyourlawn.com
18
19