1
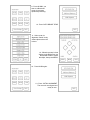
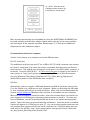
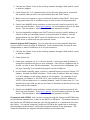
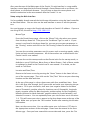
Gemini 2 Quick Start Guide
This guide will help you get started with your Gemini 2 controller. It covers installation, configuration, and basic usage.
Installing Gemini 2
The Gemini 2 case is the same width as all previous Losmandy control units and can be
attached onto your mount or pier using the same hardware as your previous unit if you
are upgrading.
After mounting the unit, connect the motors using the 6 pin DIN cables. Make sure
you connect the RA motor to the RA connector and the Dec motor to the DEC connector on the Gemini 2 unit.
There are two serial ports on the Gemini 2. Serial port 1 is typically used to communicate with a computer and serial port 2 is used to connect to the graphical hand controller. Use the coiled cable with RJ-12 connectors to connect the hand controller to
serial port 2 on the Gemini unit. Serial Port 1 can also be used with a GPS unit. Please
note that the pinouts of the serial ports are not the same as on the original Gemini (now referred to as Gemini 1).
Please do not plug a serial cable or device designed
for the Gemini 1 into the Gemini 2.
There could be damage to the Gemini 2 or your device. The com ports on the
Gemini 2 have +5V DC on them. See link below for wiring diagram.
Connect the supplied power cable to either of the power connectors on the right side
of the unit. Be sure to use a regulated power supply or a battery which can provide
12~18 volts DC at 3 amps or higher.
Getting Started
After all the cables are connected, power on the Gemini 2 unit. When you power up
the unit, you will see the following screens
1 - When you power up for
the first time you will see this
screen. Press anywhere.
2 - Using a plastic stylus or
retracted ballpoint pen,
press the center of each of
the three dots as they
appear sequentially.
3 - This screen shows that
calibration is complete.
After five seconds you will
see...
4 - ...this screen. Press
QUICK START.
5 - Select the type of
mount you are using.
6 - Enter Longitude and
Latitude or press QUERY
GPS if you have a GPS
device. Manually enter Time
Zone. Use “–” to indicate
western hemisphere.
7 - Enter Date & Time
manually if not using a
GPS device. A numeric
keypad will appear upon
selecting a field.
8 - You can now guide your
telescope using the buttons on the
screen or the tactile buttons on the
rear of the hand controller.
Press MENU to access features.
9 - Press ALIGN if you
want to calibrate the
mount for accurate
equatorial positioning.
10 - Press GOTO BRIGHT STAR.
11 - Select a star for
alignment. Gemini 2 only
shows objects above the
horizon.
12 - When the mount is done
slewing to the Bright Star, use
the manual control to center
the object, then press MENU.
13 - Press ALIGN again.
13 - Press INITIAL ALIGNMENT.
The mount is now aligned and
ready for use..
15 - GOTO - Once the mount
is aligned use this screen to go
to any library or stored object.
More accurate positioning can be enabled by using the ADDITIONAL ALIGNMENT feature and selecting at least three objects spread across the sky in the same meridian,
and one object in the opposite meridian. Repeat steps 9~13 then press Additional
Alignment for each calibration object.
Communication with your computer
Gemini 2 can connect to a computer in several different ways
RS-232 Serial Port
The traditional serial port on your PC (or a USB to RS-232 serial converter) can connect
to Gemini’s serial port #1 to send and receive commands and data using the Gemini
serial protocol. The default port settings for serial port #1 are 9600 baud, no parity, 8
bit words, 1 stop bit (9600,N,8,1). A Cable wiring diagram is located in the Gemini 2
users group at: http://tech.groups.yahoo.com/group/Gemini-II/files/Documentation_and_Manuals/Cable_Wiring_Diagrams/RS-232_Cable_Wiring_Diagram.pdf
(whole link provided in case link above does not work.)
USB Port
Alternatively, you can connect a USB cable between the USB-B connector (next to Port
F) on the Gemini 2 to a USB port on your computer. When you first plug the USB cable
in, your computer will ask you to install the driver. Make sure you’ve downloaded the
current Gemini USB driver (Windows only) and save it somewhere on your computer.
When you are prompted to install the driver, select the location where you saved it on
your computer and follow your operating system prompts to install it. On some versions of Windows, you will be prompted that the driver is not signed and potentially
unsafe. Select the option to proceed with the installation. Once the driver is installed,
Gemini will appear as a COM port on your PC. You can use any popular telescope control program that supports the Gemini serial command set. If the link above does not
work here is the full link: http://tech.groups.yahoo.com/group/Gemini-II/files/Driver_and_System_files/USB_driver/Gemini-II.inf
Network
All Gemini 2 parameters and many observing functions are accessible using a built-in
web interface. In order to use the web interface, you will need to make a network connection to your computer. This is most easily done using a cross-over Ethernet cable
directly between Gemini’s Ethernet connector and your computer’s network connector.
Alternatively, you can use standard cables between Gemini and an Ethernet hub, and
between your computer and the hub.
IP Address: In order to successfully communicate with your computer over the network, the Gemini 2 unit must have an IP address on the same subnet as the computer.
There are several ways to do this depending on how you connect to a network. The
following sections describe these methods.
Direct connection (typical configuration in the field): If you use a cross-over Ethernet
cable to directly connect your computer to Gemini, you’ll need to assign both the computer’s Ethernet port and Gemini to IP addresses on the same subnet manually. This
assumes that your computer is not running a DHCP server on the network port. If
Gemini doesn’t get an IP address assigned by DHCP, it will use its stored value
192.168.0.111 by default.
1. Use a cross-over cable to connect Gemini 2’s Ethernet port to an Ethernet port
on your computer
2. Use the appropriate tools on your computer to assign a static IP address to the
computer’s Ethernet port. The address should be in the form 192.168.0.xxx
where xxx is any number between 1 and 254 except 111. Set the subnet mask
to 255.255.255.0. On Windows, you can do this from the control panel. Look
for an option to change network connections. Refer to your OS documentation
for specific instructions. On Macintosh OS X, open System Preferences/Internet
& Wireless/Network to edit network connections.
3. Power on Gemini and attempt to access the web server at http://gemini or
http://192.168.0.111. If this doesn’t work, use the hand controller menu to
ensure that Gemini’s IP address is 192.168.0.111 by selecting the menu>mount->network options. If it is not set to that address, you can either
change your computer’s IP address to match Gemini’s subnet or you can change
Gemini’s IP address to 192.168.0.111 (preferred).
4. Gemini uses NetBIOS name resolution so that you don’t need to type the IP address into your browser. If you haven’t already done so, enter http://gemini in
your browser to access the web server. The username is “admin” and the default password is blank.
Network with DHCP support (typical configuration for most home networks with a
router): If you are connecting Gemini to an existing network through a switch, hub,
router or wireless adapter, and there is a DHCP server on the network, use this procedure. Gemini will be assigned an IP address by the DHCP server. It is important that
your computer also be set to either use DHCP to get an IP address, or use a static IP
address on the same subnet.
1. Connect the Gemini 2 unit to the existing network through a hub, switch, router
or wireless adapter.
2. Power Gemini on. It is important that you do this only after you’ve connected
the network cable so that it can communicate with the DHCP server.
3. Make sure your computer is set to receive an IP address from DHCP. Each operating system does this in a different way, so refer to your OS documentation.
4. Gemini uses NetBIOS name resolution so that you don’t need to type the IP address into your browser. Enter http://gemini in your browser to access the web
server. The username is “admin” and the default password is blank.
5. You may optionally configure your DHCP server to assign a specific address to
Gemini so that you can always access it using the same IP address. See the
documentation for your DHCP server for details how to do this. Note: your
DCHP server is often built into your internet router.
Network without DHCP support: You may also have an existing network that does
not use a DHCP server to assign IP addresses. Such a network may be using IP autoconfiguration or static IP addresses in all of your machines.
1. Connect the Gemini 2 unit to the existing network through a hub, switch, router
or wireless adapter.
2. Power Gemini on.
3. Power your computer on, if it is not on already. Look to see what IP address is
assigned to the Ethernet port on your computer. Each OS has a different way to
do this, so refer to your OS documentation. On most versions of Windows, you
can type “ipconfig” in a command prompt to see the IP address.
4. Use the hand controller menu->mount->network buttons to access Gemini’s IP
address. Uncheck the DHCP checkbox. Click on the IP address field and change
it to an IP address on the same subnet as you computer. For example, if your
computer’s IP address is 169.254.36.12, you should set Gemini’s address to
169.254.36.xxx where xxx is a number between 1 and 254 other than 12. You
should also ensure that you do not set Gemin’s IP address to be the same as any
other node on the network.
5. Gemini uses NetBIOS name resolution so that you don’t need to type the IP address into your browser. Enter http://gemini in your browser to access the web
server. The username is “admin” and the default password is blank.
Connection with ASCOM: You can also connect through the Gemini.net ASCOM driver
to the Ethernet network port, as well as the RS232 or USB ports. The newest version of
the Gemini.net ASCOM driver now lets you use the network as a virtual serial port into
the Gemini. You can be using the Gemini.net ASCOM at the same time as accessing
the web pages of the Gemini 2, while still using any function of the web pages. The
network connection can support multiple functions at the same time.
Also note that one of the Web pages of the Gemini 2’s web interface is a new mobile
interface control page that be accessed through a Smart Phone such as an iPhone, Android phone, or normal web browser. You just have to have the smart phone on a
wireless connection in the same network that the Gemini 2 is on.
Setup using the Web Interface
You’ve probably already entered the initial setup information using the hand controller
as described above. You can also use the web interface to enter or edit the parameters.
Use your browser to access the Gemini web interface at Gemini’s IP address. If you are
not using DCHP, this will be http://192.168.0.111.
Mount Type
From the Gemini home page, click on the “Mount” link, the select your mount
from the drop-down list. Then press the “Set Mount Type” to save it. If your
mount is not listed in the drop-down list, you can set your gear parameters in
the “Gearing” section and click on the “Set Gearing” button to save the information.
You can also set other parameters on this screen such as moving speeds, safety
limits and axis encoder parameters. All of these values are as described in the
Gemini Level 4 user manual.
You can also set the startup mode so that Gemini asks for the startup mode, or
defaults to one of Cold Start, Warm Start, or Warm Restart. Each of these modes
is explained in detail in the Gemini Level 4 user manual. If in doubt, set the
mode to Cold Start.
Location and Date/Time
Return to the home screen by pressing the “Home” button in the lower left corner of the current page. Then click on the “Site/Time” link to set your observing
location and the date and time.
At the top of the page is a drop-down menu with four predefined sites. Since
this is the first time through, you’ll ignore this and enter your observing site parameters. Fill in your site name, time zone (use negative values for locations
west of Greenwich, positive values for locations east of Greenwich), longitude
(again, negative values for West longitude, positive values for East longitude),
latitude (positive for North latitudes, negative values for South latitudes), and
elevation in meters. You can optionally store your site for later use in locations
1-4. This will cause your site to appear in the drop down menu at the top of the
page. Make sure you press the “Set Location” button after entering the location
information.
Next, set the correct time. You can either enter your civil time or UTC time in
the appropriate sections of the web page. Dates must be entered in the form
dd.mm.yyyy. Once you have entered the correct date and time, press the “Set
Civil” or “Set UTC” button, depending on which form you entered the date and
time.
IMPORTANT: After setting the mount type, observing location, date and time, it
is best to turn off your Gemini and then back on again while the mount is in its
standard startup position (counterweight shaft down and OTA pointing to the
celestial pole).
Using the Hand Controller
The graphical hand controller uses a combination of touch screen and physical buttons
to allow you to control your Gemini system. Depending on the startup mode selected
through the web interface, you may be prompted to select a mode when you first
power on your Gemini (Quick Start, Cold Start, Warm Start, or Warm Restart). Please
refer to the Gemini Level 4 user manual for a full explanation of the last three startup
modes.
The main HC screen contains four directional buttons along with three function buttons. The four directional buttons move the mount in RA and Dec at the speed indicated just above the “SPEED” function button. Moving speeds are Guide, Center, Move,
and Slew. There are also four directional buttons on the back of the hand controller.
These perform the same function as the four graphical buttons. The language and
color setting can be stored permanently by “Store Setting” in the Menu Screen.
SPEED Function Button
You can use the SPEED function button to cycle through the different moving speeds,
allowing you to set the speed at which the mount will move when a direction button is
pressed. The actual rate for each of these moving speeds (expressed as a multiple of
the sidereal rate) can be set from the web interface or the hand controller menu. You
can move only one axis at a time using the graphical direction buttons on the
touchscreen, but you can move both axes simultaneously using the physical buttons
on the back of the controller.
MENU Function Button
This button allows you to access some of the observing and setup functions of the
controller. These will not be exhaustively documented during the beta phase since
they are likely to change in upcoming releases.
·
Align – Perform an alignment to start or add to the pointing model
·
Park – Park the mount, put it to sleep, and wake it up.
·
Mount – Set mount parameters such as mount type, gearing, safety limits and
TVC
·
Site – Set location and time zone. Also allows you to query a GPS.
·
HC – Set the language used in the Hand Controller UI, set the color scheme and
brightness.
·
Speed – Set the rate for the various speeds (Slew, Center, Move, and Guide) as a
multiplier of sidereal rate. Note that the setting for Guide speed is multiplied by
10, so to set a guiding speed of 0.7x sidereal, enter “7”.
·
Track – Set the tracking rate of the mount.
For full details of these functions, please refer to the latest Gemini manual at
www.losmandy.com
GoTo Function Button
This button allows you to point your telescope at a specific target or set of coordinates. The sub-menus within the GoTo function won’t be exhaustively documented
during the beta period.
·
Catalog Object – Select an object from one of several built-in object catalogs:
Bright Star List (BSL), Constellations and Stars, IC, LBN, LDN, Messier,
NGC, PN, SAO, Sh2, Southern constellations and stars, WDS.
When you select a catalog, the display will show an alpha-numeric keypad. To enter a catalog object, type a portion of its name or number on
the keypad. When you hold down a key on the keypad, the display will
cycle through the three characters on the key. Release the key when the
correct character is displayed. If you make a mistake, press the DEL key
to erase the last character displayed and try again. Once you have part of
the object name entered, press the ENT key to see the first object that
matches your entry. Press the NEXT button to move to the next matching
object. When the object you want is shown, press the GOTO button to
slew the telescope to that object.
·
Solar System Object – Select an object in the solar system
·
Coordinate Input – Enter the RA and Dec of an object
·
Bookmark – Set or Goto a bookmark
·
Park – Park the mount
For additional information please contact: www.losmandy.com, or call 323-462-2855
Hollywood General Machining
1033 No. Sycamore
Los Angeles, CA 90038
© 2011 Hollywood General Machining - Losmandy Products