1
OWNER'S MANU
AL
MANUAL
VOL
TUNE/
SKIP/
TRACK
MP3 ST PTY ME/CR EON LOC
VOL
SW LOUD AF TA TP MONO REC
SEL
BAND
LOUD
T/F
CLAS
MONO
MODE
POP
AS/PS
1
PAU
2
SCN
TAPE IN
ROCK
LOC
P.EQ
MUTE
CDP
3
RPT
4
SHF
5
D.DN
6
D.UP
ACD-24
DETACHABLE FRONT PANEL AM/FM/MPX RADIO WITH
COMPACT DISC PLAYER, CD CHANGER CONTROLS AND
QUARTZ CLOCK
Released 4-24-00.
Revision A: Corrected pages 8,9,10,12,13. 6-13-00.
Revision B: Changed clock description and setting procedure 11-3-00.
Revision C: Translated to Spanish 12-5-00.
Revision D: Added CD-R and CD-RW specification notice 5-9-02.
Revision E: Incorporated new front panel layout and text changes.
128-5780E
1 of 48
INST
ALL
AT ION INSTRUC
INSTALL
ALLA
INSTRUCTT IONS
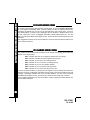
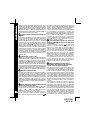
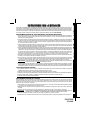
INSTALLATION INSTRUCTIONS
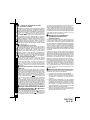
This unit is designed for installation in cars, trucks, and vans with an existing radio opening. In many cases, a special
installation kit will be required to mount the radio to the dashboard. These kits are available at electronics supply
stores and car stereo specialist shops. Always check the kit application before purchasing to make sure the kit
works with your vehicle. If you need a kit but cannot find it available, call our toll-free “HELP” line (1-800-645-4994).
UNIVERSAL INSTALLATION PROCEDURE USING MOUNTING SLEEVE
1. Remove the detachable front panel if it is attached to the chassis by pushing the “Release” button. Slide the
mounting sleeve off of the chassis. If it is locked into position, use the removal tools (supplied) to disengage it.
2. Check the dashboard opening size by sliding the mounting sleeve into it. If the opening is not large enough, carefully
cut or file as necessary until the sleeve easily slides into the opening. Do not force the sleeve into the opening
or cause it to bend or bow. Check that there will be sufficient space behind the dashboard for the radio chassis.
3. Locate the series of bend tabs along the top, bottom, and sides of the mounting sleeve. With the sleeve fully inserted
into the dashboard opening, bend as many of the tabs outward as necessary so that the sleeve is firmly secured
to the dashboard.
4. Place the radio in front of the dashboard opening so that the wiring can be brought through the mounting sleeve.
Follow the wiring diagram carefully and make certain all connections of the wiring harness are secure and insulated
with wire nuts or electrical tape to insure proper operation of the unit. After completing the wiring connections,
attach the front panel and turn the unit on to confirm operation (ignition switch must be “on”). If unit does not operate,
re-check all wiring until problem is corrected. Once proper operation is achieved, turn off the ignition switch and
proceed with final mounting of the chassis.
5. Carefully slide the radio into the mounting sleeve making sure it is right-side-up until it is fully seated and the spring
clips lock it into place.
6. Attach one end of the perforated support strap (supplied) to the screw stud on the rear of the chassis using
the hex nut provided. Fasten the other end of the perforated strap to a secure part of the dashboard either above
or below the radio using the screw and hex nut provided. Bend the strap to position it as necessary.
CAUTION: The rear of the radio must be supported with the strap to prevent damage to the dashboard from the
weight of the radio or improper operation due to vibration.
7. Re-attach the front panel to the chassis. Establish a location for the remote input jack (usually the underside of
the dashboard) if it is a feature of the radio. Anchor it in place using two self-tapping screws (M5x6). Do
not over-tighten screws. Test radio operation by referring to the Operating Instructions for the unit.
INSTALLATION USING KITS
1. If your vehicle requires the use of an installation kit to mount this radio, follow the instructions included with the
installation kit to attach the radio to the mounting plate supplied with the kit.
2. Wire and test the radio as described in Step 4 above.
3. Install the radio/mounting plate assembly to the sub-dashboard according to the instructions of the installation kit.
4. Attach the support strap to the radio and dashboard as described in Step 6 above.
5. Replace the dashboard trim panel.
ISO INSTALLATION PROCEDURE
1
This unit has threaded holes in the chassis side panels which may be used with the original factory mounting
brackets of some Toyota, Nissan, Mitsubishi, Isuzu, Hyundai and Honda vehicles to mount the radio to the
dashboard. Please consult with your local car stereo specialist shop for assistance on this type of installation.
1. Remove the existing factory radio from its dashboard or center console mounting. Save all hardware and
brackets as they will be used to mount the new radio.
2. Carefully un-snap the plastic frame from the front of the new radio chassis. Remove and discard the frame.
3. Remove the factory mounting brackets and hardware from the existing radio and attach them to the new radio.
CAUTION: DO NOT EXCEED M5 X 6 MM MAXIMUM SCREW SIZE.
LONGER SCREWS MAY TOUCH AND DAMAGE COMPONENTS INSIDE THE CHASSIS.
4. Wire the new radio to the vehicle as per step 4 above.
5. Mount the new radio assembly to the dashboard or center console using the reverse procedure of step 1.
128-5780E
2 of 48
DAY
MON. - FRI.
SATURDAY
PACIFIC
5:30AM - 4PM
6AM - 2PM
MOUNTAIN
6:30AM - 5PM
7AM - 3PM
CENTRAL
7:30AM - 6PM
8AM - 4PM
EASTERN
8:30AM - 7PM
9AM - 5PM
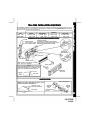
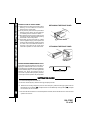
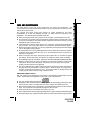
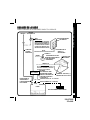
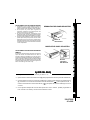
UNIVERSAL INSTALLATION USING MOUNTING SLEEVE
NUT (5MM)
PERFORATED STRAP
FASTEN THIS END TO SCREW
STUD ON REAR OF CHASSIS
EXISTING DASH OPENING
FILE EDGES TO FIT IF NECESSARY - DO NOT OVERFILE
NOTE: IF DASH IS SOLID, USE REAR SIDE (WITHOUT THE LIP) OF
MOUNTING SLEEVE AS A TEMPLATE & CUT OPENING
BEND TOP
TABS UPWARD
SCREW
(5MM)
INST
ALL
AT ION INSTRUC
INSTALL
ALLA
INSTRUCTT IONS
TOLL-FREE INST
ALL
AT ION ASSIST
A NCE
INSTALL
ALLA
ASSISTA
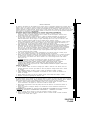
The installation and wiring connections for this unit are so simple, we doubt you'll need our help, but, if you
do, we're here to help you. Just call our toll-free telephone assistance line at 1-800-645-4994 during the days
and hours shown (U.S.A. and Canada only).
BEND BOTTOM
TABS DOWNWARD
RADIO
SCREW STUD
NUT (5MM)
MOUNTING SLEEVE
FASTEN THIS END TO SECURE PART OF DASHBOARD. DRILL HOLE IF NECESSARY.
CAUTION:
FOR PROPER OPERATION OF THE CD PLAYER, THE CHASSIS
MUST BE MOUNTED WITHIN 20° OF HORIZONTAL. MAKE
SURE THE UNIT IS MOUNTED WITHIN THIS LIMITATION.
SIDE VIEW
OF
CHASSIS
REMOVAL TOOLS
DETACHABLE
FRONT PANEL
-------~ 20° MAX.
I
~
FRONT PANEL
ISO INSTALLATION
TYPICAL INSTALLATION
REMOVE THE PLASTIC FRAME FROM THE FRONT OF THE
CHASSIS BY CAREFULLY UN-SNAPPING IT.
UN-SNAP AT 2 PLACES
EACH ON TOP AND BOTTOM
PLASTIC FRAME
MAXIMUM
SCREW SIZE
M5 x 6
MAXIMUM
SCREW SIZE
M5 x 6
FACTORY MOUNTING
BRACKETS
2
128-5780E
3 of 48
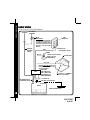
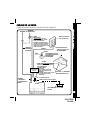
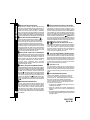
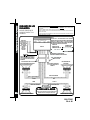
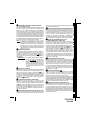
RADIO WIRING
R A DIO WIRING
REFER TO PAGE 5 FOR SPEAKER WIRING
ANTENNA
AUTOMATIC
ANTENNA
CAR
FUSEBLOCK
BLUE
IMPORTANT
THE BLUE WIRE CAN BE USED
TO REMOTELY ACTIVATE AN
AUTOMATIC ANTENNA OR AN
EXTERNAL AMPLIFIER (SEE
ANTENNA OR AMPLIFIER
MANUAL)
EXISTING
ANTENNA
CABLE
"RADIO" OR
"ACCESSORY" FUSE
RED
SCREW
BLACK
METAL PART OF DASH
(DRILL HOLE IF
NECESSARY)
CAR BATTERY
YELLOW
IMPORTANT
THIS WIRE MUST BE CONNECTED
AS SHOWN OR RADIO WILL NOT
OPERATE PROPERLY
CONTAINS:
FILTER/FUSE ONE 1-AMP FUSE
BOX
ONE 10-AMP FUSE
SEE PAGE 4 FOR
SPEAKER WIRING
POSITIVE (+) TERMINAL
12 VOLT BATTERY
14 PIN PLUG
ANTENNA SOCKET
ON REAR OF RADIO
MATING 14 PIN SOCKET
RADIO
REMOTE INPUT JACK
3
33
128-5780E
4 of 48
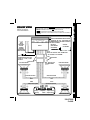
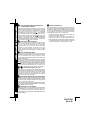
WARNING!
! THE AMPLIFIERS IN THIS RADIO ARE ONLY DESIGNED FOR USE WITH 4 SPEAKERS.
! NEVER COMBINE (BRIDGE) OUTPUTS FOR USE WITH 2 SPEAKERS.
! NEVER GROUND NEGATIVE SPEAKER LEADS TO CHASSIS GROUND.
! FAILURE TO WIRE EXACTLY AS SHOWN BELOW MAY CAUSE ELECTRICAL DAMAGE TO
THE RADIO.
REFER TO PAGE 4
FOR RADIO WIRING
R C A
JACKS
LINEOUT
FOR USE WITH
OPTIONAL
EXTERNAL
AMPLIFIERS
RED=RIGHTREAR
WHITE=LEFT REAR
RADIO
NOTE:
CHECK WITH YOUR RAMPAGE/AUDIOVOX CAR STEREO SPECIALIST OR CALL 1-800-645-4994 FOR
RECOMMENDATIONS OF THE MODELS THAT WILL
WORK WITH YOUR RADIO.
DIN CABLE
OPTIONAL
(SUPPLIED WITH
CD CHANGER
CD CHANGER).
SPE
A K ER WIRING
SPEA
SPE
A K ER WIRING
SPEA
6
COMPAC T
8-PIN DIN SOCKET FOR CONNECTION
TO OPTIONAL CD CHANGER
REMOTE INPUT INPUT JACK FOR
USE WITH EXTERNAL CD PLAYER,
CASSETTE PLAYER, OR MP3
PLAYBACK
9-PIN PLUGS
4-PIN PLUGS
SEE PAGE 3 FOR
RADIO WIRING
LEFT FRONT SPEAKER
RIGHT FRONT SPEAKER
GRAY w/BLACK STRIPE
WHITE w/BLACK STRIPE
WHITE
GRAY
GREEN
VIOLET
GREEN w/BLACK STRIPE
VIOLET w/BLACK STRIPE
HELP!
1-800-645-4994
1-800-645-4994
Monday - Friday8:30am - 7:00pm Eastern
Saturday
9:00am - 5:00pm Eastern
LEFT REAR SPEAKER
RIGHT REAR SPEAKER
4
128-5780E
5 of 48
OPER
AT ING INSTRUC
OPERA
INSTRUCTT IONS
OPER
AT ING INSTRUC
OPERA
INSTRUCTT IONS
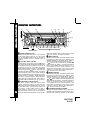
29
11
16
17
35
36
15
14
25
VOL
TUNE/
SKIP/
TRACK
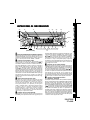
2
MP3 ST PTY ME/CR EON LOC
SW LOUD AF TA TP MONO REC
SEL
3, 4, 5, 6, 7 10
BAND
LOUD
AS/PS
12
31,30
(BEHIND PANEL)
1
PAU
2
SCN
MONO
26, 32
MODE
TAPE IN
ROCK
LOC
P.EQ
MUTE
CDP
3
9
4
RPT
SHF
5
D.DN
6
D.UP
18 21,37 19,38 20,39 28,34 27,33
1
13
is off and the ignition switch is "on", the unit will
turn on automatically when a disc is inserted, or
when the "MODE" switch or "BAND" switch is
pressed.
VOLUME / LEVEL CONTROL
To increase the volume level, press the
button.
The volume will increase and the level will be shown
on the display panel from a minimum of “VOL 00” to
a maximum of “VOL 39”. To increase the volume
quickly, keep the button pressed. To decrease the
volume level, press the
button. Keep the button
pressed to decrease the volume quickly. The display
will automatically return to the normal indication
5 seconds after the last volume adjustment or when
another function is activated. These buttons are
also used in conjunction with the ''AUDIO SELECT"
(SEL) button
to adjust the bass, treble, balance,
and fader levels as described in , ,
and .
AUDIO SELECT (SEL) BUTTON
This button is used to select the audio function
(volume, treble, bass, balance, or fade) to be adjusted using the Volume/Level Control . Pressing the "SEL" button will select bass (“BAS” on
the display), treble ("TRE"), balance (“BAL”),
fader (“FAD”) or volume (“VOL”). The display
will automatically return to the normal indication
5 seconds after the last adjustment or when another
2
3
T/F
CLAS
POP
VOL
3
24
22
1
ON/OFF POWER BUTTON
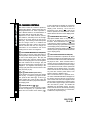
Press this button to turn the unit on or off. If the unit
456
2
5
23
8
7
function is activated. The unit will produce a single
beep tone whenever the button is pressed.
BASS CONTROL
To adjust the bass level, first select the Bass mode
so that the “BAS”
by pressing the "SEL" button
indication appears on the display panel. Within 5
seconds of choosing the Bass mode, press the
or
button of the Level Control
to adjust the
bass response as desired. The bass level will be
shown on the display panel from a minimum of -12
to a maximum of +12 (0 is flat response). The
display will automatically return to the normal
indication 5 seconds after the last adjustment or
when another function is activated.
TREBLE CONTROL
To adjust the treble level, first select the Treble mode
so that the “TRE”
by pressing the "SEL" button
indication appears on the display panel. Within 5
seconds of choosing the Treble mode, press the
or
button of the Level Control to adjust the
treble response as desired. The treble level will be
shown on the display panel from a minimum of
-12 to a maximum of +12 (0 is flat response). The
display will automatically return to the normal
indication 5 seconds after the last adjustment or
when another function is activated.
4
3
2
5
3
2
6
LEFT/RIGHT BALANCE CONTROL
To adjust the left-right speaker balance, first select
3
the Balance mode by pressing the "SEL" button
so
that the “BAL” indication appears on the display
128-5780E
6 of 48
2
7
3
2
8
9
3
bl
2
ejecting the disc. During this time, the
IN
indication will remain on the display panel to show
that a disc is still loaded in the unit. Press the
to return to disc play from the
"Mode" button
beginning of the last track in play.
When listening to music at low volume levels, the
loud feature will boost the bass and treble ranges
to compensate for the characteristics of human hearing. Press the BAND/LOUD button for at
least 2 seconds to activate this feature and the indication LOUD will appear on the display panel.
Pressing the button again for 2 seconds will
deactivate the feature (the LOUD indication will
disappear from the display panel).
MANUAL UP/DOWN TUNING (+
/
-)
AUTOMATIC SEEK TUNING
Each time the +
button is tapped, the radio will
tune one frequency step higher. Similarly, each tap
of the
- button will tune one frequency step
lower. To manually tune in a station, tap the button of
the appropriate direction until the desired frequency
is reached.
Pressing either button for longer than 2.0 seconds
and then releasing will activate the Automatic Seek
Tuning function. The radio will seek the next available
station and stop at that frequency. The Seek function
can be stopped by pressing the button again or activating any other tuning function.
cr
bm
OPER
AT ING INSTRUC
OPERA
INSTRUCTT IONS
panel. Within 5 seconds of choosing the Balance
or
button of the Level
mode, press the
Control
to adjust the balance as desired. The
balance position will be shown on the display panel
from “BAL.L 16” (full left) through “BAL.R 16” (full
right). When the volume level between the left and
right speakers is equal, “BAL 00” will be shown on
the display panel. The display will automatically
return to the normal indication 5 seconds after the
last adjustment or when another function is activated.
FRONT/REAR FADER CONTROL
To adjust the front-rear speaker balance, first select
the Fader mode by pressing the "SEL" button
so
that the “FAD” indication appears on the display panel.
Within 5 seconds of choosing the Fader mode, press
the
or
button of the Level Control to adjust
the front-rear speaker balance as desired. The fader
position will be shown on the display panel from
“FAD.R 16” (full rear) through “FAD.F 16” (full front).
When the level between the front and rear speakers
is equal, “FAD 00” will be shown on the display
panel. The display will automatically return to
the normal indication 5 seconds after the last
adjustment or when another function is activated.
LOCAL (LOC) OPERATION
This feature sets the signal level at which the radio
will stop during Manual Up/Down, Seek and/or AutoStore (AS) tuning; thus, only strong (local) stations
will be received and selected. When Auto-Store
(AS) tuning is not in effect, LOC will disappear from
the display panel, and the radio will stop at a wider
range of signals, including weaker (more distant)
stations.
AUDIO MUTE (MUTE)
This button is used to mute the volume from the
system. By pressing the button, a flashing "MUTE"
indication will appear on the display panel and the
volume will be muted. Pressing the Mute button
Select
again, or activating the Volume Control
("SEL") button
"LOUD" button, or Equalizer ("EQ")
button will return the volume level to the setting in
use before the Mute function was activated.
BAND/LOUDNESS CONTOUR SELECTION
(BAND/LOUD)
During radio operation, each momentary press of
this button will change the radio band. The indication
“AM1”, “AM2”, “FM1”, “FM2”, or “FM3” will appear on
the display panel according to your selection.
During disc play, pressing this button will stop play
of the disc and switch to radio operation without
bn AUTO-STORE TUNING (AS)
PRE-SET SCAN TUNING (PS)
During radio operation, press this button momentarily to scan the 6 stations pre-set into the memories of that band. The unit will stop at each pre-set
station for 5 seconds before continuing to the next
pre-set station. During this time, the pre-set station
number ("CH") in the band will flash. Press the button again momentarily to stop Pre-Set Scan operation and remain on the selected frequency.
The station number ("CH") stops flashing.
Pressing the button for longer than 2 seconds will
activate the Auto-Store Tuning feature which will
automatically scan the band and enter up to 6 strong
stations into the 6 pre-set memories (the indication
“AST” will flash on the display panel to show that
Auto-Store Tuning is in progress). After entering the
stations into the memories, the unit will automatically
stop at each station for 5 seconds so each can be
heard. If you have already set the pre-set memories
to your favorite stations, activating the Auto-Store
feature will erase those stations and enter the new
strong stations. This feature is most useful when
6
128-5780E
7 of 48
OPER
AT ING INSTRUC
OPERA
INSTRUCTT IONS
travelling in a new area where you are not familiar
with the local stations.
bo STATION PRE-SET MEMORIES
To set any of the 6 pre-set memories in each band,
use the following procedure:
1. Turn the radio on and select the desired band.
2. Select the first station to be pre-set using the
Manual Up/Down or Automatic Seek Tuning
Controls
.
3. Press the pre-set button ("1-6") to be set and
continue to hold it in. After approximately 2
seconds, the pre-set number will appear on the
display panel, indicating that the station is now
set into that pre-set memory position. The station
can now be recalled at any time by pressing
that button.
4. Repeat the above procedure for the remain in
pre-sets on that band and for the other 4 bands
on the unit.
bm
bp LIQUID CRYSTAL DISPLAY PANEL
FUNCTIONS
The Liquid Crystal Display (LCD) panel displays the
frequency, time, and all activated functions, including
five bar graphs which provide a visual representation
of the volume level and the left and right channel
balance levels. The volume level is represented by
three thin bar graphs. As the volume is increased,
the number of illuminated segments will increase.
The left and right channels are represented by the
wider bar graphs. As the strength of the signal applied to either the left or right channel increases, the
number of illuminated segments will increase.
NOTE: It is a characteristic of LCD panels that, if
subjected to cold temperatures for an
extended period of time, they may take longer
to illuminate than under normal conditions. In
addition, the visibility of the numbers on the
LCD may slightly decrease. The LCD
read-out will return to normal when the
temperature increases to a normal range.
DISC SLOT
With the label surface facing up, gently insert the
disc into the slot until the soft-loading mechanism
engages and disc play begins. The
indication
illuminates and becomes animated, the
IN
symbol lights, and the track number and elapsed
time will appear on the display panel.
CAUTION: This unit is designed for play of
standard 5" (12cm) Compact Discs
ONLY. Do not attempt to use 3" (8cm)
bq
7
7
CD-Singles in this unit, either with or
without an adaptor, as damage to the
player and/or disc can occur. Such
damage will not be covered by the
Warranty on this product.
TRACK SELECT
These buttons are used to quickly select the beginning
of a particular track. With each momentary tap of
the Forward Track Select button (+ ), the next
higher track number will be selected as shown on the
display panel. Similarly, with each momentary tap of
-), the next
the Backward Track Select button (
lower track number will be selected.
br
bs CUE/REVIEW FUNCTIONS
High-speed audible search to any section of the
disc can be made by the Cue and Review functions.
Press and hold the Cue button (+ ) to advance
rapidly in the forward direction or the Review button
(
-) to advance rapidly in the backward direction.
During either function, the elapsed time within each
track will automatically be shown on the display panel.
CD TRACK ONE POSITION (TOP) SELECTOR
During disc play, press this button to return to beginning of first track on disc. Disc counter will return to
zero and "TRACK" number 01 will appear on display panel.
bt
bu REPEAT PLAY SELECTOR (RPT)
During disc play, press this button to repeat the play
of the selected track (“RPT” will appear on the
display panel). Play of the track will continue to
repeat until the button is pressed again and the “RPT”
indication disappears from the display panel. Repeat
Play mode will also be cancelled by activating the
Random Play
or Track Scan
functions.
RANDOM PLAY SELECTOR (SHF)
During disc play, press this button to play the tracks
on the disc in a random or shuffled order (“RND”)
will appear on the display panel). In Random Play
mode, pressing the Forward Track Select (+ )
or Backward Track Select (
-) will also select
tracks in a random order instead of the normal progression. Additional presses will select tracks in
random order. The Random Play mode can be
cancelled by pressing the button again (“RND”)
indication will disappear from the display panel) or
or Track Scan
by activating the Repeat Play
functions.
TRACK SCAN (SCN)
During disc play, press this button to play the first 10
seconds of each track on the disc (“SCAN” will ap-
cl
cl
cm
bu
cm
cm
128-5780E
8 of 48
bu
cl
cn DISC EJECT ( )
Disc play is stopped, the disc is ejected and the unit
will change to radio operation by pressing this button.
If the disc is not removed from the unit and the button
is pressed again, the disc will be re-loaded and
begin playing.
If the disc is not removed from the disc slot within
15 seconds of being ejected, it will automatically be
re-loaded into the unit to prevent it from being
accidentally damaged. Play of the disc can be
resumed by using the CD Mode Selector to choose
CD player function.
TIME/FREQUENCY SELECTOR (T/F)
This unit can display the clock time, radio frequency or
CD player functions on the display panel. Pressing
the Time/Frequency Selector button when the
radio frequency or CD player track indication is
shown will change the display to show the time.
The time display will automatically return to the radio
frequency or CD player function indication after 5
seconds.
cr
co
cr MODE SELECTOR (MODE)
This button is used to select the radio, or the playback
mode for the CD player or remote CD changer (if
installed). Each press of the button will select a
different mode as indicated on the display panel.
During CD player operation, this button may be used
to change to radio or remote CD changer mode
("CDC") without ejecting the disc (the
IN indication will remain on the display panel to show that a
disc is still loaded in the unit). Press the button again to
return to integral CD player mode and resume play of
the disc from the point at which it was stopped.
&
DISC SELECT (CD+ & CD-)
These buttons are used to increase or decrease
selection of a desired disc for play in the remote CD
changer. To advance to a higher number disc, press
the "CD+" button
. To return to a lower number
disc, press the "CD-" button . The number of the
disc in play will be shown on the display panel.
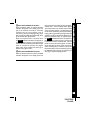
FRONT PANEL RELEASE BUTTON
This button is used to release the mechanism that
holds the front panel to the chassis. To detach the
front panel, press the button so that the left side of the
panel is released. Grasp the released side and pull it
off of the chassis.
To re-attach the panel, position the right side of the
panel in place first and then press the left side of the
panel until the mechanism locks it into place.
THEFT-DETERRENT L.E.D.
The theft-deterrent Light Emitting Diode (L.E.D.) is
located behind the front panel and is accessible when
the front panel is removed. The flashing light serves
as a visual warning to the would-be thief that the unit
has been disabled by removal of the front panel.
RESET BUTTON
A "RESET" button is located on the front of the chassis
(front panel must be removed to access the button).
The "RESET" circuitry is provided to protect the
microprocessor circuitry and should only be activated under the following circumstances as it will
erase the time and pre-set memories:
1. Upon initial installation after all wiring is completed.
2. After the position of the frequency step switch on
the bottom of the chassis has been changed.
3. If there is a malfunction of any of the switches on
the unit, pressing the "RESET" button may clear
the system and return to normal operation.
cs ct
cs
ct
OPER
AT ING INSTRUC
OPERA
INSTRUCTT IONS
pear on the display panel). When a desired track is
reached, press the Scan button again to cancel
the function and play of the selected track will
continue. Track Scan mode will also be cancelled
by activating the Repeat Play
or Random Play
functions.
cu
cp FM MONO/STEREO SELECTOR (MONO) dl
During FM radio operation, this button is used to
select mono or stereo reception of the broadcast
signal. Under normal reception conditions, the unit
should be left in the stereo mode, as indicated by
"ST " on the display panel when listening to an FM
stereo signal. If the stereo signal is too weak for
comfortable listening, press the button to switch to
mono reception (the "ST " indication will disappear from the display panel). To return to the
stereo reception mode, press the button again so
that the "ST " indication returns.
EQUALIZER SELECTOR (P.EQ)
The P.EQ button applies preset sound effects to
the unit's audio output signal. The P.EQ button,
when pressed, will activate one of three operating
modes ("ROCK, CLAS, or POP"). When the P.EQ
function is active, the bass and treble levels cannot
be changed. When the P.EQ function is not active, the unit returns to the user-set bass and
treble levels.
cq
dm
8
128-5780E
9 of 48
OPER
AT ING INSTRUC
OPERA
INSTRUCTT IONS / SET
SETTT ING THE CLOCK
NOTES ON USE OF FRONT PANEL
1. Make sure the front panel is right-side-up when
attaching it to the chassis as it cannot be
attached when up-side down.
2. Do not press very hard on the front panel when
attaching it to the chassis. No more than light
to moderate pressure should be needed.
3. When attaching the front panel, make sure the
right side is correctly engaged before pressing
the left side to lock it into position.
4. When taking the front panel with you, please
use the supplied carrying case to protect the
panel from dirt and damage. Make sure there
is no dust or dirt on the electrical terminals on
the back of the panel as this could cause
intermittent operation or other malfunctions.
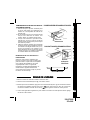
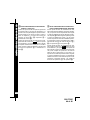
DETACHING THE FRONT PANEL
Release Button
ATTACHING THE FRONT PANEL
Engage right
side first
NOTES ON USE OF REMOTE INPUT JACK
The remote input jack provides the user option of
applying an external audio source to the radio.
The audio jack is compatible with most "Walkman"
CD and cassette players, or an MP3 digital audio
playback unit. When the external source is
connected, only that media is played by the radio;
no other input sources (radio or CD) are operative.
SET
SETTT ING THE CLOCK
1. Turn the vehicle ignition and radio “on”.
2. Press the Time/Frequency Selector button co
3.
9
to display the time.
co
While the time is being displayed, press the Time /Frequency Selector button
together with the
Manual Down Tuning button (
-) to adjust the hours or the Manual Up Tuning button (+
) to adjust
the minutes to the correct time.
4. Five seconds after the last hour or minute adjustment is made, the time will be set in the unit and normal
operation can resume.
128-5780E
10 of 48
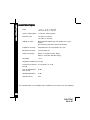
SPECIFICA
SPECIFICATT IONS
SPECIFICATIONS
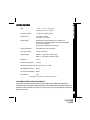
Size:
7" W x 2" H x 6-5/16" D
178 mm x 50 mm x 163 mm
Operating Voltage:
12 volts DC, negative ground
Output Power:
140 watts maximum
( 35 watts x 4 channels)
Output Wiring:
Floating-ground type designed for 4 speaker use.
Front and rear channels CANNOT be combined (bridged)
for use with 2 speakers.
RCA low-level outputs (rear channels).
Output Impedance:
Compatible with 4 ohm speakers.
Low-Level Output:
2.0 volts (2,000 mv.)
Tuning Range:
AM:530 - 1,720 KHz. (10 KHz. step)
FM:87.5 - 107.9 MHz. (200 KHz. step)
Sensitivity:
< 70 V
FM Stereo Separation:
> 20 dB
CD Frequency Response: 20 - 20,000 Hz. +0 / -3 dB
CD Signal/Noise Ratio:
85 dB
CD Channel Separation: 65 dB
CD Distortion:
0.2%
*Specifications are subject to change without notice.
CD-R AND CD-RW PLAYBACK CAPABILITY
This model can play most CD-R and CD-RW media that contains audio programs.
Playback of both CD-R and CD-RW depends on the conditions of the recording equipment
and the CD-R or CD-RW disc quality. In some cases, a CD-R or CD-RW disc cannot be
played on this unit.
10
128-5780E
11 of 48
CD CH
A NGER CONTR
OL
S
CHA
CONTROL
OLS
CD CH
A NGER CONTR
OL
S
CHA
CONTROL
OLS
CD CH
A NGER CONTR
OL
S
CHA
CONTROL
OLS
Built into this radio are controls to operate an
optional CD changer. Please check with your
Rampage/Audiovox car stereo specialist or
call 1-800-645-4994 for recommendations of
the models that will work with this radio.
Adjustment of the audio functions (volume,
tone, balance, and fader) for the CD changer
operate in the same manner as they do for
radio play. The following controls will operate
the CD changer when it is installed and
connected to this radio. Refer to the owner’s
manual included with the CD changer for
instructions on the installation and correct
loading and use of the CD magazine.
dn
CD CHANGER MODE SELECTOR (MODE)
During radio or CD play, press this button to
select operation of the CD changer as shown
by CDC on the display panel. Disc play will
begin and the disc and track number will be
shown on the display panel. If a new magazine
has been loaded into the changer, play will
begin from the first track of the first disc in the
magazine. If a magazine was already in the
changer, play will resume from the track on the
disc previously in play.
do dp
&
DISC SELECT (CD+ & CD-)
These buttons are used to select the desired
disc for play. To advance to a higher number
disc, press the CD+ button . To return to a
lower number disc, press the CD- button .
The number of the disc in play will be shown on
the display panel.
do
dq
12
dp
TRACK SELECT (+
/
-)
The Track Select functions are used to quickly
access the beginning of a particular track.
Each time the Forward Track Select (+ )
in side of the button is pressed, the next higher
track number will be selected as shown on
display panel. Similarly, each time the
Backward Track Select (
-) side of the
button is pressed, the next lowertrack number
will be selected as shown on the display panel.
dr
CUE/REVIEW FUNCTIONS (+
/
-)
High-speed audible search to any section of
the disc can be made by the Cue and Review
functions. Press and hold the Cue (+ ) side
of the button to advance rapidly in the forward
direction (the disc play symbol will rotate foward
on the display panel) or the Review (
-) side
of the button to advance rapidly in the backward
direction (the disc symbol will rotate backwards
on the display panel).
ds
TRACK/DISC SCAN SELECTOR (SCN)
When the SCAN button is pressed, the SCAN
indication will appear on the display panel, and
the first 10 seconds of each track on the disc will
be played in order. When a desired track is
reached, press the SCAN button twice with a
one second interval between presses and play
of the selected track will continue (SCAN will
disappear from the display panel). The Track
Scan mode will also be canceled by activating
any other disc function (Track Select, Cue/
Review, Repeat or Random Play).
When the SCAN button is pressed twice,
the DISC and SCAN indications will appear on
the display panel and the first 10 seconds of
each track on each disc in the magazine will be
played. When a desired disc is reached, press
the Scan button again and play of the selected
disc will continue ( DISC and SCAN will
disappear from the display panel). The Disc
Scan mode will also be canceled by activating
any other disc function (Disc or Track Select,
Cue/Review, Repeat Play etc.).
11
128-5780E
12 of 48
ds
du
du
du
do dp
ds
DISC/TRACK RANDOM PLAY (SHF)
When the Random button is pressed, the RND
indication will appear on the display panel and
the tracks on the disc will be played in a random,
will
shuffled order. The Track Select button
also select tracks in the shuffled order instead
of the normal progression. The Random Track
mode can be canceled by pressing the Random
button again or by activating the Disc Select
and , Scan
or Repeat Play
functions.
When the Random button is pressed again,
the DISC and RND indications will appear on
the display panel and the tracks on the disc will
be played in a random, shuffled order. After all
tracks on the disc have been played, a new disc
will be selected and all the tracks on this disc
will be randomly played. This will continue until
the Random Disc mode is canceled by pressing
the Random button again or by activating the
Scan
or Repeat Play
functions.
dp
dp
ds
ds
dt
do
CD CH
A NGER CONTR
OL
S
CHA
CONTROL
OLS
dt
DISC/TRACK REPEAT PLAY (RPT)
When the Repeat button is pressed, the RPT
indication will appear on the display panel and
play of the selected track will be continually
repeated until the Track Repeat mode is
canceled by pressing the Repeat button again
or by activating the Disc Select and , Scan
or Random Play
functions.
When the Repeat button is pressed twice
the DISC and RPT indications will appear on
the display panel and play of the selected disc
will be continually repeated until the Disc Repeat
mode is canceled by pressing the Repeat
button again or by activating the Scan
or
functions.
Random Play
dt
CD CH
A NGER ERR
OR CODES
CHA
ERROR
12
128-5780E
13 of 48
CD PL
AYER A
ND CD CH
A NGER ERR
OR CODES
PLA
AND
CHA
ERROR
CD PL
AYER ERR
OR CODES
PLA
ERROR
If a problem should develop while operating the CD player, an error code (ER-1, ER-2, ER-3,
etc.) may appear on the display panel. This can indicate a number of problems with the unit,
including a mechanical error or an error in the microprocessor control of the player. If an error
code should appear, try ejecting and re-loading the disc into the player. While the disc is out of
the unit, make sure it is clean, undamaged, and loaded correctly (label surface up). You may
also try activating the RESET button
on the unit, but this will also erase the time and pre-set
memories.
If the suggested measures do not solve the problem, contact an approved warranty station near
you for further assistance.
dm
CD
A
OR
CHA
ERROR
CD CH
A NGER
NGER ERR
OR CODES
CODES
If a problem should develop while operating the CD changer, the following error codes may
appear on the display panel.
ER-1: Indicates that there is no magazine loaded in the CD changer.
ER-2: Indicates a problem with the magazine eject function.
ER-3: Indicates an error in the disc loading function.
ER-4: Indicates an error in the disc un-loading function.
ER-5: Indicates an error in the magazine position.
ER-6: Indicates an error in the laser pick-up position.
ER-7: Indicates an error in the laser focus on the disc.
In any of the above situations, try ejecting the CD magazine from the changer and make sure
the discs are clean, undamaged, and loaded correctly (refer to the Owner’s Manual of the CD
changer). Re-load the magazine and check for proper operation. You may also try activating
the RESET button
on the unit, but this will also erase the time and pre-set memories.
If the suggested measures do not solve the problem, contact an approved warranty station near
you for further assistance.
dm
13
128-5780E
14 of 48
The radio section of your new sound system does not require any maintenance. We
recommend that you keep this manual for reference on the many features found in this unit as
well as how to set the clock.
The compact disc player section also requires no routine maintenance, but proper
understanding of its use and handling will help you obtain maximum enjoyment of its
capabilities. The following points should be observed:
! When cleaning the interior of the vehicle, do not get water or cleaning fluids on the unit.
! The CD player is a precision instrument and will not operate properly in extreme heat or cold.
In case of such conditions, wait until the interior temperature of the vehicle reaches a normal
temperature before using the player.
! If the temperature inside the player gets too hot, a protective circuit will automatically stop
play of the disc. In this case, allow the unit to cool off before operating the player again.
! Never insert anything other than a 5" (12 cm) compact disc into the player as the mechanism
can be damaged by foreign objects.
! Do not attempt to use 3" (8 cm) CD-Single discs in this unit, either with or without an adaptor,
as damage to the player and/or disc may occur. Such damage will not be covered by the
Warranty on this product.
! When not using the disc player, always remove the compact disc. Do not leave an ejected
disc sitting in the disc slot as this can expose it to sunlight and other causes of damage.
! Do not attempt to open the unit chassis. There are no user serviceable parts or adjustments inside.
! When the vehicle warms up during cold weather or under damp conditions, moisture may
condense on the lens of the disc player. Should this occur, the player will not operate
properly until the moisture has evaporated.
! The unit is designed with a vibration dampening CD mechanism to minimize interruption of
disc play due to normal vibration in a moving vehicle. When driving on very rough roads,
however, occasional sound skips may occur. This will not scratch or damage the disc and
normal play will resume when the rough conditions cease.
CA
RE A
ND MA
INTENA
NCE
CARE
AND
MAINTENA
INTENANCE
CARE AND MAINTENANCE
HANDLING COMPACT DISCS
Dirt, dust, scratches, and warpage can cause skips in the playback and deterioration of sound
quality. Please follow these guidelines to take care of your compact discs:
! Use only compact discs with the mark
.
! Fingerprints, dust, and dirt should be carefully wiped off the disc’s playing surface (shiny side)
with a soft cloth. Wipe in a straight motion from the inside to the outside of the disc.
! Never use chemicals such as record sprays, household cleaners or thinner to clean compact
discs. Such chemicals can irreparably damage the disc’s surface.
! Discs should be kept in their storage cases when not in use.
! Do not expose discs to direct sunlight, high temperatures or high humidity for extended periods.
! Do not stick paper, tape, or labels on the disc surfaces nor write on them with any type of marker.
14
128-5780E
15 of 48
WA RR A NT Y
12 MONTH LIMI
TED W
A RR
A NT Y
LIMITED
WA
RRA
AUDIOVOX CORPORATION (the Company) warrants to the original retail purchaser of
this product that should this product or any part thereof, under normal use and
conditions, be proven defective in material or workmanship within 12 months from the
date of original purchase, such defect(s) will be repaired or replaced with new or
reconditioned product (at the Company's option) without charge for parts and repair
labor.
To obtain repair or replacement within the terms of this Warranty, the product is to be
delivered with proof of warranty coverage (e.g. dated bill of sale), specification of defect(s),
transportation prepaid, to the warranty center at the address shown below.
This Warranty does not extend to the elimination of car static or motor noise, to correction
of antenna problems, to costs incurred for installation, removal, or reinstallation of the
product, or damage to tapes, compact discs, speakers, accessories, or vehicle electrical
systems.
This Warranty does not apply to any product or part thereof which, in the opinion of the
Company, has suffered or been damaged through alteration, improper installation,
mishandling, misuse, neglect, accident, or by removal or defacement of the factory serial
number/bar code label(s). THE EXTENT OF THE COMPANY'S LIABILITY UNDER
THIS WARRANTY IS LIMITED TO THE REPAIR OR REPLACEMENT PROVIDED
ABOVE AND, IN NO EVENT, SHALL THE COMPANY'S LIABILITY EXCEED THE
PURCHASE PRICE PAID BY PURCHASER FOR THE PRODUCT.
This Warranty is in lieu of all other express warranties or liabilities. ANY IMPLIED
WARRANTIES, INCLUDING ANY IMPLIED WARRANTY OF MERCHANTABILITY,
SHALL BE LIMITED TO THE DURATION OF THIS WRITTEN WARRANTY. ANY
ACTION FOR BREACH OF ANY WARRANTY HEREUNDER INCLUDING ANY IMPLIED
WARRANTY OF MERCHANTABILITY MUST BE BROUGHT WITHIN A PERIOD OF 30
MONTHS FROM DATE OF ORIGINAL PURCHASE. IN NO CASE SHALL THE
COMPANY BE LIABLE FOR ANY CONSEQUENTIAL OR INCIDENTAL DAMAGES
FOR BREACH OF THIS OR ANY OTHER WARRANTY, EXPRESS OR IMPLIED,
WHATSOEVER. No person or representative is authorized to assume for the Company
any liability other than expressed herein in connection with the sale of this product.
Some states do not allow limitations on how long an implied warranty lasts or the
exclusion or limitation of incidental or consequential damage so the above limitations or
exclusions may not apply to you. This Warranty gives you specific legal rights and you
may also have other rights which vary from state to state.
U.S.A.: AUDIOVOX CORPORATION, 150 MARCUS BLVD., HAUPPAUGE, NEW YORK 11788 • 1-800-645-4994
CANADA: CALL 1-800-645-4994 FOR LOCATION OF WARRANTY STATION SERVING YOUR AREA
15
Form No. 128-4270E
© 2002 Audiovox Electronics Corporation
!
Hauppauge, NY 11788
128-5780E
128-5780E
16 of 48
MA
NUEL D'INST
ALL
AT ION
MANUEL
D'INSTALL
ALLA
MANUEL D'INSTALLATION
Cet appareil a éte élaboré pour être installé dans les voiture, camions et camionettes disposant d’une ouverture radio. La
plupart du temps, une trousse de montage comprenant des consignes d’installations particulières sera nécessaire pour
installer la radio sur le tableau de bord. Ces trousses sont disponibles dans les magasins de matériel électronique et les
magasins spécialisés en stéréo-automobile. Vérifiez toujours le mode d’emploi de la trousse avant l’achat pour vous assurer
qu’elle convient à votre véhicule. Si vous souhaitez acheter une trousse mais n’en trouvez pas de disponible téléphonez à
notre numéro vert “Assistance” (1-800-645-4994).
PROCEDURE D'INSTALLATION UNIVERSELLE EN UTILISANT DES BAGUES D'ASSEMBLAGE
1 . Enlever le tableau de bord frontal détachable s’il est fixé au châssis en poussant la touche de
“relachement”. Glisser les bagues d’assemblage hors du châssis. Si elles sont bloquées, utiliser les outils
de démontage (fournis) pour les désangager.
2 . Vérifier la taille d’ouverture du tableau de bord en y glissant les bagues d’assemblage. Si l’ouverture n’est
pas assez large, coupez soigneusement ou limer au besoin jusqu’à ce que la bague d’assemblage glisse
facilement dansl’ouverture. Ne pas engager la bague d’assemblage de force et ne pas la courber ou la plier.
Vérifier que l’espace derrière le tableau de bord est suffisant pour le châssis de la radio.
3 . Trouver la série d’attaches au dessus, au dessous et sur les côtés des bagues d’assemblage. Lorsque la bague
est introduite complètement dans l’ouverture du tableau de bord, plier autant d’attaches vers l’exterieur qu’il
sera nécéssaire pour que les bagues soient attachées fermement au tableau de bord
4 . Placer la radio devant l'ouveture du tableau de bord pour que les cables puissent etre achemines à travers les bagues
d'assemblage. Suivre le schema de cablage attentivement verifier que tous les raccords des harnais electriques
sont surs et isoles avec des ecrous pour fil ou du ruban pour fil electrique afin que l'appareil fonctionne correctement.
Apres avoir finit la pose des fils electriques, attacher le panneau frontal et mettre l'appareil en marche pour s'assurer
du bon fonctionnement (la touche de mise en marche doit etre allumee). Si l'appareil ne fonctionne pas verifier
tous les cables jusqu' à ce que le probleme soit regle. Lorsque l'appareil fonctionne, éteignez la touche de mise
en marche et finnissez de monter le châssis.
5 . Lisser la radio soigneusement dans la bague d’assemblage en vous assurant qu’elle est à l’endroit, jusqu’à
ce qu' elle soit installée correctement et que les sauterelles de fixation s’enclenchent.
6 . Attacher l’une des extremités de l’attache de support perforée (fournie) au goujon de la vis à l’arrière du châssis
en utilisant l’écrou hexagonal fourni. Attacher l’autre extremité de l’attache perforée sur un côté du panneau
de bord au-dessus ou au dessous de la radio en utilisant le vis ou l’écrou hexagonal fourni. Plier l’attache
autant qu’il le faut.
ATTENTION:L’arrière de la radio doit être maintenu avec l’attache afin d’éviter que le tableau de bord soit
endommagé par le poid de la radio ou une mauvaise utilisation provoquée par les vibrations.
7. Rattacher le panneau frontal au châssis. Choisir un endroit ou placer la prise d’entrée à distance
(d’ordinaire sous le tableau de bord) si cela fait partie de la radio. Fixez-la avec deux vis autotaraudeuses (M5x6). Ne pas trop serrer les vis. A l’aide du Manuel D’utilisation de l’appareil vérifiez le bon
fonctionnement de la radio.
TROUSSE DE MONTAGE
1 . S’il est nécessaire d’utiliser une trousse de montage pour installer la radio dans votre véhicule, suivre les
consignes figurant dans la trousse pour attacher la radio aux plaques de montage fournies avec la trousse
de montage.
2 . Faites l’installation électrique et testez la radio en suivant les indications de l’Etape 4 ci-dessus.
3 . Installer l’assemblage plaques de montage/radio au sous-tableau de bord en suivant les indications de la
trousse de montage.
4 . Attacher l’attache de support à la radio et au tableau de bord comme indiqué dans l’etape 6 ci-dessus.
5 . Remplacer le panneau de garnissage du tableau de bord.
METHODE INSTALLATION ISO
Cet appareil dispose de trous taraudés sur les panneaux latéraux du chassis qui peuvent être utilisés avec les supports de
montage de certains véhicules Toyota, Nissan, Mitshubishi, Isuzu, Hyundai et Honda pour installer la radio au tableau de
bord. Veuillez demander conseil à votre détaillant de stéréo automobile local pour vous aider à l’installer.
1 . Enlever la radio de fabrique existante du tableau de bord ou de la console centrale de montage. Conserver
tous les accessoires et les supports car ils serviront à installer la nouvelle radio.
2 . Désenclencher soigneusement le cadre de plastique du devant du châssis de la nouvelle radio. Enlever et
jeter le cadre.
3 . Enlever les supports de montage de fabrique et les accessoires de la radio existante et attachez-les à la
nouvelle radio.
ATTENTION:NE PAS DEPASSER LA TAILLE DE VIS DE M5XM6 MM AU MAXIMUM DES VIS PLUS LONGUES
RISQUENT DE TOUCHER ET D’ENDOMMAGER L’EQUIPEMENT A L’INTERIEUR DU CHASSIS.
4 . Câbler la nouvelle radio au véhicule en suivant les consignes de l’etape 4 ci-dessus.
5 . Monter l’assemblage de la nouvelle radio au tableau de bord ou la console centrale en utilisant la méthode
inverse de celle décrite dans l’e tape 1.
16
128-5780E
17 of 48
MANUEL D'INSTALLATION
NUM
NUMEERO VERT POUR TOUT AIDE LORS DE L’INSTALLATION
L’installation et le cablage de cet appareil sont si simples que vous n’aurez certainement pas besoin
d’aide, cependant en cas de probleme vous pouvez nous contacter. Appelez notre numéro vert d’aide
au 1-800-645-4994 pendant les jours et heures indiqués (U.S.A. et Canada seulement).
JOUR
PACIFIQUE
LUNDI à VENDREDI 5:30AM - 4PM
SAMEDI
6AM - 2PM
MONTAGNE
6:30AM - 5PM
7AM - 3PM
COTE EST
8:30AM - 7PM
9AM - 5PM
CENTRE
7:30AM - 6PM
8AM - 4PM
NSTALLATION UNIVERSELLE EN UTILISANT DES BAGUES D’ASSEMBLAGE
ECROU (5MM)
ATTACHE PERFOREE
ATTACHER CETTE
EXTREMITE AU GOUJON DE
LA VIS SUR L‘ARRIERE DU
CHâSSIS
OUVERTURE DU TABLEAU DE BORD D’ORIGINE,
LIMER LES BORDS AUTANT QUE NECESSAIRE -NE
PAS TROP ELARGIRREMARQUE:SI LE TABLEAU EST DUR, SERVEZ-VOUS DU
COTE ARRIERE (SANS LE REBORD) DES BAGUES
D’ASSEMBLAGE COMME MODELE OU TAILLE
D’OUVERTURE.
PLIER LE DESSUS DES ATTACHES
VERS LE HAUT
SCREW
(5MM)
RADIO
GOUJON DE LA VIS
PLIER LE
DESSOUS DES
ATTACHES VERS
LE BAS
ECROU (5MM)
BAGUES
D’ASSEMBLAGE
ATTACHER CETTE EXTREMITE POUR PROTEGER UN COTE
DU TABLEAU DE BORD. PERFORER CI NECESSAIRE.
OUTILS
º
ATTENTION: POUR GARANTIR LE BON FONCTIONNEMENT
DU LECTEUR CD, LE CHâSSIS DOIT ETRE INSTALLé à 20°
DE L’HORIZONTALE. PRENEZ GARDE à RESPECTER CES
LIMITES . .
LATERALE
DU
CHâ SSIS .
-------~ 20°
VUE
I
~
DETACHABLE
PANNEAU FRONTAL
AU PLUS.
PANNEAU
FRONTAL.
INSTALLATION ISO
INSTALLATION TYPIQUE
OTER LE CADRE EN PLATIQUE DU DEVANT DU CHâSSIS EN LE
DETACHANT SOIGNEUSEMENT..
DETACHER à DEUX
ENDROITS AU-DESSUS
AU-DESSOUS.
CADRE EN PLASTIQUE
17
ET
TAILLE
MAXIMUM DE
LA VIS M5X6
TAILLE
MAXIMUM DE
LA VIS M5X6
SUPPORTS DE
MONTAGE DE FABRIQUE
2
128-5780E
18 of 48
CABL
AGE DE LLA
AR
A DIO
CABLA
RA
CONSULTER LA PAGE 19 POUR LE CABLAGE DES HAUT-PARLEURS
BLEU
IMPORTANT
CABLE DE
L'ANTENNE
D' ORIGINE
BOITE A FUSIBLE
DE LA VOITURE
LE CABLE DE COULEUR
BLEUE PEUT ETRE UTILISE
POUR ALLUMER UNE
ANTENNE AUTOMATIQUE OU
UN AMPLIFICATEUR EXTERNE
A DISTANCE (CONSULTER LE
MANUEL DE L'ANTENNE OU DE
L'AMPLIFICATEUR).
FUSIBLE POUR LA
RADIO OU POUR LES
"ACCESSORIES"
ROUGE
ECROU
NOIR
CABLAGE DE LA RADIO
ANTENNE
ANTENNE AUTOMATIQUE
PARTIE METALLIQUE
DU TABLEAU DE BORD
(PERFORER SI
NECESSAIRE)
JAUNE
IMPORTANT
CE FIL DOIT ETRE PROPREMENT
BRANCHE SINON LA RADIO NE
FONTIONNERA PAS
CORRECTEMENT.
CONTIENT:
BOITE A FILTRE UN FUSIBLE D'UNE AMPERE UN FUSIBLE DE 10
A FUSIBLE
AMPERES
CONSULTER LA PAGE 4 POUR
LE CABLAGE DU HAUTPARLEUR
POSITIVE (+) TERMINAL
BATTERIE DE 12 VOLT
FICHE DE GOUPILLE
PRISE DE
L'ANTENNE A
L'ARRIERE DE LA
RADIO
PRISE DE GOUPILLE DE COUPLAGE 14
RADIO
TÉLÉCOMMANDE DE LA PRISE
D’ENTRÉ
18
128-5780E
19 of 48
CABLAGE DES HAUT-PARLEURS
CABLAGE DES
HAUT-PARLEURS
CONSULTER
LA PAGE 18
ATTENTION!
! LES AMPLIFICATEURS DE CETTE RADIO SONT ELABORES POUR ETRE UTILISES UNIQUEMENT AVEC
4 HAUT-PARLEURS.
! NE JAMAIS ASSOCIER DES DEBITS (ON PONT) POUR UNE UTILISATION AVEC 2 HAUT-PARLEURS.
! NE JAMAIS METTRE A LA MASSE DES BRANCHEMENTS DE HAUT-PARLEURS NEGATIFS AVEC DES
MASSE DU CHASSIS.
! LE SYSTEME ELECTRIQUE DE LA RADIO PEUT ETRE ENDOMMAGE SI LE CABLAGE N'EST PAS EFFECTUE
EXACTEMENT COMME DANS LES EXPLICATIONS CI-DESSOUS THE RADIO.
REMARQUE:
CONSULTER VOTRE DETAILLANT EN ESTEREO
AUTOMOBILE RAMPAGE/AUDIOVOX OU APPELER
LE 1-800-645-4994 POUR OBTENIR LA LISTE DES
MODELES QUI FONCTIONNERONT AVEC VOTRE
RADIO.
SORTIE DE LIGNE DE PRISE
À UTILISER AVEC DES
AMPLIFICATEURS
EXTERNES
FACULTATIFS.
ROUGE = ARRIÈRE
DROITE
BLANC = ARRIÈRE
GAUCHE
CABLE …. (FOURNI
AVEC L’INVERSEUR
DE CD
RADIO
INVERSEUR DE CD
FACULTATIF
6
C OMP ACT
DOUILLE DE GOUPILLE POUR BRANCHER UN
LECTEUR DE CD FACULT
PRISE D’ENTRÉE À DISTANCE À
UTILISER AVEC UN LECTEUR DE CD
EXTERNE, UN MAGNÉTOPHONE, OU
UNE LECTURE DU SON MP3
4-FICHE DE
GOUPILLE
9-FICHE DE
GOUPILLE
HAUT-PARLEUR DE DEVANT DE GAUCHE
CONSULTER LA PAGE 3 HAUT-PARLEUR ARRIÈRE DE
POUR LE CABLAGE DE
LA RADIO
BLANC AVEC DES RAYURES
NOIRES
BLANC
DROITE
GRIS AVEC DES RAYURES NOIRE
GRIS
VERT
VIOLET
VERT AVEC DES RAYURES NOIRES
VIOLET AVEC DES RAYURES NOIRES
ASSISTANCE!
1-800-645-4994
19
Lundy Vendredi
Samedi
HAUT-PARLEUR ARRIÈRE DE GAUCHE
8:30am - 7:00pm Est
9:00am - 5:00pm Est
HAUT-PARLEUR ARRIÈRE DE DROITE
128-5780E
20 of 48
29
11
16
17
35
36
15
14
23
8
25
24
22
VOL
TUNE/
SKIP/
TRACK
2
MP3 ST PTY ME/CR EON LOC
VOL
TAPE IN
SW LOUD AF TA TP MONO REC
SEL
BAND
LOUD
T/F
CLAS
MONO
26, 32
MODE
POP
AS/PS
1
PAU
2
ROCK
LOC
P.EQ
MUTE
CDP
SCN
3
9
4
RPT
SHF
5
D.DN
6
D.UP
18 21,37 19,38 20,39 28,34 27,33
3, 4, 5, 6, 7 10
12
31,30
(BEHIND PANEL)
MODE D’EMPLOI
MODE D’EMPLOI
1
13
1
TOUCHE DE MISE EN MARCHE ET D'ARRET
4 CONTROLE DE LA BASSE
Appuyer sur cette touche pour Allumer et Eteindre l’unité. Si Pour régler le niveau de la basse, sélectionner d’abord la
l’unité est éteinte et la touche d’allumage “allumée” alors l’unité
se mettra en marche automatiquement lors de l’insération
d’un disque ou à l’appui sur LA FONCTION” d’allumage ou
“LA BANDE” de l’interrupteur.
2
CONTROLE DE L'INTENSITE DU VOLUME
Pour augmenter l’intensité du volume, appuyer sur la touche
. Le volume augmentera et l’intensité apparaîtra sur
l’écran s’étalant de “00 VOL” minimum à “39 VOL” maximum. Pour augmenter le volume rapidement, appuyer sans
relacher sur la touche. Pour baisser l’intensité du volume,
appuyer sur la touche
. Ne pas relacher la touche afin
de baisser le volume rapidement. L’affichage se repositionnera
automatiquement 5 secondes après le dernier réglage du
volume ou lorsque une autre fonction sera allumée. Ces
touches peuvent etre utilisées également en même temps
que la touche “SELECTION AUDIO” (SEL) pour ajuster
les niveaux de la basse, la tonalité, l’équilibrage et l’atténuateur
. Se rapporter aux sections , ,
et .
TOUCHE DE SELECTON AUDIO (SEL)
Cette touche sert a sélectionner les fonctions audio (volume, tonalité, basse, équilibrage, et atténuateur) à régler en
utilisant le Contrôle du Niveau de Volume . Sélectionner
la basse ( “BAS sur l’écran ), la tonalité (“TRE”), l’équilibrage
(“BAL”), l’atténuateur (“FAD”), ou le volume (“VOL”), en
appuyant sur la touche “SEL”. L’affichage se repositionnera
automatiquement sur l’affichage normal au bout de 5
secondes après le dernier réglage ou lorsqu’une autre fonction
est activée. Cette unité émettra un bref signal sonore à
l’appui de la touche.
3
3
456 7
2
3
fonction en appuyant sur la touche “SEL” pour que les
lettres “BAS” apparaissent sur l’écran 5 secondes apres
avoir sélectionné la fonction Basse, appuyer sur les boutons
ou
du Contrôle de Niveau pour régler la réponse
de la basse au niveau désiré. Le niveau de la basse sera
indiqué sur l’écran allant de -12 au minimum jusqu’à +12 au
maximum (0 indiquant une réponse fixe/stagnante).
L’affichage se repositionnera en position initiale 5 secondes
après le dernier réglage ou lorsqu’une autre fonction est
activée.
CONTROLE DE LA TONALITE
Pour ajuster le niveau de la tonalité, sélectionner d’abord
la fonction Tonalité en appuyant sur le bouton
apparaissent sur l’écran. 5 secondes après avoir choisi
la fonction Tonalité, appuyer sur les boutons
ou
du Niveau de Contrôle our régler le niveau de la
Tonnalité comme souhaité. Le niveau de la Tonnalité sera
indiqué sur l’écran allant de -12 au minimum à +12au
maximum (0 indiquant une réponse fixe). L’affichage se
repositionnera en position initiale 5 secondes après le
dernier réglage ou lorsqu’une autre fonction est activée.
2
5
3
2
6
CONTROLE DE L'EQUILIBRAGE GAUCHE/DROITE
Pour régler l’équilibrage gauche/droite du haut-parleur,
sélectionner d’abord la fonction Equilibrage en appuyant sur
la touche “SEL” 3 pour que les lettres “BAL” apparaissent sur
l’écran . 5 secondes après avoir choisi la fonction Equilibrage,
appuyer sur les boutons
ou
du Niveau de Contrôle
pour régler l’équilibrage au niveau
2
20
128-5780E
21 of 48
MODE D’EMPLOI
désiré. La position d’équilibrage sera indiquée sur l’écran
de “BAL.L16” (tout àgauche) à “BAL.R 16” (tout à droite).
Lorsque l’intensité du volume du haut-parleur de gauche
égalisera celle de celui de droite, l’indication “BAL 00”
apparaitra sur l’écran. L’affichage se repositionnera en
position initiale 5 secondes après le dernier réglage ou
lorsqu’une autre fonction sera activée.
7
CONTROLE DE L'ATTENUATEUR AVANT ET
ARRIERE
Pour régler l’équilibrage du haut-parleur avant et
arrière, sélectionner d’abord la fonction Atténuateur
en appuyant sur le bouton
“SEL” pour que les
lettres “FAD” apparaissent sur l’écran. 5 secondes
après avoir choisi la fonction Atténuateur, appuyer
ou
du Niveau de Contrôle
sur les boutons
pour régler l’équilibrage avant-arrière du hautparleur comme souhaité. La position de l’atténuateur
apparaitra sur l’écran de “FAD. R16” (tout derrière) à
“FAD.F16 (tout devant). Lorsque le niveau entre les
haut-parleurs à l’avant et à l’arriere sera équilibré,
l’indication “FAD 00” apparaitra sur l’écran. L’affichage
se repositionnera en position initiale 5 secondes
après le dernier réglage ou lorsqu’une autre fonction
sera activée.
3
2
8
UTILISATION LOCALE (LOC)
Cette fonction permet de choisir la puissance des signaux
sur lesquels l’autoradio s’arrêtera lors de la syntonisation
manuelle vers le haut ou vers le bas, de la syntonisation
automatique par repérage et/ou de la mémorisation
automatique des stations (AS) ; ainsi, seules les stations
puissantes (locales) seront reçues et sélectionnées.
Lorsque la mémorisation automatique des stations (AS)
n’est pas en fonctionnement, “ LOC ” s’efface et l’autoradio
s’arrête sur un plus grand nombre de signaux, dont ceux
émis par les stations moins puissantes (plus éloignées).
9 MISE EN SOURDINE/AUDIO
Ce bouton sert à atténuer le volume à partir du système.
En appuyant sur la touche, l’indication “MISE EN
SOURDINE” apparaîtra sur l’écran en clignotant et le volume sera mis en sourdine. En appuyant à nouveau sur la
touche de Mise en Sourdine ou en allumant le Controle de
Volume , Sélection (“SEL”) touche , la touche
“SONORE” ou la touche de l’Egalisateur (“EQ”) l’intensité
du volume retournera au niveau atteint avant la Mise en
Sourdine.
2
3
bl
SÉLECTION DE LA BANDE/COMPENSATION
PHYSIOLOGIQUE(BAND/LOUD)
21
En mode radio, chaque brève pression sur cette
touche change de bande radio. L’indication “ AM1 ”,
“ AM2 ”, “ FM1 ”, “ FM2 ” ou “ FM3 ” s’inscrira sur
l’afficheur en fonction de votre sélection.
Durant la lecture d’un disque, une pression sur cette
touche interrompt la lecture du disque et passe en
mode radio sans éjecter le disque. L’indication
IN reste alors affichée pour signaler qu’un disque est
toujours chargé dans l’appareil. Pressez la touche
“ Mode ” (26) pour reprendre la lecture du disque au
début de la dernière plage en cours de lecture.
Lorsque vous écoutez de la musique à faible volume,
la compensation physiologique accentue les
fréquences basses et aiguës de façon à compenser
les insuffisances de l’oreille humaine. Appuyez sur
la touche BAND/LOUD pendant un minimum de 2
secondes pour activer cette fonction et l’indication
“ LOUD ” s’affichera. Une nouvelle pression de 2
secondes sur la touche désactive la fonction
(l’indication “ LOUD ” s’efface).
ACCORDANGE MANUEL EN AVANT/EN
/
-)RECHECHE AUTOMATIQUE
ARRIERE (+
DE STATIONS
A chaque tape sur la touche +
a radio va se
régler sur un degré de fréquence plus élevé. De la
même facon, chaque tape sur la touche
- va
régler la radio sur un degré de fréquence plus bas.
Pour accorder manuellement une station, taper sur
la touche dans la bonne direction jusqu’a obtention
de la bonne fréquence. En appuyant sur n’importe
quelle touche plus de 2.0 secondes et en relâchant
ensuite, vous allumerez la Recherche de Stations
Automatique. La radio cherchera la prochaine station disponible et s’arrêtera à cette fréquence. La
fonction Recherche peut être interrompue en
appuyant à nouveau sur la touche ou en activant
n’importe quelle autre fonction d’accordage.
bm
bn
MISE EN MEMOIRE AUTOMATIQUE D'
ACCORDAGE / BALAYAGE POUR LA RECHERCHE DE STATIONS PREPROGRAMEES
Avec la radio en marche, appuyer sur cette touche
momentanément pour explorer les 6 stations préprogrammées dans les mémoires de cette bande.
L’unité s’arrêtera a chaque station préprogrammée
pour 5 secondes avant de continuer vers la prochaine
station préprogrammée. Pendant ce temps, le numéro
(“CH”) de la station préprogrammée dans la bande
clignotera. Rappuyer momentanément sur la touche
pour arreter l’opération de balayage Pour la Recherche
de Stations Préprogrammée et rester sur la fréquence
choisie. Le numéro de station (“CH”) s’arrêtera de
clignoter.
En pressant sur la touche pour plus de 2 secondes,
vous mettrez en marche la fonction de Mémoire
Automatique d’Accordage de Stations qui explorera
automatiquement la bande et entrera jusqu’à 6 stations puissantes dans 6 mémoires préprogrammées
(la mention “AST” clignotera sur l’écran pour montrer
que la fonction de Mémoire Automatique
d’accordagede stations est entrain de s’effectuer).
Apres avoir mémorisé les stations, l’unité s’arrêtera
automatiquement à chaque station pendant 5
secondes pour que chacune puisse être entendue.
128-5780E
22 of 48
bo
bm
ATTENTION:Cet appareil est prévu pour une lecture de
disque compact de modèle standard 5” (12
cm) uniquement. Ne pas essayer d’utiliser
des CD-Singles (unitaires) de 3” (8 cm) dans
cet appareil , soit avec ou sans adaptateur,
car vous risquez d’endommager le lecteur
ou le disque. De tels dommages ne seraient
pas couverts par la Garantie de ce produit.
br
TRACK SELECT
Ces touches servent à localiser rapidement le début d’une
MODE D’EMPLOI
Si vos stations préférées sont déja préprogrammées,
l’allumage de la mise en memoire automatique effacera
ces stations et fera entrer les nouvelles stations
fortes. Ce système est surtout utile lorsque vous
voyagez à un nouvel endroit et que vous ne
connaissez pas les stations locales.
MISE EN MEMOIRE DE STATIONS
PREPROGRAMMEES
Pour mettre en place n’importe laquelle des 6 mémoires
préprogrammées dans chaque bande, suivez les
indications suivantes:
1. Allumer la radio et sélectionner la bande désirée
2. Sélectionner la premiere station a préprogrammer en
utilisant la commande manuelle En Avant/En Arriere ou
de Recherche Automatique de Sélection de Bande .
3. Appuyer sur la touche préprogrammée (“1-6”) à programmer et continuer à la maintenir. Après 2 secondes
approximativement, le numéro préprogrammé apparaitra
sur l’écran montrant que la station est programmée en
position de mémoire préprogrammée. On peut accéder
a cette station à tout moment en appuyant sur cette
touche.
4. Renouvelez l’opération ci-dessus pour les autres
préprogrammations sur cette bande et pour les autres 4
bandes de cette unité.
plage quelconque du CD. Appuyer momentanément sur
la touche AVANCER de recherche de plage (+ ) la plage
correspondant au numéro suivant sera selectionné comme
l’indique l’écran. De la meme façon, à chaque tape
momentanée sur la touche RECULER (
-) la plage du
numéro précedent sera sélectionnée.
bs
FONCTIONS DE REPERAGE ET DE REVISION
Il est possible de procéder à une recherche audible rapide
sur n’importe quelle section du disque, en utilisant les
fonctions de repérage et de révision. Presser et Maintenir la
touche Repérage (+ ) pour avancer rapidement vers
l’avant et la touche Révision (
-) pour reculer rapidement.
Le temps écoulé entre chaque plage apparaitra
automatiquement sur l’écran au cours de chaque fonction.
bpL ‘écran
FONCTIONS DE L'ECRAN "CRYSTAL LIQUIDE"
bt
SELECTION DE LA PREMIERE PLAGE (EN
Crystal Liquide (LCD) affiche la fréquence, l’heure,
HAUT) SUR CD
et toutes les fonctions actionnées, y compris des diagrammes
à cinq barres donnant une représentation visuelle du niveau
de volume et des niveaux d’équilibre des chaines a gauche
et à droite. L’intensité du volume et representée par un
diagramme de trois barres fines. Au fûr et à mesure que le
volume augmente, le nombre de segment illuminés augmentera
aussi. Les chaines de gauche et de droite sont représentées
par des diagrammes à barres plus larges. Le nombre de
segments illuminés augmentera en fonction de l’augmentation
de la force des signaux appliqué soit sur la chaine gauche soit
sur la chaine droite.
REMARQUE: L’une des caractéristiques des panneaux
LCD c’est qu’une fois soummis à de basses
températures et pour une longue durée, ils peuvent
mettre plus de temps à s’éclairer que sous des
conditions normales. Par ailleurs, la visibilité de
nombres sur le LCD peut diminuer légerement.
L’affichage du LCD retrouvera son aspect initial
quand la température retournera à un niveau normal.
COMPARTIMENT DE DISQUE
Avec la face imprimée vers le haut, inserrer délicatement le
disque dans le compartiment jusqu’à ce que le mécanisme
de chargement se déclenche et que la lecture du disque
commence. L’indication
S’illumine et clignote, le symbole
DANS s’éclaire et le numéro de plage en lecture et le
temps écoulé apparaitront à l’écran.
bq
Pendant la lecture du disque, presser cette touche pour
revenir à la premiere plage du disque. Le compteur du
disque se repositionnera à zéro et le “NUMERO DE
PLAGE” 01 sera affiché à l’écran.
buPEndant
RETOUCHE DE "REPETITION"/SELECTION (RPT)
la lecture du disque, appuyer sur cette touche pour
reécouter la plage choisie(“RPT” apparaitra sur l ‘écran (la
lecture de la plage se répetera jusqu’a ce que ce qu’on
presse a nouveau sur la touche et la mention “RPT” disparaitra
de l’écran. Il est possible d’annuler également la fonction de
répétition en allumant les fonctions de Lecture d’Accés Direct ou de Balayage de Plage .
cl
cm
cl
SELECTION DE LECTURE (SHF) ALEATOIRE
Au cours de la lecture du disque, appuyer sur cette touche
pour une lecture aléatoire ou sans ordre particulier. La mention “RND” apparaitra sur l’écran. Pour une lecture aléatoire,
appuyer sur la Touche Avancer de sélection de plage (+ )
ou la touche Reculer (
-) les plages seront ainsi choisies
de facon aléatoire au lieu de progresser dans l’ordre habituel.
Presser davantage pour sélectionner des plages au hazard.
Pour annuler la fonction de sélection de plage aléatoire, il
suffit de represser sur la touche et la mention “RND”
disparaitra de l’écran ou en allumant les fonctions de
Répétition de lecture de plage ou les fonctions de Sélection
de Plage .
cm
bu
22
128-5780E
23 of 48
MODE D’EMPLOI
cm
SELECTION DE PLAGES (SCN)
Pendant la lecture du disque, presser cette touche pour
cr
SELECTION DE FONCTIONS ( FONCTIONS)
Cette touche permet de choisir la radio ou la fonction de
écouter les 10 premières secondes de chaque plage sur
le disque (la mention “SCAN” apparaitra sur l’écran).
Lorsque vous voulez écouter une plage en particulier,
appuyer à nouveau sur la touche SCAN pour annuler la
fonction et vous entendrez la plage choisie. Pour annuler
la fonction de Sélection de Plage, on peut aussi utiliser les
fonctions de Répétition ou de Sélection au Aléatoire .
transmission en différé du lecteur de disque ou de la
télécommande de l’inverseur de CD (si installé). Chaque
pression sur la touche sélectionnera une fonction différente
comme indiqué sur l’écran. Pendant le fonctionnement du
lecteur de CD, cette touche peut etre utilisée pour accéder à
la radio ou à la télécommande de l’inverseur de CD (“CDC”)
sans avoir à éjecter le disque (le signe
DANS restera)
sur l’écran pour indiquer qu’il reste encore un disque chargé
dans l’unité. Appuyer à nouveau sur la touche pour retourner
à la fonction intégrale du lecteur de CD et recommencer la
lecture du disque a l’endroit ou il s’était arreté.
&
SELECTION DE DISQUE (CD+ & CD-)
Ces touches dans la télécommande d’inverseur de CD servent
a augmenter ou a diminuer le nombre de fois qu’un disque
sera lu. Pour accéder a un disque d’un numéro plus élevé,
appuyer sur la touche "CD+" . Pour revenir a un disque d’un
numéro moins élevé, appuyer sur la touche “CD-“ . Le
numéro du disque lu apparaitra sur l’écran.
bu
cn TOUCHE D'EJECTION DE DISQUET ( )
Cette touche interrompt la lecture du disque, éjecte le
cl
disque, et allume la radio. Le disque sera rechargé et
sera lu à nouveau s’il n’est pas enlevé de cette unité.
Ceci peut etre réalisé en réappuyant sur cette touche.
Si le disque n’est pas enlevé du compartiement au delà de
15 secondes après avoir été éjecté, il sera à nouveau
rechargé dans l’unité pour éviter qu’il ne soit endommagé
accidentellement. La lecture du disque peut être
recommencée en utilisant la fonction de Sélection de CD
pour choisir la fonction du lecteur de CD.
SELECTEUR DE L'HEURE ET DE LA FREQUENCE(T/F)
Cette unité affiche l’heure, la fréquence radio ou les fonctions
du lecteur de CD sur l’écran. En appuyant sur la touche de
Sélection de l’Heure/Fréquence lorsque le numéro de
fréquence radio ou de sélection de plage CD est affiché
vous modifierez l’affichage pour consulter l’heure. 5
secondes après, l’affichage radio reviendra
automatiquement sur la fréquence radio ou sur la fonction
du lecteur de disque compact.
cr
co
cp
MONO) SELECTEUR FM MONO/STEREO
Pendant l’utilisation de la radio FM, cette touche permet de
sélectionner la réception mono ou stéréo du signal diffusé.
Dans de bonnes conditions de réception, cet appareil devrait
être laissé sur le mode stéréo, comme le montrent les
lettres "ST " sur l’écran lorsque vous entendez un signal
de stéréo FM. Si le signal stéréo est trop faible pour une
bonne écoute, appuyer sur le bouton pour bifurquer sur la
réception mono (les lettres "ST "disparaîtront de l’écran).
Appuyer à nouveau sur la touche pour que les lettres
"ST " réapparaîssent et pour retourner à la réception en
stéréo.
SELECTEUR DE L'EGALISEUR (P.EQ)
La touche "EQ" permet d’émettre des bruitages dans le
signal de débit audio de l’unité. En appuyant sur la touche
"EQ", vous allumerez l’une de ces 3 fonctions (“ROCK,
CLAS ou POP”). Quand la fonction “EQ”est utilisée, la
basse fréquence et la tonalité ne peuvent etre réglées.
Lorsque la fonction “EQ”est éteinte, l’unité se repositionne
sur le niveau de basse fréquence et de tonalité programmé
par l’utilisateur.
cq
23
cs ct
cs
ct
cu
TOUCHE DE DELENCHEMENT DU PANNEAU FRONTAL
Cette touche sert à relâcher le mécanisme qui maintient le
panneau frontal au châssis. Pour détacher le panneau frontal,
appuyer sur la touche afin que le côté gauche du panneau soit
relaché. Saisir le coté relaché et l’enlever du châssis. Pour
rattacher le panneau, mettre d’abord en place le côté droit du
panneau et appuyer ensuite sur le côté gauche du panneau
jusqu’à ce que le mécanisme s’enclenche.
dl
ANTI-VOL L.E.D.
Le voyant lumineux à diode anti-vol est situé derrière le
panneau frontal et est accessible lorsque le panneau frontal
est enlevé. La lumière clignotante averti le voleur potentiel que
l’appareil a été endommagé par le démontage du panneau
frontal.
dm
TOUCHE DE REINITIALISATION
La touche de réinitialisation est située sur le devant du
chassis, pour accéder à cette touche il faut enlever le
panneau frontal. La “REINITIALISATION” de l’ensemble
des circuits a pou0r but de protéger l’ensemble des
circuits du microprocesseur et ne devrait être utilisée que
sous les conditions suivantes car elle effacera l’heure et
les fonctions mise en mémoire:
1. Au moment de l’installation initiale après que tout le
câblage ait été complété.
2. Après que la position de la touche de balayage de
fréquence qui se trouve au fond du châssis ait été
modifiée.
3. Si l’une des touches de cet appareil ne fonctionne,appuyant
sur la toche"select"ecairera le systeme et retournera a
l'operation normal.
128-5780E
24 of 48
1. Assurez-vous que le panneau frontal est placé
sur le bon côté lorsque vous l’attachez sur le
châssis car il est impossible de l’attacher du
mauvais côté.
2. Ne pas presser trop fort sur le panneau frontal
lorsque vous l’attachez au châssis. Une
pression légère ou modérée devrait suffire.
3. Lorsque vous attachez le panneau frontal,
assurez-vous que le bon côté est enclenché
avant de presser le côté gauche pour le bloquer
dans la bonne position.
4. Utiliser le coffret de transport pour transporter
le panneau frontal, afin de protéger le panneau
de la saleté et des dégâts. Veillez à ce qu’il n’y
ait pas de poussière ou de saletés sur les
bornes électriques au dos du panneau car cela
pourrait provoquer une opération intermitente
ou d’autres défauts de fonctionnement.
POUR ENLEVER LE PANNEAU FRONTAL
Touche de
Relâchement
POUR ATTACHER LE PANNEAU FRONTAL
REMARQUES SUR L'UTILISATION DE LA
PRISE D'ENTREE
Grâce à la prise d’entrée, l’utilisateur peut
brancher une autre forme audio ne faisant pas
partie de la radio. La prise audio est compatible
avec la plupart des “Baladeurs” CD et des
magnétophones ou bien un appareil de
transmission en différe audio digital MP3. Ce
média externe à l’appareil étant branché
aucune autre source (radio ou CD) ne peuvent
fonctionner en même temps.
Enlever
d’Abord le
Côté Droit
MODE D’EMPLOI/REGL
AGE DE L'HORLOGE
D’EMPLOI/REGLA
REMARQUES AU SUJET DE L'UTILISATION
DU PANNEAU FRONTAL
REGL
AGE DE L'HORLOGE
REGLA
1. Allumer le contact du véhicule et mettre en marche la radio.
2. Presser la touche Heure/Fréquence
co
pour afficher l’heure.
co
3. Pendant que l’heure est affichée, appuyer sur la touche Heure/Fréquence
en maintenant la touche
de recherche de stations manuelle vers le bas (
-)pour régler l’heure ou bien sur la touche de
recherche de stations manuelle vers le haut (+
) pour régler les minutes de l’heure précise.
4. L’heure sera réglée dans l’appareil et on peut l’utiliser à nouveau 5 secondes après le dernier réglage
de l’heure ou des minutes.
24
128-5780E
25 of 48
CA
R AC
TERIST
QUES
CAR
ACTERIST
TERISTQUES
CARACTERISTIQUES
Taille:
7" W x 2" H x 6-5/16" D
178 mm x 50 mm x 163 mm
Tension d’alimentation: 12 volts DC, masse négative
Puissance utile:
140 watts au maximum
( 35 watts x 4 channels)
Câblage de sortie:
Masse flottante élaborée pour être utilisée avec 4 hautparleurs.
Bas niveau de sortie RCA (cannaux de derriere).
Impédance de Sortie:
Compatible avec des haut-parleurs de 4 ohm.
Bas Niveau de Sortie:
2,0 volts (2,000 mv.)
Portée d’Accordage:
AM:530 - 1,720 KHz. (10 KHz. degré)
FM:87.5 - 107.9 MHz. (200 KHz. degré)
Sensibilité:
< 70 V
Séparation de Stéréo FM: > 20 dB
Fréquence de Reponse 20 - 20,000 Hz. +0 / -3 dB
des CD:
Taux de Signalisation/
Bruit des CD:
85 dB
Séparation de la Chaine CD:
65 dB
Distortion de CD:
0.2%
*Ces caractéristiques sont suceptibles d’être modifiées à tout moment sans avis préalable.
25
128-5780E
26 of 48
dr
dn
COMMA
NDE D'INVERSEUR DE CD
COMMANDE
COMMANDE D'INVERSEUR DE CD
la touche, le prochain numéro de plage sera
Des commandes servant à faire fonctionner un sélectionné comme indiqué sur l’écran. De la
inverseur de CD facultatif se trouvent dans
même facon, à chaque fois que vous appuyez
cette radio. Consultez votre spécialiste en
sur la touche de Sélection vers l’Arrière (
stéréo automobile Rampage/Audiovox ou
) située sur le côté de la touche, le numéro
appelez le 1-800-645-4994 pour obtenir des
précédent de plage sera sélectionné comme
conseils au sujet des modèles pouvant
indiqué sur l’écran.
fonctionner avec cette radio. Le réglage des
fonctions audio (volume, tonalité, équilibrage,
TOUCHES DE REPERAGE ET DE REVISION
et atténuateur) de l’inverseur de CD est le
/
-)
(+
même que celui de la radio. Les commandes Il est possible de procéder à une recherche
suivantes allumeront l’inverseur de CD une
audible très rapide et ce sur n’importe quelle
fois qu’il est installé et branché à cette radio. section du disque, en utilisant les touches de
Consulter le manuel de l’utilisateur joint avec Repérage et de Révision. Presser et maintenir
l’inverseur de CD pour y trouver des consignes le côté de la touche servant au Repérage (+ )
sur l’installation, le chargement qui convient, et pour avancer rapidement vers l’avant (le
l’usage du chargeur de CD.
symbole indicant la lecture du disque se
positionnera vers l’avant sur l’écran) ou bien le
FONCTION MODE SELEC-TOR (MODE)
-)
côté de la touche servant à la Révision (
Lorsque la radio ou le CD est en marche,
pour reculer rapidement (le symbole indicant
appuyer sur cette touche pour allumer
la lecture du disque se positionnera vers
l’inverseur de CD comme l’indique CDC sur
l’arrière sur l’écran).
l’écran. La lecture du disque commencera et le
numéro du disque et de la plage apparaîtront
TOUCHE DE BALAYAGE DE PLAGE ET DE
sur l’écran. Si un nouveau chargeur a été
DISQUE
chargé dans l’inverseur, la lecture
Lorsque vous appuyez sur la touche de
commencera à partir de la première plage du
balayage, les lettres SCAN (balayage) seront
premier disque dans le chargeur. Si un
affichées sur l’écran et les 10 premieres
chargeur était déjà dans l’inverseur, la lecture
secondes de chaque plage du disque seront
reprendra à partir de la plage du disque lu
lues dans l’ordre. Lorsque vous avez accédé à
auparavant.
la plage désirée, appuyer la touche de balayage
à deux reprises en laissant une seconde
&
SELECTION DE DISQUE (CD+ & CD-)
d’intervalle entre les deux pressions et la lecture
Ces touches servent à sélectionner le disque quede la plage désirée continuera. (Les lettres
vous voulez écouter. Presser la touche CD+
SCAN disparaîtront de l’écran) La fonction de
pour accéder à un numéro de disque plus élevé.balayage pourra également être annulée en
Presser la touche CD- . Le numéro de disqueallumant n’importe quelle autre fonction du
lu sera affiché sur l’écran.
Lorsque vous appuyez à deux reprises sur la
touche de balayage (SCAN), les lettres DISC et
SELECTION DE PLAGE (+
/
-)
SCAN apparaîtront sur l’écran et vous entendrez
Les fonctions de sélection de plage servent à accéder au débutles 10 premieres secondes de chaque plage
d’une plage spécifique. A chaque fois que vous appuyez sur la
touche de Sélection vers l’Avant (+ ) située à l’intérieur de
ds
do dp
do
dp
dq
26
128-5780E
27 of 48
COMMA
NDE D'INVERSEUR DE CD
COMMANDE
dt
RELECTURE DE DISQUE OU DE PLAGE
(RPT)
Lorsque vous appuyez sur la touche de
Relecture, les lettres RPT apparaîtront sur
l’écran et la lecture du morceau désiré se
renouvellera automatiquement jusqu’à ce que
la fonction de lecture de plage soit annulée
en rappuyant sur la touche de Répétition ou en
allumant la touche de Sélection de disque
ou
de Balayage de Balayage functions.
Lorsque vous pressez à deux reprises sur la
touche de Répétition les lettres DISC et RPT
apparaîtront sur l’écran et la lecture du disque
choisi se poursuivra jusqu’à ce que la fonction
de Relecture de disque soit annulée en
appuyant à nouveau sur la touche de Répétition
ou en allumant la touche de Balayage (SCAN)
ou la touche de Lecture aléatoire
.
dp
ds
ds
do
du
du
du
LECTURE DE DISQUE OU DE PLAGE
ALEATOIRE (SHF)
Lorsque vous appuyez sur la touche de lecture
aléatoire, les lettres RND apparaîtront sur
l’écran et la lecture de plage sera aléatoire,
de
sans ordre particulier. La touche
sélection de plage choisira également des
plages sélectionnée dans le désordre au
lieu d’avancer normalement. On peut annuler
la fonction de sélection de plage aléatoire en
rappuyant sur la touche de Sélection
aléatoire ou en allumant la touche de
Sélection de disque
ou , de Balayage
ou de Répétition de Lecture
.
En rappuyant sur la touche de Sélection
aléatoire, les lettres DISC et RND s’afficheront
sur l’écran et les plages du disque seront
lues de facon aléatoire. Après lecture de
toutes les plages du disque, un nouveau
disque sera sélectionné et toutes les plages
de ce disque seront lues de facon aléatoire.
Ceci continuera jusqu’à ce que la fonction de
lecture aléatoire du disque soit annulée en
rappuyant sur la touche ou en allumant la
touche de Balayage
ou les fonctions de
.
Répétition de lecture
dp
ds
do dp
dt
ds
dt
27
128-5780E
28 of 48
COMMANDE
COMMA
NDE D'INVERSEUR DE CD
de chaque disque se trouvant dans le chargeur.
Lorsque vous accédez à un disque désiré
rappuyer sur la touche de balayage (SCAN) et
la lecture du disque choisi continuera (les
lettres DISC et SCAN disparaîtront de l’écran).
La fonction de balayage s’annulera également
lorsque toute autre fonction sera allumée
(Sélection de disque ou de plage, de Repérage,
de Révision ou de Relecture etc…).
En cas de problème lors de l’utilisation du lecteur de cd les code peuvent apparaitre sur
l'écran pour signaler toute erreur (ER-1, ER-2, ER-3, etc.). Ceci indique un nombre de probleme
avec l'unite´,ainsi que des erreures mecanique ou une erreur dans le lecteur de commande
du microprocesseur.Si un code signalant une erreur apparait ,essayer d'ejecter et remettre le
disque dans le lecteur. Lorsque le disque et a l'exterieur de l'unité,assurez-vous de la
propreté et du bon etat des disques et qu'ils sont chargés correctement(consulter le Manuel
d’Utilisation de lecteur de CD). il est possible egalement d'allumer la touche de remise à
zéro(RESET)
sur l'unité,mais l'heure et la mémoire préprogrammée seront effacées .Si
vous avez besoin d'assistance supplémentaire aprés avoir suivi les conseils cidessus,contactez un revendeur certifié près de chez vous.
If the suggested measures do not solve the problem, contact an approved warranty station
near you for further assistance.
dm
CODE SIGNAL
NS L'INVERSEUR DE DISQUE
SIGNALAA NT DES ERREURS DA
DANS
CODE SIGNAL
A NT DES ERREURS
SIGNALA
CODE SIGNAL
NS LE LEC
TEUR DE DISQUE
SIGNALAA NT DES ERREURS DA
DANS
LECTEUR
En cas de problème lors de l’utilisation de l’inverseur de disques, les codes peuvent
apparaître sur l’écran pour signaler toute erreur.
ER-1: Signale qu’il n’y a pas de chargeur chargé dans l’inverseur de CD.
ER-2: Signale un mauvais fonctionement de la fonction d’éjection de l’inverseur.
ER-3: Signale une erreur de la fonction de chargement du disque.
ER-4: Indique une erreur de la fonction de déchargement du disque.
ER-5: Indique une erreur de la position de l’inverseur.
ER-6: Indique une erreur de la position de la tête de lecture du laser.
ER-7: Indique une erreur sur le centre du laser du disque.
Si vous vous trouvez dans l’une de ces situations, essayez d’éjecter le chargeur de CD de
l’inverseur et assurez-vous de la propreté et du bon état des disques et qu’ils sont chargés
correctement (consulter le Manuel d’Utilisation de l’inverseur de CD). Recharger le chargeur
et vérifier que tout fonctionne comme il se doit. Il est possible également d’allumer la touche
de remise à zéro
sur l’unité, mais l’heure et la mémoire préprogrammée seront effacées.
Si vous avez besoin d’assistance supplémentaire après avoir suivi les conseils ci-dessus,
contactez un revendeur certifié près de chez vous.
dm
28
128-5780E
29 of 48
SOINS ET ENTRET
IEN
ENTRETIEN
29
SOINS ET ENTRETIEN
Il n’est pas utile d’effectuer l’entretien de la section radio de votre nouveau système sonore. Veuillez
conserver ce manuel en guise de référence, vous y trouverez les nombreuses caractéristiques de cet
appareil et aussi comment régler l’horloge.
Il n’est pas utile de procéder à un entretien régulier de la section du lecteur de CD, cependant vous
pourrez profiter pleinement de ses capacités si vous en comprenez l’utilisation et le maniement.
Suivez attentivement les directives suivantes:
! Ne pas mettre de l’eau ou de nettoyant liquide sur l’unité lorsque vous nettoyez l’intérieur du
véhicule.
! Le lecteur CD est un outil de précision et ne fonctionnera pas correctement à des
températures élevées ou basses. Dans de telles conditions atmosphériques, attendre que la
température intérieure de votre véhicule ait atteint un niveau normal avant d’utiliser le lecteur.
! Si la température intérieure du lecteur est trop élevée, la lecture du disque s’arrêtera
automatiquement grâce â un circuit de protection . Dans ce cas, attendre que l’unité se
refroidisse avant d’utiliser à nouveau le lecteur.
! N’insérer que des CD de 5” (12cm) dans le lecteur car le mecanisme peut être endommagé
par des corps étrangers.
! Ne pas utiliser de disques unitaires (singles) de 3” (8 cm) dans cet appareil avec ou sans
adaptateur,car le lecteur et/ou le disque peuvent etre endommagés. De tels dégâts sont
exclus de la garantie de cet appareil.
! Oter toujours le CD lorsque le lecteur n’est plus utilisé. Ne pas laisser de disque éjecté dans
le compartiment de CD car il peut etre exposé au soleil ou à d’autres sources de dommage.
! Ne pas essayer d’ouvrir le châssis de l’appareil. Aucune pièce ou ajustement pour l’usager
ne se trouve à l’intérieur.
! Quand le véhicule se réchauffe s’il fait froid ou humide, l’humidité peut se condenser sur le
verre du lecteur CD. Dans ce cas, le lecteur ne fonctionnera convenablement que lorsque
l’humidité se sera évaporée.
! Cet appareil a été élaboré avec un mécanisme de réduction de vibration des CD afin d’éviter que le
son du Cd ne sautille à cause des vibrations du véhicule en marche. Cependant, lorsque vous
conduisez sur des routes trés escarpées, le son peut sautiller. Ceci ne rayera ou n’endommagera
pas le disque et la lecture reprendra normalement après que ces conditions difficiles aient cessé.
MANIEMENT DES CD
La lecture en différé peut etre perturbée et la qualité du son détériorée par la saleté, la poussière, les
rayures et le voilage. Suivez attentivement les consignes suivantes:
! Utiliser uniquement des disques compacts avec la marque compact disc audiodigiga
! Enlever soigneusement les traces de doigt, la poussière, et la saleté de la surface imprimée
du disque (côté brillant). Essuyez d’un seul geste de l’intérieur vers le bord extérieur du
disque.
! Ne pas utiliser de produit chimique tel que des vaporisateurs à disque,des produit nettoyant
ménagers ou des diluants pour nettoyer les CD. De tels produits chimiques pourraient
endommager la surface du disque de manière irréparable.
! Garder les disques dans leur boîtier lorsque vous ne les utilisez pas.
! Garder les disques à l’abri du soleil et à l’écart des sources de chaleur et de l’humidité pour
qu’ils durent plus longtemps.
! Ne pas coller de papier, ruban adhésif ou étiquette sur les surfaces du disque et ne pas écrire
dessus avec des feutres.
128-5780E
30 of 48
G A R A NT
IE LIMI
TEE/12 MOIS
NTIE
LIMITEE/12
AUDIOVOX CORPORATION (la Compagnie) garantit à l’acheteur de cet appareil
que s’il présente un défaut de fabrication dans l’année qui suit la date d’achat
originale, cette pièce défectueuse sera réparée ou remplacée gratuitement avec
des produits neufs ou reconditionnés (au choix de la Compagnie).
Pour obtenir réparation ou remplacement selon les termes de la Garantie, ce
produit doit être retourné avec la preuve d’achat (facture datée par exemple)
description du défaut, et port payé au centre de garantie à l’adresse ci-dessous.
La présente garantie n’inclus pas l’élimination des statiques de votre voiture ou des
bruits de moteurs, ni les problèmes avec l’antenne, ni les coûts pour installer,
enlever ou réinstaller ce produit, ni les dommages sur les cassettes, CD, hautparleurs, accessoires, ou le système électrique du véhicule.
La présente garantie n’inclus pas tout produit ou piece ayant souffert ou ayant été
endommagé par des modifications, mauvaise installation, mauvaise manipulation,
mauvais usage, de négligeances, accident ou en enlevant ou effaceant les
étiquettes de numéros ou de codes barres de série d’usine .
PAR LA PRESENTE GARANTIE, LA RESPONSABILITE DE LA CAMPAGNIE SE
LIMITE AUX REPARATIONS ET REMPLACEMENTS CITES CI-DESSUS, ET LA
RESPONSABILITE FINANCIERE DE LA COMPAGNIE SE LIMITE AU PRIX
D'ACHAT PAYE PAR L'ACHETEUR DE CET APPAREIL.
Cette garantie remplace toutes les autres garanties express et autres
responsabiliés.
Toute garantie implicite y compris une garantie sur la marchandise se limite à la
durée de cette garantie écrite.
TOUTE ACTION CAUSANT UNE INFRACTION A LA PRESENTE GARANTIE Y
COMPRIS UNE GARANTIE DE COMMERCE DOIT ETRE PRESENTE SUIVENT
LA DATE D'ACHAT ORIGINALE. LA COMPAGNIE SE DEGAGE DE TOUTE
RESPONSABILITE CONCERNANT DES DEGATS CONSEQUENTIELS OU
INCEDENTELS CAUSES PAR UNE INFRACTION DE TOUTE AUTRE GARANTIE
QU'ELLE SOIT EXPRIMEE OU IMPLICITE. La Compagnie n’autorise aucune
personne ou représentant d’agir en son nom pour tout autre responsabilité que
celle citée auparavant en rapport avec la vente de ce produit.
Cette garantie vous donne des droits qui peuvent varier d’un Etat à l’autre.
U.S.A.: Audiovox Corporation, 150 Marcus Blv., HAUPPAUGE, NEW YORK 11788 . 1-800-645-4994
CANADA: Appeler 1-800-645-4994 pour localiser les marchants-vendeurs certifiés de votre région.
Form No. 128-4270E
© 2000 Audiovox Corporation
!
Hauppauge, NY 11788
128-5780E
30
128-5780E
31 of 48
ESTA PAGINA INTENSIONALMENTE BLANK
31
128-5780E
32 of 48
PROCEDIMIENTO DE INSTALACIÓN UNIVERSAL CON MANGA DE MONTAJE
1. Quite el panel delantero, si el mismo se encuentra enganchado al chasis, oprima el botón de desenganche (“Release”).
Deslice la manga de montaje para retirarla del chasis. Si está trabada en su lugar, use las herramientas de extracción
(provistas) para desengancharla.
2. Coloque la manga de montaje para verificar el tamaño de la abertura que hay en el tablero de instrumentos. Si la abertura
es pequeña, corte o lime con cuidado lo que fuese necesario hasta que la manga de montaje calce fácilmente en la abertura.
No fuerce la manga en la abertura, tampoco la doble ni arquee. Asegúrese de tener espacio suficiente detrás del tablero
de instrumentos para el chasis de la radio.
3. Ubique la serie de lengüetas a lo largo de la parte superior, inferior y los lados de la manga de montaje. Con la manga de
montaje totalmente colocada dentro de la abertura del tablero de instrumentos, doble hacia afuera todas las lengüetas que
sea necesario para asegurar firmemente la manga al tablero.
4. Coloque la radio frente a la abertura del tablero de instrumentos para poder pasar el cableado a través de la manga de montaje.
Siga cuidadosamente el diagrama de cableado y asegúrese de que todas las conexiones del arnés de cableado estén seguras
y aisladas con tuercas para alambre o cinta aislante para procurar el funcionamiento correcto de la unidad. Después de
terminar las conexiones de cableado, coloque el panel delantero y encienda la unidad para confirmar su funcionamiento
(la llave de contacto debe estar en “on”). Si la unidad no funciona, revise el cableado hasta que se corrija el problema. Una
vez logrado el funcionamiento correcto, apague la llave de contacto y proceda con el montaje final del chasis.
5. Deslice con cuidado la radio en la manga de montaje, asegúrese de que esté en la posición correcta, hasta que esté totalmente
asentada y los soportes antivibratorios trabados en su lugar.
6. Fije un extremo de la correa de soporte perforada (provista) al tornillo que se encuentra en la parte posterior del chasis
con la tuerca hexagonal provista. Ajuste el otro extremo de la correa perforada a una parte segura del tablero de instrumentos,
ya sea por encima o por debajo de la radio, con el tornillo provisto. Doble la correa para ubicarla si es necesario.
PRECAUCIÓN: La parte posterior de la radio debe estar apoyada sobre la correa para evitar daños al tablero como consecuencia
del peso de la radio o el uso incorrecto debido a la vibración.
7. Vuelva a enganchar el panel delantero al chasis. Busque un lugar para el enchufe de entrada remota (normalmente en la parte
inferior del tablero de instrumentos) si es una característica de la radio. Asegúrelo en su lugar con dos tornillos (M5x6). No ajuste
demasiado los tornillos. Consulte las Instrucciones de funcionamiento de la unidad para probar el funcionamiento de la radio.
INSTRUCCIONES PPA
A R A LLA
A INST
AL
ACIÓN
INSTAL
ALACIÓN
INSTRUCCIONES PARA LA INSTALACIÓN
Esta unidad está diseñada para ser instalada en automóviles, camiones y camionetas que ya tengan una abertura para radio. En
muchos casos, se necesitará un equipo de instalación especial para montar la radio en el tablero de instrumentos. Se puede conseguir
estos equipos en las tiendas de artículos electrónicos y en los negocios especializados en equipos estereofónicos para automóviles.
Antes de comprar el equipo averigüe para qué aplicaciones está destinado el mismo para asegurarse de que sirva para su vehículo.
Si no puede encontrar el equipo que necesita, llame a nuestra línea gratuita de AYUDA (1-800-645-4994).
LOS JUEGOS DE INSTALACIÓN
1. Si el vehículo requiere el uso de un juego de instalación para montar la radio, siga las instrucciones incluidas en el juego de
instalación para colocar la radio en la placa de montaje provista con el mismo.
2. Haga las conexiones de cables y pruebe la radio según se describe en el Paso 4 anterior.
3. Instale el conjunto formado por radio/placa de montaje en el subtablero, de acuerdo con las instrucciones del juego de instalación.
4. Fije la correa de soporte a la radio y al tablero de instrumentos según se describe en el Paso 6 anterior.
5. Vuelva a colocar el panel de reborde del tablero.
PROCEDIMIENTO DE INSTALACIÓN ISO
Esta unidad tiene orificios roscados en los paneles laterales del chasis que pueden usarse con los soportes de montaje
originales de fábrica de algunos vehículos Toyota, Nissan, Mitsubishi, Isuzu, Hyundai y Honda para montar la radio al
tablero. Sírvase consultar a la tienda local que sea especialista en equipos estereofónicos para automóviles así obtiene
asistencia para este tipo de instalación.
1. Quite la radio que venga de fábrica en el tablero de instrumentos o en la consola central. Guarde todas las piezas, tornillos
y soportes ya que los usará para montar la radio nueva.
2. Desenganche con cuidado el armazón de plástico de la parte delantera del chasis de la radio nueva. Quite y descarte el
armazón.
3. Quite los soportes de montaje que vengan de fábrica y los tornillos de la radio y úselos para la radio nueva.
PRECAUCIÓN: NO EXCEDA EL TAMAÑO MÁXIMO DE TORNILLO M5 X 6 MM. SI LOS TORNILLOS SON MÁS LARGOS,
PUEDEN TOCAR Y DAÑAR LOS COMPONENTES QUE ESTÉN ADENTRO DEL CHASIS.
4. Conecte los cables de la radio nueva al vehículo según lo indicado en el paso 4 anterior.
5. Monte la radio nueva al tablero de instrumentos o a la consola central, para lo cual siga el procedimiento inverso al paso 1.
32
128-5780E
33 of 48
INSTRUCCIONES PPA
A R A LLA
A INST
AL
ACIÓN
INSTAL
ALACIÓN
ASISTENCI
A GR
ATUI
A R A LLA
A INST
AL
ACIÓN
ASISTENCIA
GRA
TUITTA PPA
INSTAL
ALACIÓN
La instalación y las conexiones de los cables de esta unidad son muy sencillos, por lo tanto dudamos de que tenga alguna
duda o necesite ayuda, pero si tiene problemas, estamos a su disposición para prestarle ayuda. Simplemente llame a nuestro
teléfono gratuito de asistencia, 1-800-645-4994, durante los días y las horas que se indican (EE.UU. y Canadá solamente).
DÍA
LUN. VIE.
SÁBADO
ZONA PACÍFICO
5:30AM - 4PM
6AM - 2PM
ZONA HORARIA
ZONA DE MONTAÑA ZONA CENTRAL
7:30AM - 6PM
6:30AM - 5PM
7AM - 3PM
8AM - 4PM
ZONA ESTE
8:30AM - 7PM
9AM - 5PM
INSTALACIÓN UNIVERSAL CON LA MANGA DE MONTAJE
TUERCA (5MM)
CORREA PERFORADA
ABERTURA EXISTENTE DEL TABLERO
LIME LOS BORDES PARA QUE CALCE SI ES NECESARIO - NO LIME DE MÁS
NOTA: SI EL TABLERO ES SÓLIDO, USE EL LADO POSTERIOR (SIN EL
FIJE ESTE EXTREMO AL
BORDE) DE LA MANGA DE MONTAJE COMO PLANTILLA Y CORTE LA
TORNILLO DE LA PARTE
POSTERIOR DEL CHASIS. ABERTURA.
TORNILLO
(5MM)
DOBLE LAS
LENGÜETAS
SUPERIORES
HACIA ARRIBA
DOBLE LAS LENGÜETAS INFERIORES
HACIA ABAJO
RADIO
TORNILLO
TUERCA (5MM)
MANGA DE MONTAJE
FIJE ESTE EXTREMO PARA ASEGURAR LA PIEZA AL
TABLERO - PERFORE EL AGUJERO SI ES NECESARIO.
PRECAUCIÓN:
PARA QUE EL REPRODUCTOR DE DISCOS COMPACTOS FUNCIONE
CORRECTAMENTE, DEBE MONTAR EL CHASIS A NO MÁS DE 20º DE
INCLINACIÓN, ASEGÚRESE DE QUE LA UNIDAD ESTÉ MONTADA
DENTRO DE ESE LÍMITE.
HERRAMIENTAS
DE EXTRACCIÓN
PANEL DELANTERO
DESMONTABLE
MÁX. 20º
VISTA LATERAL
DEL CHASIS
PANEL DELANTERO
INSTALACIÓN ISO
INSTALACIÓN NORMAL
QUITE LA ESTRUCTURA DE PLÁSTICO DE LA PARTE DELANTERA
DEL CHASIS DESENGANCHÁNDOLO CON CUIDADO.
DESENGANCHE EN 2 LUGARES,
TANTO EN LA PARTE SUPERIOR
COMO EN LA INFERIOR
ESTRUCTURA DE
PLÁSTICO
TAMAÑO MÁXIMO
DE TORNILLO
M5 X 6
SOPORTES DE MONTAJE
QUE VIENEN DE FÁBRICA
TAMAÑO
MÁXIMO DE
TORNILLO
M5 X 6
33
128-5780E
34 of 48
PARA EL CABLEADO DE LOS PARLANTES CONSULTE LA PÁGINA 35.
ANTENA
ANTENA
AUTOMÁTICA
PORTAFUSIBLES DEL
AUTOMÓVIL
AZUL
IMPORTANTE
SEPUEDEUSARELCABLEAZUL
PARA LA ACTIVACIÓN REMOTA
DEUNAANTENAAUTOMÁTICAO
UN AMPLIFICADOR EXTERNO
(CONSULTE EL MANUAL DE LA
ANTENA O DEL AMPLIFICADOR)
CABLE DE
ANTENA
EXISTENTE
ROJO
TORNILLO
NEGRO
CABLEADO DE LA RADIO
CABLE
A DO DE LLA
AR
A DIO
CABLEA
RA
FUSIBLE DE LA
“RADIO” O
“ACCESORIO”
PARTE METÁLICA DEL
TABLERO (PERFORE UN
AGUJERO SI ES
NECESARIO)
BATERÍA DEL
AUTOMÓVIL
AMARILLO
IMPORTANTE
DEBE CONECTAR ESTE CABLE COMO SE
MUESTRA EN EL DIAGRAMA, O LA RADIO NO
FUNCIONARÁ CORRECTAMENTE.
FILTRO / CAJA
DE FUSIBLES
ENCHUFE DE LA
ANTENA EN LA
PARTE TRASERA
DE LA RADIO
CONTIENE:
UN FUSIBLE DE 1 AMP
UN FUSIBLE DE 10 AMP
TERMINAL POSITIVO (+),
PARA EL CABLEADO DE
BATERÍA DE 12 VOLTIOS
LOS PARLANTES VEA
LA PÁGINA 20
ENCHUFE MACHO DE 14 CLAVIJAS
ENCHUFE HEMBRA DE 14 CLAVIJAS
RADIO
ENCHUFE DE ENTRADA REMOTA
34
3
128-5780E
35 of 48
CABLE
A DO DE LOS PPA
A RL
A NTES
CABLEA
RLA
CABLE
A DO DE LOS
CABLEA
PA RL
A NTES
RLA
PARA EL CABLEADO DE
LA RADIO CONSULTE LA
PÁGINA 34
ADVERTENCIA:
! LOS AMPLIFICADORES DE ESTA RADIO ESTÁN DISEÑADOS ÚNICAMENTE PARA SER USADOS CON 4
PARLANTES.
! NUNCA COMBINE SALIDAS (PUENTE) PARA USARLAS CON 2 PARLANTES.
! NUNCA CONECTE A TIERRA LOS CONDUCTORES NEGATIVOS DEL PARLANTE CON LA CONEXIÓN A
TIERRA DEL CHASIS.
! SI NO SE REALIZAN LAS CONEXIONES TAL COMO SE ILUSTRA A CONTINUACIÓN, SE PUEDE PROVOCAR
DAÑOS ELÉCTRICOS A LA RADIO.
NOTA:
CONSULTE A SU ESPECIALISTA EN EQUIPOS
ESTEREOFÓNICOS PARA AUTOMÓVILES RAMPAGE/
AUDIOVOX, O BIEN LLAME AL 1-800-645-4994 PARA
OBTENER RECOMENDACIONES SOBRE LOS MODELOS
QUE VAN A FUNCIONAR CON SU RADIO.
SALIDAS RCA
PARA USAR CON
LOS AMPLIFICADORES EXTERNOS
OPCIONALES
ROJO - DERECHO
TRASERO
BLANCO IZQUIERDO
TRASERO
CABLE DIN
(PROVISTO CON
CAMBIADOR DE CD)
RADIO
CAMBIADOR DE
CD OPCIONAL
6
C OMP ACT
ENCHUFEDINDE8CLAVIJASPARASU
CONE-XIÓNALCAMBIADORDECDOPCIONAL
ENCHUFE DE ENTRADA REMOTA
USADO CON REPRODUCTORES DE
CD, CASSETTES O DE AUDIO MP3
EXTERNOS
ENCHUFE MACHO DE 9 CLAVIJAS
ENCHUFE MACHO
DE 4 CLAVIJAS
PARA EL CABLEADO
DE LA RADIO VEA LA
PÁGINA19
PARLANTE IZQUIERDO DELANTERO
BLANCO c/RAYAS NEGRAS
GRIS c/RAYAS NEGRAS
BLANCO
GRIS
VERDE
VIOLETA
VERDE c/RAYAS NEGRAS
PARLANTE DERECHO
DELANTERO
VIOLETA c/RAYAS NEGRAS
AYUDA
1-800-645-4994
35
Lunes a viernes de 8:30 am a 7:00 pm horario del este
Sábados de 9:00 am a 5:00 pm horario del este
PARLANTE IZQUIERDO TRASERO
PARLANTE DERECHO TRASERO
128-5780E
36 of 48
29
11
16
17
35
36
15
14
23
8
25
24
22
VOL
TUNE/
SKIP/
TRACK
2
MP3 ST PTY ME/CR EON LOC
VOL
SW LOUD AF TA TP MONO REC
SEL
BAND
LOUD
T/F
CLAS
MONO
26, 32
MODE
POP
1
AS/PS
3, 4, 5, 6, 7 10
12
31,30
(BEHIND PANEL)
PAU
2
SCN
2
CONTROL DE VOLUMEN / NIVEL
. El
Para aumentar el nivel de volumen, oprima el botón
volumen subirá y en el panel de visualización aparecerá el
nivel desde un mínimo de “VOL 00” a un máximo de “VOL 39”.
Para subir rápidamente el nivel de volumen, mantenga el
botón oprimido. Para bajar el nivel de volumen, oprima el
. Mantenga el botón oprimido para disminuir
botón
rápidamente el nivel de volumen. El panel de visualización
volverá automáticamente a la indicación normal 5 segundos
después del último ajuste del volumen o cuando se active
alguna otra función. Estos botones se usan también en
combinación con el botón “SELECTOR DE AUDIO” (SEL)
para ajustar los tonos graves y agudos, los niveles de
,
equilibrio y la atenuación acústica según se describe en
,
y
.
3
4
3
BOTÓN SELECTOR DE AUDIO (SEL)
Este botón se usa para seleccionar la función de audio
(volumen, tonos graves y agudos, equilibrio o atenuación
acústica) que se regulará con el control de volumen /
. Al oprimir el botón “SEL” se seleccionará los
nivel
tonos graves (“BAS” en la pantalla), tonos agudos
(“TRE”), equilibrio (“BAL”), atenuación acústica (“FAD”)
o volumen (“VOL”). El panel de visualización volverá
automáticamente a la indicación normal 5 segundos
después del último ajuste o cuando se active alguna
otra función. La unidad emitirá un sonido de advertencia
cada vez que se oprima este botón.
2
CONTROL DE LOS TONOS GRAVES
Para ajustar el nivel de tonos graves, primero seleccione la
hasta que la
modalidad grave apretando el botón “SEL”
3
P.EQ
MUTE
3
9
4
RPT
SHF
5
D.DN
6
D.UP
1
13
BOTÓN DE ALIMENTACIÓN ENCENDIDO- APAGADO
Oprima este botón para encender o apagar la unidad. Si la
unidad está apagada y la llave de contacto está en “on”, la
unidad se encenderá automáticamente cuando cargue un
disco, o cuando oprima el botón “MODE” o “BAND”.
4
LOC
CDP
18 21,37 19,38 20,39 28,34 27,33
1
5 6 7
ROCK
TAPE IN
indicación “BAS” aparezca en el panel de visualización. A los
5 segundos de elegir la modalidad grave, oprima el botón
o
del control de nivel
para ajustar la respuesta
de tonos graves que desee. En el panel de visualización
aparecerá el nivel de tonos graves con un mínimo de -12 a
un máximo de +12 (0 es la respuesta plana). El panel de
visualización volverá automáticamente a la indicación normal 5 segundos después del último ajuste o cuando se
active alguna otra función.
2
FUNCIONAMIENT
MIENTO
INSTRUCCIONES DE FUNCIONA
MIENT
O
INSTRUCCIONES DE FUNCIONA
MIENT
O
FUNCIONAMIENT
MIENTO
5
CONTROL DE LOS TONOS AGUDOS
Para ajustar el nivel de tonos graves, primero seleccione la
modalidad aguda con el botón “SEL” hasta que la indicación
“TRE” aparezca en el panel de visualización. A los 5 segundos
o
del
de elegir la modalidad aguda, oprima el botón
control de nivel
para ajustar la respuesta de tonos agudos
que desee. En el panel de visualización aparecerá el nivel de
tonos agudos con un mínimo de -12 a un máximo de +12
(0 es la respuesta plana). El panel de visualización volverá
automáticamente a la indicación normal 5 segundos después
del último ajuste o cuando se active alguna otra función.
3
2
6
CONTROL DE EQUILIBRIO ACÚSTICO
IZQUIERDO / DERECHO
Para ajustar el equilibrio acústico de los parlantes izquierdo y
derecho, primero seleccione la modalidad de equilibrio acústico
hasta que la indicación “BAL”
apretando el botón “SEL”
aparezca en el panel de visualización. A los 5 segundos de
elegir la modalidad de equilibrio acústico, oprima el botón
o
del control de nivel
para ajustar el equilibrio de los
parlantes que desee. La posición de equilibrio estará indicada
en el panel de visualización por “BAL.L 16” (totalmente a la
izquierda) a “BAL.R 16” (totalmente a la derecha). Cuando el
nivel de volumen entre los parlantes izquierdo y derecho sea
igual, en el panel de visualización aparecerá la indicación
“BAL 00”. El panel de visualización volverá automáticamente
a la indicación normal 5 segundos después del último ajuste
o cuando se active alguna otra función.
3
2
36
128-5780E
37 of 48
INSTRUCCIONES DE FUNCIONA
MIENT
O
FUNCIONAMIENT
MIENTO
7
CONTROL DEL ATENUADOR DE VOLUMEN
DELANTERO / TRASERO
Para ajustar el equilibrio acústico de los parlantes delanteros
y traseros, primero seleccione la modalidad de atenuación
acústica apretando el botón “SEL”
hasta que la indicación
“FAD” aparezca en el panel de visualización. A los 5 segundos
de elegir la modalidad de atenuación acústica, oprima el
o
del control de nivel
para ajustar el
botón
equilibrio de los parlantes delanteros y traseros que desee.
La posición de atenuación estará indicada en el panel de
visualización por “FAD.R 16” (totalmente atrás) a “FAD.F 16”
(totalmente adelante). Cuando el nivel de volumen entre los
parlantes delanteros y traseros sea igual, en el panel de
visualización aparecerá la indicación “FAD 00”. El panel de
visualización volverá automáticamente a la indicación normal 5 segundos después del último ajuste o cuando se active
alguna otra función.
FUNCIONAMIENTO LOCAL (LOC)
Esta función determina el nivel de señal al que la radio se
detendrá durante las formas de sintonía: manual ascendente
o descendente (Up/Down), de búsqueda (Seek) o para
almacenar en la memoria (AS) y, de este modo, sólo se
recibirán y seleccionarán las estaciones con señal fuerte
(locales). Cuando no esté actuando la sintonización de
almacenamiento en la memoria (AS), LOC desaparece del
visor y la radio se detiene en un rango más amplio de señales
que incluye estaciones más débiles (más alejadas).
SELECTOR SIN AUDIO (MUTE)
Se usa este botón para suprimir o silenciar el volumen
del sistema. Al oprimir el botón, la indicación “MUTE”
aparecerá intermitentemente en el panel de visualización
y se silenciará el volumen. Al oprimir nuevamente este
botón, o al activar el botón de control de volumen
(“SEL”), el botón
“LOUD” o el botón ecualizador (“EQ”)
el volumen volverá al nivel que tenía antes de activar
esta función.
SELECTOR DE BANDA Y CURVA DE VOLUMEN
(BAND/LOUD)
Cada vez que se pulse brevemente este botón, mientras la
radio está funcionando, cambia la banda de frecuencia. Según
cuál sea la elección realizada, aparece la indicación “AM1”,
“AM2”, “FM1”, “FM2” o “FM3” en el visor. Si cuando se está
tocando un disco se pulsa este botón, el disco se detiene y
cambia a la función de radio, sin eyectar el disco. Durante este
período, en el visor aparecerá
IN para indicar que la
unidad contiene un disco. Pulse el botón de selección de
modos
para volver a tocar discos desde el inicio de la
última pista tocada. Cuando se oye música a bajo volumen,
la función de volumen alto (loud) aumenta los rangos de bajos
y agudos para compensar de acuerdo con las características
del oído humano. Pulse el botón BAND/LOUD al menos 2
segundos para activar esta función y aparecerá LOUD en el
visor. Al pulsar el botón nuevamente durante 2 segundos se
desactiva la función (LOUD desaparece del visor).
CONTROL DE SINTONIZACION MANUAL ASCENDENTE
/
-) SINTONIYDESCENDENTE DESCENDENTE (+
ZACIÓN CON BÚSQUEDA AUTOMÁTICA
Cada vez que toque ligeramente el botón +
sintonizará la
radio en una frecuencia más alta. Del mismo modo, cada
- la sintonizará en
vez que toque ligeramente el botón
una frecuencia más baja. Para sintonizar una estación en
3
2
8
9
3
bl
bm
37
2
forma manual, toque ligeramente el botón en la dirección
que corresponda hasta llegar a la frecuencia deseada.
Al oprimir cualquiera de los dos botones por más de 2 segundos
y luego soltarlo, activará la función de sintonización con
búsqueda automática. La radio buscará la siguiente estación
y se detendrá en esa frecuencia. Se puede detener la función
de búsqueda al oprimir nuevamente el botón, o al activar
cualquier otra función de sintonización.
bn
SINTONIZACIÓN CON AUTOMEMORIA (AS)
SINTONIZACIÓN POR EXPLORACIÓN
PREESTABLECIDA (PS)
Durante el funcionamiento de la radio, oprima este botón por
un momento para explorar las 6 estaciones preestablecidas
en la memoria de esa banda. La unidad se detendrá en cada
una de las estaciones preestablecidas durante 5 segundos
antes de continuar con la próxima estación preestablecida.
Al mismo tiempo, el número de estación preestablecido
(“CH”) en la banda destellará. Vuelva a oprimir el botón para
detener la operación de exploración preestablecida y quedarse
en la frecuencia elegida. El número de estación (“CH”) dejará
de destellar.
Al oprimir el botón por más de 2 segundos se activará la
función de sintonización con automemoria, la radio explorará
automáticamente la banda e ingresará 6 estaciones de señal
fuerte en las 6 memorias preestablecidas (la indicación “AST”
destellará en el panel de visualización indicando que la
sintonización con automemoria está en funcionamiento).
Después de ingresar las estaciones en las memorias, la
unidad se detendrá automáticamente en cada una de ellas
por 5 segundos así las puede escuchar. Si usted ya tiene
las memorias preestablecidas para sus estaciones preferidas,
al activar la función de sintonización con automemoria se
borrarán esas estaciones y se establecerán las nuevas de
mayor potencia. Esta función es muy útil cuando viaja por
una zona nueva donde no esté familiarizado con las
estaciones locales.
bo
MEMORIAS PREESTABLECIDAS DE ESTACIONES
Para fijar cualquiera de las 6 memorias preestablecidas en
cada banda, use el siguiente procedimiento:
1. Encienda la radio y seleccione la banda deseada.
2. Seleccione la primera estación a preestablecerse con
los controles de sintonización manual ascendente y
descendente o sintonización con búsqueda auto.
mática
3. Oprima el botón preestablecido (“1-6”) que se utilizará
para esa memoria y continúe oprimiéndolo. Después de
2 segundos aproximadamente, aparecerá el número
preestablecido en el panel de visualización e indicará
que la estación ya está fijada en esa posición de memoria preestablecida. En cualquier momento se puede
llamar esa estación apretando ese botón.
4. Repita el procedimiento anterior para las restantes
estaciones preestablecidas para esa banda de radio y
para las otras 4 bandas de la unidad.
bm
128-5780E
38 of 48
FUNCIONES DEL PANEL DE VISUALIZACIÓN
EN CRISTAL LÍQUIDO
El panel de visualización en cristal líquido (LCD) muestra la
frecuencia, la hora y todas las funciones activadas, incluso
gráficas de cinco barras que ofrecen una representación
visual del nivel de volumen y del equilibrio en los canales de
la izquierda y derecha. El nivel de volumen está representado
por una gráfica de tres barras finas. Al aumentar el nivel de
volumen, aumentará el número de segmentos encendidos.
Los canales de la izquierda y la derecha están representados
por una gráfica de barras más anchas. Al aumentar la fuerza
de la señal aplicada al canal de la izquierda o al de la derecha,
aumentará el número de segmentos encendidos.
NOTA: Es típico que los paneles con LCD, al estar
sometidos a bajas temperaturas durante un tiempo
prolongado, les tome más tiempo iluminarse que en
condiciones normales. Además, la visibilidad de
los números en el visor o pantalla LCD puede
disminuir levemente. Las indicaciones de la pantalla
LCD volverán a ser normales cuando la temperatura
llegue a ser normal.
RANURA PARA DISCOS
Con la etiqueta hacia arriba, inserte suavemente el disco en
la ranura hasta que el mecanismo de carga lo enganche y
se ilumina y
comience la reproducción. La indicación
comienza a moverse, se enciendo el símbolo
IN, y el
número de pista y duración aparecerán en el panel de
visualización.
ADVERTENCIA: La unidad está destinada a reproducir
los discos compactos normales de 5"
(12 cm) SOLAMENTE. No intente usar
discos compactos de 3" (8 cm) en esta
unidad, ya sea con adaptador o sin él,
dado que se puede dañar el reproductor
y/o disco. Esos daños no estarán
cubiertos por la garantía de este
producto.
bq
br
SELECCIÓN DE PISTA
Estos botones se usan para acceder rápidamente al principio
de una pista en particular. Cada vez que toca ligeramente el
), se
botón de selección de pista hacia delante ( +
selecciona el número siguiente de pista, tal como aparece
indicado en el panel de visualización De igual manera, cada
vez que toca ligeramente el botón de selección de pista
-), se selecciona el número siguiente de
hacia atrás (
pista en orden descendente.
bs
FUNCIONES DE AVANCE Y RETROCESO
Con estas funciones de avance y retroceso puede
efectuarse la búsqueda rápida audible a cualquier sección
del disco. Oprima y mantenga apretado el botón de avance
) para avanzar rápidamente en dirección ascendente o
(+
-) para hacerlo en dirección
el botón de retroceso (
descendente. Durante cualquiera de las dos funciones, la
duración de cada pista aparecerá automáticamente en el
panel de visualización.
bt
SELECTOR DE POSICIÓN PISTA UNO DEL CD (TOP)
Durante la reproducción de un disco, oprima este botón para
volver al comienzo de la primera pista del disco. El contador
volverá a cero y el número de pista (“TRACK”) 01 aparecerá
en el panel de visualización.
bu
FUNCIONAMIENT
MIENTO
INSTRUCCIONES DE FUNCIONA
MIENT
O
bp
SELECTOR DE REPRODUCCIÓN REPETIDA (RPT)
Durante la reproducción de un disco, oprima este botón para
repetir la reproducción de la pista elegida (aparecerá “RPT”
en el panel de visualización). La reproducción de la pista
continuará repitiéndose hasta que oprima nuevamente el
botón, la indicación “RPT” desaparecerá del panel de
visualización. También se cancelará la modalidad de
reproducción repetida al activar las funciones de reproducción
o de exploración de pistas
.
con redistribución al azar
cl
cl
cm
SELECTOR DE REPRODUCCIÓN CON
REDISTRIBUCIÓN AL AZAR (SHF)
Durante la reproducción de un disco, oprima este botón para
reproducir las pistas del disco siguiendo un orden de
redistribución al azar (“RND” aparecerá en el panel de
visualización). En la modalidad redistribución al azar, al oprimir
) o el de
el botón de selección de pista hacia delante (+
selección de pista hacia atrás (
-) también elegirá las
pistas siguiendo un orden de redistribución al azar y no de
avance normal Cada vez que vuelva a pulsar, elegirá
pistas siguiendo un orden de redistribución al azar. Puede
cancelar esta modalidad de reproducción siguiendo un orden
de redistribución al azar al oprimir nuevamente el botón (la
indicación “RND” desaparecerá del panel de visualización) o
o de
al activar las funciones de reproducción repetida
exploración de pistas
.
cm
bu
cm
EXPLORACIÓN DE PISTAS (SCN)
Durante la reproducción de un disco, oprima este botón para
reproducir los primeros 10 segundos de cada pista del disco
(“SCAN” aparecerá en el panel de visualización). Al llegar a
la pista que desee, oprima nuevamente el botón de
exploración para cancelar la función y continuar con la
reproducción de la pista seleccionada. También se cancelará
la función de exploración de pistas al activar las funciones
o de reproducción con
de reproducción repetida
redistribución al azar
.
cn
cl
bu
BOTÓN DE EYECCIÓN (
)
Al oprimir este botón, se detiene la reproducción, se eyecta
el disco y cambia a la función de radio. Si no se retira el
disco de la unidad y se oprime nuevamente el botón, se
recargará el disco y comenzará su reproducción.
Si no se retira el disco de la ranura a los 15 segundos de su
eyección, se recargará el disco automáticamente para evitar
toda posibilidad de daño. Se puede reanudar la reproducción
del disco pulsando el botón selector de modalidad CD
para elegir la modalidad de reproducción de CD.
cr
co S
ELECTOR DE HORA / FRECUENCIA (T/F)
La unidad puede mostrar en el panel de visualización la hora,
la frecuencia de radio o las funciones de reproducción de
CD. Al oprimir el botón selector de hora/frecuencia, cuando
muestra la indicación de frecuencia de radio o número de
pista del reproductor de CD, cambiará la indicación y aparecerá
indicada la hora. Después de 5 segundos, la indicación volverá
automáticamente a mostrar la frecuencia de radio o la función
de reproducción de CD.
38
128-5780E
39 of 48
INSTRUCCIONES DE FUNCIONA
MIENT
O
FUNCIONAMIENT
MIENTO
cp
SELECTOR FM DE RECEPCIÓN MONOAURAL
O ESTEREOFÓNICA (MONO)
Durante el funcionamiento de la radio en FM, se usa este
botón para seleccionar la recepción estereofónica o monoaural
de la señal de transmisión. En condiciones de recepción
normal, tiene que dejarse la unidad en la modalidad
” en la pantalla al
estereofónica que se indica como “ST
oír una señal FM estéreo. Si la señal estereofónica es muy
débil como para oírse bien, oprima el botón para cambiar a la
” desaparecerá
recepción monoaural (la indicación “ST
del panel de visualización). Para volver a la modalidad de
recepción estereofónica, oprima nuevamente el botón para
” vuelva a aparecer.
que la indicación “ST
cq
SELECTOR ECUALIZADOR (P.EQ)
El botón “P.EQ” agrega a la salida de la señal de audio
efectos de sonidos preestablecidos. Al oprimir el botón
“EQ” activa uno de los tres modos de funcionamiento
(“ROCK, CLAS o POP”). Cuando la función “P.EQ” está
activada, no puede cambiar los niveles de los tonos
graves y agudos. Al desactivar la función “EQ”, la unidad
vuelve a los niveles de tonos graves y agudos que eligió
el usuario.
dm
BOTÓN DE REPOSICIÓN
En el panel delantero del chasis hay un botón de reposición
(es necesario quitar el panel delantero para tener acceso al
botón). El circuito de reposición (“RESET”) sirve para proteger
el circuito del microprocesador y solamente debe activarse
en los siguientes casos, dado que borrará las memorias
preestablecidas para la hora y las estaciones:
1. Durante la instalación inicial después de terminar las
conexiones de todo el cableado.
2. Después de cambiar la posición del interruptor del
selector de frecuencia en la parte inferior del chasis.
3. Si hay algún desperfecto de cualquiera de los interruptores
de la unidad, al apretar el botón de reposición se borrará
el sistema para volver al funcionamiento normal.
cr
SELECTOR DE MODO (MODE)
Este botón se usa para seleccionar la radio o el modo de
reproducción del reproductor de CD o del cambiador de CD
(si se ha instalado). Cada vez que oprima el botón,
seleccionará un modo diferente que aparecerá indicado en el
panel de visualización.
Durante el funcionamiento del reproductor de CD, se puede
usar este botón para cambiar a radio o al modo de cambiador
de CD remoto (“CDC”) sin eyectar el disco (la indicación
IN permanecerá en el panel de visualización indicando
que hay un disco en la unidad). Oprima el botón nuevamente
para volver al modo reproductor de CD y continuar con la
reproducción del disco a partir del punto donde se detuvo.
cs ct
y
SELECCIÓN DE DISCO (CD+ y CD-)
Estos botones se usan para avanzar o retroceder al elegir el
disco que se desea reproducir en el cambiador de CD remoto.
Para avanzar a un número de disco mayor, oprima el botón
“CD+” . Para volver a un número de disco menor, oprima
. El número del disco que se reproduce
el botón “CD-”
aparecerá en el panel de visualización.
cs
ct
cu
BOTÓN DE DESCONEXIÓN DEL PANEL DELANTERO
Este botón se usa para soltar el mecanismo que sujeta el panel
delantero al chasis. Para desmontar el panel delantero, oprima
el botón para soltar el lado izquierdo del panel. Sujete el lado
suelto y sáquelo del chasis tirando.
Para volver a montar el panel, coloque el lado derecho del panel
primero y luego oprima el lado izquierdo hasta que el mecanismo
quede trabado como corresponde.
dl
39
INDICADOR L.E.D. ANTIRROBO
El diodo emisor de luz (L.E.D.) antirrobo está ubicado detrás
del panel delantero y es accesible cuando se quita el panel.
La luz intermitente servirá como advertencia visual a un
probable ladrón de que la unidad fue desactivada al desmontar
el panel delantero.
128-5780E
40 of 48
NOTAS SOBRE EL USO DEL PANEL DELANTERO
DESMONTAJE DEL PANEL DELANTERO
Botón de
desconexión
MONTAJE DEL PANEL DELANTERO
NOTAS SOBRE EL USO DEL ENCHUFE ENTRADA
REMOTA
El enchufe de entrada remota proporciona al usuario la
opción de conectar una fuente externa a la radio. El
enchufe de audio es compatible con la mayoría de los
reproductores portátiles de cassettes o CD (“Walkman”),
o bien con alguna unidad de reproducción de audio digital
MP3. Cuando esté conectada la fuente externa, la radio
reproduce solamente ese medio, no funciona ninguna otra
fuente de entrada (ya sea radio o CD).
Primero
coloque el
lado derecho
A JUSTE DEL RELOJ
1. Ponga la llave de contacto del vehículo y la radio en “on”.
2. Oprima el botón selector de hora/frecuencia
co para que aparezca la hora en el panel de visualización.
INSTRUCCIONES DE FUNCIONA
MIENT
O/A
JUSTE DEL RELOJ
FUNCIONAMIENT
MIENTO
AJUSTE
1. Asegúrese de que el panel delantero esté en la
posición correcta para fijarlo al chasis dado que no
podrá colocarse cuando esté dado vuelta hacia abajo.
2. No lo apriete muy fuerte para enganchar el
mecanismo. Solamente es necesario ejercer una
presión que sea suave o moderada.
3. Al colocar el panel delantero, asegúrese de que el
lado derecho esté correctamente enganchado antes
de oprimir el lado izquierdo para trabarlo en su posición.
4. Al llevarse el panel delantero, sírvase usar el estuche
provisto para evitar que el panel se ensucie o dañe.
Asegúrese de que no haya polvo o suciedad en las
terminales eléctricas de la parte posterior del panel
que podrían provocar un funcionamiento intermitente
u otros desperfectos.
3. Cuando aparezca la hora en el panel de visualización, oprima el botón selector de hora/frecuencia
juntamente con el botón de sintonización manual descendente (
-) para ajustar las horas, o
el botón de sintonización manual ascendente (+
) para ajustar los minutos hasta llegar a la hora
correcta.
co
4. Cinco segundos después de hacer el último ajuste de la hora o minutos, quedará programada la
hora correcta en la unidad y volverá al funcionamiento normal.
40
128-5780E
41 of 48
ESPECIFICACIONES
ESPECIFICACIONES
Tamaño:
7" (ancho) x 2" (altura) x 6-5/16" (profundidad)
178 mm x 50 mm x 163 mm
Tensión de servicio:
12 voltios CD, negativo a masa
Potencia de salida:
máxima de 140 vatios
(35 vatios x 4 canales)
Cableado de salida:
Tipo masa flotante diseñado para usar con
4 parlantes.
NO SE PUEDE combinar los canales delanteros
y traseros (puente) para usarlos con 2 parlantes.
Salidas RCA de bajo nivel (canales traseros)
Impedancia de salida:
Compatible con parlantes de 4 ohms.
Salidas de bajo nivel:
2,0 voltios (2.000 mv.)
Margen de sintonización:
AM: 530 - 1.720 KHz. (pasos de 10 KHz.)
FM: 87,5 - 107,9 MHz. (pasos de 200 KHz.)
Sensibilidad:
< 70 V
Separación estereofónica FM:
>20 dB
Respuesta de frecuencia de CD:
20 - 20,000 Hz. +0 / -3 dB
Relación señal/ruido de CD:
85 dB
Separación de canales de CD:
65 dB
Distorsión de CD:
0,2%
*Las especificaciones están sujetas a cambios sin previo aviso.
CAPACIDAD DE REPRODUCCION DE DISCOS CD-R Y CD-RW
Este modelo puede reproducir la mayoria de los discos CD-R y CD-RW que contengan
programas de audio.
La reproduccion de los discos CD-R y CD-RW depende de las condiciones del equipo
de grabacion y la calidad del disco CD-R o CD-RW. En algunos casos, un disco CD-R o
CD-RW no puede reproducirse en esta unidad.
41
128-5780E
42 of 48
La radio tiene controles incorporados para el funcionamiento de un cambiador de CD opcional. Consulte
a su especialista en equipos estereofónicos para
automóviles Rampage/Audiovox, o bien llame al 1800-645-4994 para obtener recomendaciones sobre
los modelos que van a funcionar con su radio.
Las funciones de ajuste de audio (volumen, tonos,
equilibrio y atenuación acústica) para el cambiador de
CD funcionan del mismo modo que para la radio. Los
siguientes controles harán funcionar el cambiador de
CD cuando se lo instale y conecte a esta radio.
Consulte el manual del usuario que viene con el
cambiador de CD para obtener instrucciones sobre la
instalación y correcto uso y carga de discos.
dn
SELECTOR DE MODALIDAD CAMBIADOR
DE CD (MOD)
Durante el funcionamiento de la radio o del reproductor
de discos compactos, oprima este botón para elegir
la función opcional de cambiador de CD, la indicación
CDC aparecerá en el panel de visualización. Comenzará la reproducción del disco y el disco y número de
pista aparecerán en el panel de visualización. Si se
ha cargado un disco nuevo, comenzará la reproducción con la primer pista del primer disco en la bandeja.
Si había una bandeja cargada en el cambiador, la
reproducción continuará desde la pista en el disco
que se estaba reproduciendo antes.
do dp
y
SELECCIÓN DE DISCO (CD+ y CD-)
Se usan estos botones para elegir el disco que desee
reproducir. Para avanzar a un número de disco
mayor, oprima el botón CD+
. Para volver a un
número de disco menor, oprima el botón CD. El
número del disco que se reproduce aparecerá en el
panel de visualización.
do
dq
SELECCIÓN DE PISTA (+
dp
/
-)
Estas funciones de selección de pista se usan para
acceder rápidamente al principio de una pista en
particular. Cada vez que se aprieta el lado del botón
de selección de pista (+ ), se selecciona el número
siguiente de pista en orden ascendente, tal como
aparece indicado en el panel de visualización. De igual
manera, cada vez que se aprieta el lado del botón de
- ), se selecciona el número
selección de pista (
siguiente de pista en orden descendente, tal como
aparece indicado en el panel de visualización.
dr
FUNCIONES DE AVANCE Y RETROCESO
(+
/
-)
Con estas funciones de avance y retroceso puede
efectuarse la búsqueda rápida audible a cualquier
sección del disco. Oprima y mantenga oprimido el lado
(+ ) del botón de avance para avanzar rápidamente en dirección ascendente (el símbolo de reproducción de disco girará hacia adelante en el panel de
visualización) o el lado (
- ) del botón de retroceso
para moverse en dirección descendente (el símbolo
de reproducción de disco girará hacia atrás en el
panel de visualización).
ds
SELECTOR DE EXPLORACIÓN DE
PISTA / DISCO (SCAN)
Al oprimir el botón de exploración, aparecerá la
indicación SCAN en el panel de visualización, y se
reproducirán en orden los primeros 10 segundos de
cada pista del disco. Al llegar a la pista que desee
oprima dos veces, con un intervalo de un segundo
entre cada presión, el botón SCAN para continuar
con la reproducción de la pista seleccionada (la
indicación SCAN desaparecerá del panel de visualización). También se cancelará la función de exploración de pistas al activar cualquier otra función de
disco (selección de pista, avance/retroceso, reproducción repetida o redistribución al azar).
Al oprimir el botón de exploración (SCAN) dos veces,
aparecerán las indicaciones DISC y SCAN en el panel
de visualización, y se reproducirán en orden los
primeros 10 segundos de cada pista de cada disco
en la bandeja. Al llegar al disco que desee, oprima
nuevamente el botón SCAN para continuar con la
reproducción del disco seleccionado (las indicaciones DISC y SCAN desaparecerán del panel de visualización). También se cancelará la función de exploración de disco al activar cualquier otra función de
disco (selección de disco o pista, avance/retroceso
o reproducción repetida).
CONTR
OLES DEL CA
MBI
A DOR DE CD
CONTROLES
CAMBI
MBIA
CONTR
OLES DEL CA
MBI
A DOR DE CD
CONTROLES
CAMBI
MBIA
42
128-5780E
43 of 48
CONTR
OLES DEL CA
MBI
A DOR DE CD
CONTROLES
CAMBI
MBIA
dt
SELECTOR DE REPRODUCCIÓN REPETIDA
DE DISCO / PISTA (RPT)
Cuando se oprime el botón de repetición, aparecerá
la indicación RPT en el panel de visualización y la
reproducción de la pista elegida se repetirá constantemente hasta que se cancele al volver a oprimir el
botón de repetición o al activar las funciones de
selección de disco
y
, exploración
o
.
redistribución al azar
Cuando se oprime el botón de repetición dos veces,
aparecerán las indicaciones DISC y RPT en el panel
de visualización y la reproducción del disco elegido
se repetirá constantemente hasta que se cancele al
volver a oprimir el botón de repetición o al activar las
funciones de exploración
o redistribución al
azar
.
do dp
du
du
ds
ds
du
SELECTOR DE REPRODUCCIÓN DE DISCO /
PISTA CON REDISTRIBUCIÓN AL AZAR (RND)
Cuando oprima el botón de redistribución al azar,
aparecerá la indicación RND en el panel de visualización y la reproducción de las pistas del disco seguirá
un orden de redistribución al azar El botón de selección de pistas
también elegirá las pistas siguiendo
un orden de redistribución al azar y no de avance
normal. Se puede cancelar esta modalidad oprimiendo nuevamente el botón de redistribución al azar o
y
activando las funciones de selección de disco
, de exploración
o de repetición
.
Cuando oprima el botón de redistribución al azar,
aparecerán la indicaciones DISC y RND en el panel
de visualización y la reproducción de las pistas del
disco seguirá un orden de redistribución al azar Una
vez que se complete la reproducción de todas las
pistas del disco, seleccionará un nuevo disco y la
reproducción de todas las pistas del mismo seguirán
un orden de redistribución al azar. La modalidad de
redistribución al azar continuará hasta que la cancele
oprimiendo nuevamente el botón o al activar las
funciones de exploración
o de repetición
.
dp
dp
ds
dt
ds
do
dt
CD CH
A NGER ERR
OR CODES
CHA
ERROR
43
128-5780E
44 of 48
Si se presentara algún problema durante el funcionamiento del reproductor de CD, es probable que aparezca un código de error (ER-1, ER-2, ER-3, etc.) en el panel de visualización. Esto
puede indicar que hay distintos problemas en la unidad, incluso un error mecánico o un error
en el control del microprocesador del reproductor. Si aparece un código de error, intente
eyectar y volver a cargar el disco en el reproductor. Cuando el disco esté fuera de la unidad,
fíjese si está limpio, sin daño alguno y colocado correctamente (con la etiqueta hacia arriba).
También podría intentar activar el botón de reposición
de la unidad, pero esto también borrará la hora y las memorias preestablecidas.
Si las medidas sugeridas no resuelven el problema, comuníquese con un centro de garantía
autorizado cercano a su domicilio para recibir asistencia al respecto.
dm
CÓDIGOSCDDECH
ERR
OR DEL
CA
A DOR DE CD
ERROR
CAMBI
MBIA
A NGER
ERR
ORMBI
CODES
CHA
ERROR
Si se presentara algún problema durante el funcionamiento del cambiador de CD, es probable que aparezcan los siguientes códigos de error en el panel de visualización.
ER-1: Indica que no hay una bandeja cargada en el cambiador de CD.
ER-2: Indica que hay un problema con la función de eyección de la bandeja.
ER-3: Indica que hay un error en la función de carga del disco.
ER-4: Indica que hay un error en la función de descarga del disco.
ER-5: Indica que hay un error en la posición de la bandeja.
ER-6: Indica que hay un error en la posición levantada del láser.
ER-7: Indica que hay un error en el foco del láser sobre el disco.
En los casos antes citados, intente eyectar la bandeja de CD del cambiador y fíjese que los
discos estén limpios, sin daño alguno y colocados correctamente (consulte el manual del
usuario del cambiador de CD). Vuelva a cargar la bandeja y compruebe el funcionamiento
correcto. También podría intentar activar el botón de reposición
de la unidad, pero esto
también borrará la hora y las memorias preestablecidas.
Si las medidas sugeridas no resuelven el problema, comuníquese con un centro de garantía
autorizado cercano a su domicilio para recibir asistencia al respecto.
dm
CÓDIGOS DE ERR
OR DEL REPR
ODUC
MBI
A DOR DE CD
ERROR
REPRODUC
ODUCTT OR DE CD Y CA
CAMBI
MBIA
CÓDIGOS DE ERR
OR DEL REPR
ODUC
ERROR
REPRODUC
ODUCTT OR DE CD
44
128-5780E
45 of 48
CUIDA
DO Y MA
NTENIMIENT
O
CUIDADO
MANTENIMIENT
NTENIMIENTO
CUIDADO Y MANTENIMIENTO
La sección de la radio de su nuevo sistema de sonido no requiere mantenimiento alguno. Le recomendamos
guardar este manual para consultar las diversas funciones que tiene la unidad y la forma de poner la hora.
La sección del reproductor de discos compactos tampoco requiere mantenimiento constante, pero los
conocimientos adecuados del sistema, su uso y manejo le ayudarán a disfrutar al máximo sus posibilidades.
Se recomienda tener en cuenta lo siguiente:
! Al limpiar el interior del vehículo, no deje que entre agua o algún líquido de limpieza en la unidad.
! El reproductor de discos compactos es un instrumento de precisión y no va a funcionar como
corresponde cuando se encuentre en lugares de mucho calor o frío En caso de existir esas
condiciones, espere hasta que la temperatura interior del vehículo llegue a una temperatura normal
antes de usar el reproductor.
! Si la temperatura interior del reproductor es muy elevada, un circuito protector detendrá
automáticamente el disco. En este caso, deje que la unidad se enfríe antes de volver a usar el
reproductor.
! Nunca inserte nada más que un disco compacto de 5" (12 cm) en el reproductor dado que el mecanismo
puede dañarse con objetos extraños.
! No intente usar discos compactos de 3" (8 cm) en esta unidad, ya sea con un adaptador o sin él, dado
que se puede dañar al reproductor y/o disco. Esos daños no estarán cubiertos por la garantía de este
producto.
! Cuando no use el reproductor de discos, siempre quite el disco compacto. No deje un disco eyectado
en la ranura del disco dado que puede quedar expuesto a la luz directa del sol y otras causas de daños.
! No intente abrir el chasis de la unidad. No hay piezas que el usuario pueda arreglar ni tampoco se
pueden hacer ajustes internos.
! Cuando el vehículo se calienta en climas fríos, o en condiciones de mucha humedad, la humedad puede
condensarse en la lente del reproductor de discos. Si esto ocurriera, el reproductor no funcionará en la
forma adecuada hasta que se evapore la humedad.
! La unidad está diseñada con un mecanismo para discos compactos que amortigua las vibraciones a
efectos de minimizar la interrupción de la reproducción del disco como consecuencia de una vibración
normal en un vehículo en movimiento. Al conducir en carreteras de suelo desparejo, sin embargo, se
pueden producir algunas omisiones de sonido. Esto no rayará ni dañará el disco y la reproducción
normal continuará cuando las condiciones sean normales de nuevo.
MANEJO DE LOS DISCOS COMPACTOS
La suciedad, el polvo, los rayones y el combado de los discos puede ocasionar omisiones en la
reproducción y deterioro de la calidad del sonido Sírvase tener en cuenta las siguientes pautas para cuidar
los discos compactos:
45
! Use solamente los discos compactos que tengan la marca
.
! Es necesario limpiar bien toda huella digital, polvillo y suciedad que tenga la superficie del disco (el lado
brillante), para lo cual puede usar un paño suave. Limpie con movimientos rectos de adentro hacia
afuera del disco.
! Nunca use productos químicos tales como limpiadores en aerosol para discos, productos de limpieza
para el hogar o algún diluyente para limpiar los discos compactos Esos productos químicos pueden
dañar irreversiblemente la superficie del disco.
! Es conveniente guardar los discos en sus estuches cuando no estén en uso.
! No exponga los discos a la luz directa del sol, a altas temperaturas o a un alto nivel de humedad durante
períodos prolongados.
! No pegue ningún papel, cinta o etiqueta en las superficies de los discos ni tampoco escriba sobre ellos
con algún tipo de marcador.
128-5780E
46 of 48
G A R A NTÍA LIMI
LIMITTA DA DE 12 MESES
AUDIOVOX CORPORATION (la Compañía) garantiza al comprador minorista original del presente
producto que, en el caso de que este producto o cualquiera de las partes del mismo, en circunstancias
y condiciones de uso normal, tuviera algún defecto, tanto en el material como en la mano de obra, dentro
de un plazo de 12 meses a partir de la fecha de compra original, dicho(s) defecto(s) serán reparados
o reemplazados por piezas nuevas o reconstruidas (a entero criterio de la Compañía) sin cargo alguno
por las piezas y la mano de obra.
Para obtener servicios de reparación o sustitución en virtud de los términos y las condiciones de esta
Garantía, se deberá entregar o enviar el producto con la correspondiente constancia de la garantía (por
ejemplo, recibo de compra fechado) con flete prepagado al centro de servicios de garantía a la dirección
que se indica a continuación.
La presente Garantía no cubre la eliminación de la estática del vehículo o el ruido del motor, la corrección
de los problemas de antena, los gastos incurridos para la instalación, desmontaje o reinstalación del
producto, ni los daños ocasionados en cintas, discos compactos, parlantes, accesorios o sistemas
eléctricos del vehículo.
La presente Garantía no corresponde a todo producto o pieza del mismo que, según la opinión de la
Compañía, haya sufrido daños como consecuencia de alguna modificación, instalación incorrecta,
maltrato, uso indebido, negligencia, accidente o por la eliminación o mutilación de las etiquetas con el
número de serie de fábrica o los códigos de barra. EL ALCANCE DE LA OBLIGACIÓN DE LA COMPAÑÍA
ENVIRTUDDELAPRESENTEGARANTÍAESTÁLIMITADOALAREPARACIÓNOELREEMPLAZOSEGÚN
LO PRECEDENTE Y, POR NINGÚN CONCEPTO, LA OBLIGACIÓN DE LA COMPAÑÍA EXCEDERÁ EL
PRECIODECOMPRAPAGADOPORELCOMPRADORPORELPRODUCTO.
La presente Garantía reemplaza a todas las demás obligaciones o garantías expresas. TODA
GARANTIA IMPLÍCITA, INCLUSO AQUELLAS GARANTÍAS IMPLÍCITAS DE BUENA CALIDAD Y
COMERCIABILIDAD, ESTARÁ LIMITADA A LA DURACIÓN DE ESTA GARANTIA ESCRITA. TODA
DEMANDAPORINCUMPLIMIENTODEGARANTÍA, SEGÚNLO INDICADO ENLAPRESENTE, INCLUSO
TODA GARANTÍA IMPLÍCITA O DE COMERCIABILIDAD, DEBERÁ ENTABLARSE EN UN PLAZO DE
30 MESESAPARTIRDELAFECHADECOMPRAORIGINAL.ENNINGÚNCASOLACOMPAÑÍATENDRÁ
RESPONSABILIDADALGUNAPORDAÑOSINDIRECTOSOINCIDENTALESPORINCUMPLIMIENTODELA
PRESENTE GARANTÍA O DE CUALQUIER OTRA GARANTÍA, YA SEA EXPRESA O IMPLÍCITA, DE
CUALQUIER CARÁCTER. Ninguna persona ni representante está autorizada a asumir responsabilidad
alguna en nombre de la Compañía, excepto por lo expresado en la presente garantía, en relación con
la venta de este producto.
Algunos estados no permiten las limitaciones impuestas sobre la duración de las garantías implícitas
o la exclusión o limitación de los daños indirectos, especiales o derivados, por lo tanto es probable que
las limitaciones o exclusiones antes mencionadas no correspondan en su caso. Esta Garantía otorga
derechos legales específicos y usted puede tener otros derechos que varían de acuerdo con el estado
de que se trate.
E.U.A: AUDIOVOX CORPORATION, 150 MARCUS BLVD., HAUPPAUGE, NEW YORK 11788 - 1-800-645-4994
CANADÁ: LLAME 1-800-646-4994 PARA OBTENER INFORMACIÓN SOBRE EL CENTRO AUTORIZADO PARA
Formulario No. 128-4270E
SERVICIOS POR GARANTÍA MÁS CERCANO A SU DOMICILIO.
© 2000 Audiovox Corporation
!
Hauppauge, NY 11788
46
128-5780E
128-5780E
47 of 48
128-5780E
48 of 48