1
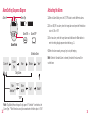
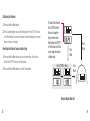
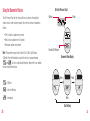
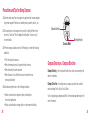
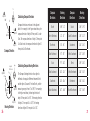
ii Instruction Manual Wenger NA 15 Corporate Drive Orangeburg, NY 10962 USA Tel: 1-800-431-2996, 1-845-365-3500 Email: [email protected] Web: www.WengerNA.com AltiNav iii Table of Contents Crafted for Life . . . . . . . . . . . . . . . . . . . . . . . . . . . . . . . . . . . . . . . . . . . . . 2 Low Battery Detection . . . . . . . . . . . . . . . . . . . . . . . . . . . . . . . . . . . . . 42 Watch Components. . . . . . . . . . . . . . . . . . . . . . . . . . . . . . . . . . . . . . . . . . . 3 Power Saving Mode. . . . . . . . . . . . . . . . . . . . . . . . . . . . . . . . . . . . . . . . 43 General Features and Components. . . . . . . . . . . . . . . . . . . . . . . . . . . . . . . . 4 Caring For Your Watch. . . . . . . . . . . . . . . . . . . . . . . . . . . . . . . . . . . . . . . 44 Operating Instructions Warranty Information. . . . . . . . . . . . . . . . . . . . . . . . . . . . . . . . . . . . . . . . 45 Setting the Analog Watch . . . . . . . . . . . . . . . . . . . . . . . . . . . . . . . . . . . . 6 Warranty Service Instructions. . . . . . . . . . . . . . . . . . . . . . . . . . . . . . . . . . 46 Digital Read-out Modes. . . . . . . . . . . . . . . . . . . . . . . . . . . . . . . . . . . . . . 7 Registration Form. . . . . . . . . . . . . . . . . . . . . . . . . . . . . . . . . . . . . . . . . . . 48 Setting the Digitial Time and Calendar. . . . . . . . . . . . . . . . . . . . . . . . . . . 8 Activating the Weather Forecast Feature . . . . . . . . . . . . . . . . . . . . . . . . 10 Setting the Alarm . . . . . . . . . . . . . . . . . . . . . . . . . . . . . . . . . . . . . . . . . 11 Using the Chronograph (Stopwatch) Feature. . . . . . . . . . . . . . . . . . . . . . 14 Using the Altimeter Feature. . . . . . . . . . . . . . . . . . . . . . . . . . . . . . . . . . 17 Using the Barometer Feature . . . . . . . . . . . . . . . . . . . . . . . . . . . . . . . . 20 Precautions and Tips for Using Compass. . . . . . . . . . . . . . . . . . . . . . . . . 24 Digital Compass Instructions . . . . . . . . . . . . . . . . . . . . . . . . . . . . . . . . . 25 iv 1 2 Crafted For Life Delémont, Switzerland 1893 Wenger Watch Components Over a century ago, Wenger built a factory in this tiny Swiss village and transformed it into production headquarters for the Genuine Swiss Army Knife™ still used by the Swiss Army today. As it was 100 years ago, each tool, implement and knife manufactured by Wenger is crafted by hand in solid stainless steel and each individually inspected for quality and craftsmanship. This same attention to detail has been applied to genuine Wenger watches. Wenger watches are Swiss-designed, -engineered and -crafted with only the most accurate Swiss movement available. Each watch is constructed with form and function that last a lifetime. As with the genuine Swiss Army knife, Wenger watches are durable, high quality, and versatile enough for use on any occasion. Wenger watches are engineered to provide the same resourcefulness as the genuine Swiss Army knife, supplying functionality beyond the everyday. Case Body – All PVD coated stainless steel for quality and durability. Movements – Specialized Swiss mechanism. Straps – Silicone rubber strap Luminous Markers – Hands, markers, and numerals may be overlaid with ® Super Luminova which recharges in seconds when exposed to direct sunlight for extended nighttime visibility. Crystal – Scratch resistant Sapphire. Crowns – Crowns are stainless steel buttons on the sides of the case body used to control the many functions of this watch. 3 General Features and Components Digital read-out Hour hand Light button Inner bezel Mode button Second hand Strap or bracelet 4 Start/Stop button Crown Reset button Minute hand Digital read-out Start/Stop Button •To start or stop the chronograph timer. •To select between functions within the same mode. •To toggle Yes/No. •To increase values within functions. Reset Button •To activate the “lap” or “reset” mode in the chronograph. •To toggle Yes/No. •To decrease values within functions. Mode Button •To select Current Time, Alarm, Chronograph, Altimeter, Barometer or Compass Modes. •To enter the Setting Display in Time, Alarm, Altimeter, Barometer and Compass Modes. •To select functions within the different modes. Light Button •To increase the brightness of the digital read-outs for 3 seconds. note: Press any button to activate your watch under Power Saving Mode. See p.43 for more information. 5 Setting the Analog Watch Digital Read-out Modes 1.To set the analog time, gently pull out the crown to Position 2. 2.Rotate crown so the watch hands move clockwise to the correct time. 3.Push crown back to Position 1. Second Hand Alignment To synchronize the digital with analog seconds, push in the crown to return it to Position 1 at correct moment. Position 1 Important note: If the analog “second” and the digital “second” are not synchronized, the digital setting may not function properly. 6 Current Time Mode Alarm Mode Chronograph Mode Compass Mode Barometer Mode Altimeter Mode Position 2 Note: A different sound will be emitted when entering Current Time Mode. 7 Setting the Digital Time and Calendar Digital Time Setting Sequence Diagram 1.To set the digital time, press and hold the mode button for 2 seconds in the Current time mode. The selected item will flash in the digital read-out. Press Mode button to toggle thru the functions 2.Press the Mode button to change the function within the Time Setting Sequence diagram shown at right. Flashing fields indicate that they are selected. 3.Press the Start/Stop button to increase the function value and press the Reset button to decrease it. 4.Press and hold the Mode button to exit the Current Time Setting Mode. Day of Week Date Current Time 8 Current Time Mode Second Minute Hour Year Month Key Tone On/Off DST On/Off Hour Format Date Format Day Hourly Chime On/Off LCD Auto Off LCD Auto On Contrast Temperature 9 Weather Forecast Feature Setting the Alarm The AltiNav watch analyses the changes in air pressure to predict upcoming weather. The watch provides 4 different symbols to indicate the weather forecast. There are 5 Daily or Schedule alarms. Schedule alarms can be set to sound on a particular date. See Diagram on p.12. 1.When in Alarm Mode, press and hold the Mode button to enter into the Alarm Number function. Press the ST/STP button to choose the alarm number and press the Reset button to move in the opposite direction. Sunny Cloudy with Sun Cloudy Rainy Activating the Weather Forecast Feature 1.Press the ST/STP Button while in Current Time Mode to toggle between the date and the weather forecast and temperature. Important note: Since the watch predicts the upcoming weather by analysing changes in air pressure, accuracy may increase when the user stays at the same altitude for at least 24 hrs. The watch predicts the weather by adopting general weather prediction principles. It is not capable of indicating dramatic changes in weather within a very short period of time. 10 2.Press the Mode button to enter the Alarm Type function and choose between the Daily or Schedule type. Press the Mode button again to enter the Hour function and press the ST/STP or Reset buttons to increase or decrease the value for either function. Press the Mode button to enter the Minute function and repeat the steps to increase or decrease the value. Follow these same steps for selecting the Year, Month and Day for the Schedule Type of alarm. 3.Press the Mode button to enter and select the Note On/Off Function. Use ST/STP and Reset to choose on or off. If you have selected Note On, press the Mode button to select the Note. Use ST/STP and Reset to choose one of the 7 preset notes. 4.Press the Mode button to revert back to the beginning of the alarm setting sequence. Press and hold the Mode button to exit the alarm setting sequence. Note: The watch will exit the setting sequence automatically when no button is pressed for more than 1 minute. 11 Alarm Setting Sequence Diagram Activating the Alarm Alarm # 1.When in Alarm Mode, press the ST/STP button to select different alarms. Alarm Type or Alarm ON or [L/R][L/R] Alarm Mode Alarm Alarm ON ON Alarm # Alarm Type 3.To set an alarm, select the target alarm and hold down the Mode button to enter the setting display sequence described on pg. 11. Alarm Alarm OFFOFF [L/R] Alarm ON 2.To turn ON/OFF an alarm, select the target alarm and press the Reset button to turn it ON or OFF. Alarm OFF Schedule Alarm Alarm OFF [L/R] Alarm ONDaily Hour Alarm ON [L/R] Minute Year* 4.When the alarm sounds, press any key to stop the beeping. Note: When the Schedule Alarm is selected, the date of the alarm will be scrolled once. Alarm OFF Alarm Alarm OFF “ON” Note Selection** Note On/Off Day* Month* “OFF” 12 Note: *Day/Month/Year settings will only appear if “Schedule” is selected as the Alarm Type. **Note Selection can only be accessed when the Note option is “ON”. 13 Using the Chronograph (Stopwatch) Feature The chronograph feature is a stopwatch which measures elapsed hours, minutes, and seconds. It is also capable of measuring split-timed events (timing a continuous event and sub-events simultaneously; e.g., timing an individual lap and an entire race). Stopwatch 1. To start the stopwatch, press the ST/STP button in Chronograph Mode. 2.To stop it, press the ST/STP button again. Using the Split-Timing Function 1. To start the stopwatch, press the ST/STP button in Chronograph Mode. 2.To mark or record a lap or other intermediate segment of time, press the Reset button. The Lap time will be shown for a short while. The chrono will continue to record the lap time internally, then externally. After that, the lap number will be increased by 1. If there are more than 10 laps, the laps over the 10th lap will be accumulated into the 10th lap. The watch will continue to time the total event internally while the lap time is being recorded. 3. Read the seconds, minutes, and hours on the Total Time read-out. Lap Time Recording 4.To reset the stopwatch to zero, press and hold the Reset Button. Note: The clock function of the watch will continue to operate while using the stopwatch. Lap # 14 Elapsed Time Chronograph Mode Total Time Lap # increased by 1 Lap Time After 10 Sec Total Time Stopwatch Running (no lap recorded) Lap Display Stopwatch Continuous Running 15 Using the Altimeter Feature Recalling the Lap Records The top digital read-out row displays an Elevation Chart for the previous 36 hours. In order to conserve power, your altitude is updated as follows: 1. Press the Reset button when the chronograph is stopped. 2.Press the ST/STP button to move to the last lap record. This watch has a ten lap memory. Lap Records Recall Sequence Reset Chronograph Stop Read-out Last Lap Record Note: The altimeter range is from -2,316 ft to 30,067 ft (-706m to 9,164m). Press the Reset button to switch between or Ft. As this is a sophisticated timepiece, please refer to our website for more in depth information. Reset Reset ST/STP 1st Lap Record • First 5 minutes: it updates every second • Next 24 hours: updates every 10 seconds • Afterwards: updates every minute Next Lap Record 36-Hr Elevation Chart -36 hour -1 hour Reset Recalibrating the Chronograph 1. Press and hold the Reset button. All lap records will be reset to zero. 16 Current Altimeter Altimeter Mode Display 17 Calibrating the Altimeter 1. Press and hold the Mode button. 2.The last altitude digital read-out will be displayed. Press the ST/STP button or the Reset button to increase or decrease the altitude based on your current position (research on Google). Resetting the altitude to factory default setting 1. Press and hold the Mode button to access the reset option. Choose Yes or No with the ST/STP button or the Reset button. 2.Press and hold the Mode button to exit the Setting Mode. To calibrate the altimeter Press ST/STP or Reset buttons to change the digital read-out value. Holding down the ST/STP or Reset buttons will allow you to change the value at a higher speed. Press Mode Press Mode Press ST/STP or Reset Press Mode Altimeter Digital Read-Out 18 19 Using the Barometer Feature The Air Pressure Chart for the previous 36 hours is shown in the top digital read-out row. In order to conserve power, the current air pressure is updated as follows: • First 5 minutes: it updates every second • Next 24 hours: updates every 10 seconds • Afterwards: updates every minute Note: The barometer range is from 8.86 inHG to 32.48 inHg (300mb to 1100mb). Press the Reset button to switch the unit of air pressure between and . As this is a sophisticated timepiece, please refer to our website for more in depth information. = Milibars = inches of Mercury = hectopascal 36-Hr Air Pressure Chart -36 hour -1 hour Current Air Pressure Barometer Mode Display Reset Reset Reset Unit Setting 20 21 Calibrating the Barometer 1. Press and hold the Mode button to access the Barometer digital read-out. 2.The current air pressure will be displayed. Press the ST/STP button or the Reset button to increase or decrease the barometer reading based on your current location. (Research on Google) Resetting the air pressure to factory default setting 1. Press and hold the Mode button to access the reset option. Choose Yes or No with the ST/STP button or the Reset button. 2.Press and hold the Mode button to exit the Setting Mode. To calibrate the barometer, Press ST/STP or Reset buttons to change the digital read-out value. Holding down the ST/STP or Reset buttons will allow you to change the value at a higher speed. Press ST/STP or Reset Press Mode Press Mode Press Mode Barometer Digital Read-Out 22 23 Precautions and Tips for Using Compass 1.Keep the watch away from any magnets or appliances that contain magnets or generate magnetic fields such as mobile phones, speakers, motors, etc. 2.This watch points to the magnetic north, which is slightly different from true north. Check the “What is Magnetic Declination” section on p.30 for more details. 3.Perform compass calibration (see p.39) frequently, or under the following conditions: • First time using the compass • When the measuring result is suspected to be incorrect • When the battery has been replaced • When the watch is in a different location from where it was previously calibrated Compass direction Compass Mode Bearing direction Compass Bearing vs. Compass Direction Compass Bearing – the horizontal direction of an object as measured by the observer in degrees. 4.Avoid measuring direction in the following conditions: Compass Direction – the path given by a compass using the four cardinal points including North, South, East & West. • Watch is placed close to magnetic objects, metal objects or electrical appliances • Watch is placed inside a moving object or a ferroconcrete building Visit: http://geology.isu.edu/geostac/Field_Exercise/topomaps/bearing.htm for more information. 24 25 N object D NW a n g u la r d iffe re n c e 315 N E object B point A SE object C Compass Direction Compass Directions a n g u la r d iffe re n c e object D 0 0 0 object D Calculating Compass Directions 0 Compass directions are shown in the adjacent table. For example, in the90figure shown below, the object B point compass direction of object B from point A is due A East. The compass direction of object C from point 135 A is South east. the compass object C direction of object D from point A is Northwest. Bearing Directions Calculating Compass Bearing Directions The Compass Bearing direction of an object is defined as the angular difference between North and the object. (Assume 0˚ for due North, and the 90 object B measuring range is from 0˚ to 359˚). For example, point A in the figure on below, the bearing direction of 135 object B from point A is 90˚. The bearing direction object C of object C from point A is 135˚. The bearing Bearing Direction direction of object D from point A is 315˚. Bearing Directions Compass Directions Bearing Directions Compass Directions Bearing Directions 169˚ - 191˚ North 349˚ - 11˚ South North Northeast 12˚ - 33˚ South Southwest 192˚ - 213˚ Northeast 34˚ - 56˚ Southwest 214˚ - 236˚ East Northeast 57˚ - 78˚ West Southwest 237˚ - 258˚ East 79˚ - 101˚ West 259˚ - 281˚ East Southeast 102˚ - 123˚ West Northwest 282˚ - 303˚ Southeast 124˚ - 146˚ Northwest 304˚ - 326˚ South Southeast 147˚ - 168˚ North Northwest 327˚ - 348˚ 315 B C 26 27 Compass Mode - Different Digital Read-outs Normal Display In Compass Mode, the digital read-out for the compass direction in the top row while the bearing direction is displayed in the bottom row. note: Analog movement will be stopped temporarily during compass measurement. Idle Display If no key is pressed for 1 minute, the watch will go to the IDLE Mode automatically to conserve battery power. To activate the compass again, press any button. Normal Display Normal Display IdleDisplay Display Idle Distortion Display If distortion is detected, the bearing direction will flash. Please refer to “Calibrating the Compass” on p.39 to restore the compass to normal operation when distortion is detected. flashing Distortion Display Distortion Display 28 Compass Mode Display 29 What is Magnetic Declination? •The Magnetic North Pole is slightly different from the True North Pole. This watch points to the Magnetic North Pole. Everything measured on a map is related to the True North Pole. Magnetic North Magnetic Declination True North Magnetic Declination • The angular difference between the Magnetic North Pole and the True North Pole is called Magnetic Declination. The amount (degrees and minutes) and direction (easterly and westerly) depends on where you are in the world. •For the advanced compass user who intends to perform an accurate navigation, the compass must be adjusted for magnetic declination. •The Watch also includes a compensation setting for Magnetic Declination. Check the coming section “Calibrating the compass - Magnetic Declination Mode” on p.39-41 for more details. Magnetic Declination Information •Most topographic maps show a magnetic north pole and/or the magnetic declination information. See the “Magnetic Declination at Major Cities” section on p.34-38. •For those cities whose names are not included in the list, enter the cities latitude and longitude into one of the below magnetic declination calculator websites: - http://gsc.nrcan.gc.ca/geomag/index_e.php 30 - http://www.ngdc.noaa.gov/geomag 31 Magnetic Declination Compensation magnetic north •This Watch allows you to compensate the compass bearing at a place where the magnetic declination is either Westerly declination or Easterly declination. Example 2: Easterly magnetic declination 22° and the compass needle points 278°. • TB = MB + E. When MB = 278°; E = 22° • TB = 278° + 22° • TB = 300° • The true bearing is 300°. magnetic declination 23°W True Bearing (TB) = Magnetic Bearing (MB) - Easterly Magnetic De 300° (TB) = 278° (MB) - 22° (E) Compensate the Bearing with Westerly (W) Magnetic Declination true north 0° true bearing true north 0° 300° object B Compensate the Be with Easterly (E) Magnetic magnetic declination 22°E magnetic north object B true bearing 300° magnetic bearing 323° point A True Bearing (TB) = Magnetic Bearing (MB) - Westerly Magnetic Declination (W) 300° (TB) = 323° (MB) - 23° (W) •Check the coming section “Calibrating the Compass” on p.39 for more details of the setting. 32 magnetic bearing 278° point A True Bearing (TB) = Magnetic Bearing (MB) - Westerly Magnetic Declination (W) 300° (TB) = 323° (MB) - 23° (W) magnetic north m 2 true north 0° true bearing 300° object B magnetic bearing 323° Example 1: Westerly magnetic declination 23° and the compass needle points 323°. • TB = MB - W. When MB = 323°; W =23° • TB = 323° - 23° • TB = 300° • The true bearing is 300°. true north 0° object B • To compensate for an object’s bearing, either subtract westerly (W) magnetic declination or add easterly (E) magnetic declination with the magnetic bearing. magnetic declination 23°W Compensate the Bearing with Westerly (W) Magnetic Declination magnetic bearing 278° point A True Bearing (TB) = Magnetic Bearing (MB) - Easterly Magnetic Declination (E) 300° (TB) = 278° (MB) - 22° (E) Compensate the Bearing with Easterly (E) Magnetic Declination 33 Magnetic Declination at Major Cities 34 Magnetic Declination at Major Cities (continued) Country City Declination Country City Declination Australia Canberra 12-E Denmark Copenhagen 1-E Austria Vienna 2-E Egypt Cairo 3-E Bangladesh Dhaka 0 Finland Helsinki 6-E Belgium Brussels 1-W France Paris 1-W Brazil Brasilia 19-W Germany Berlin 1-E Canada Ottawa 14-W Greece Athens 3-E Chile Santiago 5-E Hungary Budapest 4-E China Beijing 6-W India New Delhi 1-E China Hong Kong 2-W Indonesia Jakarta 1-E Costa Rica San Jose 0 Israel Jerusalem 3-E Cuba Havana 3-W Italy Rome 1-E Czech Republic Prague 2-E Japan Tokyo 7-W 35 Magnetic Declination at Major Cities (continued) 36 Magnetic Declination at Major Cities (continued) Country City Declination Country City Declination Jordan Amman 3-E Russia Moscow 9-E Kenya Nairobi 1-E Singapore Singapore 0 Korea Seoul 7-W South Africa Cape Town 23-W Malaysia Kuala Lumpur 1-E Spain Madrid 3-W Mexico Mexico City 6-E Sweden Stockholm 3-E Nepal Kathmandu 0 Switzerland Bern 0 Netherlands Amsterdam 1-W Taiwan Tai-pei 3-W New Zealand Wellington 22-E Thailand Bangkok 0 Norway Oslo 0 UAE Abu Dhabi 1-E Pakistan Islamabad 2-E United Kingdom London 3-W Philippines Manila 1-W United States Washington DC 10-W Portugal Lisbon 5-W United States Juneau, AK 25-E 37 Calibrating the Compass Magnetic Declination at Major Cities (continued) 38 Country City Declination This Watch must be calibrated if any of the following occurs: United States Phoenix, AZ 12-E United States Little Rock, AR 2-E • The Watch is being used for the first time • The battery is replaced • The bearing direction digits are flashing • The compass is used in a location that is apart from the place in which the compass has been calibrated • The user intends to maintain the precision of the digital compass. United States Sacramento, CA 16-E United States Denver, CO 10-E United States Atlanta, GA 4-W United States Honolulu, HI 10-E United States Boston, MA 16-W United States Jackson, MS 1-E United States Santa Fe, NM 10-E United States Oklahoma City, OK 6-E United States Salem, OR 18-E United States Salt Lake City, UT 14-E The compass calibration includes two different processes: Rotation Calibration Mode and Magnetic Declination Setting. It is recommended that both calibrations be conducted from time to time to achieve a more accurate reading. Important note: If the compass has not been calibrated, the direction shown by the compass maybe inaccurate. As this is a sophisticated timepiece, please refer to our website for more in depth information. 39 Calibrating the Compass Cont. Magnetic Declination Mode 1.Press and hold the Mode button to enter the Compass Setting Mode. 1.Check the previous section “Magnetic Declination in Major Cities” on p.34-38 to choose the magnetic declination of the city which is close to your current position. The angle will be input into the Watch during the calibration. 2.Press ST/STP button to start calibrating the compass. Lay the watch flat on a table and rotate it clockwise at a slow to medium pace until the pattern “ ” in the bottom display is completed. 3.“Done!” will be shown when the calibration is completed. Rotation Calibration 4.Hold Displaythe Mode Rotate the Watch Rotation Calibration Magnetic Declination button to go back to the Complete Compass Mode or press the Mode Horizontally Display Display button once to set the magnetic declination. Compass Calibration Compass Calibration ST/STP Rotation Rotation Calibration Display Compass Read-out 40 Horizontally Rotation Rotation Calibration Complete Display Calibration Complete Compass Calibration 3.When the current magnetic declination appears, press the ST/STP or Reset button to increase/ decrease the value. 4.When the setting is completed, press and hold the Mode button to confirm the setting and exit the adjustment display. Mode Rotate the Rotate the Watch Horizontally Watch 2.Press the Mode button in Rotation Calibration Display to access the Magnetic Declination Read-out. Magnetic Magnetic Declination Display Declination Read-out 41 Low Battery Detection Power Saving Mode When Low Battery is Detected: This Watch has a Power Saving Function which can turn off the LCD display so that the battery can last longer. The timekeeping function of the watch will still run in Power Saving Mode. • The battery-low icon “ ” will appear for two seconds when entering the Time Mode. It is recommended to replace the battery with a new battery. • The second hand will move at two second increments. 1.To enter the Power Saving Mode, press and hold the Reset button in Current Time Mode for about five seconds. “LCD Off” will be shown before it turns off. If the appearance of low-battery indicator is caused by using the Watch under very cold conditions, the indicator will disappear when normal temperature returns. 2.Press any key in Power Saving Mode to exit this mode and the LCD display will resume. Note: It is recommended to complete the battery replacement by a certified service agency because this Watch contains delicate electronic sensors and components. Also note that the memory will be cleared when the battery is replaced. 42 43 Caring for Your Watch 3-Year Limited Warranty Even though your watch is water-resistant, it is not recommended that you wear it in a hot shower, sauna or hot tub. We suggest sending your Wenger watch to our Customer Service Center for battery replacement (please see procedure under “Warranty Service”). Batteries should only be replaced by a professional jeweler to maintain the watch’s water-resistancy. If your watch has a bracelet, we suggest you see a jeweler for any sizing adjustments. Wenger is proud to stand by our quality Swiss craftsmanship with a 3-Year Limited Warranty. This Wenger watch is warranted to the original consumer/ purchaser against breakage or malfunction under normal use due to defects in material or workmanship. This 3-Year Limited Warranty also includes all components and craftsmanship of the Swiss movement and watch case. We will repair, or at our option, replace any defective Wenger watch with the same or comparable model. We will refund the purchase if repair or replacement is not commercially possible. The warranty will become null and void if the timepiece is misused, abused, tampered with or taken apart, or if the timepiece is repaired by anyone other than an authorized dealer. The warranty is not extended to the watch strap, bracelet, finish, crystal or battery. The warranty does not cover any incidental, consequential or special damage arising from any or all uses of the Wenger watch. Wenger watches must be repaired by an authorized dealer or the warranty is void. Some states do not allow the exclusion or limitations of incidental, consequential or special damages, so the above limitations may not apply. 44 45 Warranty Service In the United States, please send your watch to: WWRC, 15 Corporate Drive, Orangeburg, NY 10962. Please include a check or money order payable to Wenger NA in the amount of $10(US) to cover the cost of return shipping and handling. For battery replacement, please include a check or money order payable to Wenger NA in the amount of $20(US) to cover the cost of return shipping, battery change, and pressure testing the watch for water-resistance. If the watch is not properly serviced, it may void your warranty. If your warranty has been rendered void as a result of non-compliance with our warranty restrictions, we will send you an estimate before any repairs are made. When sending your watch to our Service Center, please pack it securely. We suggest insuring the shipment as Wenger NA cannot be responsible for damage or loss in shipping. Be sure to include your name, mailing address, phone number, email address, proof of purchase and a brief description of the problem. Note: Do not send watch boxes. 46 If you choose to bring your watch to a local professional jeweler for service, be sure to ask them to reseal your watch to ensure water-resistance. In order to ensure proper water-resistance, your watch must be pressure sealed. Failure to do so can damage the movement of your watch. If you have questions or concerns, please call 800-267-3577 or 800-447-7422 to speak to a Customer Care Associate. You may also visit us on the web at www. WengerNA.com or contact us via e-mail at [email protected]. In Canada call: 888-838-1504. Outside the U.S. or Canada, please visit www.Wenger.ch for further instructions. More information at wengerna.com. 47 Wenger Watch Registration For your convenience you can register online at www.wengerna.com/warranty or complete the form below and mail it to the address on the back. Please register your watch within 60 days from date of purchase. Name/Nombre:______________________________________________________ Address/Dirección:___________________________________________________ City/Cuidad:_ _______________________________________________________ State/Estado: ______________________ Zip Code/Código Postal:____________ Email:_____________________________________________________________ Date Acquired/Fecha de Adquisición:____________________________________ Gift/Regalo Purchase/Compre Where Purchased/Lugar de Compre:_ ___________________________________ 48 49