1
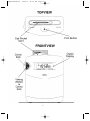
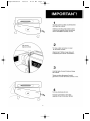
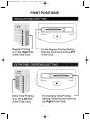
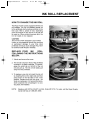
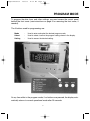
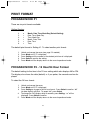
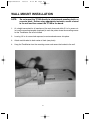
EnglishVersion
12/6/05
11:06 AM
Page 1
EnglishVersion
12/6/05
11:06 AM
Page 2
EnglishVersion
12/6/05
11:06 AM
Page 3
TABLE OF CONTENTS
Introduction................................................................................................................1
Parts Check List .......................................................................................................2
Safety Instructions ....................................................................................................3
Components .............................................................................................................4
Cover Removal / Replacement .................................................................................5
Regular Time / Overtime Printing ..............................................................................6
Ink Roll Replacement ................................................................................................7
Easy Set Up Instructions ..................................................8
Manual / Automatic Print Activation ..........................................................................8
Program Mode Description .......................................................................................9
Print Format P1 .......................................................................................................10
Daylight Savings Time Ahead / Back P3 / P4 ..........................................................11
Wall Mount Installation ............................................................................................12
Time Cards and Print Alignment .............................................................................13
Maintenance and Troubleshooting ..........................................................................14
Accessories Order Form
Limited Warranty
EnglishVersion
12/6/05
11:06 AM
Page 4
EnglishVersion
12/6/05
11:06 AM
Page 1
INTRODUCTION
Congratulations on the purchase of your new Royal® TC100 Time Clock. The TC100
is a full-featured, electronic time clock and we recommend you read this manual
carefully to become familiar with the operation of the product. The manual explains,
in simple steps, how to program, operate, and maintain your new Time Clock.
Please retain this guide for further reference.
The ROYAL CONSUMER PRODUCT SUPPORT HOTLINE gives you the opportunity to call for operational assistance and problem resolution. Please call toll-free:
Customer Service:
1-800-272-6229 (USA)
1-888-266-9380 (in Canada)
01-800-849-4826 (in Mexico)
Ordering Supplies: 1-888-261-4555
1
EnglishVersion
12/6/05
11:06 AM
Page 2
PARTS CHECKLIST
Remember to save your sales receipt in case you need warranty service, and
make sure your TC100 includes the items listed below:
• TC100 Time Clock
• 2 Keys (515)
• 50 Royal Standard Timecards
• Wall-Mounting Template
• Wall-Mounting Screws and Mounting Bracket
Tools Required:
• Standard Flathead Screw Driver
BATTERY BACK UP
The TC100 is equipped with a battery back-up system that protects time, date and
other program settings during a power outage. The time clock must be plugged in
for a minimum of 30 minutes before programming to charge the back-up battery.
This back-up battery will retain memory for a maximum of 90 days. The battery
back-up is rechargeable; expected battery life is a maximum of 5 years.
Replacement of the back-up battery must be done by an authorized service technician.
Make sure that you have an appropriate AC power source near the place you’ve chosen to install the time clock.
Royal offers a complete line of accessories for your clock - including replacement ink
roll and timecards - to make replacement of parts quick, safe, and inexpensive. To
reorder supplies, please see the Accessories page at the end of this instruction
manual or call the Royal Supply Center at 1-888-261-4555.
2
EnglishVersion
12/6/05
11:06 AM
Page 3
SAFETY INSTRUCTIONS
Always follow basic safety precautions when using this product to reduce risk of
injury, fire, or electric shock.
1.
Read and understand all instructions in the owner’s manual.
2.
Do not install the TC100 in places subject to high humidity and excessive dust,
in areas exposed to direct sunlight or in places subject to temperatures below
32°F (0°C) or above 104°F (40°C).
3.
Unplug this product from wall outlets before cleaning.
4.
Do not use this product near water or when you are wet. If the product comes
in contact with any liquids, unplug the line cord immediately. Do not plug the
product back in until it has been dried thoroughly.
5.
Install the product securely on a stable, level surface.
6.
If wall mounting the time clock, locate on a straight wall and please follow the
mounting instructions to install securely.
7.
Install this product in a protected location where no one can step on or trip over
the cord. Do not place objects on the cord that may cause damage or abrasion.
8.
If this product does not operate normally, see the Maintenance &
Troubleshooting section of this publication. If you cannot resolve the problem,
or if the product is damaged, refer to the Warranty section of this publication.
SAVE THESE INSTRUCTIONS
3
EnglishVersion
12/6/05
11:06 AM
Page 4
4
EnglishVersion
12/6/05
11:06 AM
Page 5
5
EnglishVersion
12/6/05
11:06 AM
Page 6
6
EnglishVersion
12/6/05
11:06 AM
Page 7
INK ROLL REPLACEMENT
7
EnglishVersion
12/6/05
11:06 AM
Page 8
SET UP INSTRUCTIONS
HOW TO USE YOUR TC100 TIME CLOCK
Step 1: Remove the front cover - see enclosed instruction sheet on page 5.
Step 2: Program the Date & Time and Print Method using the 3 buttons: Mode, Select, Setting:
Date & Time: Press the Mode button. The Hour will start blinking. Press the Setting button until the correct hour is displayed. Press Select to set the hour shown.
The Minutes will blink. Press Setting until the correct minutes are displayed. Press Select
to set the minutes shown.
The Seconds will blink. To set the seconds at 00, press the Setting button. Press Select.
The Year will blink. Press the Setting button until the desired year is shown. Press Select
to set the year shown.
The Month will blink. Press Setting until the correct month is shown. Press Select to set
the month shown.
The Day blinks. Press Setting until the correct day is shown. Press Select to set the day
shown.
Print Method: Press the Mode button until P5 (Program Mode 5 for Print Format) is displayed. Press Setting to choose one of the following Print Methods.
The TC100 has two settings for print activation: Manual or Automatic
1 = Automatic (default setting) - The TC100 automatically prints when the time
card is inserted.
2 = Manual - After inserting the time card, press the Print Button to activate
printing.
Press Select to confirm the Print Method chosen. Press Mode to return to normal operational mode.
Step 3:
The control knob corresponds to
format of the time card. Turn
the control knob to select the desired
day and print row.
8
Step 4: Insert the time card. The time the
time will automatically print in the
selected row.
EnglishVersion
12/6/05
11:06 AM
Page 9
PROGRAM MODE
To program the date, time, and other settings, you must access the control panel
behind the front cover (see instructions on page 5 for removing the front cover, if
needed).
The 3 buttons used for programming are:
Mode
-
Used to enter and select the desired program mode.
Select
-
Used to select / confirm the program setting shown in the display.
Setting
-
Used to access the desired setting.
At any time while in the program mode, if no buttons are pressed, the display automatically returns to normal operational mode after 20 seconds.
9
EnglishVersion
12/6/05
11:06 AM
Page 10
PRINT FORMAT
PROGRAM MODE P1
There are six print formats available:
Setting Number
1
2
3
4
5
6
=
=
=
=
=
=
Month, Date, Time, Week Day (Default Setting)
Date, Time, Week Day
Time, Week Day
Month, Date, Time
Date, Time
Time
The default print format is Setting #1. To select another print format:
1.
2.
3.
4.
5.
Unlock and remove the cover (see page 5 if needed).
Press Mode until “P1” is displayed.
Press Setting until the number of the desired print format is displayed.
Press Select to confirm the setting.
Press Mode until the display returns to the normal operational mode.
PROGRAM MODE P2 - 12 Hour/24 Hour Format
The default setting for the time is the 12 hour setting which also displays AM or PM.
The display also shows the date (default) or if you prefer, the seconds can be displayed.
To select the 24 hour format:
1.
2.
3.
4.
5.
Unlock and remove the cover.
Press Mode until “P2” is displayed.
Press Setting to change to the 24 hour format. Press Select to confirm. “dd”
(for date display) will blink. To accept “dd”, press Select.
To change the “dd” (display date) to seconds, press Setting. “ss” will be
displayed. Press Select to confirm.
Press Mode until the display returns to the normal operational mode.
10
EnglishVersion
12/6/05
11:06 AM
Page 11
DAYLIGHT SAVINGS TIME
The TC100 can be programmed to automatically adjust for Daylight Savings Time.
PROGRAM MODE P3 - Daylight Savings Time (DST) - AHEAD
To program the TC100 to automatically turn the time ahead one hour. (For example,
at 2:00 AM on the first Sunday in April.)
1.
2.
3.
4.
5.
Press Mode until “P3” is displayed.
Press Setting until the desired month (i.e. 4 for April) is shown. Press Select to
confirm.
Press Setting to choose the number 1,2,3,4 or 5 (week of the month - i.e. 1 for
the first weekend of the month). Press Select to confirm.
Press Setting until the desired day flashes - i.e. SUN for Sunday. Press Select
to confirm.
Press Mode until the display returns to the normal operational mode.
To turn off the DST, reprogram to select “- -“ .
PROGRAM MODE P4 - Daylight Savings Time (DST) - BACK
Use the following steps to program the TC100 to automatically turn the time back
one hour. (For example, at 2:00 AM on the last Sunday in October.)
1.
2.
3.
4.
5.
Press Mode until “P4” is displayed.
Press Setting until the desired month (i.e. 10 for October) is shown. Press
Select to confirm.
Press Setting to choose the number 1,2,3,4, or 5 (week of the month). For
example, “5” for the last weekend of the month. Press Select to confirm.
Press Setting until the desired day flashes - i.e. SUN for Sunday. Press Select
to confirm.
Press Mode until the display returns to normal operational mode.
To turn off the DST, reprogram to select “- -“.
11
EnglishVersion
12/6/05
11:06 AM
Page 12
WALL MOUNT INSTALLATION
NOTE:
Do not mount the TC100 directly to plasterboard, paneling, brick, or
concrete block. Rather, using appropriate fasteners, secure a board
to the wall and then mount the TC100 to the board.
1.
At a height convenient for all members of the work force and within 5 ft. of a power outlet, use the mounting template (enclosed) to mark the points where the mounting screws
for the TimeMaster are to be installed.
2.
Leaving 1/4 in. of screw shank exposed, mount enclosed screws into place.
3.
Attach metal bracket to back center of clock (see photo).
4.
Hang the TimeMaster from the mounting screws and secure the bracket to the wall.
12
EnglishVersion
12/6/05
11:06 AM
Page 13
TIME CARDS AND PRINT ALIGNMENT
The Royal Time Cards included with the TC100 are equivalent to many brands of standard
weekly time cards commonly found in office supply and stationery stores.
The Part Number for the Royal brand time cards is 013702 (250 time cards per pack).
We have tested many brands of time cards and have found the following other brands and
models to be compatible with the TC100:
BRAND
ADAMS
MODEL
9656-250
9791-250
9659-250
9657-250
BRAND
SIMPLEX
TOPS
MODEL
1950-9391
1259250
Since there are a wide variety of sizes and designs of time cards, for some brands of
cards other than Royal, it may be necessary to adjust the print alignment to print correctly
on each row of the time cards when the control knob is turned.
ADJUSTMENT SCREW FOR PRINT ALIGNMENT:
TO ADJUST THE SCREW:
13
EnglishVersion
12/6/05
11:06 AM
Page 14
MAINTENANCE and TROUBLESHOOTING
MAINTENANCE
Although your time clock is designed to be maintenance-free, it contains sensitive
electronic parts. Treat it with care to ensure best performance.
Avoid Rough Treatment
Avoid dropping the unit. Only gentle pressure is needed to activate the print action
in either Manual or Automatic modes. Retain the original packaging so you can use
it if you must ship the time clock.
Cleaning
The hard plastic casing of your clock has a durable finish that should retain its original luster for many years. Clean exposed parts with a soft, slightly damp cloth. To
remove stains, use a mild soap. Never use detergents, excess water, treated cloths,
harsh cleaning agents, or sprays.
TROUBLESHOOTING
If your TC100 does not work properly, try the following suggestions before seeking
repair assistance.
Printing
1.
If printing problem occurs, check the ink roll to make certain it is installed properly. If
needed, replace with a new ink roll.
2.
If printing is on the wrong side of the time card, check the position of the card insert slot
and adjust for regular time / extra time as needed.
3.
If it is not printing in the correct row of the time card, check if the control knob was set for
the desired day and IN or OUT setting.
4.
If printing is not aligning correctly in each row of the time card, or if printing is constantly
on the line, see page 13 for the adjustment screw instructions.
Other Questions / Problems
Make sure you have followed all the instructions in this booklet. If you have additional questions, please call Royal Customer Support in the U.S.A. at 1-800-272-6229
or in Canada at 1-888-266-9380.
14
EnglishVersion
12/6/05
11:06 AM
Page 15
ROYAL TC100 Electronic Time Clock
ACCESSORIES ORDER FORM
ITEM
DESCRIPTION
PART
NUMBER
1. Replacement Key Set (2 keys)
10490022
2. Ink Roll IR40T (2 per package)
013110
3. Time Cards (250 time cards per pack)
013702
4. 12-Card Rack (metal construction) (19-3/8”H x 4-1/8”W x 1-3/4”D)
17044H
5. 20-Card Rack (metal construction)
17057B
6. Owner’s Manual
RTC100-97
For Prices and Availability
CALL 1-888-261-4555
or visit our web site at
www.royal.com
Prices and Availability Subject to Change Without Notice
15
EnglishVersion
12/6/05
11:06 AM
Page 16
EnglishVersion
12/6/05
11:06 AM
Page 17
ROYAL ELECTRONIC TIME CLOCK WARRANTY
Royal Consumer Information Products, Inc. (“Royal”) at 379 Campus Drive, 2nd
Floor, in Somerset, NJ 08875 USA warrants that your NEW Royal Electronic Cash
Register or Time Clock (“Product”) is free of defects of workmanship and materials.
If there is a defect or malfunction of this Product, Royal will repair the Product free
of charge as follows:
PARTS: New or comparable rebuilt parts in exchange for defective parts for ONE
YEAR from the date of purchase.
LABOR: All labor charges incurred from a Royal Authorized Service Center or the
Royal Corporate Service Center are covered for 90 DAYS from the date of
purchase. After 90 days there will be a labor charge for repair of the
Product and/or assemblies such as the keyboard, display(s), logic board,
power supply and printer(s) at the Royal Corporate Service Center’s or the
Royal Authorized Service Center’s then prevailing rates. The Product must
be brought to a Royal Authorized Service Center nearest to your location;
or the Product must be shipped postage prepaid, insured and via a traceable shipping method to a Royal Authorized Service Center or to the Royal
Corporate Service Center. Royal will pay return postage from the Royal
Corporate Service Center during the labor warranty period only.
This warranty does not apply to persons who purchased this Product second hand
or used.
This warranty does not include the replacement of ink rolls, ribbons, time cards,
paper rolls or any other consumables or supplies used in the cash register or time
clock and consumed through the normal use of the Product.
This warranty does not include cleaning, adjustments, parts, or repairs required by
circumstances beyond the control of Royal, including, but not limited to, fire or other
casualty, accident, neglect, abuse, abnormal use, misuse or battery leakage damages. THERE ARE NO OTHER EXPRESSED WARRANTIES EXCEPT AS STATED HEREIN. AFTER THE PERIOD OF EXPRESSED WARRANTY SET FORTH
HEREIN, THERE ARE NO EXPRESSED OR IMPLIED WARRANTIES AND THOSE
EXCLUDED INCLUDE THOSE OF MERCHANTABILITY AND FITNESS FOR A
PARTICULAR PURPOSE. Royal shall NOT be liable for CONSEQUENTIAL DAMAGES resulting from any failure, defect, or malfunction of this Product. Some states
do not allow limitations on how long an implied warranty lasts and some states do
17
EnglishVersion
12/6/05
11:06 AM
Page 18
not allow the exclusion or limitation of incidental or consequential damages, so the
above limitations or exclusions may not apply to you.
TO OBTAIN SERVICE UNDER THE TERMS OF THIS WARRANTY:
• Pack your Product in the original carton or equivalent.
• Enclose a copy of the bill of sale or other documentation showing original purchase date.
• Enclose a card or note describing the difficulty you have had with the Product.
• Be sure to include your complete name, address and day-time telephone number.
• Bring or ship, prepaid and insured, via a traceable shipping method the above
Product to the nearest Royal Authorized Service Center location or to the Royal
Corporate Service Center. The Royal and/or the Service Center cannot be held
responsible for any loss or damage that occurs while in transit.
For Authorized Service Centers within your local area, please call 1-888-261-3888
or +1-732-563-9944. In Canada call 1-888-266-9380. Or you may call the Royal
Corporate Service Center directly at 1-708-615-8124 for shipping instructions and
additional information.
Please retain the original proof of purchase for your records to establish date of original purchase. Your warranty starts with the date of original purchase. This warranty gives you specific legal rights, and you may also have other rights which vary from
State to State.
•
This warranty is valid only on cash registers and time clocks purchased, delivered and used in the United States and/or Canada.
18