1
,,,_,_
MITSUBISHI
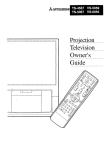
Proj e,ctlon
TV
Owner's
Guide
-3
RISK OF ELECTRIC SHOCK
DO NOT OPEN
CAUTION:
TO REDUCE THE RISK OF ELECTRIC SHOCK,
DO NOT REMOVE COVER (OR BACK)
NO USER-SERVICEABLE
PARTS INSIDE
REFER SERVICING TO QUALIFIED SERVICE PERSONNEL.
The lightning flash with arrowhead symbol, within
an equilateral
triangle, is intended to alert the user
to the presence ofuninsulated
"dangerous voltage"
within the product's enclosure that may be of sufficient magnitude to constitute a risk of electric shock.
The exclamation
point within an equilateral triangle is intended to alert the user to the presence of important
operating
and maintenance
(servicing)
instructions
in the literature
accompanying
the appliance.
WARNING
:
TO PREVENT
FIRE OR SHOCK
TO RAIN OR MOISTURE.
HAZARD,
DO NOT EXPOSE
THIS
AiPPLIANCE
CAUTION
:
TO PREVENT
ELECTRIC
SHOCK DO NOT USE THIS (POLARIZED)
PLUG
AN EXTENSION
CORD, RECEPTACLE
OR OTHER
OUTLET
UNLESS
BLADES CAN BE FULLY INSERTED
TO PREVENT
BLADE EXPOSUR:E.
WITH
THE
NOTE TO CATV SYSTEM
INSTALLER
:
THIS REMINDER
IS PROVIDED
TO CALL THE CATV SYSTEM INSTALLER'S
A'ITENTION
TO ARTICLE
820-40 OF THE NEC THAT PROVIDES
GUIDELINES
FOR PROPER
GROUNDING
AND, IN PARTICULAR,
SPECIFIES
THAT THE
CABLE GROUND
SHALL BE CONNECTED
TO THE GROUNDING
SYSTEM OF
THE BUILDING,
AS CLOSE TO THE POINT OF CABLE ENTRY AS PRACTICAL.
MITSUBISHI
OWNER'S
GUIDE
of onte-- s
Important
Preface:
Safeguards
Welcome
..........................................................
to Mitsubishi
4
.................................................
9
Summary of Special Features ...............................................
10
Unpacking Your Projection TV .............................................
What you'll fred .......................................................
A few suggestions ......................................................
11
11
11
What's in Each Chapter
12
Some Conventions
Chapter
1: Getting
Used in This Guide .......................................
to Know Your Projection
Overview
of the Front
Overview
of the Remote
Getting
Remote
Chapter
....................................................
Panel
TV
................................
...............................................
Control
.............................................
ready to use the remote control ....................................
control buttons and functions ......................................
2: Connecting
Your Projection TV .....................................
13
15
16
18
18
20
25
Overview of the Back Panel ................................................
26
Basic Connections
........................................................
Projection TV + external speakers ...........
.............................
Projectaon TV + antenna or cable without a decoder box .....................
Projection TV + antenna or cable with a decoder box ........................
Projectaon TV + separate UHF and VHF antennas
..........................
Projection TV + VCR + antenna or cable without a decoder box ..............
Projecuon TV + VCR + antenna or cable with a decoder box ................
Projectxon TV + home theater receiver (A/V receiver) .......................
Projecuon TV + audio system ............................................
Projecuon TV + external speaker with subwoofer out termfiaal ................
Projecuon TV + an amplifier that has a center channel O[.EC terminal
(VS-50VA1,
VS-50VA2,
and VS-60VA2 only.) .............................
28
29
30
31
33
34
37
40
42
43
44
Chapter3:
Operating
Your
Projection
TV ...........................
47
Getting Started ................................................
Programming
the remote control ................................
Turning the Projection TV on/off ..............................
Selecting the input source .....................................
Changing channels
...........................................
Setting the clock .............................................
Memorizing
channels
.........................................
Adding and deleting channels
.................................
Using home theater ...........................................
Renaming the inputs ...........................................
Adjusting the color alignment
..................................
Adjusting the sound ..........................................
Adjusting the picture ..........................................
48
49
52
53
54
57
58
,59
60
61
62
63
65
Using the Advanced Features .....................................
Setting the timer .............................................
Using the parental lock ........................................
Using the super quick view tuning ..............................
Using Video Mute ............................................
Using the power restore feature .................................
67
68
69
70
72
73
Chapter
4: Using the Special
Understanding
Features
76
Using the Off-Timer
...........................................
Setting the off-timer
..........................................
Changing or canceling the off-timer .............................
78
79
80
Using the Picture-in-Picture
(PIP) Mode ............................
Selecting the PIP image .......................................
Selecting the source .........................................
Exchanging
the PIP image .....................................
Freezing the PIP image .......................................
Moving the PIP image ........................................
81
82
83
84
85
86
5: Troubleshooting
Displays
75
.............................
Chapter
the On-Screen
................................
......................................
87
Using the VCR Tray .........................................
Caution and Care ...........................................
Calling for Service ..........................................
Appendix:
Index
3
Automatic
Procedure
for the Parental
..........................................................
Table of Contents
90
92
93
Lock
..............
95
97
IMPORTANT
SAFEGUARDS
PLEASE
READ ALL THESE INSTRUCTIONS
REGARDING
YOUR
TELEVISION
SET AND
RETAIN
FOR FUTURE
REFERENCES.
FOLLOW ALL WARNINGS
AND INSTRUCTIONS MARKED ON THE TV RECE]VER.
I.Read Instructions
Allthesafety
andoperating
instructions
shouldbereadbefore
the
appliance
isoperated.
2. Retain Instructions
The safety and operating
ture reference.
instructions
3. Heed Warnings
All warnings on the appliance
should be adhered to.
°
._hould be retained
and in the operating
for fu-
instructions
4. Follow Instructions
All operating
°
.
.
and use instructions
should be followed.
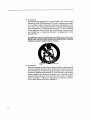
Cleaning
Unplug this Projection TV from the wall outlet before cleaning.
Do not use liquid or aerosol cleaners.
Use a damp cloth for
cleaning.
Attachment
and Equipment
Never add any attachments
and/or equipment without approval
of the manufacturer
as such additions may result in the risk of
fire, electric shock or other personal injury.
Water and Moisture
Do not use this Projection TV where contact with or immersion in
water is a possibility.
Do not use near: bath tubs, mash bowls,
kitchen sinks, laundry tubs, or swimming pools, etc.
4
.
Accessories
Do not place this Projection TV on an unstable cart, stand, tripod,
bracket, or table. The Projection TV may fall, causing serious injury to a child or adult, and serious damage to the applia:ace. Use
only with a cart, stand, tripod bracket, or table recommended
by
the manufacturer,
or sold with the Projection TV. Any mounting
of the appliance
should follow the manufacturer's
ia_l_ctions,
and should use a mounting
accessory recommended
by the
manufacturer.
An appliance
and cart combination
should be moved w:ith care.
Quick stops, excessive force, and uneven surfaces may cause the
appliance and cart combination
to overturn.
S3126A
.
Ventilation
Slots and openings in the cabinet are provided for ventilation
and
to ensure reliable operation of the Projection TV and to protect it
from overheating.
Do not block these openings or allow them to be
blocked by placing the Projection TV on a bed, sofa, rug, or other
similar surface. Nor should it be placed over a radiator
or heat
register. If the Projection TV is to be placed in a rack or bookcase,
insure that there is adequate
ventilation
and that the manufacturer's instructions
have been adhered to.
10.PowerSources
ThisProjectionTVshouldbeoperatedo:aly from
the type of power
source indicated on the marking label. If you are not sure of the
type of power supply to your home, consult your appliance dealer
or local power company.
11. Grounding or Polarization
For your safety, this Projection TV is equipped with a polarized alternating current line plug having one blade wider th an the other.
This plug will fit into the power outlet; o:aly one way. ]£you are unable to insert the plug fully into the outlet, try reversing the plug.
If the plug should still fail to fit, contact :your electrician to replace
your obsolete outlet. Do :not defeat the _'_ety purpose of the polarized plug.
12. Power-Cord Protection
Power-supply cords should be routed :30that they are not likely to
be walked on or pinched by items placed upon or against them,
paying particular
attention
to cords at plugs, convenience
receptacles, and the point where they exit from the appliance.
13. Lightning
For added protection
for this Projection TV during; a lightning
storm, or when it is left unattended
and unused for long periods of
time, unplug it from the wall outlet and disconnect the antenna or
cable system. This will prevent damage to the video product due to
lightning and power-line surges.
14. Power Lines
An outside antenna system should not t>elocated in the vicinity of
overhead power lines or other electric light or power circuits, or
where it can fall into such power line,_ o r circuits. When installing
an outside antenna system, extreme care should be taken to keep
from touching such power lines or c:Lrcuits as contact with them
might be fatal.
6
15. Overloading
Donotoverloadwall outletandextensioncordsasthis canresult
in a risk offire or electricshock.
16. Object and Liquid
Entry
Never push objects of any kind into this Prqje(,_ion TV through
openings as they may touch dangerous voltage points or short-out
parts that could result in a fire or electric shock. :Never spill liquid
of any kind on the Projection TV.
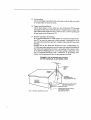
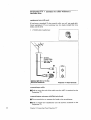
17. Outdoor Antenna
Grounding
If an outside antenna
or cable system is connected to the Projection TV be sure the antenna or cable system is I,rrounded so as to
provide some protection against voltage surges and built-up static
charges.
Section 810 of the National
Electrical
Code,., ANSIiNFPA
No.
70-1984, provides information
with respect to proper grotmding of
the mast and supporting
structure,
grounding of the lead-in wire
to an antenna
discharge unit, size of grounding conductors,
]ocation of antenna-discharge
unit, connection
to grounding
electrodes, and requirements
for the grounding
electrode.
EXAMPLE OF ANTENNA GROUNDING
AS PER NATIONAL ELECTRICAL CODE
_
ANTENNA
II F
II.
I_
I
I
. "
_
I
ELECtRiC
]
SERVICE
L
EQUIPMENT_
J
/
_
_"
I / /I
_
]_J/
_
/
/ [7"
//_..._
/
LEAOI_
I
/
L
/_
WIRE
_
AN'I'ENNA
DISCHARGE
UNIT
I
I
I
GROUNDIIqG CONDUCTORS
(NEC S;C"ION 810--21)
GROUND CLAMP_:
_--4--"------------------POWER SERVICE 3ROUNDING
ELECTRODE SYSTEM
NEC
-- NATIONAL
ELECTRICAL
CODE
(NEC
ART 250,
?AFrr
H)
18. Servicing
Do not attempt to service this Projection TV yourself as opening or
removing covers may expose you to dangerous voltage or other
hazards. Refer all servicing to qualified service personnel.
19. Damage Requiring Service
Unplug this Projection TV from the wall outlet and refer servicing
to qualified service personnel under th_ following conditions:
(a) When the power-supply
cord or plug is damaged..
(b) If liquid has been spilled, or objects have fallen into the Projection TV.
(c) If the Projection TV has been expo,;ed to rain or water.
(d) If the Projection TV does not operate normally by following
the operating instructions.
Adjust only those controls that are
covered by the operating instruc_icns
as an improper adjustment of other controls may result in damage and will often
require extensive work by a qualifie d technician
_o restore the
Projection TV to its normal operation.
(e) If the Projection TV ihas been dropped or the cabinet has been
damaged.
(f) When the Projection TV exhibits a distinct change in performance -- this indicates a need for _ervice.
20. Replacement
Parts
When replacement parts are required, be sure the service technician has used replacement
parts specified by the manufacturer
or
have the same characteristics
as the original part. Unauthorized
substitutions
may result in fLre, electri.c shock or ot:her hazards.
21. Safety Check
Upon completion of any service or repairs to this l:_ojection TV
ask the service technician to perform safety checks to determine
that the Projection TV is in a safe o_erating conditions.
8
PREFACE
Telcome
to Mitsubishi
Congratulations on your purchase of the Mitsubishi Projection TV. Your
Projection TV is designed for superb viewing pleasure as well as continued reliability.
To familiarize you with your new Projection TV and owner's guide,
we suggest that you read through the preface, which provides the following important information.
•
Summary
of Special
•
Unpacking
•
What's
in Each
•
Some
Conventions
Your
Features
Projection
TV
Chapter
Used
in This
Guide
Mitsubishi has strived to create your Project2.on TV so that it will bring
you years of viewing enjoyment.
Similarly, your owner's guide is
designed with a "user friendly"
philosophy that will help you take
advantage of all of your equipment's
feam:;es.
Once again, thank you for selecting our product and welcome to Mitsubishi!
Summary
of Special Features
Your top rated
Mitsubishi
Projection
TV delivers:
•
181-Channel
Capacitymprograms
up to 181 channels, ensuring
your continued viewing pleasure as cable services continue to expand.
•
Two-Speaker
clear, stereo
•
Expanded
Sound Capabilitymallows
you to connect the Projection TV to an external audio system for enhanc_ listening pleasur[.
Sound
sound.
System--a
special speaker
system produces
In addition to the standard features found on most advanced Projection
TVs, Mitsubishi is proud to offer the following distinctive features:
•
Remote Control with VCR/TV
Ftmction--us_s
a single re:mote
control transmitter for the television and select Mitsubishi VCRs.
•
Learning
Remote Control
remote control unit.
•
On-Screen
Displays--indicates
appears whenever a function
•
Picture-in-Picture
at the same time.
Unit---can
Preface
of other
the status of various functions
is adjusted.
Mode--allows
you to view _o
Each of these features will be explained
"Operating
Your Projection TV."
10
learn the functions
different
and
sources
in more detail in Chapter
3,
Unpacking
Your Projection
TV
What you will find
As you unpack your new Mitsubishi Projection
be sure that the following items are included:
•
•
•
•
TV, please
check to
an owner's guide,
a remote control transmitter,
a set of two size AAA batteries for the remote control and,
a belt for VCR (VS-45VA 1, VS-45VA2, VS-50VA1 and VS-50VA2
only).
"
A few suggestions
Before you hook up your new Projection
0
Complete
Projection
the unit.
the registration card.
TV's serial number,
0
Keep the box and packing
0
File your sales receipt
0
Place the Projection
to do the hook-up.
TV p:.ease take a few minutes to:
The registration card asks for the
which you'll find on the back of
materials
and warranty
fo:: furore use.
card.
TV on a stable surface with sufficient
Unpacking Your Projection
TV
fighting
II
What's
in Each Chapter
Here's
what you will find in this owner's
guide::
Chapter 1, "Getting to Know Your Projection TV", introduces you
to the location and functions of the buttons, conuols and terminals of
your Projection TV.
Chapter 2, "Connecting
Your Projection TV",
a VCR, antenna, decoder and other equipment
explains how to connect
to yeur Projection TV.
Chapter 3,"Operating
Your Projection TV", provides the step-by-step
instructions you need in order to use your Projection TV.
Chapter 4, "Using
of your Projection
the Special Features",
TV's special features.
Chapter 5, "Troubleshooting",
summarizes
along with the suggestions for remedying
The appendix
You'll
12
Preface
explains
an automatic
also find a detailed
explains
how to use some
the problLems you may have
these problems.
procedure
for the channel
index at the back of r.he book.
lock.
Some
Conventions
Used
in this Guide
Mitsubishi
has gone to great effort to provide users with an easy-tofollow, useful owner's guide. Different _ype_; of information
is treated
in different ways.
Users
which
terms
should
main topic or task
related
should read information
labeled.im]portant
is boxed and labeled warning.
The owner's
sparingly,
and all information
hig:hlighted
be read carefully.
and information
guide uses these
in this manner
topic or task
,i-wDto w._
F._,,.-,_-rv
I
•>,,,,_ w
lw
_, _, etc.
D
Procedures,
instructions
the step-by-step
on how to
accomplish a particular
are signalled by white
numbers set in a black
task,
Warning
Important:
This cue indicates
information
operation
Projection
critical
of your
This cue alerts you to
to the
new
TV.
background.
information
describing
dangerous
situations
which could ruAnyour
equipment
or cause
electrical shock.
Some Conventions
Used in this Guide
13
CHAPTER
Getting
1
to Know Your Projection
TV
Now that you've unpacked your Projection TV, read through the safety
information, and glanced at the overview explaining how this owner's guide
is organized, it's time to become familiar with the buttons and controls you'll
be using when you operate the TV. This chapter will introduce the range of
options available by using the buttons on the front panel of the TV or the remote
control. It also offers some general guideline., for using the remote control.
Most functions
can be controlled
by using either the front panel or the
remote control, but certain
specialized
functions
require the use of one
or the other. This chapter,
which will familiarize
you with the full
range
of button
functions,
contains
• Overview
of the
Front
• Overview
of the
Remote
the
following
Panel
Control
sections:
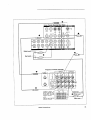
Overview
of the Front
Panel
(MONO)
.S-_O
_,IDEO
L-AUI_O.-R
0
L._
0
0
F'I:_:_Fr IN (EX'F-'T)------------;
PROGRAM
TIMER
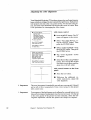
(_) S-VIDEO input terminal
Use to connect the video output of a Super VHS (S-VHS) VCR to the
Projection TV.
E> Important:
If you connect Super VHS equipment
(S-VHS), EXT-1 will automatically be the input for viewing S-VHS VCR.
video input terminals
Use to connect the video output
ponent.
audio input terminals
Use to connect the audio
output
from a VCR or aJ_other video com-
from a VCR o:: other equipment
AV reset button
Press to reset all audio and video functions
tion mode (Stereo/SAP/Mono)
and Projection
External)
to their normal level or setting.
except volume, recepTV Speaker (Intelmali
(_)test button (TEST)
This button is used to adjust optimum convergence.
audio
These
sound
audio
and video controls
buttons are used in pairs to adjust rear,ares of the image or
(other than volume) with a two-step process: using one of the
or video buttons to select a function, an5 then using the ad-
just buttons.
16
Chapter
1: Getting
to Know Your Projection
TV
audio function buttons (AUDIO) -- Use either the • buuon
the • button to select one of the following audio functions:
-- listen to stereo/sap/mono,
-- monitor out variable/fixed,
-- extra bass,
-- speaker internal/external,
-- audio expansion on/off,
-- balance,
-- treble, or
bass.
or
.
video function buttons (VIDEO)
of the following video functions:
-- tint,
-- color,
--
contrast,
-------
brighmess,
sharpness,
video noise reduction on/off,
notch filter,
color temperature,
or
color bias.
-- Use either button to select one
adjust buttons (ADJUST) -- After selecting the audio or video function, use either the • button or the • button to adjust the function
you've selected. The adjust buttons ca_ be used to:
-- turn the function on or off (e.g., expansion),
-- increase or decrease the function (e.g., color),
-- shift from one end of a scale to the other (e.g., balance), or
-- select a position (e.g., stereo).
@ input buttons (INPUT)
Use either button to select the input so'arce to view:
•
•
•
Antenna
Antenna
External
A,
B, or
1 or 2.
@ channel controls
(SCAN)
Use the • button to switch to a channel with a higher number
the T button to switch to a channel with a lower mtmber.
@ volume controls (VOL)
Press the • button to turn up the volume
down the volume.
and
and the • button to turn
(D timer reset button
Use to change all the settings to the imti,'d factory set-up. Any programs in memory and the clock-time a:re erased.
@ power button (POWER)
Use to mrn the Projection
TV on or off.
@ program timer indicator (PROGRAM-TIIVIER)
Lights up when the Projection TV is programmed
particular time.
Overview of the Front Panel
to turn on at a
17
Overview
of the Remote Control
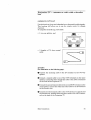
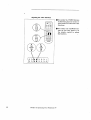
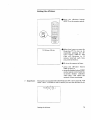
Getting
ready to use the remote
control
This section explains general information
installing
about using tae remote control.
the batteries
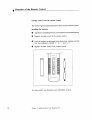
O
Take the box containing two size AAA batteries from the packing bag.
O
Remove
the back cover of the remote
contrc,1.
O Load the battieres as indicated in the illustration:
they are positioned
O
Replace
use Duracell
making
( + to +, and - ':o -).
the back cover of the remote
For best results,
18
correctly
AAA
Chapter 1: Getting to Know Your Projection
control.
(MN2400)
TV
bazteries.
sure that
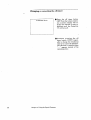
some dos and don'ts
To ensure that your remote
follow these guidelines:
•
•
•
•
control
will continue
Don't press two or more buttons at the same
Don't allow the remote control to get we_ or
Avoid dropping the remote control on a hard
When cleaning the remote control, don't use
Use only a soft, slightly moistened cloth.
general
properly,
time.
become heated.
surface.
any harsh chemicals.
instructions
When using the remote
follow these procedures:
O Be within
control to operate
20 feet of the Projection
Point the top of the remote
O Press the appropriate
button
the Projection
of the Remote
Control
TV or VCR,
TV.
control towa::d the Projection
TV.
or group 3 c,fbuttons.
The following section explains more about t he range
ble by using the remote control.
Overview
working
of options
availa-
19
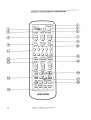
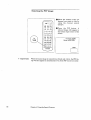
Remote
VCR
control
buttons
and functions
TV
@
©
®
@
MUTE
,9
2
@
I0 0
6
©
@
@
AUDIO
ADJUST
R F_I-AY
@
REVV/_
REC
PiP
VIDE.O
STOP
--
PLAY
j PAUSE
--
_/FF
VCR/TV,
OFF-T//
OTR/DISP
SOURCE
EXCH
POSITION
@
_.MITSUBISHI
20
@
Chapter 1: Getting To Know Your TV
©
@
Q
©
®
®
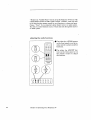
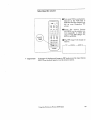
VCR/TV control (VCR/TV)
Setto "VCR" to operate the VCR and "TV"
tion 'IV.
to opera.te the Projec-
learn button (LEARN/NORM)
Use to program the remote control, See "Programming
control," page 49.
learning indicators
See "Programming
the remote
power button (POWER)
Use to turn the Projection
contcoY'
the remote
page 49.
TV on or off.
®
volume control (VOL)
Press the top part of the button to turn up the volume; press the
lower part of the button to reduce the volume. This button works
for the Projection TV even if the VCR/'IV control is set to "VCR".
®
input button (INPUT)
Use to select the input source
TV, or
External
to be monitored:
1 or 2.
®
channel control (SCAN)
Press the top part of the button to change to a channel with a higher
number; press the bottom part to change to a channe]l with a lower
number.
®
mute control (MUTE)
Use to turn the sound off completely or restore it _:oits original
volume. This button works for the Projection TV even if the VCRiTV
control is set to "VCR".
®
antenna button (ANT A/B)
Press to switch antenna between
A ard B.
@
quick view (Q.V.)
Press to switch between the current &Larmel and the last one viewed.
When the super-quick-view
tuning is set, it is used to view selected
channels programmed into super quick view memory.
@
number buttons (0-9)
Use to select a channel number, and to enter the parental lock code.
@
menu button (MENU)
Projects an on-screen menu with additional
functions.
®
instructions
for special
enter button (ENTER)
May be used after selecting a channel number, an item from the
on-screen menu, parenta2t lock code, or for entering the desired channel
number into super quick view memory.
Overview of the Remote Control
21
Remote control buttons and functions
(cont.)
®
cancel button (CANCEL)
This button is used to cancel the entered channel n_mber within ldaree
seconds, to erase the parental lock code during the parental lock sequence, and to clear the channel programmed into super quick view
memory.
®
audio and video controls
These buttons are used in pairs to adjust features of the image or sc,und
(other than volume) with a two-step process: using one of the audio
or video buttons to select a function, and then ushag the adjust buttons.
audio function buttons (AUDIO)--Use
either the top or the boatorn part of the button to select one of the following audio functions:
-listen to stereo/SAP/mono,
-monitor out variable/fixed,
-extra bass,
-speaker internal/external,
-audio expansion on/off,
-balance,
-treble, or
-bass.
video function buttons (VIDEO)--Use
ing video functions:
-tint,
-color,
-contrast,
-brightness
-sharpness,
-video noise reduction on/off,
-notch filter on/off,
-color temperature high/mid/low, or
-color bias.
to select one of the foE.ow-
adjust buttons (ADJUST)--After
selecting an audio or video fimction, use either the A button or the ¥ button to adjust the function
you've selected. The adjust button can be used to:
-turn the function on or off (e.g. :. expansion),
-increase or decrease the function (e.g., color),
-shift from one end of a scale to the other (e.g., balance), or
-select a position (e.g., stereo).
These are also used to select an item from the on-screen
®
VCR buttons
Can be used to control most Mitsubishi VCRs (See your VCR's
owner's guide for additional information). These buttons work with
the VCR even if the VCPUTV control is set to "TV".
®
off-timer button (OFF-T/OTR)
Use to program the TV to turn off automatically
®
22
menu.
Chapter
at a later tJ.me.
display button (DISP)
Use to view an on-screen summary of the current settings for Projection TV or cable functions.
1: Getting
to Know Your Projection
TV
®
picture-in-picture
controls
Use to control the special picture-in--picture
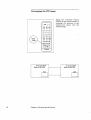
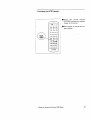
PIP button (PIP)-Press
(PIP) fumction.
to see the reduced PIP image or cancel it.
pause button 0PAUSE)-Press
cancel the image freezing.
to freeze the reduced
PIP image or
source button (SOURCE)-Press
reI_ttedly to switch the source of
the reduced PIP image between the TV and the external inputs.
exchange button (EXCH)-Press
to :,'witch back and forth between
the reduced PIP image and the main image.
position button (POSITION)-Press
reduced PIP image.
Overview of the Remote Control
to move the position of the
23
A
CHAPTER
2
Connecting
Your Projection
TV
This chapter offers step-by-step instructions
common hook-ups. It contains the following
• Overview
• Basic
of the Back
Connections
Panel
for completimg the most
sections:
,
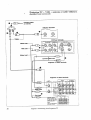
Overview
of the Back Panel
°t
INPUT
ANT
(VHF/UHF)
EXT-1
OUTPUT
EXT-2
I
A
.
TUNER MONITOR
I
I
-0
@
®
CAUTION: CONNECT
EXTERNAL
DO
NOT
SPEAKERS
TO
ONLY.
MAKE ANY OTHER
CONNECTIONS
INCLUDING
EXTERNAL AMPLIFIER.
NOTE:
TURN OFF THE SET BEFORE
SWITCHING SPEAKERS.
Important:
9.6
LJ
@
antenna
terminals
(ANT-A, ANT-B)
Use to connect VHF/UHF
antennas.
(_)
S-VIDEO
input terminal
Use to connect the video output of a Super _[S
to the Projection
TV.
(S-VHS)
If you connect Super VHS equipment (S-VHS), EXT-1
automatically
be the input for viewing your VCR.
Chapter
2: Connecting
Your
Projection
TV
will
VCR
®
VCR or another
®
audio input terminals
Use to connect the audio from a VCR or other equipment.
®
video tuner output terminal
Use to connect the video to a Home
Theater Receiver.
audio tuner output terminals
Use to transmit the audio to a Home
Theater
®
®
• Warning:
video input terminals
Use to connect the video output from a standard
component to the Projection TV.
video monitor output terminal
Use to connect the video of the Projection
Processor,
etc.
Receiver.
TV to a VCR, Video Copy
®
audio monitor output terminals
Use to connect the audio of the Projectior_ TV to an audio amplifier.
®
center channel •input terminal
(VS-50VA1,
VS-50VA2
and
VS-60VA2 only)
Use to connect the central channel output from an amplifier that delivers
surround sound, such as an HTS-100. If you make this connection,
your television's
speakers will play only the center channel signal
from your amplifier.
®
subwoofer
out terminal
A subwoofer is a speaker designed for very low frequencies. Connect the subwoofer out terminal to an amplifier and then connect
the amplifier to the subwoofer. If the subwoofer cont_fins a built-in
amplifier, then connect to the input of the subwoofer directly.
®
external speaker terminals
Use to connect spearate external speakers.
a nominal impedance of 8 ohms.)
(Only use ,;peakers with
Never connect equipment other than speakers to the external
speaker terminals. Don't connect speakers that are ab:eady hooked up to an amplifier.
Overview of the Back Panel
27
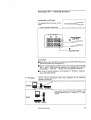
Basic
Connections
This section explains the basic connections you will need to make between your Projection TV, antennas, and VCR. You will see there are
different connections shown depending upon whether you have a decoder
box and the type of antenna you are using. Choose the type of cormection
for the type of equipment you have.
28
•
Projection
TV
+ external
speakers,
•
Projection
TV + antenna
or cable without
•
Projection
TV + antenna
or cable with a decoder
•
Projection
TV + separate
UIIF and VHF antennas,
•
Projection
•
Projection
TV + VCR + antenna or cable with a decoder
•
Projection
TV + home theater
•
Projection
TV + audio system,
•
Projection
and
TV + external speaker
•
Projection TV + an amplifier that has a cente:v channel olYr
terminal (VS-50VA1,
VS-50VA2,
and VS-60VA2 only).
a decoder
box,
box,
TV + VCR + antenna or cable without a decoder box,
Chapter 2: Connecting
Your Projection TV
receiver
(A/V
with subwoofer
box,
receiver),
out terminal,
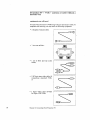
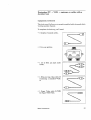
Projection
TV
equipment
you'll
To complete
need:
+ external
speakers
need
this hook-up, you'll
• 1 set of speaker
lead wires
--EXT-SP
(_)
ExternalSpesker
Wires
0
Tab (Push Hem}
procedure
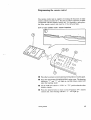
O Push down on the tab oft;he external speaker (EXT-SP) terminal
the back panel of the Projection TV.
on
Insert the appropriate
speaker lead irLtothe terminal. Be sure that
the + and - leads from the speakers are connected to the corresponding + (red) and - (black) exteraal speaker terminals.
To Listen to external speakers, set the Sl_.aJ:er to "External"
audio and adjust buttons.
•
Never connect equipment
speaker terminals.
Warnmg:
other
than
speakers
to the
using the
external
WRONG
If you wish to connect the PTV to the amplifier, use
only' the method shown in "Projection TV + audio
system".
D
RIGHT
m
AMPLIRER
Basic
SPEAKER
Connections
29
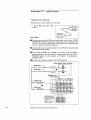
Projection
TV
decoder
box
equipment
+ antenna
or cable
without
a
you will need
If you have a standard
75-ohm coaxial cable, you x_l: _.not need ad,iitional equipment.
If your antenna
has two leads (called flat twLu
leads), you'll need:
• 1 75-300 ohm transformer.
A
=--
75 Ohm
Coaxial Cable
300 Ohm Flat
Twin Lead
ANT _
5_'_PJH_
A
0
B
Optional 300 Ohm to 75 Ohm
Matching Transformer
connecting
Projection TV Rear Terminals
a cable
O Push or screw the end of the cable onto the ANT-A '_erminal
Projection TV.
connecting
an antenna
O Use a screwdriver
with fiat twin
to connect
Push or screw the transformer
Projection TV.
30
on the
leads
the leads to the tra_;former.
onto the ANT-A
Chapter 2: Connecting Your Projection TV
terminal
on the
Projection
box
TV
equipment
you_l
+ antenna
or cable
with
a decoder
need
Use this hook-up if you need a decoder box to descramble cable signals.
This hook-up wil! allow you to use the remote control to change
channels.
To complete the hook-up, you'll need:
1 two-way splitter,
3 lengths
cable.
and
of 75 ohm coaxial
procedure
(See illustration on the following page.)
O Connect
splitter.
the
incoming
cable to the
]:N terminal
on the two-way
O Connect a coaxial cable to one of the OUT terminals
on the same
splitter; connect the other end of this cable to the ANT-A terminal
on the back of the Projection TV.
Connect the second coaxial cable to the s_,cond OUT terminal on the
same splitter; connect the other end of this cable to the IN terminal
on the decoder box.
O Connect the third coaxial cable to the OUT terminal on the back of
the decoder box, and the other end of this cable to the _'_qT-B terminal on the back of the Projection TV.
Basic Connections
31
Projection
TV
box (continued)
+ antenna
or cable
with. a decoder
___ _r-_.__lncoming
Cable
|
=:_L_r
or Antenna
O
O
Cable Decoder Box
Rear Terminals
/
®
Projection
/
TV Rear Terminals
ANT
_--_HF,_HF_---I
@
J
32
Chapter
2: Connecting
Your
Projection
TV
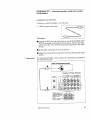
Projection
TV
equipment
+ separate
UHF
and VHF
antennas
you will need
If UI-]:F and VHF signals are brought
into your home with two
separate antennas, you'll need to combine the antennas
into a single
wire to connect them to the Projection _IuJ. To do this you will need a
UHF/VI-]:F combiner.
(There are different
combiners
for different
kinds of leads. Check with :your local electronics store fbr the kind of
combiner you need.)
Pictured
below is a standard
combiner.
UHF
®
®
.!1
To connect
separate
O Connect
the antenna
Press the combiner
UHF and VI-IF antem_as
leads to the UHFiVI-IF
onto the ANT-A terminal
VHF ANTENNA
(CHANNELS 2-13)
TV.
combiner.
on the P_ojection TV.
UHF ANTENNA
(CHANNELS !4-69)
I
1
-_
to your Projection
--FLAT
TWIN LEAD
FLATTWIN LEAD
EXTERNAL
ANTENNA
OR CABLE
4
._ANT
_
(VHF/UHF)
300 Ohm to 75 Ohm
Combiner
B
O
(_ACK_
Basic Connections
ISI_E]
ProjeclionTV
Rear Terminals
33
Projection
TV
decoder
box
equipment
+ VCR
÷ antenna
or cable
without
a
you will need
You may want to connect a VCR along with your antennas or cable. To
complete this hook-up, you may need the following equipment.
2 lengths
i two-way
of coaxial
cable,
splitter,
1 set of RCA pin-type
cables,
audio
1 RCA pin type video cable, (if_
connecting
a standard
VCR),
or
1 Super Video cable (S-VHS)
for Super VHS VCRs.
34
Chapter
2: Connecting
Your Projection
TV
procedure
(See illustration
O Connect
splitter.
on the following page.)
the incoming
antenna
to the IN terminal
on the two-way
O Connect a coaxial cable to one of the OU:? terminals
on the two-way
splitter; connect the other end of this cable to the ANT-A terminal
on the back of the television.
Connect a second coaxial cable to the ol:her OUT terminal
on the
two-way splitter. Connect the other end of this cable to the VHF-IN
terminal on the back of the VCR.
Connect an RCA pin type video cable _o the VIDEO OUT terminal
on the back of the VCR. Connect the other end of this cable to the
VIDEO INPUT terminal on the back of the televisio_a.
Important:
If you are connecting a Super VHS (S-VHS)VCR, use a Super Video
ble instead of an RCA pin type video cable. Connect a Super Video
ble to the S-VIDEO OUT terminal on the VCR. Connect the other
of this cable to the S-VIDEO INPUT terminal
on the back of
Projection TV.
O Connect
terminals
a set of RCA pin type audio cables to the AUDIO OUTPUT
on the back of the VCR. Use the red cable to connect the
right (R) channel
channel.
and the white
cable :."or connecting
O Connect the other ends of this cable to the AUDIO
nals on the back of the Projection TV.
_>Important:
cac_
end
the
the left (L)
INPUT
termi-
If your VCR is monaural
(non-stereo), you will only connect a single
RCA pin type audio cable. Connect the cable to the VCR, then connect
the other end to the L (LEFT) audio input on the back of the Projection
TV.
Set the VCR to the playback
mode.
0 Select the desired external input source on the TV (1 or 2) by using the
INPUT buttons on the front panel or remote control.
Basic Connections
35
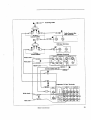
Projection
TV + VCR
decoder
box (continued)
o
-_ antenna
or cable
without
Incoming Cable
or Antenna
VCR Rear Terminals
VCR Rear Terminals
AUDIO OUT
AUDIO
_"--'-----_
(_
VIDEO
(ZP,.,rT
White Lead
CH-1
Red Lead
J
YellowLead,
i
Connect 0
Either
One
Projection TV Rear Terminals
Projection TV Rear Terminals
INPUT
S-VIDEO _9(r.I
OUTPUT
_,'T-2 TUNER MONffOR
I
j'
CAUTION:
CONNECT
TO
EXTERNAL SPEAKERS ONLY.
DO NOT k_AXE ANY OTHE_
CONNEC_ONS
{NCLUDING
_('T£_NAL
_,MPURE_.
NOTE:
T_JRN OF_ THE SET 6EF<_RE
swrr CHING SPEAKERS
36
Chapter
2: Connecting
Your Projection
TV
I
a
Projection
TV
decoder
box
+ VCR
equipment
need
you'll
+ antenna
or cable
This hook-up will allow you to record scrambled
viewing another channel.
To complete
with
cable channels
a
while
the hook-up, you'll need:
5 lengths
of coaxial
2 two-way
splitter,
1 set of RCA
cables,
pin type
audio
1RCA
pin type
video cable
(if
connecting
a standard
VCR),
--___
or
1 Super Video cable (S-VHS)
for Super VHS VCRs.
Basic Connections
37
Projection
TV + VCR
decoder box (continued)
+ antenna
or cable with
a
procedure
(See illustration on the following page.)
0 Connect
splitter.
the incoming
cable to the IN terminal
on the first two-way
O Connect a coaxial cableto
one of the OUT termiasls
on the same
splitter; connect the other end of this cable to the ANT-A terminal
on the back of the Projection TV.
O Connect a second coaxial cable to the other OUT terminal
on the
same splitter; connect the other end of this cable to the IN terminal
on the decoder box.
"
O Connect the third coaxial cable to the OUT termi sal on the back of
the decoder box; connect the other end of this cab].e to the IN terminal on the second two-way splitter.
Connect the fourth coaxial cable to one of the Ol.Y]:terminals
on title
second two-way splitter. Connect the other end of this cable to the
ANT-B terminal on the back of the .Projection TV.
0 Connect the fifth coaxial cable to the other OUT terminal
on the
same splitter. Connect the other end of this cable to the VHF-IN terminal on the back of the VCR.
0 Connect an RCA pin type video cable to the VIDE() OUT terminal
on the back of the VCR. Connect the other end of this cable to the
VIDEO INPUT terminal
on the back of the Projection TV.
_> Important:
If you are connecting a Super VHS (S-VHS) VCR, use a Super Video
ble instead of an RCA pin type video cable. Connect a Super Video
ble to the S-VIDEO OUT terminal on t:he VCR. Connect the other
of this cable to the S-VIDEO INPUT terminal
on the back of
Projection
cacaend
the
TV.
0 Connect a set of RCA pin type audio cables to the AUDIO OUTPUT
terminals
on the back of the VCR. Use the red cable to connect :_he
right (R) channel and the white cable for connecting
the left (L)
channel.
0 Connect the other ends of this cable to the AUDIO
nals on the back of the Projection TV.
_> Important:
INPUT
termi-
If your VCR is monaural
(non-stereo), you will only connect a single
RCA pin type audio cable. Connect the cable to the VCR, then connect
the other end to the L (LEFT) audio input on the back of the Projection
TV.
O Set the VCR to the playback
mode.
Select the desired external input source on the TV (1 or 2) by using the
INPUT buttons on the control panel or remote conlxol.
38
Chapter
2: Connecting
Your ProjectionTV
e _-_
Incoming Cable
0
I,
I
Rear Terminals
Cable Decoder Box
]
Coaxial Cab____F:
-@ @
_•
\
/
VCR Rear Terminals
!
.... 75 Ohm
Coaxial Cables
]
VCR Rear Terminals
White Lead
_f'@:© tl@_!f
'-,,_
_1 @-'i
Red LeadYellowLead
i
_d
'-------:
-----:
Connect Either One #
J•
0
Projection TV Rear Terminals
ANT _
(VHF_JH_
A
\
INPUT
S-_DEO EXI._
Y ,'
,A
OUTPUT
1
-:XT.2 TUNER
MCNITOR
I
White Lead-J
B
Red Lead
OUT
__
i
Basic Connections
39
Projection
receiver)
equipment
To hook-up
TV
+ home
theater
receiver
(A/V
you will need
a home theater
1 set of RCA
cables,
pin-type
receiver,
you will need:
audio
2 RCA pin-type video cables,
(if connecting a standard VCR),
u
or
=C3=
•
1 Super Video cable (S-VHS)
for a Super VHS home theater
receiver.
procedure
(See illustration on the following page.)
O
O
O
O
40
Connect one end of an RCA pin-type video cable to the Projection TV
VIDEO INPUT terminal of the home theater receiveJ:. Connect the other
end of this cable to the VIDEO TUNER OUTPUT terminal on the back
of the Projection TV.
Connect a Super Video cable to the S-VIDEO OUTPUT terminal of the
home theater receiver. Connect the other end of this c_,ble to the EXT-1
S-VIDEO INPUT terminal on the back of the Proj_clion TV.
Connect one end of an RCA pin-type video cable to fae VIDEO OUTPUT terminal of the home theater receiver. Connect the other end of this
cable to the EXT-1 VIDEO INPUT terminal on the back of the Projection
TV.
Connect a set of RCA pin-type audio cables to the Projection TV AUDIO
INPUT terminal of the home theater receiver. Use the red cable to connect
the right (R) channel and the white cable: for connecting rite left (L) channel.
Connect the other ends of this cable to the left and right AUDIO TUNER
OUTPUT terminals on the back of the Projection 'I_'.
Chapter
2: Connecting
Your Projection
TV
Home Theater Receiver Rear
II
,=,]=Lo_=q
®®@@
.TAr'E
AUX
I
I
VCR _
VC,_2
IN
IN
I
e.G°®®
vCR;
MO',ItTOR
_c)
I
L®®®®_Oe®@@o
_®®® ®/®®9
VCR'I
OuT
]APE
_'IEC
:Illo]l#XolIlt
I ;,,1.I
I
White Lead
Red Lead-
0
"--_
O
/
Projection TV Rear Terminals
INPUT
OUTPUT
®
@
---EXT-SP(8
CAUTION:
CONNECT TO
CONNECTIONS
EXTERNAL
TURN
_)---(_
INCLUDtNG
AMPLIFIER.
O:F THE SET BEFORE
SWITCHING
(_)
SPEAKERS.
Basic Comzections
Red Lea
41
Projection
equipment
To hook-up
TV + audio
system
you will need
an audio system you will need:
• 1 set of RCA pin type
cables.
audio
procedure
O Connect one end of the RCA pin type audio cables to the AUDIO
MONITOR OUTPUT terminals
on the back of 1:he Projection TV.
Use the red cable to connect the right (R) channel and the white
cable to connect the left (L) channel.
Connect the other ends of this cable to the AUX IN terminals
back of the audio system.
on the
OTurn off the Projection TV's speakers. To do this, press the AUDIO
function buttons on the front panel or remote control[ until you see the
SPEAKER display. Set the speakers to "External"
by pressing the
ADJUST button.
Set the audio system's
input to the AUX position.
Audio System Real'Terminals
AUX
Projection TV
Rear Terminals
INPUT
OUTPUT
TUN'R
MONITOR 1
D
S-VIDEO _T-1
OUT
®®®
EXT.2
0
CAUTION:
_
CONNECTTO I"---EXT'SP(8£_
NOT M._E _d_YOT_ER
CONN ECT[CNS
INCLUDING
EXTERNAL AMPUF_ER.
TURN
OFF TM=. SET _EFORE
SWITCHING
42
Chapter
2: Connecting
SPEAKERS.
Your Projection
TV
)_
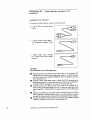
Projection
TV + external
out terminal
equipment
To hook-up
speaker
with
sub woofer
you will need
a external
speaker,
you will need:
• 1 RCA pin type audio cable.
q
Procedure
O Connect an RCA pin type audio cable to the SUB WOOFER OUT
(MONO) terminal on the back of the te:Levision. Connect the other
end of this cable to the AUX IN terminal
on the back of the audio
system.
Set the audio system input to the AUX posit£on.
Adjust the volume
system.
Important:
of the sound of the television
If a powered subwoofer
the subwoofer directly.
is used, connect
through
this terminal
the audio
to the input of
AUDIO SYSTEMREAR PANEL
AUX
Projection TV Rear Ten_inals
,_: ANT
S-vi3E
{VHFAJH
F")
v
A
0
0
I
tN =UT
OUTPUT
EXT-1 EXT.2 TUNER £1ON(TOR
®
I
,®®
_--_1-----
I
B
0
I
CE,,rr_=R
I
U
IN
SUB !
_
O WOOFER
OUT
--
EXT-SP(8 _)-----
h
OAUT]ON:
_..ONNE_'? TO
EXTERNAL $PF.AKEI_SONLY.
DO NOT MAKE ANY OTHER
CONNECTIONS
INCLUDING
EXTERNAL AMPURER.
NOTE:
TURN OFF TH£ SET BEFORE
SWIT C_-IINGSP_C_R&
Basic Connections
NN NNI
43
Projection
TV + an amplifier
that
out terminal (VS-50VA1,
VS-50VA2
equipment
•
you'll
has a center charmel
and VS.-60VA2 only)
need
1 RCA pin type audio
cable
Using the PTV speakers
as center channels speakers
If you are using a system that delivers Dolby Pro-Logic* surround sound,
such as the HTS-100, you will probably want to use the PTV speakers°
as center channel speakers. A center channel speaker adds to the realism
of surround sound systems such as Dolby Pro-Logic
It does this by
allowing certain sounds, such as voice, to be directed to the center channel. In this way, the voices appear to be coming directly from the screen,
in the exact location you would hear them in a mov:.e theater.
E>Important:
If you make this connection, the volume for your speal:ers will be controlled by the amplifier. If you are using an "invisible."
system, such
as an HTS-IO0, this will not change the way you operate your TV. If
you are using another system, it may change the way you raise and
lower the volume.
Procedure:
O Connect the end of an RCA pin type cable to the CENTER
minal on the back of the Projection TV.
O
Connect the other end of this cable to the center channel
minal on the back of the audio amplifier.
OUT ter-
INPUT
_ AN7"
(VHF/UHF)
IN ter-
I
V
I
D
E
O
S-VIDEOEXT-1 EX3".2
I ISUB
@
----EXT-SP(8
7St
.
CAUTION:
CONNECT
"O
EXTERNAL SPEAKERS ONLY.
DO NOT MAKE ANY OTHER
CONNECTIONS
iNCLUDING
EXTERNAL AMPLIFIER.
i'
®
Q )---
©
NOTE:
TURN OFF THE SET BEFORE
swrI"CI_ING
SPEAKERS.
*"Dolby,'" the double-D symbol [I]
and "'Dolby Surround," rl"l[i_t_'=_,_H "'Dolb
Pro-Logic,"
are trademarks of Dolby Laboratories Licensing Corporation.
,14
Chapter
2: Connecting
Your Projection
TV
CHAPTER
3
Operating
Your Projection
TV
Now that your TV is connected to the cable, antennas, or e_:temal components, it's time to enjoy your equipment. Tkis chapter will explain how to
operate the TV, first focusing on functions thai: are basic and easy and then
explaining some advanced features.
This
chapter
• Getting
• Using
explains:
Started
the Advanced
Features
_ Getting
Started
This section is designed to get you started enjoying your new Projection
TV. If you follow these procedures one by one, you will soon have
a picture and can begin discovering everylhing yourPrc,je.:tion TV can do.
You will fred information on:
48
•
Programming
the remote control,
•
Turning the Projection
•
Selecting the input source,
•
Changing
•
Setting the clock,
•
Memorizing channels,
•
Adding/deleting
•
Using home theater
•
Renaming
the inputs,
•
Adjusting
the color alignment
•
Adjusting
the sound, and
•
Adjusting
the picture
TV on/off,
channels,
Chapter 3: Operating
channels,
Your Projection TV
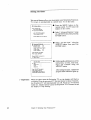
Programming
the remote
control
The remote control unit is capable of learning the functions of other
remote controls you may have. This fearare allows operation of other
components with this remote control uni;. For learning _:otake place,
the other remote control unit must be of the infra-red type.
how to learn
another
unit's remote
functions
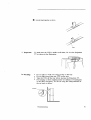
O
Place the two remote control units head to head about 2 inches apart.
O
Press the learn button (LEARN/NOI_tM)
using a pen. The learning
indicators "1" and "2" will light up, and the remol:e control will
enter the learning mode.
O
Set the VCR/TV control to "VCR"
remote controls.
or' 'TV" position that the other
O Press the desired button to learn on this Projection
control
unit. The learning
Getting Started
indicator
"1"
TV's remote
will light up.
49
Programming
O
control
(cont.)
Press and hold the corresponding
button on the other remote conl_'ol
unit until the learning indicator "1" turns off. "¢_en the button
is released, the learning indicator "2" will light up.
Repeat
•
the remote
steps
@ --
@ for learning
other funclioas.
Press the learn button again. The learning
will turn off.
indicators
"1"
and "2"
Depending on the unit, some commands may not be learned by steps
@ to @. In this case, try steps @ -- @ once again, and press
and hold the same button again until both learning indicators "1"
and "2" light up.
If the distance between two remote control units in step (_) is too
short or too long, the learning process may not be completed.
In
this case, changethe
distance between the two remote control umts
a little and then repeat steps @ --- @ once ag_a.
•
The buttons can re-learn
-- (_) again.
canceling
the learned
To erase the learned
50
new commands
by following
the steps (3
functions
function
of each button:
•
Press the learn button (LEARN/NORM)
indicators "1" and "2"' will light up.
using a pen. The learnfllg
O
Press the button whose
learn button again.
is to be erased.
Chapter
3: Operating
learned
Your Projection
function
TV
Press the
_> Important:
0 Change the batteries regularly. If you don't, you may lose the learned
memory. We suggest you change the batteries after about 10 months of
use (though their life is approximately one year).
The learning in step _ may not be completed when the learning
dicators "1" and "2" flash under the following conditions:,
• Ifthe batteries ofthe remote control unit whose commands
learned have run low
-- Replace with new fresh batteries.
• If all or some commands
unit.
cannot
be learned
by the remote
in-
are to be
control
If the command is difficult to learn or _;he memory capacity of the
unit has been exceeded (that is, if the leveled command code is complex, the learnable number of commands :may become less than the
learnable number of buttons).
-- Erase all the commands
that have already been learned, and
start over again. (It is recommended
Lhat the most frequently
used commands be learned first.)
If the units are far apart or too close, the unit may misread the light
from the other and fill its memory capacity with meaningless
commands.
-- Erase all learned commands,
change slightly the distance between the units and start over again.
O Similar problems
can also arise when the sensor i_';exposed to
strong light from fluorescent fLxtures and other powe:fful sources.
Getting
Started
51
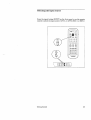
Turning
E> Im_rtant:
the Projection
TV on]off
Before using the remote control to operate the Projection TV, press the "I31
select button.
Use the POWER button on either the front panel or the remote control to tuna
the Projection TV on and off.
_> Important:
Even with the power turned off, there is a small current that: continues to flow
into the Projection TV. This maintains any changes to the setting as well as
operates the built-in clock and timing functions. Unplugging the set will erase
these settings requiring that you set them again. Unplug lhe Projection TV °
only when it won't be used for a long time.
O00OO
OOOO0
oooooo
o
52
Chapter
3: Operating
Your Projection
TV
Selecting
the input
source
Press the input button (INPUT) on the fi'ont panel or oil the remote
control to select the input source: ANT-A or ANT-B, EXT-I or EXT-2.
• <: "_ .
_J
oo
0000
I
Getting
Started
o0o
000
......
53
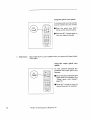
Changing
channels
Your Mitsubishi Projection TV offers you three way,,; of changing channels once their numbers have been programmed
into channel memo13r:
_> Important:
E> Important:
54
•
selecting
a channel
•
directly
•
using the special quick view option _o alternate
channel and the last channel viewed, and
•
using the super quick view function to alternate
channels programmed
for quick viewing.
accessing
To change channels
using the automatic
a channel
faster,
by pressing
use either
channel
scan feature,
the nttmber
buttons,
between
the current
between
of the following
special
procedures:
•
Enter three digits for every channelnumber, using zeros where needed.
(For example, enter "004" to view channel4 and "028" to view c_lanel 28.)
•
Press the ENTER button after selecting the number of the channel.
(For example, press "4" and "ENTER"
to vJ.ew channel 4.)
Cable stations (CATV) channel numbers 0 and greater than 126 are
unassigned. TV stations (TV) 0, 1 and 70 through 999 are unassigned.
If these channel numbers are pressed, the channel re:_a_tins unchanged.
Chapter 3: Operating Your Projection TV
changing
ically
To change
I
.°O1
OOOOOi
O0000[
,_
00
0
0
0
channels
automat-
channels:
O Press one of the channel controls (SCAN) on the front panel
or on the remote control. The
Projection
TV aatomatically
goes to the next broadcasting
station.
0o
changhag
channels
directly
To move directly to a particular
channel without going through
the prcgrammed
ch_mnels:
100(:71t0
O Use the remote
select the numbe:
control
to
of the chan-
nel you want to view.
O }h'ess the ENTE}_ button.
Getting
Started
55
using
the quick: view
option
To alternate between the currer.t
channel and the last one viewed:
O Press the quick view (Q.V.)
button on the remote control.
O Press the Q.V. button again to
view the original channel.
D Important:
Quick view (Q.V.) is not available
View (SQV).
when you operate tkLe Super
using
option
the
To view
gr_mmed
memory:
ooooo
ooooo
super
quick
Quick
view
selected channels
prointo super quick view
O Enter the desired channel into
super quick _Lew memory. (F_,e
"Super quick view tuning",
page 70.)
Press Q.V. button to view tl._e
desired cham_e:Ls in sequence.
,56
Chapter
3: Operating
Your Projection
TV
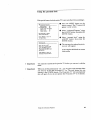
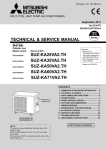
Setting
the clock
Your Mitsubishi Projection TV contains
the current time. To set the clock:
an on-screen
clock to indicate
O Press
,,_TV
the MENU button on the
remote: control. The TV menu will
Main Menu
Your choices are:
First Time Set-Up
Advanced Features
appear
on the screen.
O Select "First Time Set-Up"
using
the ,M2,JUST button; then press the
ENTER button.
•
Use ADJUST to select.
Then press ENTER.
Press MENU to exit
menus.
O You will see the "First Time Set-
O First Time Set-Up
Set the clock
Memorize channels
Add / delete channels
Use Home Theater: off
Rename the inputs
Color alignment
Up" screen. Select" Set the clock"
using the ADJUST button; then
press the ENTER button.
Use ADJUST to select.
Then press ENTER.
Press MENU to return
to "IV Main Menu.
O Follow
the
instructions.
Set the clock
Day
Clock
:
:
- - -
Use ADJUST to select.
Then press ENTER.
additio:aal
on-screen
O To view the time, press the display
(DISP)
control
button
on
the
remote
Press MENU to return to
First Time Set-Up Menu.
E> Important:
After setting Day & Clock, press the ENTER
minute arrives to start clock.
Getting Started
button when the precise
57
Memorizing
channels
Your Projection TV automatically
memorizes
the channels you can
receive. Once channels are memorized, you can scan through them using the channel control on the remote control and front panel. To memorize
channels:
0
First Time Set-Up
Set the clock
_- Memorize channels
Add/delete
channels
Use Home Theater: off
Rename the inputs
Color alignment
O Press
the MENU button on the
remote contro!. The TV menu will
appear
O Select "First Tiime Set-Up" using
the ADJUST button; then press _:he
ENTER button.
Use ADJUST 1o select.
Then press ENTER.
Press MENU to return to
TV Main Menu.
Memorize
channels
O Select "Memorize
O The instructiorts
channel
Press MENU to return to
First Time Set-Up Menu.
O
memory
for starting l:he
will appear.
whichever
input you connected
your antenna or ,:able to. If you connected an antenna to each input,
then you should :.Tlemorize the channels for the orktez input later.
Use the ADJUST button to ch(x_se
the type of antenna you connected:
cable antenna or indoor/outdc_r
Memorize channels
What is connected to
your "IV on Ant-A?
P- Cable antenna
Inctoor/outdoor
antenna
antenna.
button.
Then press the ENTER
O You will see a message that states
that channel memorization is in pJ'ogross. The channel in memori:,ation will appear in the bottom right
comer of the screen. You may stop
channel memorization
at any time
by pressing the CANCEL button.
Press MENU to return to
First 3qme Set-Up Menu.
58
us-
Choosing either antenna A (AntA) or antenna
B (Ant-B)
to
memorize
channels.
Choose
Use ADJUST to select
Then press ENTER.
_> Important:
channels"
ing the ADJUST button; then press
the ENTER button.
On which input would you
like to memorize?
Ant-A
Ant-B
Use ADJUST to select.
Then press ENTER.
on the :_creen.
The channel controls (SCAN) will work only after channels have been
programmed into memory. After memorizing,
use tile channel controls
(SCAN) on the front panel or on the remote control :o automatically
advance to the next memorized
channel. Use the NUMBER buttons
to select individual channels.
Chapter 3: Operating Your Projection
TV
Adding
and deleting channels
After all available channels have been programmed automatically, channels
with weaker signals can be added or delete5 by using the following
procedure.
First Time Set-Up
Set the clock
Memorize channels
Add/delete
channels
Use Home Theater: off
Rename the inputs
Color alignment
0
appear
Add/delete
channels
Antenna
Channel
Either "In memory" or
"Not in memory" will
appear.
Ant-A
119
In memory
Use ADJUST to select
another channel,
Press CANCEL
to delete.
Press MENU to return to
First Time Set-Up Menu.
c,n the screen.
O
Select "iFirst Time SeT:-Up" using
theADJUST
button; then press the
ENTER button.
O
Select "Add / delete charmels" using the ADJUST button; then press
the ENTER button.
Use ADJUST to select
Then press ENTER.
Press MENU to return to
TV Main Menu.
Press the MENU button on the
remote control. The TV menu will
O The "Add/delete
channels"
screen
will appear. Channels that are
in memory have the word "In
memory"
under
the channel
number; channels not in memory
say "Not in memory".
O Followhlg the additional on-screen
instruztions,
add a channel into
channel memory or delete a channel if, am channel memory.
_> Important:
The (SCAN) A button changes to a chatm_l with a higher number one
by one; the SCAN • button changes to a channel with a lower number
one by one.
_>Important:
You may switch between the antennas (A_t-A and Ant-B) by pressing
the input button (INPUT) or antenna button (ANT A/B).
Getting Started
59
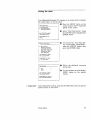
Using home theater
Use this feature
your Projection
•
if you connected a Home Theater
TV to external 1 (EXT-1)
Receiver.
It will fix
O Press the MENU
First Time Set-Up
remote control.
Set the clock
Memorize channels
Acid / delete channels
Use Home Theater:. off
Rename the inputs
Color alignment
appear
button on the
The TV menu will
on the screen.
O Select ' 'First Time Set-Up"
using
the ADJUST butten; then press the"
ENTER button.
Use ADJUST to select.
Then press ENTER.
Press MENU to return to
3"4 Main Menu.
O
Press the ADJUST button to select
"Use home theater".
Then press
the', ENTER button.
O
The message that confirms whether
yo a wish to use dais feature appears.
Press
the ENTER
button
to
continue.
O
Press the ENTER button
home theater ON.
Use home theater
This feature lets you
control all input
switching from
a Home Theater Receiver.
Press ENTER to continue.
Press MENU to return to
First Time Set-Up Menu.
Use home theater
Before using this mode,
make sure you have
a Home Theater Receiver
connected.
to ta:rn
The screen will return to the' 'First
Time
Set-Up"
menu.
Press ENTER to confirm
or press MENU for
First Time Set-Up.
Press MENU to return to
First Time Set-Up Menu.
_> Important:
60
When you set this feature to "on",
--the input source will be f_ed to external 1 (Ext-1).
--the input button (INPUT) will switch between aatennas A and B
(Ant-A/B), and
--all input switching is controlled by a Home Theater Receiver.
(See your Home Theater Receiver's
owner's grade for more
information.)
Chapter
3: Operating
Your
Projection
TV
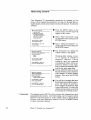
Renaming
the inputs
This feature allows you to rename the external inputs. After renaming,
the new name will appear on the screen display.
•
O
First Time Set-Up
Set the clock
Memorize channels
Add ldelete channels
Use Home The_ater: off
_- Rename the inputs
Color alignment
Press the MENU button on the
realole control. The TV :menu will
appear on the screen.
O
Selec:: "First Time Set-Up" using the ADJUST
button; then
press the ENTER button.
Press MENU to return to
"IV Main Menu.
O
Select: "Rename the inputs" ushag the ADJUST
button; then
press the ENTER button.
Rename the inputs
O
Use the ADJUST bunon to select
eitkter Ext-1 or Ext--2 to rename.
Use ADJUST to select.
Then press ENTER.
Input label
New name
Then press the ENTER
m- Ext-1
Ext-2
button.
Use ADJUST to select.
Then press ENTER.
Press MENU to return to
First Time Set-Up Menu.
O Set t_e new nan=e using
Rename the inputs
Input label
D.-Ext-1
Ext-2
New name
Use ADJUST to rename.
Then press ENTER.
Press CANCEL to clear.
ADYUST button.
Follow the additional
inslxuctions.
the
on-screen
Press MENU to return to
First T_me Set-Up Menu.
_> Important:
You can rename the inPuts using letters (A-Z), numbers (0-9), or symbols (colon, slash, period, comma, pareatheses,
blank and hyphen).
Getting Started
6I
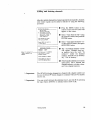
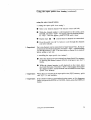
Adjusting
the color alignment
Your Mitsubishi Projection TV has three picture tubes and large diameter
lenses which are arranged in-line to project the light beams. Each picture
tube projects only one color: red, green or blue. For the best color picture, the three colors should be converged at the center of screen. Here
is the procedure for converging
the color beams:
•
First Time Set-Up
Set the clock
Memorize channels
Add/delete
channels
Use Home Theater:. off
Rename the inputs
Color alignment
with
0
controh
Press the MENU button. The TV °
menu will appear on the screen.
O
Select "First Time Set-Up"asing the ADJUST button. Then
press the ENTER button.
•
Select "Color alignment" using
the ADJUST button. Then press
the ENTER bu_ton.
Use ADJUST to select.
Then press ENTER.
Press MENU to return to
TV Main Menu.
remote
Adjust color alignment
Press VIDEO to select
Red or Blue. Then on
each screen press
ADJUST until the
crosshairs appear white.
O The "Color
screen
,will appear.
O
Press MENU to return to
First Time Set-Up Menu.
Red
alignment"
Select Red or Blue using VIDEO
button, then coverge the red and
blue lines onto the green until the
,green line will turn white.
with control
buttons
on the front
panel:
62
O
Press the test button.
0
Following
the additional
:screen instructions,
adjust
color alignment.
onthe
_> Important:
The cross-bar pattern is intended for use only as a converge aid. It should
not be left on for a long period of time, since damage to the picture
tubes could occur.
_> Important:
Convergence
of the light beams can be affected by external factors over
time and convergence readjustment may become necessary. Ifa cha:age
in the color quality of the picture becomes noticable, check the convergence adjustment with the test pattern and readjust as required.
Chapter 3: Operating Your Projection TV
Adjusting
the sound
You can adjust all of your Projection TV's sound functions by using a pair of buttons: select a function witkL the AUDIO button and
adjust the function with the ,ADJUST butto:a. You use tile ADJUST
button to:
•
•
•
•
select a position (e.g., stereo),
increase or decrease the function (e.g., bass),
shift from one end of a scale to the other (e.g.,
mrn the function on or off (e.g., expanzion).
After adjusting the sound, an on-screen
function and level you've selected.
what
display
balance),
or
will ind:_care the
you will adjust
"Listen to: stereo/SAP/mono"
allows yOrLto change the audio
reception mode to stereo, separate audio programming
(SAP), or
monaural (mono), depending on the type of broadcast you are
receiving. As you select the reception m,_e, remember the
following:
•
The "Stereo"
broadcasts.
setting allows you to receive
both mono and stereo
The separate audio programming
("SAP")
setting ol.:fers you the
option of listening to either of two separate audio programs. For
example,
a combination
television!radio
station may broadcast
through the Projection TV.
The "Mono"
setting reduces unwanted background
noise when a
stereo broadcast is coming in weak. "_v_aenyou use the "Mono"
setting, you will hear the broadcast in monaural even when the broadcast signal is in stereo.
E> Important:
An on-screen display appears when programs are broadcast
or when separate audio programming
(SAP) is available.
"Bass"
"Treble"
"Balance"
"Audio
stations.
controls
the volume
controls
the volume
of low-frequency
of high-fiegLuency
in stereo
sound.
sound.
adjusts the level of sound between, the left and right speakers.
Expansion:
On/Off"
creates
a ste:veo effect with non-stereo
"Speaker: Internal / External" controsl wbicia speaker (built-in or external) is available. Set to "Internal"
for norraal operation using output
from the speaker system. When connected to an external audio system,
the speakers can be turned off by setting thJ.s function to "External"
"Extra Base" controls the volume of very low frequency
sounds are lower than those, controlled by "Bass".
Getting Started
sounds. These
63
"Monitor out: Variable/Fixed" lets you set-up the Projection TV for use with
a home theater receiver or audio system. Choose "Variable" when you wish
to use the television remote control for such functions as volume and mute.
Choose "Fixed" if you connected a home theater receive:r or audio systera.
This lets you control functions such as volume and mute through the receiver
or audio system.
adjusting
the audio
functions
O Use either the AUDIO butto:as
on the front lc,anel or on the remote control to ,;elect one oft]ae
functions.
Use
tons
the
the
0
I_4
Chapter
3: Operating
0
0
0
0
° I
Your Projection
TV
either the ADJUST
buton the front panel or on
remote control to adju.st
function.
Adjusting
the picture
You can adjust all of your Projection TV's video functions by using a pair of buttons: select a function with the VIDEO button and
adjust the function with the .ADJUST button. You use the ADJUST
button to:
•
*
•
•
shift from one end of a scale to the other (e.g., tint),
increase or decrease the function (e.g., color),
turn the function on or off (e.g., video noise reduction),
select a position (e.g., color tempurature).
or
what you will adjust
"Tint"
delicate
adjusts the proportion
tones of color.
"Color"
determines
"Contrast"
"Bright(ness)"
"Sharpness"
controls
of red to green
the intensity
in the picture.
the light level of the image
adjusts the detail
the
of the color.
the level of white-to-black
controls
that determines
and clarity
on screen.
of the picture:.
"Video N(oise) R(eduction):
on/off''
is used to reduce background
noise that can occur with weak signals. Usually this function is set
to "off''.
"Notch filter:on/off''
of striped or checked
"Color
relative
is used in special
patterns.
temp.(erature):
High/Middle/Low"
warmth of the picture.
cases to stabilize
the color
is used to change the
"Color bias: Average/Skin-tone/Accurate"
is used to improve
color reproduction
depending to the input source.
Important:
the
"Video NR" and "Color Bias" are automatically
set to "off" or
"Average"
when turning the Projection TV off, or changing a channel
or an input source.
Getting
Started
65
adjusting the video functions
O Use either the VIDEO buttom_
on the front panel or on the re.mote control to select one o:[the
functions.
00000
O Use either the ADJUST
but.tons on the front panel o:r on
the remote, c:ontrol to adjust:
the function,
o
0
0
0
,36
Chapter
0
0
3: Operating
0
0
o
0
Your Projection
TV
Using the Advanced
Features
This section explains
You will learn:
how to use some of the more advanced
•
setting
the timer,
•
using
the parental
•
using
the super-quick-_iew
•
using
Video
•
using
the power
Using
the Advanced
Mute,
lock,
tuning,
and
restore
Features
functions.
feature.
67
Setting the timer
This special feature allows you to program your Mitsubishi Projecti.on
TV to turn on automatically
at a preset time. To set the timer:
N%.TV Main Menu
0
Press the MENU button on abe
remote control. Ti0e TV menu will
appear on the _';creen.
O
Select "Advanced Features" us:rag
the ADJUST button; then press the
ENTER button.
O
Select "Set the timer"
ADJUST button; then
ENTER buttor...
Your choices are:
First Time Set-UP
Advanced Features
Use ADJUST to select.
Then press ENTER.
Press
MENU
to exit
menus.
_1_Advanced Features
_,- Set the timer:
Parental lock:
Super quick view
Video mute:
Power restore:
off
off
(SQV)
off
off
using the
press the
Use ADJUST to select.
Then press ENTER.
Press MENU to return to
"IV Main Menu.
O Following the additional on-screen
Set the timer
Day
Start time
Input
Channel
instructions,
set Day,
Input and Channel
ADJUST button,
:-:- :- :- -
Use ADJUST to select.
Then press ENTER.
Press MENU to return to
Advanced Features Menu.
Important:
68
Start trine,
using the
After setting the timer, confirm the
program timer indicator lights up.
When the timer turns the Projection "IV on, the display will flash as
a warning. If you do not press a TV function button for about 5 minutes,
the Projection TV will automatically
rum off. Pressi:ag a TV function
button (ex. display button) causes the Projection TV to remain on and
the display to stop flashing.
Chapter 3: Operating
Your Projection
TV
Using the parentallock
This special feature locks the entire TV to prevent others from watching it.
@ Advanced
Features
Set the timer:
Parental lock:
Super quick view
Video mute:
Power restore:
off
off
(SQV)
off
off
Use ADJUST to select.
Then press ENTER.
Press MENU to return to
-rv Main Menu.
Parental
O Press the MENU button on the
remote control. The TV menu will
appear
on the screen.
O Select"Advanced
Features" using
the ADJUST button; then press the
ENTER button,
o
tB Selecl; "parental lock" using the
ADJUST
button; then press the
ENTER button.
lock
Now, the lock is off.
Enter your personal code
using NUMBER buttons.
Then press ENTER to turn
the lock on,
O The me:_sage for setting the parental lo:k will appear.
Following the additional
instructions
on-screen
Press MENU to return to
Advanced Features Menu.
_7
Important:
2> Important:
You must f'n-st unlock the Projection
timer.
TV beIbre you can use it with the
When you set the parental lock "on," you w:kllsee a lock message when
you next try to turn the Projection TV on. The only button you can
operate is the POWER button. The Projection TV will automatically
turn off again if you do not operate the Projection TV in 5 minutes.
Using
the Advanced
Features
69
Using the super quick view tuning
You can set the Super-Quick-View
from the menus of by using the ENTER
and CANCEL buttons. See "using the quick view option" page 56.
_, Advanced
O Press the MENU
button on the
remote control. "]?heTV menu will
Features
Set the timer:
Parental lock:
_- Super quick view
Video mute:
Power restore:
off
off
(SQV)
off
off
appear
O Select _'Advanc_5 Features" u,;ing
the ADJUST button; then press the
ENTER button.
Use ADJUST to select.
Then press ENTER.
Press MENU to return to
"iV Main Menu.
O
Super quick view (SQV)
Select"Super,quick
view (SQV)"
using the AD.IUST button; then
press the ENTER button.
O The instructions
for setting Super
quick view will appear. Use the
ADJUST button:; to select a position to store a TV channel, then
press the ENTER button.
ID- ................
Use ADJUST to select.
Then press ENTER.
Press MENU to return to
Advanced Features Menu.
Super quick view (SQV)
Input
Channel
on the screen.
O Set the input source by using the
ADJUST
button,
ENTER button.
.....
- - -
then press
the
Use ADJUST to select.
Then press ENTER.
Press MENU to return to
Advanced Features Menu.
O
Super quick view (SQV)
Input
_- Channel
.....
- - -
Use ADJUST to select.
Then press ENTER.
Press MENU to return to
Advanced Features Menu.
70
Chapter
3: Operating
Your
Projection
TV
Select the channel number to program
into Super
quick view
memory using the ADJUST bun:on.
Follow the additional
on-screen
instructions.
Using
the super
quick
using the enter/cancel
view
tuning
(continued)
button
< setting the super quick view tuning >
[;>Important:
0
Select your desired
0
While the channel number is still displayed on the screen, press
ENTER. The letters"SQV"
will appear under the channel number.
If "SQV'" does not appear, press ENTER until it does'.
0
Repeat
0
Press the quick view (Q.V.)
you have selected.
steps
0
channel
0
with charmel
until all desired
control
channels
(SCAN).
are memorized.
button to cycle through
the channels
Up to ten channels can be memorized in Super Quick View. If you try
to memorize more than ten channels, the letters"SQV"
will flash telling
you that the memory is full. Your must delete a channel from :memory
before adding a new one.
< cancelling
0
the super quick view tuning >
Select the channel you wish to delete flora Super QuickView memory
by pressing the channel control (SCAN) or the quick "view (Q.V.)
button.
O While the channel number is still displayed
on the screen, press
the CANCEL button. The letters "SQV" will disappe,_r from under
the channel number, and the channel will be deleted from the Super
Quick View memory.
_> Important:
When there are channels in the super quick view (SQV) memory,
view (Q.V.) is not available.
D Important:
If the channel number is not displayed on the screen, or if :itdisappears
before you press the ENTER or CANCEL button, press the DISPLAY
button.
Using the Advanced Features
quick
71
Using
Video
Mute
With video mute on, any blank section of video tape or any station with
a weak signal is replaced by a blue screen. The sound is also turned
off. If there is a case where you might wish to try tuning in a station
that would otherwise be mute, you can turn the video mute off.
Ik Advanced
O
Features
Set the timer:
Parental lock:
off
off
Press the MENU button on the
remote control. The TV menu will
appear
Super quick view (SQV)
Video mute:
off
Power restore:
off
O
Select ' 'Advancex[ Features" using
the ADJUST button; then press the
ENTER button.
O
Select "Video Mute"
ADJUST button.
O
Press the ADJUST button to select
'"Video Mute: o:a".
Use ADJUST to select.
Then press ENTER.
Press MENU to return to
"rv Main Menu.
Follow
the
instructions.
72
Chapter
3: Operating
Your
Projection
on the screen.
TV
additional
using
the
on-screen
Using the power restore
feature
When this feature is used, the Projection TV will automaticaliy
turn
on when electric current is supplied. This feature is useful when, for
example,, your Projection TV is plugged into an outlet that you control
with a wall switch.
To use the power
Advanced
restore
O
Feature
Set the timer:
Parental lock:
Super quick view
Video mute:
=,- Power restore:
feature:
Off
off
(SQV)
off
off
appear
on the screen.
O Select "Advanced
Peature"
ing the ADJUST
press _he ENTER
Use ADJUST to select.
Then press ENTER.
Press MENU to return
to "IV Main Menu.
Press che MENU button on the
remote control. The TV menu will
button;
button.
usthen
O Select' 'Power restore" using the
AD.IV ST button.
O
Use the ENTER
button to switch
tO On.
Press MENU to turn to 'IN Main
Menu.
D Important:
In order for this feature to work, you must leave the Projection
turned on when you turn off the electric current.
Using the Advanced Features
TV
73
__llkC
H___!A
P__T
ER 4
Using the Special
Features
In addition to the basic and advanced functions explained in the previous
chapter, your Mitsubishi Projection TV offers you several SlC_cjalfeatures
not generally available on other brand Projection TVs. This chapter
will explain how to use these distinctive featau-es. It contains the followhag topics:
• Understanding
the On-Screen
•
Using the Off-Timer
•
Using the Picture-in-Picture
Displays;
(PIP) Mode
Understanding
the On-Screen
Displays
Your Mitsubishi Projection TV provides an on-screen summary of the
current settings for the Projection TV or cable charmels. This on-screen
display can also be used to check the status of various functions without
adjusting them. To check a function, press the display button (DISP)
on the remote control. This section describes the displays in the order
that they occur.
Ant-A 023 ESPN
Stereo & SAP SQV
0
This setting indicates the fouowmg:
•
input source (antenna and chmmel
number, and channel name)
stereo and/or SAP are available for
•
•
Thursday
10:23 am
•
•
Ext-1 Front
S-VIDEO SQV
This setting indicates
following:
•
•
Thursday
10:23 am
•
•
•
TV Off-timer
TV
program
120 rain.
timer:
reception on fin.i,;channel,
this channel is programmed
into
super quick view memory,
current day of the week, and
time.
the
input source (external source, and
input name),
S-VHS cable has been connected
to Projection "IW,
this channel is programmed
into
super quick view memory,
current day of the week, and
time.
O This setting indicates the status of
the off-timer Jmlcdon.
off
O This setting indicates the status of
the timer, which can be use,] to
program the TV to turn on automatically.
76
Chapter
4: Using
the Special
Features
O Tl_is setting indicates
rerLt volume
setting
Projection TV.
TV Volume
the curof the
_EZ'-I
This setting indicates that the
Projection TV speaker system
has been turned off.
"IV Volume
Speaker:. off
_---"1
This setting
indicates
that
Projection TV vol_ne has been
muted.
TV Mute
O This setting indicates the current reception mode (Cable or
Indoor/outdoor).
Antenna: Indoor/outdoor
Understanding
the On-Screen
Displays
77
Using
the Off-Timer
This special function aUows you to set the Projection TV to turn off automatically. You can set the Projection TV to turn off from 10 to 120 minute:_ (2
hours). In this section you'll learn:
78
•
setting the off-timer,
•
changing
Chapter
and
or canceling the off-timer.
4: Using the Special Features
Setting
the off-timer
O Press
the
off-tiraer
(OFF-T) on the remote
TV Off timer 120 min.
button
control.
O Select how long you want the
Projection
TV to stay on by
repeatedly
pressing
the offtimer
button
(OFF-T).
The
time
will decrease
in 10
minute
intervals
each time
you press the button.
To view the amount
of time:
press
the off-timer
button
(OFF-T) once, or
press the display button (DISP)
on the remote control antil the
on-screen
display
indicates
"Off timer"
and shows the
amozmt of time remaining.
Important:
During the last minute before the Projectiion TV is set to turn off, "Off
timer 1 min." will flash in red to remind you that the off:timer is set.
%_
]
jf
TV Off timer I min. --
/
Setting
the off-timer
I
\
79
Changing
or canceling,
the off-timer
O Press
the off timer button
(OFF-T) on the remote control.
An on-screen display will indicate the aJ_ount of time remaining
un_il the Projection
TV will turn off.
TV Off timer 10 rain
O Continue
pressing
the off
timer button (OFF-T) repeatedly to cha_.ge the remain:rag
time or to cancel the off-timer.
The off-timer is canceled when
"---" appears
instead
remaining
t:[n_.e.
80
Chapter
4: Using the Special
Features
of the
Using
the Picture-in-Picture
(PIP) Mode
One of the special features of your Mitsubishi l:Tojection TV is the picturein-picture (PIP) mode, which allows you to view two different sources
at the same time. In this section you'll lem-n:
Important:
•
selecting
the PIP image,
•
selecting
the source,
•
exchanging
•
freezing
•
moving
the PIP image,
the PIP image,
and
the PIP image.
You must have a VCR connected to the P_ojection
ferentlive action pictures when using P]_P.
Using the Picture-in-Picture
(PIP) Mode
TV to see two dif-
81
Selecting
the PIP image
O Select the number
of the TV
channel you want to view by
using
the channel
control[
(SCAN).
O0000i
too
ooo
_Press
the
:PIP button.
A.
reduced image will appear in
the bottom right corner of'the
screen.
Ant-A 023 ESPN
Stet'eo & SAP SQV
A023
l
_> Important:
82
When the main image is monochrome
(black and white), the PIP image will also appear in monochrome
even if the PIP source is in color.
Chapter
4: Using
the Special
Features
i
Selecting
the source
F
-7
°° 0
O T_az_ your VCR on and select a
charnel
on the VCR that is
different than the channel you
see on your Projection
TV
sc]_een.
OPress
the
source
button
(SOIYRCE) on the remote control repeatedly
to select the
source of the PIP ilztage: TV,
EXT-1, or EXT-2.
ooooo
o0ooo
The PIP image
follows.
E> Important:
will change
as
To change the background
image in PIP mode, press the input button
(LN-PUT) on the front panel or on the remote control.
Using
the Picture-in-Picture
(PIP) Mode
83
Exchanging
the PIP
image
f
o_0
888
Press
the
exchange
button
(EXCH) on the remote control to
exchange
the positions
of the
background
image
and
the
reduced image.
OOOO0
00000
,888
84
Ant-A 02"3 ESPN
Stereo & SAP SQV
Ar_t-A023 ESPN
Stere{) & SAP SQV
Ext-1
A023
Chapter
t
4: Using the Special
Features
]
Freezing
the
PIP image
OPress
the
pause
button
(PAUSE) to freeze the reduced
image on the screen.
_
oo
0
O Pres_ again to cancel, the image freezing.
00000
00000
0
Using
the Picture-in-Picture
(PIP) Mode
85
Moving
the PIP
image.
Press the position button (POSIq_ION) repeatedly.
The position of'
the reduced ima_e will change in
each corner c,f the screen in a
counterclockwise
fashion.
Ant-A 023 ESPN
Stereo & SAP SQV
Ext-1
86
Chapter
4: Using the Special
Features
A
C_H_A
P__ TE_R
5
Troubleshooting
Even though you're now familiar with the t,asic and advanced operations of your Mitsubishi Projection TV, you may run into trouble from
time to time as you become accustomed to the raany features. This chapter
offers solutions to some of the common problems you may encounter.
We suggest that you consult this chart be:tore contacting a Mitsubishi
service representative.
Troubleshooting
Problems
Possible
The remote
work.
control
doesn't
(continued)
For More
Solutions
* Check that the batteries
installed correctly.
Check that the
is set to TV.
are
select button
Be sure that you are pointing
the top of the remote control
toward
the Projection
TV
from a distance
of no more
than 20 feet.
88
See"Getti_ng ready to use the
remote co:at::ol" in Chapter 1
for an explanation
of how to
install batteries
in the remote control.
See "Remote control buttons
and functiol_s" in Chapt_,r I,
which explains
where the
select button is located.
See "Getting ready to use the
remote con'_rol" in Chapter
1, which contains
pointers
for using the remote conl;rol.
The Projection
TV takes
several seconds to respond to
button commands.
• Use the ENTER
delays.
You can't
• Be sure that the channel you
want to view is programmed
into memory.
See "Memorizing
chanr._els"
in Chapter 3, which explains
how to program
charLnels
into the Projection
TV's
memory.
Check that the Projection TV
is tuned to the correct input
source
(antenna)
for that
channel.
See "Selecting
the I:nput
source" :in Chapter 3, which
explains how to change the
input so_arce.
access a channel.
Chapter
5: Troubleshooting
key to avoid
IJ_formation
See "Chan_,4ng channel,€_" irL
Chapter
3, which explain,,;
the function of the ENTER
key.
Problems
Possible
Solutions
For More
Information
appear
a func-
* This is part of the normal
operation
of the Projection
TV
See "Understanding
the OnScreen displays" in Chapter
4 for a full explanation
of the
on-screen displays.
There's no sound even when
the volume is turned up.
• Check that the MUTE button
isn't on.
See "Remote control buttons
and functions" in Chapter 1,
whi=h explains the location
and function
of the MUTE
button.
•
See "Adjusting
the sound"
in Chapter 3, wh:Lchexplains
ho_ to set the speaker
to
Int_xnal or Extel_al.
On-screen
displays
each time you adjust
tion.
Check
the
setting
of
"Speaker
Internal/External"
function.
the
• You forget the code you used
to set the parental lock.
• Use the alternate
procedure
that doesn't require the use of
the code.
• See the Appendix "Automatic Procedure for the Parental
Lock."
• You can't program the TV to
turn on automatically,
• The Projection
locked,
• _ee "Usingtheparentallock"
of :'Advanced
Features"
Chapter 3
The sound doesn't
image
on screen
match
the
TV
may
be
• The Projection TV's reception
mode may be set to "separate
audio program (SAP)"
Troubleshooting
in
See "Adjusting
the sound"
in Chapter 3, which explains
how to select the appropriate
reception mode.
89
Using the VCR tray (VS-45VA1,
and VS-50VA2 only)
Your Mitsubishi Projection
nience. To use the tray:
O
VS-45VbL2, VS-50VA1
TV has a built-in VCR tray for your conve--
Pull the VCR tray in an upright
position.
°L_-_-J_j--
\
\
Open the legs on both sides of
the tray and place them into the
ribs.
\
@
Fix the VCR to the tray by passhag the band through the hole on
the upper side of both legs.
I_- Warning:
90
To make sure the VCR is stable at all times, fax it to the: Projection
shown in the illustration.
Chapter
5: Troubleshooting
TV as
O
Join the band together as shown.
BELT
[_ Important:
To make sure the VCR is stable
TV as shown in the illustration.
• Warning:
•
•
•
•
at all times,
fix it to the Projection
Do not place a VCR over 16kg [35 lb] on the tray.
Do not place more than one VCR on the tray.
Take the VCR off the tray before moving the Projection TV.
For keeping set from toppling under the influence of earthquake
or the other emergency,
fix the set using the clamp attached on
the set back as shown.
CLAMP
Troubleshooting
91
Caution
•
Warning:
E> Important:
and care
Don't leave stationary
images, such as those ge:aerated from stock
market reports or video games, on screen for more than 10 minutes.
Still patterns
can scar the Projection
TV c,'msing permanent
damage to the picture tube.
If you plan to place speakers next to the Projection TV, make sure they
are the magnetically
shielded. Ordinary
speakers will cause distortion in the picture due to their strong magnets.
This distortion.,
however, will not harm the picture tube.
"
For maximum enjoyment
and safe ,operation
Projection TV, please read the "IMPORTANT
tion carefully and apply them properly.
92
Chapter
5: Troubleshooting
of your MITSUB:[SHI
S.._EGUARDS"
sec-
Calling
for service.
If you are unable to correct the problem, consult your MITSUBISHI
dealer or MITSUBISHI
Authorized
Wan-amy Service Center.
Do not adjust
any controls
Do not remove
the protective
If you see the following
any settings.
Option
not described
back cover
in this owner':;
guide.
of this unit.
display on you sc:reen, you should not change
This is a special
display
used by the factory.°
Menu
Hotel
Initial
3Dia
Syn¢
:off
:on
tint
Use ADJUST to select.
Then press ENTER.
Press MENU to return to
"IV Main Menu.
If this display appears, make sure that all of the on/off settings are the
same as the illustration above and then turn the Projection TV off. If
any of the settings are different than the illustration above, turn the Projection TV off and consult your MITSUBIStLI dealer or MITSUBISHI
Authorized Warranty Service Center.
Troubleshooting
93
A
APPENDIX
A- oma-tic
Procedure
Cut along dotted
for the Parental
line and file after reading
You will need to enter
Lock
95
the code when:
O viewing the locked TV, or
O canceling the lock.
If you forget the code, you can change, cancel, or view the locked channels without entering the code. To do this, simply press the buttons
labeled "Q.V." and "9" at the same time.
Important:
Unlocking made in this procedure is only temporary. After finishing
the procedure, follow the instructions
shown in "Using the parental
lock" in Chapter 3 to cancel or view the locked TV.
A
B
E;
Adding and deleting channels
59
Basic Connections 28
Projection TV + an
amplifier that has a center
channel OUT terminal 44
Projection TV + antenna
or cable with a decoder
box 31
Projection TV + antenna
or cable without a decoder
box 30
Projection TV + audio
system 42
Projection TV + external
speakers 29
Projection TV + extern_d
speaker with subwoofer
out termianl 43
Projection TV + home
theater receiver (A / V
receiver) 40
Projection TV + separate
UHF and VHF antennas 33
ProjeCtion TV + VCR +
antenna or cable with a
decoder box 37
ProjectionTV + VCR +
antenna or cable without a
decoder box 34
enter button (ENTER) 21
Exclaanging the PIP inaage 84
external speaker terminals 27
adjust buttons (ADJUST)
17, 22
Adjusting the color alignment 62
Adjusting the picture 65
adjusting the brightness
adjusting the color
adjusting the sharpness
adjusting the tint
changing the color bias
changing the color
temperature
changing the contrast
improving the color
aperture
reducing the video noise
Adjusting the sound 63
adjusting the balance
adjusting the graphic
equalizer
setting the monitor out to
variable/fixed
setting the reception mode
setting the speaker to
Internal/External
turning the expansion
on/off
antenna button 22
antenna terminals 26
Audio and VCR buttons 22
audio and video controls
16, 22
audio function buttons
(AUDIO) 17, 22
audio input terminals 16, 27
audio monitor output
terminals 27
audio tuner output terminals 27
Automatic Procedure for the
Parental Lock 95
A/V reset button 16
c
Calling for Service 93
cancel button 22
Caution and Care 92
Changing channels 54
Changing or canceling the offtimer 80
channel controls (SCAN)
17, 21
Connecting Your Projection
TV 25
Basic connections 28
Overview of the Back
Panel 26
Freezing the PIP image 85
Getting ready to use the
remote control 18
general instructions 19 installing the batteries 18
some dos and some don'ts 19
Getting Started 48
Adding and deleting
channels 59
Adjusting the color
alignment 62
Adjusting the picture 65
Adjusting the sound 63
Changing chxanels 54
Memorizing channels 58
Programming the remote
control 49
Renaming the inputs 61
Selecting the input source 53
Setting the clcx:k :57
Turning the Projection TV
on/off 52
Using home taeater 60
Geving to Know Your
Projection TV 15
Overview of the Front
Panel 16
Overview of 1tae Remote
Control 18
I
I/lumination button 21
ImFortant Safeguards 4
input buttons (INPUT) 17, 2 ]
installing the batteries 18
D
display button (DISP) 22
Index
97
L
Projection TV + external
speaker with subwoofer out
terminal 43
Projection TV + home theater
receiver (A/V receiver) 40
Projection TV + separate
UHF and VHF antennas 33
Projection TV + VCR +
antenna or cable with a
decoder box 37
Projection TV + VCR +
antenna or cable without a
decoder box 34
learn switch 21
learning indicators 21
M
Memorizing channels 58
menu button (MENU) 21
Moving the PIP image 86
mute control 21
N
Q
number buttons (0-9) 21
quick view (Q. v.) 21
R
O
off-timer button (OFF-T) 22
Operating Your Projection
TV 47
Getting Started 48
Using the Advanced
Features 67
Overview of the Back Panel 26
Overview of the Front Panel
16
Overview of the Remote
control 18
Getting ready to use the
remote control 18
Remote control buttons
and functions 20
P
picture-in-picture controls 23
power button (POWER) 17, 21
Programming the remote
control 49
program timer indicator 17
Projection TV + antenna or
cable with a decoder box 31
Projection TV + antenna or
cable without a decoder box 30
Projection TV + audio system
42
Projection TV + external
speakers 29
98
Renaming the inputs 61
Remote control buttons and
fianctions 20
S
select buttons 21
Selecting the PIP image 82
Selecting the input source 53
Selecting the source 83
Setting the clock 57
Setting the off-timer 79
Setting the timer 68
Some Conventions Used in
This Guide 13
subwoofer out terminal 27
Summary of Special Features 10
S-VIDEO input terminals 16, 27
T
test button 16
timer reset button 17
Troubleshooting 87
Calling for Service 93
Caution and Care 92
Turning the Projection TV
on / off 52
U
Unpacking Your Projection TV
11
Understanding the On-Screen
Displays 76
Index
Using home theater 60
Using theAdvanced Features
67
Setting the timer 72
Using ':he parental lock 73
Using :he super quick
view tuning 74
Using Video Mute 72
Using '_e Power Restore
feature 73
Using the Oif-Timer 78
Changing or canceling the
off-timer
Setting the off-timer
Using the Picture-in-Picture
(PIP) Mode 81
Selectiag the PIP image
Exchar_ging the PIP
images
Freezing the PIP images
Moving the PIP images
Selecti:ag the source
Using the Special Features 75
Using the VCR tray 90
¥
video ftmclion buttons
(VIDEO) 17,22
videoinpulterminals
16,27
videomonitoroutputterminal
27
videotimeroutputterminal
27
volume controls (VOL) 1.7, 21
W
What's in Each Chapter 12
,,,*_MITSUBISHI
MITSUBISHI ELECTRONICS AMERICA, INC.
5757 Plaza Drive, P.O. Box 6007
Cypress, CA 90630-0007
871D174A3
Printed
in USA