1
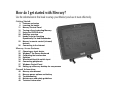
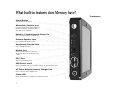
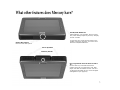
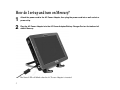
Mercury II User’s Guide ™ Assistive Technology, Inc. Assistive Technology, Inc. has made every effort to ensure that the information in this manual is accurate; it is not responsible for printing errors. The information in this document is subject to change without notice and does not represent a commitment on the part of Assistive Technology, Inc. No part of this document may be reproduced or transmitted in any form or by any means, electronic or mechanical, for any purpose, without the written permission of Assistive Technology, Inc. Your rights to the software are governed by the accompanying software license agreement. © 2005–2007 Assistive Technology, Inc. and its licensors. All rights reserved. Printed in the United States of America. Mercury II and the Assistive Technology, Inc. logo are trademarks of Assistive Technology, Inc. Microsoft, Microsoft Internet Explorer logo, Windows, Windows logo, Windows Start logo, and Windows Media are either registered trademarks or trademarks of Microsoft Corporation in the United States and/or other countries. Quicktime is a trademark used under license. Boardmaker and Speaking Dynamically Pro are registered trademarks of Mayer-Johnson LLC. Discover is a registered trademark of Madentec Limited. All other trademarks are owned by their respective companies. Mention of third-party products is for informational purposes only and constitutes neither an endorsement nor a recommendation. Assistive Technology, Inc. assumes no responsibility with regard to the performance or use of these products. Address all correspondence to: Assistive Technology, Inc. 333 Elm Street Dedham, MA 02026 Telephone: 781.461.8200 Toll-free: 800.793.9227 Fax: 781.461.8213 Web: www.assistivetech.com E-mail: [email protected] How do I get started with Mercury? Use the information in this book to set up your Mercury and use it most effectively. Getting Started: 2 6 11 16 17 20 21 22 26 Features and setup Learning the basics Mercury Control Panel Turning off and restarting Mercury Using the CD/DVD drive Software overview Handy Tools for Speaking Dynamically Pro and Boardmaker Mercury’s remote control (infrared) features Connecting to the Internet Mercury Access Features: 27 28 30 32 34 36 37 38 Choosing an input device Windows® On-Screen Keyboard Calibrating the touchscreen Switches Wheelchair/Joystick switch input Connecting peripherals Windows Control Panel Setting up a Mercury desktop for easy access General Information: 40 41 43 45 48 Mercury stand/mount Mercury power options and battery Troubleshooting Maintenance and safety guidelines Technical information 1 What built-in features does Mercury have? Touchscreen ○ ○ ○ ○ ○ ○ Turn Mercury on or reset it. ○ Power Button ○ ○ ○ ○ ○ ○ ○ ○ ○ ○ ○ ○ ○ ○ ○ ○ ○ ○ ○ ○ ○ ○ ○ ○ ○ ○ ○ ○ ○ ○ ○ ○ ○ ○ ○ ○ ○ ○ ○ ○ ○ ○ ○ ○ ○ ○ ○ ○ ○ ○ ○ ○ ○ ○ ○ ○ ○ ○ ○ ○ ○ ○ ○ ○ ○ ○ ○ ○ ○ ○ ○ ○ ○ ○ ○ ○ ○ ○ ○ ○ ○ ○ ○ ○ ○ ○ Headphone/Preview Jack ○ ○ Plug in additional speakers here. ○ ○ Plug in a single switch or a splitter here. ○ ○ ○ ○ ○ ○ ○ ○ ○ ○ ○ ○ ○ ○ ○ ○ ○ ○ ○ ○ ○ ○ ○ ○ ○ ○ ○ ○ ○ ○ ○ ○ ○ ○ ○ ○ ○ ○ ○ ○ ○ ○ ○ ○ ○ ○ ○ ○ ○ ○ ○ ○ ○ ○ ○ ○ ○ ○ ○ ○ ○ ○ ○ ○ ○ ○ Plug in headphones here. Modem Port ○ ○ Connect to the Internet, browse the World Wide Web, and send and receive e-mail. PS/2 Port Plug in your keyboard here. USB Ports 1 and 2 ○ ○ ○ ○ ○ ○ ○ ○ ○ ○ ○ ○ ○ ○ ○ ○ ○ ○ ○ ○ ○ ○ ○ ○ ○ ○ ○ ○ ○ ○ ○ ○ ○ ○ ○ ○ ○ ○ ○ ○ ○ ○ ○ ○ ○ ○ ○ ○ ○ ○ ○ ○ ○ ○ ○ ○ ○ ○ ○ ○ ○ ○ ○ ○ ○ ○ ○ ○ Plug in peripherals like your keyboard, mouse, or external drives here. AC Power Adapter/Battery Charger Port ○ ○ ○ ○ ○ ○ ○ ○ Plug in your AC Power Adapter here. Status LED Blinks when Mercury is charging or in Stand By mode. 2 ○ ○ Switch 1-2 Jack & Remote Power On ○ ○ ○ For joystick input from a wheelchair ECU. Requires a Mercury wheelchair cable. See page 36 for more info. External Speaker Jack ○ ○ ○ Wheelchair/Joystick port ○ ○ ○ ○ ○ ○ ○ ○ ○ ○ ○ ○ ○ ○ ○ ○ ○ ○ ○ CD-RW/DVD-ROM Drive Install software, run programs, listen to music CDs, make backup copies of your files, and play movies on DVDs. ○ ○ ○ ○ ○ ○ ○ ○ What other features does Mercury have? ○ ○ Foldaway Handle ○ ○ ○ ○ Stereo Speakers ○ ○ ○ ○ To open the drive, push the thin button in the middle of the door. See page 17 to learn more about the CD/DVD-ROM Drive. ○ ○ ○ ○ ○ ○ ○ ○ ○ ○ ○ ○ ○ ○ ○ ○ ○ ○ ○ ○ ○ ○ Built-in Microphone Record sounds and speech. ○ ○ ○ ○ ○ ○ ○ ○ ○ ○ ○ ○ ○ ○ ○ ○ ○ ○ ○ ○○ ○ ○ Pre-programmed universal infrared and X10 Use the Mercury’s universal infrared as a remote control for your television, VCR, DVD player and cable or satellite receiver. Use its X10 Infrared Commands to turn on and off lights and appliances (see page 22). 3 How do I set up and turn on Mercury? 1 Attach the power cord to the AC Power Adapter, then plug the power cord into a wall socket or power strip. 2 Plug the AC Power Adapter into the AC Power Adapter/Battery Charger Port on the bottom left side of Mercury. ○ ○ ○ ○ ○ ○ ○ ○ The Status LED will blink when the AC Power Adapter is inserted. 4 4 Press the Power Button on the side of Mercury to turn it on. ○ ○ ○ ○ Be sure that nothing is touching the screen while the Mercury is starting up. ○ ○ ○ ○ 3 Plug your keyboard and mouse into the USB ports on the left side of the Mercury. You will need these as you set up the Mercury and learn how to use it. 5 How do I get started? After you click on the Start button, ○ the Start menu will appear. ○ ○ ○ ○ ○ ○ ○ ○ ○ ○ ○ ○ ○ ○ ○ ○ When you turn on your Mercury, the Mercury Control Panel will load and will always be available from the Taskbar (see below). ○ From the Control Panel you can launch software applications; adjust the Mercury speaker and headphone volume, brightness of the display, the touchscreen and switch inputs; and put your Mercury in Stand By mode or shut it down. ○ ○ ○ ○ ○ Click on shortcut buttons to start Outlook Express or Microsoft® Internet Explorer and frequently used applications. ○ ○ ○ ○ ○ ○ ○ ○ ○ ○ ○ ○ ○ ○ ○ ○ ○ ○ ○ ○ After you turn on the Mercury, you will see the Windows® Taskbar at the bottom of your desktop. You can access all your programs, files, and settings from the Start menu on the Taskbar. Click on All Programs to start other programs not listed above, on the Start menu. ○ ○ ○ ○ ○ ○ ○ ○ ○ ○ ○ ○ ○ ○ ○ ○ ○ ○ ○ ○ ○ ○ ○ ○ ○ ○ For details about the Mercury Control Panel, see page 11. ○ ○ Taskbar ○ ○ ○ 6 ○ ○ ○ ○ ○ The name of the Control Panel button on the Taskbar changes to “Battery __%” (the percentage of battery power currently available) when the battery is installed. Where can I learn about basic Windows skills? ® If you need help with basic Windows concepts, such as clicking and using files and folders, choose the Tour Windows XP shortcut button from the Start menu (you can also get to this tutorial by choosing All Programs, then Accessories). After the introduction, click on the Windows XP Basics button and follow the instructions. 7 Where do I go to learn more? Choose Help and Support from the Start menu. The Help and Support Center window appears, with a variety of tools to help you solve a problem or learn more about a Windows feature. Choose a topic from the Pick a Help topic column, or type key words in the Search box. Click on any of the topics that appear. If you didn’t find the information you needed, enter different key words. For information on a specific Windows program while that program is active, press the F1 key or click on the Help menu at the top of the window. Select Help Topics. Another way to request help is to right-click the mouse on a window to bring up a What’s This? button. Click on the What’s This? button for hints on using a particular Windows feature. 8 How do I find something on the Mercury hard drive? ○ ○ ○ ○ ○ ○ ○ ○ ○ ○ ○ ○ ○ ○ ○ ○ ○ ○ ○ ○ ○ Double-click on a folder to view its contents. ○ ○ ○ ○ ○ 1 2 Select My Computer on the Start menu. Alternatively, click My Documents on the Start menu. Click the Search button at the top of the window that appears. Make a selection from the left pane to begin your search. ○ ○ ○ ○ ○ ○ ○ 9 How do I switch between programs that are open? Speaking Dynamically Pro and Windows Media Player are the open programs in this example. To switch to a different program, click anywhere on the window of that program. The Taskbar lists all programs that are currently running. If a program is running but its window is minimized or covered by other windows, click on its button on the Taskbar to switch to○ it. 10 ○ ○ ○ ○ ○ ○ ○ ○ ○ ○ ○ ○ ○ ○ ○ ○ ○ ○ What is the Mercury Control Panel? The Mercury Control Panel provides access to a variety of Mercury features and controls. Use these buttons to shut down the Mercury or put it in Stand By mode. ○ ○ ○ ○ ○ Click the Speed Buttons to run your speech ○ application, the on○ screen keyboard, or your remote controls. You can edit these buttons and add buttons to customize your Mercury. ○ ○ ○ ○ ○ ○ ○ ○ ○ ○ ○ ○ Shows time remaining if charging, or time left on battery if unplugged. ○ ○ ○ ○ ○ ○ ○ ○ ○ ○ ○ ○ ○ ○ ○ ○ ○ ○ ○ ○ ○ ○ ○ Use the Minimize button to shrink the Mercury Control Panel so that it appears as a button on the Taskbar at the bottom of the screen. ○ ○ ○ Use these controls to adjust the Mercury speaker and headphone volume and brightness of the display. ○ ○ ○ ○ ○ ○ ○ Click the More Info button to access information about the Mercury’s power supply. Click the Setup button to adjust settings for the touchscreen, Speed Buttons, switches, remote control, and power (see following pages). continued on the next page 11 If you click the Setup button on the Mercury Control Panel, you will see the Main Setup screen. Click on the tabs below to switch to different setup screens. Use this check box to ○ restrict access to Setup options by requiring a keyboard to type <Alt-S>. Use this check box to restrict access to Setup options by requiring a password (entered at the right). ○ For For For For Speed Buttons, see p. 13. Switches, see p. 32. Remote Control, see p. 22. Power, see p. 41. ○ ○ ○ ○ ○ ○ ○ ○ ○ ○ ○ ○ ○ ○ ○ ○ ○ ○ ○ Type the same password in both boxes, then click Set Password. This password will be required to enter this Setup screen. Be sure to keep a record of your password in a safe place. ○ Turn headphone preview on or off (see page 37). ○ ○ ○ ○ ○ ○ ○ ○ ○ ○ ○ ○ ○ Click to calibrate the touchscreen (see page 30). ○ ○ Click OK to keep these settings and exit Setup. Click Cancel to exit Setup without keeping changes. Click Apply to keep these settings and continue in Setup. 12 How can I customize the Speed Buttons in the Control Panel? This Setup screen allows you to add or remove Speed Buttons to customize your Mercury. You can have up to 6 Speed Buttons in a group, and any of the buttons can link to other groups, giving you an unlimited number of possible Speed Buttons. 1 2 3 Click the Setup button on the main screen of the Mercury Control Panel, then the Speed Buttons tab. To add a new button to the Home group, click the Edit button next to the first empty button. ○ ○ ○ ○ ○ ○ ○ ○ ○ ○ ○ ○ ○ ○ ○ ○ ○ ○ ○ ○ ○ ○ ○ ○ ○ ○ ○ In the Button Editor, you can create the button’s appearance and choose whether the button will launch a program or link to another button group. The screen below shows how to set up a Speed Button that launches the Wordpad accessory. Enter the name you want displayed on the Speed Button. ○ ○ ○ ○ ○ ○ ○ ○ ○ ○ ○ ○ You can hide or show any Speed Button. ○ Choose an icon for ○ ○ the Speed Button: no icon, the icon associated with this program, or any custom icon (.ico) file. ○ ○ ○ ○ ○ ○ ○ ○ ○ ○ ○ ○ ○ ○ ○ Browse to locate the program to launch from this Speed Button. Be sure to save your changes. 13 You can create a Speed Button that links to another group of Speed Buttons. Below is an example of a Speed Button group of games. ○ ○ ○ ○ ○ ○ ○ ○ ○ ○ ○ ○ ○ ○ ○ ○ ○ ○ ○ ○ ○ ○ ○ ○ ○ ○ ○ ○ ○ 1 Click the Add button to create a new group. In this example, the group is named Games. 2 Add a Speed Button to the Home group that will link to Games. To do this, click the Edit button. ○ ○ ○ ○ ○ ○ ○ ○ ○ ○ Use this button to make the selected group (above) be the Home group, which will appear on the main screen of the Mercury Control Panel whenever you turn on your Mercury. ○ ○ ○ ○ ○ ○ ○ ○ 4 Under Navigate, select Games as the Speed Button Set that this button will switch to. ○ 14 3 In the Button Editor, type the name Games and choose an icon for the button, if desired. ○ ○ ○ ○ ○ ○ ○ ○ ○ ○ ○ ○ ○ 5 Click the new Games group, then add buttons for your Games using the same method described in the Wordpad example on page 13. ○ ○ ○ ○ ○ Click OK and save the changes to your Games and Home button groups. Try out your new Speed Buttons. Click the Wordpad button to launch Wordpad. ○ ○ ○ ○ ○ ○ ○ ○ ○ ○ ○ ○ ○ ○ ○ ○ ○ ○ ○ ○ ○ ○ ○ ○ ○ ○ ○ ○ ○ ○ ○ ○ ○ ○ ○ ○ ○ ○ Click the Home button to return to the Home group. ○ ○ ○ ○ ○ ○ Click the Back button to go to the previous button group. ○ ○ ○ In this example, both buttons will return you to the Home group. ○ ○ ○ ○ ○ When you click the Games button, the new Speed Buttons for Games will appear. ○ ○ ○ ○ 15 How do I turn Mercury off? Use the Shut Down button on the Mercury Control Panel to turn off your Mercury. Use the Stand By button to put it into Stand By mode. ○ ○ ○ ○ ○ ○ ○ ○ ○ ○ ○ ○ ○ ○ ○ ○ ○ ○ ○ ○ ○ Use Stand By mode when you leave Mercury for a short time. Mercury uses very little power in Stand By mode, so you increase the amount of time you can operate Mercury on its battery. In Stand By mode, the Mercury screen will go blank, and the status LED will blink green. To wake Mercury, press the Power button or a switch plugged into the Switch 1-2 jack. The desktop will look as it did before it went into Stand By mode. Use Shut Down when you plan to leave the Mercury for longer periods of time, or you can enable Hibernate in the Power Setup tab (see p. 41). When Mercury has been shut down, the screen will be dark, and the status LED will not blink (unless Mercury is charging while AC is connected). You can also select Turn Off Computer from the Windows Start menu, then choose Stand By, Turn Off, or Restart. How do I restart Mercury? Use Restart to shut down and then immediately restart Mercury. Use Restart to get a fresh start when you are experiencing problems, or after you have installed new software. Select Turn off Computer from the Windows Start menu, then choose Restart. You can also reset Mercury by depressing the Power button for several seconds until the Mercury shuts down. Then press the Power button again to start up. 16 How do I use the CD-RW/DVD-ROM drive? With Mercury turned on, press the eject button on the CD/DVD-ROM door, and pull the tray open. Place a CD or DVD on the tray (label-side up) and then align the hole in the disc directly over the round clip in the center of the drive. Press down until you feel the disc snap into place. Close the tray gently until it latches. To run or install software from CD-ROMs: 1 Attach your external keyboard. Many programs will require you to register information or serial numbers during installation. 2 Most installations will start automatically. Then follow the on-screen instructions. 3 The installation program may instruct you to restart your computer at the end of the installation process. Often it will restart the computer for you. 4 When you want to eject the CD, press the eject button on the CDROM door, and pull the tray open. To use your CD-ROM drive to play music CDs: 1 2 Insert a music CD into the CD-ROM drive. Windows Media Player will automatically begin playing the music CD. 17 To make backup copies of your files and folders to a CD: You will find it easy and convenient to make backup copies of your data files to a CD using the CD Writing software in Windows XP and blank CD-R or CD-RW discs that you purchase. 1 Place a blank CD disc in the CD/DVD drive. In the dialog box that appears, click OK to open a writable CD folder using Windows Explorer. ○ ○ ○ ○ ○ ○ ○ ○ ○ ○ ○ ○ ○ ○ ○ ○ ○ ○ ○ ○ ○ ○ ○ ○ ○ Names of files appear here. ○ ○ ○ Drag the files and folders you wish to copy to the CD from your Mercury to the CD drive folder. ○ 2 ○ ○ ○ ○ 3 After you have selected the files and folders to copy, they will appear in the CD drive window. Open the CD Writing Wizard by clicking on Write these files to CD. 4 Type a name for the CD and click Next. Follow the onscreen instructions to write the files to the CD. ○ ○ If you are using a CD-RW disc, you can add more files to the same CD at a later time, as long as there is enough space on it. Note: You cannot write files to a blank DVD disc. 18 ○ ○ ○ ○ ○ ○ ○ ○ ○ ○ ○ ○ ○ ○ ○ ○ ○○ ○ ○ ○ ○ ○ ○ ○ ○ ○ ○ ○ ○ ○ ○ ○ To play movies on DVDs: It is easy to play movies on your Mercury. Place the DVD in the CD/DVD drive. In most cases, the movie will start automatically. If the movie DVD also contains computer files, you may be prompted to install them. If you do not wish to install the computer files, cancel those options. If the movie on the DVD does not automatically play, double-click the WinDVD icon on the Mercury desktop. When WinDVD starts up, the DVD will play and the WinDVD Player shown below will appear. WinDVD offers many ways to view and control DVD movies. The diagram below shows the functions of the main buttons, along with their keyboard equivalent commands. For complete details on how to use WinDVD and the functions of all buttons, click the WinDVD Help button. Current chapter and elapsed time display. Volume Help ○ ○ ○ ○ ○ ○ ○ ○ ○ ○ ○ ○ ○ ○ ○ ○ ○ ○ ○ ○ ○ ○ ○ Exit [X] ○ ○ ○ Capture [P] ○ ○ ○ Mute [M] ○ Stop [End] ○ ○ ○ ○ ○ ○ ○ ○ ○ ○ ○ ○ ○ ○ ○ ○ ○ ○ ○ ○ ○ ○ ○ ○ ○ ○ ○ ○ ○ ○ ○ ○ ○ ○ ○ ○ ○ ○ ○ ○ ○ ○ ○ Eject [E] ○ ○ ○ ○ ○ ○ ○ ○ ○ DVD Menu [Ctrl+M] ○ ○ ○ ○ Chapter List ○ ○ ○ Subpanels Navigation, Language, Display, Color, Audio effects ○ ○ Fast Forward [F] ○ ○ ○ ○ ○ ○ ○ ○ Speed for Fast Forward and Rewind. Prev Chapter [PgUp] ○ ○ ○ This marker shows how much of the movie has played. It automatically moves to the right as the movie plays. ○ ○ Fast Rewind [R] ○ ○ ○ ○ ○ ○ ○ ○ ○ ○ ○ Pause [Space] ○ ○ ○ ○ ○ ○ ○ ○ ○ ○ ○ ○ ○ ○ ○ ○ ○ ○ ○ ○ ○ ○ ○ ○ ○ ○ ○ ○ ○ ○ ○ ○ ○ ○ ○ ○ Variable Speed Fast Forward and Rewind (drag up or down to scroll through the movie) ○ ○ ○ ○ ○ ○ ○ ○ Play [Enter] Next Chapter [PgDn] 19 What software is included with the Mercury? Mercury comes with a variety of software installed. Some functions of these programs may require mouse and keyboard. You may need additional software for your particular input method to work with them. Microsoft® Internet Explorer—browser software that gives you access to the World Wide Web. You need to set up an account with an Internet Service Provider (ISP) before you can go online. Microsoft® Outlook Express—e-mail software that lets you maintain and access your e-mail account. You need to set up an account with an ISP before you can send or receive e-mail. QuickTime™—software for viewing pictures and movies and playing synchronized graphics, sound, and music. Windows Media Player™—software for playing music CDs and other media. interVideo® WinDVD® 4—software for playing DVDs. Functionally Speaking—a set of Speaking Dynamically™ Pro theme-based communication boards and two levels of functional language boards developed by Assistive Technology, Inc., located in the My Boards folder under My Documents. A User’s Guide in Portable Document Format (PDF) file is also provided in this folder. Mercury Remote Control boards—a set of six Speaking Dynamically Pro boards located in the SDP Sample Boards folder in the My Boards folder under My Documents. These boards have the Mercury remote control functions pre-programmed, designed to be accessible and linked to your own SDP communication boards. For help on linking SDP boards, see the User’s Guide for Boardmaker with Speaking Dynamically Pro from Mayer-Johnson LLC. Windows Messenger—software for sending instant messages to other users who have signed up for MSN Messenger Service. SDP Finger Guard Templates—a set of seven Speaking Dynamically™ Pro templates pre-designed to fit the Mercury finger guards, located in the My Boards folder under My Documents. Windows On-Screen Keyboard—on-screen version of an external keyboard that lets you enter text and access system functions using the touchscreen, mouse, switch or alternative pointer. If you purchased a Communication Software Set, the following software will also be installed: Windows Movie Maker—software for editing movies from video cameras. 20 Boardmaker™ with Speaking Dynamically™ Pro—a symbol and speech output communication program and display maker, with over 3000 Picture Communication Symbols. Handy Tools for Speaking Dynamically Pro and Boardmaker ® Mercury comes with two features that are specially designed for use with Speaking Dynamically Pro and Boardmaker software from Mayer-Johnson LLC. This software is pre-installed on your Mercury if you ordered a Communication Software Set or purchased it separately when you ordered your device. 1 Making a Startup Board This feature allows you to quickly and easily configure any Boardmaker board to load automatically when Windows starts up on your Mercury. To make a board load when Windows starts, right-click on the board’s icon, select “Send To”, and then select “Startup Folder”. When you restart Windows, the board you chose will load automatically. If you would like to change the startup board, simply follow the instructions above for the new board. Windows’ startup settings will be changed to load the new board in place of the old one. 2 Moving a File to the “SDP Externals” Folder To launch a file from SDPro you need to put a shortcut to that file in a folder called “SDP Externals”. This feature lets you quickly and easily create a shortcut to any file and move it to the “SDP Externals” folder. To send a shortcut for a file to “SDP Externals”, right-click on the file’s icon, select “Send To”, and then select “SDP Externals”. When you select “Launch Application” from the Boardmaker button action menu, you will see a shortcut to the file with “_shortcut” appended to the filename. 21 How do I set up Mercury’s remote controls? Before you use the Mercury Remote Control for the first time, you will need to set up the remote control codes for the particular television, VCR, cable system, DVD player, or satellite system you have. You can set up multiple rooms, each with different devices. 1 Click the Setup button in the Mercury Control Panel (see page 11), then click on the Remote Control tab. 2 Click the Add button to add a room. Type a name for the room in the small window that opens. 3 ○ Highlight the room name at the left and click the Add Device button. ○ 22 ○ ○ ○ ○ ○ ○ ○ ○ ○ ○ ○ ○ ○ ○ ○ ○ ○ ○ ○ ○ ○ ○ ○ ○ ○ ○ ○ ○ ○ ○ ○ ○ ○ ○ ○ ○ ○ ○ ○ ○ ○ ○ ○ ○ ○ ○ ○ ○ ○ ○ ○ ○ ○ ○ ○ ○ ○ ○ ○ 4 In the window that opens, select a device type from the left column, then choose the manufacturer of that device from the second column. 5 Aim the infrared transmitter (on the top of the Mercury) at the device and click the Try Code button. The correct code will turn the device on or off. If the first code does not work, press the Try Next Code button, testing each code sequentially until you find the one that turns your device on or off. How do I use Mercury’s remote control features? First, set up the remote controls, as described on the previous page. Then, to use them, click the Speed Button for Remote on the Mercury Control Panel (see page 11). 2 From the choices at the top of the Remote Control window, click on the device you want to control. 3 Click the buttons on your Mercury’s “virtual” remote to operate the device. The buttons that are available depend on the type of device. For example, the Television button set does not include the VCR controls. ○ ○ ○ ○ ○ ○ 1 Click the Change Room button to select the room you are in. X-10 allows you to control lights and appliances using Mercury’s infrared emitting capabilities with an X-10 Infrared Command Center and additional equipment (not included). Please contact Assistive Technology, Inc. for more information (1-800-793-9227). ○ ○ ○ ○ ○ ○ ○ ○ ○ ○ ○ ○ ○ ○ ○ ○ ○ ○ ○ ○ ○ ○ ○ ○ ○ ○ ○ ○ ○ ○ ○ 23 How do I program other applications to use Mercury’s remote control? All the actions for Mercury’s remote control buttons, as well as the actions for the Mercury Control Panel buttons for volume, brightness, stand by, hibernate, and shutdown, exist as individual files that can be launched from any program capable of launching applications, such as Speaking Dynamically Pro (SDP)*. If you purchased SDP with your Mercury, a pre-made set of boards that perform Mercury remote control functions is already installed in the SDP Sample Boards folder in the My Boards folder under My Documents. To create a button action in a Speaking Dynamically Pro board that performs a Mercury Control Panel function: 1 Open the board you wish to modify in Speaking Dynamically Pro and enter Design mode (press <ctrl-D> or choose Design from the Dynamic Boards menu, if menus are showing). 2 3 4 5 Double-click the button you want to add the action to. 24 In the Action Categories column, click the Cool Stuff radio button. In the Action Menu, select Launch Application. Choose the command you want the button to launch, then click OK. * The files for these actions are located in the folder: C:\Program Files\AED Control Panel\Control Modules Selecting Multi-digit Channels with Speaking Dynamically Pro® Entering a two- or three-digit channel number (any channel number above 9) typically requires careful timing in order to be successful. For example, if you want to enter channel 56, and pause for too long between pressing the 5 and pressing the 6, your device may change first to channel 5 and then to channel 6, rather than to channel 56. This may be even more difficult for switch users when scanning from one digit to the next. The process described below makes sending multi-digit channel commands simpler and faster. How to create a multi-digit channel command: 1. Navigate to the SDP Externals folder. a. Click the Start menu and select “My Computer”. b. Double-click “Local Disk (C:)”. c. Double-click the “Program Files” folder. d. Double-click the “Boardmaker with Speaking Dynamically Pro” folder. e. Double-click the “SDP Externals” folder to open it. 2. Depending on the media device you will be using, click one of the following four files (you may not see the .vbs extension): TV_201.vbs Cable_201.vbs VCR_201.vbs Satellite_201.vbs 3. From the Edit menu, select Copy. 4. From the Edit menu, select Paste. (This duplicates the original file, so you can make additional multi-digit channel commands.) 5. From the File menu, select Rename. Type the desired channel number in place of ‘201’ in the filename. For example, to make a command file to change the TV channel to 56, rename the file ‘TV_56’ (or ‘TV_56.vbs’). Note that the filename should begin with the name of the device you are controlling, followed by an underscore character (_), then the channel number. The filename must end with a .vbs extension. If the file extensions are hidden, you don’t need to add the extension. If the extension was there to begin with, then you should keep it. 6. Repeat steps 2 through 5 for each multi-digit channel you would like to access. If you purchased SDP software with your Mercury, a pre-made set of boards that perform remote control functions is installed in the SDP Sample Boards folder in the My Boards folder under My Documents. Now you can edit individual Boardmaker buttons in these boards for each multi-digit channel you wish to access. 1. In Design Mode, double-click a button you wish to use to access a channel. 2. Select Launch Application from the button’s Action menu, under the Cool Stuff category. 3. Choose the file for the channel you wish to access with this button. 4. Switch to Use Mode and try it out! 25 How do I connect Mercury to the Internet? You need to be physically connected to the Internet by the built-in modem or by Ethernet using a USBEthernet adapter (see page 36 for recommended products). You also need to have an account with an ISP (Internet Service Provider) before you can access the Internet. Your ISP may provide instructions and installation disks. If your ISP does not provide installation materials: 1 2 Open the Start menu. Select All Programs, then Accessories, then the Communications submenu, and finally New Connection Wizard. Follow the instructions and answer the questions as they appear. If you are having problems connecting to the Internet, contact your ISP for assistance. How do I find something on the Internet? 1 2 3 26 Open the Start menu, then click on the Internet Explorer shortcut. Click the Search button, and type what you want to find. A list of Web sites will appear. Click on the link to go to that Web site. ○ ○ ○ ○ ○ ○ What type of input device should I use? Who uses a keyboard? A person with fine motor skills who can identify target keys either by letter and number or pictures is a good candidate for using a keyboard. Any standard USB keyboard or alternative keyboard such as the IntelliKeys® from IntelliTools, Inc., as well as the Windows On-Screen Keyboard will work with Mercury. Who uses a switch? A person with very limited movement is a good candidate for a switch. A switch can be mounted to any stable surface and be accessed by any body part with deliberate, discernible movement. Switches come in a variety of shapes and sizes and have varying degrees of sensitivity. The switch inputs on Mercury can be set to send any keystroke or mouse click. Switchaccessible software programs expect the switch to emulate a certain keystroke or mouse equivalent. For example, Speaking Dynamically Pro from Mayer-Johnson Co. expects the switch to act as a mouse click, while other programs might expect the switch to act as the “1” key or the “2” key. Use the Mercury Control Panel (see page 33) to set up the switch(es) to send the correct information to your software program. Who uses a mouse? A person with average visualmotor skills and the ability to attend to the computer screen is a good candidate for a mouse. Some users can physically access a mouse, but find it challenging to understand the relationship between moving the mouse and cursor movement on the screen. In that case, try direct selection using the built-in touchscreen. Who uses an alternative pointing device? A person with limited movement of the upper and lower extremities, but who has controlled head movement, is a good candidate for an alternative pointer. Who uses a touchscreen? A person who can target objects by direct selection, who cannot attend to both the computer screen and a peripheral device simultaneously, or who cannot associate using a peripheral device with seeing cursor movement on the screen is a good candidate for a touchscreen. Clinicians often use a touchscreen to motivate clients to interact with the computer. An optional clear Finger Guard fits over the Mercury touchscreen. It assists users in moving and selecting targets on the touchscreen. Who uses a joystick? A person who uses a joystick to drive a powered wheelchair or who finds the mouse or trackpad difficult to use due to limited dexterity may prefer to use a joystick as an input device. It allows for direct selection as the user has control over mouse direction and speed. Additional switches may be used for click and drag options. 27 How do I use the Windows On-Screen Keyboard? The Windows On-Screen Keyboard can be used in click or hovering (dwell) mode with a mouse or joystick for selecting characters, or can be used in scanning mode using a keyboard or switch input. 1 Click on the Keyboard button on the Mercury Control Panel (see page 11). ○ ○ ○ ○ ○ ○ ○ ○ ○ ○ ○ On-Screen Keyboard 2 At the Settings menu on the On-Screen Keyboard, choose Typing Mode. ○ 28 ○ ○ ○ ○ ○ ○ ○ ○ ○ ○ ○ ○ ○ ○ ○ ○ ○ ○ ○ ○ ○ ○ 3 To use the On-Screen Keyboard in hovering (dwell) mode with a mouse or joystick, select Hover to select. Adjust the minimum hover time by choosing a number from the Minimum time to hover list. (Click to select is for direct mouse or touchscreen selection.) 4 To use the On-Screen Keyboard in scanning mode with a keyboard or Mercury switch input, select Joystick or key to select. Choose a number from the Scan interval list to set the scanning speed. Click the Advanced button to select the Keyboard key. Click the down arrow and select <space>. 5 To use the On-Screen Keyboard with the Mercury switch input, make sure that <space> is selected here and switch 1 is set to <space> in the Mercury Control Panel. (To set up the switch input, see page 33.) Even though switch 1 is set to <space>, it does not send a <space> to the application you are using when the On-Screen Keyboard is running. The <space> is only used to communicate with the OnScreen Keyboard. Note: Click on the window of the program you will be typing into (for example, WordPad). The On-Screen Keyboard’s keystrokes will not appear if the program is not currently active. 29 How do I calibrate the touchscreen? The touchscreen interprets your touch and moves the cursor where you move your finger. You can adjust or “calibrate” your touchscreen for your individual touch from the Mercury Control Panel. Use your finger or a stylus on the touchscreen; do not use sharp objects that can scratch or puncture it. 1 2 3 Click the Setup button on the Mercury Control Panel (see page 11), then in the Main Setup tab under Touchscreen click Touchscreen Setup. ○ ○ ○ Click the Calibration tab at the top of the window, then click the large calibration target to start calibration. (The default Calibration Type is 4-point. If this is not appropriate, click the Configure button to change the number of points.) With your finger or a pointer, touch the center of each crosshair as it appears. Keep pressing on each target while the prompt next to it indicates HOLD, then stop pressing when the prompt changes to RELEASE. ○ ○ ○ ○ ○ ○ ○ ○ ○ ○ ○ ○ ○ ○ ○ ○ ○ (To exit this screen without recalibrating, simply wait for the time-out indicator at the lower left of the screen to count down.) 30 ○ ○ ○ ○ ○ ○ ○ ○ ○ ○ ○ ○ ○ Additional Touchscreen Features If you need to access right mouse button functions from the touchscreen, click the Click Settings tab, and then the Enable right click emulation check box. ○ ○ ○ ○ ○ ○ ○ ○ ○ ○ ○ ○ ○ ○ ○ ○ ○ ○ ○ ○ ○ ○ ○ ○ ○ ○ If you need to change the way the touchscreen responds, click the Touch Settings tab, and then choose either Normal, Touch down or Touch up. 31 How do I attach a switch to Mercury? To use a single switch (for automatic scanning): Insert the plug from the switch into the Switch 1-2 jack on the side of the Mercury. Click the Setup button in the Mercury Control Panel, then click the Switches tab and set Switch 1 to the function required by the program you are using. Make sure that Switch 2 is set to Ignore. To use two switches simultaneously (for dual-switch scanning): Use a dual switch (such as the Rocker switch from Tash, Inc.) and insert the plug into the Switch 1-2 jack on the side of Mercury. Or, using 2 single switches, insert the plug from each switch into a “splitter,” then plug the splitter into the Switch 1-2 jack. The splitter (or “Y Adapter”) is available from RadioShack®, and the catalog number is 274-375B. The jacks are color-coded: Nickel for left (Switch 1), and Gold for right (Switch 2). To use the Wheelchair Joystick input: See page 34 for information on using a Wheelchair Joystick. To turn Mercury on using a switch: If you have a single switch attached, you can turn Mercury on or wake it from Stand By mode by pressing the switch. If you have two switches attached, switch 1 will turn the Mercury on or wake it from Stand By mode. 32 How do I adjust Mercury to work with a switch? A switch connected to the Mercury normally acts like a mouse button. It translates switch 1 presses into left mouse button clicks. Many switch-accessible programs will require this setting. Some programs require a different setting. To change the settings: 1 2 Open the Mercury Control Panel. Click the Setup button, then click the Switches tab. Use the program’s documentation to choose the correct settings for either single- or dualswitch scanning. When you click OK or Apply, your settings are saved. Check your software documentation to determine if a keystroke is required for scanning. If you are using a switch with Discover:Switch® software, click the Discover button to use the Mercury switch input to activate Discover. Set Switch 1 to Discover for single-switch scanning in Discover. Set both Switch 1 and Switch 2 to Discover for dual-switch scanning in Discover. ○ ○ ○ ○ ○ ○ ○ ○ ○ ○ ○ ○ ○ ○ ○ ○ ○ ○ ○ ○ ○ ○ ○ ○ ○ ○ ○ 33 How do I set up Mercury to work with my wheelchair electronics? If you are powering your Mercury with a wheelchair battery, install the Mercury wheelchair power cable (purchased separately from ATI) and make the power connections from the port on the wheelchair to the Mercury AC Adapter/Battery Charger port. To use the wheelchair joystick as an input device with your Mercury, connect the larger 9-pin connector of the Wheelchair Joystick Cable (purchased separately from ATI) to your wheelchair ECU connector. Connect the smaller 8-pin connector to the Mercury wheelchair/joystick port. When your joystick is in switch/communication mode (see the documentation for your wheelchair electronics), the joystick will move the mouse on the screen. If you want to add a switch to click the mouse button, connect a single switch to the Switch 1-2 jack on the Mercury or to the auxiliary switch input on the wheelchair ECU. The normal setting for Joystick is Move Mouse. Moving the joystick will start moving the mouse pointer slowly or quickly, depending on the acceleration setting, and speed up to the Speed Setting. A slower Acceleration Speed allows finer accuracy when moving short distances. Faster Speed and Acceleration allow quicker movement over longer distances (or across the display). 34 If you want to change what your joystick does: 1 Open the Mercury Control Panel, click Setup, then click the Edit Custom button under Joystick on the Switches tab. 2 The Custom Joystick Setup window will appear. Choose the settings appropriate for you and the programs you use. (Select Ignore for unused directions.) ○ ○ ○ ○ ○ ○ ○ ○ Check your software documentation to determine which keystroke to enter here, if you want the joystick to send keystrokes. How do I use an alternative pointer with Mercury? If you want to use an alternative pointer with Mercury, you will need a Windows-compatible USB mouse emulator such as the Tracker®Pro from Madentec Ltd. or the HeadMouse® Extreme from Origin Instruments. An alternative pointer provides a way to point to an object, but not always a way to select it. This means that you will need a switch (hardware) or a dwell utility (software) to select an object. Check the documentation that came with your head pointing device for more information. If you will be selecting objects with a switch, you will need a momentary contact switch with a standard 1/8-inch plug. If you are not using a switch, use a dwell utility such as Dragger32™ from Origin Instruments, Magic Cursor 2000 from Madentec, or SmartClick from RJ Cooper & Associates. Call ATI at 1-800-793-9227 for product details. 35 What other devices work with Mercury? The USB ports let you plug in a range of devices without having to shut down and restart the Mercury. For example, you can plug a mouse and keyboard into the USB ports on the side of Mercury. You can also add any of the following devices: External drive (floppy, Zip™ or USB Flash Drive) USB IntelliKeys or other alternative keyboard (or use the PS/2 port) Trackball Joystick Printer Digital camera Alternative pointer such as TrackerPro or Headmouse Extreme Ethernet adapter, for connecting to an Ethernet network Wireless adapter, for connecting to a wireless network Multiple switch, such as those available from Tash, Inc. (requires ATI’s wheelchair/joystick cable to connect) If you need to use more than two USB devices at the same time, you must use a USB hub. To use a hub with Mercury: Plug the hub into one of the Mercury USB ports, then plug your other peripherals into the USB ports on the hub. Some devices are powered by the USB port. Other devices have or require their own power (AC adapter). Follow the manufacturers’ directions to set up and connect these devices. The USB port can manage up to 127 devices by attaching multiple hubs and hubs of different sizes. If you want to connect Mercury to an Ethernet network, you will need an adapter. Recommended adapters that have been tested with Mercury are the Belkin USB Ethernet adapter (Model No. F5D5050) and the Linksys® wireless adapter (Model No. WUSB11 ver. 2.6). Both are available from Assistive Technology, Inc. For more information on these adapters or using non-USB devices, call ATI at 1-800-793-9227. 36 How do I use headphones? To listen to headphones privately (or anytime you want to turn off the built-in speakers), open the Mercury Control Panel. Turn down the Speaker volume (to 0) and set Headphone volume as desired. The headphone preview feature is supported for Speaking Dynamically Pro software or any program that uses the left channel for previews and the right channel for the main voice. In the Mercury Control Panel, click Setup, then click Enable under Headphone Preview on the Main Setup tab. To use the headphone previews with Speaking Dynamically Pro, open SDP’s Dynamic Boards menu and choose Speaker Volume. Then under Separation of Sounds click Left Channel and Right Channel. Sounds played on the left channel will be heard on your headphones, and sounds played on the right channel will be heard from your Mercury speakers. To hear the previews, button clicks and button scan sounds on headphones only, under Right Volume set Preview Sounds, Button Click Sounds, and Button Scan Sounds to Mute. Only Normal Sounds will then be heard from the Mercury speakers. To set up headphone previews in SDP, add Recorded Preview actions to your buttons in your SDP boards. (Only Recorded Preview actions will be heard privately on your headphones. Spoken Preview actions will be heard from both headphones and speakers.) See the SDP manual or contact Mayer-Johnson LLC at 1-800588-4548 if you require assistance with adding Recorded Preview actions. What is the Windows Control Panel? At the Windows Control Panel, you can change other settings on your system, such as the date and time, display settings, and Accessibility Options (see page 39). To open the Windows Control Panel, open the Start menu and click on Control Panel. Choose the category of the settings you wish to modify. At the next screen, choose the specific option. 37 How do I set up Mercury for accessibility? Modifying features in the Windows Control Panel and other options can make Mercury easier to access for some users. Display Control Panel To enlarge the size of the text that appears on windows and menus, choose Control Panel from the Start menu. At the Pick a Category screen, choose Appearance and Themes. Then choose Display from the Control Panel icons near the bottom of the screen. Select the Appearance tab on the Display Properties window that appears. Choose Extra Large Fonts from the Font size: drop-down menu, then click Apply. Start menu with default text size. 38 Start menu with Extra Large Fonts selected. Accessibility Options Control Panel For keyboard users: At the Start menu, choose Control Panel. At the Pick a Category screen, choose Accessibility Options. Then choose the Accessibility Options Control Panel icon at the next screen. At this window you can turn on and off features such as StickyKeys, FilterKeys, and ToggleKeys. Folder Options Control Panel At the Start menu, choose Control Panel. At the Pick a Category screen, choose Appearance and Themes. Then choose the Folder Options Control Panel icon at the next screen. At this window you can choose to open items with a single click. ○ ○ ○ ○ ○ ○ ○ ○ Other Accessibility Options Other accessibility programs included with your Mercury are the Magnifier and Narrator. To access Magnifier, a feature that enlarges the mouse or pointer’s current location to make boxes and buttons easier to see, choose All Programs from the Start menu, then Accessories, then Accessibility, then Magnifier. To access Narrator, a screen readback utility, choose All Programs from the Start menu, then Accessories, then Accessibility, then Narrator. 39 How do I use the Mercury stand/mount? The stand/mount lets you place the Mercury on a desk or other flat surface at an appropriate angle. The stand/mount also provides a way to mount the Mercury onto a wheelchair. The stand opens to a wide range of angles. Use a viewing position that is comfortable and stable and does not tip forward. To adjust the angle of the device, place the unit on a table, touchscreen facing up, with the Mercury foldaway handle farthest from you. Push the aluminum button on the right side of the stand and swing the Mercury upright into position with your other hand. Then release the button to keep the unit in place. Note that the inner black ring moves while you push the button. Do not squeeze the plastic ring while pushing the button, as the leg will not operate properly. Use an angle that is slightly less than 90 degrees. Depress the aluminum button to adjust the angle of the device then release to lock in place. ○ ○ ○ ○ ○ ○ ○ ○ ○ ○ ○ Cutout on plate accommodates several different mounts. ○ ○ ○ ○ ○ ○ ○ ○ ○ ○ ○ ○ Mounting the unit to a wheelchair The cutout on the plate accommodates both the Daedalus quick-release mount and the clip used with the CJT quick-release mount. If you ordered a Profiler™ mount you will notice a black clip that connects to the CJT quick-release mount attached to the holes in the plate. 40 How do I adjust Mercury power settings? Mercury has several power settings that you can adjust. To view or change the settings, click the Setup button on the Mercury Control panel, then click the Power tab. Adjust the level at which Mercury warns○ you of a low battery or shuts down the Mercury. Choose the suspend mode you prefer. ○ ○ ○ ○ ○ ○ ○ ○ ○ ○ ○ ○ ○ ○ Choose which power buttons are available on the Mercury Control Panel main screen. ○ ○ ○ ○ ○ ○ ○ ○ ○ ○ ○ ○ ○ ○ ○ ○ ○ ○ ○ ○ ○ ○ ○ ○ ○ ○ ○ Open the Windows Power Control Panel. Optimize Mercury for economy (longer battery life) or performance (faster processing speed) with the Advanced Power Savings settings. Restore the original Power settings. 41 What do I need to know about the Mercury battery? Mercury runs on a Lithium Ion battery with a charge that lasts approximately seven hours with average use. It recharges when plugged into its AC Power Adapter. The battery fully recharges in approximately four hours while plugged into the AC Power Adapter. Additional Mercury batteries as well as an optional external battery charger are sold separately by Assistive Technology, Inc. To preserve the life of your battery, charge and discharge it frequently (daily, if possible). Leaving it in the Mercury with it always plugged in will shorten the battery’s life. If the battery will not be used for a long period of time, store it below room temperature at less than a 50% charge. If you follow these guidelines, your battery should last for several years. Warning: You will lose all unsaved data if you change the battery while Mercury is in Stand By mode and no power adapter is connected. Be sure to shut the system down or connect the AC power adapter before changing the battery. To remove the battery: ○ ○ Slide the spring latch toward the top of the Mercury, then pull the battery out from the right. ○ ○ Handle the battery carefully. Do not drop, puncture, disassemble, mutilate or incinerate it. Never get batteries wet. 42 ○ ○○ ○○ ○○ ○○ ○○ ○○ ○○ ○○ ○○ ○ ○ ○ ○ ○ ○ ○ ○ ○ ○ ○ ○ ○ ○ ○ ○ ○ What if I have a problem? If Mercury won’t respond, the pointer won’t move, or the display is dim: Tap the screen. It may take a few seconds to respond. If not, try to cancel what Mercury is doing: Press the <ctrl><alt><delete> keys simultaneously. Choose Task Manager and then click on the End Task button. If the Mercury does not respond, press the <ctrl><alt><delete> keys simultaneously and click on the Shutdown button in Task Manager. If your Mercury still doesn’t respond, restart it. Press and hold the Power button for five seconds to shut down the Mercury, then press the Power button again to restart it. If the problem occurs when you use a certain program: Check with the program’s manufacturer to see if it is compatible with Mercury. If Mercury won’t turn on or start up: Make sure the AC Power Adapter is plugged into Mercury and into a functioning power outlet. Check that the battery is installed properly and check the Mercury Control Panel to see if the battery is charged. If Mercury does not start up properly: Reset it. Remove the battery and disconnect the AC Power Adapter. Depress the power button for several seconds. Then reconnect the AC Power Adapter and press the power button. If that does not work, or if you hear a strange sound during startup: Contact Assistive Technology, Inc. If the problem occurs frequently, contact Technical Support at Assistive Technology, Inc. at 1-800-793-9227. Before calling, find the Mercury’s serial number, located on the sticker on the rear of the device. You will need to give the ATI Technical Support Representative this number when you call. 43 If your touchscreen does not respond after you turn on Mercury: Check that the touchscreen is not cracked, scratched or damaged, and that nothing is pressing on the touchscreen. If your mouse and keyboard work properly, check that the TSHARC driver is loaded. Restart Mercury by selecting Turn Off Computer from the Start menu and then choosing Restart. If this does not solve the problem or if you need assistance in following these instructions, call ATI Technical Support (1-800-793-9227). If you have a problem connecting other devices: Make sure that the device is properly connected. Try unplugging and plugging in the device again. If the device requires its own power, check to see that its power supply is plugged in and turned on. Check to see if the device requires any software that needs to be installed. If that doesn’t work, contact the device manufacturer. 44 If your switch input doesn’t work: Make sure the Mercury Control Panel is running and is loaded as a startup item. If that doesn’t work, restart Mercury. If you have a problem with a software program: Contact the manufacturer of the software. If you have other problems: Look at the information in Windows help for instructions and troubleshooting information. If you have a problem with your Internet connection: Make sure the telephone line is connected and the line is working properly. Contact your Internet Service Provider. How do I clean and care for Mercury? For your own safety and to protect your Mercury, always disconnect the power plug (by pulling the plug, not the cord) and remove the battery if any of the following conditions exist: the power cord or plug becomes frayed or otherwise damaged you spill something into the case your Mercury is exposed to rain or any other excess moisture your Mercury has been dropped or the case has been otherwise damaged you suspect that your Mercury needs service or repair you want to clean the case To clean the touchscreen: Clean the touchscreen with a damp cloth. To clean the case: 1 2 Disconnect the power plug and remove the battery. (Pull the plug, not the cord.) Wipe the surfaces lightly with a clean, soft cloth dampened with water. Warning Do not use any substance that contains any strong chemicals. These can damage the touchscreen and case. Electrical equipment may be hazardous if misused. Operation of this product, or similar products, must always be supervised by an adult. Do not allow children access to the interior of any electrical product and do not permit them to handle any cables. Do not open Mercury. If you attempt to open your Mercury, any damage you cause to your equipment will not be covered by your Mercury warranty. Contact Assistive Technology, Inc. if you have other warrantyrelated questions. Important The only way to disconnect power completely is to both unplug the power cord and remove the battery. Make sure at least one end of the power cord is within easy reach so that you can unplug your Mercury when you need to. 45 Is there anything else I need to know? Follow these instructions to use Mercury safely and wisely. When setting up and using Mercury, remember the following: Read the installation instructions carefully before you plug Mercury into a wall socket. Keep these instructions handy for reference by you and others. Follow all instructions and warnings that appear on the Mercury screen. Use only the power adapter that came with Mercury. Adapters for other electronic devices may look similar, but they can damage Mercury. Always leave space around your Mercury power adapter. Make sure you use this equipment in a location where air is able to flow around the Mercury power adapter. 46 Make sure you connect the modem to an analog phone line, the type typically used in residences. Do not connect it to a digital telephone line. This type of line is incompatible with the modem and can damage it. Lithium Ion batteries contain hazardous chemicals and should not be thrown out with household trash. Check with local authorities for disposal. When using Mercury or when charging the battery, it is normal for the bottom of the case to get warm. The bottom of the case functions as a cooling surface that transfers heat from inside the device to the cooler air outside. The bottom of the case is raised slightly to allow airflow that keeps the unit within normal operating temperatures. Keep Mercury away from sources of liquids, such as drinks, bathtubs, or shower stalls. If you spill any food or liquid onto the Mercury, shut it down immediately, unplug it, and remove the battery before cleaning it. Depending on what you spilled and how much got into Mercury, you may have to return it to ATI for cleaning and service. If you have a problem with your Mercury and nothing in the manual helps, call Assistive Technology, Inc. at 1-800-793-9227. Attempting to repair Mercury yourself will void your warranty. Do not move Mercury if you hear its hard disk spinning. When you put the Mercury in Stand By mode, wait until the screen is dark before moving it. If your Mercury has been in a cold place for several hours, let it warm up to room temperature before using it. Avoid leaving Mercury where temperatures may be extreme or unpredictable, for example, in the trunk of a car. Protect Mercury from dampness or wet weather, such as rain or snow. Never force a connector into a port. Make sure the connector matches the port and that it is oriented properly. If the connector does not insert easily, they do not match. Do not use sharp or pointed objects on the touchscreen. Do not place heavy objects on the touchscreen. Excess weight can cause damage to the touchscreen and display. Use only the battery that came with Mercury. Batteries for other electronic devices may look similar, but they can damage it. 47 Technical Information Communications regulation information FCC declaration of conformity This device complies with Part 15 of the FCC Rules. Operation is subject to the following two conditions: (1) This device may not cause harmful interference, and (2) this device must accept any interference received, including interference that may cause undesired operation. Radio and television interference The equipment described in this manual generates, uses, and can radiate radio frequency energy. If it is not installed and used properly it may cause interference with radio and television reception. This equipment has been tested and found to comply with the limits for a Class B digital device in accordance with the specifications in Part 15 of the FCC Rules. These specifications are designed to provide reasonable protection against such interference in a residential installation. However, there is no guarantee that interference will not occur in a particular installation. You can determine whether your Mercury system is causing interference by turning it off. If the interference stops, it was probably caused by the Mercury or one of the peripheral devices. If your Mercury system does cause interference to radio or television reception, try to correct the interference by using one or more of the following measures: Turn the television or radio antenna until the interference stops. Move the Mercury to one side or the other of the television or radio. Move the Mercury farther away from the television or radio. 48 Plug the Mercury into an outlet that is on a different circuit from the television or radio. (That is, make certain the Mercury and the television or radio are on circuits controlled by different circuit breakers or fuses.) If necessary consult Assistive Technology, Inc. See the service and support information that came with Mercury. Changes or modifications to this product not authorized by ATI could void the FCC Certification and negate your authority to operate the product. Important This product was tested for FCC compliance under conditions that included the use of ATI-approved peripheral devices and shielded cables and connectors between system components. It is important that you use ATI-approved peripheral devices and shielded cables and connectors between system components to reduce the possibility of causing interference to radios, television sets, and other electronic devices. You can obtain ATI-approved peripheral devices and proper shielded cables and connectors from ATI. Responsible party (for FCC matters): Assistive Technology, Inc. Industry Canada statement This Class B device meets all requirements of the Canadian interference-causing equipment regulations. Cet appareil numérique de la Class B respect toutes les exigences du Règlement sur le matérial brouilleur du Canada. Europe—EU Declaration of Conformity This device complies with requirements of the European Directives 89/336/EEC (for IT devices) and 93/42/EEC (for medical devices). Notify your telephone company Some telephone companies require that you notify the local business office when you hook up a modem to their lines. Information you need in the United States The internal modem complies with Part 68 of the FCC rules. On the back of this equipment is a label that contains, among other information, the FCC registration number and ringer equivalence number (REN). If requested, provide the following information to your telephone company: Ringer equivalence number (REN): less than 0.1. The REN is useful to determine the quantity of devices you may connect to your telephone lines and still have all those devices ring when your telephone number is called. In most, but not all areas, the sum of the RENs of all devices connected to one line should not exceed five (5.0). To be certain of the number of devices you may connect to your line, as determined by the REN, you should contact your local telephone company to determine the maximum REN for your calling area. Telephone jack type: USOC, RJ-11 An FCC-compliant telephone cord and modular plug are provided with this equipment. This equipment is designed to be connected to the telephone network or premises wiring using a compatible modular jack that complies with Part 68 rules. Telephone line problems If your telephone doesn’t work, there may be a problem with your telephone line. Disconnect the modem to see if the problem goes away. If it doesn’t, report the problem to your local telephone company. If disconnecting the modem eliminates the problem, the modem itself may need service. See the service and support information that came with your product for instructions on how to receive assistance. If you do not disconnect your modem when it is adversely affecting the telephone line, the telephone company has the right to disconnect your service temporarily until you correct the problem. The telephone company will notify you as soon as possible. Also, you will be informed of your right to file a complaint with the FCC. The telephone company may make changes in its facilities, equipment, operations, or procedures that could affect the operation of your equipment. If this happens, the telephone company will provide advance notice in order for you to make the necessary modifications to maintain uninterrupted service. The internal modem will not work with party lines, cannot be connected to a coin-operated telephone, and may not work with a private branch exchange (PBX). Telephone Consumer Protection Act The Telephone Consumer Protection Act of 1991 makes it unlawful for any person to use a computer or other electronic device to send any message via a telephone fax machine unless such message clearly contains in a margin at the top or bottom of each transmitted page or on the first page of the transmission, the date and time it was sent and an identification of the business or other entity, or individual sending the message and the telephone number of the sending machine of such business, entity, or individual. Information you need in Canada The Industry Canada (IC) label identifies certified equipment. This certification means that the equipment meets certain telecommunications network protective, operational, and safety requirements. The Department does not guarantee the equipment will operate to a user’s satisfaction. Before installing this equipment, make sure that you are permitted to connect to the facilities of the local telecommunications company. Be sure you use an acceptable method of connection to install the equipment. In some cases, you may extend the company’s internal wiring for single-line individual service by means of a certified telephone extension cord. Be aware, however, that compliance with these conditions may not prevent degradation of service in some situations. In fact, telecommunications enterprises will not permit any further connections, except in certain specific cases outlined in their regulations. Repairs to certified equipment should be made by an authorized Canadian maintenance facility designated by the supplier. Any equipment malfunctions or repairs or alterations that you make to this equipment may cause the telecommunications company to request that you disconnect the equipment. Users should ensure for their own protection that the electrical ground connections of the power utility, telephone lines, and internal metallic water pipe system, if present, are connected together. This precaution may be particularly important in rural areas. 49 Warning Users should not attempt to make such connections themselves, but should contact the appropriate electric inspection authority or electrician. Telephone jack type: CA-11 Informations destines aux utilisateurs Canadiens L’étiquette d’Industrie Canada identifie un matériel homologué. Cette étiquette certifie que le matériel est conforme à certaines normes de protection, d’exploitation et de sécurité des réseaux de télécommunications. Le Ministère n’assure toutefois pas que le matériel fonctionnera à la satisfaction de l’utilisateur. Avant d’installer ce matériel, l’utilisateur doit s’assurer qu’il est permis de le raccorder au réseau de l’entreprise locale de télécommunication. Le matériel doit également être installé en suivant une méthode acceptée de raccordement. Dans certains cas, le cablage appartenant à l’entreprise utilisé pour un service individuel à ligne unique peut être prolongé au moyen d’un dispositif homologué de raccordement (cordon prolongateur téléphonique). L’abonné ne doit pas oublier qu’il est possible que la conformité aux conditions énoncées ci-dessus n’empechent pas la dégradation du service dan certaines situations. De fait, les entreprises de télécommunication ne permettent pas que l’on raccorde un matériel aux prises d’abonné, sauf dans les cas précis prévus par les tarifs particuliers de ces entreprises. Les réparations de matériel homologué doivent être effectuées par un centre d’entretien canadien autorisé désigné par le fournisseur. Le compaignie de télécommunications peut demander à l’utilisateur de débrancher un appareil suite à des réparations ou des modifications effectuées par l’utilisateur ou à cause de mauvais fonctionnement. Pour sa propre protection, l’utilisateur doit s’assurer que tous les fils de mise à la terre du secteur, des lignes téléphoniques et les canalisations d’eau métalliques, s’il y en a, soient raccordés ensemble. Cette précaution est particulièrement importante dans les régions rurales. 50 Avertissement L’utilisateur ne doit pas tenter de faire ces raccordements lui-même; il doit avoir recours à un service d’inspection des installations électriques ou à un électricien, selon le cas. Type de prise téléphonique: CA-11 Information you need in other countries The internal modem complies with IEC 60950 and TÜV standards for use in the United Kingdom, Germany, France, Austria, Japan, Republic of Korea, Switzerland, and Nordic countries. Laser information Warning Making adjustments or performing procedures other than those specified in your equipment’s manual may result in hazardous radiation exposure. Do not attempt to disassemble the cabinet containing the laser. The laser beam used in this product is harmful to the eyes. The use of optical instruments, such as magnifying lenses, with this pro-duct increases the potential hazard to your eyes. For your safety, have this equipment serviced only by Assistive Technology, Inc. Your computer is a Class 1 laser product. The Class 1 label, located in a user-accessible area, indicates that the drive meets minimum safety requirements. A service warning label is located in a service-accessible area. High-risk activities warning This computer system is not intended for use in the operation of nuclear facilities, aircraft navigation or communications systems, or air traffic control machines, or for any other uses where the failure of the computer system could lead to death, personal injury or severe environmental damage.