1
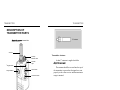
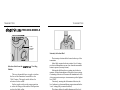
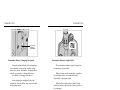
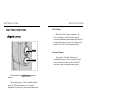
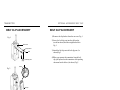
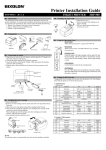
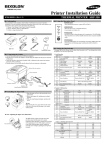
REMOTE CONTROLLED
DOG TRAINING COLLARS
OWNER’S MANUAL
1250 E. 223rd Street, Suite 119
Carson, CA 90745
Tel :(310) 522 -1800
Fax :(310) 522 - 1805
Web Site : www.dogtra.com
Toll Free :1-888- 811-9111
Copyright c 2002 Dogtra Company
2004 -
Web Site : www.dogtra.com
CONTENTS
OVERVIEW
3
MAIN FEATURES
5
PRODUCT SAFETY AND HEALTH
STATEMENTS
6
COLLAR PACKAGE CONTENTS
7
DESCRIPTION OF TRANSMITTER PARTS
8
BUTTON FUNCTION
14
DESCRIPTION OF COLLAR PARTS
18
BATTERY CHARGER
23
CHARGING THE BATTERIES
24
TESTING YOUR
COLLARS
27
OPERATING INSTRUCTIONS
30
ACCESSORIES
36
WARRANTY AND REPAIR
INFORMATION
37
1
OVERVIEW
OVERVIEW
training collars give you the
ability to communicate with your dog in a
timely manner even when the dog is far away
from you. This makes it much easier for the
dog to learn its lessons because late corrections
are very confusing to the dog.
remote collars offer three
different kinds of stimulation:
Pressing the Nick button causes a very
short single pulse of electrical stimulation.
It automatically shuts off in a fraction of a
second, no matter how long the button is held
down.
The Nick is used as a substitute for leash
corrections when the dog is off lead.
It is mild but motivating!
3
OVERVIEW
Pressing the Constant button causes the
collar to emit electrical stimulation that stays
on for up to twelve seconds as long as the
button is held down. Constant stimulation is
used for low-level applications for guiding
dogs into the desired behavior or as a reserve
high to stop unsafe behaviors such as chasing
animals or cars.
Pressing the Pager button causes the
dog’s collar to vibrate like a phone pager.
It allows you to train with a non-electrical type
of stimulation. It’s a great attention getter.
All
collars come complete with
a handheld transmitter, dog collar with
receiver, battery charger, test light, operating
instructions manual and carrying case.
MAIN FEATURES
MAIN FEATURES
Easy to use transmitter.
All intensity level adjustments are made from a
digital dial on the transmitter. The dial
works like a rheostat, gradually increasing the
intensity with no jumps between intensity
levels.
Reliable stimulation effective for all types of
dogs no matter how heavy the coat.
The
range.
has a 1/2-mile
Two-dog models allow the trainer to control
two different dogs from one transmitter.
Waterproof collar receiver and transmitter.
No external antenna on the collar receiver.
User replaceable and rechargeable Ni-MH
batteries.
Over 3000 different identity codes to prevent
conflicts with other collars.
4
5
PACKAGE INCLUDES
PRODUCT SAFETY AND HEALTH STATEMENTS
PRODUCT SAFETY AND HEALTH STATEMENTS
COLLAR
PACKAGE CONTENTS
collars use state-of-the-art microtechnology.
If the constant button is held down for more
than 12 seconds, an automatic power-down
circuit will activate.
A filtering system prevents unwanted
reception from outside sources.
collars are intended for the sole use
for training dogs.
Transmitter
Receiver (two collar receivers for
two dog models)
Battery charger and splitter cable
Test light
Dogs should be in good health during any
e-collar training.
Owner’s manual
collars are not intended for use on
dogs weighing less than 12 pounds or less
than 6 months of age.
Carrying case
Discontinue use if signs of irritation begins to
appear on the dog's skin around the neck
caused by the rubbing action of the collar
strap and/or contact points.
Do not attempt to test
humans or other animals.
6
collars on
7
TRANSMITTER
TRANSMITTER
DESCRIPTION OF
TRANSMITTER PARTS
2” Antenna
transmitter
Antenna
Intensity
Selection Dial
Indicator
Light
* Toggle Switch
“Pager” Button
“Nick” Button
“Constant” Button
Transmitter Antenna
A short 2” antenna is supplied with the
.
The antenna should be screwed into the top of
the transmitter to ensure that the signals are sent
properly to the collar receiver and that maximum
range is attained.
indicates optional switch for 2 dog models
8
9
TRANSMITTER
TRANSMITTER
TWO-DOG MODELS
ck
Bla ange
Or
Collar
selection
switch
Intensity Selection Dial
Selection Switch on the
Models
Two-Dog
The two-dog models have a toggle switch on
the face of the transmitter located above the
“Nick” button. The toggle switch allows for
selection of either collar.
Set the toggle switch on the orange position
to select the orange collar and the black position
to select the black collar.
10
The intensity selection dial is located on the top of the
transmitter.
In the fully counter clockwise position-”zero” settingno electrical stimulation occurs even when the transmitter
button is pressed (a satety feature).
Moving the dial from the zero setting in a clockwise
manner, electrical stimulation will begin at a lower setting.
Continuing clockwise will increase the stimulation level in
a liner progression-no steps or increments up to the highest
level (100).
Conversely, moving the dial counter-clockwise, the
level reduces in a downward linear progression until at the
“zero” setting (fully counter-clockwise).
This feature allows for subtle adjustment of the level
(upward of downward) while the transmitter button is held
down continuously - providing e-linear training.
11
TRANSMITTER
TRANSMITTER
Transmitter
Charging
Receptacle
Transmitter Battery Charging Receptacle
Located on the backside of the transmitter,
the receptacle is covered by a rubber plug.
Insert one end of the battery charging cable
into the receptacle to charge the battery.
(See Battery Charging Procedure.)
After charging is completed, close the
receptacle with its rubber plug to prevent dirt
from getting inside.
12
Transmitter Indicator Light (LED)
The transmitter indicator light is located by
the intensity selection dial.
When a button on the transmitter is pushed,
the red light comes on to indicate that the
transmitter is being activated.
If the indicator light emits a double blink
while the button is pressed, the battery needs to
be recharged.
13
BUTTON FUNCTION
BUTTON FUNCTION
“Nick” Button
BUTTON FUNCTION
When the “Nick” button is pushed, the
receiver emits an extremely short pulse of
electrical stimulation that automatically shuts off
no matter how long you leave your finger on the
button. The “Nick” is mild but motivating!
Nick
“Constant” Button
Constant
The transmitter for
buttons.
Pressing the “Constant” button gives
stimulation for up to twelve seconds, at which
time, the collar will turn off. The collar will
reactivate when you push the button again.
has two
The top button gives “Nick” stimulation when
pressed. The bottom button gives “Constant”
stimulation for as long as you press the button up to
twelve seconds.
14
15
BUTTON FUNCTION
BUTTON FUNCTION
“Nick” Button
Nick
When the “Nick” button is pushed, the receiver
emits an extremely short pulse of electrical
stimulation that automatically shuts off no matter
how long you leave your finger on the button. The
“Nick” is mild but motivating!
Pager
“Constant” Button
Constant
The transmitter for
has three
buttons (two on the face of the transmitter and one
on the side).
On the face of the transmitter the top button gives
a pre-measured “Nick” of stimulation when pressed.
The bottom or “Constant” button gives
stimulation for as long as you hold down the button
for up to twelve seconds.
The button on the side is the “Pager” button.
When pressed, the “Pager” button causes the collar
receiver to vibrate.
16
Pressing the “Constant” button gives
stimulation for up to twelve seconds, at which
time, the collar will turn off. The collar will
reactivate when you push the button again.
“Pager” Button
Pressing the “Pager” button on the side of the
transmitter causes the collar to vibrate. It’s a great
way of communicating with your dog using nonelectrical stimulation. It is useful as an attention
getter, giving you added training finesse.
17
COLLAR
COLLAR
DESCRIPTION OF
COLLAR PARTS
Collar
Collar Strap
ON/OFF Button
Contact Points
To turn the collar on, press the button on
the end of the receiver for one full second until
the light comes on.
Indicator
Light
Power switch
ON/OFF
Push button
18
To turn the collar off, hold the button down
for one full second until the red light goes off.
A delay has been built into the on/off switch
so the dog cannot turn the collar off by accident.
Battery Charging
Receptacle
and Cover
19
COLLAR
COLLAR
Receiver Indicator Light (LED)
Located on the front of the collar, the indicator
light comes on and blinks once every 2 seconds
after the collar is turned on.
The blinking will change from a single flash
to a double flash when the collar needs to be
recharged.
When the “Constant” button on the transmitter
is pushed, the collar indicator light will glow
steadily for as long as you hold the button down,
for up to twelve seconds. When the “Nick” button
is pushed, the light comes on for a fraction of a
second.
20
Contact Points
The collar should be fitted so that the
stainless steel contact points press firmly against
the dog’s skin.
A loose fit can allow the collar to move
around on the dog’s neck. When this happens the
contact points may rub the skin and cause
irritation. If the collar is too loose, electrical
contact will be inconsistent and your corrections
will be inconsistant also.
21
COLLAR
BATTERY CHARGER
Receiver
Charging
Receptacle
BATTERY CHARGER
Charging Cable
110 volt
Charger
Two-dog
unit only
Receiver Battery Charging Receptacle
On the inside of the collar, next to the collar
strap, is a battery charging receptacle with a
rubber cover plug.
Internal Antenna
The
has no external
antenna on the collar. The Antenna is inside the
collar receiver.
22
The battery charger and charging cables allow
you to charge both the transmitter and receiver at
the same time.
The battery charger is designed for a 110-volt
wall outlet. (European 220-volt AC chargers and
12-volt field charger for your automobile are also
available).
To use the battery charger for the two-dog
unit, combine both sets of battery charging
cables as shown. This enables you to charge the
transmitter and both receivers at the same time.
23
CHARGING THE BATTERIES
CHARGING THE BATTERIES
CHARGING THE BATTERIES
3. Fully charge the batteries for 14 hours if the
collar is to be stored without use for a period
of a month or more.
4. Recharge the battery if
- the indicator light on the collar is emitting a
double blink every 2 seconds,
- the indicator light on the transmitter or
receiver will not come on,
- the indicator light on the transmitter or
receiver comes on momentarily but will not
stay on when the “Constant” button is
pushed.
uses Ni-MH (Nickel-Metal-Hydride)
batteries that do not set a memory and can be
charged on a regular basis without harm to the
battery. Allow batteries to clrain completely
every 4 months to maximize battery life.
1. Charge the batteries for 14 hours before
using the collar for the first time.
2. Do not charge the batteries near any
flammable substances.
24
25
CHARGING THE BATTERIES
Battery charging procedure
1. Attach the charging cables to both the
transmitter and receiver(s), as shown on page 24.
TESTING
TESTING YOUR
COLLARS
2. Plug the charger into a 110-volt wall outlet as
if using the accessory field charger plug into a
cigarette lighter.
(Use 220-volt European charger for Europe)
When properly plugged in, all indicator lights
should glow red.
The receiver automatically turns off when you
insert the charging cable into the battery
charging receptacle on the receiver.
3. After charging, cover the battery charging
receptacles with the rubber plugs on the
transmitter and receiver.
4. Battery is fully charged with a 14-hour charge.
26
1. Turn the power switch on by pressing the
button on the end of the collar receiver for one
second. The indicator light will come on for a
moment then blink once every two seconds,
showing that the collar is ready to use. (If the
red indicator light emits a double blink every
two seconds, the batteries need to be charged.)
27
TESTING
2. Place the test light on the receiver contact
points and hold it there.
3. Set the transmitter intensity dial to level
one hundred and push the “Constant” button.
TESTING
Testing the “Pager” Feature:
If you have a dogtra collar with the pager feature,
push the”Pager” button while holding the
receiver in your hand. You should feel the collar
vibrate.
4. Watch the test light as you push the
“Constant” button on the transmitter.
It should glow brightly. As a safety feature the
collar will automatically turn off after twelve
seconds. To reactivate, release the button for
one second and the collar will reset.
5. Push the “Nickt” button. The test light should
light for just a moment.
6. Change the intensity dial to level fifty and
repeat the test. The test light should glow
dimmer.
NOTE : It is normal for the test light not to come
on if the intensity level is set below level ten.
28
29
OPERATING
OPERATING INSTRUCTIONS
Fitting the collar
The collar strap should be adjusted so that the
contact points are held firmly against the dog’s
skin. If the collar is too loose, it can cause
irritation from the contacts rubbing against the
skin.
If the dog has a heavy coat, move the receiver
up and down to work the contact points down
into the coat.
OPERATING
Intensity selection
To select the intensity level, start on the
“zero” setting. Gradually increase the level until
you get a response from the dog that would be
equivalent to a quick pull or “POP” with a leash.
Remember that you will need to adjust the
setting(upward or downward) as the dog’s
attitude changes, especially during times of
increased excitement or distraction.
ATTENTION!
Avoid having the dog wear the collar with
the contact points in the same place for more
than two hours at a time. Leaving the points
on the same spot for extended periods of time
can cause skin irritation. If the dog is to wear
the e-collar for long periods, occasionally
reposition the collar so that the contact points
are moved to a different spot on the dog’s
neck.
30
31
OPERATING
Maintenance
Always clean and rinse the collar thoroughly
with tap water after use in salt water.
The receiver and collar strap should be
periodically cleaned with detergent and
water to prevent malfunction. Remove the
contact points and clean the area beneath
the strap.
MAINTENANCE
Reception
The
collar has a range
of a half-mile. Depending on the way you use
your transmitter, the transmitting range may
vary.
You will have extended range if you hold the
transmitter away from your body when you push
the button.
Maximum Range
Typical Range
Minimum Range
If your finger touches the antenna near the
dial on the top of the transmitter, the actual
range may be reduced, while you push the
button on the transmitter
32
33
TRANSMITTER
OPTIONAL ACCESSORY BELT CLIP
BELT CLIP ACCESSORY
BELT CLIP ACCESSORY
1) Remove the clip bracket from the rear case. Fig.1.
Fig. 1.
2) Insery the belt clip post into the clip bracket
(uward as shown) and then retighten the bolts.
Fig.1.
Rear case
Clip bracket
Bolt
Belt clip post
3)Attach the belt clip onto the belt clip post.(As
shown)Fig.2
4)When you separate the transmitter from the belt
clip, pull upward on the transmitter while pushing
downward on the locker.(As shown) Fig.2
Locker
Fig. 2.
Belt clip
34
35
ACCESSORIES
ACCESSORIES
The following items may be purchased
separately
WARRANTY
WARRANTY AND
REPAIR INFORMATION
Warranty Repair
European Charger
Designed for use with 220V AC electrical
outlets in Europe.
Field Auto Charger
Designed for use with the 12-volt cigarette
lighter in your car.
36
provides the original
purchaser a two-year limited warranty on parts and
labor from the date of the original purchase. The
warranty does not cover failure resulting from
damage, abuse or loss of parts. The warranty is void
if the unit has been altered or an unauthorized person
has attempted work.
Batteries or the labor to replace them are not
covered under warranty after the first year.
A copy of the sales receipt showing purchase
date is required before warranty work is begun.
Write a note briefly explaining the problem and
include your name, address, city/state/zip code,
daytime and evening phone numbers.
Return shipping for warranty is the owner’s
responsibility. Costs for shipping(via regular ground
service) back to the customer is covered by Dogtra
Co. within the continental United States. Any
expedited shipping service will be at the owner’s
expense.
37
REPAIR
MEMO
Ship to :
1250 E. 223rd Street, Suite 119
Carson, CA 90745
For any questions concerning your dogtra products
call us Toll Free at 1-888-811-9111.
Out of Warranty Repair
For repair work that is no longer covered by
warranty, the cost of repair will include parts,
labor and shipping. Write a note briefly
explaining the problem. Include your name,
address, city/state/zip code, daytime phone
number and evening phone number.
Send equipment to:
1250 E. 223rd Street, Suite 119
Carson, CA 90745
Tel :(310) 522 -1800
Fax :(310) 522 - 1805
Toll Free :1-888- 811-9111
38
MEMO