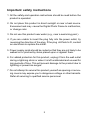
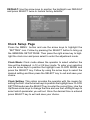
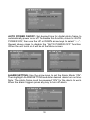
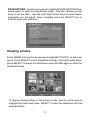
1
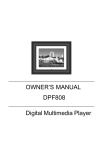
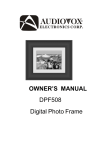
OWNER’S MANUAL
DPF701
Digital Photo Frame
Important safety instructions
1. All the safety and operation instructions should be read before the
product is operated.
2. Do not place this product in direct sunlight or near a heat source.
Excessive heat may cause the Digital Photo Frame to malfunction,
or change color.
3. Do not use this product near water (e.g., near a swimming pool ).
4. If you are unable to insert the plug fully into the power outlet, try
reversing the direction of the plug. If the plug still fails to fit, contact
an electrician to replace the outlet.
5. Power supply cords should be routed so that they are not likely to be
walked on or pinched by items placed upon or against them.
6. For added protection for this product, unplug it from the wall outlet
during a lightning storm or when it is left unattended and unused for
long periods of time. This will prevent damage to the product due to
lightning or power-line surges.
7. Do not attempt to service this product yourself as opening or removing covers may expose you to dangerous voltage or other hazards.
Refer all servicing to qualified service personnel.
2
Package Contents
QTY
Item
Image
1
Digital Picture Frame
1
Remote Control
1
AC/DC Power Adaptor
(+9V, 1A, Support 110/240VAC 50 -60Hz)
1
User Manual
Getting Started
1. Connect the AC power adapter into the digital photo frame and plug
it into a power outlet.
2. Insert your memory card with photos or music, into the memory
slot (MultiMediaCardTM/ Secure DigitalTM/ Compact FlashTM/xD
Memory CardTM/ Memory StickTM) or USB storage device into the
USB port. (Note: If no memory card is available, there are some
demo images preloaded in the internal memory*)
3. Adjust the digital photo frame stand to its extended position and
push the POWER button located on top.
* To delete preloaded images, please refer to the “Delete images from
Internal Memory” section.d
3
Photo Frame Controls and Indicators Functions
Top View
POWER LED
POWER button
PLAY/PAUSE/SELECT button
MENU button
UP/COPY/DELETE button
DOWN/ROTATE button
PREV. button
NEXT button
Right View
Left View
Volume
Control
SD/MMC/xD/
MS Card Slot
USB Port
CF Memory
Slot
Power Input
4
Remote Control Functions
Pull plastic tab from remote control to
activate. (Note: replacement battery
model #CR2025)
CLOCK: Press to cycle through clock calendar and side show.
NOTE: Only available when in slide show mode.
SOURCE: Press to select which external memory card or USB storage
device, which will be used to retrieve data for the DPF.
NOTE: Internal memory can only be accessed by removing all external
memory sources!
REPEAT: Press to switch between different repeat modes for audio playback. NOTE: Control of the repeat function is unavailable in slideshow
with MP3 mode. The slideshow with MP3 is set to the default mode Repeat all.
MENU: Press to access menu.
ZOOM: Press to enlarge photo display in pause mode.
UP or COPY/DEL: Press to move up or copy/delete in Pause mode.
LEFT/PREV or RETURN: Press to move left, or return to previous screen
in slideshow mode.
PLAY/PAUSE OR SELECT: Press to play or pause photo, or music files.
Press to make selections in menu or setting mode.
RIGHT/NEXT: Press to move right, or move to next screen in slideshow
mode.
DOWN or ROTATE: Press to advance to the next page when in thumbnail
mode, move picture down when in zoom mode.
5
Changing Settings
Press the MENU button and use the arrow keys to highlight the
“SETTING” icon. Press the SELECT button to gain access to the GENERAL SETUP PAGE. Once at the GENERAL SETUP PAGE press Select to enter the the adjustment mode.
General Setup Page
Press the MENU button and use the arrow keys to highlight the
“SETTING” icon. Press the SELECT button to gain access to the GENERAL SETUP PAGE. Once at the GENERAL SETUP PAGE press SELECT to enter the adjustment mode.
BRIGHTNESS: Use the arrow keys to position the highlight over BRIGHTNESS . Press select to enter the adjustment mode. Upon finding the
desired setting, press select to exit and save your selection.
6
SLIDESHOW TIME: Allows the user to select how long an image is
displayed in slide show mode. Use the arrow keys to position the highlight over SLIDESHOW TIME. Press SELECT to enter the selection mode.
Upon finding the desired setting, press SELECT to exit and save your
selection.
OSD LANGUAGE: Allows the user to select what the OSD LANGUAGE
will be. Use the arrow keys to position the highlight over OSD LANGUAGE.
Press SELECT to enter the selection mode. Upon finding the desired
setting, press SELECT to exit and save your selection.
SLIDE WITH MP3: Controls whether MP3 music will play during the
slide show. Option is only available for use with external memory devices. Use the arrow keys to position the highlight over SLIDE WITH
MP3. Press SELECT to enter the selection mode. Upon finding the desired setting, press SELECT to exit and save your selection.
7
PHOTO MODE: Select normal mode to display the photo in its native
format or widescreen mode to fit photos to the full width of the screen.
Option is only available for use with external memory devices.
Note: In widescreen mode, a portion of the photo may be cropped.
Use the arrow keys to position the highlight over PHOTOMODE. Press
SELECT to enter the selection mode. Upon finding the desired setting,
press SELECT to exit and save your selection.
MATTING: This feature lets you place a decorative border around the
photo displayed during slideshow. Use the arrow keys to position the
highlight over MATTING. Press SELECT to enter the selection mode.
Upon finding the desired setting, press SELECT to exit and save your
selection.
Matting Theme options:
Mode 1= Balloon
Mode 2= Beach Theme
Mode 3= Party Cake
Mode 4= Merry Christmas
Mode 5= Valentines’s Day
8
DEFAULT: Use the arrow keys to position the highlight over DEFAULT
and press SELECT twice to restore factory defaults.
Clock Setup Page
Press the MENU button and use the arrow keys to highlight the
“SETTING” icon. Follow by pressing the SELECT button to bring up
the GENERAL SETUP PAGE. Then press the right arrow key to highlight the clock icon and press select to enter the adjustment mode.
Clock Mode: Clock mode allows the operator to select whether the
time will be displayed in 12 or 24 hour mode. To enter your selection
use the arrow keys to position the highlight over CLOCK MODE and
press the SELECT key. Follow by using the arrow keys to select the
desired setting and then press the SELECT key to exit and save your
choice.
Clock Setting: This option provides the operator with the means for
setting the time. Use the arrow keys to position the highlight over CLOCK
SETTING and press the SELECT key to enter the current time. Use the
Up/Down arrow keys to change the time and use the Left/Right keys to
select which parameter you will set. Once the desired time is entered
press SELECT key to exit and save your choice.
9
AUTO POWER ON/OFF: Set desired time for digital photo frame to
automatically power on or off. To disable this function, return to “AUTO
POWER ON”, then use the UP or DOWN arrow keys to select ”-:-:-” .
Repeat above steps to disable the “AUTO POWER OFF” function.
When the unit turns on it will be at the Menu screen.
ALARM SETTING: Use the arrow keys to set the Alarm Mode “ON”.
Then highlight ALARM SETTING and enter desired alarm turn on time.
Note: The photo frame must be powered “ON” for the alarm to work.
When the alarm triggers press any key to turn off alarm.
10
DATE SETTING: Use the arrow keys to highlight DATE SETTING then
press select to enter the adjustment mode. Use the Up/Down arrow
keys to set the date. Use the Left/ Right arrow keys to select which
parameter you will adjust. Once complete press the SELECT key to
exit and save your selection.
Viewing photos
Press MENU and use the arrow keys to highlight “PHOTO” on the main
menu. Press SELECT for the slideshow to begin. During the slide show,
press SELECT to pause the slideshow, press PAUSE again to enter the
thumbnail mode.
To display desired photo in full screen mode, use the arrow keys to
highlight the photo and press SELECT to start the slideshow from the
selected photo.
11
ROTATE PHOTO: Rotates the photo 90 degrees to the right each
time the Down arrow is pressed.
COPY PHOTO INTO INTERNAL MEMORY: Press the Up Arrow in
Pause mode and follow the on-screen instructions.
Note: Function only available for copying a photo into the internal memory,
not for AUDIO.
DELETE PHOTOS FROM INTERNAL MEMORY: Press the Up Arrow and follow the on-screen instructions.
Note: Function only available for deleting photos from the internal
memory. The ZOOM and Rotate function are valid for internal memory’s
photo.
VIEWING CALENDAR/CLOCK
CALENDAR/CLOCK
This option provides the operator with the capability of selecting whether
the Calendar or Clock will be displayed on the screen. At the Menu
screen use the arrow keys to highlight the CALENDAR or the CLOCK
icon and then press the SELECT button. The Screen will display the
operator’s selection.
12
MUSIC PLAYBACK
Press MENU to access the Menu Screen, use the arrow keys to highlight the AUDIO icon. Then press SELECT. The display will list music or
audio files that reside on the external memory source as illustrated below:
Use arrow keys to select the desired audio file and press SELECT to
start playback. Use the “volume” control on the left side to adjust volume. Press REPEAT at any time to change repeat mode.
Mode options: REPEAT-ALL (play all songs continuously), REPEAT-ONE
(Repeat the same track), REPEAT-OFF (Play until the end of last track
and stop) and RANDOM (Play tracks in a shuffle mode).
TIPS FOR CLEANING AND CARE
Please power off the Digital Photo Frame before cleaning.
Do not spray or pour liquid cleaning agents directly on the screen or
frame.
Do not use ammonia, alcohol, or abrasive detergent cleaning agents.
Cleaning the screen:
1. Wipe screen with a clean, soft, lint-free cloth to remove dust and loose
particles.
2. If further cleaning is required, apply an appropriate cleaning agent (approved for LCD displays) to a clean, soft , lint-free cloth and wipe the
screen.
NOTE: Do not apply too much pressure on the screen to avoid
damaging it.
13
Specifications
Size
Aspect ratio
7”
16:9
Resolution
External Power Adapter
480*234 Pixels
+9v, 1A,Support 110/240Vac
Audio
Internal speakers
Stereo
USB Ports
Storage/Media
STD USB 2.0 Host
Internal memory
Memory cards supported
15 photos MAX
Memory cards slot 1
Memory cards slot 2
SD/MMC/MS/xD
CF
Media Files Supported
Photo file formats
JPEG
Audio file formats
User Interface/Control
MP3
Buttons at the Top of digital
photo frame
Yes
Remote control
Calendar & Clock
Yes
Yes
Design and Specifications are subject to change for product
improvement without notice.
14
Troubleshooting
Solution
Problem
Your digital picture frame
won’t turn on
A memory card is inserted
in your digital picture frame
but you cannot view your
photos.
The adapter is not securely connected
to your picture frame or the power
switch is not on.
* Make sure that the memory card
contains JPEG files. (Progressive JPEG
are not supported).
* Turn your digital picture frame off and
make sure that the memory card is
inserted all the way into the card slot
and is inserted correctly. Then turn the
frame on again.
* This device does not support flash
cards larger than 4GB.
*If some cards can not be read. You can
try to format it first. .
* Note: Some digital cameras save
images in formats other than JPEG.
Refer to your camera’s manual if your
photos are not JPEG files.
The frame displays some Higher resolution pictures load more
pictures slower and some slowly. Try using lower resolution pictures or down sampling your images.
pictures faster.
See your camera’s operating manual for
details on down sampling your photos.
15
90 DAY LIMITED WARRANTY
Applies to Audiovox Video Products
AUDIOVOX ELECTRONICS CORP. (the Company) warrants to the original retail purchaser of
this product that should this product or any part thereof, under normal use and conditions,
be proven defective in material or workmanship within 90 days from the date of original
purchase, such defect(s) will be repaired or replaced with reconditioned product (at the
Company's option) without charge for parts and repair labor. A game controller, if supplied,
is similarly warranted for ninety (90) days.
To obtain repair or replacement within the terms of this Warranty, the product is to be delivered
with proof of warranty coverage (e.g. dated bill of sale), specification of defect(s),
transportation prepaid, to the Company at the address shown below.
This Warranty does not extend to the elimination of externally generated static or noise, to
correction of antenna problems, to costs incurred for installation, removal or reinstallation of
the product, or to damage to digital memory/media devices, gaming devices, discs, speakers,
accessories, or electrical systems.
This Warranty does not apply to any product or part thereof which, in the opinion of the
Company, has suffered or been damaged through alteration, improper installation, mishandling, misuse, neglect, accident, or by removal or defacement of the factory serial number/
bar code label(s). THE EXTENT OF THE COMPANY'S LIABILITY UNDER THIS WARRANTY IS
LIMITED TO THE REPAIR OR REPLACEMENT PROVIDED ABOVE AND, IN NO EVENT, SHALL
THE COMPANY'S LIABILITY EXCEED THE PURCHASE PRICE PAID BY PURCHASER FOR THE
PRODUCT.
This Warranty is in lieu of all other express warranties or liabilities. ANY IMPLIED WARRANTIES, INCLUDING ANY IMPLIED WARRANTY OF MERCHANTABILITY, SHALL BE LIMITED TO
THE DURATION OF THIS WRITTEN WARRANTY. ANY ACTION FOR BREACH OF ANY
WARRANTY HEREUNDER INCLUDING ANY IMPLIED WARRANTY OF MERCHANTABILITY
MUST BE BROUGHT WITHIN A PERIOD OF 24 MONTHS FROM DATE OF ORIGINAL
PURCHASE. IN NO CASE SHALL THE COMPANY BE LIABLE FOR ANY CONSEQUENTIAL OR
INCIDENTAL DAMAGES FOR BREACH OF THIS OR ANY OTHER WARRANTY, EXPRESS OR
IMPLIED, WHATSOEVER. No person or representative is authorized to assume for the
Company any liability other than expressed herein in connection with the sale of this product.
Some states do not allow limitations on how long an implied warranty lasts or the exclusion
or limitation of incidental or consequential damage so the above limitations or exclusions may
not apply to you. This Warranty gives you specific legal rights and you may also have other
rights which vary from state to state.
U.S.A. : AUDIOVOX ELECTRONICS CORPORATION, 150 MARCUS BLVD, HAUPPAUGE, NEW YORK 11788
z 1-800-645-4994
CANADA : CALL 1-800-645-4994 FOR LOCATION OF WARRANTY STATION SERVING YOUR AREA
© 2007 Audiovox Electronics Corporation
128-5556G
© 2008 Audiovox Electronics Corporation
128-8471
16