1
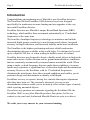
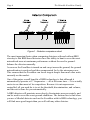
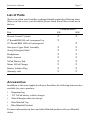
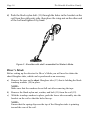
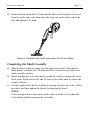
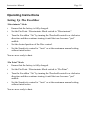
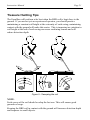
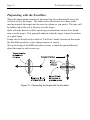
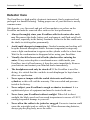
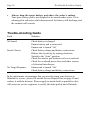
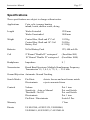
Multiple Frequency
Underwater
Treasure Hunting
Excalibur 800
Excalibur 1000
INSTRUCTION MANUAL
The Minelab Excalibur
with BBS Technology
The Minelab Excalibur
Instruction Manual
Contents
Page No.
Introduction ................................................................................................ 3
BBS Technology ........................................................................................ 4
List of Parts ............................................................................................... 6
Accessories ............................................................................................... 6
Assembling the Excalibur .......................................................................... 8
Batteries ................................................................................................... 11
The Excalibur’s Controls ......................................................................... 12
Operating Instructions .............................................................................. 18
Treasure Hunting Tips .............................................................................. 20
Environmental Concerns .......................................................................... 23
Detector Care .......................................................................................... 24
Trouble-shooting Guide ............................................................................ 25
Specifications ........................................................................................... 26
Warranty and Service .............................................................................. 27
Minelab Service Repair Form .................................................................. 28
Version 1.1
August 2001
Instruction Manual
Page 3
WARNING
THIS DOCUMENT CONTAINS
MINELAB ELECTRONICS PTY LIMITED
RIGHTS TECHNICAL DATA OR
RESTRICTED RIGHTS DATA OR BOTH.
© Minelab Electronics Pty Limited
This work is copyright. Apart from any use
as permitted under the Copyright Act 1968,
no part may be reproduced by any process
without prior written permission from
Minelab Electronics Pty Limited,
118 Hayward Avenue,
Torrensville, SA 5031,
Australia.
Since there may be a range of options available in this detector type,
equipment may vary according to the model or items ordered with your detector.
Certain descriptions and illustrations may differ (in this manual) from the exact
model that you purchased. In addition, Minelab reserve the right to respond to
ongoing technical progress by introducing changes in design, equipment and
technical features at any time.
Page 4
The Minelab Excalibur Family
Introduction
Congratulations on purchasing one of Minelab’s new Excalibur detectors.
The Excalibur 800 and Excalibur 1000 detectors have been designed
specifically for underwater treasure hunting and are upgrades to the very
successful Excalibur detector.
Excalibur detectors use Minelab’s unique Broad Band Spectrum (BBS)
technology, which enables them to transmit automatically at 17 individual
frequencies at the same time.
The benefits of multiple frequency technology are numerous and include
increased depth, greater sensitivity to non-ferrous metal objects, increased
accuracy in target indication, and increased stability under most conditions.
The Excalibur is the highest performing and most reliable underwater
discriminating detector available in the world today. It is designed to be used
up to a depth of 200 feet, or when wading in shallow water, or on land.
Excalibur detectors are designed to locate valuable metal objects in high trash
areas and in areas of either extreme salt or ground mineralization, conditions
that are commonly encountered by treasure hunters around the world. When
using a single- or dual-frequency detector under these conditions, a treasure
hunter may experience a significant loss of detection depth and discrimination
accuracy. However, the Excalibur, with its 17 individual frequencies,
eliminates the interference from these ground conditions and enables you to
penetrate deeply and discriminate accurately at full depth.
Excaliburs are easy to operate, having few controls that require adjustment
after they have been set. The extremely advanced, yet easy-to-use
discrimination features enable you to accurately select certain types of metals
while rejecting unwanted objects.
If you have any questions or comments regarding the Excalibur 800, the
Excalibur 1000, or any other Minelab product, then please feel free to
contact us via your local Authorized Minelab Dealer or write to us direct.
We wish you every success in your treasure hunting.
Instruction Manual
Page 5
BBS Technology
When developing BBS technology, Minelab’s engineers first looked at the
technology that was already available on the market and identified its
limitations in field use.
Discussions with seasoned treasure hunters from around the world identified a
number of common problems facing detector operators. These problems
included:
•
Loss of detection depth in highly mineralized ground
•
Inaccurate target identification beyond 5 or 6 inches
•
Inability to detect good targets in close proximity to iron trash
•
Erratic operation when searching salt-water beaches.
BBS circuitry allows the Excalibur to operate automatically at 17 different
frequencies simultaneously — a feature that is unique to Minelab metal
detectors.
Most detectors on the market operate on a single (or dual) frequency, ranging
from 1 to 70 kHz. Although this technology has served the industry well for
years, Minelab’s engineers found that a frequency that worked well in one area
would often offer only marginal performance when used in another location.
Ground mineralization, trash content, and target size all had an effect on how
well a detector transmitting a single frequency would operate.
The BBS circuit automatically transmits 17 frequencies simultaneously,
ranging from 1.5 to 25.5 kHz in 1.5 kHz increments. The signal received from
the coil is analyzed and information is relayed to the operator via the
headphones. Through the use of its 17 frequencies, the Excalibur is able to
find and accurately identify targets at maximum depth, regardless of the ground
conditions or trash present.
Essentially, when using an Excalibur with BBS technology, it is like swinging
17 single-frequency detectors at the same time. Because BBS operates at a
number of frequencies that no other detector does, BBS detectors such as the
Excalibur can find objects that no other detector has the ability to find.
Page 6
The Minelab Excalibur Family
Figure 1 - Detector comparison chart
The most important factor when comparing detectors with and without BBS
circuitry is that BBS-based detectors have the ability to hunt in even the most
mineralized areas at maximum performance without the need to groundbalance the detector manually.
As soon as the Excalibur is turned on and swept across the ground, the ground
mineralization is analyzed and then compensated for by the microprocessor.
This ensures that the Excalibur can locate targets deeper than most other units
currently on the market.
One of the major overall benefits of BBS technology is that although it
automatically operates at 17 frequencies — all at the same time — it is actually
easier to use than most of its competitors. Because it is microprocessor
controlled, all you need do is to set the threshold, discrimination, and volume,
and the rest is done for you automatically.
A BBS detector will penetrate more deeply, discriminate more accurately, and
can be used in even the worst ground conditions. The bottom line is that when
you use a Minelab detector such as the Excalibur with its BBS technology, you
will find more good targets than you will with any other detector.
Instruction Manual
Page 7
List of Parts
The box in which your Excalibur is shipped should contain the following items.
When you first receive your Excalibur, please check that all these items are in
the box:
Part
Excalibur model
800
1000
Electric Control Cylinder
!
8" Round BBS 800 coil (waterproof) or
!
!
!
10" Round BBS 1000 coil (waterproof)
One-piece Upper Shaft Assembly
!
!
(Long) Fiberglass Shaft
!
!
Headphones
!
!
Black Armrest
!
!
NiCad Battery Pod
!
!
Mains NiCad Charger
!
!
Battery Adaptor Plug
!
!
Warranty card
!
!
Accessories
In addition to the items supplied with your Excalibur, the following items are also
available for you to purchase.
•
•
•
•
•
Hipmount bag
12V NiCad battery vehicle charger
Short Fiberglass tube (for diving)
Blue Minelab Cap
Blue Minelab Poloshirt
For more information on these and other Minelab products call your Minelab
dealer.
Page 8
The Minelab Excalibur Family
Figure 2 - Excalibur exploded view
Instruction Manual
Page 9
Assembling the Excalibur
Please follow these simple instructions to assemble your new Excalibur. Refer
to the drawings to identify parts and how they are positioned. If you have any
difficulties, call your dealer for more instructions.
Armrest / Upper Shaft Assembly
a)
Remove the black nylon bolt and nut (2) from the armrest (1).
b) With the armrest’s larger fins pointing in the same direction as the foam
handgrip (4), slide the armrest (1) onto the end of the upper metal shaft
(3).
c)
Push the nylon bolt (2) through the holes and tighten the wing-nut by hand.
d) The control cylinder (5) and battery pod (6) should already be clipped onto
the upper shaft. If not, then first clip the control cylinder onto the shaft.
Ensure that the headphone cable (7) is pointing toward the armrest.
e)
Clip the battery pod onto the shaft, ensuring that the plug (8) is facing
away from the armrest.
f)
Connect the battery cable from the control cylinder to the battery pod. The
connection uses a water exclusion seal that needs to be firmly tightened by
hand, otherwise water may enter the connection causing instability and
corrosion of contacts, and voiding the warranty.
Land and Wader’s Mode
a)
Remove the tape on the long fiberglass tube (9) that is holding the black
teardrop washers (10) in place.
NOTE:
Make sure that the washers do not fall out after removing the tape.
b) Remove the black nylon nut, washer, and bolt (11) from the coil (12).
c)
With the teardrop washers in place, push the lower tube assembly into
the bracket on the coil so that the holes line up.
NOTE:
Ensure that the spring clip near the top of the fiberglass tube is pointing
toward the rear of the coil.
Page 10
The Minelab Excalibur Family
d) Push the black nylon bolt (11) through the holes in the bracket on the
coil from the cable entry side, then place the wing-nut on the other end
of the bolt and tighten it by hand.
Figure 3 - Excalibur with shaft assembled for Wader’s Mode
Diver’s Mode
Before setting up the detector for Diver’s Mode you will need to obtain the
short fiberglass tube, which can be purchased as an accessory.
a)
Remove the tape on the short fiberglass tube (13) that is holding the black
teardrop washers (10) in place.
NOTE:
Make sure that the washers do not fall out after removing the tape.
b) Remove the black nylon nut, washer, and bolt (11) from the coil (12).
c)
With the teardrop washers in place, push the lower tube assembly into the
bracket on the coil so that the holes line up.
NOTE:
Ensure that the spring clip near the top of the fiberglass tube is pointing
toward the rear of the coil.
Instruction Manual
Page 11
d) Push the black nylon bolt (11) through the holes in the bracket on the coil
from the cable entry side, then place the wing-nut on the other end of the
bolt and tighten it by hand.
Figure 4 - Excalibur with shaft assembled for Diver’s Mode
Completing the Shaft Assembly
a)
Slide the lower shaft assembly into the upper metal shaft. Note that the
black plastic twistlock nut (14) may need to be loosened to get the lower
shaft assembly in place.
b) Begin winding the coil cable firmly around the shaft by rotating the lower
black stem. Wind between 25 and 28 turns of the cable until it reaches the
control cylinder.
c)
Set the length of the shaft by locking the spring clip into one of the 3 holes
provided, and then tighten the plastic locking ring by hand.
NOTE:
Leave enough slack at the bottom of the cable near the coil to adjust the
coil position without straining the coil cable.
Page 12
The Minelab Excalibur Family
Batteries
Excalibur detectors are all supplied with a battery pod which contains a
rechargeable battery pack.
Under most circumstances the battery pack can be used and recharged without
ever removing it from the battery pod.
Extra battery pods are available for purchase from your Minelab dealer and can
be carried while detecting, thus ensuring that no loss of detecting time occurs if
your battery goes flat.
NOTE:
Spare battery pods should not be taken underwater as they will discharge and
the battery terminals will corrode.
When the battery pod has reached the point at which it will no longer operate
the Excalibur, threshold instability will occur and it is recommended that the
battery pod be recharged or changed to avoid missing targets.
Charging the Batteries
a)
To recharge the battery, unplug and remove the battery pod from the main
shaft and connect it to the charger, using the supplied adaptor.
b) Plug the charger into the power socket and leave charging for 12–14 hours.
c)
Before using your Excalibur for the first time, you should charge the
battery for 12–14 hours in order to ensure peak performance in the field.
d) It is not necessary to completely discharge or flatten the battery every time
before recharging. However, we do recommend that this is done
periodically to prolong battery life.
e)
A fully charged battery pod should provide you with 10–15 hours of
detecting time.
Instruction Manual
Page 13
The Excalibur’s Controls
This section gives detailed descriptions of the Excalibur’s controls and their
functionality. It is important that you read through this section carefully as it
will provide you with all the information required to set and adjust these
controls. As you gain experience with your detector it may be beneficial to
refer back to this section.
Figure 5 – The Excalibur Control Panel
Threshold Control and On / Off Switch
The Threshold control allows you to adjust the level of
background threshold in addition to switching the Excalibur
“On” or “Off”. When in the fully anti-clockwise position,
the Excalibur is “Off”. Turn the control clockwise and the
Excalibur will “click” “On”. The background Threshold or
“Hum” aids in the location of targets.
Small or large, deep targets may not produce a distinct target signal but rather
cause only a slight change in the Threshold tone.
Ideally, this control should be set to a position where the Threshold tone is
“just” audible. At this level, the presence of these small or deep targets will be
more easily recognized.
Turning the Threshold control in a clockwise direction, the Threshold level will
increase. At the most clockwise setting, the Threshold is at its “maximum”.
Once again, it is advisable to set this threshold to a level that is “just” audible.
A Threshold level that is too high will “mask” out the small or deep targets,
while a “silent” or non-audible Threshold level will not allow the small change
in Threshold tone created by small or deep targets to be heard.
Page 14
The Minelab Excalibur Family
Volume Control
This control is used to adjust a target’s signal volume.
As you turn this control in a clockwise direction, the
volume of target signals will increase.
At the most clockwise position, the volume is set at the
“maximum”, i.e. loudest, position.
Sensitivity Control
The Sensitivity control allows you to adjust the level of
sensitivity to suit the ground conditions in which you are
detecting. It is often thought of in terms of a depth control
and it is, to a point, but it also makes the unit more or less
sensitive to interference caused by such things as ground
chemistry “mineralization”, or electrical fields.
At the most anti-clockwise position this control “clicks” into the “Auto”
position. In this setting the Excalibur will automatically select its optimum
level of sensitivity to suit the conditions being worked.
When detecting at the beach, set the Sensitivity to the “Auto” position when on
wet sand, or concentrated black sand, or in the water.
Turning the control clockwise will “click” the Excalibur out of the “Auto”
setting into manual sensitivity. As you continue to turn this control in a
clockwise direction the level of sensitivity will reduce. At the most clockwise
position, the Excalibur is at “minimum” sensitivity.
When not in the “Auto” position, the Sensitivity control should be set to the
maximum manual position without registering interference from ground
minerals or electrical interference. If ground minerals or electrical interference
become too high, the Excalibur will produce a number of erratic signals. If this
occurs, simply turn the Sensitivity control in a clockwise direction until these
erratic signals disappear.
Instruction Manual
Page 15
Discriminate / Pin Point Mode Switch
This switch selects either “Discriminate” or “Pin Point”
mode.
In “Discriminate” mode, the Discriminate (Disc) control
becomes active. This control can be used to ignore various
unwanted metal objects.
Metal objects fall into two broad categories: ferrous and
non-ferrous. A magnet can be used to determine if an object is a ferrous or
non-ferrous metal; ferrous metals will be attracted to the magnet while nonferrous metals will not. Generally while detecting, ferrous objects such as iron
and steel are not wanted, whereas the more valuable non-ferrous metals such as
gold, silver, and bronze are wanted.
In the “Discriminate” mode of operation and with the Disc control set to 1, the
Excalibur will ignore or “mask out” ferrous metal objects while still accepting
non-ferrous metal objects. In addition, target signals from non-ferrous objects
will vary depending upon their level of conductivity.
Effectively this allows you to identify the type of object detected before
recovering it from the ground. By way of example, a US quarter or Australian
$1 coin will produce a high pitch signal, whereas aluminum foil will produce a
low pitch signal. Pull-tabs, rings, and certain coins will produce an
intermediate pitch depending upon the object’s conductivity. The higher an
object’s conductivity, the higher the signal tone will be.
Additionally, in “Discriminate” mode, when the Excalibur detects a ferrous or
rejected non-ferrous object, the background threshold tone will momentarily
disappear and then return again at a pitch similar to the ignored signal. A
ferrous object will cause the returning threshold pitch to be much lower than
normal, while a pull-tab that is being ignored will cause the returning threshold
pitch to be higher than normal.
When in “Discriminate” mode, if the Excalibur produces a high-pitched rapidly
pulsing sound, the detector is being overloaded by a substantially large piece of
metal close to the coil. Raise the coil slightly above the ground and pass it over
the area again to check the target. By lifting the coil away from the ground, it
enables the Excalibur to analyze the object detected accurately.
Page 16
The Minelab Excalibur Family
In “Pin Point” mode, the Excalibur will detect both ferrous and non-ferrous
objects. In this mode the Disc control has no effect and the Excalibur will
respond in the same way to all types of metal. This mode is ideal for target
pinpointing as the target signal response is fast and sharp.
“Pin Point” mode is also useful if you are searching for ferrous targets such as
relics.
Discriminate Control
The Discriminate (Disc) control is used when operating in
“Discriminate” mode to select which unwanted non-ferrous
metal targets are to be “discriminated” or ignored.
If the Disc control is set to the most anti-clockwise position,
the Excalibur will not produce a “signal beep” from ferrous
metals. (Large ferrous objects may produce short “pops” or
“clicks”.) However, non-ferrous objects will give a “signal
beep” or be “accepted”.
Typical ferrous objects encountered by treasure hunters are nails, screws,
washers, bits of wire, etc. These objects are generally not considered to be of
value, so it is a distinct advantage to be able to ignore them while detecting.
Objects that will cause the Excalibur to produce a “signal beep” will be nonferrous metals, including such items as aluminum foil, most jewelry, pull-tabs,
coins, bottle tops, gold, silver, brass, etc.
Not all of these non-ferrous objects are considered valuable. Therefore, by
using the Disc control, the Excalibur can be adjusted to ignore some of the less
valuable non-ferrous objects while still locating the more valuable targets.
The Disc control is a one-turn pot with 17 graduations. As you turn the Disc
control clockwise and increase the “discrimination” level, non-ferrous objects
of lower conductivity will be ignored.
The Excalibur uses the electrical conductivity of the object to determine the
type of metal detected and, based upon the Disc control setting, will either
ignore or accept the object. The most effective way to demonstrate this is to
consider a number of objects, all of varying conductivity, placed in a line on
the ground. As you move from left to right, the objects increase in conductivity.
Instruction Manual
Page 17
Figure 6 - Target conductivity
As you turn the Disc control more clockwise, objects with greater conductivity
will be ignored. Imagine if you turn the Disc control to approximately position
11 to ignore the pull-tab. (Pull-tabs are made from various metallic alloys, thus
their conductivity can vary. Disc control positions for pull-tabs may therefore
range between 11 and 15.) Making this adjustment will mean that all objects
having a similar or lower conductivity than the pull-tab will be ignored while
objects of higher conductivity are still accepted, as shown in Figure 7.
Figure 7 - Discriminating targets based on conductivity
Figure 8 shows some common objects and where the Disc control has to be set
to ignore them.
As a general rule, the two objects treasure hunters most commonly wish to
ignore are aluminum foil and pull-tabs. As can be seen in Figure 8, these
objects both cover a significant range on the Disc control. Setting the Disc
control “high” to eliminate all unwanted items will cause you to ignore a large
range of valuable items. We recommend that you only discriminate the most
common trash items, accepting the occasional unwanted target.
Page 18
The Minelab Excalibur Family
Figure 8 - Discriminate control examples
The Disc control setting must be relative to the types of objects that you wish
to hunt for and the amount of trash that you are prepared to detect. For
example, if you are hunting for fine white gold rings and set the Disc control to
position 4, you will also find some types of aluminum foil. If you do not want
to dig old bottle caps but do want to dig brass buttons and copper coins, the
Disc control is set higher (approximately at number 13), but most fine white
gold rings, foil, and some yellow gold rings will also be ignored.
With experience, setting the Disc control will become second nature, and you
will be able to skillfully set this control to ignore most targets you do not want.
Instruction Manual
Page 19
Operating Instructions
Setting Up The Excalibur
“Discriminate” Mode
•
Ensure that the battery is fully charged.
•
Set the Pin Point / Discriminate Mode switch to “Discriminate”.
•
Turn the Excalibur “On” by turning the Threshold control in a clockwise
direction and then continue turning it until the tone becomes “just”
audible.
•
Set the desired position of the Disc control.
•
Set the Sensitivity control to “Auto” or at the maximum manual setting
without interference.
You are now ready to hunt.
“Pin Point” Mode
•
Ensure that the battery is fully charged.
•
Set the Pin Point / Discriminate Mode switch to “Pin Point”.
•
Turn the Excalibur “On” by turning the Threshold control in a clockwise
direction and then continue turning it until the tone becomes “just”
audible.
•
Set the Sensitivity control to “Auto” or at the maximum manual setting
without interference.
You are now ready to hunt.
Page 20
The Minelab Excalibur Family
Practicing the Controls
We suggest you first take some time to become familiar with how your
Excalibur responds to various metal objects.
Gather a collection of different metal objects such as a rusted nail, pull-tab,
brass button, aluminum foil, various coins, and some gold and silver jewelry.
Take the unit outside, away from known electrical devices or metal objects and
support the Excalibur so that objects can easily be moved past the coil. Ideally,
sit it on a wooden table away from nails and hinges. Then remove all jewelry
from your hands and wrists.
Ensure that the Mode Switch is in “Discriminate”.
Turn the Disc control to the most anti-clockwise position.
Turn the Sensitivity control to “maximum”, the most anti-clockwise position
without clicking into “Auto”. If excessive interference is encountered, turn the
Sensitivity control clockwise until this disappears.
One at a time, pass the test objects across the coil. The Excalibur should
“beep” on the non-ferrous objects and ignore ferrous objects.
Take note that as you pass the ferrous nail over the coil the threshold tone
disappears. As the threshold tone returns it will have a lower than normal pitch,
indicating the object ignored was ferrous.
Passing different non-ferrous objects over the coil will produce different signal
tones. Objects with high conductivity, such as silver or lead, will produce a
high-pitched signal tone while objects with lower conductivity, such as
aluminum foil, will produce a low-pitched signal tone. With experience you
will be able to use the signal pitch from an object to accurately determine the
type of object you have found before recovering it from the ground.
Now turn the Disc control progressively clockwise in steps and pass the objects
over the coil. Take note of when certain objects are rejected, this will enable
you to more accurately discriminate these objects in the field.
Turn the Disc control to the position where it ignores the pull-tab. Passing
objects with lower conductivity (such as the aluminum foil) over the coil will
not produce a signal. Take note of the threshold tone as it disappears and then
returns. It should return at a slightly higher pitch than normal. This indicates
that the Excalibur ignored a non-ferrous object.
Instruction Manual
Page 21
Treasure Hunting Tips
The Excalibur will perform at its best when the BBS coil is kept close to the
ground. If you are not yet an experienced operator, you should practice
maintaining a constant coil height at the extremity of each swing; maintaining
contact with the ground will make this easier. This is important as variation in
coil height at the end of each swing can cause confusing sounds and will
reduce detection depth.
Figure 9 - Sweeping the coil
NOTE:
Each sweep of the coil should overlap the last one. This will ensure good
ground coverage.
Keeping the BBS coil in contact with the ground will increase detection depth
and response to small objects.
Page 22
The Minelab Excalibur Family
Pinpointing with the Excalibur
When the approximate location of the target has been determined, move the
coil slowly over the target. The audio tone will increase in volume while
moving towards the target and decrease in volume as you pass it. The tone will
be loudest when the coil is directly over the target.
Quite often the detector will be producing its maximum volume for a broad
area over the target. This generally indicates that the target is near the surface
or is quite large.
It may also be beneficial to switch to “Pin Point” mode, because in this mode
the Excalibur produces a fast, sharp response to targets.
The open design of the BBS coil makes it easy to mark the ground directly
about the target to aid its recovery.
Figure 10 - Pinpointing the target with the Excalibur
Instruction Manual
Page 23
Digging the Object
Once you have pinpointed the target, clear away the surface material and check
again for the signal. If there is no signal then the target is amongst the surface
material. In this case search the area until you have located the target.
However, if the signal is still there, remove a few inches of soil or sand off the
surface of the ground. If the target is not visible, sweep the coil over the hole
again. The signal should still be there, so continue to dig.
Take care how you dig because a swift blow to an object with a pick could
deface a valuable coin or split a piece of gold in two.
If the object is not clearly visible you may need to scan the soil that has been
dug up, so be sure to pile the soil carefully while digging. There are two
methods of scanning this soil.
1.
Spread out the soil and then sweep the coil over it to locate the target.
(Be sure that there is no object buried in the ground beneath the soil.)
2.
Lay the coil on its side near the hole. Pick up a handful of soil from the
pile and pass it across the coil. If there is no signal then place the soil in a
second pile away from the first and grab another handful of soil. Continue
this process until you receive a signal; the target is now in your hand. Sift
through the soil until the object is located.
Once the target has been recovered it is a good idea to run the detector over the
hole again to make sure that there are no other targets to be found.
When you have recovered all targets from the hole, remember to refill it. Once
a target has been found, there is a high chance that more targets are close by, so
it is advisable to search the surrounding area extremely carefully
Once again, always remember to refill your holes.
Page 24
The Minelab Excalibur Family
Environmental Concerns
It should be pointed out that treasure hunting with a metal detector is the most
environmentally friendly way to recover coins, rings, and other treasure items.
However, it is important to leave an area that you have searched in the same
condition as you found it.
All holes that have been dug must be properly refilled. Not only is it
environmentally unacceptable to not fill in your holes, it is also very
dangerous. There are special tools that enable you to recover targets easily
from grassed areas without digging large holes.
Take away and properly dispose of any junk that you find or produce, such as
nails, tin cans, or flat batteries. Leaving an area “scarred” can result in action
being taken to prevent the use of metal detectors, which spoils this fascinating
hobby for others as well as you.
Instruction Manual
Page 25
Detector Care
The Excalibur is a high-quality electronic instrument, finely engineered and
packaged in a durable housing. Taking proper care of your detector is mostly
common sense.
Salt deposits, very fine sand, and grit will accumulate everywhere on the
Excalibur and must be removed after each use for best performance.
•
Always thoroughly rinse your Excalibur with fresh water after each
use. Disconnect the shafts, battery pod, and armrest, and flush out all salt
and sand, especially in the battery terminals. Failure to do this could cause
the shafts to stick together permanently.
•
Avoid rapid changes in temperature. Gradual warming and cooling will
keep the internal atmosphere stable. Extreme temperature swings may
cause a light condensation to appear on the cylinder walls for a short time.
Wait for the condensation to disappear before using your Excalibur.
•
Visually check the lower end of both cylinders after entering the
water. If any water droplets or condensation are visible inside your
Excalibur, turn it off and remove it from the water immediately. Remove
your batteries and contact your Minelab dealer immediately.
•
The headphones need only be rinsed off. If the Excalibur is used for
diving, it is critical that the vent hole in each diaphragm be kept clean to
allow ear equalization.
•
Never open or tamper with the sealed electronics and battery
cylinders, as this will void the warranty. This was sealed and pressuretested at the factory.
•
Never subject your Excalibur to rough or abusive treatment. It is a
sophisticated piece of equipment and must be treated with care.
•
Never leave your Excalibur in direct sunlight. When left in direct
sunlight, the black search coil can reach temperatures in excess of 150°C,
causing irreparable damage to your coil.
•
Never allow the cables to be jerked or snagged. Excessive tension could
cause the watertight seals or cable to fail. When disconnecting batteries,
always grip the plug body, never the cable.
Page 26
•
The Minelab Excalibur Family
Always keep the spare battery pod above the water’s surface.
Your spare battery pod is not designed to be carried under water. If it is
submerged in salt water while disconnected, the battery will discharge and
the contacts will corrode.
Trouble-shooting Guide
Fault
Solution
No Sound
Check battery is charged
Ensure battery pod is connected
Ensure unit is turned “On”
Erratic Noises
Check battery charge and battery connections
Reduce the sensitivity by turning clockwise
Switch to the “Auto” position
Check for sand or grit between coil cover and coil
Check for overhead power lines and other sources
of electrical interference
No Target Response
Ensure unit is turned “On”
Check battery charge and battery connections
In the unfortunate circumstance that you need to return your detector to
Minelab for service, please fill out the Service Repair Form on page 28 and
enclose it with the detector. Please supply as much detail as possible as this
will assist our service engineers to rectify the fault quickly and efficiently.
Instruction Manual
Page 27
Specifications
These specifications are subject to change without notice.
Applications
Coin, relic, treasure hunting
inland, beach, shallow water, diving
Length
Wader Extended
Wader Unextended
1220 mm
1040 mm
Weight
Control Box, Shaft and 8" Coil
Control Box, Shaft and 10" Coil
Battery Pod
1.83 Kg
2.05 Kg
0.31 Kg
Batteries
NiCad Battery Pack
12V, 600 mA/Hr
Coil
8" Round “Double D” waterproof
10" Round “Double D” waterproof
(Excalibur 800)
(Excalibur 1000)
Headphones
Impedance
8Ω
Transmission
Broad Band Spectrum: Multiple Simultaneous Frequency
Transmission 1.5, 3, 4.5, 6, 7.5, 9, … 25.5 kHz
Ground Rejection Automatic Ground Tracking
Search Modes
Pin Point:
Discriminate:
Controls
Volume
Sensitivity Auto or Manual
Threshold / On Off
Discriminate
Pin Point / Discriminate
Warranty
Patents
detects ferrous and non-ferrous metals
rejects unwanted items
Pot. 1 turn
Pot. and Switch
Pot. and Switch
Pot. 1 turn
Switch 2 Pos.
1 Year
US 4942360, AUS593139, US4890064,
US4894618, AUS595835, CAN1260146
Page 28
The Minelab Excalibur Family
Warranty and Service
There is a one-year parts and labour warranty for the electronic control box of
the Excalibur. Refer to your Warranty Card for more details. The BBS coil is
warranted for one year. Refer to your supplier or Minelab for service, either in
or out of warranty.
NOTE:
This warranty is not transferable, nor is it valid unless the enclosed warranty
registration card is returned to Minelab Electronics Pty Ltd or an authorized
Minelab Electronics Pty Limited regional distributor within 14 days of the
original date of purchase.
The Minelab warranty does not cover damage caused by accident, misuse,
neglect, alteration, modifications, or unauthorised service. For specific details
of the Minelab warranty, refer to the machine’s “Product Warranty Card”.
Instruction Manual
Page 29
Minelab Service Repair Form
Today’s Date: ...........................................................
Detector Model: .............................................. Serial No.: .................................
Purchased From: .................................................................................................
Purchase Date: .........................................................
Faulty Part(s): .....................................................................................................
............................................................................................................................
Description of Fault: ...........................................................................................
............................................................................................................................
............................................................................................................................
............................................................................................................................
............................................................................................................................
Owner’s Name: ...................................................................................................
Address: ..............................................................................................................
............................................................................................................................
Phone: Day (
Fax: (
) ........................................ Home (
) ...............................
) ....................................................... Email: ....................................