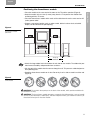
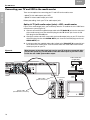
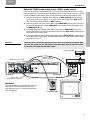
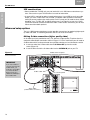
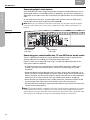
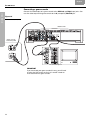
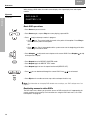
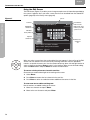
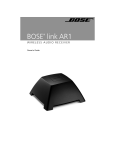
1
3•2•1 GSX DVD HOME ENTERTAINMENT SYSTEM 2ZQHU¶V*XLGH Français Español English SAFETY INFORMATION Please read this owner’s guide Please take the time to follow this owner’s guide carefully. It will help you set up and operate your system properly, and enjoy all of its advanced features. Save your owner’s guide for future reference. WARNING: To reduce the risk of fire or electric shock, do not expose the system to rain or moisture. WARNING: This apparatus shall not be exposed to dripping or splashing, and objects filled with liquids, such as vases, shall not be placed on the apparatus. As with any electronic products, use care not to spill liquids in any part of the system. Liquids can cause a failure and/or a fire hazard. The CAUTION marks shown here are located on the bottom of your 3•2•1 GSX home entertainment system media center and the rear panel of the Acoustimass module: The lightning flash with arrowhead symbol, within an equilateral triangle, alerts the user to the presence of uninsulated dangerous voltage within the system enclosure that may be of sufficient magnitude to constitute a risk of electric shock. The exclamation point within an equilateral triangle alerts the user to the presence of important operating and maintenance instructions in this owner’s guide. CAUTION: To prevent electric shock, match wide blade of plug to wide slot, insert fully. CAUTION: No naked flame sources, such as lighted candles, should be placed on the apparatus. Class 1 laser product CLASS 1 KLASSE 1 LUOKAN 1 KLASS 1 LASER LASER LASER LASER PRODUCT PRODUKT LAITE APPARAT The DVD player within the media center is classified as a CLASS 1 LASER PRODUCT according to EN60825-1:1994 + A1+A2, IEC60825-1:1993+A1+A2. CAUTION: Use of controls or adjustments or performance of procedures other than those specified herein may result in hazardous radiation exposure. The DVD player should not be adjusted or repaired by anyone except properly qualified service personnel. Class B emissions limits This Class B digital apparatus meets all requirements of the Canadian Interference-Causing Equipment Regulations. Batteries Please dispose of used batteries properly, following any local regulations. Do not incinerate. Additional safety information See the additional instructions on the Important Safety Information sheet enclosed in the shipping carton. %RVH&RUSRUDWLRQ1RSDUWRIWKLVZRUNPD\EHUHSURGXFHGPRGLILHGGLVWULEXWHGRURWKHUZLVHXVHGZLWKRXWSULRUZULWWHQSHUPLVVLRQ 7KHGLVWLQFWLYHGHVLJQRIWKHPHGLDFHQWHULVDOVRDUHJLVWHUHGWUDGHPDUNRI%RVH&RUSRUDWLRQ 0DQXIDFWXUHGXQGHUOLFHQVHIURP'ROE\/DERUDWRULHV³'ROE\´DQGWKHGRXEOH'V\PERODUHWUDGHPDUNVRI'ROE\/DERUDWRULHV&RQILGHQWLDO8QSXEOLVKHG :RUNV'ROE\/DERUDWRULHV$OOULJKWVUHVHUYHG 7KLVSURGXFWFRQWDLQVRQHRUPRUHSURJUDPVSURWHFWHGXQGHULQWHUQDWLRQDODQG86FRS\ULJKWODZVDVXQSXEOLVKHGZRUNV7KH\DUHFRQILGHQWLDODQGSUR SULHWDU\WR'ROE\/DERUDWRULHV7KHLUUHSURGXFWLRQRUGLVFORVXUHLQZKROHRULQSDUWRUWKHSURGXFWLRQRIGHULYDWLYHZRUNVWKHUHIURPZLWKRXWWKHH[SUHVVSHU PLVVLRQRI'ROE\/DERUDWRULHVLVSURKLELWHG&RS\ULJKWE\'ROE\/DERUDWRULHV,QF$OOULJKWVUHVHUYHG 03(*/D\HUDXGLRFRPSUHVVLRQWHFKQRORJ\OLFHQVHGE\)UDXQKRIHU,,6DQG7+20621PXOWLPHGLD ³'76´DQG³'76'LJLWDO6XUURXQG´DUHUHJLVWHUHGWUDGHPDUNVRI'LJLWDO7KHDWHU6\VWHPV,QF 2 English Español Français CONTENTS CONTENTS INTRODUCTION 5 SYSTEM SETUP 8 SYSTEM CONTROLS AND INDICATORS 26 OPERATION 35 CHANGING SOURCE SETTINGS 48 CHANGING SYSTEM OPTIONS 53 MAINTAINING YOUR SYSTEM 64 TROUBLESHOOTING 66 INTRODUCTION 5 Before you begin . . . . . . . . . . . . . . . . . . . . . . . . . . . . . . . . . . . . . . . . . . . . . . . . . . . . . . . . . . . . . . . . . . . . . . . . . . . . . System features . . . . . . . . . . . . . . . . . . . . . . . . . . . . . . . . . . . . . . . . . . . . . . . . . . . . . . . . . . . . . . . . . . . . . . . . . . . . . . Introducing the uMusic™ intelligent playback system . . . . . . . . . . . . . . . . . . . . . . . . . . . . . . . . . . . . . . . . . . . . . . . . . Checking for region code compatibility . . . . . . . . . . . . . . . . . . . . . . . . . . . . . . . . . . . . . . . . . . . . . . . . . . . . . . . . . . . . Selecting compatible discs . . . . . . . . . . . . . . . . . . . . . . . . . . . . . . . . . . . . . . . . . . . . . . . . . . . . . . . . . . . . . . . . . . . . . Glossary of terms . . . . . . . . . . . . . . . . . . . . . . . . . . . . . . . . . . . . . . . . . . . . . . . . . . . . . . . . . . . . . . . . . . . . . . . . . . . . . Limited warranty . . . . . . . . . . . . . . . . . . . . . . . . . . . . . . . . . . . . . . . . . . . . . . . . . . . . . . . . . . . . . . . . . . . . . . . . . . . . . . SYSTEM SETUP 5 5 5 5 6 6 7 8 Unpacking . . . . . . . . . . . . . . . . . . . . . . . . . . . . . . . . . . . . . . . . . . . . . . . . . . . . . . . . . . . . . . . . . . . . . . . . . . . . . . . . . . Selecting locations for your 3•2•1 GSX system components . . . . . . . . . . . . . . . . . . . . . . . . . . . . . . . . . . . . . . . . . . . Positioning the media center . . . . . . . . . . . . . . . . . . . . . . . . . . . . . . . . . . . . . . . . . . . . . . . . . . . . . . . . . . . . . . . Positioning the speakers . . . . . . . . . . . . . . . . . . . . . . . . . . . . . . . . . . . . . . . . . . . . . . . . . . . . . . . . . . . . . . . . . . Positioning the Acoustimass® module . . . . . . . . . . . . . . . . . . . . . . . . . . . . . . . . . . . . . . . . . . . . . . . . . . . . . . . . Making system connections . . . . . . . . . . . . . . . . . . . . . . . . . . . . . . . . . . . . . . . . . . . . . . . . . . . . . . . . . . . . . . . . . . . . Connecting the Acoustimass module to the media center . . . . . . . . . . . . . . . . . . . . . . . . . . . . . . . . . . . . . . . . Connecting the speakers to the Acoustimass module . . . . . . . . . . . . . . . . . . . . . . . . . . . . . . . . . . . . . . . . . . . Connecting the supplied antennas . . . . . . . . . . . . . . . . . . . . . . . . . . . . . . . . . . . . . . . . . . . . . . . . . . . . . . . . . . . Connecting cable FM radio . . . . . . . . . . . . . . . . . . . . . . . . . . . . . . . . . . . . . . . . . . . . . . . . . . . . . . . . . . . . . . . . Connecting your TV to the media center . . . . . . . . . . . . . . . . . . . . . . . . . . . . . . . . . . . . . . . . . . . . . . . . . . . . . . . . . . . Making audio connections . . . . . . . . . . . . . . . . . . . . . . . . . . . . . . . . . . . . . . . . . . . . . . . . . . . . . . . . . . . . . . . . . Making composite video connections . . . . . . . . . . . . . . . . . . . . . . . . . . . . . . . . . . . . . . . . . . . . . . . . . . . . . . . . Connecting your TV and VCR to the media center . . . . . . . . . . . . . . . . . . . . . . . . . . . . . . . . . . . . . . . . . . . . . . . . . . . Option A: TV (with audio output jacks) + VCR + media center . . . . . . . . . . . . . . . . . . . . . . . . . . . . . . . . . . . . . Option B: TV (NO audio output jacks) + VCR + media center . . . . . . . . . . . . . . . . . . . . . . . . . . . . . . . . . . . . . . VCR considerations . . . . . . . . . . . . . . . . . . . . . . . . . . . . . . . . . . . . . . . . . . . . . . . . . . . . . . . . . . . . . . . . . . . . . . Advanced setup options . . . . . . . . . . . . . . . . . . . . . . . . . . . . . . . . . . . . . . . . . . . . . . . . . . . . . . . . . . . . . . . . . . . . . . . Making S-video connections (higher quality video) . . . . . . . . . . . . . . . . . . . . . . . . . . . . . . . . . . . . . . . . . . . . . . Making component video connections (highest quality video) . . . . . . . . . . . . . . . . . . . . . . . . . . . . . . . . . . . . . Connecting digital audio devices . . . . . . . . . . . . . . . . . . . . . . . . . . . . . . . . . . . . . . . . . . . . . . . . . . . . . . . . . . . . Connecting your cable/satellite box, TV, and VCR to the media center . . . . . . . . . . . . . . . . . . . . . . . . . . . . . . Connecting a game console . . . . . . . . . . . . . . . . . . . . . . . . . . . . . . . . . . . . . . . . . . . . . . . . . . . . . . . . . . . . . . . . Installing the remote control batteries . . . . . . . . . . . . . . . . . . . . . . . . . . . . . . . . . . . . . . . . . . . . . . . . . . . . . . . . . . . . . Connecting the power cord . . . . . . . . . . . . . . . . . . . . . . . . . . . . . . . . . . . . . . . . . . . . . . . . . . . . . . . . . . . . . . . . . . . . . Verifying your system setup . . . . . . . . . . . . . . . . . . . . . . . . . . . . . . . . . . . . . . . . . . . . . . . . . . . . . . . . . . . . . . . . . . . . . SYSTEM CONTROLS AND INDICATORS 8 9 9 10 11 12 12 12 14 14 15 15 15 16 16 17 18 18 18 19 20 20 22 23 24 25 26 Remote control . . . . . . . . . . . . . . . . . . . . . . . . . . . . . . . . . . . . . . . . . . . . . . . . . . . . . . . . . . . . . . . . . . . . . . . . . . . . . . . Setting up your remote to control other audio/video devices . . . . . . . . . . . . . . . . . . . . . . . . . . . . . . . . . . . . . . . . . . . Direct entry of a device code . . . . . . . . . . . . . . . . . . . . . . . . . . . . . . . . . . . . . . . . . . . . . . . . . . . . . . . . . . . . . . . Searching for a device code . . . . . . . . . . . . . . . . . . . . . . . . . . . . . . . . . . . . . . . . . . . . . . . . . . . . . . . . . . . . . . . . Verifying an entered device code . . . . . . . . . . . . . . . . . . . . . . . . . . . . . . . . . . . . . . . . . . . . . . . . . . . . . . . . . . . . Changing channel selection control . . . . . . . . . . . . . . . . . . . . . . . . . . . . . . . . . . . . . . . . . . . . . . . . . . . . . . . . . . . . . . . Media center . . . . . . . . . . . . . . . . . . . . . . . . . . . . . . . . . . . . . . . . . . . . . . . . . . . . . . . . . . . . . . . . . . . . . . . . . . . . . . . . 26 30 30 31 33 33 34 3 Français Español English OPERATION 35 Turning your system on and off . . . . . . . . . . . . . . . . . . . . . . . . . . . . . . . . . . . . . . . . . . . . . . . . . . . . . . . . . . . . . . . . . . Playing video DVDs . . . . . . . . . . . . . . . . . . . . . . . . . . . . . . . . . . . . . . . . . . . . . . . . . . . . . . . . . . . . . . . . . . . . . . . . . . . Basic DVD operations . . . . . . . . . . . . . . . . . . . . . . . . . . . . . . . . . . . . . . . . . . . . . . . . . . . . . . . . . . . . . . . . . . . . Restricting access to video DVDs . . . . . . . . . . . . . . . . . . . . . . . . . . . . . . . . . . . . . . . . . . . . . . . . . . . . . . . . . . . Playing audio CDs . . . . . . . . . . . . . . . . . . . . . . . . . . . . . . . . . . . . . . . . . . . . . . . . . . . . . . . . . . . . . . . . . . . . . . . . . . . . Listening to FM/AM radio . . . . . . . . . . . . . . . . . . . . . . . . . . . . . . . . . . . . . . . . . . . . . . . . . . . . . . . . . . . . . . . . . . . . . . . Tuning to a station . . . . . . . . . . . . . . . . . . . . . . . . . . . . . . . . . . . . . . . . . . . . . . . . . . . . . . . . . . . . . . . . . . . . . . . Storing stations as presets . . . . . . . . . . . . . . . . . . . . . . . . . . . . . . . . . . . . . . . . . . . . . . . . . . . . . . . . . . . . . . . . . Erasing a preset . . . . . . . . . . . . . . . . . . . . . . . . . . . . . . . . . . . . . . . . . . . . . . . . . . . . . . . . . . . . . . . . . . . . . . . . . Using the uMusic™ intelligent playback system . . . . . . . . . . . . . . . . . . . . . . . . . . . . . . . . . . . . . . . . . . . . . . . . . . . . . Storing CDs . . . . . . . . . . . . . . . . . . . . . . . . . . . . . . . . . . . . . . . . . . . . . . . . . . . . . . . . . . . . . . . . . . . . . . . . . . . . Playing stored music . . . . . . . . . . . . . . . . . . . . . . . . . . . . . . . . . . . . . . . . . . . . . . . . . . . . . . . . . . . . . . . . . . . . . Rating your music . . . . . . . . . . . . . . . . . . . . . . . . . . . . . . . . . . . . . . . . . . . . . . . . . . . . . . . . . . . . . . . . . . . . . . . . Stored music play modes . . . . . . . . . . . . . . . . . . . . . . . . . . . . . . . . . . . . . . . . . . . . . . . . . . . . . . . . . . . . . . . . . . Repeat and shuffle functions . . . . . . . . . . . . . . . . . . . . . . . . . . . . . . . . . . . . . . . . . . . . . . . . . . . . . . . . . . . . . . . Deleting stored tracks . . . . . . . . . . . . . . . . . . . . . . . . . . . . . . . . . . . . . . . . . . . . . . . . . . . . . . . . . . . . . . . . . . . . Using uMusic presets . . . . . . . . . . . . . . . . . . . . . . . . . . . . . . . . . . . . . . . . . . . . . . . . . . . . . . . . . . . . . . . . . . . . . Using the Playlist . . . . . . . . . . . . . . . . . . . . . . . . . . . . . . . . . . . . . . . . . . . . . . . . . . . . . . . . . . . . . . . . . . . . . . . . Searching through your music library . . . . . . . . . . . . . . . . . . . . . . . . . . . . . . . . . . . . . . . . . . . . . . . . . . . . . . . . Registering your system for music information updates . . . . . . . . . . . . . . . . . . . . . . . . . . . . . . . . . . . . . . . . . . CHANGING SOURCE SETTINGS 35 35 36 36 37 38 38 38 38 39 39 40 42 42 42 43 43 45 46 47 48 Using the settings menus . . . . . . . . . . . . . . . . . . . . . . . . . . . . . . . . . . . . . . . . . . . . . . . . . . . . . . . . . . . . . . . . . . . . . . . Stored CD settings menu . . . . . . . . . . . . . . . . . . . . . . . . . . . . . . . . . . . . . . . . . . . . . . . . . . . . . . . . . . . . . . . . . . . . . . . FM/AM settings menu . . . . . . . . . . . . . . . . . . . . . . . . . . . . . . . . . . . . . . . . . . . . . . . . . . . . . . . . . . . . . . . . . . . . . . . . . CD settings menu . . . . . . . . . . . . . . . . . . . . . . . . . . . . . . . . . . . . . . . . . . . . . . . . . . . . . . . . . . . . . . . . . . . . . . . . . . . . . DVD settings menu . . . . . . . . . . . . . . . . . . . . . . . . . . . . . . . . . . . . . . . . . . . . . . . . . . . . . . . . . . . . . . . . . . . . . . . . . . . TV, CBL-SAT, and AUX settings menu . . . . . . . . . . . . . . . . . . . . . . . . . . . . . . . . . . . . . . . . . . . . . . . . . . . . . . . . . . . . CHANGING SYSTEM OPTIONS 48 50 50 50 51 52 53 Using the System menu . . . . . . . . . . . . . . . . . . . . . . . . . . . . . . . . . . . . . . . . . . . . . . . . . . . . . . . . . . . . . . . . . . . . . . . . Stored CD options . . . . . . . . . . . . . . . . . . . . . . . . . . . . . . . . . . . . . . . . . . . . . . . . . . . . . . . . . . . . . . . . . . . . . . . . . . . . Audio options . . . . . . . . . . . . . . . . . . . . . . . . . . . . . . . . . . . . . . . . . . . . . . . . . . . . . . . . . . . . . . . . . . . . . . . . . . . . . . . . Video options . . . . . . . . . . . . . . . . . . . . . . . . . . . . . . . . . . . . . . . . . . . . . . . . . . . . . . . . . . . . . . . . . . . . . . . . . . . . . . . . Media center options . . . . . . . . . . . . . . . . . . . . . . . . . . . . . . . . . . . . . . . . . . . . . . . . . . . . . . . . . . . . . . . . . . . . . . . . . . Remote control options . . . . . . . . . . . . . . . . . . . . . . . . . . . . . . . . . . . . . . . . . . . . . . . . . . . . . . . . . . . . . . . . . . . . . . . . DVD Lock options . . . . . . . . . . . . . . . . . . . . . . . . . . . . . . . . . . . . . . . . . . . . . . . . . . . . . . . . . . . . . . . . . . . . . . . . . . . . MAINTAINING YOUR SYSTEM 53 54 58 59 60 61 62 64 Cleaning . . . . . . . . . . . . . . . . . . . . . . . . . . . . . . . . . . . . . . . . . . . . . . . . . . . . . . . . . . . . . . . . . . . . . . . . . . . . . . . . . . . . Replacing the remote control batteries . . . . . . . . . . . . . . . . . . . . . . . . . . . . . . . . . . . . . . . . . . . . . . . . . . . . . . . . . . . . Accessories . . . . . . . . . . . . . . . . . . . . . . . . . . . . . . . . . . . . . . . . . . . . . . . . . . . . . . . . . . . . . . . . . . . . . . . . . . . . . . . . . TROUBLESHOOTING 64 65 65 66 Troubleshooting table . . . . . . . . . . . . . . . . . . . . . . . . . . . . . . . . . . . . . . . . . . . . . . . . . . . . . . . . . . . . . . . . . . . . . . . . . Customer service . . . . . . . . . . . . . . . . . . . . . . . . . . . . . . . . . . . . . . . . . . . . . . . . . . . . . . . . . . . . . . . . . . . . . . . . . . . . . TECHNICAL INFORMATION END USER LICENSE AGREEMENT DEVICE CODES 66 67 68 69 A-1 4 English Español Français INTRODUCTION Thank you for purchasing the 3•2•1 GSX DVD home entertainment system, which offers superb sound, elegance, and simplicity in an advanced home audio setup. Using Bose® proprietary signal processing technology, the 3•2•1 GSX system provides improved spaciousness from stereo recordings, and bold movie effects from surround-encoded materials. Yet its few parts require little effort to set up, so you can enjoy your new system’s performance right away. The following items are included to help you set up your system: • Quick Setup Guide • Detailed setup instructions in Setup section of this guide • Setup DVD System features • Integrated AM/FM tuner and DVD/CD player in a small media center • uMusic™ intelligent playback system for storing and playing your favorite songs • Small, easy-to-place shelf speakers and an attractive hideaway Acoustimass® module • Easy-to-use universal infrared remote control • Media center input jacks for a TV, cable/satellite box or other component such as a DVR Introducing the uMusic™ intelligent playback system Your 3•2•1 GSX DVD home entertainment system includes the new uMusic intelligent playback system – a breakthrough Bose technology that makes it possible to store and enjoy your CD collection. What can you do with this system? • Store your favorite CDs in a music library. Your system can store approximately 200 hours of music or about 200 CDs. • Teach the system which tracks your like or dislike, conditioning the system to automatically play the music you want to hear most. • Discover many ways to enjoy your music. Checking for region code compatibility For a DVD player and DVD disc to be compatible, their region code numbers must match. These numbers are allocated according to where the player and disc are sold. The 3•2•1 GSX DVD home entertainment systems have a region code which must also match the DVD discs. Check the region code number on the carton of the 3•2•1 GSX DVD home entertainment system or on the bottom of the media center that comes in the carton. Then be sure to choose only DVD discs that show the same region number on the disc label or front cover. For example, a Region 1 DVD disc should display the following mark: 5 ,QWURGXFWLRQIP INTRODUCTION Before you begin Français Español English INTRODUCTION INTRODUCTION Selecting compatible discs The DVD/CD player built into the 3•2•1 GSX media center can play the following types of discs identified by their corresponding logos: • Video DVD • Audio CD • Video CD • CD-R and CD-R/W • DVD+R, DVD-R, DVD+RW and DVD-RW • MP3 CDs, where – All tracks were burned in a single closed session – The disc format is ISO9660 – Each file has a “.mp3” extension and the filename contains no other periods • SACDs (CD-compatible content only) Note: Regarding copy protection – Music and other content may be protected by international and domestic copyright laws and may contain specific restrictions on use and/or reproduction. Please respect the rights of the artists and other copyright holders. Glossary of terms Aspect Ratio – The shape of the rectangular picture in a TV set. It is the width of the picture relative to the height. Our standard TV picture, in terminology used by that industry, is 4 units wide by 3 units high, or 4:3 (read as 4 by 3) in aspect ratio. There are currently two standard TV aspect ratios, 4:3 and 16:9. Chapter – In DVD-Video, a division of a title. Component Video – A video signal split into three parts: luminance and two color signals (marked as YPbPr). It provides the highest level of video quality. Composite Video – A single video signal that contains luminance, color, and synchronization information. NTSC and PAL are examples of composite video systems. Dolby Laboratories – Developer of a perceptual coding system for audio. Dolby Digital DTS – A type of multi-channel surround sound format used on discs. – A type of multi-channel surround sound format used on discs. DVD – An acronym that is most commonly known to mean Digital Video Disc or Digital Versatile Disc. The audio/video/data storage system based on 12- and 8-cm optical discs. DVD Video – A standard for storing and reproducing audio and video on DVD-ROM discs, based on MPEG video, Dolby Digital and MPEG audio, and other proprietary data formats. 6 ,QWURGXFWLRQIP English Español Français INTRODUCTION INTRODUCTION Gracenote – Music recognition technology and related data provided as part of the service contracted by Bose. IR – An acronym for infrared. Pertains to the type of remote that sends/receives commands on an infrared light beam. MPEG – A type of data compression used for audio or video storage on disc. MP3 – MPEG-1 Layer III audio. This is a compressed audio format that allows you to record many hours of music on a single CD. NTSC – An acronym for National Television System Committee. The organization that developed both the American Black & White and Color television systems. PAL – An acronym for Phase Alternate Line. A television format used extensively in Western Europe. Progressive Scan – A video format which displays all lines of the picture frame in a single pass, and refreshes the TV image 30x/sec. Not compatible with all video displays. PVR – An abbreviation for Personal Video Recording. Sometimes used interchangeably with DVR for Digital Video Recording, but may include non-digital technology, as used in VCRs. RDS – A system that displays radio broadcast station and programming information.This feature is available on European systems only. SACD – An abbreviation for Super Audio Compact Disc, used for high-resolution digital audio storage on CD-sized discs. New Bose® 3•2•1 GSX systems play the CD-compatible portion of such discs, identified by the CD disc logo on the front of the disc. SCART – A type of jack commonly found on consumer electronics products manufactured for use in Western Europe. S-video – A video interface standard that carries separate luminance and chrominance signals, usually on a four-pin mini-DIN connector. Also called Y/C. The quality of S-video is significantly better than composite video since it does not require a comb filter to separate the signals. Most high-end televisions have S-video inputs. uMusic™ intelligent playback system – A revolutionary Bose play mode, which performs like a virtual DJ by noting listener preferences and playing suitable stored CD tracks in response. Videostage® 5 – Bose proprietary Videostage 5 decoding circuitry gives you a five-channel surround sound experience from everything you listen to – VHS tapes, stereo CDs, even mono TV programs. Limited warranty Your 3•2•1 GSX DVD home entertainment system is covered by a limited transferable warranty. Details of the limited warranty are provided on the product registration card that came with your system. Please fill out the information section on the card and mail it to Bose. Failure to do so will not affect your limited warranty rights. 7 ,QWURGXFWLRQIP Français Español English SYSTEM SETUP Unpacking SYSTEM SETUP Carefully unpack your system. Save all packing materials, which provide the safest way to transport your system. Check to be sure your system includes the parts shown in Figure 1. If any part of the system appears damaged, do not attempt to use it. Notify Bose or your authorized Bose® dealer immediately. For Bose contact information, refer to the address sheet included in the carton. WARNING: To avoid danger of suffocation, keep the plastic bags out of the reach of children. Figure 1 Contents of the shipping carton Your system includes one of the following cords: Remote control Batteries Acoustimass® module cable 120 VAC power cord (US/Canada) 115/230 VAC power cord with adapter (US/Europe) Gemstone® speaker arrays ® Media center Acoustimass module Small rubber feet for speaker arrays Speaker cable Large rubber feet for Acoustimass module AM antenna Antenna stand Video cable FM antenna 230 VAC power cord (Europe) Setup disc Stereo cable 230 VAC power cord (UK/Singapore) For your records Now is a good time to find the serial numbers on the bottom of the media center and on the rear of the Acoustimass® module. Please record them here and on your Product Registration Card. You will need to have them ready if you ever need to contact Bose® Customer Service. 240 VAC power cord (Australia) Media center serial number: _________________________________________________________ Acoustimass module serial number: __________________________________________________ Dealer name: ______________________________________________________________________ Dealer phone: __________________________ Purchase date: _____________________________ We suggest you keep your sales receipt and product registration together with this owner’s guide. 8 6\VWHP6HWXSIP English Español Français SYSTEM SETUP Selecting locations for your 3•2•1 GSX system components Note: While these guidelines are offered to help provide great system performance, you may find other placement choices that are more convenient and provide the sound you enjoy. Positioning the media center CAUTION: Do not block any ventilation openings. For reliable operation of the product and to protect it from overheating, put the product in a position and location that will not interfere with its proper ventilation. For example, do not place the product on a bed, sofa, or similar surface that may block the ventilation openings. Do not put it in a built-in system, such as a bookcase or cabinet that may keep air from flowing through its ventilation openings. • Place the media center where nothing obstructs opening the disc tray on its front panel. • Position the media center close enough to the Acoustimass® module and the speakers so that all the cables will reach. • Make sure the media center is close enough to additional source devices (TV, VCR or cable box) so that all the cables will reach. • Make sure that the front of the media center is unobstructed so that it may receive IR (infrared) commands from the remote control. Figure 2 Sample media center and speaker placement 3 ft (1 m) maximum 3 ft (1 m) minimum 3 ft (1 m) maximum Left speaker Right speaker Media center Note: The left and right speakers are magnetically shielded to prevent interference with your TV screen. 9 6\VWHP6HWXSIP SYSTEM SETUP Use the following guidelines and Figure 2 to choose locations and positions for the components of your 3•2•1 GSX home entertainment system. Français Español English SYSTEM SETUP Positioning the speakers SYSTEM SETUP Choosing a good location for the speakers will allow you to experience the audio surround effects that your 3•2•1 GSX home entertainment system is designed to deliver. • Place the left and right speakers at least 3 feet (1 meter) apart from each other to optimize the surround sound experience (Figure 3). • Place each speaker within 3 feet (1 meter) of the edge of the TV screen. Placing the speakers more than 3 feet away from the TV can cause the sound to become separated from the picture. • If you are using a bookshelf or a home entertainment unit, place each speaker at the front edge of its shelfPositioning the speakers too far back in an enclosed space can change the overall quality of sound and alter the movie sound effects. CAUTION: Choose a stable and level surface for both speakers. Vibration can cause the speakers to move, particularly on smooth surfaces like marble, glass, or highly polished wood. If you are placing the speakers on a flat surface, be sure to attach one set of the small rubber feet to the bottom surface of each speaker. You can obtain additional rubber feet (PN 178321) from Bose® Customer Service. To contact Bose, refer to the list of offices included in the product carton. Note: The speakers can be mounted on Bose brackets, table stands, or floor stands. For ordering information, refer to “Accessories” on page 65. Additional or longer cables may also be ordered. Figure 3 • Set the speakers on their bottom surfaces, only, with the Bose logo right-side up. Recommended speaker placement • Aim the speakers straight ahead into the listening area. Do not place the speakers at an angle. Angling one or both speakers into or away from the listening area significantly alters system performance. 10 6\VWHP6HWXSIP English Español Français SYSTEM SETUP Positioning the Acoustimass® module • Place the module at the same end of the room as the TV and the speakers (Figure 4). • Place the Acoustimass module within reach of the cable from the music center and an AC (mains) power outlet. • Choose a convenient location such as under a table, behind a sofa or chair, or behind drapes, but do not block the port opening. Figure 4 Recommended Acoustimass module placement 3 ft (1 m) minimum • Attach the large rubber feet to the bottom of each foot on the module. The rubber feet provide increased stability and protection from scratches. • Aim the port of the module into the room or along the wall. This prevents a blocked port or over-powering bass. • Stand the Acoustimass module on its feet. Do not lay it on its side or stand it on either end (Figure 5). Figure 5 T ACINPU ENTER MUSICC Recommended orientation of the module CAUTION: Do not block the openings on the back of the module, which provide ventilation for the built-in circuitry. CAUTION: The Acoustimass module generates a magnetic field. Although this is not an immediate risk to your video tapes, audio tapes, and other magnetic media, you should not store any of these items directly on or near the module. 11 6\VWHP6HWXSIP SYSTEM SETUP • Keep the module at least 3 feet (1 meter) away from the TV to prevent the module from interfering with the TV screen. Français Español English SYSTEM SETUP Making system connections SYSTEM SETUP CAUTION: Do not plug the Acoustimass® module into an AC power (mains) outlet until all the components are connected. Connecting the Acoustimass module to the media center Plug one end of the Acoustimass module cable into the Acoustimass Module jack on the rear ) jack on the of the media center (Figure 6). Plug the other end of the cable into the input ( rear of the Acoustimass module. Note: The jacks for the Acoustimass module cable are keyed so that the cable connectors only plug in one way. Make sure that the arrow on the connector body faces up when plugging in the cable. Figure 6 Acoustimass module-tomedia center connection Media center rear panel Acoustimass module input jack Acoustimass module cable Acoustimass module rear panel Connecting the speakers to the Acoustimass module 1. Insert the single-plug end of the speaker cable into the SPEAKERS jack on the rear panel of the Acoustimass module (Figure 7). Tighten both screws on the plug. Figure 7 Speaker cable-toAcoustimass module connection Acoustimass module cable Speaker cable Acoustimass module input jack Note: If additional audio cables or longer cables are needed to make these connections, contact Bose Customer Service. Refer to the list of offices included in the product carton. 12 6\VWHP6HWXSIP English Español Français SYSTEM SETUP 2. At the other end of the speaker cable, separate the left and right speaker cords as much as necessary to reach each speaker (Figure 8). SYSTEM SETUP Figure 8 Separating left and right speaker cords 3. Plug the LEFT speaker cable into the rear jack of the left speaker (Figure 9). Plug the RIGHT speaker cable into the rear jack on the right speaker. Figure 9 Left and right speaker connections RIGHT speaker cable LEFT speaker cable Note: Make sure cable connectors are fully inserted and seated firmly in the speaker jacks. 13 6\VWHP6HWXSIP Français Español English SYSTEM SETUP SYSTEM SETUP Connecting the supplied antennas The rear panel of the media center provides jacks for the AM and FM antennas included with your system (Figure 10). Unwind the wires for each antenna to provide the best reception. Note: An outdoor antenna may be used in place of the supplied indoor antennas. To add an outdoor antenna, consult a qualified installer. Follow all safety instructions supplied with the antenna. Figure 10 Antenna connections FM dipole antenna Media center AM loop antenna FM antenna Plug the FM antenna into the FM jack on the media center rear panel. Spread out the antenna arms and move them around to establish optimum FM reception. Extend the antenna as far from the media center and other equipment as possible. AM antenna Plug the AM loop antenna into the AM jack on the media center rear panel. Place the antenna loop at least 20 inches (50 centimeters) away from the media center and at least 4 feet (1.2 meters) away from the Acoustimass® module. Experiment with positioning the loop for optimum AM reception. Follow the instructions enclosed with the AM loop antenna to stand it on the supplied base, or mount it to a wall. Connecting cable FM radio Some cable TV providers make FM radio signals available through the cable service to your home. This connection is made to the external FM jack on the back panel of the media center. To connect to this service, contact your cable TV provider for assistance. Note: Make sure that the cable radio installation includes a TV/FM splitter so that only the FM radio band, not the cable TV band, is received by the media center. If necessary, contact your cable company. 14 6\VWHP6HWXSIP English Español Français SYSTEM SETUP Connecting your TV to the media center Making audio connections Note: If your TV does not have audio output jacks, see “Option B: TV (NO audio output jacks) + VCR + media center” on page 17. Otherwise, continue. 1. Connect one end of the supplied stereo cable to the TV Audio IN jacks on the rear panel of the media center (Figure 11). Insert the white RCA plug into the TV white L jack. Insert the red RCA plug into the TV red R jack. 2. Connect the other end of the stereo cable to the audio output jacks on your TV. Insert the white RCA plug into the white AUDIO OUT L jack. Insert the red RCA plug into the red AUDIO OUT R jack. Making composite video connections Note: Some older TVs with standard TV cable connectors do not have a composite video or an S-video input. Such TVs are not compatible with any DVD players and require use of an RF modulator for this connection. RF modulators are available at your local electronics store. 1. Insert one end of the supplied video cable (yellow) to the Video OUT C (composite) jack on the back of the media center (Figure 11). 2. Insert the other end of the video cable into one of the video input jacks on your TV. Figure 11 TV (composite video)-tomedia center connections Write the name of the video input jack used on your TV in the box on page 25. After you turn the system on, you will need to select this video input on your TV in order to view the 3•2•1 GSX system video output. Media center rear panel Video cable (yellow connectors) TV connector panel TV Stereo cable (red and white connectors) * 15 6\VWHP6HWXSIP SYSTEM SETUP If you want to use the 3•2•1 GSX system with both a TV and a VCR, skip this section and go to “Connecting your TV and VCR to the media center” on page 16. Français Español English SYSTEM SETUP Connecting your TV and VCR to the media center SYSTEM SETUP There are two options for connecting your TV and VCR to the media center. • Option A: TV with audio output jacks+VCR • Option B: TV without audio output jacks+VCR Before proceeding, check your TV for audio output jacks. Option A: TV (with audio output jacks) + VCR + media center If your TV has audio output jacks, you can directly route the TV audio to the 3•2•1 GSX home entertainment system (Figure 12). 1. Connect one end of the supplied stereo cable to the TV Audio IN jacks on the rear panel of the media center. Insert the white RCA plug into the TV white L jack. Insert the red RCA plug into the TV red R jack. 2. Connect the other end of the stereo cable to the audio output jacks on your TV. Insert the white RCA plug into the white AUDIO OUT L jack. Insert the red RCA plug into the red AUDIO OUT R jack. 3. Insert one end of the supplied video cable (yellow) to the Video OUT C (composite) jack on the back of the media center. Insert the other end of the video cable into one of the video input jacks on your TV. Figure 12 Option A connections Write the name of the video input jack used on your TV in the box on page 25. After you turn the system on, you will need to select this video input on your TV in order to view the 3•2•1 GSX system video output. Cable/satellite box (if applicable) Cable service VCR TV connector panel Video cable (yellow connectors) Stereo cable (red and white connectors) * 16 6\VWHP6HWXSIP Cable service TV English Español Français SYSTEM SETUP Option B: TV (NO audio output jacks) + VCR + media center 1. Connect one end of the supplied stereo cable to the AUX Audio IN jacks on the rear panel of the media center (Figure 13). Insert the white RCA plug into the AUX white L jack. Insert the red RCA plug into the AUX red R jack. 2. Connect the other end of the stereo cable to the AUDIO OUT jacks on your VCR. Insert the white RCA plug into the white AUDIO OUT L jack. Insert the red RCA plug into the red AUDIO OUT R jack. 3. Insert one end of the supplied video cable (yellow) into the VIDEO OUT jack on the back of your VCR. Insert the other end of the cable into the Video IN C (composite) jack on the back of the media center. 4. Insert one end of the second video cable (yellow) into the Video OUT C (composite) jack on the back of the media center. Insert the other end of the cable into one of the video input jacks on your TV. Figure 13 Option B connections Write the name of the video input jack used on your TV in the box on page 25. After you turn the system on, you will need to select this video input on your TV in order to view the 3•2•1 GSX system video output. Cable/satellite box Video cables (yellow connector) Media center rear panel Cable service VCR VCR connection panel Stereo cable (red and white connectors) IMPORTANT If you connected your TV and VCR this way, you will need to turn on your VCR and select the AUX source on the 3•2•1 remote to hear sound from TV programs. Cable service TV TV connection panel 17 6\VWHP6HWXSIP SYSTEM SETUP If your TV does not have audio output jacks, you will need to feed audio to the 3•2•1 GSX home entertainment system through a secondary source, such as a VCR. To do this, you will need one additional video cable, which can be purchased at your local electronics store. Français Español English SYSTEM SETUP VCR considerations SYSTEM SETUP • Some combination TV/VCR units may not work with 3•2•1 GSX home entertainment systems. Please refer to your TV/VCR owner’s manual for information. • A stereo VCR is required for optimal sound performance. If your VCR has only one audio output, you have a mono VCR. You will need a Y-adapter cable (available at electronics stores) to connect audio to the media center. For this setup, you will need to select “Mono decoding” (see “TV, CBL-SAT, and AUX settings menu” on page 52) so your 3•2•1 GSX system will simulate surround sound effects from a mono source. Otherwise, you will hear mono sound from both speakers. Advanced setup options The 3•2•1 GSX home entertainment system provides connections for producing higher quality video and audio. The following describes how to use these connections. Making S-video connections (higher quality video) An S-video input jack, provided on many TVs, delivers a higher quality TV picture than the composite video output connection shown in Figure 11. For this connection you will need an S-video cable which can be purchased from your Bose dealer or a local electronics retailer. 1. Insert one end of the S-video cable into the S-Video OUT jack on the media center (Figure 14). 2. Insert the other end of the S-video cable into the S-VIDEO IN jack on your TV. Figure 14 Media center rear panel TV (S-video)-to-media center connections IMPORTANT If you use S-video to connect your TV to the media center, you must also use S-video to connect all other devices (such as a cable box and VCR) to the media center. S-video cable TV connector panel TV Stereo cable (red and white connectors) 18 6\VWHP6HWXSIP English Español Français SYSTEM SETUP Making component video connections (highest quality video) For the highest quality video from DVDs, you may want to use a component video connection between the media center and the TV. To do so, your TV must provide component video jacks (typically labelled Y, Pb, and Pr). Refer to your TV owner’s guide for more information. To make component video connections you will need a component video cable that is long enough to reach from the rear of the media center to your TV (Figure 15). If the cable is not supplied with your TV, you can purchase it separately. 1. On the media center rear panel, plug one end of the component video cable into the Component Y, Pb, and Pr video output jacks (Figure 15). Be sure to match the color of the plug with the color of the jack. 2. Plug the other end of the component video cable into the corresponding (color or letter code) component video jack on the back of your TV. Figure 15 Component video TV-to-media center connections Component video output jacks: Y (green) Pb (blue) Pr (red) Media center rear panel Component video cable Stereo cable (red and white connectors) TV connector panel (example) IMPORTANT FOR COMPONENT VIDEO USERS Input signals received by the C (Composite) or S-Video IN jacks are not passed through to the Component video OUT jacks. If you connect an external video device to the C or S-Video IN jack, you must also connect the C or S-Video OUT jack on the media center to the respective video input jack on your TV. To view the external video input on your TV, you will need to select the TV video input used for that device. To view the onscreen menus of the 3•2•1 GSX system, you will need to switch back to the TV’s component video input. Note: For more information, or to purchase the video cables, contact your local electronics store or authorized Bose dealer. 19 6\VWHP6HWXSIP SYSTEM SETUP Note: Component video connections are required in order to use the progressive scan (NTSC only) feature of your 3•2•1 GSX system. Your TV must also support this feature. To turn on the progressive scan feature, see “Video options” on page 59. Français Español English SYSTEM SETUP Connecting digital audio devices SYSTEM SETUP Some audio devices feature a digital audio output for optimum sound performance. Use an optical digital cable or a coaxial digital cable, as appropriate, to connect this output to the digital input on the media center. You can purchase the required cables at a local electronics store. On the media center rear panel, an optical digital cable connects to the OPTICAL jack. A coaxial cable connects to the audio input jacks labeled D. Note: Before you can benefit from the optical connection, you will need to assign the optical connector to the audio source in the system settings menu. See “Media center options” on page 60. Figure 16 Media center digital audio input jacks Optical digital audio input Coaxial digital audio inputs Connecting your cable/satellite box, TV, and VCR to the media center The 3•2•1 GSX home entertainment system provides flexibility for you to add up to three external audio devices, including your TV, directly to the media center. Figure 17 shows you an advanced setup using a TV, VCR and cable/satellite box. In this setup, please notice the following: • S-video connections are used to deliver the cable/satellite signal to the media center. Therefore, the media center output video is sent to the TV also through an S-video connection. • Analog and digital coaxial audio connections are shown for the cable/satellite box. As an option, you may use an optical digital connection. However, before you can benefit from the optical connection, you will need to assign the optical connector to the cable/satellite box audio source in the system settings menu. See “Media center options” on page 60. • When connecting an audio device to the media center jacks, remember to match the red jack to the right channel (R) and the white (or black) jack to the left channel (L). • For further details on making the video connections between your VCR and TV, refer to the manuals for these video devices. Note: The recommendations contained in this owner’s guide are basic suggestions for connecting external devices to the 3•2•1 GSX system. Instructions and terminology pertinent to these external devices may vary, depending on the manufacturer. Consult the owner’s guide that came with the device for clarification on setup and usage before making any connections. 20 6\VWHP6HWXSIP English Español Français SYSTEM SETUP Figure 17 SYSTEM SETUP Advanced setup example: TV, VCR and cable/satellite box Media center For future use only. Cable/satellite (CBL-SAT) service CBL-SAT S-video Cable/satellite CBL-SAT analog audio CBL-SAT digital audio CBL-SAT signal to VCR VCR TV CBL-SAT signal to TV VCR analog audio Media center’s S-video output to TV Note: For more information on advanced connections, refer to the DVD setup disc that came with your 3•2•1 GSX home entertainment system. 21 6\VWHP6HWXSIP Français Español English SYSTEM SETUP SYSTEM SETUP Connecting a game console Connect the audio output of a game console to the AUX Left and Right input jacks. Connect the video output of the game console to the C (composite) Video IN jack. Figure 18 Game console connections Media center Game console connection panel TV connection panel IMPORTANT If you connected your game console this way, you will need to select the AUX source on the 3•2•1 remote in order to hear sound from the game console. 22 6\VWHP6HWXSIP English Español Français SYSTEM SETUP Installing the remote control batteries 2. Insert the two supplied AA (IEC-R6) 1.5V batteries, or their equivalent, as shown. Match the plus (+) and minus (–) marked on the batteries with the plus (+) and minus (–) inside the battery compartment. 3. Slide the battery compartment cover back into place. Note: Replace the batteries when the remote control stops operating or its range seems reduced. Figure 19 (2) AA batteries (IEC R6) Installing the batteries + Battery compartment cover + 23 6\VWHP6HWXSIP SYSTEM SETUP 1. On the back of the remote, slide open the battery compartment (Figure 19). Français Español English SYSTEM SETUP Connecting the power cord SYSTEM SETUP CAUTION: Do not plug the Acoustimass® module into an AC power (mains) outlet until all the components are connected. CAUTION: For dual voltage models only, be sure to set the dual voltage switch on the back of the Acoustimass module to the appropriate voltage for your area (115V or 230V) before connecting to power. If you are not sure about the proper voltage for your area, consult your local electrical authorities. 1. Insert the small connector end of the power cord into the AC INPUT connector on the Acoustimass module (Figure 20). 2. Insert the large end of the cord into an AC power (mains) outlet. Note: On 220-240V models only, turn the Acoustimass module POWER switch to on (l). Figure 20 Connecting to power AC input jack AC power switch Note: Provided only on 220-240V rated systems 24 6\VWHP6HWXSIP 115/230V selection switch Note: Provided only on 115/230V dual voltage rated systems English Español Français SYSTEM SETUP Verifying your system setup SYSTEM SETUP 1. Check the following before you continue: • All cables are connected for the setup you chose. • The batteries were installed in the remote control. • The power cord was installed and plugged into a live AC receptacle. 2. Turn on your TV. Use the remote control that came with your TV. 3. Using your TV remote, select the video input on your TV that connects to the video output of the media center. Name TV video input used: • The method of selecting the right video input depends on your TV. Refer to your TV owner’s guide for help. 4. Turn off the TV speakers. • Refer to your TV owner’s guide for help. • If your TV does not have an option to turn off the internal speakers, you may need to adjust both the 3•2•1 GSX system volume and your TV volume until you find a level that produces the desired sound. • In some TVs, when the internal speakers are turned off, you may need to raise the TV’s volume level by 75% to 100% in order to hear audio from the 3•2•1 GSX home entertainment system. See your TV owner’s guide for help. 5. Turn on your 3•2•1 GSX system. • Point the 3•2•1 GSX remote control at the media center and press On-Off. 6. Play the 3•2•1 GSX setup DVD. • Press Eject on the media center control panel. • Insert the DVD setup disc into the disc tray. • Press Eject again to close the tray. The DVD will automatically begin to play. If it does not, press the play button ( ). Note: Be sure to play the Setup DVD, included in the carton with your system, as soon as all the connections are completed. This will help you verify the connections you have made and confirm proper sound performance. 25 6\VWHP6HWXSIP Français Español English SYSTEM CONTROLS AND INDICATORS Remote control Turns the system on or off. SYSTEM CONTROLS AND INDICATORS Remote status LED Status LED: • Off (unlit) during normal operation. • On during the process of setting up the remote to control other equipment such as your TV or VCR. Silences or restores the sound from the current source. Selects the Stored CD source and turns the system on to the last-selected uMusic™ intelligent playback system play mode. Selects the built-in CD/DVD player and turns the system on. • Selects the built-in tuner and turns the system on to the previously selected FM/AM station. • Switches between FM and AM when the tuner is selected. TV: Selects the TV sound source and turns your system on. Input: Changes the external input to your TV. For example, your TV might have two external inputs where one is connected to your cable box and the other to your VCR. Pressing this button alternates between the cable box and the VCR.* On/Off: Turns your TV on and off.* CBL-SAT: Selects the CBL-SAT sound source and turns your system on. On/Off: Turns your cable/satellite box on or off.* AUX AUX: Selects the AUX sound source and turns your system on. On/Off: Turns a VCR or PVR that is connected to the AUX jack on or off.* * Requires special remote settings. See “Setting up your remote to control other audio/video devices” on page 30. 26 &RQWUROV$QG,QGLFDWRUVIP English Español Français SYSTEM CONTROLS AND INDICATORS Remote control – cont. Displays the Settings menu for the current source on your TV screen or media center display. Displays the System menu on your TV screen. • Displays the DVD menu of the currently loaded DVD disc on your TV screen. • Displays the main menu of a cable/satellite box, VCR, or PVR on your TV screen (if supported).* Displays the TV program guide (if supported) on your TV screen. • Removes the Settings menu, System menu, or Library menu from your TV screen. • Removes the TV program guide (if supported) from your TV screen or media center display. • Tunes the FM or AM radio to the next higher or lower frequency. • Selects the next item, up or down, in menus. Confirms a menu selection or introduces the next level of menu options. Moves up, down, left, or right in onscreen menus and media center displays. * Requires special remote settings. See “Setting up your remote to control other audio/video devices” on page 30. 27 &RQWUROV$QG,QGLFDWRUVIP SYSTEM CONTROLS AND INDICATORS Enters the library of stored CD tracks. Français Español English SYSTEM CONTROLS AND INDICATORS Remote control – cont. SYSTEM CONTROLS AND INDICATORS • Raises or lowers the volume of the current source. • Pressing + restores muted sound from the current source. • Pressing – lowers the volume of the current source, but does not restore muted sound. Skips to the next or previous CD track, DVD chapter, radio station preset, or TV channel (if the remote is set up to control your TV). • Stops the disc player. • For DVDs only, the disc stops and the system saves the DVD play posicontinues the DVD from the saved play position. tion. Pressing twice for a disc in play returns to the beginning of the disc. Pressing • Pauses a currently playing disc. • Pressing again (or pressing ) resumes play of a paused disc. • After 20 minutes of no user interaction, the disc player stops and returns to the beginning of the disc to wait for the next command. Starts the disc player. • Skips backward or forward through CD tracks. • Skips backward or forward through DVD chapters. • Seeks backward or forward to the next strongest radio station. Plays audio CD tracks in random order. Press again to cancel. Repeats a CD, CD track, DVD chapter, or DVD title depending on the selected source. Press again to change the repeat mode. • Selects a CD track, DVD chapter, radio station preset, or TV channel. • Selects a uMusic preset for the Stored source. • Allows numerical selection for some menu options. • Displays or dismisses a cable/satellite information window, if supported. • If playing an MP3 CD, displays or dismisses artist and title information on the media center display panel. • Displays information about the stored track that is playing. Skips to the previous TV channel (if supported by your TV or cable/satellite box). 28 &RQWUROV$QG,QGLFDWRUVIP English Español Français SYSTEM CONTROLS AND INDICATORS Remote control – cont. • Applies a negative (–) or positive (+) rating to the stored track currently playing. • Pressing – immediately selects a new track. • Pressing + continues playing the current track. Selects and plays stored music that most closely matches the style of the current track. Plays the tracks from a CD selected by its number in the uMusic system. Plays all the tracks, if any, assigned to the playlist. Can be used with other play mode options, like Encore. Skips from the track most recently playing to the first track on the CD of origin and plays that CD from beginning to end. 29 &RQWUROV$QG,QGLFDWRUVIP SYSTEM CONTROLS AND INDICATORS Selects the uMusic™ intelligent playback system for playing stored music. Overrides any other stored music play mode. Français Español English SYSTEM CONTROLS AND INDICATORS Setting up your remote to control other audio/video devices SYSTEM CONTROLS AND INDICATORS Your remote can be set up to control other audio/video devices such as a TV, VCR, PVR or cable/satellite box by entering a device code while in the setup mode. • If you know the device code, follow the instructions under the heading, “Direct entry of a device code” below. Device codes are listed in the back section of this owner’s guide and in the System menus under Remote Control options. • If you can’t find the device code and want to search the system for it, see “Searching for a device code” on page 31. • If you want to verify the device code you have entered for an audio/video device, see “Verifying an entered device code” on page 33. • If you want to return to a previous device assignment, press and hold the TV button until the remote LED is lit (about 5 seconds). On the remote keypad, enter 977. • If you want to wipe out all assigned codes, press and hold the TV button until the remote LED is lit (about 5 seconds). On the remote keypad, enter 981. Note: More than one code may work with your particular brand of product. If you notice a lack of response or limited functionality after setting up the remote, try a different code. Note: The remote status LED flashes rapidly eight times if you press an invalid key, or enter an unavailable device code. Wait seven seconds for the error to clear and start again. Direct entry of a device code Device codes can be found at the back of this owner’s guide or in the System menu under Remote Control options. If you know the device code, you can do the following: To set up the remote to control your TV 1. Turn on both the 3•2•1 GSX system and your TV. 2. Press and hold the TV button until the remote LED is lit (about five seconds). 3. On the remote keypad, enter the four-digit device code for your TV. The LED will turn off temporarily as you press each key. 4. Check that the LED turns off after the code is entered. If the LED blinks, the code is invalid. Try again. 5. Point the remote at your TV and press the TV On-Off button. If your TV does not respond, go back to step 2 and try other codes. If you are still unsuccessful, see “Searching for a device code” on page 31. Note: $IWHUSURJUDPPLQJ\RXUUHPRWHWRFRQWUROH[WHUQDODXGLRYLGHRGHYLFHVIURPWKH6\VWHP PHQXSUHVVWKH6\VWHPEXWWRQRQFHWRFRQWLQXHQDYLJDWLQJWKH6\VWHPPHQX To set up the remote to control your cable/satellite box 1. Turn on both the 3•2•1 GSX system and your cable/satellite box. 2. Press and hold the CBL-SAT button until the remote LED is lit (about five seconds). 3. On the remote keypad, enter the four-digit device code for your cable/satellite box. The LED will turn off temporarily as you press each key. 30 &RQWUROV$QG,QGLFDWRUVIP English Español Français SYSTEM CONTROLS AND INDICATORS 4. Check that the LED turns off after the code is entered. If the LED blinks, the code is invalid. Try again. To set up the remote to control your VCR or PVR (such as Tivo or Replay TV) 1. Turn on both the 3•2•1 GSX system and your VCR or PVR. AUX 2. Press and hold the AUX button until the remote LED is lit (about five seconds). 3. On the remote keypad, enter the four-digit device code for your VCR/PVR. The LED will turn off temporarily as you press each key. 4. Check that the LED turns off after the code is entered. If the LED blinks, the code is invalid. Try again. AUX 5. Point the remote at your VCR or PVR and press the AUX On-Off button. If your VCR or PVR does not respond, go back to step 2 and try other codes. If you are still unsuccessful, see “Searching for a device code” below. Searching for a device code Use this method if you do not know the code for a device. Note: This is a very time-consuming process. Use it as a last resort. To set up the remote to control your TV 1. Turn on both the 3•2•1 GSX system and your TV. 2. Press and hold TV until the remote LED is lit (about five seconds). 3. Alternately press Channel and TV On-Off until your TV turns off. 4. Press Enter. Check that the remote LED turns off. 5. Point the remote at your TV and press TV On-Off. If your TV does not respond, go back to step 2 and try again. 31 &RQWUROV$QG,QGLFDWRUVIP SYSTEM CONTROLS AND INDICATORS 5. Point the remote at your cable/satellite box and press the CBL-SAT On-Off button. If your cable/satellite box does not respond, go back to step 2 and try other codes. If you are still unsuccessful, see “Searching for a device code” below. Français Español English SYSTEM CONTROLS AND INDICATORS To set up the remote to control your cable/satellite box 1. Turn on both the 3•2•1 GSX system and your cable/satellite box. SYSTEM CONTROLS AND INDICATORS 2. Press and hold CBL-SAT until the remote LED is lit (about five seconds). 3. Alternately press Channel turns off. and CBL-SAT On-Off until your cable/satellite box 4. Press Enter. Check that the remote LED turns off. 5. Point the remote at your cable/satellite box and press CBL-SAT On-Off. If your cable/ satellite box does not respond, go back to step 2 and try again. To set up the remote to control your VCR or PVR (for example, TiVo or Replay TV) 1. Turn on both the 3•2•1 GSX system and your VCR/PVR. AUX 2. Press and hold AUX until the remote LED is lit (about five seconds). AUX 3. Alternately press Channel and AUX On-Off until your VCR/PVR turns off. 4. Press Enter. Check that the remote LED turns off. AUX 5. Point the remote at your VCR/PVR and press AUX On-Off. If your VCR/PVR does not respond, go back to step 2 and try again. 32 &RQWUROV$QG,QGLFDWRUVIP English Español Français SYSTEM CONTROLS AND INDICATORS Verifying an entered device code In case you need to check to see what code the remote is using for a particular device, do the following: 2. Press the Info button. 3. Press 1 on the remote and count the number of times the LED blinks (zero is indicated by a long blink). This is the first digit. 4. Press 2 on the remote and count the number of times the LED blinks (zero is indicated by a long blink). This is the second digit. 5. Press 3 on the remote and count the number of times the LED blinks (zero is indicated by a long blink). This is the third digit. 6. Press 4 on the remote and count the number of times the LED blinks (zero is indicated by a long blink). This is the fourth digit. 7. Press Exit. Changing channel selection control If you are using your 3•2•1 GSX home entertainment system with other audio/video devices, such as a VCR and cable/satellite box, you may wish to change channels using one of these other audio devices rather than your TV. You can easily switch your 3•2•1 remote to change channels on another audio device: 1. Press and hold Last on the 3•2•1 remote. The remote status LED will illuminate and blink the number of times corresponding to the device controlling channel selection. 1 blink = TV 2 blinks = CBL-SAT 3 blinks = AUX 2. After the blinking stops, press the source button (TV, CBL-SAT, or AUX) that corresponds to the device you want to use for channel selection. 3. Press Exit on the 3•2•1 remote. To confirm, press and hold Last on the 3•2•1 remote and count the number of blinks. If the change was made, press Exit. If not, repeat steps 2 and 3. 33 &RQWUROV$QG,QGLFDWRUVIP SYSTEM CONTROLS AND INDICATORS 1. Press and hold a source key (TV, CBL-SAT, or AUX) until the remote LED lights (about five seconds) Français Español English SYSTEM CONTROLS AND INDICATORS Media center SYSTEM CONTROLS AND INDICATORS The media center has a control panel on the top, a display area to show the current status of the system, and a disc tray that opens on the front of the console. Control panel The media center has six buttons located above the display. Figure 21 On-Off Source – Volume + Store Eject Lowers and raises the volume level. Copies tracks from an audio CD into the music library. Opens or closes the disc tray. Media center controls Turns system power on or off. Steps through the available source selections. ® Note: If you select another source by pressing the Source button, you cannot control the new source with the remote until you press the button for that new source on the remote. Display indicators With the system turned on, the media center display lights up to show the state of the system. Not all possible choices, shown below, light up at once (Figure 22). The display changes with each adjustment or selection you make. Figure 22 Example media center display Lights to indicate disc is in play. CD 0:06 TRACK 1/12 SHUFFLE Indicates shuffle mode is selected for the current disc. REPEAT Indicates repeat mode is selected for current track or disc. DISC TRACK Indicates “Repeat Disc” or “Shuffle Repeat Disc” mode is selected. 34 &RQWUROV$QG,QGLFDWRUVIP Lights briefly when a remote control command is received. Indicates “Repeat Track” mode is selected. English Español Français OPERATION Turning your system on and off To turn power on or off: • Point the 3•2•1 remote at the media center and press On/Off. OR OPERATION On-Off • Press On-Off on top of the media center. To turn the system on and select a source at the same time: • Press Stored, CD-DVD, FM-AM, TV, CBL-SAT, or AUX on the 3•2•1 remote. Note: Your 3•2•1 remote control can be set up to control other audio/video devices such as your TV, VCR, or cable/satellite receiver. For instructions, see “Setting up your remote to control other audio/video devices” on page 30. Playing video DVDs Before you play your first DVD: • Familiarize yourself with the 3•2•1 remote control. See “Remote control” on page 26. • Be sure you understand how to switch between the available video inputs on your TV. To view a video DVD, you will need to select the video input on your TV that is connected to the video output of the 3•2•1 GSX media center (see “Connecting your TV to the media center” on page 15). • If you are unable to select the correct video input on your TV, please consult your TV owner’s guide. • Be sure that you play the 3•2•1 GSX system setup DVD first. This will help you verify the connections you have made and confirm proper sound performance. 1. Turn on your TV. 2. Select the correct video input on your TV for the 3•2•1 GSX system. 3. On the 3•2•1 remote, press CD/DVD to turn the 3•2•1 GSX system on to the CD/DVD source. Eject 4. On the media center control panel, press Eject to open the disc tray. 5. Place the DVD disc in the disc tray. Eject 6. Press Eject again to close the tray. The DVD should begin to play automatically. If not, press Play on the 3•2•1 remote. Note: Not all DVDs offer the same features. For example, you can choose to display subtitles while watching a movie only if that particular disc provides subtitle information. 35 2SHUDWLRQIP Français Español English OPERATION While playing a DVD video, the media center displays the elapsed play time and chapter number. OPERATION Figure 23 Sample display for a DVD video DVD 0:06:11 CHAPTER 1/12 Basic DVD operations • Press Pause to pause a movie. OR • Press Pause again, or press Play to resume playing a paused CD. • Press (stop) to interrupt a movie in progress. once. The system holds the movie at the point of interruption. Press Play to • Press resume from the point of interruption. OR • Press twice. Play is interrupted and the system returns to the beginning of the disc. Press Play to restart the DVD. • Press Chapter to skip to the next chapter on the current DVD. Press Chapter to the previous chapter. to skip • Press Repeat once for REPEAT CHAPTER mode. • Press Repeat again for REPEAT TITLE mode. • Press Repeat again to turn the repeat function off (REPEAT OFF). • Press to scan backward through the current DVD. Press to scan forward. Eject • Press Eject on the media center to stop a disc and open the disc tray. Note: For information on changing DVD-related source settings, see “DVD settings menu” on page 51. Restricting access to video DVDs The DVD Lock menu allows you to restrict access to DVD content that is inappropriate for certain members of your family. For instructions on using the DVD Lock menu, see “DVD Lock options” on page 62. 36 2SHUDWLRQIP English Español Français OPERATION Playing audio CDs Eject 1. On the 3•2•1 remote, press CD/DVD to turn the 3•2•1 GSX system on to the CD/DVD source. OPERATION 2. On the media center control panel, press Eject to open the disc tray. 3. Place the CD disc in the disc tray. Eject 4. Press Eject again to close the tray. 5. The audio CD should begin to play automatically. If not, press Play on the 3•2•1 remote. Basic CD operations • Press Pause to pause an audio CD. OR • Press Pause again, or press Play to resume playing a paused CD. • Press to stop a playing audio CD. to skip to the next track on the current CD. Press Track • Press Track previous track. • Press Seek to skip to the once to skip to the next track. • Within the first 2 seconds of play, press Seek to skip to the previous track. After 2 seconds of play, press Seek to skip to the beginning of the current track. • Press and hold Seek or Seek to scan backward or forward through a track. • Press Repeat once for REPEAT TRACK mode. Press Repeat again for REPEAT DISC mode. Press Repeat again to turn the repeat functions off (REPEAT OFF). • Press Shuffle once for SHUFFLE DISC mode. Press Shuffle again to turn off the shuffle mode (SHUFFLE OFF). Note: For information on changing CD-related source settings, see “CD settings menu” on page 50. Note: While playing an MP3 CD, pressing Info displays artist and title information on the media center display panel. 37 2SHUDWLRQIP Français Español English OPERATION Listening to FM/AM radio On the 3•2•1 remote, press FM-AM. If the system is off, the radio will turn on to the most recently selected station. OPERATION Tuning to a station Use the following controls to tune to a radio station. • Press FM-AM to switch between the FM and AM bands. • Press Tune to tune up the band. Press Tune to tune down the band. to go to the previous station. Press Seek to go to the next available • Press Seek station. Press and hold for rapid tuning. Release to stop at the next available station. To stop anytime, briefly press Seek or Seek . To begin seeking again without holding down the Seek button, briefly press Seek or Seek as soon as the first seek operation stops. • Press the number of a stored station on the remote. OR • Press Preset stored station. to select the next stored station. Press Preset to select the previous Note: For information on changing FM/AM-related source settings, see “FM/AM settings menu” on page 50. Storing stations as presets Using your 3•2•1 remote control you can store up to 20 AM and 20 FM station presets. This enables you to tune to a favorite station quickly. 1. Tune to the preferred station. 2. Press Enter on the remote to store the station at the next available preset number. OR Enter a number on the remote using the numeric buttons. For numbers 1-9, press the single number button and hold it. For numbers 10-20, press the first number followed immediately by pressing and holding the second number. The newly stored preset number appears briefly on the media center display. Note: Storing a station to a preset number replaces any station previously stored to that preset. Erasing a preset 1. Tune to the preset station. 2. Press and hold the 0 button on the remote until the media center display tells you that the preset is erased. 38 2SHUDWLRQIP English Español Français OPERATION Using the uMusic™ intelligent playback system Before you can play stored music and use the uMusic intelligent playback system, you need to store some CD tracks in your media center. To experience the impact of the uMusic playback system, you should start by storing 10 discs. Storing CDs 1. To start, choose 10 of your favorite CDs. Eject 2. Press Eject on the media center to open the disc tray. 3. Place an audio CD in the disc tray. 4. Press Eject again to close the tray. Store 5. Press Store on the media center. • Storing takes about 5 minutes per disc. While a CD is being stored, the media center display (Figure 24) shows you what percentage of the task is completed. • To interrupt or stop storing at any time, press Eject. To resume storing the same disc, close the disc tray and press Store again. Figure 24 Example of media center display while storing a CD CD 47% STORED STORING 6. After AUDIO CD STORED appears on the media center display, open the disc tray and remove the CD. 7. Repeat these steps for each CD. Planning time to store your music • Allow about 5 minutes per CD to copy the tracks. • Storing 10 discs will take about 1 hour, including the time it takes to insert and remove them. • After storing a CD, your system needs to process the tracks for efficient storage. If after storing several CDs the media center displays BUSY PROCESSING CDS, you will need to wait and allow the system to complete its process. Turning your system off will allow it to process CDs faster. • For 10 CDs your system will need about 6 hours of processing time with the system turned off. • If your CD collection is extensive, you should plan several separate sessions. 39 2SHUDWLRQIP OPERATION Note: Your system is designed to store tracks of regular CDs only. It will not store MP3 tracks or the contents of DVDs. If an inappropriate disc type is in the disc tray when the Store button is pressed, the media center displays an error message to indicate that storage is not possible. Français Español English OPERATION Playing stored music OPERATION • Press Stored on your remote to select the stored music source and turn the system on, if it is off. The uMusic™ system will begin to play the stored music under the last-selected preset and in the last play mode used. Your media center displays information (Figure 25) about the track that is playing. Figure 25 Audio source Elapsed time Preset number Example media center display of track information STORED 2:06 1 My Songs P1 UMUSIC uMusic system preset name (See “To name a preset” on page 44.) Play mode STORED 3:26 Rolling Stones P1 STORED 3:26 Wild Horses P1 STORED 3:26 TRACK 3/10 P1 CD: 152 Artist Song title Track number Number of tracks on CD Number of CD • If you want a different preset, press the corresponding preset number (1 to 9) on the remote. • Press Pause to interrupt the current selection. OR • Press Pause again, or press Play to resume playing a paused selection. 40 2SHUDWLRQIP English Español Français OPERATION • Press Stop once to stop playing a selection. Pressing Play will continue the selection from where the track stopped. • Press Stop twice. Pressing Play will start the selection from the beginning of the track. to skip to another track. • Press Track to skip to a previous track. Note: Pressing Track or Seek See “Rating your music” on page 42. • Press Seek OPERATION • Press Track to skip a track registers a negative rating for that track. once to skip to the next track. • Within the first 2 seconds of play, press Seek to skip to the previous track. After 2 seconds of play, press Seek to skip to the beginning of the current track. • Press and hold Seek or Seek to scan backward or forward through a track. • Press Info to see information about the track that is playing on the media center and on your TV (Figure 26) if it is on. Figure 26 Example of Info display Info for track – Almost Blue Almost Blue/Elvis Costello (3:07) Genre - Rock / Pop CD #7 Track 10 of The Best of Elvis Costello & the Attractions (1985) by Elvis Costello Data by All Music Guide ®2004 AEC One Stop Group, Inc. Preset 1 – My Songs Track 10 on CD7 Elapsed Time - 00:01 / 03:07 Note: For information on changing stored music related source settings, see “Stored CD settings menu” on page 50. 41 2SHUDWLRQIP Français Español English OPERATION Rating your music OPERATION When you first start playing your stored music, the uMusic™ system doesn’t know what you like to hear the most, so the system starts by playing tracks from your entire music library. As you spend time listening to your music and rating each track, the system learns what you like to hear. While a track is playing you can tell the system if you like or dislike it: • Press the – Rating button to tell the system you dislike the current track. The current track will stop and the system will select the next track. Pressing the – Rating button makes this track, and tracks like it, less likely to be played in the current preset. • Press the + Rating button to tell the system you really like the current track. The current track will continue to play. Pressing the + Rating button makes this track, and tracks like it, more likely to be played in the current preset. A rating is also registered when you skip a track or listen to a track all the way through. However, the effect of pressing a Rating button is stronger than either of these two actions. You can also rate your stored music from within the Music Library. See “Rating stored music in the library display” on page 47. Stored music play modes • Press uMusic to return to the uMusic playback mode from the Encore, CD#, Playlist, or Whole CD play mode. • Press Encore if the current track that is playing really captures your mood and you would like to hear other similar tracks from your stored music. After the other similar tracks are played, the uMusic playback system resumes. • Press CD#, immediately followed by a CD number, to play one of your stored CDs. The CD number appears on right side of the media center display while a CD is playing. • Press Playlist briefly to play the tracks that you have put into your playlist. For more information, see “Using the Playlist” on page 45. • Press Whole CD to play all tracks, in order, of the CD that includes the track now playing. When the CD is finished playing, uMusic playback resumes. Repeat and shuffle functions Repeat and Shuffle functions only apply to CD#, Playlist and Whole CD modes. • Press Shuffle to play tracks in a random order. SHUFFLE is displayed on the media center. • Press Shuffle again to turn off the shuffle function. • Press Repeat to repeat a track. REPEAT TRACK is displayed on the media center. • Press Repeat again to repeat the whole CD or playlist. REPEAT DISC is displayed on the media center. • Press Repeat again to turn off the repeat function. • To repeat a CD and play its tracks in random order, press Shuffle and then press Repeat. SHUFFLE REPEAT DISC is displayed on the media center. 42 2SHUDWLRQIP English Español Français OPERATION Deleting stored tracks If there is a track stored in the system that you will never want to play, you can permanently delete it from your stored music collection. 1. Press System on the remote control. 3. Select CD# and press Enter. 4. Choose the number of the CD containing the track you want to delete and press Enter. 5. Select Track and press Enter. 6. Choose the name of the track you want to delete and press Enter. 7. Select Track Action and press Enter. 8. Choose Delete Track and press Enter. 9. After the confirmation, “Do you really want to permanently delete the track from the System,” select Yes and press Enter. 10. Press Exit to leave the System menu. Using uMusic™ system presets The uMusic system can manage up to nine sets of preferences using presets. The nine presets can be used to establish music preferences for different family members or for special purposes or occasions. If you wish, you can enter a name for each preset to help you remember how it is used. To select a uMusic preset 1. Press Stored. 2. Press 1 to 9 on the remote for the preset you want. A P followed by the preset number is displayed on the media center to verify your choice. Figure 27 Example music center display showing preset number STORED 2:06 TRACK 1/2 5 P3 Note: When you play the uMusic system for the first time it automatically selects preset 1. 3. The uMusic playback system starts to play music according to the likes and dislikes registered, if any, for this preset. You can continue to rate the music being played using the + and – Rating buttons. 43 2SHUDWLRQIP OPERATION 2. Select Stored CDs and press Enter. Français Español English OPERATION To name a preset 1. Press System. OPERATION 2. Select Media Center options (Figure 28). Figure 28 System menu – media center options 0HGLD &HQWHU 6HOHFW0HGLD&HQWHUWRDGMXVWWKHVHV\VWHPRSWLRQV 'LVSOD\%ULJKWQHVV 'LVSOD\/DQJXDJH 2SWLFDO6RXUFH 7XQHU6SDFLQJ %RVHOLQN5RRP&RGH X0XVLF3UHVHWV 5HVWRUH6HWWLQJV navigate select 3. Select uMusic Preset and press Enter. 4. Choose a preset and press Enter. 5. Select uMusic Preset Action and press Enter. 6. Select Edit Name and press Enter. 7. Using the edit screen, enter a name for the preset. See “Using the Edit Screen” on page 56 for instructions on using the edit screen. 8. Select Done at the top right corner of the screen and press Enter. 9. Press Exit to leave the System menu. 44 2SHUDWLRQIP English Español Français OPERATION Using the Playlist Using the Playlist feature you can create a playlist of songs for a specific purpose such as a birthday party or holiday gathering. The Playlist can contain as many tracks as you have stored in your media center. OPERATION To add the currently playing song to the playlist Press and hold Playlist until ADDED TO PLAYLIST is displayed on the media center. To listen to the Playlist Press Playlist briefly. The tracks in the playlist play in order. Press the uMusic button to leave the playlist and return to the uMusic playback mode. To repeat a track or play the tracks in random order, see “Repeat and shuffle functions” on page 42. To remove a track from the Playlist While listening to the track in Playlist mode, press and hold Playlist until REMOVED is displayed on the media center. The track is removed from the playlist but not from the system. To add songs to the Playlist by track, album, artist, or genre 1. Press Library. 2. Use the navigation buttons to browse through your stored music collection. Refer to “Finding stored music” on page 46. 3. Select the track, album, artist, or genre that you want to add. 4. Press and hold Playlist until TRACK>>PLAYLIST or ALBUM>>PLAYLIST is displayed on the media center. The Music Library screen on your TV also indicates that a track, or one or more albums have been added to the Playlist. To remove all tracks from the Playlist Before building a new playlist, you may find it easier to clear the playlist of all its songs. 1. Press System. 2. Select Media Center options. Press Enter. 3. Select uMusic Preset Action. Press Enter. 4. Select Clear Playlist. Press Enter. 5. Press Exit to leave the System menu. 45 2SHUDWLRQIP Français Español English OPERATION Searching through your music library Using the Library display, you can search through your music collection by genre, artist, album, or track. OPERATION Finding stored music 1. Press Library. The Music Library display (Figure 29) appears on your TV. Information also appears on the media center display (Figure 30). Figure 29 Music Library On-screen Music Library display Items list Current Preset Preset 1 Genre: Artist: Album: - All genres - Track: - All tracks - - All artists Selection - All albums - Summary of selections 97 albums / 0 tracks (0 minutes) selected. Left/Right: narrow selection by genre. This filters available selections below. navigate select details 2. Use the navigation buttons on the remote to search for music by Genre, Artist, Album, or Track. Use the up/down arrows to select an item in the list. Use the left/right arrows to change the selection. 3. When you select a track or album you want to hear, press Enter to play it. When it is done, the uMusic™ playback system will again start to select songs for you. 4. Press Exit to leave the Music Library. Figure 30 Artist: All Artists Example of Library information on the media center display L I B R A RY 46 2SHUDWLRQIP English Español Français OPERATION Rating stored music in the library display You can register a rating for any stored music found in the library by genre, artist, album, or track. First find the item in the library display. While the item is selected, press the – Rating or + Rating button on your remote. The display confirms your rating (Figure 31). Music Library Example of rating indicator in the music library display Selection you are rating OPERATION Figure 31 Preset 1 Genre: Artist: Album: - All genres - Track: + Caught a Torch of Your Love Washington, Grover Jr. - All albums - 97 albums / 0 tracks (0 minutes) selected. Music rating confirmation (+ or – indicates how you rated the selection) 1 track rated (+) in Preset 1 navigate select details Registering your system for music information updates When you store CDs, your system draws information from a built-in catalog of music information. This catalog includes 30 different characteristics about each CD such as style, tone, related artists, key influences, and musicians. This is the information that makes the uMusic intelligent playback system work. Periodically, Bose issues a system update disc to make sure system owners have the most up-to-date music catalog. To receive future updates, be sure to register your system by mailing your completed Product Registration Card to Bose. If indicated on your card, you may be able to register using the Internet. 47 2SHUDWLRQIP Français Español English CHANGING SOURCE SETTINGS Using the settings menus While watching a video or listening to music on your system, you can make quick adjustments that will increase your enjoyment of the program. For that purpose, each source you use with this system has its own Settings menu with features appropriate to that source. To view the settings menus CHANGING SOURCE SETTINGS You can see the Settings menu for each source on your TV screen (Figure 32) and on the display panel of your media center (Figure 33). 1. Turn on your TV and select the correct TV input to view your 3•2•1 GSX system. 2. Press a source button on your 3•2•1 remote control. 3. Press Settings to display the Settings menu for the selected source. If the list of menu items is too long for the screen, a small down or up arrow indicates that you need to scroll down or up to see other items. 4. Press Exit to leave the Settings menu. Figure 32 Source name Sample Settings menu on your TV screen FM Menu item name Output Mode: Auto Menu items Setting Selection box Navigation help - which buttons to use Note: Any changes made in the settings menu on your TV screen will also appear in the media center display panel. On the media center display panel, menu items will scroll in and out of view as you press the up ( ) and down ( ) arrow buttons on the remote. Figure 33 Sample Settings menu on the media center display >OUTPUT MODE: Auto SLEEP TIMER: Off SETTINGS 48 English Español Français CHANGING SOURCE SETTINGS To make changes in the settings menus Whether you use your TV screen or the media center display to change settings, the same instructions apply. 1. Turn on your TV and select the correct TV input to view your 3•2•1 GSX system. 2. Press a source button on your 3•2•1 remote control. 3. Press Settings to display the Settings menu for the selected source. 4. Using the down ( ) and up ( 5. Press the right arrow ( 6. Press the up ( ) arrow buttons, select the menu item you want to change. ) button to select the menu item setting. ) or down ( ) arrow button to change the setting. 7. Press Enter or the left arrow ( ) button to save the setting. 8. Press Exit to leave the Settings menu. The progression in Figure 34 shows output mode for the FM tuner being changed from Auto to Stereo. Figure 34 Changing the FM output mode setting FM FM Output Mode: Auto The down arrow button was pressed to select the Output Mode menu item. FM Output Mode: Auto Output Mode: Stereo The right arrow button was pressed to select the setting. The up or down arrow button was pressed to change setting from Auto to Stereo. Note: You can restore all default settings by choosing Restore Settings in the Systems menu, under Media Center options. This reverts all source settings back to the factory default settings. It also changes the Audio Processing setting back to Automatic (found in the Systems menu under Audio options). 49 CHANGING SOURCE SETTINGS You can use the actions above to change back to the original (default) settings, too. Do that if you do not like the effect of a change you have made, or accidentally made a change you did not intend. The default settings for each source are shown in the menu tables on the following pages. Français Español English CHANGING SOURCE SETTINGS Stored CD settings menu To see the Stored CD Settings menu, press Stored on the remote. Then press Settings. Press Exit to remove the menu from the screen. Item Name Settings Default CHANGING SOURCE SETTINGS uMusic Preset 1 through 9, or names Description 1 (or last Indicates the current preset and selected) allows you to change it. Play Mode (indicator) Library, Encore, uMusic CD#, Playlist, Whole CD, Shuffle, Repeat Indicates the current uMusic play mode. Not adjustable in the Settings menu. Sleep Timer 10-90 minutes Sets system to turn off when the selected time elapses. Off FM/AM settings menu To see the FM/AM Settings menu, press FM-AM on the remote. Then press Settings. Press Exit to remove the menu from the screen. Item Name Settings Default Description Output Mode (FM only) Auto, Stereo, Mono Auto Allows you to listen to stereo broadcasts in either stereo or mono output. RDS Info (FM only, and only on some systems) Off, On Off Displays station and program information (as available from Radio Data System). Sleep Timer Off, 10-90 minutes Off Turns the system off after the set time expires. Choose off to deactivate the timer. CD settings menu To see the CD Settings menu, press CD-DVD on the remote while playing an audio CD. Then press Settings. Press Exit to remove the menu from the screen. Item Name Settings Default Track __ of __ Sleep Timer Off, 10-90 minutes Description Allows you to select a track on the current disc. 50 Off Turns the system off after the set time expires. Choose off to deactivate the timer. English Español Français CHANGING SOURCE SETTINGS DVD settings menu To see the DVD Settings menu, press CD-DVD on the remote while playing a DVD video disc. Then press Settings. Press Exit to remove the menu from the screen. Item Name Default Description On, Off On Optimizes the tonal balance for movies. Range Compression* On, Off On Adjusts volume to maintain dialogue intelligibility. Keeps some sounds from overwhelming others. Mono Decoding* On, Off On Engages Videostage® 5 mono decoding circuitry to convert mono sound (one-channel audio) into simulated surround sound. Time _:_ _ 0:00 Displays the elapsed time of the current DVD. Also, allows you to move to a new location in the movie by entering a new time. Title __ of __ Selects a DVD title from the current disc, according to the number set. Some DVDs do not allow direct access to titles. Chapter _____ Selects a DVD chapter from the current DVD movie, according to the number entered. Some DVDs do not allow direct access to chapters. Audio Track Dependent on disc Allows you to choose one of the available audio tracks on the current disc. Subtitle language Dependent on disc Allows you to choose one of the available subtitle languages (only if included on disc). Camera Angle 1 of ____ Allows you to select one of the available camera angles (only if included on disc). A-B Repeat A, B Repeats a segment of the DVD after the start and end points are defined. To begin: 1. Move backward or forward to the point in the DVD where you want the segment to start. Movie EQ* 2. Press Enter. 3. Move to the point where you want it to end. 4. Press Enter. Repeats until you press the Settings button. Sleep Timer Off, 10-90 minutes Off Turns the system off after the set time expires. Choose off to deactivate the timer. *Available only when Audio Processing is set to User Adjustable. See “Audio options” on page 58 for more information. 51 CHANGING SOURCE SETTINGS Settings Français Español English CHANGING SOURCE SETTINGS TV, CBL-SAT, and AUX settings menu The settings below affect programs on the TV, even when the source of the program is VCR, CBL/SAT or AUX. There are no separate setting menus for these sources. CHANGING SOURCE SETTINGS Movie EQ, Range Compression and Mono Decoding appear in the menu only if Audio Processing is set to User Adjustable. Audio Processing can be found in the System menu under Audio options. Item Name Settings Default Description Movie EQ* On, Off On Optimizes the tonal balance for movies. Range Compression* On, Off On Adjusts volume to maintain dialogue intelligibility. Keeps some sounds from overwhelming others. Mono Decoding* On, Off On Engages Videostage® 5 mono decoding circuitry to convert mono sound (one-channel audio) into simulated surround sound. Dolby Digital 1+1** 1, 2, Both 1 Plays audio content of selected soundtrack(s). The content of the second soundtrack may be a second language, for example. Sleep Timer Off, 10-90 minutes Off Turns the system off after the set time expires. Choose off to deactivate the timer. *Available only when Audio Processing is set to User Adjustable. See “Audio options” on page 58 for more information. ** Available only when a Dolby Digital 1+1 signal is detected. 52 English Español Français CHANGING SYSTEM OPTIONS Using the System menu Changes to system options are typically made only once. If your system operates as you want it to, there may be no need for any changes. In some cases, however, changes are required to make the system fully compatible with the installation options you have chosen. To change System menu options Unlike the source settings menus, the System menu only appears on your TV screen. CHANGING SYSTEM OPTIONS 1. Turn on your TV and select the correct TV input to view your 3•2•1 GSX system. 2. Press the System button on your 3•2•1 remote control. The System menu (Figure 35) appears on your TV screen. Note: Entering the System menu causes any DVD or VCD that is playing to pause. Figure 35 Categories of options System menu example 6WRUHG &' $XGLR 9LGHR 0HGLD &HQWHU 5HPRWH &RQWURO '9' /RFN 6HOHFW$XGLRWRDGMXVWWKHVHV\VWHPRSWLRQV List of system options for the selected category %DVV&RPSHQVDWLRQ 7UHEOH&RPSHQVDWLRQ $XGLR3URFHVVLQJ ,QSXW/HYHOV Navigation help – Which remote control buttons to use navigate select 3. Using the right ( ) and left ( ) arrow buttons, highlight one of the option categories (Stored CD, Audio, Video, Media Center, Remote Control, or DVD Lock). 4. Press Enter or the down ( 5. Using the down ( ) and up ( 6. Press the right arrow ( 7. Press the up ( ) arrow to select the option category. ) arrow buttons, select the system option to change. ) button to see the system option settings. ) or down ( ) arrow button to change the setting. 8. Press Enter or the left arrow ( ) button to save the setting. 9. Press Exit to leave the System menu. 53 Français Español English CHANGING SYSTEM OPTIONS Stored CD options Press System on the remote control. A preview of Stored CD features is displayed. Press the down arrow button to move into an active display of submenus. CHANGING SYSTEM OPTIONS Note: This choice is available from the System menu only when music from at least one CD has been stored in the system. For information on storing your music, refer to “Storing CDs” on page 39. Figure 36 Stored CD preview 6WRUHG &' 6HOHFW6WRUHG&'WRDGMXVWWKHVHV\VWHPRSWLRQV &' &'$FWLRQ &'3OD\EDFN *HQUH $OEXP 7UDFN 7UDFN$FWLRQ navigate select Stored CD Options Settings Description CD# (Indicator only) 1 [default] or selected CD number Shows the settings for the CD with that number in the system. Changes when the CD selection changes; cannot be edited. CD Action Reload CD information [default] Delete CD Replaces user edits with database information. Requires confirmation. Then removes all information related to this CD. CD Playback Automatic [default] Plays linked tracks of a CD in order, such as movements of a symphony. Tracks play together and in order only. Tracks do not always play in order and together. Link all tracks Don’t link all tracks 54 English Español Français CHANGING SYSTEM OPTIONS Stored CD Options Settings Description Identifies the type of music on the CD. Rock/Pop, Classical, Jazz, Electronica, World, Latin, Country, Reclassifies the CD as the selected music genre. Hip Hop/Rap, Vocal Music, Gospel/Religious, Blues, Soundtrack, Folk/Bluegrass, New Age, Reggae, Easy Listening, Children, Spoken/Comedy, Holiday, Other, Unlabeled Album Specific to the CD. Displays an editing screen** on your TV which allows you to change album information. Artist* Specific to the CD. Displays an editing screen** on your TV which allows you to change artist information. File Artist As* Specific to the CD. Displays an editing screen** on your TV which allows you to change the way an artist’s name is listed. Track Specific to the CD. Allows you to select a track on the CD. Track Action Edit [default] Delete Track Selecting Edit displays an editing screen on your TV. Displays a message asking you to confirm your selection. Upon confirming, the current track and all track information is deleted. CHANGING SYSTEM OPTIONS Genre *Does not appear in every menu. ** See “Using the Edit Screen” on page 56. 55 Français Español English CHANGING SYSTEM OPTIONS Using the Edit Screen The Edit Screen (Figure 37) enables you to change or replace music information provided by the system. It appears when you select a menu item that can be edited from the Stored CD options (page 54) or the Library menu (page 46). Figure 37 Cursor Edit Screen example Text line CHANGING SYSTEM OPTIONS Mozart, Wolfgang Amadeus_ Done Alphabetic characters Done button: Removes the Edit Screen and returns you to the system menu. Numbers and symbols Special characters Erase Space Shift Selected character set Select “Erase” to remove a mistake. Select “Done” when you are finished. navigate select When you select a menu item that can be edited, the text appears in the text line of the Edit Screen. You can add to it or enter new text by selecting characters from the alphabetic, numeric, or special character sets. Use the remote control up, down, left and right arrows to select a character and press Enter to write it in the text line. When you are finished editing, select the Done button and press Enter to remove the Edit Screen. To remove existing characters from the text line: Characters are removed from right to left starting at the cursor. 1. Select Erase. 2. Press Enter to remove the last character in the text line. 3. Press Enter as often as needed to remove additional characters in that line. To enter new text or add to existing text: New characters are added starting at the cursor. 1. Move to a character and press Enter. 2. Move to the next character and press Enter. 56 English Español Français CHANGING SYSTEM OPTIONS To enter a space between words: Spaces are entered to the right of the last character in the text line. 1. Select Space and press Enter. 2. Select the first character of your next word and press Enter. 1. Select Shift and press Enter. Notice that the alphabetic character set is now all capital letters. 2. Select the next character and press Enter. 3. Select Shift and press Enter again if you want the next entered character to be lower case. To enter a number or symbol: 1. Select the number and symbols character set. 2. Select the number or symbol you want and press Enter. To enter a non-English special character: 1. Select the special characters set. 2. Select the special character(s) you want and press Enter. To save the text: • Select Done and press Enter. To undo all edits you’ve made: To undo changes you made to CD information, you can replace your changes with the original music information that came stored in your system. 1. Press System on the remote. 2. Select CD Action. 3. Select Reload CD information and press Enter. 4. Press Exit. 57 CHANGING SYSTEM OPTIONS To enter a capital letter: The first letter of a new line of text is automatically capitalized. Lower case characters are entered after that unless you use the Shift function. Français Español English CHANGING SYSTEM OPTIONS Audio options The audio options affect the way the system sounds in your home. Note: Listening to an audio source while you change audio options can be helpful. Some changes will be immediately noticeable and therefore useful in fine tuning your selections. Figure 38 Audio system options CHANGING SYSTEM OPTIONS $XGLR 6HOHFW$XGLRWRDGMXVWWKHVHV\VWHPRSWLRQV %DVV&RPSHQVDWLRQ 7UHEOH&RPSHQVDWLRQ $XGLR3URFHVVLQJ ,QSXW/HYHOV navigate select Audio Options Settings Description Bass Compensation 0 [default] –14 to +14 Normal low-frequency reproduction. Decreased (–) or increased (+) low-frequency reproduction. Treble Compensation 0 [default] –14 to +14 Normal high-frequency reproduction. Decreased (–) or increased (+) high-frequency reproduction. Audio Processing Automatic [default] Standard Bose® processing applied. User Adjustable Processing options (Movie EQ, Range Compression, Mono Decoding) available in Source Settings menus. Normal [default] Input Levels: –6, –3, +3, +6 TV Analog Input Level TV Digital Input Level CBL/SAT Analog Input Level CBL/SAT Digital Input Level AUX Analog Input Level AUX Digital Input Level Standard signal level (loudness). Decreases or increases signal level (adjustable to match the levels of other audio devices). Note: You may want to adjust the input levels of external audio devices so they match the system’s internal FM and CD levels. 58 English Español Français CHANGING SYSTEM OPTIONS Video options The video options affect the way the picture looks on your TV. Figure 39 Video system options 9LGHR 6HOHFW9LGHRWRDGMXVWWKHVHV\VWHPRSWLRQV CHANGING SYSTEM OPTIONS 79$VSHFW5DWLR :LGHVFUHHQ'9'V 9LGHR&RQQHFWRU 9LGHR)RUPDW 9LGHR%ODFN/HYHO 3URJUHVVLYH6FDQ navigate select Video Options Settings Description TV Aspect Ratio Normal [default] Widescreen 4:3 ratio screen display. 16:9 ratio widescreen display. Widescreen DVDs Modified [default] Unmodified Modified [default]. Unmodified. Video Connector* Composite + S-Video [default] Identifies the type of video connection made on the back panel of the media center. Component Video Format NTSC [default] PAL Correct for NTSC (US standard) monitors. Correct for PAL (European standard) monitors. Video Black Level Normal [default] Extended Screen black level generally appropriate for TVs. Increases screen black level, appropriate for certain TVs. Progressive Scan** Off [default] On Screen image repaints in standard style. Screen image repaints in advanced style (if available on the TV). * A read-only item that indicates the connection detected automatically by the system. ** Appears only when Video Connector is Component (NTSC only). 59 Français Español English CHANGING SYSTEM OPTIONS Media center options The media center options affect the general operation of the system. Figure 40 Media Center system options 0HGLD &HQWHU CHANGING SYSTEM OPTIONS 6HOHFW0HGLD&HQWHUWRDGMXVWWKHVHV\VWHPRSWLRQV 'LVSOD\%ULJKWQHVV 'LVSOD\/DQJXDJH 2SWLFDO6RXUFH 7XQHU6SDFLQJ %RVHOLQN5RRP&RGH 5HVWRUH6HWWLQJV navigate Media Center Options select Settings Description Display Brightness 4 [default] 1 (darkest) to 4 (brightest) Media center display lights with a mid-range brightness. Darkens or lightens the media center display. Display Language English [default] On-screen display menus appear in the selected language. Dansk, Deutsch, Espanol, Francais, Italiano, Nederlands, Svenska Optical Source None [default] TV, CBL/SAT, AUX No digital signal received via optical cable. Digital signal received via optical cable for selected source. Tuner Spacing US [default] European Channel spacing for AM/FM radio stations set to selected region standard. uMusic Preset 1 [default] 2, 3, 4, 5, 6, 7, 8, 9 The selected preset to which a uMusic Preset Action is applied. uMusic Preset Action Edit name Clear playlist Clear ratings Opens an editing screen for naming or renaming the selected uMusic Preset. Removes all tracks from the system playlist. Removes all stored ratings associated with the selected uMusic Preset. Bose link Room Code* B [default] Assigns a room code to your 3•2•1 GSX system when it is ® C, D, E, F, G, H, I, J, K, L, M, N, or O connected to a Bose link source. Restore Settings No Yes Maintains current system settings. Reverts system settings back to factory defaults. ** Appears only when a Bose® link source is connected. 60 English Español Français CHANGING SYSTEM OPTIONS Remote control options The Remote Control options help you set up your remote to control other audio devices that are connected to your system. Figure 41 Remote Control system options 5HPRWH &RQWURO CHANGING SYSTEM OPTIONS 6HOHFW5HPRWH&RQWUROWRDGMXVWWKHVHV\VWHPRSWLRQV 79%UDQG 79'HYLFH&RGH &%/x6$7'HYLFH &%/x6$7%UDQG &%/x6$7'HYLFH&RGH $8;'HYLFH $8;%UDQG $8;'HYLFH&RGH navigate select Remote Control Options Settings Description TV Brand Brand name Provides a list of TV brands for the 3•2•1 remote control to operate. TV Device Code Code number Provides a list of available device codes for the selected TV brand. CBLxSAT Device Cable, Satellite Identifies which of two devices is connected to the CBL-SAT input. CBLxSAT Brand Brand name Provides a list of cable/satellite box brands for the 3•2•1 remote control to operate. CBLxSAT Device Code Code number Provides a list of available device codes for the selected cable/satellite box brand. AUX Device VCR, PVR Identifies which of two devices is connected to the AUX input. AUX Brand Brand name Provides a list of VCR/PVR brands for the 3•2•1 remote control to operate. AUX Device Code Code number Provides a list of available device codes for the selected VCR/PVR brand. Note: To find the brand and device codes for each component that can be connected to, and controlled by the 3•2•1 GSX system, see “Device Codes” on page A-1. Note: After programming your remote to control external audio/video devices from the System menu, press the System button once to continue navigating the System menu. 61 Français Español English CHANGING SYSTEM OPTIONS DVD Lock options The DVD Lock options allow you to restrict viewing of DVD videos with certain ratings. To activate this feature, you need to set a level of restriction and establish a password in the DVD Lock section of the System menu. Figure 42 DVD Lock system options CHANGING SYSTEM OPTIONS '9' /RFN 6HOHFW5HPRWH&RQWUROWRDGMXVWWKHVHV\VWHPRSWLRQV /RFN8QUDWHG'LVFV /RFN'LVFV5DWHG$ERYH 0DQDJH'9'3DVVZRUG select navigate DVD Lock Options Settings Description Lock Unrated Discs Off On No restriction applies to unrated DVD movies. Restricts viewing access to unrated titles when password is set. Lock Discs Rated Above 1 to 8 Helps prevent viewing discs above the selected number when a password is created. Manage DVD Password ____ Establishes a new four-number code to restrict access to movies with certain ratings. Setting a password and restriction level Your password will help prevent unauthorized viewing of DVD videos that have a higher rating than your restriction level. There are 8 levels to choose from, matched to movie ratings set by the Motion Picture Association of America (MPAA). See “Motion Picture Association of America (MPAA) rating system” on page 63. 1. Turn on your TV and select the correct TV input to view your 3•2•1 GSX system. 2. Press the System button on your 3•2•1 remote control. 3. Using the right ( ) and left ( 4. Press Enter or the down ( ) arrow buttons, highlight the DVD Lock option. ) arrow key. Note: If you are using the DVD Lock option for the first time, enter a four-digit password. Then enter it again to confirm. 62 English Español Français CHANGING SYSTEM OPTIONS 5. Enter your four-digit password. 6. Using the down ( ) button, scroll down to Lock Discs Rated Above. 7. Press the right arrow ( 8. Press the up ( ) button to see the available settings. ) or down ( ) arrow button to find the rating you want. ) button to save the setting. CHANGING SYSTEM OPTIONS 9. Press Enter or the left arrow ( 10. Press Exit to dismiss the Settings menu. Motion Picture Association of America (MPAA) rating system Parental Control Setting MPAA Rating 8 Audience Restriction None 7 NC-17 Adult audiences 6 R Mature audiences 5 Mature teenage audiences 4 PG-13 Teenage audiences 3 PG Mature young audiences 2 1 Most audiences G General Example: Choosing a Parental Control Setting of 4, restricts access to videos rated above PG-13. Videos with ratings above that may be viewed only after entering the password. Your password also helps prevent others from changing the restriction level setting without permission. 63 Français Español English MAINTAINING YOUR SYSTEM Cleaning Cleaning the media center • Use only a soft, dry cloth to clean the outside surfaces of the media center. • Do not use any sprays near the system. Do not use any solvents, chemicals, or cleaning solutions containing alcohol, ammonia, or abrasives. • Do not allow liquids to spill into any openings. MAINTAINING YOUR SYSTEM Cleaning the speakers • Clean the surface of your speakers with a soft, damp cloth. You can use an ammonia-free window cleaner on a soft cloth to maintain the finish. • Do not use any sprays near the speakers. Do not use any solvents, chemicals, or cleaning solutions containing alcohol, ammonia, or abrasives. • Do not allow liquids to spill into any openings. Cleaning discs • Handle discs by their edges to prevent fingerprints and scratches (Figure 43a). • To remove stains or fingerprints from the surface of a disc, use a soft and dry lint-free, cloth. Wipe in straight movements from the center of the disc to the outside (Figure 43b). Do not use any chemical products; they can damage the disc. • Do not use a circular motion to clean (Figure 43c). • Do not write on or attach labels to the surface of a disc. • To minimize exposure to dust and dirt, return discs to their cases after use. Store each disc in its case, away from direct sunlight, high temperatures, and humidity. Figure 43 Disc care 64 a. b. c. English Español Français MAINTAINING YOUR SYSTEM Replacing the remote control batteries CAUTION: Please dispose of used batteries properly, following any local regulations. Do not incinerate. • Slide open the battery compartment (Figure 44). • Notice the polarity markings (+ and –) inside the compartment and install the batteries accordingly. Be sure to replace both batteries. • Slide the battery compartment cover back into place. (2) AA batteries (IEC R6) MAINTAINING YOUR SYSTEM Figure 44 Putting in the batteries + Battery compartment cover + Accessories The Bose® 3•2•1 GSX system shelf speakers are compatible with Bose mounting accessories, including the UB-20 wall brackets, UFS-20 floor stands and UTS-20 table stands (Figure 45). Bose also offers cable adapters for use in running speaker cable through walls. For further information or to order the mounting brackets, stands, or cable adapters, contact your Bose dealer or Bose Corporation directly. Refer to the address sheet included in the shipping carton. Figure 45 Speaker accessories UFS-20 Floor Stand UB-20 Wall Bracket US-T20 Table Stand 65 Français Español English TROUBLESHOOTING TROUBLESHOOTING Troubleshooting table Problem What to do System doesn’t do anything • Make sure the unit is turned on. Try pressing the remote On-Off button and the media center On-Off button. • Make sure the Acoustimass module cable is properly connected to the media center and the Acoustimass module. • Make sure the power cord is inserted securely into the Acoustimass® module and plugged firmly into an operating AC wall outlet. • Be sure to select a source (CD/DVD, AM/FM, etc.). • Unplug the Acoustimass module power cord from the outlet for one minute, then reconnect it. This allows the unit to reset itself. After reconnecting the power cord, wait for the message, “BOSE 3•2•1” to appear on the media center display. Disc won’t eject • Turn off the unit. • Unplug the Acoustimass module power cord from the outlet for one minute, then reconnect it. This allows the unit to reset itself. • Before powering on, press and hold Eject on the media center. No sound • Increase the volume. • Check to see if MUTE is lit on the display. If it is, press the Mute button on the remote control to unmute the sound. • On the remote, press the button for the source you want to hear. If you previously selected a source by pressing the Source button on the media center, you cannot control the new source with the remote until you press the button for this new source on the remote. • Make sure the Acoustimass module cable and speaker cable are firmly seated in their respective jacks and the multi-pin connector on the other end is firmly seated in the Acoustimass module jack. • Check speaker connections. • Turn the media center off for 10 seconds, then on again. • Check the connections for any external audio devices. Be sure to select the correct source for the desired input. • Be sure the disc is placed correctly, label-side up, in the CD tray. • Connect the FM and AM antennas. • Unplug the Acoustimass module power cord from the outlet for a minute, then reconnect it. This allows the unit to reset itself. • If you are using an optical digital audio connection, make sure that the optical jack is correctly assigned in the System menu. • Make sure the volume is turned up on the TV. • Check input level settings for each connected device in the System menu. Sound, but no picture • Make sure the TV is on. • When playing a DVD or other video source, make sure the TV is set to the correct video input. Remote control is inconsistent or does not work • Check batteries and their polarity (+ and –). See “Replacing the remote control batteries” on page 65. • On the remote, press the button for the source you want to hear. If you previously selected a source by pressing the Source button on the media center, you cannot control the new source with the remote until you press the button for this new source on the remote. • Point the remote control at the media center. 66 English Español Français TROUBLESHOOTING What to do Radio does not work or has poor reception • • • • • • Make sure antennas are connected properly. Move AM antenna at least 20 inches (50 cm) from the media center. Adjust antenna position to improve reception. AM antenna must be upright. Move antennas farther from TV or other electronic equipment. You may be in an area of weak signal coverage. DVD or CD does not play • • • • • • • Check to see if the Play symbol in the display is lit. After pressing the CD/DVD button, wait a few seconds before pressing Play. Make sure the disc is properly inserted (label-side up). Eject the disc and try loading it again. There may be dirt or dust on the disc. Clean the disc. See “Cleaning discs” on page 64. The disc may be defective. Try another disc. Make sure region codes for both the DVD and player match. See “Check for region code compatibility” page 5. FM sound is distorted • Adjust antenna position to reduce interference. Sound is distorted • Make sure speaker cables are not damaged and the connections are secure. • Reduce the output level from any external audio devices connected to the music center. • Reduce the input level setting for the connected device in the system menu. Picture is black and white or rolling • Check the video cable connections. • Check the Video Format setting and change to appropriate setting (NTSC or PAL). See “Video options” on page 59. Forgot your password • Enter the password 2673 to unlock DVD access. “NO LABEL” appears • The uMusic system uses a catalog of music information to identify and classify the CDs on the media center disyou store. A recent CD release might not be in the catalog. To receive music information play when using the updates, be sure to register your system. Stored CD source • Manually enter information using the edit screen (page 56). “BUSY PROCESSING CDs” appears on the media center display and it won’t let me store any more CDs • When you store a CD, the tracks are first placed in a holding area which can hold up to 10 CDs. This message appears if this holding area is full. Wait 30 minutes and try again. Customer service For additional help in solving problems, contact Bose® Customer Service. Refer to the address list included in the carton. 67 TROUBLESHOOTING Problem Français Español English TECHNICAL INFORMATION Power rating USA/Canada: 120V Maximum ambient temperature 50/60Hz 300W International: 220-240V 50/60Hz 300W Dual voltage: 115/230V 50/60Hz 300W Audio inputs AUX – Left, Right (analog); D (digital) CBL-SAT – L, R (analog); D (digital) TV – L, R (analog); D (digital) Optical – SPDIF digital, mapped to input 104°F (45°C) Dimensions Media center: 3¼"H x 13¾"W x 10"D (8.3 cm x 34.9 cm x 25.4 cm) Remote control: 1 1 8"H x 2½"W x 9"D (3.0 cm x 6.5 cm x 22.9 cm) 3•2•1 GSX speakers: 2½"H x 5½"W x 4"D (6.4 cm x 14 cm x 10.5 cm) Acoustimass module: 14½"H x 8¾"W x 19 1 8"D (36.7 cm x 22.2 cm x 48.5 cm) Audio outputs Acoustimass® Module – SPDIF Weights Media center: 6.7 lb (3.0 kg) Video inputs C (composite) – NTSC or PAL format S-Video Video outputs C (composite) – NTSC or PAL format S-Video Component Y, Pb, Pr GSX speakers: 1 lb (.45 kg) each Acoustimass module: 23.3 lb (10.6 kg) Finish Media center: polymer Speakers: polymer Acoustimass module: polymer Antennas FM 75: – external FM antenna AM – external AM antenna 68 English Español Français END USER LICENSE AGREEMENT IMPORTANT: READ CAREFULLY: This End User License Agreement (“EULA”) is a legal agreement between you, the End User (“End User” or “You”), and Bose Corporation (“Bose”) governing your use of the technology and software and data and data content belonging to Bose, its vendors and licensors (“Technology”), that is contained in this audio/video device (“System”). By tearing open the protective wrapping on this System, you are agreeing to be bound by the terms of this EULA. In the event you disagree with any of the terms contained herein, DO NOT UNWRAP THIS SYSTEM. Return the sealed System to Bose Corporation for a full refund. Copyright laws and international copyright treaties, as well as other intellectual property laws and treaties protect the Technology contained within this System. The Technology is being licensed, not sold. This EULA grants you the right to use the Technology only on this Bose System. You may NOT transfer, lend, distribute, prepare derivative works, reverse engineer, de-compile, or disassemble the Technology, except and only to the extent that applicable law expressly permits such activity. You agree that you will use the Technology and the System solely for your own personal non-commercial use. The Technology contains software that allows You to obtain vendor-supplied music-related information, including name, artist, track, and title information (“Data”). You may use Data only be means of the intended End User functions of the Technology. You agree not to assign, copy, transfer or transmit such Data to any third party. YOU AGREE NOT TO USE OR EXPLOIT DATA EXCEPT AS EXPRESSLY PERMITTED HEREIN. You agree that your non-exclusive license to use the Technology will terminate if you violate these restrictions. If your license terminates, you agree to cease any and all use of the Technology or Data. Bose, its vendors and licensors reserve all rights in the Technology, including all ownership rights. You agree that the vendors and licensors of Bose may enforce their rights under this Agreement directly in their own name. Bose warrants this System in accordance with the provisions of the warranty card delivered with this System. EXCEPT AS EXPRESSLY SET FORTH THEREIN, BOSE, ITS VENDORS, AND ITS LICENSORS HEREBY DISCLAIM ALL WARRANTIES, EXPRESS, IMPLIED, AND STATUTORY, IN CONNECTION WITH THE TECHNOLOGY, INCLUDING WITHOUT LIMITATION, THE IMPLIED WARRANTIES OF MERCHANTABILITY, NON-INFRINGEMENT OF THIRD PARTY RIGHTS, AND FITNESS FOR A PARTICULAR PURPOSE. IN NO EVENT WILL BOSE, ITS VENDORS, OR ITS LICENSORS BE LIABLE FOR ANY INDIRECT, SPECIAL, INCIDENTAL, OR CONSEQUENTIAL DAMAGES ARISING OUT OF THE USE OR INABILITY TO USE THE TECHNOLOGY. IN NO EVENT SHALL BOSE BE LIABLE FOR ANY DAMAGES. None of the Technology shall be exported or re-exported in violation of any export provisions of the United States or any other applicable jurisdiction. Any attempt to sublicense, assign or transfer any of the rights, duties or obligations hereunder shall be void. This Agreement shall be governed by and interpreted under the laws of the Commonwealth of Massachusetts, without regard to its conflicts of law provisions. YOU ACKNOWLEDGE THAT YOU HAVE READ AND UNDERSTAND THIS AGREEMENT AND AGREE TO BE BOUND BY ITS TERMS. YOU FURTHER AGREE THAT THIS AGREEMENT IS THE COMPLETE AND EXCLUSIVE STATEMENT OF THE AGREEMENT BETWEEN YOU AND BOSE AND SUPERCEDES ANY PROPOSAL OR PRIOR AGREEMENT, ORAL OR WRITTEN, AND ANY OTHER COMMUNICATIONS RELATING TO THE SUBJECT MATTER OF THIS AGREEMENT. 69 Device Codes Códigos de instalación Codes de configuration Akai................... TV Television Televisor Télévision 0264, 0412 A-Mark .............. 0003 A.R. Systems ....... 0374, 0455 Abex ................. 0032 Accent ............... 0009 Acec ................. 0012 Acura ................ 0009 .............. Akiba ................. 0037, 0218, 0282, 0294, 0455 0284 Akito.................. 0037, 0272 Addison ............. 0092, 0108, 0653 Akura ................. Admiral .............. 0087, 0093, 0163, 0264, 0463 0009, 0037, 0218, 0264, 0282, 0412, 0493, 0668, 0714 Advent ............... 0519, 0761, 0779, 0783, 0807, 0815, 0817, 0842, 1933 Adcom Adventura ........... 0046 Adyson .............. 0032, 0216, 0217 Agashi ............... 0216, 0217, 0264 ................. Agef.................. Aiko .................. 0516 AGB 0087 0009, 0092, 0216, 0217, 0264 .................. 0037, 0072, 0706, 0753 Aiwa ................. 0701, 0705, 0848, 1904, 1910, 1914 Aim Anitech .............. 0009, 0037, 0282 0003, 0009, 0030, 0060, 0092, 0093, 0108, 0178, 0179, 0180, 0451 Baile .................. 0001, 0009, 0374, 0661 Baird.................. 0072, 0073, 0190, 0193, 0208, 0217 Aolingpu ............. 0858 Bang & Olufsen ..... 0087, 0565 Aolinpike ............ 0264, 0412 Baohuashi ........... 0264, 0412 Apex Digital ......... 0748, 0765, 0767, 0879, 1943 Baosheng ............ 0009, 0817 Barco ................. 0380 Apollo ................ 0473 Basic Line Arc En Ciel .......... 0109, 0196, 0198, 0399, 0501 Arcam................ 0216, 0217 Bastide ............... 0217 Archer ............... ............... Aristona ............. 0003 Baur .................. Ardem 0037, 0714 0037, 0303, 0361, 0505, 0512, 0535, 0554 Baysonic ............. 0180, 0236, 0463 Bazin ................. 0217 Beaumark ............ 0178 Beijing ................ 0001, 0009, 0208, 0226, 0264, 0374, 0412, 0661, 0812, 0817, 0821 Beko .................. 0037, 0370, 0418, 0486, 0606, 0714, 0715, 1037 0012, 0037, 0556 0009, 0036, 0037, 0163, 0216, 0218, 0235, 0247, 0355, 0371, 0418, 0443, 0487, 0581, 0668, 1037 Arthur Martin........ 0163, 0400 ASA .................. 0070, 0087, 0104 Asberg ............... 0037, 0102 ................ 0009 Albatron.............. 0700, 0843 Astra ................. 0037 Alfide ................. 0672 Asuka ................ Allorgan .............. 0206, 0217, 0294 0217, 0218, 0264 Allstar ................ 0037 ........ America Action ..... Amplivision .......... 0177 Ampro ................ 0751 Amstrad.............. 0009, 0037, 0171, 0177, 0218, 0264, 0354, 0371, 0412, 0433, 0516, 0581, 0648, 1037 Anam ................. 0003, 0009, 0180, 0250, 0628, 0700, 0861 0009, 0264, 0412 AOC .................. Alba .................. 0217, 0370, 0400 0009 Baihe ................. 0009, 0104, 0292, 0370, 0428, 0668 0179, 0216 0180 1937 Axxent................ Ansonic .............. Alaron ................ Ambassador Axion ................. Asora ........... 0009, 0037, 0217, 0218, 0282, 0339, 0374, 0455, 0556, 0668 Atlantic .............. 0037, 0206, 0216, 0259 Atori .................. 0009 Bell & Howell ........ 0016, 0154 Auchan .............. 0163, 0400 Beon.................. ............. Audiosonic .......... 0180 0032, 0037, 0418 .............. Best .................. Bestar ................ 0668 Bestar-Daewoo ..... 0374 0217, 0264, 0370, 0428, 0486 Binatone ............. 0217 Black Diamond...... 0614, 1037 0003, 0092, 0180, 0451, 0623, 0802, 0875, 1937 Black Panther ....... 0102 Black Star ........... ............ Blackway ............ Blaupunkt ............ 0247 Blacktron 0282 Audinac Audioton ............ Audiovox ............ 0009, 0037, 0109, 0217, 0218, 0264, 0337, 0370, 0374, 0428, 0486, 0714, 0715 Anam National ...... 0055, 0250, 0650 Autovox ............. 0087, 0206, 0217, 0247 Anglo ................. 0009, 0264 Awa .................. Anhua ................ 0051 0009, 0011, 0036, 0108, 0157, 0216, 0217, 0264, 0374, 0606 Berthen 0337 0037, 0370, 0374 0218, 0282 0036, 0170, 0191, 0195, 0200, 0327, 0328, 0455, 0535, 0554 A-1 Device Codes•Códigos de instalación•Codes de configuration 888 ................... 0009, 0030, 0035, 0037, 0072, 0163, 0178, 0191, 0208, 0216, 0217, 0218, 0264, 0284, 0361, 0371, 0377, 0412, 0433, 0448, 0473, 0480, 0516, 0548, 0556, 0581, 0602, 0606, 0631, 0672, 0696, 0702, 0708, 0714, 0715, 0729, 0745, 0753, 0806, 0812, 1537, 1903 Celestial TV Device Codes•Códigos de instalación•Codes de configuration Blue Sky ............ 0037, 0218, 0282, 0455, 0487, 0556, 0668, 0714, 0715, 1037, 1254 Blue Star ............ 0282 Bondstec............ 0247 Boots ................ 0009, 0217, 0272 BPL .................. 0037, 0282 Bradford............. 0180 Brandt ............... Brandt Electronic .. Brinkmann .......... 0109, 0196, 0198, 0335, 0399, 0501, 0560, 0625 0037, 0418, 0486, 0519, 0668, 1237 0087 ............ Broksonic ........... 0216, 0217 0767, 0819, 0820, 0821 0808 Conrowa 0009, 0145, 0156, 0264, 0412, 0696, 0698, 0753,1170 Contec ............... 0009, 0036, 0037, 0157, 0180, 0216 Deitron ............... 0374 Denko ................ 0264 0145, 0511 CGE .................. 0074, 0084, 0247, 0370, 0418 ........ 0001, 0009, 0051, 0264, 0374, 0412, 0661, 0817 Changcheng .............. Carnivale ............ Carrefour ............ Carver ............... Cascade ............ Casio ................ Cathay............... CCE.................. Celebrity ............ Celera ............... A-2 0037, 0455 0030 0036, 0070 Continental Edison. .......... 0264, 0412, 0696, 0753, 0817 0109, 0196, 0198, 0399, 0487, 0501 Cosmel .............. 0009, 0037, 0337 DER................... 0190, 0193 Changhai ............ 0009, 0817 Craig ................. Desmet ............... 0180 0009, 0037, 0087 Changhong .......... 0009, 0156, 0264, 0508, 0519, 0765, 0767, 0783,0807, 0817, 0820, 0821, 0827, 0848, 1028, 1910 Crosley .............. 0054, 0074, 0084, 0087, 0247 Diamant .............. 0037 Diamond ............. 0009, 0264, 0698, 0825 0009, 0037, 0039, 0053, 0180, 0208, 0339, 0370, 0412, 0418, 0486, 0487, 0579, 0606, 0672, 0712, 0714, 0715 Digatron .............. 0037 Digiline ............... 0668 Digital Life ........... 0780, 0872 Digitor ................ 0037 Changfeng Chun Yun ............ 0009, 0264 Chung Hsin.......... 0033, 0036, 0053, 0108, 0180 .......... Chunsun ............. Cimline ............... Cinema .............. Cineral ............... Citizen ............... Chungfeng 0037, 0217 0000 0765 Crown ............... Crown Mustang .... 0672 CS Electronics...... 0216, 0218, 0247 CTC .................. Curtis Mathes ...... 0412 0009, 0817 Denver Dixi ............... ................... 0009, 0037, 0087 DL..................... 0848 Domeos .............. 0668 0247 Domland ............. 0394 0016, 0030, 0039, 0047, 0051, 0054, 0056, 0060, 0093, 0145, 0154, 0166, 0451, 0466, 0702, 1147, 1347, 1919 Dongda .............. 0009 Donghai .............. 0009 Drean ................. 0037 DTS ................... 0009 Dual .................. 0009, 0218 CXC .................. 0180 0672 Cybertron ........... 0218 0092, 0451 D-Vision ............. 0037 Dual Tec.............. 0030, 0039, 0046, 0056, 0060, 0092, 0186, 0280, 0451, 0535, 1928 Daenyk .............. 0179, 0672 Dumont ............. 0003, 0009, 0030, 0032, 0037, 0039, 0056, 0092, 0108, 0154, 0170, 0178, 0180, 0217, 0218, 0374, 0451, 0499, 0556, 0623, 0628, 0634, 0661, 0672, 0700, 1661, 1902, 1909, 1921, 1928 Daewoo 0037 0037, 0217, 0259, 0303, 0394, 0519, 0807, 1137, 1237 0217 .............. 0017, 0070, 0087, 0102 Durabrand ........... 0003, 0171, 0178, 0180, 0463 Dux ................... 0012, 0037 Dwin .................. 0720, 0774 Dynatron ............. 0012, 0037 E-Elite ................ 0218 ECE ................... 0037 Edison-Minerva ..... 0487 Elbe ................... 0217, 0238, 0259, 0292, 0411, 0435, 0516, 0610, 0630 .......... ......... Elekta................. City ................... 0009 Clarion ............... 0180 Clarivox .............. 0037, 0070 Clatronic ............. 0009, 0037, 0102, 0217, 0218, 0247, 0264, 0370, 0371, 0579, 0714 Dainichi .............. 0216, 0218 1037 Dansai ............... 0009, 0032, 0035, 0036, 0037, 0208, 0216, 0217 1906 Dansette............. 0412 Elbe-Sharp 0516 0056 Dantax ............... 0714, 0715 Electroband 0000 0009 Dawa 0009, 0037 0037 0000, 0003, 0009, 0033, 0092, 0179, 0180, 0700, 0843 Chunfeng ............ 0054, 0170 0037 0033, 0037, 0072, 0217, 0272, 0516, 0621 Denon ................ 0009, 0036, 0037, 0208, 0217, 0218, 0235, 0264, 0272, 0282, 0284, 0294, 0355, 0361, 0371, 0374, 0487, 0519, 0556, 0581, 0614, 0617, 0668, 0698, 0714, 1037, 1237, 1900 Carena DEC 0009, 0374, 0817 Bush ................. 0610, 0668, 1037 Conia ................ Changfei ............. 0218 Carad ................ 0795 Conrac............... BTC .................. 0264 .................. Decca ................ 0087, 0238, 0247 0163, 0294 0218 0208, 0227, 0548 Century .............. BSR .................. Capsonic ............ 0374, 0661 De Graaf ............. 0032 0003, 0009, 0092, 0179 Canton .............. Dayu .................. Conic ................ Ching Tai............. 0030, 0046, 0056, 0186 0754 0037 0087 Candle............... 0009, 0037, 0374 0009 1037 Bruns ................ 0748 .............. Daytron Centurion ............ 0009, 0817 0009, 0817 Dayton ............... Centrum ............. Chengdu ............. Cailing ............... 0009, 0037, 0247, 0264, 0282, 0370, 0411, 0418 0780, 0826 0003, 0236, 0463, 1905, 1911, 1929, 1935, 1938 Caihong ............. Condor .............. Centrex .............. 0109, 0501 Brionvega ........... Britannia ............. .............. CMS .................. CMS Hightec........ Colt ................... Concerto............. Concorde ............ Clayton 0216 0217 ................ 0037 0009, 0264 Elektra ............... 0017, 1661 ELG .................. 0037 Elin ................... 0009, 0037, 0104, 0361, 0448, 0548 Elite .................. 0218 Elman ................ 0102 Elta................... 0009, 0264 Emco ................ 0247 Emerson ............ 0037, 0070, 0072, 0087, 0102, 0104, 0105, 0179, 0217, 0346, 0411, 0473, 0480, 0492, 0516, 0621, 0629, 0631, 0714, 0715 Firstar ................ 0009, 0033, 0236 .............. 0009, 0037, 0072, 0208, 0216, 0217, 0235, 0238, 0247, 0294, 0361, 0374, 0411, 0556, 0668, 0714, 1037 Firstline Fisher ................ 0036, 0045, 0047, 0072, 0087, 0104, 0154, 0157, 0208, 0217, 0303, 0370 Emperor ............. 0282 Envision ............. 0030, 0813 Enzer Epson ................ ............... Erres ................. ESC .................. Ether ................. Etron ................. 0001, 0009, 0163 Eurofeel ............. 0217, 0264 Frontech ............. Euroman ............ 0037, 0216, 0217, 0264, 0370 0009, 0163, 0217, 0247, 0264, 0448 Fujitsu ................ 0009, 0072, 0179, 0186, 0206, 0217, 0259, 0683, 0809, 0853 Europa............... Flint ................... 0037, 0072, 0218, 0264, 0455, 0610 0753 Forgestone .......... 0193 0833, 0840 Formenti ............. 0037, 0087, 0216 Fortress .............. 0087, 0093 Fraba ................. 0037, 0370 Friac .................. 0009, 0037, 0102, 0370, 0499 0012, 0037 0037, 0217 0003, 0009, 0030 0037 ........... 0102, 0217, 0516 Expert ............... 0163, 0206, 0259, 0400 Europhon Exquisit.............. 0037, 0247 .............. Feilu ................. Feiyan ............... Feiyue ............... Fenner ............... Ferguson ............ 0009 Feilang Fidelity............... 0009, 0817 0264, 0412 0009, 0817 Fujitsu General ...... 0009, 0186, 0206, 0217 Funai ................. 0171, 0179, 0180, 0264, 0294, 0303, 0668, 1904 Furi ................... 0145, 0264, 0412, 0817 Futuretech ........... 0180 Galaxi ................ 0037 0009, 0374 Galaxis ............... 0037, 0370 0037, 0053, 0073, 0109, 0190, 0192, 0193, 0238, 0335, 0548, 0560, 0625 Ganxin ............... 0817 Gateway ............. 1755, 1756 GBC .................. 0009, 0218, 0374 0037, 0163, 0193, 0216, 0264, 0361, 0371, 0412, 0512 GE .................... 0021, 0027, 0030, 0047, 0051, 0055, 0092, 0093, 0178, 0180, 0282, 0451, 0560, 0625, 1147, 1347, 1447, 1454, 1907, 1917, 1919, 1922 Filsai ................. 0217 Finlandia ............ 0072, 0163, 0208, 0346, 0548 Geant Casino ....... 0400 GEC .................. 0037, 0043, 0072, 0163, 0217, 0361, 0516 Grunpy ............... 0179, 0180 Haier.................. 0698, 0768, 0779, 0869, 1017 Haihong .............. 0009 Haiyan ................ 0264, 0412, 0817 Halifax ................ 0216, 0217, 0264 Geloso ............... 0009, 0374 General .............. 0186, 0590 General Electric .... 0021, 0027, 0047, 0055 General Technic .... 0009 Genesis.............. 0009, 0037 Hallmark ............. 0178 Genexxa ............. 0009, 0037, 0163, 0218, 0412, 0493 Hampton ............. 0216, 0217 Hanimex ............. 0218, 0294, 1908 Hankook ............. 0030, 0056, 0178, 0180, 0628 Hanseatic ............ 0009, 0037, 0087, 0217, 0282, 0294, 0361, 0377, 0394, 0428, 0499, 0519, 0556, 0634, 0661, 0714, 0808, 1237 Hantarex ............. 0009, 0037, 0102, 0238, 0516 Hantor ................ 0037 Harley Davidson .... 0043, 0179, 1904 Harman/Kardon ..... 0054 .............. Harwood ............. 0180 Hauppauge .......... 0037 Havermy ............. 0093 HCM .................. 0009, 0037, 0217, 0218, 0264, 0282, 0412, 0418 Giant ................. 0217 Gibralter ............. 0017, 0030 Gintai ................ 0354, 0721 ............ GoldHand ........... GoldStar............. 0668 Goldfunk 0216 0001, 0030, 0032, 0037, 0039, 0056, 0109, 0154, 0163, 0178, 0216, 0217, 0247, 0290, 0361, 0377, 0606, 0714, 0715, 1910, 1926 Gooding ............. 0487 Goodmans .......... 0009, 0032, 0035, 0036, 0037, 0072, 0179, 0217, 0218, 0235, 0264, 0335, 0360, 0371, 0374, 0480, 0487, 0499, 0516, 0556, 0560, 0579, 0630, 0634, 0661, 0668, 1037, 1900, 1909 Harvard 0009, 0032, 0037, 0412, 0487 Gorenje .............. 0370 GPM ................. Hello Kitty 0451 0218 ........... Hema ................. 0009, 0217 0053, 0056, 0170 Hifivox ................ ............... 0163, 0339, 0361, 0371 0109, 0196, 0198, 0399, 0501 Higashi ............... 0216 Highline .............. 0037, 0264 ............... Himitsu ............... 0218 Hinari ................. 0009, 0036, 0037, 0179, 0218, 0235, 0264, 0294, 0355, 1908 Hisawa ............... 0218, 0282, 0400, 0455, 0610, 0714 Hisense .............. 0009, 0145, 0156, 0227, 0508, 0696, 0748, 0753, 0821, 0848, 1170 Hit..................... 0087 Gradiente Graetz Gran Prix ............ 0648 Granada ............. 0037, 0045, 0072, 0108, 0163, 0208, 0217, 0225, 0226, 0339, 0400, 0473, 0502, 0516, 0548, 0560 Grandin .............. Grundig .............. 0009, 0037, 0163, 0282, 0374, 0455, 0579, 0610, 0668, 0714, 0715 0009, 0036, 0037, 0070, 0191, 0195, 0443, 0487, 0535, 0554, 0556, 0587, 0672, 0706, 0740, 1935 Hikona 0180, 0628, 0779 A-3 Device Codes•Códigos de instalación•Codes de configuration 0037, 0038, 0039, 0070, 0087, 0154, 0171, 0177, 0178, 0179, 0180, 0236, 0247, 0280, 0282, 0361, 0370, 0371, 0463, 0486, 0623, 0714, 1905, 1909, 1911, 1928, 1929, 1944 Finlux................. Imperial .............. TV Device Codes•Códigos de instalación•Codes de configuration Hitachi ............... 0009, 0016, 0027, 0030, 0032, 0036, 0037, 0038, 0039, 0043, 0044, 0056, 0072, 0092, 0105, 0108, 0109, 0145, 0151, 0156, 0157, 0163, 0165, 0178, 0179, 0186, 0194, 0196, 0198, 0217, 0225, 0227, 0473, 0480, 0481, 0492, 0499, 0508, 0516, 0548, 0563, 0578, 0629, 0634, 0719, 0744, 1037, 1045, 1137, 1145, 1170, 1225, 1256, 1481, 1904 Hitachi Fujian ....... 0108, 0150, 0828 Hitsu ................. 0009, 0218 HMV ................. 0087, 0193 Hongmei ............ 0009, 0093, 0264, 0817, 0848, 1910 Hongyan ............ 0012, 0037 Hoshai ............... 0282 Hua Tun ............. 0009 Huafa ................ 0009, 0145 Huanghaimei ....... 0009 Huanghe ............ 0009, 0817 Huanglong .......... 0009 ......... Huanyu .............. 0009, 0264, 0412, 0817 0216, 0227, 0264, 0374, 0817, 0848, 1910 Huaqiang............ 0264, 0412 Huari ................. 0145, 0264, 0412 Huodateji............ 0051 ............. Hyper ................ Hygashi Hypson .............. 0803, 0849, 0865 H÷her ................ 0714 ................ ICE ................... 0037 ICeS ................. 0216, 0218 A-4 0037 Infinity ................ 0054 Ingelen ............... 0163, 0487, 0610, 0714 Ingersoll.............. 0009 Inno Hit .............. 0009, 0072, 0102, 0217, 0247, 0282, 0290, 0516 Jensen ............... 0519, 0761, 0807, 0815, 0817, 1933 ............... Jialicai ............... 0051 Jinfeng............... 0051, 0208, 0226, 0817 Jiahua 0009, 0264, 0412 KLL ................... 0037 Kloss ................. 0024, 0046 Kneissel .............. 0037, 0238, 0259, 0292, 0374, 0411, 0435, 0499, 0556, 0610 Kolin .................. 0033, 0036, 0053, 0108, 0180 Jinxing ............... 0009, 0037, 0054, 0145, 0156, 0264, 0556, 0698, 0817, 0821 Kolster ............... 0102, 0247 Kongque ............. 0009, 0264, 0817 Konka ................ 0037, 0218, 0371, 0418, 0628, 0632, 0638, 0641, 0703, 0707, 0714, 0754, 0779, 0795, 0816, 0817, 1957 Kontakt............... 0487 Korpel ................ 0037 Korting ............... 0087 Kotron ................ 0412 Koyoda ............... 0009 0017 JMB .................. 0037, 0247, 0264 0443, 0499, 0556, 0634 Jocel ................. 0712 Interfunk ............. 0012, 0037, 0087, 0109, 0163, 0200, 0247, 0275, 0327, 0361, 0501, 0512 Jubilee ............... 0556 Juhua ................ 0264, 0412, 0817 .................. 0036, 0053, 0054, 0093, 0190, 0192, 0193, 0218, 0371, 0418, 0463, 0508, 0606, 0653, 0683, 1253, 1923 JVC 0037 0009, 0037, 0218, 0247, 0290, 0371 0765, 0767 0009, 0264, 0412, 0848, 1910 Interbuy .............. Irradio ................ 0037, 0668 KLH ................... Jinta.................. Inteq .................. 0009, 0037, 0102, 0217, 0218, 0247, 0264, 0282, 0377, 0394, 0448, 0455, 0486, 0487, 0519, 1237 Kiton .................. 0009, 0264, 0412, 0817 0519, 1237 ........... 0054, 0556, 0706 Jinque ............... 0037 Intervision 0216 Kioto.................. 0848, 1910 Innovation ........... Internal ............... Kingsley .............. Jinhai ................ Innova ................ ................ 0009, 0264, 0412, 0817 Kraking ............... 0238 Kaisui ................ 0009, 0037, 0216, 0217, 0218, 0282, 0455 Kriesler ............... 0012 KTV ................... 0030, 0039, 0180, 0217, 0280 Kuaile................. 0009, 0264, 0412 0001, 0009, 0264, 0374, 0661, 0817 Kuba Electronic ..... 0303 Kulun ................. 0009 Kangyi ............... 0009, 0264, 0412 Kunlun................ 0051, 0208, 0226, 0264, 0374, 0661, 0817 Kyoshu ............... 0032, 0412, 0418 Kyoto ................. 0032, 0163, 0216, 0217 Kaige IRT .................... 0451, 0628, 0698, 1661 Kamp ................ 0216 Isukai ................. 0037, 0218, 0282, 0455 Kangchong 0848, 1910 ITC.................... 0217 ......... Kangli ................ ITS .................... 0037, 0216, 0218, 0264, 0282, 0371 ITT .................... 0163, 0179, 0193, 0208, 0339, 0346, 0361, 0473, 0480, 0548, 0610 Kapsch .............. 0104, 0163, 0206, 0361 Karcher .............. 0264, 0282, 0610, 0714, 0778 0163, 0179, 0208, 0339, 0346, 0361, 0473, 0480, 0548, 0606, 0610 Kathrein ............. 0556 Kawa................. L&S Electronic ...... 0808 0371 Kawasho ............ Lark ................... 0386 0216 KB Aristocrat ....... LaSAT ................ 0486 0163 KEC .................. Leader................ 0009 0180 Ken Brown .......... Lecson ............... 0037 0236, 0463 ............... Lemair ................ 0032, 0411 0037, 0102, 0235, 0247, 0411, 0428, 0519, 0610, 1237 ................ Lenoir ................ Lesa .................. Leyco ................. 0037, 0374 ITT Nokia ............ 0009, 0216, 0217, 0247 0037, 0264, 0282, 0400, 0455, 0668, 0714, 0715 0001, 0009, 0264, 0374, 0412, 0661 Indiana ............... 0216, 0217 Hyundai ............. Iberia ..... 0264, 0412, 0817 Hornyphone ........ Huangshan Imperial Crown 0037, 0074, 0084, 0196, 0247, 0370, 0418, 0630 ITV .................... Janeil ................. 0037, 0247, 0264, 0284, 0374 0046 JBL ................... 0054 JCB................... 0000 Jean .................. 0003, 0009, 0036, 0051, 0092, 0156, 0179, 0236, 0721 0216, 0217, 0218, 0264, 0371 JEC ................... 0502 Kendo Kenia................. 0030 Kennedy ............. 0163, 0206, 0435 Kenwood ............ 0030 Lenco 0009 0247 0037, 0072, 0264, 0294, 0579 LG.................... 0001, 0003, 0030, 0032, 0037, 0038, 0039, 0056, 0060, 0108, 0109, 0178, 0442, 0556, 0606, 0644, 0698, 0700, 0714, 0715, 0856, 1178, 1934 Magnin ............... 1907 Magnum ............. 0037, 0648, 0714, 0715 Mermaid ............. 0037 Majestic .............. 0016 Metronic ............. .............. Manesth ............. 0264 Metz Liesenk & Tter ...... 0037 Manhattan ........... Liesenkotter ........ 0012, 0037, 0327, 0328 Marantz .............. Lifetec ............... Lloyd's .............. ............. Loewe ............... Lloytron Logik................. Naiko ................. 0037, 0606 0037, 0087, 0275, 0367, 0388, 0447, 0535, 0554, 0587, 0668, 0746 Nanbao .............. 0009, 0264, 0412, 0848, 1910 Nansheng ............ 0264, 0412, 0817 NAT ................... 0214, 0226 National .............. 0051, 0055, 0208, 0214, 0226, 0227, 0508 .................. 0009, 0011, 0030, 0036, 0046, 0051, 0053, 0056, 0154, 0156, 0165, 0170, 0178, 0186, 0217, 0264, 0374, 0412, 0455, 0497, 0499, 0508, 0603, 0704, 0817, 1170, 1270, 1704 Neckermann ......... 0037, 0087, 0191, 0200, 0247, 0327, 0370, 0411, 0418, 0505, 0554, 0556 NEI .................... 0037, 0337, 0371 Nesco ................ 0179, 0247 Netsat ................ 0037 Network .............. 0032, 0337 Neufunk .............. 0009, 0037, 0218, 0556, 0610, 0714 New Tech ............ 0009, 0037, 0217, 0448, 0556 New World ........... 0218 Newave .............. 0009, 0092, 0093, 0178, 0721 Nicamagic ........... 0216 Nikkai................. 0009, 0032, 0035, 0036, 0037, 0072, 0216, 0217, 0218, 0264, 0337 0030, 0037, 0054, 0412, 0556, 0704, 0854, 0855, 1154 Micromaxx .......... 0037, 0630, 0668, 0808, 1037 Marelli ................ 0087 Microstar ............ 0808 0817 Mark .................. 0009, 0037, 0216, 0217, 0374, 0714, 0715 Midland .............. 0017, 0032, 0039, 0047, 0051 Masuda .............. 0037 Minerva .............. 0037, 0087, 0136, 0292, 0512, 0516, 0633, 0655, 0790, 1790 0009, 0037, 0217, 0218, 0264, 0371 Minato ............... 0032 Materin ............... 0858 0070, 0108, 0487, 0516, 0535, 0554 Matsui ................ 0009, 0011, 0033, 0035, 0036, 0037, 0072, 0163, 0177, 0191, 0195, 0208, 0217, 0235, 0272, 0294, 0335, 0354, 0355, 0371, 0433, 0443, 0455, 0487, 0516, 0556, 0579, 0714 .............. 0037, 0412 0001, 0011, 0016, 0033, 0193, 0371, 0698 0264, 0412, 0817 ................ Lumatron ............ 0206, 0259 0037, 0073, 0163, 0206, 0217, 0259, 0264 Matsushita Lux May ............. McMichael........... 0043 0009, 0037, 0581 Mediator ............. 0012, 0037 ............. Luxor ................ 0056, 0579 Medion ............... 0037, 0512, 0556, 0668, 0698, 0808, 1037, 1137, 1437, 1900 0163, 0179, 0194, 0208, 0217, 0290, 0361, 0473, 0480, 0548, 0631 0047, 0054, 0154, 0156, 0178 .......... ......... Megas................ Megatron ............ Megapower 0700 0610 0003, 0145, 0178 0054 Meile ................. M Electronic ........ 0009, 0037, 0104, 0105, 0109, 0163, 0217, 0346, 0374, 0480 0264, 0412, 0817, 0848, 1910 Melectronic .......... 0009, 0037, 0104, 0105, 0163, 0216, 0217, 0247, 0346, 0374, 0411, 0480, 0492, 0512, 0634, 0661 Madison ............. 0037 Magnadyne ......... 0087, 0102, 0247, 0516 Magnafon ........... 0102, 0216, 0516 ........ Magnavox........... 1913, 1928 0011, 0020, 0024, 0030, 0036, 0054, 0179, 0186, 0187, 0386, 0706, 0780, 1254, 1454, 1904, 1913, 1931, 1944 Melvox ............... Memorex ............ Memphis............. Minutz ............... 0021 Mirror ................ 1900 Mistral Electronics . 0193 Mitsubishi ........... 0030, 0033, 0036, 0037, 0056, 0087, 0093, 0108, 0150, 0154, 0178, 0179, 0180, 0236, 0250, 0354, 0512, 0535, 0556, 0817, 0836, 0868, 1037, 1250, 1917 0051, 0250, 0650 M & S ................ Magnasonic 0625 0030, 0150, 0178, 0218, 1907 Minoka 0400 0009, 0016, 0056, 0060, 0150, 0154, 0178, 0179, 0250, 0463, 1037, 1911, 1920, 1924, 1926, 1927 0556 0156, 0178, 0361, 0866 0009, 0037, 0218, 0374, 0519, 0668, 1037, 1137, 1237 0001, 0009, 1904 Myryad ............... .................. MGA ................. Longjiang ........... LXI ................... 0001, 0009, 0037 0037, 0668, 0778, 1037 0668 Luxman ................. 0035, 0037, 0217, 0235, 0264, 0294 Logix................. Luma ............. NAD NEC Mivar ................. 0216, 0217, 0290, 0291, 0292, 0516, 0609 ............. Monivision .......... Morgan's ............ Motorola............. MTC ................. 0009 MTEC ................ 0032 Mudan ............... 0009, 0051, 0208, 0226, 0264, 0412, 0817 Nikko ................. 0030, 0092, 0178 Nikon ................. 0848, 1910 Multibroadcast ..... 0193 Noblex ............... Multistandard ....... 0102 0037, 0154, 0264 Multitec .............. 0037, 0486, 0668, 1037 Nobliko ............... 0070, 0102, 0216 Multitech ............ 0009, 0037, 0102, 0180, 0216, 0217, 0247, 0264, 0486 Nogamatic ........... 0109, 0196, 0399, 0501 Nokia ................. 0163, 0179, 0208, 0339, 0346, 0361, 0374, 0473, 0480, 0548, 0606, 0610, 0631, 1912 Monaco 0700, 0843 0037 0055, 0093 0030, 0056, 0060, 0216, 0370, 0512 Murphy .............. 0039, 0163, 0216 Musikland ........... 0218, 0247 0337 A-5 Device Codes•Códigos de instalación•Codes de configuration Lihua................. Mandor Mercury TV Norcent.............. 0748, 0824 Nordic ............... 0217 Nordmende ......... 0037, 0109, 0195, 0196, 0198, 0399, 0501, 0560, 0714 Normerel ............ ............... Novatronic .......... 0012 NTC .................. 0092 Novak Device Codes•Códigos de instalación•Codes de configuration 0037 0698 Oceanic ............. 0163, 0208, 0361, 0400, 0473, 0548 0009, 0037, 0072, 0370 Omega .............. 0264 Omni ................. 0780 Onking 0280 Onwa ................ 0102, 0180, 0218, 0371, 0433, 0581, 0602 Opera ................ 0037 Optimus ............. 0154, 0166, 0250, 0650, 1913, 1924, 1927 Optonica ............ 0093, 0165 Orbit ................. 0037 Orion................. 0011, 0037, 0102, 0177, 0179, 0235, 0236, 0294, 0355, 0412, 0443, 0463, 0516, 0556, 0655, 0714, 1905, 1911, 1929, 1954 Ormond ............. 0668, 1037 0516 Osaki ................ 0032, 0037, 0072, 0217, 0218, 0264, 0272, 0355, 0374, 0412, 0493, 0556 Osio.................. 0037, 0290 Oso .................. 0218 .............. Otto Versand A-6 ....... 0216 Palsonic ............. Panasonic ........... 0037, 0051, 0054, 0055, 0108, 0163, 0208, 0214, 0226, 0227, 0250, 0361, 0367, 0508, 0516, 0548, 0650, 1210, 1310, 1410, 1650, 1651, 1919, 1924, 1927, 1930, 1941, 1946, 1947 Panavision ........... 0037, 0411 Panda ................ 0009, 0051, 0208, 0226, 0264, 0412, 0508, 0698, 0706, 0780, 0817, 0821, 0826, 0848, 1910 Pathe Cinema ....... 0163, 0216, 0238 Pathe Marconi ...... 0109, 0196, 0198, 0399, 0501 Pausa ................ 0009 Penney ............... 0003, 0021, 0027, 0030, 0032, 0039, 0047, 0051, 0056, 0060, 0156, 0178, 1347, 1907, 1919, 1926 ............... 0037, 0072, 0163, 0216, 0282 0000, 0009, 0012, 0017, 0020, 0024, 0027, 0030, 0032, 0037, 0043, 0051, 0054, 0056, 0087, 0092, 0108, 0178, 0186, 0187, 0193, 0200, 0238, 0361, 0374, 0554, 0556, 0570, 0690, 0721, 0774, 1154, 1454, 0499 Protech............... 0009, 0037, 0102, 0217, 0247, 0264, 0337, 0418, 0486, 0668 Proton ................ 0001, 0003, 0009, 0030, 0039, 0178, 0466, 0644 ProVision............. 0037, 0556 Pulsar ................ ................... 0017 Pye 0012, 0037, 0087, 0374, 0412, 0554, 0556 Phoenix.............. 0037, 0087, 0216, 0486 ............. Pymi .................. 0009 0012, 0037, 0087, 0193, 0216 Qingdao .............. Pilot .................. 0051, 0208, 0226, 0264, 0412, 0817 0030, 0039, 0712 Quadra Vision ....... 0400 Pioneer .............. 0011, 0037, 0038, 0109, 0163, 0166, 0361, 0428, 0486, 0512, 0679, 0760, 0866 Quadral .............. 0218 Phonola Quasar ............... 0009, 0051, 0055, 0165, 0247, 0250, 0650, 1919, 1924 Quelle ................ 0011, 0037, 0070, 0074, 0084, 0104, 0200, 0327, 0328, 0361, 0505, 0512, 0535, 0554, 0668 Pionier ............... 0370, 0486 Plantron ............. 0009, 0037, 0264 Playsonic ............ 0217, 0714, 0715 Policom.............. 0109, 0501 Polytron ............. Questa ............... 0032, 0036 0282, 0697 ............... Portland ............. R-Line ................ 0037 0009 Radialva.............. 0218, 0337 0039, 0092, 0374 Radiola ............... Powerpoint.......... 0012, 0037, 0217, 0556 0037, 0487 Prandoni-Prince .... Radiomarelli ......... 0361, 0516 0037, 0087, 0516 Premier .............. 0009, 0264 RadioShack ......... ................ 0009, 0264, 0303, 0412, 0519, 0761, 0783, 0807, 0815, 0817, 1933 0030, 0032, 0037, 0039, 0047, 0056, 0154, 0165, 0178, 0180, 1904, 1920 Radiotone............ 0009, 0037, 0264, 0412, 0428, 0579, 0648, 0668 Poppy Prima Princeton ............ 0700, 0717 Prinz ................. 0072, 0194, 0361 Rank .................. 0070 ................ Profex................ 0051 Rank Arena .......... 0036, 0753, 0796 0009, 0163, 0361 Ranser Prism Perfekt ............... 0037 ............... 0001 Pershin ............... 0400 Profi .................. 0009 RBM .................. 0070 Phase ................ 0032 Profitronic ........... 0037, 0102 RCA Philco ................ 0020, 0030, 0032, 0037, 0054, 0056, 0074, 0084, 0087, 0145, 0178, 0180, 0186, 0247, 0370, 0418, 0463, 0628, 0774, 1661, 1911 Proline ............... 0012, 0037, 0072, 0411, 0625, 0630, 0634 ............. 0047, 1347, 1447, 1922 0032, 0036, 0037, 0072, 0157, 0218 0036, 0037, 0093, 0109, 0191, 0217, 0226, 0235, 0247, 0294, 0303, 0361, 0505, 0512, 0535, 0554, 0556 0001, 0037, 0072, 0217, 0218, 0264, 0284, 0377, 0418, 0448, 0698, 0773, 0779 0037, 0217, 0247, 0264 Perdio ................ Philips 0037, 0247, 0370, 0411, 0418, 0519, 0630, 0655, 1137, 1237 Panama .............. 0037, 0218 Orsowe .............. Osume .................. Palladium ............ Pael 0264 Okano ............... Orline ................ 0519, 0556, 0714, 0807, 1037, 1137, 1237 0037, 0105, 0374 NU-TEC ............. Odeon ............... Pacific ................ ................ Philharmonic ........ Philex 0193 0217 Proscan Prosco ............... 0156 Prosonic ............. 0037, 0214, 0216, 0217, 0370, 0371, 0374, 0579, 0668, 0714 .................. 0000, 0030, 0038, 0047, 0051, 0060, 0090, 0092, 0093, 0178, 0560, 0618, 0625, 0679, 0702, 1047, 1147, 1247, 1347, 1447, 1454, 1547, 1907, 1917, 1919, 1922, 1948, 1953, 1958 Realistic ............. 0030, 0032, 0039, 0056, 0154, 0165, 0178, 0180 Recor ................ 0037, 0418 Rectiligne ........... 0037 Rediffusion.......... 0036, 0346, 0361, 0548 Reflex................ 0037, 0668, 1037 Relisys............... 0865 Reoc ................. 0714 Revox................ 0037 Samsung ............ 0009, 0030, 0032, 0037, 0039, 0056, 0060, 0072, 0090, 0092, 0093, 0154, 0156, 0163, 0178, 0179, 0208, 0216, 0217, 0226, 0264, 0290, 0370, 0448, 0519, 0556, 0587, 0618, 0644, 0702, 0766, 0774, 0812, 0814, 0817, 0821, 1060, 1237, 1903 SEG .................. 0009, 0036, 0037, 0102, 0216, 0217, 0218, 0264, 0668, 1037, 1437 Siesta ................ ............ Silva .................. 0370 Signature 0016 SEI ................... 0037, 0087, 0102, 0163, 0177, 0206, 0294, 0516 Silver ................. 0036, 0179, 0361, 0455, 0715 Sei-Sinudyne ....... Simpson ............. 0186, 0187 0037, 0087, 0102, 0206, 0294, 0516 Singer ................ Seleco ............... 0163, 0206, 0259, 0264, 0346, 0371, 0411, 0435 0009, 0037, 0087, 0102, 0335, 0435, 1537 Sinudyne ............. 0037, 0087, 0102, 0163, 0177, 0206, 0235, 0294, 0361, 0516 0037, 0216, 0361, 0648 .................. 0163, 0206, 0259, 0264, 0411 Samsux .............. 0039 Semivox ............. Sandra ............... 0180, 0236, 0463 0216, 0217 RFT .................. 0037, 0072, 0087, 0264, 0428 Semp ................ 0156, 1356 SKY ................... 0037 Sanjian ............... 0264, 0412 0009 Skygiant 0451 Rhapsody ........... 0216 Sansui................ Roadstar ............ 0009, 0037, 0218, 0264, 0282, 0418, 1037 ............... Serie Dorada ........ 0035 0037, 0371, 0455, 0463, 0602, 0655, 0706, 0727, 0729, 0861, 1904, 1911, 1929 ............. Skysonic ............. Skyworth............. 0180 Sansei ................ Sencora ............. Serino................ 0093, 0455, 0610 Shancha ............. 0264, 0412, 0817 SLX ................... 0668 Smaragd ............. 0487 Solavox .............. 0032, 0037, 0072, 0163, 0361, 0548 Sonawa .............. 0218 Songba............... 0009 Soniko................ 0037 Sonitron .............. 0208, 0217, 0339, 0370 Sonneclair ........... 0037 Sonoko ............... 0009, 0037, 0217, 0264, 0282 Sonolor............... 0163, 0208, 0282, 0361, 0400, 0505, 0548 Robotron ............ 0087 Rowa ................ 0009, 0037, 0216, 0264, 0587, 0698, 0712, 0748, 0817 Roxy ................. 0448 Royal Lux ........... 0335, 0370, 0412 Runco ............... 0017, 0030, 0497, 0603 Ruyi .................. 0227, 0817 Saba ................. 0087, 0109, 0163, 0196, 0198, 0250, 0335, 0361, 0399, 0501, 0516, 0548, 0560, 0625 Saccs ................ 0238 Sagem ............... 0455, 0610 ................ Saisho ............... 0009, 0817 Saige Santon ............... 0009 Sanyo ................ 0011, 0036, 0045, 0072, 0088, 0104, 0108, 0145, 0154, 0156, 0157, 0180, 0208, 0216, 0217, 0227, 0264, 0280, 0339, 0370, 0412, 0508, 0721, 0799,1154, 1907 Sanyuan ............. 0009, 0093, 0817 SBR .................. 0012, 0037, 0043, 0193 Schaub Lorenz...... 0361, 0374, 0486, 0548, 0606, 0714 Schneider............ 0009, 0011, 0033, 0177, 0217, 0235, 0264, 0354,0516 0012, 0037, 0163, 0217, 0218, 0247, 0259, 0303, 0361, 0371, 0394, 0519, 0556, 0648, 0668, 0714, 1037, 1137, 1237, 1904 Saivod ............... 0037, 1037 Sakan................ 0163 Scotch ............... 0178 0163, 0194, 0208, 0290, 0361, 0480, 0516, 0519, 0548, 0621, 0807, 1237 Scotland ............. 0163 Scott ................. 0178, 0179, 0180, 0236 Salora ............... Salsa................. Sampo 0335 ............ 0102, 0290, 0516 .............. 0009, 0030, 0032, 0036, 0039, 0092, 0093, 0154, 0171, 0178, 0650, 0700, 0721, 1755 Sambers Sears ................. 0047, 0054, 0056, 0154, 0156, 0171, 0178, 0179, 1904, 1926 Sentra 0030, 0056, 0156, 0178 Shanghai ............ 0009, 0208, 0226, 0264, 0412, 0817, 0848, 1910 Shaofeng ............ 0145, 0227, 0817 Sharp ................ 0009, 0030, 0032, 0036, 0039, 0053, 0093, 0157, 0165, 0186, 0193, 0200, 0256, 0294, 0386, 0491, 0516, 0650, 0688, 0689, 0720, 0760, 0851, 1193, 1917 0696, 0753 0009, 0037, 0264, 0696, 0698, 0727, 0748, 0753, 0817 Sharper Image...... 1950 Shen Ying ........... 0003, 0009, 0092, 0179 Sontec ............... 0009, 0037, 0294, 0370 Shencai .............. 0009, 0145, 0264, 0412 Sony .................. ......... 0009, 0033, 0093, 0179, 0236 Shenyang ........... 0009, 0264, 0696, 0753, 0817 0000, 0011, 0036, 0037, 0102, 0111, 0157, 0353, 0505, 0650, 0834, 1010, 1100, 1505, 1651, 1904, 1925 Sherwood ........... 0009 Sound & Vision ...... Shintoshi ............ 0102, 0218, 0374 0037 Shivaki ............... Soundesign.......... 0037, 0178, 0443 0178, 0179, 0180, 0186 Shorai................ Soundwave .......... 0179, 0294 0032, 0037, 0418, 0715 Siam ................. 0037 Sowa ................. 0036, 0051, 0060, 0092, 0156, 0178, 0226 .............. Spectricon ........... Squareview .......... Ssangyong .......... 0009 Sheng Chia Seaway .............. 0634 Siarem ............... 0087, 0102, 0516 Seelver ............... 1037 Siemens ............. 0032, 0037, 0157, 0191, 0195, 0200, 0327, 0328, 0535, 0554 Siera ................. 0012 Spectra 0003 0171 0009, 0032 A-7 Device Codes•Códigos de instalación•Codes de configuration Rex Tashiko ............... Device Codes•Códigos de instalación•Codes de configuration TV SSS .................. 0180 Stag.................. 0032 Staksonic ........... 0009 Standard ............ 0009, 0037, 0217, 0218, 0374, 1037 Starlite ............... 0009, 0037, 0180, 0264 Stenway ............. 0218, 0282 Stern ................. 0163, 0206, 0259, 0411 Tatung ................ TCL ................... 0032, 0033, 0036, 0043, 0092, 0163, 0216, 0217, 0650, 0721 Telefusion ........... 0037 Tongtel ............... 0780 Telegazi .............. 0037, 0163, 0218, 0259, 0264, 0284 Tophouse ............ 0180 Toshiba ............... 0003, 0009, 0011, 0036, 0037, 0051, 0054, 0055, 0060, 0072, 0154, 0156, 0217, 0272, 0502, 0516, 0621, 0629, 1156, 1356, 1756 Telesonic ............ 0037 Telestar .............. 0009, 0037, 0579 Teletech ............. 0009, 0037, 0247, 0337, 0668, 1037 Teleton ............... 0036, 0186, 0206, 0217, 0259 0412, 0698, 0727, 0806, 0826, 1035 Televideon........... 0163, 0216 Teleview ............. 0037 Televiso .............. 0400 0009, 0035, 0036, 0060, 0070, 0093, 0102, 0109, 0145, 0154, 0156, 0195, 0217, 0227, 0243, 0264, 0412, 0502, 0508, 0618, 0644, 0650, 0698, 0702, 0718, 0767, 0821, 0832, 0845, 1156, 1256, 1356, 1508, 1656, 1704, 1918, 1935, 1936, 1945 ............... Tempest ............. Tennessee ........... Tensai ................ 0294 Totevision ............ 0039 0009 Towada ............... 0217 0037 Toyoda ............... 0009, 0264, 0371 Trakton ............... 0009, 0217, 0264 .... 0037, 0217, 0668, 1037 ............ 0009, 0037, 0264, 0418, 0455, 0512, 0587, 0698, 0712 Strato ................ 0009, 0037, 0264 TCM .................. 0714, 0808 Studio Experience . 0843 Teac .................. Sunkai ............... 0294, 0355, 0455, 0487, 0610 0009, 0037, 0170, 0171, 0178, 0217, 0264, 0282, 0412, 0418, 0455, 0512, 0668, 0686, 0698, 0706, 0712, 0714, 0721, 0755, 1037, 1437, 1668, 1724, 1755, 1904, 1909, 1913, 1932, 1949 Sunstar .............. 0009, 0037, 0264, 0371, 0579 Sunwood ............ 0037 Superla .............. 0516 ......... SuperTech .......... 0208 Supersonic Supra ................ ........ Supreme ............ Susumu ............. Sutron ............... SVA .................. Supre-Macy 0009, 0037, 0216, 0218, 0556 Tec.................... 0009, 0039, 0056, 0178 Tech Line ............ 0046 0000 0009, 0037, 0217, 0247, 0259, 0337 0193, 0218, 0264 Triumph .............. 0177, 0243, 0346, 0516, 0556 Tsoschi ............... 0282 Tuntex ................ 0009, 0030, 0092 TVS ................... 0463 TVTEXT 95........... 0556 Uher .................. 0037, 0206, 0303, 0374, 0418, 0480, 0486 Ultra .................. 0192 Ultravox .............. 0037, 0087, 0102, 0216, 0247 0556 Sylvania ............. 0020, 0030, 0054, 0171, 1931, 1944 Teco .................. 0009, 0036, 0051, 0092, 0093, 0178, 0218, 0264, 0280, 0653 Techwood ........... Tedelex............... 0003, 0051, 0056 0009, 0208, 0217, 0418, 0606, 1537 Synco................ 0000, 0036, 0060, 0092, 0093, 0178, 0451 Sysline............... 0037 Sytong............... 0216 T + A ................. 0447 T+A .................. 0447 Teleavia .............. 0009, 0092, 0178, 0179 0109, 0196, 0399, 0501 Telecor ............... 0037, 0163, 0217, 0218, 0259, 0284, 0394 Telefunken ........... 0037, 0056, 0073, 0074, 0084, 0101, 0109, 0196, 0262, 0335, 0346, 0486, 0501, 0625, 0698, 0702, 0712 Tandy ................ 0039, 0072, 0093, 0163, 0217, 0218 A-8 0157 Tristar................. Tecnimagen ......... 0367 0556 Trical .................. 0217, 0516 0216, 0217 Tandberg ............ Triad .................. 0037, 0109, 0196, 0198, 0335, 0399, 0501, 0560, 0625, 1447 Sydney .............. 0009, 0374, 0817 0216 0009, 0216, 0217, 0218, 0374 Thomson ............ 0847 0009 Transtec .............. Texet ................. Trident ................ Techview ............. Taishan .............. 0037, 0648, 0668, 0714, 1137 1904 0587, 0748, 0768, 0865, 0870, 0871, 0872 Tai Yi ................. Tevion ................ Transonic Thomas .............. 0179 0272 0030, 0466 0051, 0250, 0650 Technol Ace ......... Tactus ............... Tera .................. 0218 0009 ............... 0009 Technics ............. 0556, 0655 Tacico Trans Continens Techica............... TechniSat ............ 0171, 0180, 1904, 1913 0009, 0037, 0104, 0105, 0217, 0218, 0247, 0294, 0371, 0374, 0377, 0715 Tenson ............... 0037, 0668 0218, 0335 Symphonic.......... Temco Tek .................... 0795 Teknika ............... 0016, 0039, 0054, 0056, 0060, 0092, 0150, 0179, 0180, 0186 Thorn ................ 0035, 0036, 0037, 0072, 0073, 0074, 0084, 0104, 0109, 0190, 0192, 0193, 0238, 0272, 0335, 0361, 0499, 0502, 0505, 0512, 0535 Thorn-Ferguson .... 0073, 0190, 0192, 0193, 0238, 0499 Tiane ................. 0093, 0817 TMK .................. 0056, 0177, 0178 TNCi ................. 0017 Unic Line ............. 0037, 0455 ................. 0009, 0264, 0412, 0748 United ................ 0037, 0714, 0715 Tokai ................. 0009, 0037, 0072, 0163, 0217, 0337, 0374, 0448, 0668 Universal ............. 0027 Tokaido .............. 1037 Tokyo ................ 0035, 0216, 0303, 0448 Tomashi ............. 0218, 0282 Tongguang .......... 0264, 0412 Tobo Universum .......... Watson ............... 0009, 0037, 0163, 0218, 0394, 0519, 0579, 0668, 1037, 1237, 1437 .......... Waycon .............. Wega ................. 0102, 0216 Weipai ................ 0009 Weltblick ............. 0217 Wharfedale .......... 0037, 0519, 0556, 0807, 1237 Watt Radio White Westinghouse 0156 0036, 0037, 0087 0037, 0186, 0216, 0337, 0463, 0623, 1909 Univox ............... 0037, 0087, 0163, 0337 ................ V7 .................... Vector Research ... Vestel ................ 0864, 1756 Winco ................ 0412 1755 Windsor .............. 0668 0030 Windstar ............. 0282, 0337 V Inc. 0037, 0217, 0556, 0668, 1037 Vexa ................. 0009, 0037 Vibrant ............... 0272 Victor ................ 0036, 0053, 0250, 0650, 0653 Videologic........... 0216, 0218 Videosat ............. 0247 VideoSeven ......... 1755 VideoSystem ....... 0037 Videotechnic........ 0217 ............. Vidtech .............. Viewsonic ........... 0054 Viking ................ 0046 Vidikron 0036, 0178 0857, 0864, 1755 ............... Vision ................ 0216 ................ Vortec ............... Voxson .............. 0206 Waltham............. 0037, 0109, 0217, 0418, 0668 Visiola Vistar Wards ............... Warumaia ........... 0032, 0037, 0072, 0217, 0264 Wintel ................ 0714 Xenius ................ 0661 Xiahua................ 0009, 0264, 0412, 0698, 0773, 0779, 0817 ............. Xiangyang ........... Xiangyu .............. Xihu .................. Xianghai ............. Xingfu ................ Xinghai ............... Xinrisong............. XLogic ............... Xrypton .............. Xuelian ............... Yamaha .............. Xinaghai Yamishi .............. Hanseatic ............ Zenith ................ 0016, 0017, 0092, 0178, 0463, 1904, 1909, 1911, 1929 Hitachi................ 1481 Hyundai .............. 0803, 0865 Zenor ................ 0339 LG Zhuhai ............... 0009, 0374 Zonda................ 0003, 0698, 0779 LCD LCD TV LCD TV TV avec écran LCD Audiovox ............ 0180, 0802, 0875, 1937 ............. LG .................... Manhattan .......... Marantz.............. Panasonic ........... Philips ............... RCA .................. Samsung ............ Sharp ................ SVA .................. 0849 0848, 1910 Sylvania ............. 0171 0860 Techview ............ 0847 0037 Toshiba .............. 0845, 1656 0848, 1910 V Inc.................. 0864 0030, 0769, 0833, 0839 Viewsonic ........... 0857, 0864 0009 0264, 0412 0009 0264, 0412, 0817 0412 0009 Hyundai 0264 0037, 0217, 0218, 0282, 0455 L&S Electronic ...... .................... 0856, 1178 0778 0855 0650, 1941 1454 0047, 1958 0766, 0814 0093 0587, 0870, 0871 Medion ............... 0808 Micromaxx........... 0808 Microstar............. 0808 Mitsubishi ............ 0836 Monivision ........... 0843 .................. Norcent .............. Panasonic ........... Philips ................ Pioneer ............... Relisys ............... Sampo ............... Sharp ................. Sony .................. Studio Experience .. SVA ................... Tatung ................ TCL ................... TCM .................. Teac .................. Toshiba ............... V Inc. ................. V7 ..................... VideoSeven .......... Viewsonic ............ Xenius ................ Zenith ................ 0704, 1704 CAB Plasma TV TV de plasma TV avec écran à plasma Cable box Receptor de cable Terminal câble 0848, 1910 Akai .................. ABC 0009 Albatron ............. 0843 0843 0087, 0163, 0178, 0418 Yingge ............... Yokan ................ Yoko .................. 0009 Yongbao ............. Yonggu ............... 0037 0808 0037, 0056, 0178, 0856 0704 PLTV 0250 0808 Marantz .............. NEC 0813 Yapshe ............... 0374, 0661 0206, 0264 Envision ............. 0037 0000, 0016, 0017, 0020, 0021, 0024, 0027, 0030, 0047, 0051, 0054, 0055, 0056, 0060, 0111, 0154, 0156, 0165, 0166, 0178, 0179, 0180, 0186, 0187, 0866, 1147, 1156, 1347, 1356 Zanussi .............. 0824 0250, 0650 0690 0679, 0760 0865 1755 0093 0000 0843 0865 1756 1035 0808 0755, 1755 0650, 1704 1756 1755 1755 1755 0661 0178 0009, 0037, 0216, 0217, 0218, 0247, 0264, 0339 0708, 0812 .................. 0003, 0008, 0011, 0013, 0014, 0017, 0237 .................. 0218 Chun Yun............ 0896 0817 Conrac............... Alcatel ................ Youlanasi ............ 0808 0899 Yousida .............. 0009, 0848, 1910 ............. Digital Life ........... Fujitsu ............... Americast ............ Daewoo 0451, 0661 Amstrad .............. 1222 0872 Austar ................ 0012, 0276 0683, 0809, 0853 Bell & Howell ........ 0014 1755, 1756 Bell South............ 0899 Yorx Yuhang ............... Zanela ................ 0009 0238 Gateway ............. A-9 Device Codes•Códigos de instalación•Codes de configuration 0009, 0011, 0032, 0036, 0037, 0070, 0072, 0074, 0084, 0104, 0105, 0109, 0157, 0170, 0177, 0200, 0217, 0247, 0264, 0290, 0294, 0327, 0328, 0346, 0361, 0370, 0411, 0418, 0473, 0480, 0492, 0501, 0505, 0512, 0519, 0535, 0554, 0631, 0668, 0807, 1037, 1237, 1437, 1901 Birmingham Cable Communications ... 0276 British Telecom ..... 0003 Cable & Wireless ... 1068 Cabletime ........... 0448, 0665 ........ ClearMax............ Comcrypt ........... Comtec.............. Comtronics ......... Contec .............. Coolmax ............ Daeryung............ 0883 Decsat ............... 0423 Clearmaster Device Codes•Códigos de instalación•Codes de configuration ....... 0276 Trans PX ............. 0276 Astacom 0668, 0710 Oak ................... 0019 Tri-Vision ............ 1257 Aston Ono ................... 1068 Tristar ................ 0883 0142, 1129, 1261 ............. Optus ................ Pace .................. 0021 TS .................... 0003 Astra 0108, 0607, 0713 0276, 1060 Tudi .................. 0286 Astrastar 0548 0237, 1060, 1068, 1877 United Cable ........ 0003 Astro Panasonic ........... US Electronics...... 0276 0000, 0008, 0021, 0040, 0107 V2 .................... 0883 0133, 0173, 0369, 0548, 0607, 0658, 0868, 1099, 1100, 1317 .............. Paragon.............. Philips ................ Viewmaster ......... 0883 0637 Athena 0668 Vision ................ 0883 Atlantic Telephone 0879 Visiopass ............ 0451, 0817 Atsat 1300 Vortex View ......... 0883 Aurora 0642, 0879 Zenith ................ 0000, 0525, 0899 Austar 0497, 0642, 0863, 0879, 1173, 1225, 1259 NTL Cabletell CAB Optimus 0883 0443 0019 0040 Panther 0019 0000 0013, 0286, 0317, 0619, 0817, 1305 0883 Pioneer............... 0008, 0277, 0477, 0877, 1877 0144, 0533, 0877, 1021, 1877 Pulsar ................ 0000 0003 SAT Avalon 0396 Axiel 0668, 0710 Axis 0369, 0834, 1111 .................. 0637 PVP Stereo Visual Matrix ................ Director.............. 0476 Quasar ............... 0000 Dumont.............. 0637 RadioShack ......... 0883 Beko 0455 0040 RCA .................. 0021 Bentley Walker 1017 0443 Regal ................. 0020, 0273, 0279 Best 0369 Blaupunkt 0173 Blue Sky 0713 Boca 0132, 0713, 0794 Digi Everquest ........... Filmnet .............. Satellite receiver Receptor de satélite Récepteur Satellite Foxtel ................ 1222 Rembrandt .......... 0011 @sat 1300 France Telecom .... 0451, 0817, 0896 Runco ................ 0000 ABsat Funai................. 0019 Sagem ............... 0123, 0668, 0713, 0832 0817 1259 Galaxi................ 0008 Salora ................ ADB 0000 AGS 0668, 0710 0000, 0040, 0144 ... 0008, 0017, 0237, 0277, 0477, 0877, 1877 ................... 0237 Samsung ............ Gehua ............... 0476 Scientific Atlanta General Instrument 0003, 0011, 0014, 0276, 0476, 0810 Golden Channel .... 1110 Signal ................ 0040 ............ Hamlin ............... 0040, 0144 Signature ............ 0011 SL Marx .............. 0040 Alltech 0713 Sony.................. 1006 Alpha 0668 Sprucer .............. 0021 AlphaStar 0772 Starcom.............. 0003, 0014 Stargate.............. 0040 Amitronica 0713 Supercable .......... 0276 Ampere 0132, 0396 ........... Tadiran ............... Tele Danmark ....... Tele+1 ................ Telepiu ............... Teleview.............. Telewest ............. Thomson ............ Timeless ............. Tocom ................ Torx ................... Toshiba .............. 0883 GE GoldStar Hitachi ............... HyperVision ......... Jerrold ............... 0009, 0020, 0273 0011, 0014 0619 0003, 0011, 0012, 0014, 0276, 0476, 0810 Kabelvision ......... 0003 LG.................... 0040, 0144 Macab ............... 0817 Memorex ............ 0000 MNET ................ 0019, 0443 Motorola ............ 0276, 0476, 0810, 1106, 1254, 1376 Mr Zapp ............. 0817 Multichoice ......... 0019, 0443 MultiVision .......... Noos ................. NTL .................. A-10 0012 0817 1060, 1068 Supermax 0040 0132, 0299, 0713, 0742, 0834, 0885 0200 Akena 0668 Alba 0455, 0713 British Sky Broadcasting 1175, 1848, 1849 Allsat 0200, 1017, 1043 Broco 0713 Allsonic 0369 Altai Amstrad 0619, 1016 0443 0668, 0710 Brand Unknown Akai 0040 0443 Boston 0396 0132, 0345, 0396, 0713, 0742, 0795, 0863, 0868, 0882, 0885, 1317, 1849 Anglo 0713 Ankaro 0369, 0713 BskyB 1849 BT 0668, 0710 Bubu Sat 0713 Cambridge 0868 Canal Digital 0853 Canal Satellite 0853, 1339 Canal+ 0853 Century 0856 CERT 0108 Channel Master 0212 Chaparral 0053, 0209, 0216 Cherokee 0123, 0710 Chess 0157, 0713, 1085 AntSat 1017, 1083 Apollo 0455 CityCom Arcon 0834, 1043, 1075, 1205 0115, 0299, 0607, 1176 Clemens Kamphus 0396, 0834 0012, 0013 Asat 0200 Cobra 0396 0003 ASLF 0713 Colombia 0132, 0668 0000 AssCom 0853 Comag 0132, 1412 1068 1110 0040 0369, 0607 Engel 0713, 1017 Goldvision 1017 JOK 0710 Connexions 0396 EP Sat 0455 Gooding 0571 JVC Conrad 0115, 0369, 0607, 0868 Eurieult 0084, 0882, 0885 Goodmans 0455, 1246, 1284 0492, 0571, 0775, 1170, 1775 Crossdigital 1109 Euro1 1278 Gradiente 0856, 1487 K-SAT 0713 Kamm 0713 KaTelco 1111 Kathrein 0114, 0115, 0123, 0173, 0200, 0249, 0658, 0713, 0742, 1057, 1221, 1224 Kathrein Eurostar 0115 Kenwood 0853 Condor Cryptovision 0455, 0795 Eurocrypt 0108, 0455 Cyrus 0200 Europa D-box 0723, 0873, 1127 0607, 0863, 0868 European 0794 Daeryung 0396 Europhon Daewoo 0713, 1111, 1296 0132, 0299, 0607 Eurosky Daumling 0794 0115, 0132, 0299, 0369, 0607, 0868 0863 Eurostar 0115, 0607 Deltasat 1075 Eutelsat 0713 Dgtec 1242, 1542 Expressvu 0775, 1775 Digatron 1294 Fast 1901 Digenius 0299, 1161 Fenner DigiQuest 0863 0157, 0369, 0605, 0668, 0713 DigiSat 0868 Ferguson 0455, 0711 DigitAll World 1227 Fidelity 0868 Digiturk 1076 Finlandia 0108, 0455 DirecTV 0099, 0247, 0392, 0566, 0639, 0724, 0749, 0819,1076, 1109, 1142, 1392, 1442, 1443, 1444, 1639,1640, 1749, 1856 Finlux 0108, 0455, 0573 Discoverer 0605 Discovery 0668, 0710 Diseqc 0710 Fraba 0868 Dish Network System 0775, 1005, 1170, 1505, 1775 Fracarro Dishpro 0775, 1005, 1505, 1775 Distratel 0084, 0885, 1205 DMT 1075 DNT 0200, 0396 Dream Multimedia 1237 Dune 0369 Echostar 0159, 0167, 0269, 0280, 0396, 0610, 0668, 0713, 0775, 0853, 0871, 1005, 1086, 1170, 1200, 1505, 1775 0084 Grundig 0173, 0345, 0571, 0750, 0853, 0879, 1150, 1291, 1297, 1849 Hanseatic 0605, 1099, 1100 Hauppauge 1294 HDT 1011 Helium 0607 Hirschmann 0108, 0173, 0299, 0369, 0396, 0573, 0607, 0710,0868, 0882, 1085, 1111 Hitachi 0455, 0489, 0491, 0819, 1250 Key West 0132, 0794 Kiton 0114 Klap 0668, 0710 Konig 0607 Koscom 0834, 1043 Kreiling 0114, 0249, 0658 Kreiselmeyer 0173 L&S Electronic 0132, 0369, 1043 Labgear 1296 LaSAT 0115, 0132, 0157, 0299, 0369, 0607 0238 Houston 0396, 0668 0713 Hansel & Gretel 0132 Force 1101, 1194 HTS 0775, 1775 Force NO AS 1101, 1194 Legend 0269 Fortec Star 1017, 1083 Hughes Network Systems 0749, 1142, 1442, 1443, 1444, 1749 Lenco 0115, 0369, 0607, 0713 Foxtel 0497, 0879, 1173, 1176, 1225 Humax 0863, 1176 Lenson 0868 Huth 0132, 0607, 0794, 1017, 1075, 1143 LG 1075, 1226 Lifesat 0668, 0871 Hwalin 0885 Freecom 0868 0132, 0157, 0299, 0369, 0605, 0713, 1043 Hyundai 1011, 1075 Freesat 0882 Logix 1017, 1075 ID Digital 1176 Fresat 0885 Lorenzen IEEC 0605 FTEmaximal 0369, 0713, 0863 Imex 0084 0132, 0299, 0607, 0742, 0794, 0867, 1161, 1294 Indovision 1487 Lupus 0369 Ingelen 0396, 0882 Luxor Innova 0099 0108, 0345, 0573, 0868 International 0132 Magnavox 0722, 0724 Manata 0132, 0668, 0710, 0713 Manhattan 0455, 0834, 1017, 1083 Marantz 0200 Maspro 0173, 0571, 0713, 0750 Matsui 0173, 0571, 0710 Matsushita 0340, 0500 Max 0607 Flair Mate Fuba Galaxis 0108, 0115, 0173, 0299, 0369, 0396, 0573, 1161 0115, 0369, 0834, 0853, 0863, 1101, 1111 Garnet 1075 GbSAT 1214 0566 General Instrument 0869 0132, 0713, 0794, 0868 GF 0834, 1043 0713, 1129 GF Star 1043 Elsat 0713 GOD Digital 0200 Elta 0200, 0369 GOI 0775, 1775 Emme Esse 0369, 0871 Gold Box 0853 eMTech 1214 Goldbox 0292, 0853 Elap Grandin Homecable GE Einhell 0108, 0455 Interstar 1017 Intervision 0607 InVideo 0871 IQ 0210 IQ Prism 0210 Irdeto Technology 0879 ISkyB 1487 Italtel 0871 ITT 0108 ITT Nokia Janeil 0455, 0573, 0723, 0873 MB 0605 Mediacom 1206 0152 A-11 Device Codes•Códigos de instalación•Codes de configuration Delfa Granada Device Codes•Códigos de instalación•Codes de configuration SAT MediaSat 0292, 0853, 0868 Medion 0132, 0299, 0369, 0713, 1043, 1075 Ouralis 1205 RadioShack 0869 Oxford 0668 Radix Pace 0123, 0200, 0241, 0455, 0497, 0720, 0791, 0795, 0853, 0867, 1175, 1323, 1423, 1487, 1849 0396, 0882, 1317 RCA 0143, 0392, 0566, 0855, 1392 Realistic 0052 Rebox 1214 SKY 0099, 0711, 0856, 1014, 1175, 1487, 1848, 1849, 1856 Sky Television 1014 SKY+ 1175 Skymaster 0157, 0605, 0713, 1075, 1085, 1200 Skymax 0200 Skyplus 1412 SkySat 0114, 0157, 0605, 0607, 0713 Mega 0200 Memorex 0269, 0724 Pacific Satellite 0834 Red Star 0369 Metronic 0084, 0123, 0713, 0885, 1205, 1215, 1282, 1283 Packsat 0710 RFT 0200 Palcom 0299, 1161 Roadstar 0713, 0853 Palladium 0396, 0571, 0868 Rover 0369, 0713 Saba Palsat 0157, 0868 0115, 0607, 0710, 0885 SL 0132, 0742 Panasat 0615, 0879 Sabre 0455 SM Electronic Panasonic 0152, 0247, 0340, 0455, 0500, 0701, 1304, 1320, 1849 Sagem 0820, 1114, 1253, 1307 0157, 0713, 1200 Smart Salora 0108 Samsung 0853, 0863, 1017, 1109, 1206, 1243, 1244, 1276, 1293 0115, 0132, 0396, 0713, 0794, 0882, 1101, 1273, 1317 Sony 0163, 0292, 0294, 0639, 0853, 1639, 1640, 1849 Star 1487 Metz 0173 Micro 0607, 0713, 0868 Micromaxx 0299, 0369 Microtec 0713 Minerva 0571 Mitsubishi 0455, 0491, 0749 Panda 0108, 0173, 0455, 0607, 0834 Morgan's 0132, 0200, 0713, 0794 Motorola 0869 Pansat 1011 0642, 0879 Patriot 0132, 0668, 0710 Multichoice Multitec 0157 Myryad 0200 Mysat 0713 NEC 0496, 1270 Netgem 1322 Netsat 0099, 1487 Neuhaus 0607, 0713, 0834, 0868 Neusat 0713, 0834 Neveling 1161 Newton 0396 Next Level NextWave 0869 1143, 1227 Paysat Philips Phonotrend Pioneer Planet Polytron 0724 0099, 0133, 0173, 0200, 0292, 0455, 0571, 0668, 0710, 0722, 0724, 0749, 0750, 0853, 0856, 1076, 1114, 1142, 1442, 1487, 1749 0863, 1017, 1200 0292, 0329, 0352, 0853 0396, 0871 Sanyo 0493, 1219 SAT 0868 Sat Control 1300 Sat Cruiser 1143 Sat Partner 0868 Sat Team 0713 Satcom 0605, 0607 SatCruiser 1143 Satec 0713, 0834 Satelco 0369 0455 0132, 0157, 0605, 0607, 0863, 0885, 1075, 1083,1111 Tarbs 1225 Schwaiger Sedea Electronique 0132 0455 Primacom 1111 Seemann 0396 OnDigital 0133, 0241, 0751 Prosat Proscan Prosonic Opentel 1412 Optex 0834, 1043, 1283 Pye SEG 0114, 0369, 0605, 0742, 1075, 1087 1173, 1225 Seleco 0871 0392, 0566 Septimo 0885, 1205 0742 Serino 0610 0571 Sharp 0494 Optus 0879, 1143 Pyxis 0834 Siemens 0173 Orbitech 0114, 0157, 0548, 0834, 0868, 1099, 1100 Quadral 0369, 0668, 0710 Silva 0299 Origo OSAT A-12 Quelle 0497 0345 Radiola 0115, 0299, 0607, 0742 0200 0132, 0369, 0642, 0794 1487 0115, 0299 0455 0713 Sunstar Tantec SCS 0668, 0710 Sunsat Supernova 0795 Promax 0369 1143 Prima Profile 0210 Sunny Sound Supermax 0292, 0853, 0873 1505 STS 0157, 0668, 0710, 1206, 1901 Premiere 0668 0132, 0369, 0853, 0879, 1158, 1300 1083 0108, 0455, 0573, 0723, 0751, 0853, 0873, 1023, 1127, 1223, 1723 Okano 0200 Strong Schneider Nokia OctalTV Starlite Satstation 0200, 0713 Nordmende 0180 0157 0396 0132, 0396, 0794, 1101, 1317 0869 Star Trak Satplus Nikko Preisner Star Choice Skantin 0713 SKR 0713 Tatung 0455 TCL 1143 Teac 1225, 1227, 1322 Tecatel 1200 TechniSat 0114, 0157, 0396, 0455, 0548, 0863, 0868, 1099, 1100 Technosat 1143, 1206 Technowelt 0132, 0607 Techsan 1017 Techwood 0114 tekComm 1017 Telasat 0115, 0605, 0607 Teleciel 1043 Telefunken 0710 Teleka Telesat Telestar 0396, 0607, 0750, 0834, 0868 Viasat 1323 Victor 0492 0605 Visiosat 0114, 0142, 0710, 0713, 1129 Viva 0856 Telesystem 0396 Voom 0869 Teletech 0114 Welltech 0157 Televes 0132, 0455, 0868, 1214 Wetekom 0157, 0605, 0868 Televisa 1487 Wewa 0455 Tempo 1143 Wisi Tevion 0713 0173, 0299, 0396, 0455, 0607, 0868 Thomson 0115, 0292, 0392, 0455, 0607, 0668, 0710, 0711, 0713, 0820, 0853, 0885, 1046, 1198, 1291 Thorn 0455 Worldsat 0114, 0123, 0668, 0710 XCOM 0123, 0668, 0832 Xcom Multimedia 0668 Xrypton 0369 Xsat 0123, 0668, 0713, 1323, 1849 Tioko 0132 Tivo 1142, 1442, 1443, 1444 Yes 1487 Tokai 0200 Zehnder Tonna 0455, 0668, 0713, 0834, 0868 0114, 0115, 0369, 0742, 1075, 1412 Zenith 0856, 1856 Topfield 1206, 1207 Zinwell 1173, 1225 0082, 0455, 0486, 0749, 0790, 1285, 1749 Zodiac 0396 Toshiba TPS 0820, 1253, 1307 Triasat 0868 Triax 0114, 0115, 0200, 0396, 0713, 0853, 0868, 1296,1317 Turnsat 0713 Twinner 0713 UEC 0879 Uher 0157 UltimateTV 1392, 1640 Uniden 0052, 0074, 0076, 0238, 0722, 0724, 0834 Unisat Universum Van Hunen Variosat 0132, 0200 0114, 0115, 0173, 0299, 0571, 0607, 0742, 1087,1099 1161 0000, 0072, 0081, 0209, 0278, 0315, 0348, 0352 Alienware ............ 1972 ............. Allstar ................ America Action ..... American High ...... Amoisonic ........... Amstrad ............. 0240 Anam ................ 0037, 0162, 0226, 0240, 0278, 0480, 1037 Allorgan 0081 0278 0035 0479 0000, 0072, 0278 Anam National ...... 0162, 0226, 1162, 1562 Anitech .............. 0072 Ansonic .............. 0000 ............. 0081 Aristona ASA .................. 0037, 0081 Asha ................. 0240 Asuka ................ 0037, 0038 Audiosonic .......... 0278 Audiovox ............ 0037, 0278 AVP .................. 0000, 0352 Awa .................. 0037, 0043, 0278, 0642 Baird ................. 0000, 0041, 0104, 0106 Bang & Olufsen..... 0499 VCR Basic Line ........... 0072, 0104, 0278 VCR VCR VCR Beaumark ........... 0240 Beko ................. 0104 ....... Bestar ............... Black Diamond ..... Black Panther ...... Blaupunkt ........... 0104 Blue Sky ............. 0037, 0072, 0209, 0278, 0348, 0352, 0480, 0642 Zwergnase .................. Accent ............... Admiral............... Adventura ........... Adyson ............... Aiko .................. Aim ................... Aiwa .................. ABS Akai................... 0173 Vega 0369 Akiba ................. Ventana 0200 Akura ................. Vestel 0114, 0742 VH-Sat 0299 0794 Bell & Howell 1972 0072 0048, 0209 0000 0072 Calix .................. 0037 Canon ................ 0035 Carena ............... 0081, 0209 Carrefour ............. 0045 Carver ................ 0081 Casio ................. 0000 Cathay ............... .................. CGE .................. Changhong .......... Cimline ............... Cineral ............... Citizen ................ Clatronic ............. Colt ................... Combitech ........... Condor ............... Craig ................. 0278 CCE 0072, 0278 Crown ................ 0072, 0271, 0278, 0480 Curtis Mathes ....... 0035, 0041, 0060, 0162, 0760 Cybernex ............ 0240 CyberPower ......... 1972 Cyrus ................. 0081 Daewoo .............. 0045, 0046, 0104, 0209, 0278, 0352, 0637, 0642 Dansai ................ 0072, 0278 Dantax ............... .............. De Graaf ............. 0352 Daytron 0278 Decca ................ 0000, 0041, 0067, 0081, 0209, 0352 Deitron ............... 0278 0278 0642 0278 0034, 0081, 0162, 0226 0000, 0041 0048, 0081 0072 0278 0037, 0278 0000, 0072 0072 0352 0278 0037, 0047, 0072, 0240, 0271 0042, 0046, 0048, 0081, 0104, 0166 ................... 1972 Denko ................ 0072 Denon ................ 0042 Diamant .............. 0037 .............. Domland ............. Dual .................. 0739 Dell 0278 Bondstec ............ 0072 0278 Brand Unknown .... 0104 0000, 0037, 0124, 0209, 0307, 0348, 0352, 0479 Brandt ............... 0041, 0320, 0321 .. 0041 0037, 0041, 0106, 0240, 0315, 0352, 0642 Brandt Electronique 0041 .......... Broksonic ........... 0209, 0348 Dumont .............. 0000, 0081, 0104 0002, 0121, 0184, 0209, 0348, 0479 Durabrand ........... 0038, 0039 ............ Elbe ................... Elcatech.............. 0000 0072 0072, 0271 Brandt Electronic Brinkmann Bush ................. 0000, 0072, 0081, 0209, 0278, 0315, 0348, 0352 DirecTV Dynatech 0209 0000, 0041, 0081, 0278, 0348 0038, 0278 0072 A-13 Device Codes•Códigos de instalación•Codes de configuration 0114, 0157, 0868, 1099, 1100 Alba .................. Goodmans VCR 0000, 0037, 0072, 0081, 0209, 0278, 0348, 0352, 0637, 0642 Intervision ........... 0000, 0209, 0278 IR ..................... 0041, 0042, 0045, 0047, 0072, 0081, 0104, 0106, 0209, 0226, 0240, 0348 Electrohome ........ 0037 Electrophonic....... 0037 GPX .................. 0037 Elin ................... 0240 Gradiente ............ 0000 Elsay ................. 0072 Graetz ................ 0072, 0278 0041, 0104, 0240 Irradio ................ Elta................... Emerex .............. 0032 ............. 0000, 0037, 0042, 0046, 0048, 0081, 0104, 0226, 0240 ITT.................... Emerson Device Codes•Códigos de instalación•Codes de configuration .......... ............ 0000, 0002, 0035, 0037, 0043, 0045, 0072, 0121, 0184, 0209, 0240, 0278, 0479, 0637, 1593 ESC .................. 0240, 0278 Etzuko ............... 0072 Ferguson ............ 0000, 0041, 0278, 0320, 0321 Fidelity............... Finlandia ............ Finlux ................ Firstline .............. 0000, 0072, 0240, 0352, 0432 0000, 0037, 0042, 0043, 0046, 0048, 0081, 0104, 0106, 0166, 0226, 0384 0000, 0042, 0081, 0104 0037, 0043, 0045, 0072, 0209, 0278, 0348, 0480 Fisher ................ 0046, 0047, 0104 Flint .................. 0209 ............ Granada Grandin .............. 0000, 0037, 0072, 0209, 0278 Grundig .............. 0034, 0072, 0081, 0226, 0320, 0347, 0348, 0352 Magnavox ........... Magnin ............... 0000, 0035, 0039, 0081, 0149, 0563, 0593 0240 ............. 0045, 0072, 0081, 0209 0037, 0072, 0081 Marantz .............. 0035, 0038, 0081, 0209 0041, 0046, 0104, 0106, 0240, 0384 Mark .................. 0000, 0278 Marta ................. 0037 ................... JBL................... Jensen ............... JMB .................. 0037, 0278 Master's ............. Matsui ................ 0278 Matsushita ........... 0035, 0162, 0226, 1162 .................. Media Center PC ... 1972 0041, 0045, 0067, 0081, 0384 Mediator ............. 0081 Medion ............... 0209, 0348, 0352 ITV JVC 0278 0041 0209, 0348, 0352 Manesth 0209, 0240, 0348, 0352 Haaz.................. 0348 Hanimex ............. 0352 Kaisui ................ 0072 Hanseatic ............ 0037, 0038, 0081, 0209 Karcher .............. 0081, 0278 MEI ................... 0035 KEC .................. 0037, 0278 Melectronic .......... ............... 0000, 0037, 0038 0072, 0106, 0209, 0278, 0315, 0348 Memorex............. Kenwood ............ 0038, 0041, 0067, 0384 0000, 0035, 0037, 0039, 0046, 0047, 0048, 0104, 0162, 0209, 0240, 0307, 0348, 0479, 0569, 1037, 1048, 1162, 1262 Memphis ............. 0072 ............. Metz .................. 0081 Haojie ................ 0240 Harley Davidson .... 0000 Harman/Kardon..... 0038, 0081 Harwood ............. 0072 Kendo ................. 0072 KIC ................... 0000 Headquarter ......... 0046 Kimari ................ 0047 Hewlett Packard .... 1972 Kioto ................. 0348 HI-Q .................. 0047 KLH .................. 0072 HCM Hinari ................. 0041, 0072, 0209, 0240, 0278, 0352 Kneissel ............. Hisawa ............... 0209, 0352 Kodak................ 0035, 0037 0037, 0209, 0278, 0348, 0352 Metronic 0037, 0081, 0162, 0226, 0347, 0836, 1162, 1562 0072 Hischito .............. 0045 Kolin ................. 0041, 0043 MGA .................. 0043, 0240 Fuji ................... 0033, 0035 Hitachi ............... Korpel MGN Technology ... 0240 0000, 0045 0047 Micormay ............ 0348 Fujitsu General ..... 0037 0226 Micromaxx........... 0209 Funai................. 0000, 0593, 1593 ............... Kuba ................. Kuwa................. Kyoto ................ Lenco ................ Leyco ................ LG .................... 0072 Fujitsu ............... 0000, 0037, 0041, 0042, 0046, 0081, 0089, 0166, 0240 0072 Microsoft............. 1972 0278 Migros ................ 0000 0072 Mind .................. 1972 0037, 0038, 0042, 0045, 0209, 0480, 1037 Minolta ............... 0042 Mitsubishi ............ 0000, 0041, 0043, 0048, 0067, 0081, 0480, 0642 Frontech Galaxi................ Galaxis .............. 0000 0278 Hornyphone ......... 0081 Howard Computers 1972 HP .................... 1972 Garrard .............. 0000 Hughes Network Systems ............. 0042, 0739 ............ GE ................... 1972 Hypson .............. 0000, 0037, 0072, 0209, 0278, 0352, 0480 Gateway ................. General .............. General Technic .... Genexxa ............ Go Video ............ GoldHand ........... GoldStar ............ GEC A-14 0035, 0048, 0060, 0226, 0240, 0320, 0760 H÷her ................ 0278 0081 iBUYPOWER ........ 1972 0045 Imperial .............. 0000 0348 Ingersoll.............. 0209, 0240 .............. Interbuy .............. Interfunk ............. Internal ............... International ......... 0072, 0240 0104 0432, 0526 0072 0037, 0038, 0209, 0226, 0480 Inno Hit Lifetec ............... 0209, 0348 Lloyd's ............... 0000 Motorola ............. 0035, 0048 0037, 0081, 0162, 1562 MTC .................. 0000, 0240 Multitec .............. 0037 Loewe ............... Logik ................. 0072, 0106, 0209, 0240 Multitech ............. 0000, 0072 Lux May ............. 0072 Murphy ............... 0000 0043, 0046, 0047, 0048, 0104, 0106, 0315 Myryad ............... 0081 .................. National .............. NEC .................. 0104 Luxor ................ 0037, 0072 0081, 0104 0278, 0637 0037, 0278 ................... M Electronic ........ Magnasonic......... LXI 0037 0000, 0038 0278, 0593 NAD 0226 0035, 0037, 0038, 0041, 0048, 0067, 0104, 0278 Neckermann ........ 0081 ............... Neufunk ............. Newave ............. Nikkai ................ Nikko ................ Nikon ................ Noblex............... Nokia ................ 0000, 0072 Nesco 0209 0037 0072, 0278 0037 0034 0000, 0035, 0081, 0226, 0384, 0563, 0593, 0618, 0739, 1081, 1181 Phonola .............. 0081 .................. Pioneer............... 0037 Pilot 0042, 0067, 0081, 0162 0240 Polk Audio ........... 0081 0041, 0042, 0046, 0048, 0081, 0104, 0106, 0240, 0278, 0315 Portland.............. 0278, 0637 Prinz .................. 0000 ........... Proline ............... 0081, 0240 0041, 0067, 0320, 0321, 0384, 0494 Profitronic 0000, 0278, 0320, 0321, 0642 Northgate ........... 1972 Proscan .............. 0060, 0760 NU-TEC ............. 0209 Prosco ............... 0278 Oceanic ............. 0000, 0041, 0046, 0048, 0081, 0104, 0106 Prosonic ............. 0209, 0278 Protec ................ 0072 .............. ProVision ............ Pulsar ................ Pye ................... Qisheng .............. Quarter ............... Quartz ................ Quasar ............... 0081 Quelle ................ 0081 Okano ............... 0072, 0209, 0278, 0315, 0348 ............ 0035, 0226 Optimus ............. 0037, 0048, 0104, 0162, 0432, 0593, 1048, 1062, 1162, 1262 Olympus Orbit ................. 0072 Orion................. 0002, 0121, 0184, 0209, 0348, 0352, 0479 Protech Radialva ............. 0278 0039 0081 0060 0039 Singer ................ Saba ................. 0041, 0278, 0320, 0321, 0384, 0494 0045, 0072, 0271 Sinudyne ............. 0081, 0209, 0352 Saisho ............... 0209, 0348 Smaragd ............. 0348 Salora ................ 0043, 0046, 0104, 0106 Sonic Blue ........... 0614, 0616 Sonneclair ........... 0072 Sonolor............... 0046 ............... Sony .................. 0037 Soundwave .......... 0037, 0209 .......... Standard ............. Stern ................. Strong ................ STS ................... Sunkai ................ 0072 Runco ............... Sampo ............... 0037, 0048 Samsung ............ 0045, 0240, 0432, 0760, 1014 Sanky ................ 0039, 0048 Sansei ............... 0048 Sansui ............... 0000, 0041, 0067, 0072, 0106, 0209, 0271, 0348, 0479 Sontec Ssangyong 0000, 0032, 0033, 0034, 0035, 0106, 0636, 1032, 1972 0278 Sanyo ................ 0046, 0047, 0048, 0067, 0104, 0159, 0240 Saville................ 0240, 0278, 0352 SBR .................. 0081 Schaub Lorenz ..... 0000, 0041, 0104, 0106, 0315, 0642 Sunstar ............... 0000 Suntronic 0000, 0037, 0042, 0072, 0081, 0240, 0278, 0352, ............ ............ Supra ................. Sylvania .............. 0000 Sunwood 0072 Schneider ........... 0046 0046 Scott ................. 0035, 0162, 0278, 1162 0043, 0045, 0121, 0184 Sears ................ 0000, 0035, 0037, 0042, 0046, 0047, 0104 0037, 0048, 0072, 0081 Seaway .............. 0278 SEG .................. 0072, 0081, 0240, 0278, 0637, 0642 Symphonic .......... 0278 0271 0042 0209, 0278, 0348 0037 0000, 0035, 0043, 0081, 0593, 1593 0000, 0593, 1593 Systemax ............ 1972 T+A ................... 0162 Tagar Systems ...... 1972 Taisho ................ 0209 0278 Orson ................ 0000 Osaki ................ 0000, 0037, 0072 Radiola ............... 0081 0037 .............. Otake ................ Otto Versand ....... Radionette ........... 0072 RadioShack ......... 0000, 0037, 1037 SEI ................... 0081 Tandberg ............. Radix ................. Sei-Sinudyne ....... 0081 0000, 0104 0037 Tandy ................. 0081 Pace 0352 Randex 0037 Seleco ............... 0037, 0041, 0384 Pacific ............... 0041 0000, 0037, 0048, 0081, 0240 0000 Semivox ............. 0045, 0209 Palladium ........... 0041 Tatung ................ 0037, 0041, 0072, 0209 Semp ................ 0045 Palsonic ............. .............. Rank.................. Rank Arena .......... RCA .................. Tashiko ............... 0000, 0072, 0642 0000, 0035, 0042, 0048, 0060, 0106, 0149, 0226, 0240, 0320, 0760, 0880 Sentra ............... ............... Sharp ................ 0072 0000, 0041, 0043, 0045, 0048, 0067, 0081, 0209, 0348, 0352 Setron 0072 TCM .................. 0348 0000, 0035, 0037, 0046, 0047, 0048, 0104 Shinco ............... 0000 Shintom ............. 0072, 0104 0348 Shivaki ............... 0037 0614, 0616 Shogun .............. 0240 Siemens ............. Osume Panasonic........... 0209 0035, 0162, 0226, 0616, 0836, 1062, 1162, 1262, 1562, 1662 Pathe Cinema ...... 0043 Pathe Marconi ...... 0041 Penney .............. 0035, 0037, 0038, 0042, 0240 Pentax ............... 0042 Perdio ............... 0000, 0209 Philco ................ 0000, 0035, 0038, 0072, 0209, 0226, 0479 Realistic.............. ................. ReplayTV ............ Rex ................... RFT ................... Ricoh ................. Roadstar ............. Reoc Royal ................. 0041, 0384 0072 0037, 0048, 0209, 0569, 0848, 1048 Teac .................. 0000, 0037, 0041, 0072, 0278, 0307, 0526, 0593, 0637, 0642 Tec .................... 0072 Tech Line ............ ............. 0072 Technics 0037, 0046, 0081, 0104, 0320, 0347 0035, 0162, 0226, 1162 TechniSat ............ 0348 Teco .................. 0035, 0037, 0038, 0041, 0048 Tedelex ............... 0037, 0348 0034 Siera ................. 0081 0037, 0072, 0081, 0240, 0278 Silva .................. 0037 Silver ................. 0278 0072 A-15 Device Codes•Códigos de instalación•Codes de configuration Nordmende ......... Philips ................ Device Codes•Códigos de instalación•Codes de configuration Teknika .............. 0041 Telefunken .......... 0041, 0209, 0278, 0320, 0321, 0384, 0494 Telestar .............. 0037 Teletech ............. 0000, 0072, 0278 Tenosal .............. 0072 Tensai................ 0000, 0072, 0278 ............... Texet ................. Thomas ............. Thomson ............ 0348 Tevion Thorn ................ Tivo .................. 0278 0000 0041, 0060, 0067, 0278, 0320, 0321, 0384, 0494, 0722 0037, 0041, 0104 0618, 0636, 0722, 0739, 1503 1909, 1921, 1928 Toshiba .............. 1972 Emerson ............. Touch ................ 1972 0236, 1905, 1909, 1911, 1928, 1929 Viewsonic ........... 1972 Funai ................. 1904 ZT Group ............ 1972 GE .................... 1907, 1917, 1919, 1922 GoldStar ............. 1926 Goodmans........... 1909 Hanimex ............. 1908 Harley Davidson .... 1904 Hinari ................. 1908 Hitachi................ 1904 JVC ................... 1923 Watson ............... 0081, 0352 Weltblick ............. 0037 Wharfedale .......... 0593 White Westinghouse 0072, 0209, 0278, 0637 World ................. 0348 XR-1000 ............. 0000, 0035, 0072 Yamaha .............. 0038, 0041 .............. Yokan ................ Yoko .................. 0072, 0278 Yamishi Zenith ................ ZT Group ............ ZX .................... TVDVD TV/DVD combination Combinación de TV/DVD Combinaison TV/DVD Audiovox ............ 1937 0000, 0033, 0034, 0039, 0209, 0479, 0637 Axion................. 1937 Broksonic ........... 1935 Magnin ............... 1907 1972 Bush ................. 0698, 1037, 1900 Memorex............. 1920, 1924, 1926, 1927 0209, 0348, 0352 Daewoo ............. Goodmans .......... Grundig .............. Jensen ............... Konka ................ Mirror ................ 1902 MGA .................. 1907 Panasonic 1941 ................ RCA .................. Samsung ............ Sylvania ............. Teac .................. Toshiba .............. 1933 0348 0041, 0043, 0045, 0067, 0081, 0352, 0384, 0432, 1008, 1503, 1972 Digital Video Recorder (DVR) DVR Enregistreur audio numérique Prima 1900 Mitsubishi ............ 1917 Nokia ................. 1912 1933 Optimus .............. 1913, 1924, 1927 Orion ................. 1905, 1911, 1929 ........... 1919, 1924, 1927, 1930 Penney ............... 1907, 1919, 1926 1957 1900 1948, 1958 0037, 0240 ABS .................. 1972 Touch ................ 1972 Alienware ............ 1972 Towada .............. 0072 CyberPower ......... 1972 Triad ................. 0278 Dell ................... 1972 Uher ................. 0240 Gateway ............. 1972 Ultravox ............. 0278 Hewlett Packard .... 1972 Unitech .............. 0240 Howard Computers 1972 TVVCR United Quick Star .. 0278 HP .................... 1972 Universum .......... 0000, 0037, 0081, 0104, 0106, 0209, 0240, 0348 iBUYPOWER ........ 1972 Media Center PC ... 1972 TV/VCR combination Combinación de TV/VCR Combinaison TV/VCR ............ 1972 Mind .................. 1972 Northgate ............ 1972 Panasonic ........... 0616 Magnavox 1935 Totevision ........... 0041, 0067, 0384 1904, 1913, 1931 1943 Toshiba .............. 0038 ........... Apex Digital ......... Topline............... Microsoft 1913, 1928 0037, 0072, 0240 DVR 0045 1904 Magnasonic ......... 1933 0037, 0041, 0072, 0104 ............... Vector Research ... Victor ................ 1934 Advent ............... 0240 Vector .................... Lloyd's ............... LG 0072 ................. Tokai ................. TMK Daewoo .............. Tivo .................. 0000, 0035, 0037 Teleavia.............. 0618, 0636, 0722, 0739 0000, 0033, 0035, 0038, 0039, 0042, 0045, 0046, 0047, 0048, 0060, 0072, 0081, 0149, 0240, 0760 Wards ................ VCR Panasonic 1903 Quasar ............... 1919, 1924 0171 RadioShack ......... 1904, 1920 1949 RCA .................. 1907, 1917, 1919, 1922 Sansui ................ 1904, 1911, 1929 1935 ................ 1907 Schneider ............ 1904 Sears ................. 1904, 1926 Sanyo Sharp ................. 1917 Sony .................. 1904, 1925 Sylvania .............. 1931 .......... Teac .................. 1904, 1913 Symphonic Aiwa ................. 1904, 1910, 1914 1904, 1909, 1913, 1932 Video Concepts .... 0045 Philips ................ 0618, 0739 America Action ..... 0180 Thomas .............. 1904 ...... Videomagic ......... Videosonic .......... Viewsonic ........... Villain ................ 0000 ReplayTV ............ 0614, 0616 Audiovox ............ 0180 Toshiba ............... 1918, 1936 0037 Sonic Blue ........... 0614, 0616 Broksonic ........... 1905, 1911, 1929 White Westinghouse 0240 Sony.................. 0636, 1972 1972 Systemax ............ 1972 0000 Tagar Systems ...... 1972 ............ 0722 Video Technic Thomson A-16 Citizen ............... 1928 .................. ...... 1906 Colt Curtis Mathes 1919 Zenith ................ 1909 1904, 1911, 1929 TVVCRDVD SATDVR DVDDVR DTVA TV/VCR/DVD combination Combinación de TV/VCR/DVD Combinaison TV/VCR/DVD DBS/DVR combination Combinación de receptor de DBS/DVR Combinaison récepteur DBS/DVR DVD/DVR combination Combinación de DVD/DVR Combinaison DVD/DVR DTVA DTVA DTVA Akai .................. Broksonic ........... 1300 ................. 1300 1944 British Sky Broadcasting ........ 1175 1954 Canal Satellite ...... Comag ............... Digiturk .............. Dream Multimedia .. Echostar ............. 1339 1938 1946, 1947 1953 1917 1944 1945 CABDVR Cable/DVR combination Combinación de cable/DVR Combinaison Câble/DVR Atsat 1412 1076 1237 0610, 0775, 1170, 1505 Euro1 ................. 1278 Expressvu ........... 0775 Fast................... 1901 Force NO AS ........ 1194 GbSAT ............... 1214 Grundig .............. 1150 Hughes Network Systems ............. 1142, 1442, 1443, 1444 Humax ............... RCA .................. Toshiba .............. 0880 1008, 1503 PROJ Video projector Proyector de vídeo Projecteur vidéo Ampro ............... 0751 Dwin ................. 0720, 0774 Epson ................ 0833, 0840 JVC .................. 0683 Marantz.............. 1154 Mitsubishi ........... 0868 1176 NEC .................. 0497 0899 Hyundai .............. 1011 Panasonic ........... 1310, 1410 General Instrument 0476, 0810 JVC ................... 1170 RCA .................. 0047 Jerrold ............... 0476, 0810 Kathrein .............. 1221, 1224 Runco ............ 0476, 0810, 1106, 1376 Opentel .............. 1412 Sanyo ................ 0799 Pace ................. 0237, 1877 Pace .................. 1423 Sharp ................ Pioneer .............. 0877, 1877 Panasonic ........... 1320 0491, 0688, 0689, 0851 0353, 0834 0877, 1877 1142, 1442 Sony ................. Scientific Atlanta ... Philips ................ 0392 0832 1006 Proscan .............. Toshiba .............. Sony ................. 0276 1317 0833, 0839 ......... Zenith................ Radix ................. Yamaha .............. RCA ............... ... 1392 Zenith ................ 0017 0899 Rebox ................ 1214 Supercable Sagem ............... 1253, 1307 Schneider............ 1901 SKY .................. ............... 1296 Grundig .............. 1297 Hauppauge .......... 1294 Labgear .............. 1296 .............. Nokia ................. Pace .................. Panasonic ........... Rebox ................ Teac .................. Triax .................. 1322 Netgem Americast ........... Motorola Daewoo .............. 1723 1323, 1423 1304, 1849 1214 1227, 1322 1296 AMP Audio amplifier/tuner Amplificador de audio/sintonizado Amplificateur audio/tuner Bose .................. 1629 0497, 0603 1175, 1848 Skyplus .............. 1412 Sony.................. 0639, 1640 Strong ................ 1158, 1300 Topfield .............. 1206 TPS ................... 1253, 1307 Zehnder .............. 1075, 1412 A-17 Device Codes•Códigos de instalación•Codes de configuration ............ Orion................. Panasonic........... RCA.................. Sharp ................ Sylvania ............. Toshiba .............. Emerson @sat .................. 1903 5%RVH&RUSRUDWLRQ7KH0RXQWDLQ )UDPLQJKDP0$86$ $05HY&&0