1
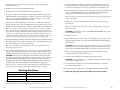
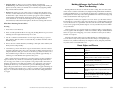
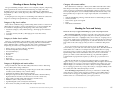
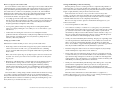
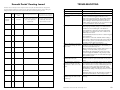
Zach & Dani’s™
Instructional Guide
and
Roasting Journal
Table of Contents
Important Safeguards . . . . . . . . . . . . . . . . . . . . . . . . . . . . . . . . . . . . . . . . . . . . . . . . . . . 2
Welcome to the world of Home Coffee Roasting . . . . . . . . . . . . . . . . . . . . . . . . . . . 3
Description of Parts . . . . . . . . . . . . . . . . . . . . . . . . . . . . . . . . . . . . . . . . . . . . . . . . . 4
Description of Control Panel . . . . . . . . . . . . . . . . . . . . . . . . . . . . . . . . . . . . . . . . . . 5
Before You Begin . . . . . . . . . . . . . . . . . . . . . . . . . . . . . . . . . . . . . . . . . . . . . . . . . . . . 6
Roasting . . . . . . . . . . . . . . . . . . . . . . . . . . . . . . . . . . . . . . . . . . . . . . . . . . . . . . . . . . 7-9
Caring for your roaster . . . . . . . . . . . . . . . . . . . . . . . . . . . . . . . . . . . . . . . . . . . . . . 10
A Few Words from Kenneth Davids . . . . . . . . . . . . . . . . . . . . . . . . . . . . . . . . . . . 11-17
•
•
•
•
•
•
•
Why Roast Coffee at Home
What Does Roasting Do to Coffee?
What Influences the Taste of Coffee?
Blending: Categories
Blending for Taste and Variety
How to Set Up Your Own Coffee Cellar
Storing and Handling Coffee After Roasting
Roasting Journal . . . . . . . . . . . . . . . . . . . . . . . . . . . . . . . . . . . . . . . . . . . . . . . . . . . . . . . 18
Troubleshooting . . . . . . . . . . . . . . . . . . . . . . . . . . . . . . . . . . . . . . . . . . . . . . . . . . . . 19-20
Guarantee . . . . . . . . . . . . . . . . . . . . . . . . . . . . . . . . . . . . . . . . . . . . . . . . . . . . . . . . . . . . . 21
Warranty . . . . . . . . . . . . . . . . . . . . . . . . . . . . . . . . . . . . . . . . . . . . . . . . . . . . . . . . . . . . . . 22
Zach & Dani’s™ Instructional Guide and Roasting Journal
1
IMPORTANT SAFEGUARDS
Welcome to the
World of Home Coffee Roasting!
1. Read all instructions before using appliance.
2. Do not touch any hot surfaces.
3. Do not place roaster on or near hot electric or gas burners, or in a heated oven.
4. Do not immerse cord, plug, or base of this appliance in water or other liquid.
5. Children should not use this appliance. Close supervision is necessary when
any appliance is used near children.
6. Unplug roaster when not in use and before cleaning. Allow roaster to cool
before removing parts.
7. Do not operate any appliance with a damaged cord or plug, after the appliance
malfunctions, or has been damaged in any manner. Return the appliance to the
nearest authorized service facility for examination, repair or adjustment.
8. Do not let cord hang over edge of table or counter, or touch hot surfaces.
9. Do not leave the appliance unattended while in use.
10. Do not remove the bottom of the roaster housing. There are no serviceable
parts inside. Only authorized service personnel should attempt repair.
Congratulations on your purchase of a Zach & Dani’s Gourmet Coffee Roaster!
You are about to create the most delicious cup of coffee in the world at a
fraction of the price you’d pay at a gourmet coffee shop.
Zach and Dani’s is here for you every step of the way with all the information you
need to roast your premium coffee beans to perfection. We’ll help you understand
how to care for your coffee roaster, how to blend and store your coffee beans, and
how to roast the freshest coffee anywhere, right in your own kitchen. You’ll learn
how to create the best-tasting coffee in the world.
Zach & Dani’s™ makes it possible for you to experience a remarkable range of
flavors and rich aromas that are missing from today’s stale, store-bought coffees.
Home coffee roasting allows you to roast your coffee beans exactly the way you
like them... light or dark, single bean variety or special blend. You have complete
control of the flavor and freshness of your coffee.
11. This appliance has a polarized plug, one blade is wider than the other, as a
safety feature. This plug will fit in a polarized outlet only one way. If the plug
does not fit fully in the outlet, reverse the plug. If it still doesn’t fit, contact a
qualified electrician. Do not attempt to defeat this safety feature.
Five Reasons to Roast Your Own Coffee
12. Do not move the appliance while it is running.
1.
Freshness. If you're not roasting your coffee at home, chances are you're
drinking stale coffee. Imagine drinking coffee that was roasted minutes ago,
not weeks ago.
2.
Flavor. You’ll discover a remarkable range of distinct flavors and satisfying
aromas only available from genuinely fresh coffee.
3.
Fun. It’s fun and easy. All it takes is 20-30 minutes – if you can pop popcorn
you can roast your own coffee.
4.
Creative. Home roasting puts you in full creative control. Create your own
signature coffees from your favorite bean combinations.
5.
Savings. Home roasting saves you up to 50% on every pound of gourmet
coffee your drink.
13. Do not use outdoors.
14. Do not use appliance for anything other than intended use.
15. This appliance is for household use only, designed to process normal
household quantities. It is not suitable for continuous operation.
16. Roaster should be used only to roast unroasted coffee beans or unroasted
coffee beans that have gone through a decaffeinating process.
17. Do not pour liquid of any type into the roasting chamber when it is positioned
on the roaster housing.
18. Do not allow hot roasting chamber to come in contact with anything wet or cold.
19. Do not remove top cover while appliance is in operation.
20. Throw away roasting chamber if glass becomes cracked.
21. Prior to starting appliance make sure all seals, chaff cup, and cover are in place
and sealed correctly.
22. Use the handle when handling the roasting chamber.
You’ve taken the first step towards truly fresh coffee. Get ready to enjoy the
most flavorful cup of coffee you’ve ever tasted!
23. Do not operate roaster without the chamber in place and securely attached to
the roaster.
24. The use of an accessory not evaluated for use with this appliance or sold by
the manufacturer may cause injuries, fire or electric shock.
25. Do not clean plastic parts with abrasive cleaning materials.
2
Zach & Dani’s™ Instructional Guide and Roasting Journal
Zach & Dani’s™ Instructional Guide and Roasting Journal
3
Description of Parts
Control Panel
Gourmet Coffee Roaster
Your Roaster has an easy to use Control Panel (refer to Diagram 2 below).
Your Roaster comes complete with easy to assemble parts (Refer to Diagram 1
below). Roaster parts are easily identifiable:
1. Cover
2. Rear Seal
3. Roaster Base
4. Cut Off Switch
5. Chaff Cup
6. Screen
7. Front Seal
8. Auger
9. Roasting Chamber
Note: The Chaff Cup, the screen located in the Cover, as well as the Roasting
Chamber, must be cleaned between every use to ensure proper and safe functioning
of your roaster.
RED LIGHT is only lit during
roast cycle
LCD count down
timer display
“START”
begins roast cycle
“UP” arrows adds
minutes to roast cycle
CAUTION: Not cleaning these parts or operating the machine without proper
installation will shorten the life of the roaster and can create the opportunity
for the roaster to overheat and malfunction. Make sure that all washable
components are completely dry before using.
All metal surfaces become extremely hot during the roasting process and should
never be handled or touched during or directly following a roast cycle.
5. Chaff Cup
1. Cover
6. Screen
7. Front Seal
2. Rear Seal
9. Roasting
Chamber
3. Roaster
Base
4. Cut Off
Switch
8. Auger
“COOL” when pressed
will eliminate any time
left on the roast cycle
and will start a 5 minute
cool down process
“DOWN” arrows
decrease minutes
to roast cycle
“RECALL” remembers the time setting
the last time the start button was pushed
GREEN LIGHT is only lit during
the cool down cycle
Diagram 2 – Control Panel
Diagram 1 – Components of Zach and Dani’s Roaster
4
Zach & Dani’s™ Instructional Guide and Roasting Journal
Zach & Dani’s™ Instructional Guide and Roasting Journal
5
Before You Begin
Before you roast your first batch of coffee:
1. Unpack your roaster to make sure all of the parts listed in “Description of
Parts” are included.
2. Wash and rinse the cover, chaff cup, and roasting chamber to eliminate any
flavor residue from the packing materials. Make sure all parts are completely
dry before re-assembling your roaster. These parts are dishwasher safe.
CAUTION: Never submerge the body of your coffee roaster in water or place it
in the dishwasher.
Note: The auger inside the roasting chamber is designed to move from side to side to
accommodate the movement of the coffee beans. Do not tighten the auger.
3. Select your favorite unroasted gourmet coffee beans and get ready to roast!
ROASTING
Operating Instructions
Once you have cleaned and dried all the removable parts for the roaster, you are
ready to begin roasting your own coffee.
1. Place the roasting chamber on the
drive shaft, aligning the guide slots
with the pins located on the heat
deflector. You should feel the
roasting chamber slip into position
and fit securely on the heat
deflector (see Diagram 3).
Roasting
Chamber
Guide
Slots
Drive
Shaft
2. Fill the roasting chamber up to
either the “Fill Line” or the “Dark
Roast” line with your favorite Zach
& Dani’s unroasted coffee beans.
Note: Do not over fill your roaster.
You could damage the machine.
3. Slide the removable screen under
the lip of the front seal.
Heat
Deflection
Locator
Pins
Roaster
Base
WARNING: It is very important that
Diagram 3
the screen be put in place before you
start the roaster. If the screen is not in place it will cause your roaster to malfunction.
Roaster issues caused by leaving out the screen will NOT be covered by the warranty.
4. Put the combined chaff cup and front seal into the chamber.
Rear Seal
Detached
Rear Seal
Attached
Properly
6
Zach & Dani’s™ Instructional Guide and Roasting Journal
Zach & Dani’s™ Instructional Guide and Roasting Journal
Screen
Screen
7
5. Make sure the rear seal is placed securely over the larger opening in the
underside of the cover.
6. Slide the cover into place by aligning the hinges.
7. Gently press the cover down until the latches click into place.
8. Plug in the coffee roaster. The default setting on the LCD timer display will
indicate 20 minutes. This will produce a “light” roast. We do not recommend
that you roast for less than 20 minutes. We suggest that you roast your first
roast at least 25 minutes. Experiment, have fun!
9. Adjust the roast time using the up or down arrows located next to the LCD
display. Press the “Up” arrow to add minutes the cycle and the “Down” arrow
to subtract minutes from the cycle. A longer roast time will yield a darker roast.
Note: The maximum roast time setting is 30 minutes. However, during a roasting
cycle, you may add up to 5 additional minutes of roasting time by pressing the UP
arrow while the red light is illuminated and the remaining roast time is between 6 and
24 minutes. The roaster will not allow you to add more than 5 minutes to a cycle, so
the maximum allowable roasting time is 35 minutes. Once the 5 minute cooling cycle
begins and the green light comes on you can no longer add more roasting time.
10. The RECALL button will retrieve the time setting that was last displayed when
the START button was pressed, even if the roaster is unplugged between each
use. This will help you roast more consistently.
Note: The recall button will not remember previous minutes that may have been
added during a roasting cycle.
11. Once you have selected the time for your roast cycle, press the START button.
The auger will begin to turn the coffee beans and you will hear the fan. The
red light indicates the heating element is on and the roasting cycle has begun.
12. As the roasting cycle continues, you will notice that the beans increase in
volume and their color slowly changes from pale green to chocolate brown.
You will also notice the pleasant aroma of the beans as they begin to roast.
13. Five minutes before the end of the roast cycle, the cooling cycle will begin and
the roaster will begin blowing cool air over the beans. The red light will
change to green and the fan and auger speeds will increase.
Note: Pressing the Cool button at any time stops the roasting stage and begins the 5
minute cooling stage.
14. When your roaster has completed the roasting/cooling cycle, it will stop
automatically.
Note: We recommend you let the roaster cool for 10 minutes before removing the
fresh-roasted coffee.
CAUTION: The metal parts of the roaster WILL STILL BE HOT. Use caution
when handling the roaster.
15. Unplug the roaster.
16. After 10 minutes, remove the roaster cover by tipping it away from you and
turning it aluminum-side up to keep the chaff particulates from dislodging
from the screen.
CAUTION: Please use caution when removing the roaster cover, as the metal
side may still be hot from the roasting process. Please note that this and all
metal surfaces should be handled with care after the roaster has been used.
17. Remove the chaff cup by grasping the front seal and pulling it from the
roasting chamber. Discard the chaff in trash.
CAUTION: If the auger does not begin to turn immediately after pressing the
start button a bean may be stuck under the auger, causing it to jam. Stop the roast
cycle immediately by unplugging the roaster. Allow the roaster to cool if hot.
Empty the beans from the roasting chamber, checking to make sure that none are
under the auger. Reload and realign the roasting chamber to begin again.
18. Lift the roasting chamber from the base by the plastic handle.
Note: If you roast consecutive batches of beans they may roast faster than the first
because the roaster may still be warm. Adjust your time settings accordingly.
19. Pour the fresh-roasted beans from the roasting chamber into an airtight
container or coffee grinder.
Roasting Guidelines
Desired Roast
Roast Cycle
Light Roast
20-22 minutes
Medium Roast
23-26 minutes
Dark Roast
27-30+ minutes
CAUTION: Do not touch the glass or metal base directly, as they may still be
hot from the roasting process.
20. Grind your fresh roasted beans in a Zach & Dani’s burr or blade grinder.
21. Brew and enjoy the best cup of coffee you’ve ever tasted!
Note: Roast times may vary, due to ambient room temperature, power/voltage, variety
and amount of beans used in each batch. Experiment, take notes, have fun!
8
Zach & Dani’s™ Instructional Guide and Roasting Journal
Zach & Dani’s™ Instructional Guide and Roasting Journal
9
Caring for Your Roaster After Use
1. Your roaster must be cleaned after every use. This will ensure the safe
operation of the machine, its longevity and optimal roasting results.
2. With the machine disassembled, brush or rinse the chaff particles off the
screen.
3. Wash the chaff cup, roasting chamber, and roaster top with soap and warm
water or run these parts through your dishwasher. Let all removable parts air
dry before re-assembling the roaster.
CAUTION: Not cleaning these parts or operating the machine without proper
installation will shorten the life of the roaster and can create the opportunity
for the roaster to overheat and malfunction. Make sure that all washable
components are completely dry before using.
4. The roaster may be wiped clean with a damp cloth and set to air dry.
Note: At no time should the roaster housing ever be submerged or placed in the
dishwasher.
5. Please note the vents surrounding the drive shaft. Blow or wipe away any
debris with a damp towel. This surface should be clean and free of all debris
before beginning your next roasting cycle.
6. Log the results in your Roasting Journal (see page 18). This will help you learn
about the many and varied coffee flavors, blends and roast colors. Have fun
and enjoy!
Note: A standard oven cleaner can be used to remove heavy coffee oil build-up that
may accumulate after several months of use.
From the Expert
Kenneth Davids is one of the world’s leading experts on the subject of coffee
and coffee roasting. He is the author of four books on the subject of coffee
including; Coffee: A Guide to Buying, Brewing and Enjoying and Home Coffee Roasting:
Romance and Revival. Kenneth Davids began his quest for the perfect cup of coffee
in the early 1970’s when he opened his first coffee shop in San Francisco,
California. Since then he has been traveling the world researching the history of
coffee, the many different varieties of coffee, the various methods of coffee
production and the best roasting techniques. Through his extensive research on
the topic, Kenneth Davids has concluded that roasting one’s own coffee at home is
the best way to get the most flavorful, aromatic, and delicious cup of coffee. In
Home Coffee Roasting: Romance and Revival Kenneth Davids notes the many reasons
why roasting ones own coffee at home is best. From the fact that roasting at home
provides unsurpassed freshness and flavor to the fact that unroasted beans are up
to 50% less expensive than pre-roasted, stale beans, Kenneth Davids shows why
“For those who really love coffee, the moment may have come to leave both cans
and enormous coffee-store chains behind and enjoy coffee as people did before the
advent of brand names, chain stores, and advertising: by roasting your own.”
Kenneth Davids has personally endorsed Zach and Dani’s gourmet coffee
roaster because he has experienced the difference that roasting premium Arabica
beans at home can make. Kenneth Davids wrote the following pages especially for
Zach & Dani’s. Use them as a reference as you begin to experiment with home
coffee roasting. Read on for tips on how to become a home coffee roasting expert
from the man who wrote the book on it.
©1996 by Kenneth Davids from HOME COFFEE ROASTING: Romance and Revival by
Kenneth Davids. Reprinted with permission of St. Martins Press, LLC.
A Few Words from Kenneth Davids,
author of Home Coffee Roasting: Romance and Revival:
Why Roast Coffee at Home?
• Freshness and flavor. Coffee is best about a day after it has been roasted. Once
past that moment, a rapid and relentless deterioration in flavor sets in as the
protective envelope of carbon dioxide gas dissipates, allowing oxygen to
penetrate the bean and stale the delicate flavor oils. For someone who
genuinely loves coffee, the bouquet of optimally fresh beans is unquestionably
the most tangible of the many reasons to roast coffee at home.
• Personal satisfaction. Roasting coffee at home allows us to outflank
consumerism by gaining control of a heretofore-mysterious process that was
once imposed on us by others. Home roasting is also an art. A minor one
perhaps, but an art nonetheless, and one that can provide considerable
gratification.
• Money. You can save anywhere from 25% to 50% by roasting at home.
10
Zach & Dani’s™ Instructional Guide and Roasting Journal
Zach & Dani’s™ Instructional Guide and Roasting Journal
11
• Bragging rights. So there you are, roasting a blend of Guatemalan
Huehuetenango and Sumatran Lintong, your kitchen pungent with smelly yet
glamorous smoke, when your friends arrive for dinner carrying that pathetic
bag of week-old house blend...
• Romance. Roasting your own coffee carries you deeper into the drama and
romance of coffee. That romance is nowhere as vividly encapsulated as in that
moment when a pile of hard, almost odorless grey-green seeds is suddenly
and magically transformed into the fragrant vehicle of our dreams, reveries,
and conversation. To ourselves be the magicians, waving the wand of
transformation, makes that metamorphosis all the more stirring and resonant.
What Does Roasting Do to Coffee?
Roasting…
1. Forces water out of the bean;
2. Dries out and expands the bean’s woody parts, making them more porous and
reducing its total weight of the bean by 14% to 20%
3. Sets off a continuous transformation of some sugars into CO2 gas, a process
that continues after the coffee is roasted and only concludes when the coffee is
definitively stale
Nothing Influences the Taste of Coffee
More Than Roasting
Nothing influences the taste of coffee more than roasting. The same unroasted
coffee can be roasted to taste baked, sour, bright and dry, full-bodied and mellow,
rounded and bittersweet, or even charred. In appearance, roasted beans can range
from light brown with a dry surface through dark brown with an increasingly oily
surface to black with an almost greasy look.
It all depends on when you stop the roast - how “done” you allow the coffee to
become before you start the cooling cycle. The best way to understand how degree
of roast affects taste is to experiment - take the same unroasted coffee and bring it
to four or five progressively darker degrees of roast, taste them all, and see which
one you like best.
However, here are a few popular names for coffees brought to varying degrees
of roast, together with descriptions of their characteristics. Keep in mind that these
terms are vague and overlapping; one roaster’s medium roast may be as dark as
another one’s espresso.
Generally, unroasted coffees taste most like themselves at lighter degrees of
roast. In other words, a Kenya will taste most like a Kenya at a Light through a
Viennese roast, a little less like Kenya at an Espresso Roast, and pretty much like
any other coffee at a Dark French roast.
4. Drives off some volatile substances, including a small part of the caffeine; and
finally and most importantly...
5. Caramelizes a portion of the bean’s sugars and transforms some into what are
popularly called the coffee’s flavor oils: the fragile yet deliciously heady mix of
complex substances that give coffee its aroma and a good deal of its flavor. It is
the caramelized sugars and flavor oils that (along with the approximately 1%
caffeine) give coffee drinkers the experience they crave.
After roasting, the bean is reduced to a protective package for the caramelized
sugars and flavor oils, which are secreted in tiny pockets throughout the bean’s
now woody, porous interior (or in very dark roasts, partly forced to the surface of
the bean, giving these roasts their characteristic ‘oily’ appearance). The CO2 gas
gradually works its way out of the bean in a process called degassing, which
temporarily protects the flavor oils from the penetration of oxygen and staling. Of
course, when the CO2 is finally gone, so is flavor. Vacuum cans, nitrogen flushed
bags, etc. are all artificial efforts to protect the coffee from the staling penetration
of oxygen.
12
Zach & Dani’s™ Instructional Guide and Roasting Journal
Roast Styles and Flavors
New England or Light
Light brown; Dry surface; Tea-like and grainy
in flavor
American or Medium
Medium brown; Dry surface; Dry and brisk in
flavor
Viennese or Full City
Medium dark brown; Flecks of oil on surface;
Still dry in flavor but sweeter and rounder
French
Moderately dark brown; Light sheen of oil on
surface; Sweet, round flavor
Espresso
Dark brown; Surface can range from very oily
to barely slick; Round, roasty and rich in
flavor; Full body
Italian
Dark to blackish brown; Definite oily surface;
Sharply pungent and roasty but still sweet in
flavor
Dark French or Spanish
Very dark brown, almost black; Very oily;
Burned and bitter in flavor with a slight halo
of sweetness; Thin body
Zach & Dani’s™ Instructional Guide and Roasting Journal
13
Blending at Home: Getting Started
The goal of blending is simple: achieve a more complete, complex, and pleasing
coffee experience than can be achieved from brewing one single coffee. It is
probably easiest to get a feel for the process by combining very different but
complementary coffees: a brisk, dry, acidy coffee with a fuller, deeper-toned coffee,
for example.
To help that process along, here is a list dividing some well-known coffees into
categories according to the qualities they can contribute to a blend:
Category 1: Big classic coffees
These coffees contribute body, powerful acidity, and classic flavor and aroma to
a blend. They may make too strong a statement for use as a base for blends, but
are excellent for strengthening and energizing coffees with softer profiles.
• Guatemala (Antigua, Coban, Huehuetenango, other high-grown Guatemala
coffees)
• Costa Rica (Tarrazu, Tres Rios, other high-grown Costa Rica coffees)
• Colombia
Category 2: Softer classic coffees
These are “good blenders”; they establish a solid, unobtrusive base for a blend,
and contribute body and acidity without competing with more individualistic
coffees. When brought to a darker roast they often confer a satisfying sweetness
and pleasing chocolate notes, making them favorites for espresso blends.
•
•
•
•
•
•
•
•
Mexico (Oaxaca, Coatepec, Chiapas, Tapachula)
Dominican Republic/Santo Domingo
Peru (Chanchamayo)
Brazil Santos
Panama
El Salvador
Nicaragua
India washed or wet-processed coffees
Category 3: Highlight and exotic coffees
Their powerful fruit- and wine-like acidity makes these coffees a distracting
base for a blend, but exciting contributors.
• Ethiopia Harrar (this wild-tasting, complex dry-processed coffee contributes
sweetness, fruit and berry notes, and rich acidity)
• Yemen Mocha (similar to Harrar but less intense)
• Ethiopia wet-processed coffees (Yirgacheffe and Sidamo add extraordinary
high-toned floral and citrus notes that survive even into a dark roast)
• Kenya (adds powerful acidity and fruit, berry and wine notes)
• Zimbabwe (same as Kenya but less intense)
• Ugandan Bugishu (same as Kenya but less intense)
• New Guinea AA (adds powerful acidity and complex citrus notes)
14
Zach & Dani’s™ Instructional Guide and Roasting Journal
Category 4: Base-note coffees
These add richness and body to a blend, and combine well with other coffees.
Their deep-toned acidity will anchor and add resonance to the lighter, brisker
coffees of category 2, and balance without blunting coffees in categories 1 and 3.
Don’t be put off by their occasional mildly mildewed, fermented or earthy notes.
These qualities may not please in a single origin coffee, but can contribute to a
blend.
•
•
•
•
•
Sumatra (Mandheling, Lintong, and Aceh natural or traditionally processed)
Sulawesi/Celebes
New Guinea organic and Y-grade
Timor
India Monsooned Malabar
Blending for Taste and Variety
There are two ways to approach blending: by system or by improvisation.
One systematic approach would be to start with a base coffee from category 2
above, roast and drink it long enough to really know it, then experiment with
adding other coffees to it - a highlight coffee, a base coffee, etc. - keeping notes as
you go along. Another approach might be to choose a coffee from each of the four
categories. Combine them in equal proportions, and then substitute one at a time
from coffees of the same category until you achieve a combination that pleases
you.
Or you can start the way professional cuppers do, by cup blending. Roast
several coffees, say two from each of the four categories above, then brew them all
and let them sit on a table at room temperature and combine them in varying
proportions, using a soupspoon. One spoonful of this, another of that, and so on,
experimenting with various combinations until you arrive at a formula that
pleases you. Then roast the coffees that made up your preferred-cup blend.
Combine them in proportions that please you, brew up a pot, and see how it
tastes.
Although most blends are composed of coffees brought to roughly similar
degrees of roast, you also can experiment blending coffees brought to dramatically
different degrees. A good way to start is by roasting the same coffee to two very
different degrees, to a medium roast and to a dark, for example, then blend the
two in varying proportions. If you enjoy the result, try varying the identity of the
two coffees, then add a third, then perhaps a fourth.
As for blending by improvisation, obviously no instruction is needed. Buy
coffees from two or three of the categories I noted above and combine them as
moment and mood suggests. It probably still is a good idea to use one or two
familiar coffees as a consistent base for your caprice, however.
Zach & Dani’s™ Instructional Guide and Roasting Journal
15
How to set up your own Coffee Cellar
Storing and Handling Coffee after Roasting
For food romantics “coffee cellar” has a fine ring to it. It resonates with the same
combined pleasure of connoisseurship and security that motivates people to keep
dusty wine bottles piled deep in the hearts of their houses. Correct storage for
unroasted coffee is cool but not cold, dark, dry, and, above all, well ventilated.
Rather than cellar, think pantry: The storage cupboards in the kitchens of older
houses that allow air to circulate among the shelves represent an ideal
environment in which to store green coffee.
Since the primary reason for roasting at home is to experience the perfume of
truly fresh coffee, you obviously should store and handle your roasted coffee with
care. Coffee in its unroasted state keeps very well, but the moment it is roasted it
begins a rapid, relentless journey from flavorful to flavorless.
• Good, high grown unroasted coffees (Central America, Colombia, East Africa)
kept in such conditions will change very little over the years. For the first year
or so they will round and sweeten in flavor; after that they become fuller in
body but gradually lose brightness and acidity.
• Lower grown, gentler coffees may change in flavor rather quickly. Brazil
Santos, for example, will begin to lose acidity as soon as six months or a year
after harvest.
• Coffees that arrive dark green or brown in color and high in moisture
(particular Sumatras and Sulawesis) usually develop mildewed or musty notes
when stored for any length of time. For some, this heavy, malty flavor is
attractive; others may not like it.
Setting Up a Coffee Cellar
What kind of container should you use to store your unroasted coffee?
• Plastic bags are fine for short-term storage, but if you plan to hold unroasted
coffee for more than a month or two, you should transfer it to something
porous: cloth is doubtless best, but corrugated cardboard boxes probably will
work as well.
Note: Zach & Dani’s plastic bags are specially designed to allow the unroasted beans
to breathe. You can leave your Zach & Dani’s unroasted coffee beans in their plastic
bags for years.
• Burlap bags of the kind used to construct temporary levees during periods of
flood are ideal for storing coffee at home. They are sold empty, they are a
convenient size (not trivially small yet still luggable when full), and they
include sewn-in drawstring closures. You can find them in obscure industrial
parts of cities; look in the Yellow Pages under “Bags.” Buy the cloth bags, not
the plastic.
Coffee tastes best a few hours to a day out of the roaster. Two days after
roasting, a good part of the aroma has fallen prey to the staling effect of oxygen; a
week later the taste is also compromised; in two weeks the aroma has virtually
vanished and the taste has lost its complexity and authority.
Here are some steps to take to preserve and maximize the fragrance of your
home-roasted coffee:
• Roast small quantities of coffee often.
• Store coffee in a sealed jar or canister in a cool, dry place, away from direct
sunlight. After allowing the coffee to rest for a day uncovered, place in a sealed
jar or canister. Caution: Do not fill a tight-sealing canister or jar more than
about halfway with just-roasted coffee that has not been rested for a day or so.
The gas escaping from absolutely fresh coffee can exert considerable pressure
on the walls and lid of a filled and tightly sealed container.
• Grind your coffee immediately before brewing. The purpose of grinding coffee
is to break open the bean and make the flavor oils available to hot water and
thus to our palates. Unfortunately, breaking open the bean also makes the
flavor oils available to oxygen and staling. Grinding is a devastating procedure
that only should be undertaken a few moments before you brew.
• Resist the refrigerator reflex. Don’t store coffee in refrigerators; they’re damp
inside and dampness compromises aroma and flavor.
• Freeze coffee only in an emergency, when you have an oversupply of already
roasted coffee that you can’t consume within a week. Put the beans in a sound
zip lock freezer bag and squeeze as much air as possible out of the bag before
sealing. Remove only as many beans as you intend to consume for the day and
immediately reseal the bag and return it to the freezer.
• Drink your coffee immediately after brewing. It does little good to roast, then
grind and brew superbly fresh coffee if you let it sit on a hot plate for ten
minutes while the aromatics evaporate. If you must keep brewed coffee
around before you drink it hold it in a pre-heated insulated carafe, which will
preserve the taste if not the aroma.
Unroasted coffee is a living entity; it needs to breathe. Elevate the boxes or bags
on a palette or similar arrangement that allows air to circulate beneath them.
Every few months shift the containers around. Turn them over, and if they are in a
pile shift the bottom containers toward the top of the pile and bring the top ones
down, much as you would rotate tires on a car.
All of these rules and instructions can be taken either as a symptom of a
pointless obsessiveness or, if you love coffee, as a way of being, and taking time to
savor a small but exquisite space in the onrush of life.
16
Zach & Dani’s™ Instructional Guide and Roasting Journal
Zach & Dani’s™ Instructional Guide and Roasting Journal
17
Kenneth Davids’ Roasting Journal
TROUBLESHOOTING
Note that “roast ‘em ‘til they’re brown” improvisers don’t need to fool with charts like this one. Be prepared to
accept the fact that no matter how consistent you are, roasts still will differ from session to session. Tasting and
making observations about surface oils are activities ideally carried out the day following the roast.
Concerns
Possible Solutions
Unit will not turn on.
Make sure unit is plugged in.
Coffee Name Roast
Date
There is nothing on the display.
Check outlet or power source.
The display works but the roaster
won’t start.
There is a safety cut off switch under the cover of your
coffee roaster that is triggered when the cover is
removed or improperly placed. The roasting chamber
and cover must be properly placed before the roast
cycle will begin. The roast cycle will not activate if
either of these components are out of position. Re-align
cover and chamber to activate the roaster.
Roasting times are inconsistent.
From time to time your household voltage may vary,
this will proportionately change roast characteristics.
Colombian
Supremo
04/15
Roasting Time
Describe the Roasted Coffee
What do you like about it?
(including cool-down)
(minutes)
(color and appearance, surface oils)
(acidity, body, taste, aroma, complexity)
(for dark roasts: sweetness, pungency)
26 minutes
Dark, Rich, Strong chocolate-like Smells great, slightly sweet aroma,
brown color, Slightly oily,
medium-body, smooth taste.
Uniform roast.
Try 27 minutes next time.
All beans are not created equal. Some batches of
unroasted beans contain more moisture and require
more time to roast. Beans from some countries roast
differently from others.
Decaffeinated beans take less time to roast than regular
unroasted beans.
Trial and error is the rule of thumb. When roasting a
new variety of bean follow it thru the cycle noting the
time it took to get it to your desired roast. Use your
roasting journal to chart your progress.
Mid way through a cycle smoke
appears to be coming out of the
bean roaster.
The front or rear rubber seals were improperly
installed or missing altogether. It is advised that you
clean the screen after every use.
Make sure that the auger is turning. If the auger is not
turning or if smoke is thick, stop roast cycle
immediately by unplugging the roaster. Let roaster
cool then empty the chamber of all partially roasted
beans. Make sure that none are stuck under the auger.
Reload and try again.
The unit speeds up with five
minutes left in the cycle.
This is normal. The roaster automatically shifts to a 5
minute “cool down” period at the end of every roast
cycle.
After running the coffee beans
through a maximum cycle the
beans aren’t as dark as I would
prefer.
Your bean roster is equipped with an option to add up
to 5 minutes to the roast time within each roast cycle.
Note that the time can only be added during the roast
stage, prior to the cooling stage which takes place
during the last 5 minutes of the total cycle, and that
the maximum setting on the display will never exceed
30 minutes.
Extremely dark roasts can be achieved by roasting less
than the recommended 5 oz. bean load per cycle.
There is an excessive amount of
chaff blowing out of the roaster
near the top.
18
Zach & Dani’s™ Instructional Guide and Roasting Journal
The front rubber seal was improperly installed or is
missing.
Zach & Dani’s™ Instructional Guide and Roasting Journal
19
Concerns
Possible Solutions
Unit is running but auger is not
spinning.
In any case, prior to inspection of a stalled auger
condition, shut down the unit and remove plug from
power source. Allow to cool.
Guarantee
Roasting chamber is not properly seated.
The auger (Diagram 1), thrust washer, and, or, drive
screw are improperly installed.
A bean is stuck under the auger, causing it to jam.
After shutting down the roaster, removing plug from
power source and allowing the roaster to cool, empty
the chamber of all beans, making sure to remove any
that may be stuck under the auger. Clean and dry the
chamber, auger, chaff cup and cover. Reload and try
again.
An internal problem with the drive system has
occurred. Return the unit to an authorized repair
center.
Beans are not circulating even
though auger is spinning.
I pushed the buttons while the
unit was running and nothing
happens.
Only 2 buttons are active while the unit is running.
These are the up arrow (to increase the roast time) and
the COOL button.
I roasted my beans and they are
too dark.
The beans that you have just roasted may not taste as
dark as they look. Give them a try, you may like them.
Decrease roasting time.
Make sure you are roasting the recommended amount
of beans. The recommended amount of beans is 5
ounces of unroasted beans, exactly to the “fill line” on
your roaster’s chamber.
20
We guarantee that you will enjoy your first sip of fresh-roasted coffee more than
you’ve ever enjoyed any other coffee. If you are not absolutely convinced that you
are drinking the freshest, most delicious cup of coffee on earth, simply return the
Zach & Dani’s™ Gourmet Coffee Roaster for a refund of the full purchase price,
no questions asked within 30 days of your purchase.
For supplies, coffee beans, accessories or questions:
The roasting chamber is excessively dirty and needs to
be cleaned.
The roasting chamber has been cleaned but was not
properly dried. Do not roast beans in a chamber that
has not been properly dried because the water acts as a
drag on the beans not allowing them to circulate.
I want to manually stop the roast
cycle when I see the beans change
color.
One Sip Guarantee
If you are monitoring your roast cycle and see your
desired color, simply press the cool button to stop the
roasting stage. The cooling stage will begin, thus
ending the roasting process. The machine will shut off
automatically at the end of the cooling stage.
Zach & Dani’s™ Instructional Guide and Roasting Journal
Phone:
877-470-0330
Monday - Friday, 8am-5pm, MDT
Email:
[email protected]
Via the web:
www.coffeeroasting.com
Zach & Dani’s™
8200 E. Maplewood Ave.
Greenwood Village, CO 80111
Zach & Dani’s™ Instructional Guide and Roasting Journal
21
Six Month Limited Warranty
Thank you for your purchase of a Zach & Dani’s™ Gourmet Coffee Roaster.
This Warranty applies to coffee roasters that were purchased for personal or
household use and shall not apply to commercial use of the units. The units were
not designed for and should not be used in commercial applications. In addition,
this Warranty only applies to the original purchaser of the unit (or, in the case of a
gift, the original user of the unit).
Your Zach & Dani’s™ Gourmet Coffee Roaster is warrantied by its
manufacturer to be free from manufacturing defects in materials or workmanship
for six months from the date of original purchase in connection with the normal
use of the unit for personal or household purposes. If your coffee roaster exhibits
such defects, the manufacturer will, in its sole discretion, choose to repair or
replace the unit. This Warranty covers the cost of repair or replacement and the
cost of returning a repaired or replacement unit to you, but does not cover the
initial cost of shipping a unit to the manufacturer.
This Warranty does not cover damage due to accident, misuse, abuse,
negligence or intentional misconduct by the user, including, without limitation,
tampering with or altering the unit. In addition, this Warranty does not cover
damage incurred due to servicing a unit at a non-authorized service center.
Furthermore, your coffee roaster comes equipped with numerous safety features.
Any attempt to interfere with or alter the operation of these safety features makes
this Warranty null and void. Finally, this Warranty is limited to repair or
replacement and shall not include any incidental, consequential, punitive or
special damages, costs or expenses.
This Warranty is the sole and exclusive warranty covering your Zach &
Dani’s™ Gourmet Coffee Roaster. ALL OTHER WARRANTIES, WHETHER
EXPRESS OR IMPLIED, INCLUDING, WITHOUT LIMITATION, ANY
WARRANTIES OF MERCHANTABILITY OR FITNESS FOR A PARTICULAR
PURPOSE, ARE HEREBY EXPRESSLY OVERRIDDEN, EXCLUDED AND
DISCLAIMED TO THE MAXIMUM EXTENT PERMITTED BY APPLICABLE
LAW.
In order to make a claim under this Warranty, you must provide the original
proof of purchase for the unit.
IF YOU HAVE ANY QUESTIONS ABOUT THIS WARRANTY,
PLEASE VISIT OUR WEBSITE, WWW.COFFEEROASTING.COM
OR CONTACT US AT (877) 470-0330,
MONDAY - FRIDAY, 8AM - 5PM, MOUNTAIN TIME.
22
Zach & Dani’s™ Instructional Guide and Roasting Journal