1
inalámbricas (C65)
* GAP (del inglés Generic Access
de acceso genérico). La mayoría de los
dispositivos DECT son compatibles con GAP.
Números de teléfono de Europa:
Plantronics B.V.
Hoofddorp, Nederland
(0)0800www.onedirect.fr
PLANTRONICS
0800 7526876
(NL)
Numéro
Vert
00800 75268766 (BE/LUX)
Plantronics Sarl
Noisy-le-Grand, France
No Indigo: 0825 0825 99
0 , 15
TTC / mn
+33 (0)1 41 67 41 41
Plantronics Acoustics
Italia S.r.l
www.onedirect.es
Milano,
Italia
Numero Verde: 800 950934
902 30 32 32
0 800 72 4000
+39 039 685971
58 Av de Rivesaltes Appel Gratuit
Av Diagonal 618 8º D
Plantronics GmbH
Hürth, Deutschland
Service: 0800 9323 400
Technik: 0180 5007996
Österreich: 0800 242 500
Schweiz: 0800 932 340
Plantronics Middle East,
Eastern Europe, Africa
and India
+44 (0)1793 842443
Nordic Region
Finland: 0201 550 550
Plantronics
Iberia, S.L.
Sverige: 031
28 95 00
www.onedirect.it
www.onedirect.pt
Madrid, España
Danmark: 44 35 05 35
902 41 51 02
91 365 22 990 Norge: 23 17 37 70
800 780 300
+34 91 640 47 44
Via Caracciolo 20
66240
St Inc.
Esteve
20155
Milano
08021el Barcelona
© 2004
Plantronics
Todos los derechos reservados. Plantronics,
diseño del logotipo, Plantronics y el diseño
del logotip
o combinados e
tel. +33(0)468
929 322
tel.SPA11/04
+39 02 365 22 990
IntelliStand
son marcas comerciales
o marcas registradas detel.
Plantronics
Inc.241
DECT38
es una
+34 93
90marca comercial de ETSI.
fax +33(0)468 929 333
fax +39 02 365 22 991
fax +34 93 241 37 92
Av. da Libertade nº 9 - 7º
1250-139 Lisboa
tel. 800 780 300
fax 800 780 301
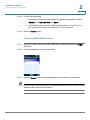
USER GUIDE
Cisco Wireless-G IP Phone
Model WIP310
CS60C65/SPA/1104
Plantronics Ltd
Wootton Bassett, UK
0800 410014
+44 (0)1793 842200
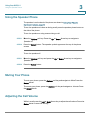
Contents
Welcome
5
About the Phone
5
About This Guide
6
Chapter 1: Getting to Know Your WIP310
Charging the Phone
10
Using Phone Keys and Buttons
12
Handset Navigation Pad
13
Entering Text
13
Using Your Phone’s Hardware Features
15
Understanding the Phone LEDs
15
Viewing the Phone Display Screen
16
Understanding Display Screen Icons
17
Understanding Display Messages
20
Chapter 2: Installing the WIP310
21
Installing the Battery
21
Charging the Battery
22
Powering On the Phone
23
Powering Off the Phone
23
Before You Begin
24
Accessing the Wireless Network
24
Using Wi-Fi Protected Setup
25
Using the Push Button Method
25
Using the PIN Connect Method
27
Manually Configuring Your Wireless Connection
Cisco WIP310 User Guide
10
30
Determining Your Wireless Router Security Type
30
Adding a Wireless Profile
32
Unsecured Routers
34
Creating a New Router Profile
34
1
Contents
Configuring WEP
35
Configuring WPA/WPA2 Personal
36
Editing a Wireless Profile
37
Deleting a Wireless Profile
37
Switching Between Wireless Profiles
37
Choosing the Wireless IP Settings
Registering Your Phone
Chapter 3: Using Your WIP310
Making and Receiving Phone Calls
Cisco WIP310 User Guide
38
40
41
42
Dialing a Number from the Recently Used Numbers List
42
Dialing a Number from your Contacts or the Call History List
43
Redialing the Last Called Number
43
Receiving Phone Calls
43
Receiving Phone Calls While Configuring Your Phone
44
Placing a Call on Hold
44
Ending a Call
44
Using the Speaker Phone
45
Muting Your Phone
45
Adjusting the Call Volume
45
Transferring a Call
46
Creating Conference Calls
46
Viewing Missed Calls
47
Viewing the Call History
48
Setting Do Not Disturb on Your Phone
50
Configuring Call Waiting
50
Blocking Anonymous Calls
51
Blocking Caller ID
52
Setting Up Call Forwarding
52
2
Contents
Using Speed Dials
Adding a Speed Dial Number
54
Editing or Deleting a Speed Dial Number
55
Calling a Speed Dial Number
55
Choosing Your Ringtone
56
Using Keypad Options
57
Locking the Keypad
57
Muting the Keypad
57
Changing the Backlight Setting
58
Setting the Date and Time
59
Changing the Phone Name (Station Name)
60
Viewing the Display Name or Phone Number
61
Using Contacts
62
Adding a Contact
62
Managing Contacts
63
Editing a Contact
63
Calling a Contact
64
Using Messaging
64
Viewing a Message
65
Composing a Text Message
66
Accessing Draft Messages
67
Accessing Sent Messages
67
Using Web Services
68
Using Local Search
68
Getting Stock Quotes
69
Viewing Local Weather Information
70
Chapter 4: Advanced Functions
Cisco WIP310 User Guide
54
71
Enabling the Web Server
71
Using the Web Interface
72
Using Star Codes
74
3
Contents
Upgrading Your Phone Firmware
76
Performing a Factory Reset
77
Restarting the Phone
78
Chapter 5: Using the WIP310 with the Cisco SPA9000 Voice System
Picking Up Calls
79
Picking Up a Call at a Specific Extension
80
Picking Up a Call at an Extension in a Group
80
Using Call Park
80
Parking a Call
80
Retrieving Parked Calls
81
Using Paging
81
Using the Corporate Directory
82
Enabling the Linksys Key System
82
Appendix A: Where to Go From Here
83
Support
83
Regulatory Compliance and Safety Information
83
Warranty
84
End User License Agreement (EULA)
84
Appendix B: Specifications
Cisco WIP310 User Guide
79
85
4
Preface
Welcome
Thank you for choosing the Cisco WIP310 Wireless-G IP Phone. The phone allows
you to make inexpensive, yet high-quality, Voice over IP (VoIP) telephone calls
using your Internet connection. The phone supports traditional features, such as
redialing, speed dialing, call forwarding, contacts list, call history, and speaker
phone. The WIP310 Wireless-G IP Phone also supports advanced call features,
such as 3-way call conferencing, call transferring, web services (Local Search,
Stock, and Weather), and more.
NOTE Some advanced call features require Internet Telephone Service Provider (ITSP)
integration and support. For information on these features, check with your ITSP. For
more information about your Internet phone service, please refer to the materials
provided by your ITSP.
Use the instructions in this User Guide to help you connect to your wireless
network and configure your WIP310 Wireless-G IP Phone so that you can start
making calls right away!
About the Phone
The Cisco WIP310 IP phone is part of the Cisco suite of products for small-tomedium businesses and individuals. This suite of products provides low-cost
Internet telephony solutions, including an IP PBX (SPA9000) to provide businessclass phone services, a line of wired IP phones, and the WIP310 wireless IP
phone.
Cisco WIP310 User Guide
5
Preface
The WIP310 wireless IP phone is compatible with the Cisco SPA9000 Voice
System to provide wireless IP phone service in a home office or small office
environment. It can serve also as a standalone wireless Internet phone in a home
environment where a wireless G network is available. For travel, the Cisco WIP310
provides phone service wherever wireless networks are available.
NOTE Wireless networks requiring you to enter authentication (such as a user name and
password) are not compatible with the WIP 310.
About This Guide
While reading through the User Guide you may encounter various icons designed
to call attention to a specific item. Below is a description of these icons:
NOTE Means reader take note. Notes contain helpful suggestions or references to
materials not contained in this manual.
!
CAUTION Means reader be careful. In this situation, you might do something that could result
in equipment damage or loss of data.
TIME SAVER Means the described action saves time. You can save time by performing the
action described in the paragraph.
TIP
Cisco WIP310 User Guide
Means the following are useful tips.
6
Preface
Finding Information in PDF Files
The WIP310 documents are published as PDF files. The PDF Find/Search tool
within Adobe® Reader® lets you find information quickly and easily online. You
can perform the following tasks:
•
Search an individual PDF file.
•
Search multiple PDF files at once (for example, all PDFs in a specific folder
or disk drive).
•
Perform advanced searches.
Finding Text in a PDF
Follow this procedure to find text in a PDF file.
STEP 1
Enter your search terms in the Find text box on the toolbar.
NOTE By default, the Find tool is available at the right end of the Acrobat toolbar. If the
Find tool does not appear, choose Edit > Find.
STEP 2
Optionally, click the arrow next to the Find text box to refine your search by
choosing special options such as Whole Words Only.
STEP 3
Press Enter.
STEP 4
Acrobat displays the first instance of the search term.
STEP 5
Press Enter again to continue to more instances of the term.
Cisco WIP310 User Guide
7
Preface
Finding Text in Multiple PDF Files
The Search window lets you search for terms in multiple PDF files that are stored
on your PC or local network. The PDF files do not need to be open.
STEP 1
Start Acrobat Professional or Adobe Reader.
STEP 2
Choose Edit > Search, or click the arrow next to the Find box and then choose
Open Full Acrobat Search.
STEP 3
In the Search window, complete the following steps:
a. Enter the text that you want to find.
b. Choose All PDF Documents in.
From the drop-down box, choose Browse for Location. Then choose the
location on your computer or local network, and click OK.
c. If you want to specify additional search criteria, click Use Advanced Search
Options, and choose the options you want.
d. Click Search.
Cisco WIP310 User Guide
8
Preface
STEP 4
When the Results appear, click + to open a folder, and then click any link to open
the file where the search terms appear.
For more information about the Find and Search functions, see the Adobe Acrobat
online help.
Cisco WIP310 User Guide
9
1
Getting to Know Your WIP310
This chapter contains the following sections:
•
Charging the Phone, page10
•
Using Phone Keys and Buttons, page12
•
Entering Text, page13
•
Using Your Phone’s Hardware Features, page15
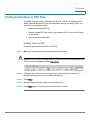
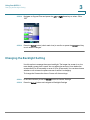
Charging the Phone
Your Cisco WIP310 Wireless-G IP Phone set consists of a handset, charger, USB
cable, and power supply.
Cisco WIP310 User Guide
10
Getting to Know Your WIP310
Charging the Phone
1
To charge the phone:
STEP 1
Place the phone in the charging cradle.
STEP 2
Connect one end of the power supply to the phone charger.
STEP 3
Connect the other end of the power supply to an electrical outlet.
See Charging the Battery, page 22.
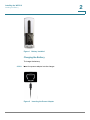
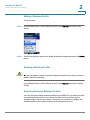
You can also connect one end the included USB cable to the USB port on the
bottom of the phone and the other end to your PC to charge the phone.
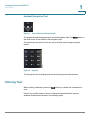
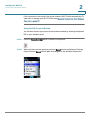
Figure 1 USB port on phone
!
CAUTION The battery must charge for at least 8 hours prior to the phone’s initial use. Do not
power on the phone for the first time until it has charged for at least 8 hours.
Talk time for the phone is approximately three (3) hours and standby time is
approximately 40 hours.
NOTE Talk and standby time can vary widely depending on your phone settings and
wireless environment. Cisco recommends that you keep the phone in the charger
when it is not in use.
Cisco WIP310 User Guide
11
1
Getting to Know Your WIP310
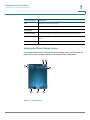
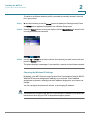
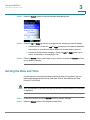
Using Phone Keys and Buttons
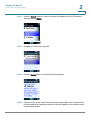
Using Phone Keys and Buttons
2
3
4
250777
1
Figure 2
Phone Buttons
This table describes your phone’s buttons:
Number
Description
1
Left soft key—The function of this key depends on the phone
screen or menu you are currently viewing. For example, in
the Home screen, press this soft key for Options.
2
Right soft key—The function of this key depends on the phone
screen or menu you are currently viewing. For example, in
the Home screen, press this soft key for Contacts.
3
Call button—Used to place and answer calls.
4
Power/End Call button—To power on the phone, press and
hold this button until the screen is lit. To power off the phone,
press and hold this button until the screen becomes dark.
TIP You also press this button to end a call or to return to the
phone Home screen at any time.
Cisco WIP310 User Guide
12
1
Getting to Know Your WIP310
Entering Text
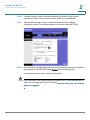
Handset Navigation Pad
Figure 3
Select Button and Arrow Keys
To navigate through the phone menus, use the Navigation Pad. The Select button is
the silver button in the middle of the navigation pad.
The arrow keys are used to move up, down, left and right through the phone
menus.
Figure 4
Keypad
The keypad is used for dialing numbers and entering letters and symbols.
Entering Text
When entering characters, press the Back soft key to delete one character at a
time.
Press a key multiple times to view the characters associated with that key.
Available characters are shown in the following table:
Cisco WIP310 User Guide
13
1
Getting to Know Your WIP310
Entering Text
Key
Character Set
1
1/:\,!;$^|
2
abc2ABC
3
def3DEF
4
ghi4GHI
5
jkl5JKL
6
mno6MNO
7
pqrs7PQRS
8
tuv8TUV
9
wxyz9WXYZ
0
Space 0 ~ ? > ‘ < “
*
.@*&%[]_
#/P
#+-=(){}
To exit to a previous menu without saving information:
STEP 1
Press the Back key multiple times until you reach the beginning of the text field.
The Cancel soft key then appears.
STEP 2
Press Cancel to exit.
TIP
Cisco WIP310 User Guide
Press the Power/End Call button to return to the Home screen at any time.
14
1
Getting to Know Your WIP310
Using Your Phone’s Hardware Features
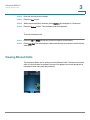
Using Your Phone’s Hardware Features
Your phone includes a speaker phone and a headset port.
Figure 5 Speaker Phone
The speaker is located on the back of the phone. To use the speaker phone, while
on a call, press the Speaker On/Off button located on the left side of the phone.
The speaker symbol appears on the phone display when the speaker phone is in
use.
Figure 6
Headset
To use a headset with your phone, connect a supported headset to the 2.5 mm
headset jack on the right side of the phone.
Understanding the Phone LEDs
Your phone has an LED in the upper left corner that displays colors to indicate the
phone status. The following table shows the colors and their meanings:
Cisco WIP310 User Guide
15
1
Getting to Know Your WIP310
Using Your Phone’s Hardware Features
Color and State
Definition
Off
The phone is off and is not charging.
Solid red
The phone is off and is charging.
Solid green
The phone is off and is fully charged.
Orange blinking
The phone is on and cannot register to the ITSP, or the phone has low power.
Green blinking
The phone is on, is connected to the wireless network and the ITSP, and is in ready
to use.
Red blinking
The phone is on and there is an unread text message or voice mail message.
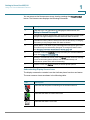
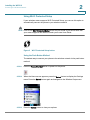
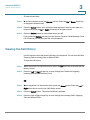
Viewing the Phone Display Screen
Your phone features a full-color high-resolution display screen that provides the
phone status, time and date, and other information as described below.
2
3
1
250778
4
7
6
5
Figure 7 Home Screen
Cisco WIP310 User Guide
16
1
Getting to Know Your WIP310
Using Your Phone’s Hardware Features
You can return to the Home screen at any time by pressing the Power/End Call
button. The Home screen displays the following information:
Number
Description
1
Date and Time—For information on changing the date and time, see
Setting the Date and Time, page 59.
2
Indicates the wireless signal status. Solid bars indicate the wireless signal
strength. Full signal strength is available when four bars are shown.
3
Indicates the battery status. Flashing bars indicate the battery is charging.
The battery is fully charged when four bars are shown.
4
Station Name—The name of your phone appears in the upper right corner.
This name may be automatically assigned. To change the station name,
see Changing the Phone Name (Station Name), page 60.
5
Contacts—Press the Contacts soft key to access your contacts address
book. See Using Contacts, page 62.
6
Settings—In the Home screen, press the Select button under the Settings
icon to access many phone options, such as wireless setup, call
preferences, speed dials, and call forwarding.
7
Options—Press the Options soft key to access phone options.
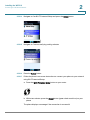
Understanding Display Screen Icons
The display screen also contains icons that indicate phone functions and status.
The most common icons are shown in the following table.
Icon
Description
Indicates that the phone is searching for the wireless network.
Indicates that there are new missed calls.
Indicates that there is voice mail.
Cisco WIP310 User Guide
17
1
Getting to Know Your WIP310
Using Your Phone’s Hardware Features
Icon
Description
Indicates that there are new message(s) waiting.
Indicates that the speaker phone is in use.
Indicates that the handset or headset is in use.
Indicates that the phone ringer is off.
Appears when you are accessing the phone volume control.
Identifies the Settings menu or button. In the Home screen, press the
Select button to access the settings menu.
Displays phone information. Press the Select button for more
information on the menu item.
Enables Do Not Disturb. Press the Select button to enable or disable Do
Not Disturb.
Indicates that the phone is locked.
Indicates that you have an incoming call.
Indicates that dialing is in progress.
Indicates that a call is progressing.
Cisco WIP310 User Guide
18
1
Getting to Know Your WIP310
Using Your Phone’s Hardware Features
Icon
Description
Indicates that a call is in progress between two WIP310 phones.
Indicates that a call is active.
Indicates that a call is on hold.
Indicates that a call has ended because the other party hung up, the
number was incorrect, or the call timed out.
Indicates that you have picked up a call from another extension.
Indicates that you have picked up a call from an extension in a group of
phones.
Indicates that the call is shared between two extensions.
Indicates a conference call. In the Options menu, press Select to create
a conference call.
Indicates that an incoming call is rejected.
When this icon appears, press Select to edit the current entry.
When this icon appears, press Select to confirm the current choice.
When this icon appears, press Select to view more details about the
current highlighted item.
When this icon appears, press the Select button to view or edit the
selected menu item.
Cisco WIP310 User Guide
19
1
Getting to Know Your WIP310
Using Your Phone’s Hardware Features
Understanding Display Messages
Your phone displays status messages on the screen to indicate phone actions and
results. Some of the common display messages are:
•
Acquiring Network—The phone is attempting to connect to a wireless
network.
•
Trying to Register—The phone is connected to the wireless network and is
attempting to connect to your Internet Telephony Service Provider (ITSP) to
register your phone.
•
Registration Failed—The phone is connected to the wireless network, but
cannot register with your ITSP. The phone must be registered with your
ITSP before use. Registration can fail if:
-
Your Internet service is not available to complete the registration.
-
Your ITSP’s systems are not responding to the registration request.
-
Your registration information is incorrect.
Contact your ITSP for troubleshooting information.
Cisco WIP310 User Guide
20
2
Installing the WIP310
This chapter contains the following sections:
•
Installing the Battery, page 21
•
Powering On the Phone, page 23
•
Powering Off the Phone, page 23
•
Before You Begin, page 24
•
Accessing the Wireless Network, page 24
Installing the Battery
To install the battery:
STEP 1
Open the phone’s back battery cover.
STEP 2
Place the battery so that the metal contacts on the battery touch the metal
contacts in the battery compartment. The battery fits only one way. Do not force.
STEP 3
Replace the cover after the battery is installed.
Cisco WIP310 User Guide
21
2
Installing the WIP310
Installing the Battery
Figure 1 Battery Installed
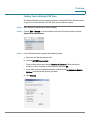
Charging the Battery
To charge the battery:
STEP 1
Insert the power adapter into the charger.
Figure 2
Cisco WIP310 User Guide
Inserting the Power Adapter
22
2
Installing the WIP310
Powering On the Phone
STEP 2
Insert the adapter into a wall outlet.
STEP 3
Charge the phone by placing the phone into the charger.
NOTE You can also charge the phone using the USB cable. Connect one end to your
phone and the other end to a USB port on your personal computer.
The phone briefly displays a charging icon and the LED is solid red. When the LED
is solid green, the phone is fully charged.
NOTE The battery needs to charge for at least 8 hours prior to the phone’s initial use. Do
not power on the phone until it has charged for at least 8 hours.
Powering On the Phone
Power on the phone by pressing and holding the Power/End Call button for
approximately five seconds until the screen is lit. The phone is ready to use when
the Home screen appears (in approximately 30 seconds).
Powering Off the Phone
Power off the phone by pressing and holding the Power/End Call button until the
screen becomes dark.
Cisco WIP310 User Guide
23
2
Installing the WIP310
Before You Begin
Before You Begin
To use your Wireless-G IP Phone, you need the following:
•
Access to a Wireless-B or Wireless-G network with Internet access
•
An account with an Internet Telephony Service Provider (ITSP)
To use your phone, you need to complete the following tasks:
STEP 1
Connect to a wireless network.
STEP 2
Register your phone with your ITSP. If you received your phone directly from your
ITSP, it should be pre-configured and should perform this step automatically after
you power on the phone.
Accessing the Wireless Network
The first time you power on the phone, the phone is not configured to connect to a
network. To connect your phone to your wireless network, you need to set up a
Wireless Profile. There are two ways to configure the Wi-Fi Profile: Automatically
via Wi-Fi Protected Setup1 and Manually.
NOTE When configuring the phone’s wireless network, you should be as close as
possible to the wireless router. For normal use, the phone should be within 300 feet
(90 m) of the wireless network to connect.
1. The Wi-Fi Protected Setup Mark is a mark of the Wi-Fi Alliance.
Cisco WIP310 User Guide
24
2
Installing the WIP310
Accessing the Wireless Network
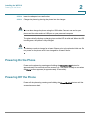
Using Wi-Fi Protected Setup
If your wireless router supports Wi-Fi Protected Setup, you can use this option to
automatically connect the phone to your wireless network.
NOTE Look for the Wi-Fi Protected Setup button on your router. If you are not sure that
your router supports this feature, consult your router User Guide.
Figure 3
Wi-Fi Protected Setup button
Using the Push Button Method
The easiest way to connect your phone to the wireless network is the push button
method:
STEP 1
Press the Power/End Call button to power on the phone.
STEP 2
When the Home screen appears, press the Select button to display the Settings
menu. Press the Select button again and navigate to the Wireless Setup menu.
STEP 3
Press the Select button to view your options.
Cisco WIP310 User Guide
25
Installing the WIP310
Accessing the Wireless Network
2
STEP 4
Navigate to Use Wi-Fi Protected Setup and press the Select button.
STEP 5
Navigate to Connect easily by pushing a button.
STEP 6
Press the Select button.
STEP 7
Follow the phone’s on-screen instructions to connect your phone to your network
using Wi-Fi Protected Setup:
a. Press the Wi-Fi Protected Setup button on your router.
b. Within two minutes, press the Select button (green check mark icon) on your
phone.
The phone displays a message if the connection is successful.
Cisco WIP310 User Guide
26
Installing the WIP310
Accessing the Wireless Network
2
If the connection is successful, the phone creates a Wi-Fi Profile automatically. To
view, edit, or manage your Wi-Fi Profiles, see Manually Configuring Your Wireless
Connection, page 30.
Using the PIN Connect Method
You can also connect your phone to the wireless network by entering the phone’s
PIN on your wireless router.
STEP 1
Press the Power/End Call button to power on the phone.
STEP 2
When the Home screen appears, press the Select button to display the Settings
menu. Press the Select button again and navigate to the Wireless Setup menu.
Cisco WIP310 User Guide
27
Installing the WIP310
Accessing the Wireless Network
2
STEP 3
Press the Select button to view your options. Navigate to Use Wi-Fi Protected
Setup and press Select.
STEP 4
Navigate to Connect by using PIN.
STEP 5
Press the Select button. Your phone’s PIN is displayed.
STEP 6
Connect to your router’s web interface using a web browser. Your computer must
be connected to your wireless network. Enter the IP address of the wireless router
in the browser toolbar.
Cisco WIP310 User Guide
28
Installing the WIP310
Accessing the Wireless Network
2
STEP 7
If required, enter the user name and password. (By default, Linksys routers
typically use “admin” for the user name and “admin” for the password.)
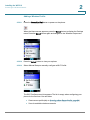
STEP 8
View the Wireless tab or screen. Locate the Wireless Protected Setup
configuration menu. The following example is from the Linksys WRT160N:
STEP 9
Enter the PIN into the field that allows you to setup wireless devices using a PIN. (In
the example for the WRT160N, press Register after entering the PIN.)
A message appears if the connection is successful.
NOTE If the connection is successful, the phone creates a Wi-Fi Profile automatically. To
view, edit, or manage your Wi-Fi Profiles, see Manually Configuring Your Wireless
Connection, page 30.
Cisco WIP310 User Guide
29
2
Installing the WIP310
Accessing the Wireless Network
Manually Configuring Your Wireless Connection
Use this method to connect to your network if your router does not support the WiFi Protected Setup feature. If you are manually configuring your WIP310 wireless
connection, you need to know the wireless security type for your router. The
WIP310 works with the following security types:
•
WEP—Wired Equivalent Privacy. With this type of security, you need to
enter a 64 or 128-bit key on the phone (or a more easily remembered
passphrase to generate the key). The phone then authenticates with your
router to provide a secure connection.
•
WPA—Wi-Fi Protected Access. With this type of security, you need to enter
a password on the phone. The phone then authenticates with your router to
provide a secure connection.
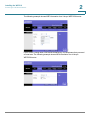
Determining Your Wireless Router Security Type
If you do not know your wireless router security type, you need to log in to the
router interface to get this information. The steps below are written for a Linksys
router, but procedures for other routers should be similar.
STEP 1
Log in to your wireless router’s web interface using a web browser. Your computer
must be connected to your wireless network. Enter the IP address of the wireless
router in the browser toolbar.
STEP 2
If required, enter the user name and password. (By default, Linksys routers
typically use “admin” for the user name and “admin” for the password.)
STEP 3
View the Wireless tab or screen. Note the network name (SSID) and the type of
security (WEP, WPA Personal, or WPA2 Personal).
If your router is using WEP, note the following:
Cisco WIP310 User Guide
•
WEP encryption: 64 bit or 128 bit. You need to choose this later.
•
Default transmit key, or TX key: The default key (of the 4) that the router
transmits to authenticate. This value will be 1, 2, 3, or 4.
•
Passphrase and keys: You choose one of two methods to enter the WEP
key. You either directly enter the WEP key, or enter a more simple
passphrase to generate the WEP key.
30
Installing the WIP310
Accessing the Wireless Network
2
The following example shows WEP information for a Linksys WRT160N router:
If your router is using WPA, note the WPA shared key, or passphrase that you need
to enter later. The following example shows WPA information for a Linksys
WRT160N router:
Cisco WIP310 User Guide
31
2
Installing the WIP310
Accessing the Wireless Network
Adding a Wireless Profile
STEP 1
Press the Power/End Call button to power on the phone.
When the Home screen appears, press the Select button to display the Settings
menu. Press the Select button again and navigate to the Wireless Setup menu.
STEP 2
Press the Select button to view your options.
STEP 3
Select Manual Setup to manually configure a Wi-Fi Profile.
The Wi-Fi Profiles screen list appears. The list is empty when configuring your
phone for the first time. You can either:
Cisco WIP310 User Guide
•
Create a new profile (skip to Creating a New Router Profile, page 34).
•
Scan for available wireless networks
32
2
Installing the WIP310
Accessing the Wireless Network
STEP 4
To search for the available networks, press the Options soft key, then navigate to
Scan Networks. Press the Select button.
A list of available networks appears.
STEP 5
Cisco WIP310 User Guide
Navigate to the desired network and press the Select button:
•
If the network is unsecured, see Unsecured Routers, page 34.
•
If the network is secured, you will need to enter your passphrase or other
security credentials.
33
Installing the WIP310
Accessing the Wireless Network
2
Unsecured Routers
If your network appears in the list, and you are not using router security, the phone
automatically connects to your network after you press the Select button. The
display screen indicates whether or not the connection was successful.
NOTE If your router did not appear automatically in the list, security settings on your router
probably prevented its name from being shown. You need to know the name
assigned to the router by the network administrator.
Creating a New Router Profile
Follow the steps below to add the profile:
STEP 1
In the Wireless Setup > Manual Setup screen, press Options and choose New
Profile.
STEP 2
Press the Left Arrow key to turn Auto Connect on.
Cisco WIP310 User Guide
34
2
Installing the WIP310
Accessing the Wireless Network
STEP 3
Scroll down and enter a profile name (such as “Home” or “Work”) to identify the
wireless router to which you are connecting.
STEP 4
Enter the name, or SSID, of the wireless router to which you want to connect.
STEP 5
Press the Right Arrow key. Scroll down to choose the type of security:
•
None—Press the Select button and the phone automatically connects to
the router.
•
WEP (Wired Equivalent Privacy)—See Configuring WEP, page 35.
•
WPA/WPA2 Personal—See Configuring WPA/WPA2 Personal, page 36.
Configuring WEP
STEP 1
In the Wi-Fi Security Screen, scroll to WEP and press the Right Arrow key.
STEP 2
Press the Right Arrow key to choose the WEP key length (64 or 128 bits).
STEP 3
Press the Down Arrow key and enter the default TX Key (1, 2, 3, or 4).
Cisco WIP310 User Guide
35
2
Installing the WIP310
Accessing the Wireless Network
STEP 4
STEP 5
Do one of the following:
•
Scroll down to enter the passphrase. (To generate a passphrase, select
Options. Click Generate Key, then Save.)
•
Scroll down to enter the 64 or 128-bit key into the Key 1, Key 2, Key 3, or
Key 4 field. You chose the TX key field (1, 2, 3, or 4) in Step 3.
Press the Select button.
Configuring WPA/WPA2 Personal
STEP 1
In the Wi-Fi Security Screen, scroll to WPA/WPA2 Personal and press the Right
Arrow key.
STEP 2
Enter the passphrase to access the router.
STEP 3
Press the Select button. A message appears if the connection is successful.
NOTE If you have more than one wireless profile saved, the phone tries to contact the first
wireless router in the list upon startup.
Cisco WIP310 User Guide
36
Installing the WIP310
Accessing the Wireless Network
2
Editing a Wireless Profile
To edit a profile:
STEP 1
In the Wireless Setup > Manual Setup screen, press Options and choose Edit
Profile.
STEP 2
Scroll to the field you want to edit. Make the desired changes and press the Select
button.
Deleting a Wireless Profile
!
CAUTION You are not asked to confirm you want to delete the profile, so be sure you want to
delete it before proceeding.
In the Wireless Setup > Manual Setup screen, press Options and choose Delete
Profile.
Switching Between Wireless Profiles
You can configure multiple wireless profiles on your WIP310. If you have more than
one wireless profile saved on your phone, the phone tries to contact the first
wireless router in the list upon startup. Therefore, you should first configure the
wireless profile for the location where you use the phone the most.
Cisco WIP310 User Guide
37
Installing the WIP310
Accessing the Wireless Network
2
To switch to a different wireless profile, you need to manually choose it from the
list in your phone:
STEP 1
In the Home screen, press the Select button to display the Settings menu. Press
the Select button again and navigate to the Wireless Setup menu.
STEP 2
Press the Select button to view your options. Select Manual Setup to show the list
of configured wireless networks.
STEP 3
Use the Up or Down Arrow key to choose the network you want from the list and
press the Select button.
The phone displays a message if it successfully connects to the wireless network.
Choosing the Wireless IP Settings
By default, your WIP310 phone uses Dynamic Host Configuration Protocol (DHCP).
With DHCP, the router assigns an IP address to your phone. This IP address
assignment is dynamic, meaning that the IP address assigned to your phone can
change.
You can configure the phone with a static, or unchanging IP address.
NOTE You should only configure your WIP310 to use a static IP address if you have been
instructed to do so by your ITSP or by another support person.
Cisco WIP310 User Guide
38
2
Installing the WIP310
Accessing the Wireless Network
To change the wireless IP setting:
STEP 1
In the Home screen, press the Select button to display the Settings menu.
Navigate to the Wireless Setup menu and press the Select button to view your
options.
STEP 2
Select IP Settings and press the Select button.
STEP 3
Press the Right Arrow key to choose DHCP or Static IP.
If you choose Static IP, enter the following:
STEP 4
Cisco WIP310 User Guide
•
Static IP—Enter the permanent IP address to assign to your phone.
•
NetMask—Enter the netmask to identify the subnet.
•
Gateway—Enter the IP address of your wireless router.
•
Primary DNS—Enter the IP address of the primary Domain Name Server.
(This server translates domain names to IP addresses.)
•
Secondary DNS—Enter the IP address of the secondary Domain Name
Server.
Press the Select button.
39
Installing the WIP310
Accessing the Wireless Network
2
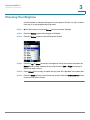
Registering Your Phone
After you configure your phone to connect to the wireless network, your phone
must register with your ITSP. If you received your phone directly from your ITSP, it
should be pre-configured and perform this step automatically.
If there is a problem with registration, the phone displays a message that it failed
to register. If this occurs, contact your ITSP for assistance.
Cisco WIP310 User Guide
40
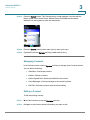
3
Using Your WIP310
This chapter contains the following sections:
Cisco WIP310 User Guide
•
Making and Receiving Phone Calls, page 42
•
Using the Speaker Phone, page 45
•
Muting Your Phone, page 45
•
Adjusting the Call Volume, page 45
•
Transferring a Call, page 46
•
Creating Conference Calls, page 46
•
Viewing Missed Calls, page 47
•
Viewing the Call History, page 48
•
Setting Do Not Disturb on Your Phone, page 50
•
Configuring Call Waiting, page 50
•
Blocking Anonymous Calls, page 51
•
Blocking Caller ID, page 52
•
Setting Up Call Forwarding, page 52
•
Using Speed Dials, page 54
•
Choosing Your Ringtone, page 56
•
Using Keypad Options, page 57
•
Changing the Backlight Setting, page 58
•
Setting the Date and Time, page 59
•
Changing the Phone Name (Station Name), page 60
•
Viewing the Display Name or Phone Number, page 61
41
3
Using Your WIP310
Making and Receiving Phone Calls
•
Using Contacts, page 62
•
Using Messaging, page 64
•
Using Web Services, page 68
Making and Receiving Phone Calls
To make a phone call:
STEP 1
Dial the number (including any digits that must be used for long distance).
STEP 2
Press the Call button and the call is placed.
Dialing a Number from the Recently Used Numbers List
STEP 1
Press the Call button and scroll to a number.
STEP 2
(Optional) To edit the number, press the Select button. Use the Left and Right
Arrow keys to insert numbers and the Back soft key to delete numbers.
STEP 3
Press the Call button.
Cisco WIP310 User Guide
42
3
Using Your WIP310
Making and Receiving Phone Calls
Dialing a Number from your Contacts or the Call History List
STEP 1
Press the Call button.
STEP 2
Press Options, then navigate to choose:
•
Contacts—Select a number from the Contacts list.
•
Call History—Select a number from the Call History list.
•
Speed Dial—Select a speed dial.
•
Star Code—Select a star code to enter before dialing. See Using Star
Codes, page 74.
STEP 3
Press the Select button.
STEP 4
Press the Call button and the call is placed.
Redialing the Last Called Number
To redial the last called number, in the Home screen, press the Call button twice.
Receiving Phone Calls
Press the Call button to answer an incoming call. Information about the call
appears on the phone screen display.
While the phone is ringing, you can also press the Options soft key and choose
one of the following options:
Cisco WIP310 User Guide
43
3
Using Your WIP310
Making and Receiving Phone Calls
•
New Call—Ignore the call and place a new call. Press the Down or Up
Arrow keys and navigate to New Call and press the Select button.
•
Mute—Mute the speaker on your phone.
•
Setup—Ignore the call and enter the Setup menu.
Receiving Phone Calls While Configuring Your Phone
If you receive a call while using a configuration screen on your phone (for example,
the Settings screen), a message appears notifying you of the new call.
•
To answer the call, press the Call button.
•
To ignore the call, press the Back soft key. You return to the phone screen
and the incoming call continues to ring.
•
To reject the call, press the Select button when the reject icon is displayed.
Placing a Call on Hold
To place a call on hold, press the Select button while on a call. The hold icon
appears. To return to the call, press the Select button again.
Ending a Call
To end a call, press the Power/End Call button.
Cisco WIP310 User Guide
44
3
Using Your WIP310
Using the Speaker Phone
Using the Speaker Phone
The speaker is on the back of the phone, as shown in Using Your Phone’s
Hardware Features, page15.
To turn the speaker on before or during a call, press the speaker phone button on
the side of the phone.
To turn the speaker on using menus during a call:
STEP 1
Press the Options soft key. Press the Up or Down Arrow key to navigate to
Speaker on.
STEP 2
Press the Select button. The speaker symbol appears at the top of the phone
screen.
To turn the speaker off:
STEP 1
Press the Options soft key and press the Up or Down Arrow key to navigate to
Speaker off.
STEP 2
Press the Select button.
Muting Your Phone
To mute your phone, press the Options soft key and navigate to Mute. Press the
Select button.
To unmute your phone, press the Options soft key and navigate to Unmute. Press
the Select button.
Adjusting the Call Volume
While in a call, press the Left or Right Arrow key to adjust the call volume. Press the
Select button to save the setting.
Cisco WIP310 User Guide
45
3
Using Your WIP310
Transferring a Call
Transferring a Call
You can transfer calls in two ways:
•
Blind transfer—Transfer a call to another party without waiting for the other
party to answer.
•
Attended transfer—Transfer a call to another party after speaking to the
other person.
To perform a blind transfer:
STEP 1
While in a call, press Options and navigate to Blind Trnsfr.
STEP 2
Press the Select button.
STEP 3
Enter the phone number to which you want to transfer the call.
STEP 4
Press the Call button. The call is immediately transferred.
To perform an attended transfer:
STEP 1
While in a call, press Options and navigate to New Call.
STEP 2
Enter the phone number to which you want to transfer the call.
STEP 3
Press the Call button.
STEP 4
After speaking to the other party, press Options and navigate to Transfer.
STEP 5
Press the Select button. The call is transferred to the other party.
Creating Conference Calls
You can create three-way conference calls on your phone. To make a conference
call:
STEP 1
Place the first call. (See Making and Receiving Phone Calls, page 42.)
STEP 2
Press Options and navigate to New Call. Press the Select button.
Cisco WIP310 User Guide
46
3
Using Your WIP310
Viewing Missed Calls
STEP 3
Enter the second phone number.
STEP 4
Press the Call button.
STEP 5
When the second party answers, press Options and navigate to Conference.
STEP 6
Press the Select button. The conference call icon appears.
To end a conference call:
STEP 1
Press the Up or Down Arrow key to select the party to disconnect.
STEP 2
Press End Call. The selected line is disconnected and you remain in a call with the
other party.
Viewing Missed Calls
This selection allows you to quickly view any Missed Calls. If there are no missed
calls, this choice does not appear. A phone icon appears on-screen along with a
message of how many calls were missed.
Cisco WIP310 User Guide
47
3
Using Your WIP310
Viewing the Call History
To view missed calls:
STEP 1
In the Home screen, press the Options soft key. Press the Up or Down Arrow key
to navigate to Missed Calls.
STEP 2
Press the Select button. A list of missed calls appears. If there is more than one
missed call, press the Up or Down Arrow key to navigate to a call.
STEP 3
Press the Select button to view details about the call.
If you press the Options soft key, you can Send to Contacts, Send Message, Clear
List, Clear Entry or Edit Dial (edit the call information).
Viewing the Call History
Use this option to view the recent call history for the phone. You can view All Calls,
Outgoing Calls, Incoming Calls, or Missed Calls.
To view the call history:
STEP 1
When the phone is in the Home screen, press the Up Arrow key to access the Call
History screen.
STEP 2
Press the Left or Right Arrow key to scroll through the Combined, Outgoing,
Incoming, and Missed call history lists.
OR
STEP 1
When the phone is in the Home screen, press the Select button. Press the Left or
Right Arrow key to scroll to the Call History option.
STEP 2
Press the Select button. The entire Call History appears.
STEP 3
Press the Left or Right Arrow key to scroll through the Incoming Calls, Outgoing
Calls and Missed Calls.
Cisco WIP310 User Guide
48
3
Using Your WIP310
Viewing the Call History
To place a call to a number in the Call History, or view more details about a call:
STEP 1
Press the Up or Down Arrow key to navigate to the entry, then press the Select
button. A small green phone icon appears above the Select button.
STEP 2
Press the Select button to select the number to edit, or immediately press the Call
button to call that number.
To save the number to contacts, send a message to, or delete the number from the
call history:
STEP 1
When the entry is highlighted, press the Options soft key, to see the submenu
options. You can choose to Send to Contacts, Send Message, Clear List, Clear
Entry or Edit Dial.
STEP 2
Use the Up or Down Arrow key to navigate to your choice and then press the
Select button.
Cisco WIP310 User Guide
•
If you choose to Send to Contacts, the Contacts Entry menu appears. You
can edit the information.
•
If you choose Clear List or Clear Entry, the message “Are you sure you want
to remove this list/entry?” appears. Press the Select button (check mark
icon) to confirm your choice.
49
Using Your WIP310
Setting Do Not Disturb on Your Phone
3
Setting Do Not Disturb on Your Phone
This selection allows you to block incoming calls.
STEP 1
In the Home screen, press the Options soft key. Press the Up or Down Arrow key
to navigate to Do Not Disturb.
STEP 2
Press the Select button. The Do Not Disturb symbol appears at the top of the
phone screen.
To turn this feature off, follow steps 1 and 2, selecting DND Off.
OR
STEP 1
In the Home screen, press the Select button to choose Settings.
STEP 2
Press the Select button and navigate to Call Preferences.
STEP 3
Press the Select button and navigate to Do Not Disturb.
STEP 4
Press the Left or Right Arrow key to select ON or OFF.
STEP 5
Press the Select button (check mark icon) to confirm or press the Cancel soft key
to exit without changes.
Configuring Call Waiting
If you are in a phone call, call waiting notifies you of another incoming call by
playing a beep and showing the incoming call on the display. You can turn call
waiting on and off.
Cisco WIP310 User Guide
50
3
Using Your WIP310
Blocking Anonymous Calls
To configure call waiting:
STEP 1
In the Home screen, press the Select button to choose Settings.
STEP 2
Press the Select button and navigate to Call Preferences.
STEP 3
Navigate to Call Waiting and press the Left or Right Arrow key to select ON or OFF.
Press the Select button (check mark icon) to confirm or press the Cancel soft key
to exit without changes.
Blocking Anonymous Calls
You can configure your phone to block calls from an unidentified caller. Calls from
unidentified callers will not ring your WIP310 phone. To configure call blocking:
STEP 1
In the Home screen, press the Select button to choose Settings. Press the Select
button and navigate to Call Preferences.
STEP 2
Navigate to Block Anonymous Calls and press the Left or Right Arrow key to select
ON or OFF.
STEP 3
Press the Select button (check mark icon) to confirm or press the Cancel soft key
to exit without changes.
Cisco WIP310 User Guide
51
3
Using Your WIP310
Blocking Caller ID
Blocking Caller ID
You can configure your phone to block your Caller ID from appearing when you
make a call. To block your Caller ID:
STEP 1
In the Home screen, press the Select button to choose Settings. Press the Select
button and navigate to Call Preferences.
STEP 2
Navigate to Block Caller ID and press the Left or Right Arrow key to select ON or
OFF.
STEP 3
Press the Select button (check mark icon) to confirm or press the Cancel soft key
to exit without changes.
Setting Up Call Forwarding
Use this option to forward incoming calls to a different phone number or to your
voice mail. You can forward all calls, forward calls when your phone is busy, or
forward calls when there is no answer.
Cisco WIP310 User Guide
52
3
Using Your WIP310
Setting Up Call Forwarding
STEP 1
After navigating to Call Forwarding in the Settings menu, press the Select button
to see the call forwarding options.
STEP 2
Scroll up or down to navigate to the call forward option that you want. Your
choices are:
Cisco WIP310 User Guide
•
Forward All—Forward all calls.
•
Forward All Dest—If you selected Forward All, enter the phone number to
which you want to forward all calls. To stop call forwarding, delete the call
forwarding number.
•
Forward Busy—Forward calls when you are on a call.
•
Forward Busy Dest—If you selected Forward Busy, enter the phone number
to which you want to forward the calls. To stop call forwarding, delete the
call forwarding number. By default, calls are forwarded to voice mail (“vm”
appears in this field).
•
Forward No Ans—Forward calls when there is no answer at your phone.
You can set the number of seconds for the phone to ring before it is
forwarded in the Forward No Ans Delay field.
•
Forward No Ans Dest—If you selected Forward No Answer, enter the phone
number to which you want to forward the calls. To stop call forwarding,
delete the call forwarding number. By default, calls are forward to voice mail
(“vm” appears in this field).
•
Forward No Ans Delay—If you selected Forward No Answer, the number of
seconds to elapse before the call is forwarded. Press the Left or Right
Arrow keys to select the number of seconds.
53
3
Using Your WIP310
Using Speed Dials
STEP 3
Press the Select button (check mark icon) to confirm or press the Cancel soft key
to exit without changes.
Using Speed Dials
Use this feature to add, edit or delete entries in your speed dial list. You can have
up to 98 Speed Dial numbers.
NOTE Speed Dial 1 is reserved for voice mail and is not editable.
Adding a Speed Dial Number
STEP 1
In the Home screen, press the Select button to choose Settings.
STEP 2
Press the Select button and navigate to Speed Dial in the Settings menu.
STEP 3
Press the Select button to see the Speed Dial list.
STEP 4
Press the Up or Down Arrow key to navigate to an available Speed Dial number
slot (1 is reserved for voice mail). Press the Select button.
Cisco WIP310 User Guide
54
3
Using Your WIP310
Using Speed Dials
STEP 5
Enter a name for the speed dial, using the keypad. (See Entering Text, page13.)
When you are finished, press the Down Arrow key to enter a phone number to
associate with this name.
STEP 6
Press the Select button (check mark icon) when you are finished.
Editing or Deleting a Speed Dial Number
STEP 1
When you are viewing the Speed Dial list, press the Up or Down Arrow key to
navigate to the entry you want to edit or delete. Press the Options soft key.
STEP 2
Press the Up or Down Arrow key to navigate to Remove Entry, Edit or Edit Dial.
Press the Select button.
STEP 3
Navigate to Edit to edit the speed dial name.
STEP 4
Navigate to Edit Dial to edit the speed dial number.
STEP 5
Press the Select button when you are finished.
STEP 6
If you navigated to Remove Entry, press OK (Select button). The message, “Are you
sure?” appears. Press the Select button to remove the entry.
Calling a Speed Dial Number
To call a speed dial number that you have configured, press and hold the speed
dial digit. For speed dials with more than one digit, press and hold the last number.
Cisco WIP310 User Guide
55
3
Using Your WIP310
Choosing Your Ringtone
Choosing Your Ringtone
Use this feature to change the ringtone for your phone. Choose “no ring” or select
from any of six pre-programmed ring tones.
STEP 1
In the Home screen, press the Select button to choose Settings.
STEP 2
Press the Select button and navigate to Ringtone.
STEP 3
Press the Select button to see the Ringtone options.
STEP 4
Press the Up or Down Arrow key to navigate to a ring tone choice and press the
Select button to hear a sample of the tone. Press the Left or Right Arrow key to
adjust the ringer volume.
STEP 5
Press Select (left soft key) to enable the ring tone. An X appears in the check box.
STEP 6
Press the Back soft key to move back one screen. Press the Power/End Call button
to return to the Home screen.
Cisco WIP310 User Guide
56
3
Using Your WIP310
Using Keypad Options
Using Keypad Options
You can lock or mute your phone keypad.
Locking the Keypad
This selection allows you to temporarily lock the phone buttons and keypad. When
the phone is locked, pressing phone keys and buttons has no effect. To enable key
lock:
STEP 1
When the phone is in the Home screen, press the Options soft key. Press the Up or
Down Arrow key to navigate to Key Lock .
STEP 2
Press the Select button to enable Key Lock. A lock icon appears at the bottom
center of the screen and the phone returns to the Home screen.
To remove the Key Lock:
STEP 1
Press the Select button (the lock icon displays above this key).
STEP 2
Press the asterisk (*) button on the keypad.
Muting the Keypad
You can turn the phone keypad off so that no tones are played when phone keys
and buttons are pressed. To mute the phone keypad:
STEP 1
Cisco WIP310 User Guide
In the Home screen, press the Select button to choose Settings. Press the Select
button and navigate to Call Preferences.
57
Using Your WIP310
Changing the Backlight Setting
3
STEP 2
Navigate to Keypad Tone and press the Left or Right Arrow key to select ON or
OFF.
STEP 3
Press the Select button (check mark icon) to confirm or press the Cancel soft key
to exit without changes.
Changing the Backlight Setting
Use this option to manage the screen backlight. The longer the screen is on, the
more battery power that is used. You can adjust the amount of time before the
screen dims (0 to 30 seconds) or turns off (0 to 60 seconds). You can also choose
whether or not to leave the phone screen on while it is charging.
To change the Screen dim after or Screen off after settings:
STEP 1
In the Home screen, press the Select button to choose Settings.
STEP 2
Press the Select button and navigate to Backlight Settings.
Cisco WIP310 User Guide
58
3
Using Your WIP310
Setting the Date and Time
STEP 3
Press the Select button to see the Backlight Settings options.
STEP 4
Press the Up or Down Arrow key to navigate to the setting you want to change:
STEP 5
•
Screen dim/off—Press the Left or Right Arrow key to increase or decrease
the number of seconds that elapse before the screen dims or goes off.
•
Screen on during battery charging—Press the Left or Right Arrow key to
select Yes (always on at charging) or No.
Press the Select button (check mark icon) to confirm or press the Cancel soft key
to exit without changes.
Setting the Date and Time
Use this option to customize the date and time settings for the phone. You can
individually change the Month, Day, Year, Date Format, Hour, Minute and Time
Format (12 or 24 hour).
NOTE Your customized time and date settings are erased if the phone battery is removed
or depleted.
STEP 1
In the Home screen, press the Select button to choose Settings.
STEP 2
Press the Select button and navigate to Date/Time.
Cisco WIP310 User Guide
59
Using Your WIP310
Changing the Phone Name (Station Name)
3
The top of the screen allows you to change the month, day, year, and date format.
Press the Left or Right Arrow key to increase or decrease the number for each
setting.
Use the Down arrow key to go to the next screen:
This section allows you to change the hour, minute, and time format. Press the Left
or Right Arrow key to increase or decrease the number for each setting.
STEP 3
Press the Select button (check mark icon) to confirm or press the Cancel soft key
to exit without changes.
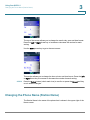
Changing the Phone Name (Station Name)
The Station Name is the name of the phone that is shown in the upper right of the
Home screen.
Cisco WIP310 User Guide
60
Using Your WIP310
Viewing the Display Name or Phone Number
3
NOTE If this phone is part of a Cisco SPA9000 Voice System and is registered to a
SPA9000, the Station Name also appears in the Corporate Directory.
STEP 1
In the Home screen, press the Select button to choose Settings.
STEP 2
Press the Select button and navigate to Display Settings.
STEP 3
Press the Select button to see the Display Settings options.
STEP 4
Press the Up or Down Arrow key to navigate to the Station Name.
STEP 5
Use the keypad to enter the name for your phone.
STEP 6
Press the Select button (check mark icon) to confirm or press the Cancel soft key
to exit without changes.
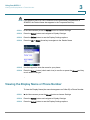
Viewing the Display Name or Phone Number
To view the Display Name (the name that appears on Caller ID) or Phone Number.
STEP 1
In the Home screen, press the Select button to choose Settings.
STEP 2
Press the Select button and navigate to Display Settings.
STEP 3
Press the Select button to see the Display Settings options.
Cisco WIP310 User Guide
61
3
Using Your WIP310
Using Contacts
STEP 4
Press the Up or Down Arrow key to navigate to Display Name or Phone Number.
STEP 5
Press the Select button (check mark icon) to confirm or press the Cancel soft key
to exit without changes.
Using Contacts
To access the Contact menu, either:
STEP 1
In the Home screen, press the Select button to choose Settings.
STEP 2
Press the Right or Left Arrow button to navigate to Contacts. Press the Select
button.
OR
In the Home screen, press the Contacts soft key.
Adding a Contact
STEP 1
In the Contacts menu, press the Select button to access the Contacts list. All
current Contacts appear. If there are no names, an empty list appears.
STEP 2
Press the Options soft key and press the Up or Down Arrow key to navigate to
Add New.
Cisco WIP310 User Guide
62
3
Using Your WIP310
Using Contacts
STEP 3
Press the Select button. The Contacts entry screen appears. You can add the
Name, Home Phone, Work Phone, Mobile Phone, Email address and street
address. Use the keypad to enter the information.
STEP 4
Press the Select button (check mark icon) to save your entry.
STEP 5
(Optional) Press the Options soft key to add another entry.
Managing Contacts
In the Contacts menu, use the Options soft key to manage your Contacts entries.
You can do the following:
•
Add New—Add a new contact.
•
Delete—Delete a contact.
•
Add to Speed Dial—Add a speed dial for the contact.
•
Send Message—Send a message to the contact’s phone.
•
Edit Dial—Edit the contact’s number before dialing
Editing a Contact
To edit an existing contact:
STEP 1
In the Home screen, press the Contacts soft key.
STEP 2
Navigate to the contact whose information you want to edit.
Cisco WIP310 User Guide
63
3
Using Your WIP310
Using Messaging
STEP 3
Press the Select button to open the contact’s information.
STEP 4
Press the Select button when finished editing.
Calling a Contact
To call a contact:
STEP 1
In the Home screen, press the Contacts soft key.
STEP 2
Navigate to the contact you want to call.
STEP 3
(Optional) Press the Right Arrow key to navigate through multiple phone numbers
for the contact.
STEP 4
Press the Call button.
Using Messaging
Use Messaging to compose and send a text message up to 127 characters. You
can store up to 50 messages in your Inbox, 50 in the Sent box and 50 in the Drafts
box.
To access the Messaging menu:
STEP 1
Cisco WIP310 User Guide
From the Home screen, press the Select button to see the menu options. Press the
Left or Right Arrow key to navigate to Messaging.
64
3
Using Your WIP310
Using Messaging
STEP 2
Press the Select button to display the Messaging menu. Press the Up or Down
Arrow key to navigate to an option. You can view your Inbox, compose a New
Message, view any Drafts or Sent Items.
Viewing a Message
A notification appears on the phone screen when you have a new, unread
message. To view a message:
STEP 1
In the Messaging menu, press the Up or Down Arrow key to navigate to Inbox and
press the Select button.
STEP 2
Use the Up or Down Arrow key to scroll to the desired message and press the
Select button to view the message or press Options and choose Read.
Cisco WIP310 User Guide
65
3
Using Your WIP310
Using Messaging
STEP 3
(Optional) After reading the message, press the Options button to choose one of
the following:
•
Delete—Delete the message.
•
Forward—Send the message to another phone. Enter the number to which
to send the message and press the Select button.
•
Reply—Create a reply to the message. Use the keypad to enter a reply, then
either press the Select button to send the message, or press Options and
choose Save as Draft to save the reply in the Drafts folder.
•
Mark—Mark the message as new.
•
Call Back—Call the sender of the message. Press Call to call the sender.
•
Delete All—Delete all messages in the Inbox.
Composing a Text Message
To compose a message:
STEP 1
In the Messaging menu, press the Up or Down Arrow key to navigate to New
Message and press the Select button.
STEP 2
Use the keypad to enter the message. Use the Back soft key to delete characters.
Click the Select button when you are done.
STEP 3
In the Send to field, enter the phone number to which you want to send the
message.
STEP 4
You can then either send or save the message as a draft. Press the Options soft
key and press the Up or Down Arrow key to select Send or Save as Draft .
If you choose to save the message, you can send it or delete it later.
Cisco WIP310 User Guide
66
3
Using Your WIP310
Using Messaging
Accessing Draft Messages
To access draft messages:
STEP 1
Press the Up or Down Arrow key to navigate to Drafts from the Messaging menu.
Press the Select button to enter the Drafts mailbox.
STEP 2
Scroll to navigate to the message. Press the Select button to edit the message.
STEP 3
To manage the Drafts mailbox, press Options and press the Up or Down Arrow key
to select one of the following:
•
Edit
•
Edit Dial—Edit the destination number and place a phone call to that
number. Press the Call button to place the call after editing.
•
Delete
•
Delete All—Delete all messages from the Drafts mailbox.
Accessing Sent Messages
To access sent messages:
STEP 1
Press the Up or Down Arrow key to navigate to Sent Items from the Messaging
menu. Press the Select button to enter the Sent Items mailbox.
STEP 2
Scroll to navigate to the message. Press the Select button to edit the message.
STEP 3
To manage the Sent Messages mailbox, press Options and press the Up or Down
Arrow key to select one of the following:
Cisco WIP310 User Guide
•
Edit
•
Edit Dial—Edit the destination number and place a phone call to that
number. Press the Call button to place the call after editing.
•
Delete
•
Delete All—Delete all messages from the Sent Messages mailbox.
67
3
Using Your WIP310
Using Web Services
Using Web Services
Use this option to download data services from the Web. When you have a
connection to the Internet, you can download local area business, entertainment,
and other local information.
STEP 1
Press the Select button to see the Settings menu options. Press the Left or Right
Arrow key to select Web Services.
STEP 2
Press the Select button to view the available Web Services.
STEP 3
Press the Up or Down Arrow key to navigate to an available Web Services option.
Using Local Search
Use local search to find listings in your area based on the search criteria you enter.
To use local search:
STEP 1
In the Web Services menu, press the Up or Down Arrow key to navigate to Local
Search. Press the Select button to see the Local Search screen.
STEP 2
Use the phone keypad to enter your zip code.
STEP 3
Press the Down Arrow key to enter keyword information, using the phone keypad.
The phone displays available local information on the screen.
Cisco WIP310 User Guide
68
3
Using Your WIP310
Using Web Services
Getting Stock Quotes
To obtain stock quotes, you create a list of stocks to track.
STEP 1
In the Web Services menu, press the Up or Down Arrow key to highlight Stock .
STEP 2
Press the Select button.
STEP 3
In the GET QUOTE field, enter the symbol for the stock you want to track.
STEP 4
Press the Select button. The name is added to the list of stocks.
STEP 5
To view the stock list, press the Back soft key. Press the Power/End Call button to
return to the Home screen.
To add other stocks to the list:
STEP 1
In the list of stocks you are tracking, press Options.
STEP 2
Scroll to Edit List and press the Select button.
STEP 3
Press Options and scroll to Add New. Press the Select button.
STEP 4
In the GET QUOTE field, enter the symbol for the stock you want to track.
STEP 5
Press the Select button. The name is added to the list of stocks.
STEP 6
To view the stock list, press the press the Back soft key. Press the Power/End Call
button to return to the Home screen.
To delete a stock from the list:
STEP 1
In the list of stocks you are tracking, press Options.
STEP 2
Scroll to Edit List and press the Select button.
STEP 3
Highlight the stock you want to delete.
STEP 4
Press Options and scroll to Delete. Press the Select button.
STEP 5
To view the updated stock list, press the press the Back soft key. Press the Power/
End Call button to return to the Home screen.
Cisco WIP310 User Guide
69
3
Using Your WIP310
Using Web Services
Viewing Local Weather Information
You can access local weather information by zip code. To get weather information:
STEP 1
In the Web Services menu, press the Up or Down Arrow key to highlight Weather.
STEP 2
Enter the first zip code for the area weather you want to view.
STEP 3
Press the Select button. The screen displays local weather information. The
location you entered is added to the list of weather information. Press the Back
soft key to view this list.
To add another location to the list:
STEP 1
In the Web Services menu, press the Up or Down Arrow key to highlight Weather.
STEP 2
Press the Select button to view the list of weather locations.
STEP 3
Press Options and use the Up or Down Arrow key to highlight Add New.
STEP 4
Press the Select button.
STEP 5
Enter the zip code for the weather area you want to view. The screen displays the
local weather information and the location you entered is added to the list of
weather information. Press the Back soft key to view this list.
Cisco WIP310 User Guide
70
4
Advanced Functions
This chapter describes advanced phone functions.
!
CAUTION Do not edit any of the advanced phone settings described in this chapter unless
directed to do so by a technical support person from your Internet Telephony
Service Provider (ITSP) or your Value Added Reseller (VAR).
This chapter contains the following sections:
•
Enabling the Web Server, page 71
•
Using the Web Interface, page 72
•
Using Star Codes, page 74
•
Upgrading Your Phone Firmware, page 76
•
Performing a Factory Reset, page 77
•
Restarting the Phone, page 78
Enabling the Web Server
Enabling the web server allows the phone to be configured using a web browser.
NOTE Most phone configuration is done using the phone. However, enabling this setting
allows system administrators to use the web browser to configure advanced
settings.
Cisco WIP310 User Guide
71
4
Advanced Functions
Using the Web Interface
To enable the web server:
STEP 1
In the Home screen, press the Select button to choose Settings.
STEP 2
Press the Select button and scroll to navigate to Misc Settings.
STEP 3
Press the Select button to see the Misc Settings options.
STEP 4
To Enable Web Server, press the Left or Right Arrow key to select ON or OFF.
STEP 5
Press the Select button (check mark icon) to confirm or press the Cancel soft key
to exit without changes.
Using the Web Interface
STEP 1
Obtain the IP address of your phone by pressing the Options softkey. Scroll to
Phone Info and press the Select button.
STEP 2
On your PC, open Internet Explorer.
STEP 3
Enter the IP address of your phone in the browser toolbar.
Cisco WIP310 User Guide
72
4
Advanced Functions
Using the Web Interface
STEP 4
The Info page of the Wireless-G IP Phone Web Interface displays.
You can configure some of your phone settings, such as call forwarding and Do
Not Disturb, using the web interface. See the sections on those settings in this
guide for more information.
Cisco WIP310 User Guide
73
4
Advanced Functions
Using Star Codes
Using Star Codes
The WIP310 supports numerous “star codes: to access phone supplementary
services. These codes, which start with *, are entered before dialing a telephone
number and provide services. For example, to block caller ID (star code 67), you
would dial *67, followed by the telephone number you are calling.
Following is a list of supported star codes:
Cisco WIP310 User Guide
Code
Definition
98
Perform a blind call transfer. See Transferring a Call, page 46.
86
Deactivate Call Back.
72
Activate Call Forward All. See Setting Up Call Forwarding, page 52.
73
Deactivate Call Forward All.
90
Activate Call Forward Busy. See Setting Up Call Forwarding, page 52.
91
Deactivate Call Forward Busy.
92
Activate Call Forward No Answer. See Setting Up Call Forwarding,
page 52.
93
Deactivate Call Forward No Answer.
56
Activate Call Waiting. See Configuring Call Waiting, page 50.
57
Deactivate Call Waiting.
71
Activate Call Waiting for a single call.
70
Deactivate Call Waiting for a single call.
67
Activate Caller ID Blocking. See Blocking Caller ID, page 52.
68
Deactivate Caller ID Blocking.
81
Activate Caller ID Blocking for a single call.
82
Deactivate Caller ID Blocking for a single call.
77
Activate anonymous call blocking. See Blocking Anonymous Calls,
page 51.
74
4
Advanced Functions
Using Star Codes
Code
Definition
87
Deactivate anonymous call blocking.
78
Activate Do Not Disturb. See Setting Do Not Disturb on Your Phone,
page 50.
79
Deactivate Do Not Disturb.
16
Activate Secure Call feature for all calls.*
17
Deactivate Secure Call feature for all calls.*
18
Activate Secure Call feature for a single call.*
19
Deactivate Secure Call feature for a single call.*
96
Page an extension.**
38
Park a call.*
36
Pick up a call at another extension.*
39
Unpark a call.*
37
Pick up a group call.*
03
Request media loopback for a call to monitor Voice over IP quality.
071770
Configure the phone to prefer the G711u codec for all calls.
027110
Force the phone to use the G711u codec for all calls.
017111
Configure the phone to prefer the G711a codec for all calls.
027111
Force the phone to use the G711a codec for all calls.
0172632
Configure the phone to prefer the G726r32 codec for all calls.
01729
Configure the phone to prefer the G729 codec for all calls.
02729
Force the phone to prefer the G729 codec for all calls.
*Requires that the WIP310 phone be part of a Cisco SPA9000 Voice System
network.
**Requires that the paged extension be part of a Cisco SPA9000 Voice System
network.
Cisco WIP310 User Guide
75
4
Advanced Functions
Upgrading Your Phone Firmware
Upgrading Your Phone Firmware
The software on your WIP310 that controls the phone’s features and functions is
called firmware. You may be advised by your technical support person to upgrade
your firmware if the phone shipped with an older version.
!
CAUTION We suggest that you do not upgrade firmware without being told to do so by a
technical support person from your ITSP or Value Added Reseller.
Your firmware can be upgraded in the following ways:
•
Remotely—Your ITSP may upgrade your firmware remotely from an HTTP
server or by using a profile for your phone. For more information on this
method of upgrading your software, contact your ITSP.
•
By Downloading Firmware to your Computer—You can download an
upgrade package and run the upgrade utility to upgrade your firmware. You
need the phone’s USB cable to perform this task. Your PC must have the
Microsoft Windows XP or Vista operating system installed.
•
By Using the Cisco SPA9000 Voice System Setup Wizard—The Wizard
ships with the latest firmware for all phones that are used in the Cisco
SPA9000 Voice System, including the WIP310. Firmware upgrades can be
completed by using the Setup Wizard.
To determine the phone’s firmware version:
STEP 1
In the Home screen, press the Select key and navigate to Settings.
STEP 2
Press the Select key and navigate to Phone Info.
STEP 3
Scroll to Software Version. The phone lists the software version.
Cisco WIP310 User Guide
76
4
Advanced Functions
Performing a Factory Reset
To upgrade your phone firmware using the upgrade utility:
STEP 1
Download the Cisco WIP310 Upgrade Utility (see www.linksys.com/wip310 to
obtain this software) onto your computer.
STEP 2
Turn off your WIP310 and connect it to your computer using the USB cable.
STEP 3
Double click the Cisco WIP310 Upgrade Utility and follow the on-screen
instructions. When the upgrade is complete, disconnect the phone from your PC
and power it on.
To upgrade your phone firmware if your WIP310 is part of a Cisco SPA9000 Voice
System:
STEP 1
Start Internet Explorer, and enter the following URL: http://www.cisco.com/go/
smallbiz.
STEP 2
Search for the SPA9000 product.
STEP 3
Download the Setup Wizard.
STEP 4
Double-click SetupWizard.exe to run the program.
Performing a Factory Reset
!
CAUTION This option resets all the phone settings to the factory default. The phone settings
are restored to the same settings the phone had when it came out of the box. The
call histories, speed dials, contacts, and any other custom changes are erased!
STEP 1
In the Home screen, press the Select button to choose Settings.
STEP 2
Press Select again to enter the Settings menu.
STEP 3
Navigate to Factory Reset . Press the Select button.
Cisco WIP310 User Guide
77
4
Advanced Functions
Restarting the Phone
STEP 4
Press the Up or Down Arrow key to navigate to the setting you want to reset to
Factory default settings.
STEP 5
Press the Select button (check mark icon) to confirm or press the Cancel soft key
to exit without changes.
Restarting the Phone
Use this option to restart the phone. If you are on an active call, it is disconnected.
STEP 1
In the Home screen, press the Select button to choose Settings.
STEP 2
Press Select again to enter the Settings menu.
STEP 3
Navigate to Restart Phone and press the Select button. The question, “Are you
sure?”appears on-screen.
STEP 4
Press the Select button (check mark icon) to confirm or press the Cancel soft key
to exit without changes.
Cisco WIP310 User Guide
78
5
Using the WIP310 with the Cisco SPA9000
Voice System
This chapter contains information about Cisco SPA9000 Voice System-specific
functions of the WIP310. The Cisco SPA9000 Voice System (formerly called the
Linksys Voice System) is an Internet telephony phone system for small businesses
that provides features such as shared telephone lines, paging, call parking, and
hunt groups. If your WIP310 is used in a small business environment, it may be part
of a Cisco SPA9000 Voice System. Contact your system administrator for more
information.
NOTE The Cisco SPA9000 Voice System features described in this chapter work only if
your Wireless IP Phone is part of a Cisco SPA9000 Voice System and the phone is
registered to a SPA9000. Consult your system administrator if you need more
information.
Picking Up Calls
You can pick up a call that is ringing at another extension. Depending on the way
your phone network is configured, you can pick up a call ringing at any extension,
or you may have a group of phones configured where members of the group can
pick up a call ringing at any group member’s phone.
Cisco WIP310 User Guide
79
Using the WIP310 with the Cisco SPA9000 Voice System
Using Call Park
5
Picking Up a Call at a Specific Extension
To pick up a call ringing at a specific extension:
STEP 1
From the Home screen, enter the pickup star code (36) and the extension number
of the ringing phone.
STEP 2
Press the Call button.
Picking Up a Call at an Extension in a Group
To pick up a call ringing at an extension in your group of phones:
STEP 1
From the Home screen, enter the group pickup star code (37). A list of phone calls
to extensions in the group displays.
STEP 2
Select the extension whose call you want to pick up and press the Call button.
Using Call Park
If your phone is part of a Cisco SPA9000 Voice System, you may have this feature.
You can “park,” or place a call on hold on a line. You can then “unpark” or retrieve
the call from your wireless IP phone.
Parking a Call
To park a call:
STEP 1
While in a call, press Options and navigate to New Call.
STEP 2
Dial *38 and then a number to park the call. This number can be any number;
choose one that is easy to remember. (For example, *1001.)
STEP 3
Press the Call button. The call is parked on the line number that you entered; the
caller hears on-hold music.
Cisco WIP310 User Guide
80
Using the WIP310 with the Cisco SPA9000 Voice System
Using Paging
5
Retrieving Parked Calls
If your phone is part of a Cisco SPA9000 Voice System, you may have this feature.
You can “unpark” or retrieve a parked call from your wireless IP phone.
To retrieve a parked call if you know the parked line number:
STEP 1
Dial *39 and the number of the line on which the call is parked. (For example,
*1001.)
STEP 2
Press the Call button. The parked call is transferred to your phone.
If you do not know the parked line number:
STEP 1
In the Settings menu, navigate to Call Park Status and press the Select button. The
screen displays information about any parked calls, including the extension
number of the person who parked the call; the name of the caller, and the park line
number.
STEP 2
Use the arrow keys to navigate to the call you want to retrieve, then press the Call
button to unpark the call. The call is transferred to your phone.
Using Paging
Your WIP310 can automatically answer pages from other Cisco SPA phones in the
Cisco SPA9000 Voice System. When your WIP310 is paged, the phone emits a
series of beeps, and two-way audio is established between your phone and the
phone that called you. You do not have to accept the page.
You can page another extension in the Cisco SPA9000 Voice System with your
WIP310. To page another phone:
STEP 1
Dial *96, then the extension of the phone you are paging.
STEP 2
Press the Call button.
Cisco WIP310 User Guide
81
Using the WIP310 with the Cisco SPA9000 Voice System
Using the Corporate Directory
5
Using the Corporate Directory
After navigating to Corporate Directory in the Settings menu, press the Select
button. The phone looks for the corporate directory. If it finds entries, a list
appears.
Press the Up or Down Arrow key to navigate to a name.
Press the Call button to place the call. (To edit the number before calling, press
Options. Edit the number, then press the Call button.)
Enabling the Linksys Key System
If your phone is part of a Linksys Key System, you need to enable the key system
to access Linksys Key System functions.
STEP 1
After navigating to Misc Settings in the Settings menu, press the Select button to
see the Misc Settings options.
STEP 2
To enable the Linksys Key System, press the Left or Right Arrow key to select ON
or OFF.
STEP 3
Press the Select button (check mark icon) to confirm or press the Cancel soft key
to exit without changes.
Cisco WIP310 User Guide
82
A
Where to Go From Here
See the following documents for more information relating to the WIP310.
Related Documentation
•
Cisco Wireless-G IP Phone Quick Installation Guide
•
Cisco SPA and Wireless IP Phone Administration Guide (for
administrators)
Support
Support contact information for this product is available on Cisco.com at the
following location:
www.cisco.com/go/smallbiz
Regulatory Compliance and Safety Information
Regulatory Compliance and Safety Information for this product is available on
Cisco.com at the following location:
www.cisco.com/go/smallbiz
It is also available on the CD-ROM that ships with this product.
Cisco WIP310 User Guide
83
A
Where to Go From Here
Warranty
Warranty
Warranty information that applies to this product is available on Cisco.com at the
following location:
www.cisco.com/go/smallbiz
It is also available on the CD-ROM that ships with this product.
End User License Agreement (EULA)
Licensing information that applies to this product is available on Cisco.com at the
following location:
www.cisco.com/go/smallbiz
It is also available on the CD-ROM that ships with this product.
Cisco WIP310 User Guide
84
B
Specifications
Model
WIP310
Band
2.4Ghz
Transmit Power
13 dBm for 802.11g / 15 dBm for 802.11b
Radio Range
Outdoor up to 100m-300m, Indoor up to 25m-100m
Antenna
PIFA
External Interface
One USB Port (1.1 and 2.0), 2.5m Standard 4 Segment Ear Phone Jack
Display
1.8 inch TFT, LCD (128 x 160 pixels) 65K Colors, Backlit
Memory
32MB NAND Flash + 32MB SDRAM
Network Protocols
TCP/UDP/IP, IPV4, DHCP Client
Wi-Fi Features
802.11v, 802.11g
WMM (802.11e)
WMM-PS
Security64-bit, 128-bit WEP Encryption
WPA – PSK / TKIP
WPA2 – AES / PSK (802.11i)
WPS
Voice Protocols
SIP v2 Session Initiation Protocol RFC3261, 3262, 3263, 3264
SDP RFC 2327
SIP Re-Registration with Primary SIP Proxy
SIP Proxy Redundancy via DNS SRV
Voice Codecs
G.711 u-law / A-law, G.723.1 (6.3kbps, 5.3kbps), G.726 (at 32 kbps only),
G.729AB
DTMF Transmission
In-band, Out-band (RFC2833)
Voice Quality
G.167 and G.168 Echo Cancellation
Automatic Gain Control (AG)
Adaptive Jitter Buffer
Packet/Frame Lost Concealment
Adjustable Audio Frames Per Packet
Cisco WIP310 User Guide
85
B
Specifications
CNG - Comfort Noise Generation
VAD - Voice Activity Detection
Call Control*
Caller ID
Call Mute
Call Hold / Resume
Call Forward (Conditional, Unconditional, Busy or No Answer)
Call Transfer (Attended or Blind)
Call Waiting
Call Blocking
Do Not Disturb
Shared Line Appearance
3-way Conferencing with local mixing
Phone Feature
Speaker Phone Button
Local Phone Book
Dial from Call History
SMS (Short Message Service)
Web Services (Weather / Stock
Quote / Local Search)
Selectable Ring Tones
Key Lock
Volume Control
RF/Battery level indication
Wi-Fi Signal Integrity and Performance
Wi-Fi AP Site Survey
Voice / Data Statistic
Speed Dial
Clock
Phone Book (200 Records)
Call History (20 Records)
Management features
Embedded Web configuration interface (with password protection)
Auto Provisioning via TFTP/HTTP/HTTPS
Configuration changes via MMI or Web GUI
Remote Software firmware via TFTP/HTTP/HTTPS
Secure, Remote Provisioning capabilities for mass-scale Service Provider
Activation
Cisco WIP310 User Guide
86
B
Specifications
Environmental
Handset
Dimensions
1.71” x 5.85” x 1” W x H x D (44 x 149 x 25 mm)
Weight
.24 lbs, 3.88 oz (110 g)
Charger
Mini USB AC adapter AC100 ~ 240V Input, 5V/1.0A DC Output
Power
Li-Ion 3.7V 860mAH Battery, AC Adapter **
Certification
FCC, CE, IC, Wi-Fi
Operating Temp.
Humidity
32 to 104°F (0 to 40°C) Storage Temp. -4 to 149°F (-20 to 65°C) Operating
10% to 80% Non-Condensing
Storage Humidity
10% to 95% Non-Condensing
* Some features may require support by call server.
**Batteries are rechargeable and have a limited number of charge cycles. The
batteries may eventually need to be replaced. Battery life will vary from the stated
average by usage, configuration and environment.
Cisco WIP310 User Guide
87