1
Owner's Manual
£RIIFTSMAMo
6.0HORSEPOWER
20" REAR DISCHARGE
ROTARY LAWN MOWER
Model No.
917.387321
•
•
•
•
Safety
Assembly
Operation
Maintenance
•
•
Espafiol
Repair Parts
CAUTION:
Read and follow all
Safety Rules and Instructions
before operating this equipment
Sears, Roebuck and Co., Hoffman Estates, IL 60179
Warranty
Safety Rules
Assembly
Operation
Maintenance Schedule
Maintenance
2
2
4
6
10
10
Product Spec'_calions
Service and Adjustments
Storage
Troubleshooting
Repair Parts
Parts Ordering
11
13
14
15
32
Back Cover
L]MITED TWO YEAR WARRANTY ON CRAFTSMAN POWER MOWER
For two years from date of purchase, when this Craftsman Lawn Mower is maintained,
lubricated, and tuned up according to the operating and maintenance instructions in the
owner's manual, Sears will repair free of charge any defect in material or workmanship.
If this Craftsman Lawn Mower is used for commercial or rental purposes, this warranty
applies for only 90 days from the date of purchase.
This Warranty does not cover:
• Expendable items which become worn duflng normal use, such as rotary mower
blades, blade adapters, belts, air cleaners and spark pJug.
• Repairs necessary because of operator abuse or negligence, including bent crankshafts and the failure to maintain the equipment according to the instructionscontained in the owner's manual.
Warranty service is available by returning the Craftsman power mower to the nearest
Sears Service Center/Department in the United States. This warranty applies only whi[e
this product is in use in the United States.
This Warranty gives you specific legal rights,and you may also have other dghts which
vary from state to state.
SEARS, ROEBUCKAND CO., D/817 WA, HOFFMAN ESTATES, ILLINOIS 60179
TRAINING:
• Read this operator's manual carefully.
Become familiar with the controlsand
know how to operate your mower
properly.Learn how to quickly stop
mower.
• Do not allow children to use your mower.
Never allow adults to use mower without
proper instructions.
• Keep the area of operation dear of all
persons, especially small ehi[dren and
pets.
• Use mower only as the manufacturer
intended and as described in this manual.
° Do not operate mower if it has been
dropped or damaged in any manner.
A{ways have damage repaired before
using your mower.
• Do not use accessory attachments that
are not recommended by the manufac-
lurer. Use of such attachments may be
hazardous.
• The btade tums when the engine is
running.
PREPARATION:
• Always thoroughly check the area to be
mowed and clear it of all stones, sticks,
wires, bones, and other foreign objects.
These objects will be thrown by the blade
and can cause severe injury.
• Always wear safety glasses or eye
shields when starting and while using
your mower.
° Dress properly. Do not operate mower
when barefoot or wearing open sandals.
Wear only solid shoes with good traction
when mowing.
• Check fuel tank before starting engine.
Do not fill gas tank indoors,when the
engine is running or when the engine is
hot. Allow the engine to cool for several
minutes before filling the gas tank. Clean
off any spilledgasoline before starting the
engine.
• Always make wheel height adjustments
before starting your mower. Never
attempt to do thiswhile the engine is
running.
• Mow only in daylightor good artificial
_ght.
OPERATION:
• Keep your eyes and mind on your mower
and the area being cut. Do not let other
interestsdistract you.
• Do not mow wet or slippery grass. Never
run while operatingyour mower. Always
be sure of yourfooting -- keep afirm
hold on the handles and walk.
• Do not put hands or feet near or under
rotating parts. Keep clear of the discharge
opening at all times.
• Always stop the engine whenever you
leave or are not using your mower, or
before crossingdriveways, walks, roads,
and any gravel--covered areas.
• Never direct discharge of materia_toward
bystanders nor allow anyone near the
mower while you are operating it.
• Before cleaning, inspecting, or repairing
your mower, stop the engine and make
absolutely sure the blade and all moving
parts have stopped. Then disconnectthe
spark plug wire and keep it away from the
spark plug to prevent accidental starting.
• Do not continueto run your mower if you
hit a foreign object. Follow the procedure
outlined above, then repair any damage
before restarting and operating you
mower.
• Do not change the governor settingsor
overspeed the engine. Engine damage or
personal injury may result.
• Do not operate your mower if it vibrates
abnormally. Excessive vibration is an
indication of damage; stop the engine,
safely check for the cause of vibration
and repair as required.
• Do not run the engine indoors. Exhaust
fumes are dangerous.
° Never cut grass by pullingthe mower
towards you. Mow aorosethe faoe of
slopes, never up and down or you might
lose your footing.Do not mow excessively steep slopes. Use cautionwhen
operatingthe mower on uneven terrain
or .whenchangingdirections-- maintain
good footing.
• Never operate your mower without
proper guards, plates,grass catcheror
other safety devices in place.
MAINTENANCE AND STORAGE;
• Check the blade and the engine mounting bolts oftento be sure they are
tightened properly.
• Check all bolts,nuts and screws at
frequent intervalsfor propertightnessto
be sure mower is in safe working
condition.
• Keep all safety devices in place and
working.
• To reducefire hazard, keep the engine
free of grass, leaves or excessive grease
and oil.
• Check grass catcher often for deterioration and wear and replace worn bags.
Use only replacement bags that are
recommended by and comply with
specifications of the manufacturer of your
mower.
• Always keep a sharp blade on your
mower+
• Allow engine to cool before storing inany
enclosure.
• Never store mower with fuel in the tank
inside a buildingwhere fumes may reach
an open flame or an ignition source such
as a hot water heater, space heater,
clothes dryer, etc.
CAUTION: Always disconnect spark piug
wire and place wire where it cannot
contact spark plug in order to prevent
accidental starting when se_ng up,
transporting, adjusting or making repairs.
WARNING
The engine exhaust from this product
contains chemicals known to the State of
CaJJfomiato cause cancer, birth defects,
or ether reproductive harm.
These accessories were available when this
lawn mower was produced.They are also
available at most Sears retailoutlets and
service centers. Most Sears storescan also
order repairpartsfor you, when you provide
the model number of your lawn mower.
Some ofthese accessories may notapply
to your lawn mower.
LAWN MOWER PERFORMANCE
CUPPING
DEFLECTOR
FOR REAR DISCHARGE
LAWN MOWERS,
STABIL,IZER
MULCHER,KFrS
FOR
FOR
SIDE DISCHARGE
GRASS
CATCHERS
LAWN MOWERS
REAR DISCHARGE
GRASS
LAWN CATCHERS
MOWERS
GAS CANS
LAWN MOWER MAINTENANCE
MUFFLERS
BELTS
AIR FILTIERS
BLADES
BLADE ADAPTERS
IMPORTANT: This cutting machine is
capable of amputating hands and feet and
throwing objects. Failure to observe the
following safety instructionscould result in
serious injury or death.
Safety standards require operator presence controls to minimize the risk of injury.
Your unit is equipped with such controls.
Do not attempt to defeat the function of the
operator presence controls under any
circumstances.
Read these instructionsand this manualin its
enl_retybefore you attempt to assemble or
operate your new lawn mower.Your new lawn
mower has been assembled at the factory
with the exceptionof those parts left
unassembled for shipping purposes AI[parts
such as nuts, washers, bolts, etc., necessary
SPAI_,,,K PLUGS,
WHEELS
ENGINE OIL
to completethe assemblyhavebeen placedin
the parts bag. To ensuresafe and proper
operationof yourlawn mower,all partsand
hardware youassemblemust betightened
securely. Usethe correct toolsas necessaryto
ensure proper tightness.
TO REMOVE LAWN MOWER FROM
CARTON
• Remove loose parts included with mower.
• Cut down two end comers of carton and lay
end panel down flat.
• Remove all packing materials except
padding between upper and lower handle
and padding holding operator presence
control bar to upper handIe
• Roll lawn mower out of cartonand check
cartonthoroughIy for addrtionalloose parts.
4
HOW TO SET UP YOUR LAWN
MOWER
TO UNFOLD HANDLE
IMPORTANT: Unfold handles carefully so
as not to pinch or damage control cables.
- Raise handles until lower handle section
locks into place in mowing pos_on.
° Remove protective padding, raise upper
handle section into place on lower
handles and tighten both handle knobs.
• Remove handle padding holding
operator presence control bar to upper
handle.
• Your lawn mower handle can be
adjusted for your mowing comfort. Refer
to "Adjust Handle" in the Service and
Adjustment section of this manual.
control bar
Lift up
Lower
handJe
Mowing
position
TO INSTALL AI-I'ACHMENTS
Your lawn mower was shipped ready to be
used as a mulcher. To convert to begging
or discharging:
• Open rear door and remove mulcher
plug. Store mulcher plug in a safe place.
• You can now install catcher or opt_onat
clipping deflector.
° To return to mulching operation, install
mulcher plug into discharge opening of
mower.
Mulcherplug
CAUTION: Do not run your lawn mower
without mulcher plug in place or approved
clipping deflector or grass catcher in
place. Never attempt to operate the lawn
mower with the_'rear door removed or
propped open,
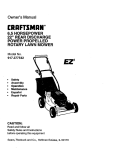
KNOW YOUR LAWN MOWER
READ THIS OWNER'S MANUALAND SAFETY RULES BEFORE OPERATING YOUR LAWN
MOWER. Compare the illustrations with your lawn mower to familiarize yourseffwiththe
location of various controls and a_ustments. Save this manuaJfor future refer.
These symbols may appear on your lawn mower or in literature supptied with the
product. Learn and understand their meaning.
CAL'q'tON
ENGINE
OR WARNING
ON
ENGINFOFF
FAST
8;LOW
CHOKE
FUEL
OIL
DANGER, KEEP HANDS
AND FEET AWAY
Operator presence control bar
Engine zone controJcab]e
Handle
Grass catcher
Air filter
MuJcher plug
Engine oil cap
with dipstick
Lawnmower housing
Wheeladjuster
(oneach wheel)
iii
MEETS CPSC SAFETY REQUIREMENTS
Sears rotarywalk-behind power lawn mowers conform to the safetystandards of the American
National Standards Inst_uteand the U.S. Consumer ProductSafety Commission, The blade
turnswhen the enqine is runnin,_.
,,,
i
i
Operator Presence Control Bar- must be
Starter Handle- used for starting the engine.
helddown to the handle to startthe engine.
Mulcher Plug - located at the discharge
Releaseto stop the engine.
openingmust be removedwhenconvertingto
Primer - pumps addilJonalfuel from the
bagging or dischargingoperation.
carburetorto the cylinderfor usewhen staring
a coldengine.
The operationof any lawn mowercan resuttin TO ATTACH GRASS CATCHER
foreignobjectsthrown intothe eyes,whichcan • Closethe flip lid. Eliplid mustbe dosed
res_ in severeeye damage. Always wear
whgeoperatinglawn mower
safetyglassesor eye shieldswhiteoperating
• Liftthe reardoor on the mower housing and
yourlawn moweror performingany adjustplacethe grasscatcherframe ontothe
merits or repairs, We recommenda wide
formedtabson the rear doorhingebracket.
visionsate_ mask over the sr_ctactesor
• The grasscaltl
cher is se_re d to the lawn
standardsafetyglasses.
mowerhousingwhen the mar door _s
HOW TO USE YOUR LAWN MOWER
lowered ontothe grasscatcherframe.
CAUTION: Do not runyour Iawn mower
ENGINE SPEED CONTROL
withoutdippingdeflector or approved grass
The engine speed was set at the factory
catcherin place.Never attemptto operatethe
for optimum performance. Speed is not
lawn mowerwiththe rear door removedor
adjustable.
proppedopen.
ENGINE ZONE CONTROL
CAUTION:
Federal reguIations require
Hinge
bracket
an enginecontrolto be installedon this
lawn mower in order to minimize the risk
of blade contact injury. Do not under any
circums'_tnces attempt to defeat the
function of the operator control. The blade
turns when the engine is running.
• Your lawn mower is equipped with an
operator presence controlbarwhich
requiresthe operatorto be posHoned
behindthe lawn mowerhandletostartand
operatethe lawn mower.
TO ADJUST cLrn3NG HEIGHT
• Raise wheelsfor low cutand lower wheels
for high cut.
• Adjust cutting heightto suit your requiremerits. Medium position is best for most
lawns.
• To change cuffing hek3ht,squeeze adjuster
levertoward wheel Move wheel up or down
to suit your requirements, Be sure all wheels
are inthe same set, rig.
NOTE: Adjuster is property positionedwhen
platetab insertsinto hole in lever. ALso,9posifion adjusters (ifso equipped) _ow lever
to be pos'_ionedbetween the plate tabs.
Formed
tabs
TO EMPTY GRASS CATCHER
• To remove grass catcher, releaseoperator
presencecontrol bar to stopengine.
• Liftup reardoor and remove the grass
catcher by the handle.
NOTE: Do not drag the bag when emptying;
it wilI cause unnecessary wear.
Lower Wheels for High Cut
_
Grass catcher
Lever
Raise Wheels for Low Cut
7
BEFORE STARTING ENGINE
OIL
Yourlawnmower is sh_ed withoutoil inthe
engine.
• Besure moweris leveland area aroundoil
fillis clean.
• Removeengine oilcap w/dipstickandfilIto
the fullI_neon the d'_ostick.
• Use 20 ozs. of oil.Fortypeand gradeofoil
to use,see "ENGINE" in Maintenance
sectionofthismanual.
• Pour oilslewty.Do not over fill
• Check oil level before each use. Add oiIif
needed. RI[to fulllineon d_s_ck.
• To read proper level, tighten engineoil cap
each time.
• Reinstallengineoilcap andtighten.
° Changethe oilaftereve]y25 hoursof
operationor each season. You may need
to changethe oilmore oftenunderdusty,
dirtyconcr_ons.
GAS
• Fill fuel tank. Use fresh, clean, regular
unleaded gasoline with a minimum of 87
octane. (Use of leaded gasoline wig
increase carbon and lead oxide deposits
and reduce valve life). Do not mix oil
with gasoline. Purchase fuel in quantities that can be used within 30 days to
assure fuel freshness.
IMPORTANT: WHEN OPERATING IN
TEMPERATURES BELOW 32°F(0°C), use
fresh, clean winter grade gasoline to help
insure good cold weather starting.
WARNING: Experience indicates that
alcohol blended fuels (caited gasohol or
using ethanol or methanol) can attract
moisture which leads to separation and
formation of acids dudng storage. Acidic
gas can damage the fuel system of an
engine while in storage. To avoid engine
problems, the fuel system should be
emptied before storage of 30 days or
longer. Drain the gas tank, start the
engine and let it run until the fuel lines and
carburetor are empty. Use fresh fuel next
season. See Storage Instructions for
additional information. Never use engine
or carburetor cleaner productsin the fuel
tank or permanent damage may occur.
CAUTION: Fill to bottom of gas tank filler
neck. Do not overfill. Wipe off any spilled
oil or fuel. Do not store, spill or use
gasoline near an open flame.
TO START ENGINE
• To starta coldengine,pushprimerfive (5)
times beforetnjingto start.Use a firmpush.
ThisstepiSnotusuallynecessarywhen
starthg an enginewhichhas already runfor
a few minutes.
• Holdoperator presencecontrol bardownto
the handleand pull starterhandlequickly.
Do not allow starter rope to snap back.
• To stopengine,releaseoperatorpresence
control bar.
NOTE: In coolerweatherit may be necessary
to repeat pdmingsteps.In warmerweather
over priming may cause flooding and engine
willnot start. If you do floodengine,wait a few
minutesbefore attempting to start and do not
repeat primingstep_
MOWING TIPS
• Under certain cond'_ons,suchas very tall
grass,it may be necessaryto raise the
heightof cutto reducepush_g effortandto
keepfromoverloadingthe engineand
leaving dumpsof grass clippings.
• For extremely heavycutting,reducethe
width of cut and raisethe rear of the lawn
mower housing one (1) wheel adjuster
sett_g higherthan the frcnt for better
discharge of grass.
• When using a rear discharge lawn mower in
moist, heavy grass,clumpsof cut grass
may not enterthe grass catcher. Reduce
groundspeed (pushing speed) ancVorrun
the lawn mower over the area a second
time.
• If a trailof grassclippingsisleft on the right
side of a rearc_schargeIawn mower, mow
in a clockwisedirectionwith a smalloverlap
to collect the clippingsonthe nextpass.
• Keeptopof enginearoundstarterclearand
elean of grassclippingsand chaff.Thiswill
helpengineairflow andextendenginelife.
° Pores in clothgrass catcherscan become
filledwith dirtanddust withuse and
catcherswillcollectless grass.To prevent
this,regularly hosecatchersoffwithwater
and let drybefore using.
MULCHING
MOWING
TIPS
IMPORTANT:
Forbestperformance,
•
time the grasshasdriedand the newlycut
areaw111
notbe exposed to the directsun.
• For bestresults,adjustthe _awnmower
cullingheightso that the lawn mowercuts
offonlythe topone-thirdofthe grassblades.
If the lawn is overgrown it willbe necessary
to raisethe height of cutto reduce pushing
effoffand tokeep from overloading _
engineand leaving clumpsof mulched
grass.For extremely heavy mulching,
reduce your wid_ of cut, mow slowiyand
raisethe rearof the lawnmower one wheel
adjuster settinghigherthan the front.
• Certaintypesofgrassandgrassconditions
may requirethatan area be mutcheda
secondtimeto completelyhidethe
clippings.When doinga secondcut,mow
acrossor perpendicularto the firstcut path.
• Changeyourcuttbgpatternfromweekto
week. Mow northtosouthone week then
changeto east to westthe nextweek. This
will helppreventmattingand grainingofthe
lawn.
keep mower housing free of built-up grass
and trash. Clean UNDERSIDE OF
MOWER HOUSING after each use. See
"Cleaning" in MAINTENANCE sec'don of
this manual.
• The special mulchingblade willrecut the
grassclippingsmany times and reduce
them in size so that as theyfag onto the
lawn they witldisperse into the grass and
notbe noticed. Also, the mulched grass will
biedegrade quickly to provide nutrients for
the lawn, A_waysmulch withyour highest
engine (blade) speed as this w=llprovide the
best recut_ng action of1heblades.
• Avoid curlingyour lawn whenit is wet.Wet
grass tendsto formdumps and interferes
withthe mulching amen. The best time to
mow your lawn Lsthe earlyaJtemoon.At this
1/3
9
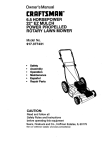
FELL FN DATES
/___#"_._
REGULAR
SERV}CE
AS YOU COMPLETE
/_/_f-SER--___V
Oheck for Loose Fa.,.steners
CJean/]nspect Grass Catcher
(If Equipped)
M
Clean La_-i Mower
O
E
{Power-Prope|ted
Clean Under Drive Mowers}
Cover
Check drive be_fle_
{Power:P'ropelled Mowers)
g
CheckJSharpen/RepTace
_._
_,_
ICE
_
Vt
I_
I,/
I_
ik/
II/
BJade
'I_e_ st_ M_e_ 1
E c_ E._e o, Leve|
N Chan@e
Er_neOil
]
[nsl_ct
N
Clean orRepla_
E
Replace Air P_iter Paper C_tddge
DATES
I/
IV/'=
i Lubr_catio_ Chart
CIea.n Battery/Rechmge
tf
v'
v'4
......
! y" i
_,_'_
Muffler
Spark Plug
I - Ch_lge rnor_ _en when _p_mtmg un_r = h_
2 -_
mote o_en when o_:_em1_g in d_y or du_
!/"
V'2
load or _ high R._b[ent templra_ums.
_or_s.
LUBRICAT]ON
Wheel
4 - Charge 48 houm _t end of l_son.
GENERAL RECOMMEND/_glONS
The warrantyon this lawn mowerdoesnot
cover itemsthathavebeen subjectedto
operatorabuseor neg[igence.Toreceivefull
valuefrom the warranty,operatormust
maintain mower as instructedin this manual.
Some adjustments will need to be made
periodically to properly maintain your un_
Alladjustmentsin the Service andAdjustments
section of this manual should be checked at
]east once each
_,_-,I,
CHART
adjusters
season.
(_ Brake spring
bracket
• Once a year, replace the spark plug, replace
air filter element and check bladefor wear.A
new spark plug and ciearv'newair filter
element assures proper air-fuelmixture and
helpsyour engine run better and last longer.
•FoIIow the maintenance schedule in this
manual
BEFORE EACH USE
• Check engine oil level.
• Check for loose fasteners.
LUBRICATION
Keep un'_weI[lubricated (See "LUBRICATION
,gine oil
C) Rear (3_)Handle bracket
door
hinge
mounting pin
(_)
SPRAY LUBRICANT
_)
SAE30 MOTOROL
REFERTO
ENGINE - MAINTENANCE SECTION.
IMPORTANT: Do not oil or greaseplastic
whee! bearings. Viscous lubricantswill
attractdust and dirt that w_lshorten the
lifeofthe self lubricating beatings. If you
feel they must be lubricated,use onlya
dry, powderedgraphite type lubricant
sparingly.
CHAFrr).
10
PRODUCT
SPECIFICATIONS
MODEL NUMBER
917.387321
SERIAL NUMBER
DATE OF PURCHASE
HORSEPOWER:
6.0
DISPLACEMENT."
11.5 CU. IN.
GASOLINE CAPACITY/TYPE:
1.5 QUARTS
UNLEADED REGULAR
OiLTYPE (API-SF/SG/SH):
SAE 30 (ABOVE 32°F)
SAE 5W-30 (BELOW 32°F)
OIL CAPACITY:
SPARK PLUG(GAP:
20 OZS.
.030")
CHAMPION RJ!9LM OR J19LM
VALVE CLEARANCE:
INTAKE:
.004 - .008
EXHAUST:
.004 - .008
SOLID STATE IGNITION
AIR GAP:
.0125 IN.
BLADE BOLT TORQUE:
35-40 FT. LBS.
• The model and serial numbers will be found on a decal attached to the rear of the
lawn mower housing.Record both serial number and date of purchase in space
provided above.
LAWN MOWER
Always observesafety ruleswhen performing
any maintenance.
TIRES
• Keep_
free of gasoline, oil,or insect
control chemicalswhich can harm rubber.
• Avoid stumps, stones, deep ruts, sharp
objects and other hazards that may cause
tire damage.
BLADE CARE
For best results, mower bIade must be kept
sharp. Replace bent or damaged blades.
TO REMOVE BLADE
• Disconnectspark plug wke from spankplug
and place wire where itcannot come in
contact with spark plug.
° Turn lawn mower on its side. Make sure air
filter and carburetor are up.
• Use a wood block between blade and
mower housing to prevent blade from
turning whenremoving blade boll
• Protectyour hands with gloves and/orwrap
blade withheavy cloth.
• Remove blade bolt bytuming counterclockwise. Use a 9/t 6" box or open-end
wrench.
• Remove blade and attachinghardware
(bolt,lockwasherandhardened washer).
NOTE; Removethe bladeadapter and
checkthe key inside hubofblade adapter.
The key mustbe in goodconditionto work
properly.Replace adapter if damaged.
TO REPLACE BLADE
o Position the blade adapter on the engine
crankshaft.Be sure key in adapter and
keyway in crankshaft are aligned.
• Position blade on the blade adapter
aligning the two (2) holes inthe blade with
the raised lugs on the adapter.
• Be sure the trailing edge is up toward the
engine.
• tnstatlthe blade bott v4th the [ockwasher
and hardened washer into blade adapter
and crankshaft.
° Use block of wood between blade and
Iawn mower housing and lighten the blade
belt, turning ctodevise.
• The recommended _ghtening torque is 3540ft. Ibs.
IMPORTANT: Blade bolt is grade 8 heat
treated.
11
NOTE: We do not recommendsharpening
blade - butif youdo, be suret_ btadeis
balanced.
NOTE: Although multi--viscosity oils
(5W30, 10W30 etc.) improve startingin
cold weather, these multi---viscosity oils
will result in increased oil consumption
when used above 32°F. Check your
engine ell level more frequently to avoid
possible engine damage from running low
on oil.
TO SHARPEN BLADE
Care shouldbe taken to keepMe blade
balanced.An unbalancedbladewillca:use
eventualdamage to lawn moweror engine.
• The blade can be sharpenedwith a file or
on a grading wheel Do notattempt to
sharpen while on the mower.
• To checkblade balance, d_e a nail into a
beam or wall. Leave about one inchof _e
straight nail exposed. Race center holeof
blade over the head of the nail. If blade is
balanced, it should remain in a horizontal
pos_on. If either end of the blade moves
downward, sharpenthe heavy end until the
blade is balanced.
Change the oilafterevery25 hoursofoperation orat least once a year if the lawn mower
is not used for 25 hours in one year.
Check the crankcase oil level before
startingthe engine and after each five (5)
hours of continuous use. _ghten oil plug
securely each time you check the oil level.
TO CHANGE ENGINE OIL
NOTE: Before tipping lawn mower to drain
oil, drain fuel tank by running engine until
GRASS CATCHER
fuel tank is empty.
* The grass catchermay be hosedwith
• Disconnect spark plug wire from spark
plug and place wire where it cannot
water, butmust be d_ whenused.
• Check yourgrasscatcher oftenfor damage
come in contact with spark plug.
or deterioration. Through normaluse it wilt
• Remove engine oil cap; lay aside on a
clean surface.
wear. If catcherneeds replacing,replace
° T_p lawn mower on its side and drain oil
onlywith a manufacturer approved
into a suitable container. Rock lawn
replacementcatcher.Givethe lawn mower
model numberwhen ordering.
mower back and forth to remove any oil
trapped inside of engine.
Blade
Crankshaft
• Wipe off any spilled oil on lawn mower
adaptor
and on side of engine.
• Fil! engine with oil Fill only to the "FULL"
line on the dipstick.DO NOT OVER
FILL.
• Replace engine oil cap.
• Reconnect spark plug wire to spark
plug.
BLoltckwas/he
r H_ardened \ "_B_ade'sOha_ k
washer Trailing adaptor
edge
ENGINE
LUBRICATION
Container
Use only high quality detergent oil rated
with API service classification SF, SH or
SG. Select the oil's SAE viscosity grade
according to your expected operating
temperature.
AIR FILTER
Your engine wilt not run properly and may
be damaged by using a dirtyair filter.
Replace the air filter every year, more
often if you mow in very dusty, dirty
cond_ions. Do not wash air filter.
TO CHANGEAIR
FILTER
• Remove the air filter cover by turning
counterclockwise to the stop and pull
away from coIfar.
• Remove filter from inside of cover.
12
• Clean the inside of the cover and the
collar to remove any dirt accumulation.
• Insert new filter into cover.
• Put air filter cover and filter into collar
aligning the tab with the slot.
• Push in on cover and turn clockwise to
Tum
counter-:lock'wiseto
remove
Slot
to tighten
Air filtercover
MUFFLER
Inspect and replace corroded muffler as it
could create a
fire hazard and!or damage.
SPARK PLUG
Change your spark plug each year to
make your engine start easier and run
better. Set spark plug gap at .030 inch.
CLEANING
IMPORTANT:
For best performance,
keep mower housing free of built--up
grass and trash. Clean underside of
mower housing after each use.
CAUTION:
Disconnect spark plug wire
from spark plug and placeowirewhere it
cannot come in contactwith the spark
plug.
• Turn lawn mower on its side. Make sure
air filter and carburetor are up. Clean the
underside of your lawn mower by
scraping to remove build.--up of grass
and trash.
• Clean engine often to keep trash from
accumulating. A clogged engine runs
hotter and shortens engine life.
• Keep finished surfaces and wheels free
of a[I gasoline, oil, etc.
• We DO NOT recommend usinga
garden hose to clean lawn mower
unless the electdcEdsystem, muffler, air
filter and carburetor are covered to kee_:
water out. Water in engine can result in
shortened engine life.
CAUTION:
Before performingany
• To change from medium low to medium
high position,the upper and lower
service or adjustments:
handle sections will have to be turned
•
Release contro! bar.
over.
•
Make sure the blade b.ndall moving
•
Remove the cable clips.
parts have completely stopped.
• Remove the controls and operator
•
Disconnect spark plug wire from
presence control bar from the upper
spark plug and place where it cannot
handle.
come in contact with plug.
• Remove hairpin cotters.
LAWN MOWER
• Disconnect the lower handle from the
TO ADJUST cu'n'ING HEIGHT
handIe brackets.
See "TO ADJUST CUrFING HEIGHT" in
• Turn the handle over and reassemble
the Operation section of this manual.
the hairpin cotters that have been
REAR DEFLECTOR
removed.
The rear deflector, attached between the
• Reassemble the controls and the
rear wheels of your lawn mower, is
operator presence control bar to the
provided to minimize the possibility that
upper handle.
objects will be thrown out the rear of the
CAUTION: The operator presence control
lawn mower into the operator's mowing
bar must pivot freely to permit blade brake
position.
engagement when control bar is released.
If the rear deflector becomes damaged, it
Do not over tighten the fasteners holding
should be replaced.
the controls to the upper handle.
TO ADJUST HANDLE
• To change from medium low to high
Your lawn mower handle can be raised or
position only the upper handle section
lowered for your mowing comfort. Four
will have to be turned over.
(4) positions are available: high, medium
high, medium tow and low. Handles are
shipped mounted in the medium low
position.
13
• Tochange
from
;::o:o,o
\\
medium tow to low
position, only the lower handle section
will have to be turned over.
Me_um Low
r
MediumHigh
Handle
Bracket
HairpinClip
ShippingPosition
High__.
Low
LowerHandle
Immediately prepareyourlawn mower for
storageat the end of the season or ifthe unit
willnotbe usedfor30 days or more.
LAWN MOWER
When lawn mower is to be stored for a period
of time, cleanit thoroughly, remove all dirt,
grease,leaves, etc. Store in a dean, dryarea.
• Clean entirelawn mower (See "CLEANING"
in the Maintenance section of this manual).
• Lubricate as shown in the Maintenance
section ofthis manual.
• Be sure that all nuts, bo_, screws, and pins
are securely fastened. Inspect moving
parts for damage, breakage andwear.
Replace if necessary.
• Touch up all rustedor chipped paint
surfaces; sand lightly
before painting.
HANDLE
ENGINE
CARBURETOR
Your carburetor has a non-adjustable fixed
main jet for mixture control. If your engine
does not operate properly due to suspected carburetor problems, take your
lawn mower to an authorized service
center for repair or adjustment.
ENGINE SPEED
Your engine speed has been factory set.
Do not attempt to increase engine speed
or it may result in personal injury. If you
believe that the engine is running too fast
or too slow, take your lawn mower to an
authorized service center for repair and
adjustment.
IMPORTANT: When foldingthe handle
for storage or transportation, be sureto
fold the handle as shown or you may
damage thecontrol
cables.
• When setting
upyourhandle
fromthe
storage
posillon,
thelower
handle
will
automatically
lockintothe mowingpos'_on.
Lower
Handle
Handle
Squeeze to ford
Hairpin
Cotter
OperatorPresence
Control Bar
_
Youcan fold your lawn mower handle for
storage.
• Squeeze the bottomends ofthe lower
handletoward each other un'dlthelower
handle clears the handle bracket,then
move handle forward.
• Loosen upper handle mounting bolts
enough to allow upper handle to be folded
back.
_,_
y+,,
_
FoldForward
For Storage
14
_
MOWi._
Lower Handle
Pos'tlo.
ENGINE
FUEL SYSTEM
IMPORTANT: It is important to prevent
gum deposits from forming in essential
fuel system parts such as carburetor, fuel
filter,fuel hose, or tank during storage.
Also, experience indicates that alcohol
blended fuels (called gasohol or using
ethanol or methanol) can attract moisture
which leads to separation and formation
of acids during storage. Acidic gas can
damage the fuel system of an engine
while in storage.
• Drain the fuel tank.
• Start the engine and let it run until the
fuel lines and carburetor are empty.
• Never use engine or carburetor cleaner
products in the fuel tank or permanent
damage may occur.
• Use fresh fuel next season.
ENGINE OIL
Drain
oil(withengine warm) and replacewith
cleanengineoil. (See "ENGINE" inthe
Maintenance sectionofthismanua]).
CYLINDER
• Remove sparkplug.
,. Pouroneounce (29 ml)'of oil through-spark
plug hole into cylinder.
• Pugstarter handle slowly a few times to
distributeoil.
• Replacewith new spark plug.
OTHER
• Do not store gasoline from one season to
another.
• Replaceyour gasolinecan if your can starts
to rust. Rust and/or dirt in your gasoline will
cause problerns.
- Ifposs!]_e,store your unit indoors and cover
it to g'rveprotection from dust and dirt.
• Cover your unit with a suitable proteclive
cover that does not retain moisture. Donot
NOTE: Fuel stab_T,
Ter is an acceptable
use plastic. Plasticcannotbreathe which
alternative in minimizingthe formationoffuel
allows condensationto form and v@lcause
gum deposits during storage. Add stabilizerto
yourunitto rust.
gasolinein fuel tank or storage container.
Always followthe mix ratio found on stabiF_zer IMPORTANT: Never cover mower while
container. Run engineat ]east 10 minutes
engine and exhaust areas are still warm.
CAUTION: Neverstore the lawn mowerwith
after adding stabilizer to allow the stabiFr_erto
reachthe carburetor. Do not drain the gas
gasoline in the tank inside a buildingwhere
tankand carburetor if using fuel stabi_zer.
fumes may reach an open flame or spark.
Allow the engine to cool before storing in any
enclosure.
TROUBLESHOOTING
PROBLEM
Does not start
CHART
CORR ECTION
CAUSE
• Dirty air filter.
• Out of fuel.
• Stale fuel.
• Water in fuel.
• Spark ptug wire is
disconnected.
• Bad spark plug.
• Loose blade or broken blade
adapter.
• Control bar in released
pes_on,
• Control bar defective.
15
• Clean/replace air filter.
• Fillfuel tank.
• Draintank and refillwith
fresh clean fuel.
• Drain fuel tank and
carburetor and refilltank
with fresh gasoline.
• Connect wire to plug.
• Replace spark plug.
• _g_en blade bolt or
replaceblade adapter.
• Depress control bar to
handle.
• Replace control bar.
TROUBLESHOOTING
CHART
PROBLEM
CAUSE
CORRECTION
Loss of power
• Rear oflawn mowerhousing
or cutt_g blade dragging
in heavygrass.
* Cutting toomuch grass
• Setto"HigherCuf'
position.
• Dirty air filter.
• Buildup of grass, leaves,
and trashunder mower.
• Toomuchoil in engine.
• Walking speed too fast.
• Setto'Higher Cut"
position.
• Cleanlreplace air filter.
• Clean underside of mower
housing.
• Check oil level.
• Cut at sIowerwalking
speed
Poor cut- uneven
• Worn, bentor looseblade.
• Wheel heightsuneven.
* Buildup ofgrass, leaves
and _rashundermower.
Excessive
vibration
• Worn, bentor looseblade.
• Bent engine crankshaft.
;Starter mpe hard
to pull
* Engine flywheeIbrake is on
whencontrolbar is released.
• Bent engine crankshaft.
• Blade adapter broken
• Bfadedragging in grass.
• Replaceblade.-Rghten
blade bolt.
• Set all wheelsat same
height
• Clean undersideof
mowerhousing.
• Replaceblade. Tighten
blade bolt.
• Contact an authorized
service center.
* Depress control bar to
upper handlebefore
pulling starter rope.
* Contact an authorized
servicecenter.
• Replaceblade adapter.
• Move lawn mower toc_
grassorto hardsurface
to start engine.
Grass catcher
not filling ('dso
equipped)
• Cuffing heighttoo low.
• Lift on blade worn off.
• Catcher notventing air
• Raise cuttingheight
• Replace blade.
• Clean grass catcher.
Hard to push
• Grass istoo highorwheel
height is too low.
* Rear of lawn mower
housJngor blade dragging
in grass.
• Grass catcher too fuIL
• Hand[e height position not
rightfor you
• Raise cutting height
16
• Raise rear of lawn mower
housing one (1) setting
higher.
• Empty grass catcher.
• Adjust handle height to
suit.
Garantia
Reglasde Seguridad
Montaje
Operaci6n
Mantenimiento
Programade Mantenimiento
17 Especificaciones
del Producto
25
17 Servicioy Adjustes
27
"'19 Nmacenarniento
28
20
Identificaci6nde problemas
30
24
Partesderepuesto
Vea el manual
24
ingl6sdel dueSo
Ordende Partes
Contratapa
r
GARANT[A UMITADA
DE DOS AI_IOS PARA LA SEGADORAA
MOTOR CRAFTSMAN
Por dos (2) aSos, a parlir de la fecha de compra, cuando esta Segadora Craftsmanse mantenga, lubric_e
y afineseg_'l las inst]'ucciones
para la opemci6ny el mantenirr_ento en el manuaJdetdueSo,Sears
repara._ gra_stodo defecto en et rnateriat y ]a mano de obra.
St la Segadem Craftsmanse usa para fines comerciateso de arrtendo, esta garant]'as_o se aplica por
noventa (90) dfas a parerde [a fecha de compr'a.
Esta Garanlfa no cubre:
• Articutosque se desgastan duranteel uso norrna[ tales como las cuch_'iIas
segaderasrotatoties, los
adaptadores de la cuchilla,las ¢_Teas, ]os f_tros de aire y las bujias.
* Reparacionosnecesarias debido at abuso o a la negligencia de] operador, incluy&'zdosea los
cig0er3alesdobladosy a la fatta de mantenimientode| equfposeg_n las inslzuccionesque se incluyen
en el manual del dueffo.
EL SERVICIO DE GARANTfA ESTA DISPONIBLE al devo[ver la segadpm a motor Craftsmanat centre/
deparb-nento de servido Sears rnascercano en los Estades Unidos.Esta garantJ'ase aplica solamente
rnientras el productoeste en uso en los Estades Unldos.
Esta Garantia le otorgaderechos legates espec{f_s, y puede que tambi_ntengaotrosderechos que
varfan de estaclo a estado.
Sears, Roebuck and Co., D/817WA, Hoffman Estates, IL 60179 USA
Losestandraresde seguddadexigen la presencia
de[ operatoren los controlespara reducir a un
_nirno el riesgode [esionarse.S u unidadviene
equipada condichos con_oles. Porningunmotivo
trate del elirninarla funci6n de los contmlesClUe
exigen la presenciadel operador.
ENTRENAMIENTO:
• Lea este manualdel operadorcuidadosamente.
Famitian'ceseconlos cont_o[esy aprenda a
operar su segadora en formaadecuada.
Aprenda a parar su segadorar&pidarnente.
• No permitaque los niSesusen su segadora.
Nunca permita que los adultos operen la
segadora sin contarconles instrucciones
adecuades.
• Mantenga el _rea de operaci6ndespejada de
gente, especiatmente de nilus pequeSos y de
anLmatesdom_sticos.
• Use la segadora sdamente para los fines
propuestospor e! fabriesnte y seg0n les
expticacionesdescritasen este manual
• No opere la segadora si se ha ca(doo dafado
en cuatquiera forrna. Sierr_re reparelos daSos
antes de usada.
• No use accesorios que no hayan sido
recomendados pot el fabricante, El uso de
dichosaccesoriespuede ser pe[igroso.
• Lacuchillagiracuando el motorest_
funcionando.
PFIEPARACION:
• Siempre revisecuidadosamenteel _ea que se
va a segar y desp_jelade todas [as piedras,
palos, alambres,huesos y otms objetos
extra,fios,Estosobjetosser&nlanzados conla
cuchilfa y pueden producir tesiones graves.
• Siempre use anteojos de seguridad o
protectores de ojos cuando arranque y durante
el liempo clue use la segadora.
• Vfstase en forn_aadecuada. No opere la
segadera sin zapatos o consandal,s abiertas.
Use solamentezapatos s6lidescon buena
lraoci6n _ando siegue,
17
• Vfstese
enforma
adecuada.
Noopera
la
° Nunca
opere
lasegadora
sin[asprotesciones
segadora
sinzapatos
oconsat_alies
mientras adecuadas,
lasplan_qas,
elrecogedor
de
queel motorest_ funcionando,
c_spedy otrosdispositivos
desegur_adensu
• Sieguesiempredurante eldfa o conbuenaluz
lugar.
artificial.
MANTENIMIENTO Y ALMACENAMIENOPERACI6N:
TO:
• Mantenga-sus
oXosysu menteenla segadora--• °Revfsela cuchHla
y lospemosde montajedel
y an el &rea que ss est_ cortando. No permita
que otros intereses ]o distraJgan.
• No corte c_ped mojado o resbaloso. Nunca
corra mientzasest6 operando su segadora.
Siempre aseg=irese de mantener el equ_ibrio
- mantenga el mango agarrado firmemente y
camine.
• No ponga las manes 0 _os pies cerca odebajo
de les partes rotatorias. Mant_ngese aJejado
de la abed_ra de descarga en todo memento.
• Siempre pare el motor cuando se vaya
ocuando no est_ usando su segadora, o antes
de etravesar las entradas pare autos, los
senderos, carninos y &reas cubiertas de ripio.
• Nunca didja la descarga del material hacia los
espectadoms ni permita a nadie cerca de Ia
segadora mientras la estd operando.
• Antes de limpiar, inspeccionar o de reparar Ia
segadora, pare el motor y est6 completamente
seguro de que la cuchi[lay que todes las
partes qua se mueven se
hayan detenido,
Luego, desconecte el alarnbre de la bujia y
mant6ngalo a[ejado de _sta para evffar el
arranque per accidents.
• No con_nfle haciendo funcionar su segadora
si le pega a un objeto extra.rio.$_ga el
procedimiento descrito antedormente, luego
repare cuaiquier de,re antes de volvera
arrancar y de operar su segadora.
• No cambie los ajustes del reguladoro
hagaque el motor ands a una ve!ocidad
exces_a. Se pueden producir daSos en el
motor y I esiones personales.
• No opere su segadora si vibra fuera de Io
normal. La vibraci6n excesiva es una
indicaciSn de daSo; pare el motor, revise en
forma segura la cause de la vibraci6n y haga
las reparaciones segfin sea necesario.
• No haga funcionar el motor en
recintoseerrados. Lee gases de escape son
peligrosos.
• Nunca corte e| c_sped tirando la segadora
hacia usted. Siegue a tray, s de [a cara de ]as
pendientes, nunca hacia arriba o hacia abajo
puss puede perder el equi[[brio. No siegue
pendientes demasiado empinadas. Tenga
cuidado cuando opere [a segadora en terreno
disparejo o cuando cambie de direcci6nmantenga un buen equilibdo.
motor a menudo, para asegurarse que estdn
apretados en la forma adecuada.
• Revise redes los pemos, tuerces y total[los a
intervalos frecuentes, para verificar si est&n
apretades en forma adecuada, y
asegurarseque la.segadora se encuentra en
condiciones de funcionamiento seguro.
• Mantenga todos los dLspositivosde segurided
en su lugar y listos para funcionar.
• Pare reducir el peligrode incendio, mantenga
el motor sin c6sped, hojas y grasa o ace_teen
exceso.
• Revise at recogedor de c_sped a menudo
para veriflcar st hay detertoro y desgeste y
cambie Ias bossesdesgastadas. Use
solamente las bolsas de repuesto
recomendadas per el fabricante de su
segadera o que cumplen con ¿as
espec_caciones de _ste.
• Siempre mantenga una cuchilla afilada en su
segadora.
• Slempre permJtaque el motor se enfde antes
de guardarla en cualquier recintocerrado.
• Nunca guards la segadora con combustible en
el estanque dentro de un ediflcio en donde los
gases pueden alcanzar una llama expuesta o
una fuente de igniei6n, tel come el calentador
de agua, la estufa de calefacci6n, la secadora
de ropa, etc.
PRECAUC]ON;
Siempre desconecte el
alambre de la buj_a y p6nga[o donde no pueda
entrar en contacto con la bujia, pare eviterel
arranque per accidents, durante EapreparaciSn,
el transports, el ajuste o cuando se hacen
reparaciones.
PRECAUCK)N:
Es conocido porel Estado de
California que los gases de escape del motor de
este productor contienen qul'mfcos los cuales a
ciertos nive]es, pueden ocasionar, c_,ncer,
defectos de nacimiento, y otros defies al sistema
reproductive.
18
Estosaccesoriosestabandisponiblescuando
se produjola segadera.Tambi_n estdn
disponibiesen la mayor_ade lastiendasde
Sears y en loscentrosdeservicio,La mayorfa
RENDIMIENTO
DE _
SEGADORA
D_M:N)R DEREI_R'_..S
PAPASEGADORAS
CONDESCARC-_
TRASERA
de las lJendas Sears tambi6n pueden mamdar a
pedir partes de repuesto para usted, s_les
proporctona el nOmero dei modelo de su
segadora. Algunos de estos accesodos tal vez
no se apliquen a su segadora.
JUEGOS PAPA LA ACOLCHADORA
PN_A
SEGADORAS
CON
DESCARGA
RECOREDOR
TRASERA
MANTENIMIENTO
PAPA
SEGADORA5
CON
DESCARGA
RECOREDOR
LATERAL
_IV_ES
DE GANOUNA
DE LA SEGADORA
FILTROS DE ATRE
SILENCIADORES
CORRF--AS
ESTABIUZADORES
CUCH|LLAS
DE CUCHILLA
Lea estas i_ones
y este manual
completamente antes de tratar de rcordar u operar
su segadera nueva. Su segad_ra nueva ha s_de
montada en la f-&br_cacon la excepciSn de aquellas
partes que se dejaron sin montar por razones de
envt'o.Todas las _les como las tuercas, las
arande]as, los pemos, etc., que son necesa_as
para completar el montaje hart sido co[ocadas en la
boisa de partes. Para asegumrse que su segadom
funck)na en fomla segura y adecuada, todas [as
pades y los art[culos de ferretefia que se rnonten
tienen que ser apretades s_ramer_e.
Use las
herramientas cormctas, como sea necesarEo,para
asegurar que se apdeten adecuadamente.
PARA REMOVER LA SEGADORA DE
LA CAJA DE CARTON
• Romuevalas partes sueltasque se incluyen con
la segadora.
• Corte las dos esqu_'_s de Io_ ex_remosde la
c_a de cartbn y Uenda el pane] del extmmo
piano.
• Remuevat_do e] rnaterial de empaque, excepto
la curia entre el mango superiory _1inferior,y la
curia que sujeta la barra de los control que exige
RUEDAS
BUJ|AS
DI:L MOIDR
la presencia del eperador junto con el mango
superior_
• Haga roda_la segadora hacia afuera de ]a caja
de carlbny rev_selacuk_dosamente para
re,car si todavia quedan partes sueltas
adlctonales.
COMO PREPARAR SU SEGADORA
PARA DESDOBLAR
EL MANGO
IMPORTANTE: Despliegue el mango con mucho
cuidado para no pell_car o daSar los cab[esde
contro!.
• Levantelos mangos hast_ que [asecci6n del
mangoinferior se asegure en su lugar, en la
posici_ para segar.
• Remueva la cLr_aprotectora, levantela secci6n
del mango supedor basra su lugar en el mango
infedor y apdete ambas mani[[as del mango.
• Remueva la cuSa del mango que sujeta la bana
de los contrd que ex_gela presenda del
operador junto con el mango su,oe_r.
• [] mango de la segadera puede ajustarse seg_rn
le acomode para segar. Refi6rasea "AJUSTE
DEL MANGO" en la SecdSn de Serv_cio y
Ajustes de este manual
19
- Para vo_vera _aoperaciSn de acolchan_ento con
capa vegetal,instaJela tapon acolchadora en la
abertura de descargade lasegadora.
PRECAUCi6N: No haga funcionar su
segaderasin la tapon acolchadoraaprobadaen su
lugar, o sin el desviadorde recortes,os_nel
recogedorde cOsped, aprobados,en su lugar. _
Nunca irate de opererla segadoracuando se ha
removido la puerta traserao cuandoes_ un poco
abierta.
Barra de control que exige la
presencia del operador
Levantar
_evantar
]nfenor _
para segar
PARA INSTALAR
LOS ACCESOR/OS
Su segadora fue enviadaIfstapara usarsecomo
una acoEchadorade capa vegetal. Para conve_fla
de mode que pueda ensacaro descargac.
• Abra la puerla trasera y remueva latapon
acolchadon'd.Gu_rdela en un lugar seguro.
• Ahora puede instalarel recogedoro el desvtador
de recortesopciona].
FAMtUARICESE
Taponalcolchadora_
CON SU SEGADORA
LEA ESTE MANUAL DEL DUEI_IOY t_ASREGLAS DE SEGURIDAD ANTES DE OPERAR SU
SEGADORA. Compare las['lustmcionescon su segadora para Pami]i_
con la ubicad6n de los
d'rversoscontmlesy ajustss. Ouardeeste manualparareferenda en elfuture.
Estos simbolos pueden apareser sobre su segadora o en la literatura propomionada con el
produoto. Aprenda y comprenda sus significados.
A_O
MOTC_
MOTOR
R._P_O
___'XtO ES_aO
CX_W
AC:E_,_TE
P_JORO, Qt._D_t/_
Barra de control que exige la
presenc[a del opemdor
Cable de control de la
vetocldad del motor
Manllla del mango
CordSn
arranc_dor
Tapa del re]leno de la
gaso[ina
Recogedor del
c_=sped
Cebador
Filtro delaire
Tapon de la
acolchadera
(en
Tapadel depositode aceitedel
motor convafiiIa indicadorade
carlarueda)
nivel
Caja
=
CUMPLE CON LOS REQUISITOS DE SEGURIDAD DE LA CPSC
La.ssegadoras a motor,cluese conducen desde [a parte de afros, rotatortas, Sears, cump[en conlos
es_ndares de segundaddelAme_can National Standards ]ns'_b_rte
yde la U.S. Consumer ProductSafety
Commission. La cuchillagiracuando el motorest_ funcionando.
'13arrade control que exJgela presencia del
Cord6n armncador--se usa para hacer arrancar
operader-- 5oneque sujetarse abajo, junto con el
el motor.
mango, para hacer arrancar el rnotoT.Su_ltela para
parar el motor,
Cebador-- bombea combL,sl_bleadic'_onaldesde el
carburador aJc_ndro para uso cuando se necesita
hacer arrancar un motor fifo.
Tapon de la aco|chadora-- permRe la conve_6n
para la operaci6n de descarga o ensacado.
20
Laoperaci6n
decualquler
segadora
puede
hacerquasaltenobjetes e_xaSosdentrode sus
PAFIA MONTAR Y ADJUNTAR
RECOGEDOR DE CESPED
ojes, Io cluepuede producTr
da,fias gravesen _'tos.
Siempre use anteo_osde seguridado protecci6n
para los o_ _enlras opera su segadora o cuando
haga ajestes o mi_araciones.Recomendamos una
•- mascarade seguridadd.erviSibn
amptia, para uso
espejueles o anteojos de seguridadesiandarte.
COMO USAR SU SEGADORA
VELOCIDAD
DEL MOTOR
La vefocidad del motor se estableci6 en la
f&brica para un rendimiento 6ptimo. La
velocidad no se puede ajustar.
CONTROL
DE ZONA DEL MOTOR
PRECAUCI6N: I_asreguiacionesfederaIes exJgen
qua se insta]e uncontrolpara el motoren es_
segadora para reducira un mfnimoel desgode
lesionatsedebido al cont_.-'toconla cuchilla. Pot
ning_,n rnof_votrate de eliminar la funci6n del control
de[ operador. La cuchilla giracuande e! motor est_
funcionando.
• Su segadora viene equ[pada con una barra de
contmtque e_ge ]a presenc]adel operador, 1o
qua requiem qua eloperadorest6 detr_s de[
mango de la sogadorapara haceria arrancar y
operarla.
PAPA AJUSTAR LA ALTURA DE CORTE
las medas _
• Clerre la tapa soltable.La tapa soltable debe
estaresrrada cuando se esta operandola
segadora.
• Lovante la puertabaserade la cajade la
segadom y ponga el bastidor del re¢ogedorde
c_sped en _s orejas formadasen el puntalde
bisagrade la puertatrasera.
• [] recogederde c@spedesta aseguradoen la
caja de la segadera coando se baja _ puerla
tmsera pare descansaren el bastidordet
re_gedor de c_kspod
PRECAUCi6Nt No haga funcionar su segadera
sin e[ desviadorde recones o sin el recx_jedor de
c#.sped, aprobados, en su lugar.Nunca trate de
operar ta segadora cuando se ha removido la
puertatrasera o cuando est&un poco abierta.
Puntal de
bldagra
Bastidor de
Omjas
fmmadas
cesped
PAPA VACIAR EL RECOGEDOR
C_SPEO
• Levante las ruedas para el conebajoy bale las
ruedas pare el cortealto.
• Ajuste la a!_ra de colte para que se acomode a
sus requisitos. La pesiciSndel medio es Ia major
para la mayon'a de los c6spedes.
• Para cambiar la attura de cone, empuje [a
pa_ancadel ajus'tador hacia la nJeda.Mueva la
rueda hacia arfiba o hacia abajo de modo qua se
acomode a sus requLCrtes.
Asegl3rese que todas
las tuedas queden igualmente ajustadas.
ATIENC]6N: [] ajustadoresta co]_ectamente
cobcado cuando)_ o_
de la p(aca eslr;m
insertadasen el agujero del mango. Tambi_n,los
ajustes de 9 pesiciones {s_equipado) permiten que
el mango pueda ser movido entre las orejas de la
placa_
Para un aorta alto, baje
EL
DE
• Pareremover el recogedorde[ c_sped suelte la
barra de control del operador para poder parar el
motor.
• Levante la puerta de arras y remova el recogedor
del c6sped por el mango.
AVISO: No arrastreta bolsa cuando[a vacfe; se
produci_ un desgasteinnecesado.
ANTES DE HACER ARRANCAR EL
MOTOR
Orejasde lapiaca
ACEITE
Su segadora rue enviada sin aceiteen el motor.
• Aseg_resequa la segadoraest_ nive(ada y que
el _ea alrededordel dep6sito de aceiteest6
limpia.
• Remueva la tapa del dep6s_ de aceite det
motor con la va_lla indicadera de nivel y rellene
hasta [a ]i'neade tleno en _.sta.
• Use 0,61 (20 oz.) de aceite. Para el _po y fa
celidadyea "MOTOR" en la sead6n de las
"Manten(mento" en este manual.
° VacFeel aceite le_amente. No 1oliana
demasiado.
• Revise el rwe] del aceite antes de cada uso.
Agregue aceite si es neceesrio. Uene hasta la
I[neade llano en la van]laindicadora de hive).
_ngo
Para un corte bajo, levantelas ruedas
21
• Para]eerel nJveladecuado,aprtet_latapadel
dep6dtode aceitedel motorcadavez..
• Vuelv_a instaiarlatapadeldep6sJtodelace_ y
apri6tela.
• Cam,
bieet aceitedespudsde25 horasde
operaciSno unavezpot temporada.Pu_e
necesitar
cambiarelacoite_ a menudo
cuandolascondidones
_ pdvorosaso sudas.
GASOUNA
• Uene el estanquedecon-bus_ble.Use
gaso[inaregular,sinplomo,nuevay limpia
conel m_'nimode 87 octanos. (Elusode
gaso[inaconplomoaumentar_losdepSsitos
de6xido de plomoy carbonoy se mduelrbla
duraci6nde la v_lvula). Nomezde e[ aceite
con la gaso]ina. Paraasegurarque Ia
gasolina utiFizadasea fresca compre
estanqueslos cuales puedan ser utifizados
durante los pdmeros 30 d[as.
IMPORTANTE: CUANDO SE OPERE EN
TEMPERATURAS POR DEBAJO DE 32 ° F
(0 ° C) USE GASOLINA DE CAUDAD DE
INVIERNO, LIMPIAY NUEVA PARAAYUDAR
AASEGURAR UN BUEN ARRANQUE EN
CLIMA F-RIO.
ADVERTENCIA: La experienciaha ind'_ado
que los combustibles mezdados con alcohoi
(conoddos como gasohol,o e_us(>de etanol o
metano]) pueden atraer la humedad, la que
conduce a ia separaci6ny formacidn de
&cidos durante el a[macenamiento. La
gasolina acid_capuede da_ar el sisterna del
combustible de un motor durante el
aImacenamiento. Para evitar los problemas
con el motor, se debe vaciar el s'_tema de
combustible antes de guardarlo por un
periodo de 30 dfas o m_. Vacie el estanque
de combustible, haga arrancar e[ motor y
h&ga[ofuncionar hasta que las Ifneasdel
combu_le y el carburador queden vados.
La pr6ximatemporada use combustble
nuevo. Vea las lnstrucdones para el
Almacenamiento para mds informaci6n.
Nunca use productosde limpieza pare el
motor o para el carburador en el estanque dei
combus_'blepues se pueden produdrdaSos
permanentes.
PRECAUCION: Uene hasta la parte
inferiordeI cuel[o de rel[eno del estanque de
gasoIina- No Io Ilene demasiado. Limpie el
aceite o el combustible derramado. No
almacene, derrame o use gaso[ina cerca de
una Ilama expuesta.
PARA HACER AFIRANCAR
EL MOTOR
• Para hacerarrancar unmotorfrb, empuJeet
cebadordnco (5) veces antes de trataflo.Use un
empujefirmemente. Este pasononnaJmenteno
es necesariocuandose hace arrancarun motor
queya ha est_o fundor_ndopotunosCLe_OS
rdnutoso
• Sujete
labarra.decontrdque exigelapresenda
del operador abajo en el mango yfire et mango
del amancador r'_apklamente.
No petmitaqueet
cordSnde[ azTancadorse devuelva
abruptamente.
• Para pararel rnotor, suelte la bana de control
queexige la presenda deI operador.
AVISO: En dimas _
frfos puedecluesea
necesa_o repelJrlospesos del cebade. En cl_mas
rods ca_urososel cebar dernasiado puede produdr
elahogo y el motor nova a anancar. Sise ahogael
motorespere unoscuantosn'_.rtos antes de tratar
de hacedoarrancary no rep_ los pasos del
cebado.
CONSEJOS PAPA SEGAR
• Bajociertas
condidones,
tal
como cespedmw
alto,
puede sernecesario
elelevarlaaltura
del
code parareducir
e_esfuerzo
necesario
pard
empujarlasegadoray paraevitar
sobrecargar
el
motor,dejandomontonesde recortes de c_sped.
• Para uncode muy pesado,reduzca el anchodel
code pasendopamielmentepor endrnadel lugar
anteriormentecortadoy siegue lentamer_e.
• Cuando use una segadora con descarga trasera
en cesped ht:enedo y pesado, los montones del
cesped cortadopuedeque no enb'enen el
recogedorde c&sped. Reduzca la velocidaddel
recorride(veloddad de empuje)y/o haga
funcionar la segadora sobre el _ea por segunda
vez.
• Si queda una huella de cortes an e{ lade derecho
de una segadera con descarga trasera, siegue
en la direcd6n an que g|ran1asmaniltas del re_,
solapando un poco para recaudar los recortes en
la prOximapasada.
• Los poros en los recogedores de c#.spedde tela
pueden l]enarse con mugre y pdvo con el uso y
los recogederes mcauderdn menos c_sped.
Para evttar _.sto, rode el recogedercon la
manguera de agua regularmente y dOje[o
secame antes de usarlo.
• Mantenga la parte supe_or del motor, aFrededor
del arrancador,despejada y sin recortes de
c_sped y paja. Esto ayudara et flujo del aire del
motor y extender_ la duraciSn _.ste.
22
CONSEJOS
ACOLCHAR
PARA
SEGAR
Y
IMPORTANTE: Para obtener el mejor
rendimiento mantenga la caja de la segadora
sin acumulacion de cesped y basura. Yea
"LIMPIEZA" en la se¢ciort de
"MANTENIMENTO" de este manual.
• La cuch_llaacolchadora especial va a vo|ver
a cortar los recortes de c_sped muchas
veces, y los reduce en tama_o, de modo que
si se caen en el cdsped se van a dispesar
entre _ste y no se van a notar. Tambi_n, el
c6sped acolchado se va a deshacsr
rapidamente entregando substancias
nubitivas para e] c6sped. Siempre acolche
con la ve]ocidad de] motor (cuchilla) robs
alta, pues as| se obtendrd ]a rnejor acciSn de
recorte de las cuchillas.
• Evite cortar el c6specl cuando est_ mojado.
El c_sped mojado tiende a format montones
e interfiere con la acciSn de acolchado. La
mejor hora para segar el cdsped es
temprano en la tarde. A esa hora _ste se ha
secado y el _.rea reci6n cottada no quedard
expuesta al sol directo.
• Para obtener los rnejores resu;lados, ajuste
]a altura del corte de la segadora de modo
que esta corte solarnente el tercio superior de
las hojas de cdsped. En el caso de que el
c_sped haya crecido demastado, puede set
necesario el elevar la a_tumdel corte para
reducir el esfuerzo necesadq para empujar.!a.
segadora y para evltar sobrecargar et motor,
dejaLndomontones de recortes de c6sped.
Pard un acofchamiento mW pesado, reduzc_
el ancho del corte pasando por encima del
lugar antedormente cortado y siegue
lentamente.
• Ciertos tJposde c_sped y sus condiciones
pueden exigir que un drea tenga que ser
acolchada pot segunda vez para esconder
completamante los recortes. Cuando se haga
el segundo corte, siegue atravesado o en
forma perpendicular a la pasada del primer
corte.
• Cambie su patrSn de corte de semana a
semana. Siegue de norte a sur una semana y
luego cambie de este a oeste la prSxima
semana. Esto evitard que el c_sped se
enrede y cambie de direcci6n.
Max. t13
23
_o
Reviser sl ha}' su_dores
m,mltos
Umpi_/In:sp_ormr
e$recogedor de
cdsped
(el viene ecluipado)
A
Gj_i'_e'7
V _
.....
V e
I_
Um_i_r Ifeba]o de Ill c'_J
biell_ do lat ransmtm_ (_doras
con poder propulsor)
V e
_
,
,
if
{segadoras
conarra_que
e_ct_co)
Revis_e]nk-eldeL
aee]te
Cambiar
d aceltode]motor
O Ump=ar elfi[ttodOaJre
I
I/e 3
de lubd_6n
Tab]a
umpiar _abateffe,frecargar
M
DESERV;C[O
V*
l _.__das
pode
r pmpulsor)
Rm_ {s_adoras
las correascon
y las
poless
lmpulRevlsar otafllartcambbzr {a cuchllla
R
FECHAS
..........
V#
_
M4
_..
_1_
....
I_,..
I_imp[ar
otc_mbiar
labuJ='a
O Inspeccionar
elsilen_adoz
O_mbl_"etcar_ucho
depapal de]lUtro
dee3're
p/ft
I_=
4 - Cmgar For 48 horas _=1fin de Is tempor'ada.
TABLA DE LUBRICACION
RECOMENDACIONES GENERALES
(_Aceite de motor
@ Ajustadordela mada
La garantfa'deesta segadora nocubre _osartfcu]os
qua hall estado sujetosal abuso o ala nsgligencia
det operador. Pare recibir todo el valor de la
garantia, el operador liens que mantener ]a
segadora seg0n ias ins'm_cciones
descdtasen este
manila].
Hay algunos ajustesque se l_enancluehacer en
forrna peri_dicapara podermantenersu unidad
adecuadamente.
Todos losajustes en la secci0n de Servicioy
Ajustes de es_ manual tisnen qua ser revisados por [omenos un vez por cads temporada.
• Una vez al afio, c_nble _ bujfa, limpie o cambie
el elemento del filtro de airs y revise si la cuchilla
est& desgastada. Una buj[a nueva y un elemento
de! filbo de alre limpio!nuevo aseguran la mezcla
de aire-combusb'ble adecuada y ayudan a quasu
motor funcione major y que dure rods.
• Siga el programa de mantenimiento en este
manual.
®
Puntal
(_)Clavija de montaja del(_}
puntal de] mango
{_
t'_
ANTES DE CADA USO
• Revise el nivel del ace'rte del motor.
• Revise si hay sujetadores sueltos.
LUBRICACION
Mantenga
de resorts
delfreno
Bisagra de la
puarta trasera
Rocie el lubricante
Aciete de motor de SAE 30. refierase
ala seccion de Mantenimento en
MOTOR"
IMPORTANTE: No aceite o engrase los
rodamientos de la rueda de plastico. Los
lubricantes viscosos atraeran polvo y rnugre, Io
que acortara la duraciSn de los rodamientos
autolubricantes. Si cree qua fienen qua
lubricarse, use solamente un lubricante.fipo
grafito, de po]vo seco in forma modemda.
la unidad bien lubricada
24
ESPECIFICACIONES
NOMERO
DE MODELO
NOMERO
DE SERIAL
FECHA
DEL PRODUCTO
917.387321
DE CQMPRA
CABALLOS
DE FUERZA:
DESPLAZAMIENTo:
6.0
11.5 CU. IN.
CAPACIDAD
Y TIPO
DE GASOLINA:
1.5 Cuartos
REGULAR SIN PLOMO
TIPO DE ACEITE:
(API-SF/SH/SG)
SAE 30 (sobre 32°F)
SAE 5W-30 (debajo 32°F)
CAPACIDAD
20 oz. de capacidad
DE ACEITE:
_BUJ{A (ABERTURA:
TOLERANCIA
SENCEND]DO
CHAMPION
RJ19LM
O J19LM
ADMISION:
.004 - .008
DESCARGA:
.004 - .008
DE ESTADO
SOU DO ABERTURA
TORSION
.030")
DE VALVULA:
DE AIRE:
0125 IN.
DEL PERNO
DE LA CUCHILLA:
35-40
FT. LBS.
El num6ro del nodelo y e[ de eerie se encuentran
en la calGomania adjunta ala parte
trasera de la caja de la segadora. Debe registrar tanto el num_ro de serie come la
fecha de compra y mantengalos
en un Iugar seguro para refencia en el futuro.
SEGADORA
Siempre observe las reglas de seguridad
cuando haga el mantenimiento.
LLANTAS
• Manter=ga lee Ilantas sin gasoline, aceite o
substancias quirnicas pare control de
insectos que pueden de,tier }agoma.
• Ev[te los tocones, las piedras, tas gdetas
profundas, los objetos afilados y otros
pe[igros que pueden de.tier a [as Jlantas.
CUIDADO DE LA CUCHILLA
el sent_docontrado en que giran las manf_las
del reloj,
• Remueva la cuchilJay los artfcuJos de
ferreteria adjuntadores (el pemo, la arande[a
de seguddad y la arandela endure€ida).
AVISO: Remueva e] adaptador de la cuchitla y
revise el cubo intedor de la ranura del
adaptador de la cuchilla. La ranura tiene que
ester en buenas condiciones pare que funcione
en forma adecuada. Carnbie el adaptador s]
est& dafiado.
PARA CAMBIAR
Pare obtener los mejores resultados, la cuchil[a
de la segadora IJene que mantenerse afiJada.
Carnbie la cuchi]la doblada o daSada.
LA CUCHtLLA
• Ponga el adaptador de la cuchilla en el
cigueSal de! motor. Aseg_rese que }a ranura
del adaptartor y que el chavetero del c!guefial
PARA REMOVER
LA CUCHILLA
est_n alineadoe.
• Desconecte el alambre de Fabujfa y p6ngalo
" Ponga Ia cuchi[la en e[ adaptador de esta
alineando los dos (2) agujeros en la cuchilia
en donde no pueda entrar en contacto con
_sta.
con las salientes e[evadas en el adaptador.
• Haga descansar la segadora en su ]ado.
" AsegLirese de que el borde de salida de la
cuchiIla (opuesto a] borde affiado) est_ hacia
Aseg[_rese que el filtro de aire y que el
arriba hacia el motor.
carburador queden mirando hacia arfiba.
• Use un bloque de madera entre la cuchilla y
" Instale e[ pemo de la cuchilla con la arandela
de segufidad y _aarandela endurecida en el
[a caja de la segadora pare evitar que la
adaptador de la cuchil{a y el cigueSal.
cuchiJla g]re cuando se [e quite e! pemo.
• Proteja sue manos con guantes y/o envuelva
" Use un bloque de madera entre la cuchiila y
la caja de la segadora y apriete el pemo de la
la cuchilla con una tela gruesa.
cuchilla gir_Lndoloen el sentido en que giran
• Remueva el pemo de ]a cuch!lIagir_ndolo en
25 [as rnaniIlas del reloj.
MOTOR
•
La torsi6n pare apretar recomendada es de
35 - 40 pies libras.
]MPORTANTE: EL PERNO DE LA CUCHILLA
ES CLASE 8 TRATADO A CA[OR.
AVISO: No recomendamos el afilar la ouch|lie pete si [o hace, asegdrese de que quede
balanceada.
- -_
Adaptaderde la cuchll]a
Chavetero del
Ranura _'_
Cuchilla _
la cuch[l[a /
segunaaa
==_._
LUBRICACION
Use solarnente eceite de detergente de alta
caIidad ctasfficadocon [a dasificaci6n SF,SG o
SH de servicioAPI. Select|one [a ¢alided de
viscostdad SAE seg_n su temperature de
o.peraci6n esperada.
,.
CAUDADK$
DE V'_SCOSIDAD
DE ,_
--._c_guenal
] /
_
'i_\
Arandela
endurecida
PARA AFILAR LA CUCHILLA
AVISO: A poser de que los aceites de
multiviscosidad (5W30, 10W30, etc.) mejoran el
arranque en clime trio, estos eceltes de
multiviscosidad van a aumentar el consume de
aceite cuando se usan en temperatures sobre
32° F. Revise el nivel det aceite del motor m_is a
manudo, pare evitar un posible dafio en el
motor, debido a clue no tiene suflclente aceite.
Cambieel aceitedespu6s de 25horaSdeoperaci6n
o per Io menos una vez al afiosi la segadora se
utilize menos 25 bores et erie.
Se tiene que tenor cuidado de manteneda
balanceada. Una cuchil[a que no est,.
balanceada vaa producir eventua|mante dafio
en la segadora o en el motor.
• La cuchllla puede afi{arse con una Iima o en
una rueda rectif_cadora. No trate de afi]ada
mientras se encuentra en _asegadora.
• Pare reviser e] balance de la cuchilla, clave
un clave en una riga o en la pared. Deje
alrededor de una pulgada de un clave recto
expuesto. Ponga el agujem central de la
ouch|lie sobre la cabeza de[ clave. Si la
cuchilla est& baJanceada debe permanecer
en la posici6n horizonta!. Si cualquiera de los
extremes de la ouch|lie se mueve hacia
abajo, afile el extreme pesado hasta que 6sta
quede balanceada.
RECOGEDOR
DE C_SPED
Revise el niveI de| aceite del cdrter antes de
arrartcar el motor y despu_s de cada clnco (5)
bores de use continuado. Apfiete e} tap6n de{
ace|to en forma segura cada vez que revise el
nivel de{ ace|to.
PARA CAMBIAR EL ACEITE DEL
MOTOR
AVISO: Antes de Inclinar [a segadora pare
drenar el aceite, drene el tanque de combustible
haciendo correr el motor haste que el tanque
est6 vacio.
• Desconecte el alambre de la buj_a y p6ngalo
de mode que no pueda entrar en contacto
con 6sta.
• Remueva la tape del dep6sIto de[ acelte;
d_jela a un lade en una supe_cie limpia.
• incline la segadora y h,4gala descansar en su
lade y drone el aceite en un envase
adecuado. Mueva la segadora de atr'&s pare
adelante para remover todo el aceite que se
haya quedado e_rapado dentro del motor.
• Limpie todo e] aceite derramado an la
segadora yen et lade de] motor.
• Uene el motor con aceite. LI6nelo so]amente
hasta la ]rhea de "LLENO" (FULL) en la vadfla
indicadora de nivel. NO LO LLENE
DEMASIADO.
• Vuek, a a porter la tape en e[ depbsito del
ace|to.
• Vuelva a conectar el alambre de [a bujfa a
_sta.
• El recogedor de c6sped puede ser rociado
con el ague de ]a manguera pore tiene que
estar seco cuando se vaya a user.
• Revise su recogedor de cesped a menudo
para vet|ricer siest& dafiado o deteriorado.
So va a desgastar con el use normal. Si se
necesita cambiar el recogedor, c_mbielo
solamente per uno que sea aprobado per el
fabricante. D_ el n'_mem del modelo de la
segadora cuando Io ordene.
Envase
26
FILTRO DE AIRE
SILENCIADOR
Su motor no funcionar_ an forrna adecuada y
puede sufrirdafios si se usa un filtro de airs
sucio.
Inspeccioney cambieel silenciadorsi est_
corro[do puesproducirun peligro de incendioyi
o dar]o.
BUJ(A
Cambie el filtrode aire cada a.5o, y rods a
menudo si siega en condiciones muy
polvorosas b sucfas. No tave el fiJtro de &ira,
PARA CAMBIAR EL FILTRO DE AIRE
• Remueva el filtro de aim gir&ndoloen el
sen_do contratio en qua giran las maniBas
de[ reloj, haste el tope, y retfrelo del collar.
• Remueva el flltro de la parts interior de la
cubietta.
° Limpie la parte intedor de la cubierta y el
collar pare remover toda acumulacibn de
mugre.
• Inserte el flltro nuevo en la cubierta.
• Ponga la cubierta deI filtrode aim dentro deI
collar al_neando la oreja con la ranura.
• Empuje la cubierta hacia adentre y gi'rela en
el sentido de Jasmanillas del reloj pare
apretarla.
Glrean el
Abesent_o
Collar
zadera
contrar_o
a fas
maLq)ttas
de_
reEoj
pare
remover
RsrlLIra
Filtrode
aim
Oreja
Cubiertadel fjltro
dBaire
Cambie su bujfa cada a_o pare hacer qua su
motor arranque m&s _cilmente y funcione
mejor. Ajuste la abertura de la bujfa en 0,030
pu[gada.
LIMPIEZA
IMPORTANTE: PARA OBTENER EL MEJOR
RENDI-MIENTO, MANTENGA LA CAJA DE LA
SEGADORA SIN ACUMULACI6N DE ClaSPED
Y BASURA. LIMPIE LA PARTE DEABAJO DE
SU SEGADORA DESPUES DE CADA USO.
PRECAUCI_N: Desconecte el aJambre do la
bujia y p6ngalo en donde no pueda entrar en
contaeto con 6sta.
• Haga descansar la segadora en su lado.
Aseg_rese que el filtm de aire y que el
carburador queden miranda hacia arriba.
Ltmpie la parte inferior de su segadora
rasp_mdola pare remover la acumulacibn de
c_sped y basura.
• Limpie el motor a menudo pare evitar qua se
acumule la basura. Un motor tapado funciona
mas caliente y se acorta su durar_6n.
• Mantenga Ias superficies acabadas y las
ruedas sin gaso]ina, aceite, etc.
* No recomendamos el usa de una manguera
sentldo de las
de jardt'n pare Jimpiarla segadora a menos
manill_sde[ reloj
qua e! sistema el6ctrico, el silenciador, el
pareapretar
filtro de alre y e] carburador est_n tapados
pare evitar que les entre el agua. El ague an
el motor puede acortar la duraciSn de _ste.
PAPA AJUSTAR EL MANGO
PRECAUCI(SN: Antes de dar calquier servicio o
de hacer ajustes:
• Suelte la barra de control y pare el motor.
• Aseg_rese qua la cuchi[la y qua todas las
partes movib|es se hayan detenido
completamente.
* Desconecte el alambre de la bujfa y pSngaio
en donde no pueda entrar en contacto con
6sta.
Se puede Jevantaro bajar el mango de su segadora
seg_n le quede c6modo. Hay cuatro (4) posiciones
disponib_es:alta, mediana a_ meolanabaja, baj&
Los mangos se envfan montados en la posid6n
medJana baja..
• Para cambiar de la posidSnmed_anabaia a
mecliana alta, la ser_,ciSnsuperior y la inferior del
mango tendrdn que darse vueita.
SEGADORA
° Remueva las abmxaderas del cable.
• Remueva los controles y la barra de control que
PARA AJUSTAR LA ALTURA DE CORTE
ex_gela presencia del operador del mango
Vea °PARAAJUSTAR LAALTURA DE CORTE" en
superior.
la secci6n de OperaciSn de este manual.
• Remueva las OaSes de horquilla.
• Desconecte el mango inferiorde los pun_es del
DESVIADOR TRASERO
mango.
Se proporciona un d_or
trasero,adjunto entre
* De vuelta el mango y vualva a montar las davijas
las ruedas traseras de su segadora, pare reducir a
de horqui]la que se habfan removido.
un mfnimo la posibilidad que objetos span lanz.ados • Vuelva a montar los controles y la barra de
hacia afuera de la parte trasera de la segadora, en
contr_es que exJgela presenciadel operador en
TaposiciSn en donde se encuentra e[ cperador. Si
el mango superior.
se daSa el desv_dor debe cambiarse.
27
PRECAUCI6N: La barra de controlque exlga la
presencia del operador tJenaqua pivotear
libramente para permTtirel enganche de la
cuchilfaifreno cuando se suelta la barra de.
control No apriete damasiado los sujetadores
qua sujetan a los controles aJmango superior.
• Pare cambiar de la posicibn de mediana baja
a alta
solamente, se
tendr&que.dar
vuelta Ia
o ++ ..........
.._
,:
: secci6n del mango superior.
- Pare _Tnbiar de la posiciSn mediana baja a
baja, soIamente se tendr_ que dar vuelta la
seccfSn del mango inferior.
Posici6n de env_o
Medianabaja
Med[ana a_ta
Mango lnfedor
._"
Sit
_.)
"_
montaje
ClavEja
de horqu|lia
MOTOR
CARBURADOR
Su carburador tlene un chorro principal fijo no
ajustabia pare controlar la mezcla. Si su motor
no estd funcionando an forrna adecuada debido
a problemas qua se sospecha v_enen del
carburador, tteve su segadora a un centro de
servic_oautorizado pare repararla y/o aJustada
VELOCIDAD
DEL MOTOR
La velocidad del motor ha sido ajustada an Ia
f_J0rica, No trate de aumentar la velocidad del
motor pues se pueden producir lesiones
personales. Si cree qua el motor est_
funcionando demasiado r,_pidoo demasiado
lento, lieve su segadora a un cantro de servicio
autorizado pare reparada o aJustada.
tnmediatamente prepare su segadora pare el
almacenamiento al final de cada temporada o si
la unidad no se va a usar por 30 dfas o m_.s.
SEGADORA
Cuando se va a guardar la segadora pot e[erto
perfodo de tiempo, Ifmpiela cuidadosamente,
remueva toda la mugre, la grasa, las hojas, etc.
Gu&rdela en un &rea limpia y seca.
* Limpie toda ia segadora (Vea "L[MP1E7__.A"
en
la seccidn de Mantenimento de este manual).
, Lubr[quela segdn se muestra en [a secci6n
de MantenJmentode este manual.
° Aseg_rese de que todas las tuercas y ctavijas
y todos los pemos y tomittos est6n apretados
en foma segura. Inspeccione las partes qua
se mueven pare verificar si est_n dar_adas,
quebradas o desgastadas. Ca.mbielas si es
necesario.
• Retoque todas [as superficies qua est6n
oxidadas o con la pintura picada; use una lija
antes de pintar.
MANGO
quada separado del puntal del mango, luego
mudvalo hacia adelante.
• Suelte ios pemos de montaje del mango
supedor Io suficiente como pare permiUr qua
el mango superior se pueda doblar hacia
attics.
IMPORTANTE: Cuando dob]e el mango pare el
anmacenarniento o al transporte, asegurese
que Io doble segun se muestra o puede danar
los cables de control.
• Cuando prepare sue mangos a pa_r de la
posiei6n de almacenamiento, el mango
inferior autom&tieamente se asegurar& en la
posici6n para segar.
Mango inferior
Pontal de[
Puede doblar el mango de su segadora para
almacenarla.
• Apriete los extremos inferiores del mango
inferior entre si'haste qua el mango infedor
Clavija de
horqulUa
28
ACEITE DEL MOTOR
Drene el ace_e (con el motor caliente) y
cdmbfelo con aceite de motor limpio. (Vea
"MOTOR" en la secd6n de Mantenimentode
este manual.)
CILINDRO
Mango
superio_
Doblar hacia adetante
a[maconar
* Remueva la bujfa_
• Vacfe una onza (29 ml) de aceite a travSs del
agujero de la buifa en el ciiindro.
• Tire la manitla de arranque tentamente unas
cuantas veces pare distribuir el aceite.
° Vuelva a montar la nueva bujfa.
OTROS
Posici6npara
segar
Mango infedor
MOTOR
SISTEMA
o No guarde la gasoline de una tempomda a la
otra.
- Cambie et envase de la gasoline si se
empieza a oxidar. La oxidaci6n y/o la mugre
en su gasoline producirdn pmblemas.
• Si es posible, guarde su unidad en un recinto
cerrado y c=3bra]apare protegeda contra e[
po[vo y la mugre.
, Cubra su unidad con un forro protector
adecuado que no retenga la humedad. No
use pl_stico. El pl_stico no puede respirar, Io
que perrnite la formacl6n de condensaci6n, |o
que produeir&la oxldaci6n de su unidad.
IMPORTANTE: Nunca eubra la segadora
nientras el motor y las areas de escape todavia
estan caIientes.
DE COMBUSTIBLE
IMPORTANTE: Es Importante evitar qua se
formen depositos de goma an partes
fundamentales del sistema de combustible tales
como el carburador, el fijtro del combustible, la
manguera del combustible o en el estanque
durante el almacanamiento. La experincia
tambien endica que los combustibles
Mezciados con alcohol (conocido como gasoho[
o que tienen etanol o metanol) pueden atraer
humedad, to queconduce ala separation y a [a
formacion de acidos durante el
almacenamiento. La gasoline acdica puede
danar el sistema de combustible de un motor
durante el periodo de a_macenamiento.
• Drene el estanque de combu_bie.
• Haga arrancar ef motor y d_jalo funcionar
haste que las [fneas del combustible y el
carburador est_n vacios.
• Nunca use los pmductos pare limpieza del
carburador o del motor en el estanque de
combustible pues se pueden pmdudr dados
permanentes.
• Usa combustible nuevo ta pr6xima
temporada.
AVISO: El estabi[izador de combustible es una
alternative aceptable pare reducir a un minlmo
la formaci6n de depdsitos de goma en el
combustfble durante e] periodo de
aJmacenamiento. Agregue estabitizador ala
gasollna en eI estanque de combustible o en el
envase pare el almacanamfento. Siempre siga
la proporci6n de mezcla que se encuentra en el
envase del estabilizador. Haga funcionar el
motor pot Io menos 10 minutos despu_s de
agregar el estabilizador, para perm_r que este
tlegue al carburador. No drene la gasoline del
estanque de gasoline y el carburador si se est_
usando estabilizador de combustible.
PRECAUCI6N: Nunca almacene la segadora
con gaso[[na en ei estanque dentro de un
edificio en donde los gases pueden alcanzar
una llama expuesta o una chispa. Permita que
se enfr/e el motor antes de almecenaria en
alg0n recinto car{ado.
29
IDENTIFICAC|ON
DE PROBLEMAS
CORRECCION
CAUSA
• Fi_tro
deaJresucio.
iiii
PROBLEMA
Noarranca
• Umpie/cambie el filtrode aire.
• Llene el estanque de combustible.
• Drene el estanque y vuelva a
IIenarlo con combustible limpio y
° Sin combustible.
• Combustible rancio,
-nuevo_
• Agua en el combustible
• A_anlbre de la buj[a
desconectado.
Falta de fuer-za
• Drene el estanque dB combustible y
e[ carburador y vuelva a Ilenar el
estanque con gasolina nueva.
Conecte el alambre a la bujia.
° Buj[a mata.
* Cuchi[la suelta o adaptador
de la cuchitlaquebrado.
• Barm de control en la posici6n
suelta.
• Barra de control defectuosa.
Cambie la bujfa.
• Apriete el pemo de Ia cuchilta o
cambie el adaptador de ta cuchitla.
• Presione la barra de control hacia e1
mango.
• Cambie la barra de control.
• Parte trasera de ta cajacuchi[la
de la segadora arrastTdndose
en el c_sped pesado.
• Est_ cortando mucho c6sped.
• Ajuste a la posici6n de "Corte m&s
alto."
, Filtro de aim sucio.
• Llmple/camble
elfiltro
deaire.
• Limpiela parteinfedorde la cajade
• Ajustea ]a posici6nde"Corterods
alto."
oAcumulaci6n de c_sped, hojas
y basura debajo de la segadora.
• Demasiado aceite en el motor.
3O
la segadora.
• Revise et nivel del aceite.
PROBLEMA
Mal torte -.-dispareio
CORRECCION
CAUSA
• CuchiJladesgastada, doblada o • Cambiela cuchilla.Aprieteel
suelta.
pemode ]a cuchllla.
• Altura de las ruedas disparoja. • Ajustetodaslas ruedasa la
misma_ltura.
-o-_Acomu-lacibn-de c6sped, hojas oi • Umpie la partelnfedorde la cala
basura debajo de la segadora. '
de la segadora.
Vibraci6n excesiva
Cordbn arrancador
diffcil de tirar
• Cuchilla desgastada, doblada o
suelta.
• Cigue_al dal motor dob]ado.
• El freno del votante de] motor
est& aplicado cuando se suelta
la barra de control.
• Cigue_al del motor doblado.
• Adaptador de la cuchilla
quebrado.
• La cuchilla se arrastra en el
c_sped.
Recogedor de cdsped • Altura de corte demasiado
baja.
no se [Jena (si viene
• Levantamiento de fa cuchilla
equipado)
desgastado.
• Recogedor sin ventilaci6n de
afre.
Diffcil de empujar
•
El c_sped est_ demasiado alto
o JaaJtura de la rueda demasiado baja.
• Par/e trasera de la caja/cuchTlia
de la segadora arrastrdndose
en e[ cdsped.
• Recogedor de c_sped demasiado I[eno.
• Posici6n de la aitura del mango
no adecuada para usted.
31
• Cambie la cuchiga. Apriete el
pemo de lacuchilla.
• Pbngase en contacto con su
centro de servicio autorizado
m_s oercano.
• Pres_one la barra de control
hacia el mango superior antes de
tirar el cord6n arrancador.
• P6ngase an contacto con su
centro de servicio autodzado
rods cercano.
° Cambie el adaptador de la
cuchifla.
• Mueva la segadora a un lugar en
donde el c_specl ha sido cortado
o a una superficie firme pare
hacer arrancar e[ motor.
• Eleve la altura de corte.
• Cambie la cuchillas.
• Limpie el recogedor de c6sped.
° Eleve la altura de corte.
-
Eleve la parte trasera de la caja de
la segadora (1) un lugar mds alto.
• Vacfe el recogedor de c_sped.
• Ajuste la altura de[ mango de
modo que ie acomode.
84
39
CRAFTSMAN ROTARY LAWN MOWER - - MODEL NO. 917.387321
KEY
NO.
1
2
3
4
5
7
8
9
1o
1t
13
14
15
17
18
19
21
22
23
24
25
26
28
29
31
32
33
34
35
36
37
36
39
4o
PART
NO.
86902
16545tX479
150424
132001
157081 X479
131959
66426
51793
136376
156577
750097
850733X004
63601
147613
700357;<479
150050
54583
700063X479
88652
700363X479
14.4875X479
140657
161757)(479
161756X479
15OO78
700325×007
146630
128415
87877
700331X004
145935X004
62335
142748
752063
DESCRIPTION
Control Bar
Upper Handle
Mulcher Plug
Rope Guide
Lower Handle
Handle Bolt
Wire Tie
Hairpin Cotter
Handle Knob
Engine Zone Centre] Cable
Hex Washer Head Screw 10-24 x 112
Up-Stop Bracket
Keps Locknut 1/4-20
Rear Door Assembly' Kit
Back Ptate
Self Tapping Screw 10-24 x 5/8
Hex Head Tapping Screw I/4-20 x 1/2
Rear Baffle
Hinge Screw 1/4-20 x 1-1/4
Side Baffle
Discharge Baffle
Rear Deflector
Handte Bracket Assembly (Left)
Handle Bracket Assembly (Right)
Screw 5t16o18 x 3/4
Wheel Adjusting Bracket
Spacer
Pop Rivet
Serector Knob
Selector Spr_ng
Axle Arm Assembly
Bel[evllle Washer
Shoulder Bolt
Wheel and Tire Assembly
KEY
NO.
PART
NO.
42
43
44
45
46
47
50
51
52
53
54
55
58
57
5B
83923
77400
85463
150406
161857
751592
700938X479
851084
850263
851074
145106
850977
144748
154870
......
59
60
61
62
63
64
65
---
144747
74760612
750913X004
61651
88348
148442
57143
161058
165485
DESCRIPTION
Hex Range Locknut
Hubcap
Danger Decal
Hex Head Thread Rolling Screw 3/8-16 x 1
Lawn Mower Housing (Incl. Key #18, 22, 24, 44, 50)
Loeknut 3/8+16
Front Baffle
Hex Head Machine Screw 3f5=24 x 1-3/8 (Grd. 6)
Helical Lockwasher 3/8
Washer
Blade 20"
BTadeAdapter
Tube Frame
Grass Bag
Engine - (See Breakdown) Craftsman
Mode[ 143.986002
Throat Frame
Bolt
Axle Arm
Washer
Washer
Wheel
.,
Wave WasP;dr
Warning Decal (Not Shown)
Owner's Manual
Available accessories not Included with lawn mower.
71 33623
Gas Can (2.5 gal.)
71 33500
Fuel Stabilizer
71 33000
SAE 30W Oil (20 oz.)
71 3.3417
Dust Shfeld
33318
Mower Cover
71 33303
Chute Deflector
CRAFTSMAN
4.-CYCLE
ENGINE
MODEL NUMBER.
,,,
,, 143.986002
_251
135
275.
298
.CRAFTSMA..N4-CYCLE E,,NGINE
KEY
NO.
PART
NO.
I
2
6
7
12
12A
36774
26727
33734
36557
36775
36558
128
14
15
16
17
18
19
2O
30
40
4O
36694
28277
30589
34839A
31335
651016
36281
32600
36793
40004
40005
41
36070
41
36071
42
42
43
45
40006
4O0O7
20381
36777
46
48
50
32610A
27241
36778
52
69
70
29914
35261
38995
72
75
80
81
82
83
86
89
g0
92
93
100
101
•_03
38083
27897
305"74A
39590A
30591
30588A
650488
61 I004
611112
650816
656816
344438
610118
651OO7
110
119
120
125
125
37047
36787
36625
36779
36780
126
126
36781
36782
t30
135
150
I5I
151A
6021A
35395
35991
31673
40017
DESCRIPTION
Cylinder (Incl. 2 & 20)
Dowel Pin
Breather Element
Breather Ass'y. (Incl. 6 & 12A)
Breather Tube
B_eather Cover & Tube
(Incl. 128)
BreatherTube Elbow
Washer
Governor Rod (Incl. 14}
Goverr_or Lever
Governor Lever C!emp
Screw, Torx T-15, 8-32 _ 19/64"
Extension Spring
Oil Seal
Crankshaft
Piston, Pin & Ring Set (Std.)
Piston, Pin & Ring Set
(,010" OS)
Piston & Pin Ass'y. (Std.)
(Incl. 43)
Piston & Pin Ass'y. (,010 ° OS}
(Inc_.43)
Ring Set (S_.)
Ring Set (.010" OS)
Piston Pin Retaining Ring
Connecting Rod Ass'y.
(IneL 46}
Connecting Rod Bolt
Valve Litter
Camshaft (MCR)
Oll Pump Ass'y.
Mounting Flange Gasket
Mounting Range
(incl. 72 thru 83)
Oil Drain Plug
Oil Seal
Governor Shaft
Washer
Governor Gear Ass'y. (lnc}. 81)
Governor Spool
Screw, 1/4-20 x 1-1/4"
Flywheet Key
Rywhee[
BeUevil[e Washer
Flywheel Nut
SoLid State Ignition
Spark P_ugCover
Screw, Torx T-15,
10-24x 15/16 =
Ground Wire
• Cylinder Head Gasket
Cy|indar Head
Exhaust Valve (Std.} 0ncL 151}
Exhaust Valve (I/32" OS)
(IncL 151)
Intake Valve (Std_) {Incl. 151)
Intake Valve (1/32" OS)
(Incl. 15t)
Screw, 5116-I8 x t-1/2"
Resistor Spark Plug (RJlgLM)
Valve Sp_ing
Valve Spring Cap
Intake Valve Seal
....
KEY
NO.
MODEL NUMBER 143.98600.2,
PART
NO.
169
172
174
178
182
184
36783
36784
30200
29752
6201
26756
185
186
I89
191
195
207
216
223
224
238
239
241
245
250
260
261
262
275
277
286
287
290
292
296
300
301
305
306
307
309
3t0
313
370A
370C
370K
380
390
400
36785
32653
650839
36559
610973
34336
33086
650451
36786
650932
34336
35797
35066
35065
36980
30200
650831
36790
650988
35000A
650926
29774
6460
28763
36916
36246
35647
36996
35499
650562
35648
34060
36261
,3696"1
36695
640026
590694
36792A
416
36085
417
900
900
650760
------
DESCRIPTION
t
Valve Cover Gasket
Valve Cover
Screw, 4 0-24 x 9/16"
Nut & Lock Wast_er, 1/4-28
Screw, 1/4-28 x7/8"
Carburetor To IntaKe
Pipe Gasket
Intake Pipe
Governor Link
Screw, 1/4,20 x 3./8'
S.E. Brake Bracket (Incl. 195)
Terminal
Throttle Link
R.P.M. Adjusting Lever
Screw, 1t4-20 x 1"
Intake Pipe Gasket
Screw, 10-32 x 49/64"
Air Cleaner Gasket
A{r C{ea,ner Collar
Air Cleaner Filter
Air Cleaner Cover
Blower Housing
Screw, I0-24 x 9/16"
Screw, 1/4-20 x 1/2"
Mumer
Screw, 1/4-20 x 2-5/16"
Starter Cup
Screw, 8-32 x 21/64"
Fuel Line
Fuel Line Clamp
Screw, 10-37. x 35f64"
Fuel Tank (ind. 292 & 301)
Fuel Cap
Oil Fill Tube
"O"-Ring
"O"-Ring
Screw, 10-32 x 1/2"
Dipstick
Spacer
Lubrication Decal
Primer Decal
Starter Decal
Carburetor (tn{;[. 184}
Rewind Starter
GasKet Set
([nci. Items Marked "in Notes)
Spark Arrestor Kit
(IncL 417)(Optional)
Screw, 8-32 x 3/8" (Optiona_
Replacement Engine NONE
Replacernent S/B 750795A,
order from 71-999
RPM Higt_ 2900 to 32.00
NOTE: This engine cot_ld have been buitt v-_th
590737
starter.
NOTE: All component dimensions _ven in UoS.
inches
1 inch = 25.4 mm
35
CRAFT,,SMAN 4-CYCLE ENGINE
...... MODEL NUM,B,,,E,R
143.986002
4_
KEY
NO.
1
2
4
5
6
7
16
17
18
20
20A
25
27
28
29
30
31
35
36
37
40
44
47
48
PART
NO.
DESCRI PTION
640026
631615
631767
631164
631183
631036
650506
631775
650417
630766
640027
640053
631867
631024
632019
631028
631021
631022
36045A
632735
632547
640028
27110
630748
631027
Carburetor (Incl. 184 of Engine Parts List)
ThrotSe Shaft & Lever Assembly
Throttle Return Spring
Dust Seal Washer
Dust Seat (Throttle)
Throttie Shutter
Shutter Screw
Fuel Fitting
Throttle Crack Screw!tdle Speed Screw
Tension Spdng
Idle Restdcter Screw
Id[e Restdetor Screw Cap
Float Bowl
Float Shaft
Float
Float Bowl "O" Ring
Inlet Needle, Seat, & CIip (Incl. 31}
Sprblg Clip
Pdmer Bulb/Retainer Ring
Main Nozzle Tube
"(3" Ring, Main NezzJe Tube
High Speed Bow[ Nut
Bow[ Nut Washer
Welch Plug, Idle Mixture Well
Welch Plug, AtrnospherIc Vent
36
CRAFFSMAN
4-CYCLE ENGINE
MODEL NUMBER 143.986002
KEY
NO.
1
2
3
4
5
6
7
8
590694
690599A
5906OO
590696
590601
590697
590698
590699
590700
11
590695
12
590535
13
690701
KEY
NO.
37
PART
NO.
PART
NO.
3
6
7
8
590737
590740
590616
59O617
590618A
11
690687A
I2
590535
13
14
590701
590741
DESCRIPTION
Recoil Sta_e_"
Spr_ngPin (Incl. 4)
Washer
Reta.iner
Washer
Brake Spring
Starter Dog
Dog Spr_ng
Pulley & Rewind Spring
Ass'y.
Starter Housing Ass'y.
(40 degree grommet)
Starter Rope ( 98 =X 9/"
64" dis.)
Starter Handle
DESCRIPTION
Rewrnd Starter
Retainer
Starter Dog
]Dog Spring
PufIey& Rewind Spr_ng
Ass'y
Starter Housing Ass'y
(40 degree grommet)
Starter Rope
(Length 9B" x 9164" dis,)
Starter Handle
Locking Tab
38
39
For the repair or replacement parts you need
delivered dimctJy to your home
Call 7 am - 7 pro, 7 days a week
1-800-366-PART
(1-800-366-7278)
Para ordenar piezas con entrega a
_domicilio - 1-800-659-7084
For in-house major brand repair service
Call 24 hours a day, 7 days a week
1-800-4-REPAIR
(1-800-473-7274)
Para pedir servicio de reparacidn a
domicillo - 1-800676-5811
For the location of a Sears Parts and
Repair Center in your area
Call 24 hours a day, 7 days a week
1-800-488-1222
For information on purchasing a Sears
Maintenance Agreement or to inquire
about an existing Agreement
Call 9 am - 5 pro, Monday-Saturday
1-800-827-6655
When requesting service or ordering
parts, always provide the following
information:
• Product Type
• Part Number
• Model Number ° Part Description
S£ARS
Amenca's
165485
06.08.98
REV.1
VB
Reparr Spectalzsts
Printed in U.S.A.