1
10
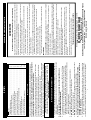
Your shower requires a minimum running pressure of 69kPa (0.7 bar, 10 psi).
At pressures above 69kPa (0.7 bar, 10 psi) it will minimise temperature fluctuations as detailed
above. If the water pressure falls below 69kPa (0.7 bar, 10 psi) it is likely that the pressure switch
will turn off the power to the heating elements, resulting in a cold shower.
This will be indicated by the neon light going out.
Your shower is designed to stabilise temperature changes caused by water pressure
fluctuations. These can result from toilets being flushed or taps being turned on and off.
When this happens your showering temperature will be held within a controlled band, provided that
the minimum pressure required by the shower is maintained.
Effect of Other Water Devices on Incoming Water Supply
The required water temperature is achieved by adjusting the rate of water flow.
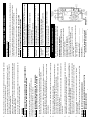
Diagram 9 shows the principle involved in relating temperature rise to flow rate.
The higher the water rate the lower the temperature and vice versa.
The temperature of the water supplied from the mains can vary considerably
throughout the year from 5 to 20°C.
This means that in the winter, flow rate will be less than in the summer to
achieve the same outlet temperature.
In summer the “ (medium)” power setting may give adequate hot water.
Effect of Seasonal Incoming Water Temperature Changes
7. The pressure relief device is to safeguard against abnormal pressure conditions, and provides a
level of appliance protection should an excessive build of pressure occur within the shower.
6. As a further safeguard, a thermal cut-out switches the power off if the water temperature
climbs above the set limit. This cut-out, which gives an audible click, may also operate due to
residual heat when the shower is switched off.
It will reset itself if water is run through the shower for 10 to 20 seconds.
5. If the water supply falls below a set limit, the pressure
switch will operate and switch off the power to the elements.
This is indicated by the neon light going out (see “Effect of Other Water Devices on Incoming
Water Supply”).
4. The flow of water is automatically held at the level set
by the user even though the supply pressure may vary
(see “Effect of Other Water Devices on Incoming Water Supply”).
3. The water is turned on and off by the solenoid
valve built into the shower.
This is switched on when outer knob “A” is
clicked clockwise.
2. The heaters are only switched on when sufficient
water is flowing.
This is done automatically with a switch which
works on water pressure and is indicated by the
neon light illuminating depending on the power
selected by outer knob “A”.
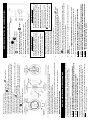
1. Water is heated instantaneously as it flows over the
heating elements in the copper cylinder (Diagram 8).
HOW YOUR ACTIVE 320S SHOWER WORKS
b. Plumbing c. Electrical connections
The handset must not be able to come into contact with used water in the cubicle, bath or
basin. If it can, even after the hose has been retained by the retaining ring (see separate
accessories fitting instructions sheet), a vacuum breaker must be fitted.
3
6. Decide the position of entry of the cold water pipe into the unit.
If top, cut away the backplate. If rear, please read the section on plumbing.
If bottom, remove the front cover (complete with knobs) and cut away the detachable corner
section as shown.
5. Decide the position of the electrical cable into the unit.
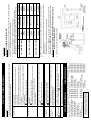
If top or bottom entry is chosen (according to Diagram 7 on page 9), cut away the walls in the
backplate as shown in Diagram 2.
4. Fix the riser rail with screws provided (see separate instructions supplied with accessories).
•
3. Adjust the position to get the most convenient arrangement taking
the following into account.
• The heater must not be mounted in the direct spray from the handset.
2. Position the heater so that the top of the unit is horizontal and level
with, or a maximum of 0.6 metres (2ft) below the top of the
riser rail. Choose a flat piece of wall to avoid the possibility of
distorting the backplate thus making the front cover a poor fit.
1. Position the riser rail at a convenient height for majority of users as
detailed in Diagram 1 and mark its position (also see separate
accessories fitting instructions).
a. FIXING THE SHOWER TO THE WALL
a. Fixing the shower to the wall
We recommend that the installation is done in the following sequence.
WARNING: DO NOT INSTALL THIS SHOWER WHERE IT MAY BE
SUBJECTED TO FREEZING CONDITIONS
WARNING: ALL WIRING AND INSTALLATION MUST BE
SUPERVISED BY A SUITABLY QUALIFIED PERSON.
HOW TO INSTALL YOUR ACTIVE 320S SHOWER